2015 MERCEDES-BENZ SLS AMG GT COUPE tire type
[x] Cancel search: tire typePage 17 of 290
DOT (Department of Transporta-
tion) (definition) ............................. 268
GAW
R(GrossA xle Weight Rating)
(definition) .................................... .268
GVW (Gross Vehicle Weight) (def-
inition) .......................................... .268
GVW R(Gross Vehicle Weight Rat-
ing) (definition) .............................. 269
Important safety notes .................. 250
Increase dvehicle weight due to
optional equipment (definition) ...... 268
Kilopascal (kPa )(definition) ........... 269
Labeling (overview )........................ 264
Loa dbearing index (definition) ...... 270
Loa dindex ..................................... 266
Loa dindex (definition) ................... 269
Maximu mloaded vehicleweight
(definition) ..................................... 269
Maximu mloadona tire (definition) .. 269
Maximu mpermissibl etire pres-
sure (definition) ............................. 269
Maximu mtire load ......................... 267
Maximu mtire load (definition) ....... 269
Optiona lequipment weight (defi-
nition) ............................................ 269
PSI (pounds pe rsquare inch )(de f-
inition) ........................................... 269
Replacing ....................................... 270
Service life ..................................... 252
Sidewal l(de finition) ....................... 269
Speed rating (definition) ................ 268
Storing ........................................... 271
Structure and characteristics
(definition) ..................................... 268
Technica ldata. .............................. 277
Temperature .................................. 264
TIN (Tire Identification Number)
(definition) ..................................... 270
Tire bead (definition) ...................... 269
Tire pressure (definition) ................ 269
Tire pressures (recommended )...... 268
Tire size (data )............................... 275
Tire size designation, load-bearing capacity, speed rating .................... 264
Tire trea d....................................... 251
Tire trea d(definition) ..................... 269
Tota lloa dlim it (definition) ............. 270
Tractio n......................................... 263 Tractio
n(definition) ....................... 270
Tread wear ..................................... 263
Uniform Tire Quality Grading
Standard s...................................... 263
Uniform Tire Quality Grading
Standard s(de finition) .................... 268
Wea rindicator (definition) ............. 270
Wheel rim (definition) .................... 268
see Fla ttire
Top Tether ............................................ 53
Tow-away alarm .................................. 59
Towing Important safety guideline s........... 244
Installing the towing ey e................ 245
Removing the towing ey e............... 245
With the rea raxler aised ................ 245
Towin gaway
With both axles on the ground ....... 246
Transmission
Driving tip s.................................... 124
Selector lever ................................ 121
Shift rang e..................................... 127
Transmissio nposition display ......... 123
Transmissio npositions .................... 123
Transporting the vehicle .................. 246
Trim piece s(clea ning instructions) .. 230
Trip computer (on-board computer) .. 153
Trip odometer Calling up ....................................... 152
Trunk
Emergency release .......................... 74
Important safety guideline s............. 72
Locking separatel y........................... 74
Opening (automatically from
inside ).............................................. 73
Trunk lid
Displa ymessage ............................ 184
Opening/closing ........................ 72, 73
Opening dimensions ...................... 286
Trunk load (maximum) ...................... 286
see Technical data
Turn signal (display message) ......... 174
Turn signals Switching on/of f.............................. 98
Type identificatio nplate
see Vehicl eide ntification plate Index
15
Page 131 of 290
You must avoid fire, open flames
,creating
spark sand smoking. Switch off the engine
and, if applicable, the auxiliary heatin gbefore
refueling. G
WARNING
Fuel is poisonous and hazardous to health.
There is arisk of injury.
You must make sure that fuel does not come int oc ontac twith your skin ,eyes or clothing
and that it is not swallowed. Do not inhale fuel
vapors .Keep fuel away from children.
If you or others com eintoc ontac twith fuel,
observ ethe following:
R Wash away fuel from skin immediately
using soap and water.
R If fuel comes int ocontac twith your eyes,
immediately rinse the mthoroughly with
clean water. Seek medical assistanc ewith-
out delay.
R If fuel is swallowed, seek medical assis-
tance without delay. Do not induc evomit-
ing.
R Immediately change out of clothing which
has com eintoc ontac twith fuel. G
WARNING
Electrostatic buildup can create spark sand
ignit efuel vapors .There is arisk of fire and
explosion.
Always touc hthe vehicle body befor eopening
the fuel filler flap or touching the fuel pump
nozzle. An yexisting electrostatic buildup is
thereby discharged.
! Do not use diesel to refuel vehicles with a
gasolin eengine. Do not switc honthe igni-
tion if you accidentally refuel with the
wron gfuel. Otherwise, the fuel will enter
the fuel system. Even small amount softhe
wron gfuel could result in damage to the
fuel syste mand the engine. Notify aquali-
fied specialis tworkshop and have the fuel
tan kand fuel lines draine dcompletely. !
Overfilling the fuel tan
kcould damage the
fuel system.
! Take care not to spill any fuel on painted
surfaces. You could otherwise damage the paintwork.
! Use
afilter when refuelin gfrom afuel can.
Otherwise, the fuel lines and/or injection
syste mcould be blocked by particles from
the fuel can.
If you overfill the fuel tank, fuel could spray
out when the fuel pump nozzle is removed.
Further information on fuel and on fuel grades can be foun dinthe "Fuel" section
(Y page 282). Refueling
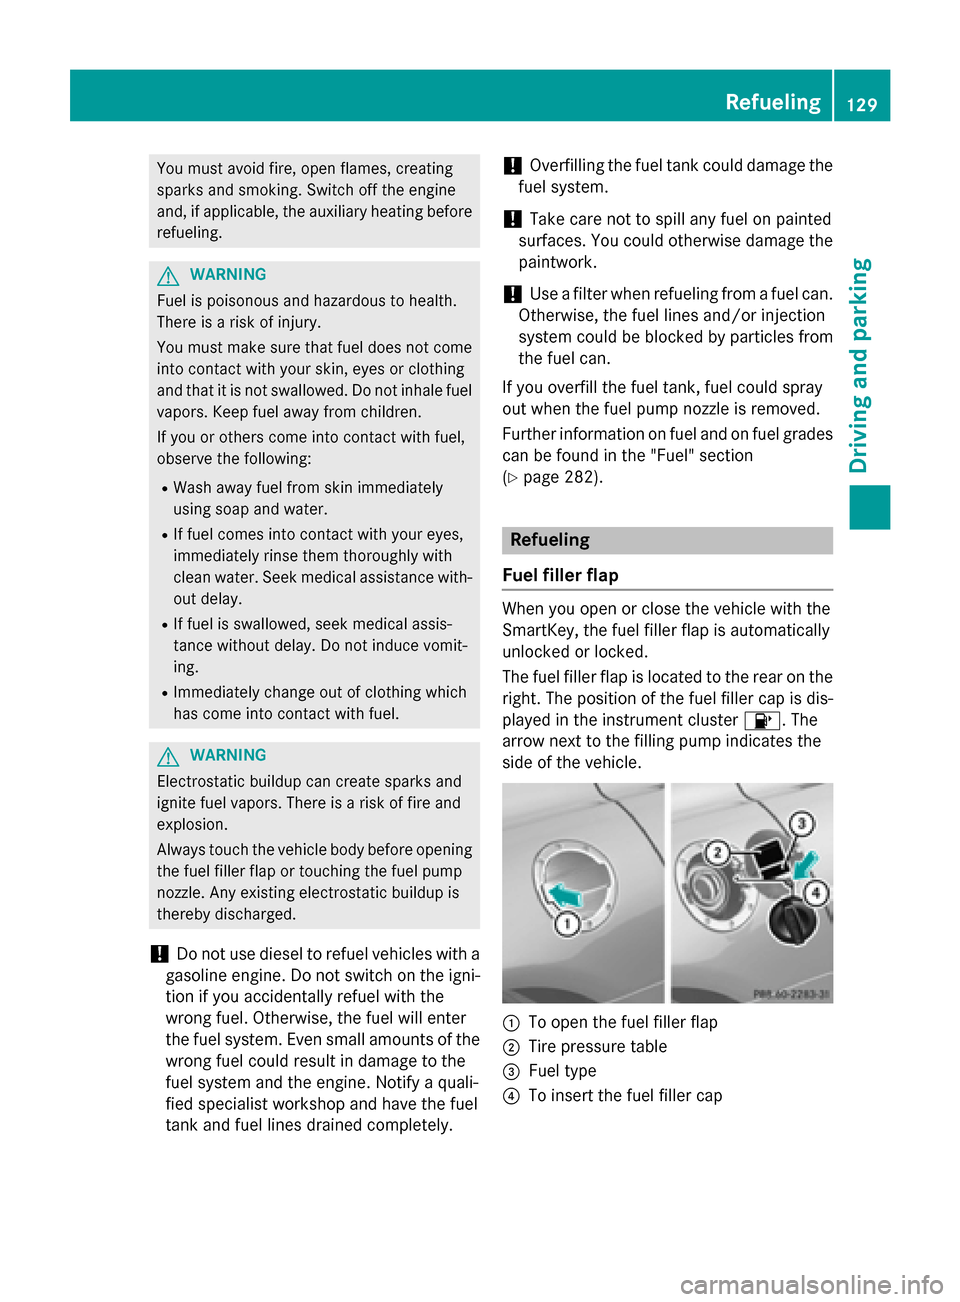
Fuel filler flap When you open or close the vehicle with the
SmartKey, the fuel filler flap is automatically
unlocked or locked.
The fuel filler flap is located to the rear on the right .The position of the fuel filler cap is dis-
played in the instrumen tcluster 00B6.T he
arrow nex ttothe filling pump indicates the
side of the vehicle. 0043
To open the fuel filler flap
0044 Tire pressure table
0087 Fuel type
0085 To inser tthe fuel filler cap Refueling
129Driving and parking Z
Page 232 of 290
Cleaning genuine wood and trim ele-
ments !
Do no
tuse solvent-based cleanin gagents
suc hast ar remover, wheel cleaners, pol-
ishe sorw axes. Ther eisotherwise ariskof
damaging th esurface.
! Do no
tuse chrom epolis hont rimp ieces.
The trim pieces have achrom elook but are
mostly made of anodized aluminum and
can lose their shin eifchrom epolis his
used. Use adamp, lint-free cloth instead
when cleanin gthe trim pieces.
If th echrome-plated trim pieces are very
dirty, you can use achrom epolish. If you
are unsure as to whether th etrimp ieces
are chrome-plated or not, consult an
authorized Mercedes-Ben zCenter.
X Wipe th ewoode ntrima nd trim pieces with
ad amp, lint-free cloth ,e.g.am icrofiber
cloth.
X Heavy soiling: use careand cleanin gprod-
uct srecommended and approved by
Mercedes-Benz.
Cleaning th eseat covers General notes
! Do no
tuse microfiber cloth stoclean gen-
uine leather ,artificial leather or DINAMICA
covers. If used often ,the se can damag ethe
cover.
i Not
ethatregular car eisessential to
ensure that th eappearanc eand comfort of
th ec oversisr etaine dovertime.
Genuine leather seat covers
Leather is anatural product.
It exhibit snatural surface characteristics, for
example:
R differences in th etexture
R sign sofs tretching and marking
R sligh tnuances of color
Thes eare characteristic sofleather and not
material defects. !
To retain th
enatural appearanc eofthe
leather ,observ ethe followin gcleaning
instructions:
R Clean genuine leather cover scarefully
wit had amp cloth and then wipe th ecov-
ers down wit hadry cloth.
R Mak esure that th eleather does not
become soaked. It may otherwise
become roug hand cracked.
R Only use leather car eagents that have
been tested and approved by Mercedes-
Benz. You can obtain these from aquali-
fied specialist workshop.
Seat cover sofother materials
! Observ
ethe followin gwhen cleaning:
R clean artificial leather cover swithac loth
moistene dwithas olution containing 1%
detergen t(e.g. dish washin gliquid).
R clean cloth cover switham icrofiber cloth
moistene dwithas olution containing 1%
detergen t(e.g. dish washin gliquid). Rub
carefully and always wipe entir eseat sec-
tions to avoid leavin gvisible lines. Leave
th es eat to dry afterwards. Cleaning
results depen donthetype of dirt and
how lon githas been there.
R clean DINAMICA cover swithad amp
cloth .Makes ure that you wipe entire
seat sections to avoid leavin gvisible
lines.
Cleaning th eseat belts G
WARNING
Seat belt scan become severely weakened if
bleached or dyed. This coul dcaus ethe seat
belt stot earorf ail, for instance, in th eevent of
an accident. This pose sanincreased ris kof
injury or fatal injury.
Never bleac hordye theseat belts.
! Do no
tclean th eseat belt susin gchemical
cleanin gagents .Don otdry th eseat belts
by heating at temperatures abov e176 ‡
(80 †) or in direct sunlight. 230
CareMaintenance and care
Page 252 of 290
Useful information
i This Operator's Manual describes all
models and all standard and optional equip- ment of your vehicle available at the time of
publication of the Operator's Manual.
Country-specific differences are possible.
Please not ethat your vehicle may not be
equipped with all feature sdescribed. This
also applies to safety-related system sand
functions.
i Please read the information on qualified
specialist workshops (Y page 23).Important safet
ynotes G
WARNING
If wheels and tires of the wrong size are used, the wheel brakes or suspensio ncomponents
may be damaged. There is arisk of an acci-
dent.
Always replace wheels and tires with those
that fulfill the specification softhe original
part.
When replacin gwheels, make sure to use the
correct:
R designation
R model
When replacin gtires ,make sure to use the
correct:
R designation
R manufacturer
R model G
Warning
Af lat tire severely impairs the driving, steer-
ing and brakin gcharacteristic softhe vehicle.
There is arisk of an accident.
do not drive with aflat tire. Immediately
replace the flat tire with your spare wheel, or
consult aqualified specialist workshop.
Accessories that are not approved for your
vehicle by Mercedes-Benz or that are not being used correctly can impair the operating
safety.
Before purchasin gand using non-approved
accessories, visit aqualified specialist work-
shop and inquire about:
R suitability
R legal stipulations
R factory recommendations
Information on dimensions and types of
wheels and tires for your vehicle can be found (Y page 275).
Information on air pressure for the tires on
your vehicle can be found:
R on the vehicle' sTire and Loading Informa-
tion placard on the B-pillar
R on the tire pressure label on the fuel filler
flap
R under "Tire pressure"
i Further information on wheels and tires
can be obtained at any qualified specialist
workshop. Operation
Information on driving
R If the vehicle is heavily loaded, chec kthe
tire pressures and correct them if neces-
sary.
R While driving, pay attention to vibrations,
noises and unusual handling characteris-
tics, e.g. pulling to one side. This may indi- cate that the wheels or tires are damaged.If you suspect that atire is defective,
reduce your speed immediately. Stop the
vehicle as soon as possible to chec kthe
wheels and tires for damage. Hidden tire
damage could also be causing the unusual
handling characteristics. If you find no
signs of damage, have the wheels and tires checked at aqualified specialist workshop.
R When parkin gyour vehicle, make sure that
the tires do not get deformed by the curb or
other obstacles. If it is necessary to drive
over curbs, speed humps or similar eleva- 250
OperationWheels and tires
Page 254 of 290
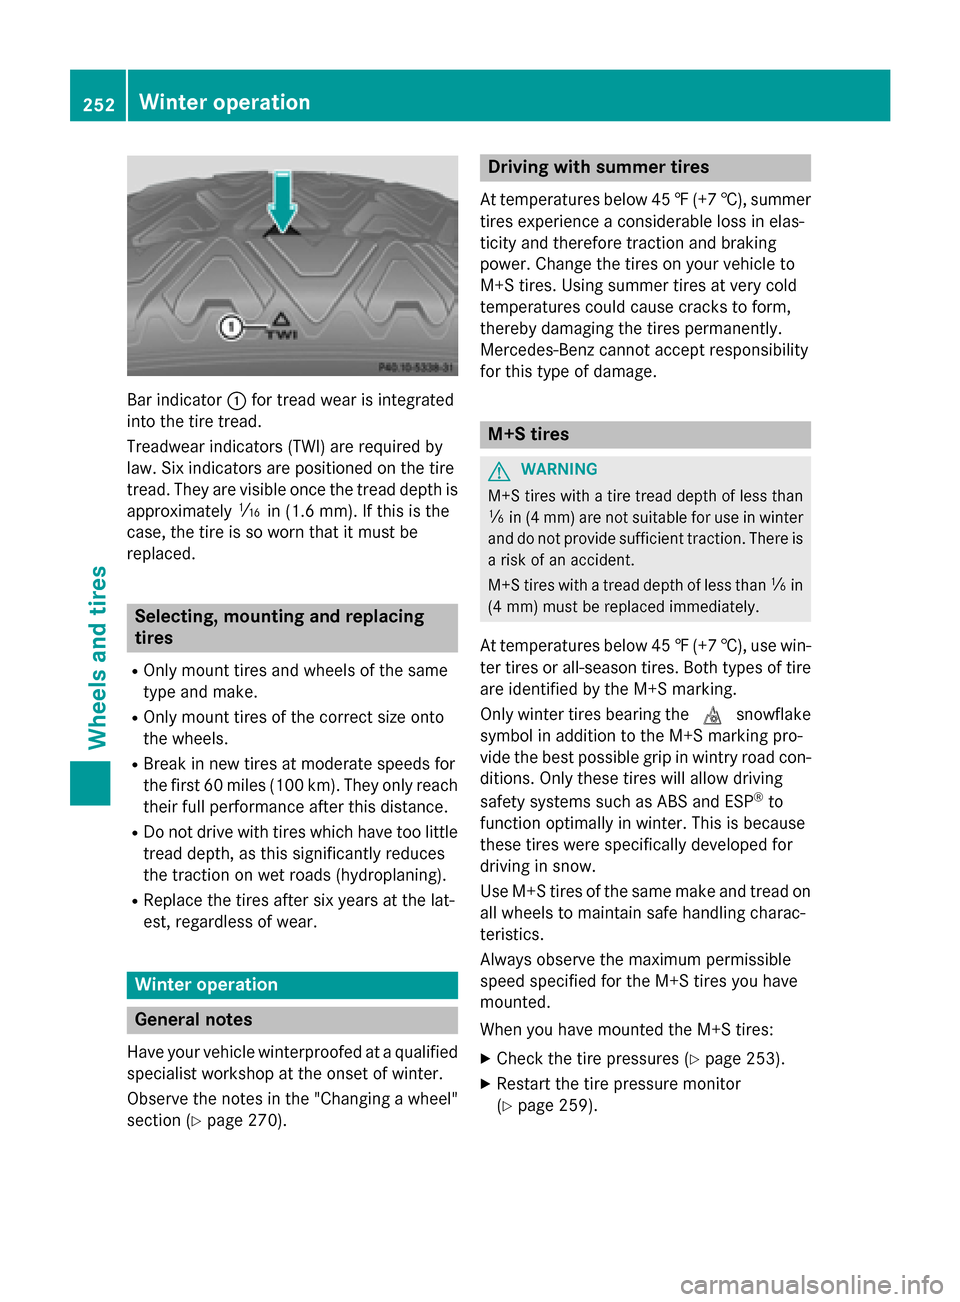
Bar indicator
0043for trea dwearisi ntegrated
into the tire tread.
Treadwear indicator s(TWI) are required by
law. Six indicator sare positioned on the tire
tread. The yare visible once the trea ddepth is
approximately 00CDin (1.6 mm). If this is the
case ,the tire is so worn that it mus tbe
replaced. Selecting, mounting and replacing
tires
R Only mount tire sand wheel softhe same
typ eand make.
R Only mount tire softhe correct size onto
the wheels.
R Brea kinn ew tire satmoderate speeds for
the firs t60miles (100 km) .The yo nly reach
thei rfullp erformance afte rthis distance.
R Do not drive with tire swhich have too little
trea ddepth, as this significantl yreduces
the traction on we troads (hydroplaning).
R Replace the tire saftersix years at the lat-
est, regardless of wear. Winter operation
General notes
Have your vehicle winterproofe dataqualified
specialist worksho patthe onse tofwinter.
Observe the notes in the "Changing awheel"
section (Y page 270). Drivin
gwiths ummer tires
At temperatures below 45 ‡(+7† ), summer
tires experience aconsiderable loss in elas-
ticity and therefore traction and braking
power. Change the tires on you rvehicle to
M+S tires. Using summe rtires at very cold
temperatures coul dcause cracks to form,
thereb ydamaging the tires permanently.
Mercedes-Benz cannot accep tresponsibility
for this type of damage. M+S tires
G
WARNING
M+S tires with atire tread depth of less than
00CF in (4 mm )are not suitabl efor use in winter
and do not provide sufficient traction. There is
ar isk of an accident.
M+S tires with atread depth of less than 00CFin
(4 mm) must be replaced immediately.
At temperatures below 45 ‡(+7† ), use win-
ter tires or all-season tires. Both type softire
are identified by the M+S marking.
Only winter tires bearing the 004Dsnowflake
symbol in addition to the M+S marking pro-
vide the best possibl egrip in wintry road con-
ditions. Only these tires will allow driving
safety systems such as ABS and ESP ®
to
function optimally in winter. Thi sisbecause
these tires were specifically developed for
driving in snow.
Use M+S tires of the same make and tread on
allw heels to maintain safe handling charac-
teristics.
Always observe the maximu mpermissible
spee dspecified for the M+S tires you have
mounted.
When you have mounted the M+S tires:
X Check the tire pressure s(Ypag e253).
X Restart the tire pressure monitor
(Y pag e259). 252
Winte
roperationWheels and tires
Page 267 of 290
Therefore, only use tire types and sizes
approved for your vehicle model. Observe the
tire load rating and speed rating required for
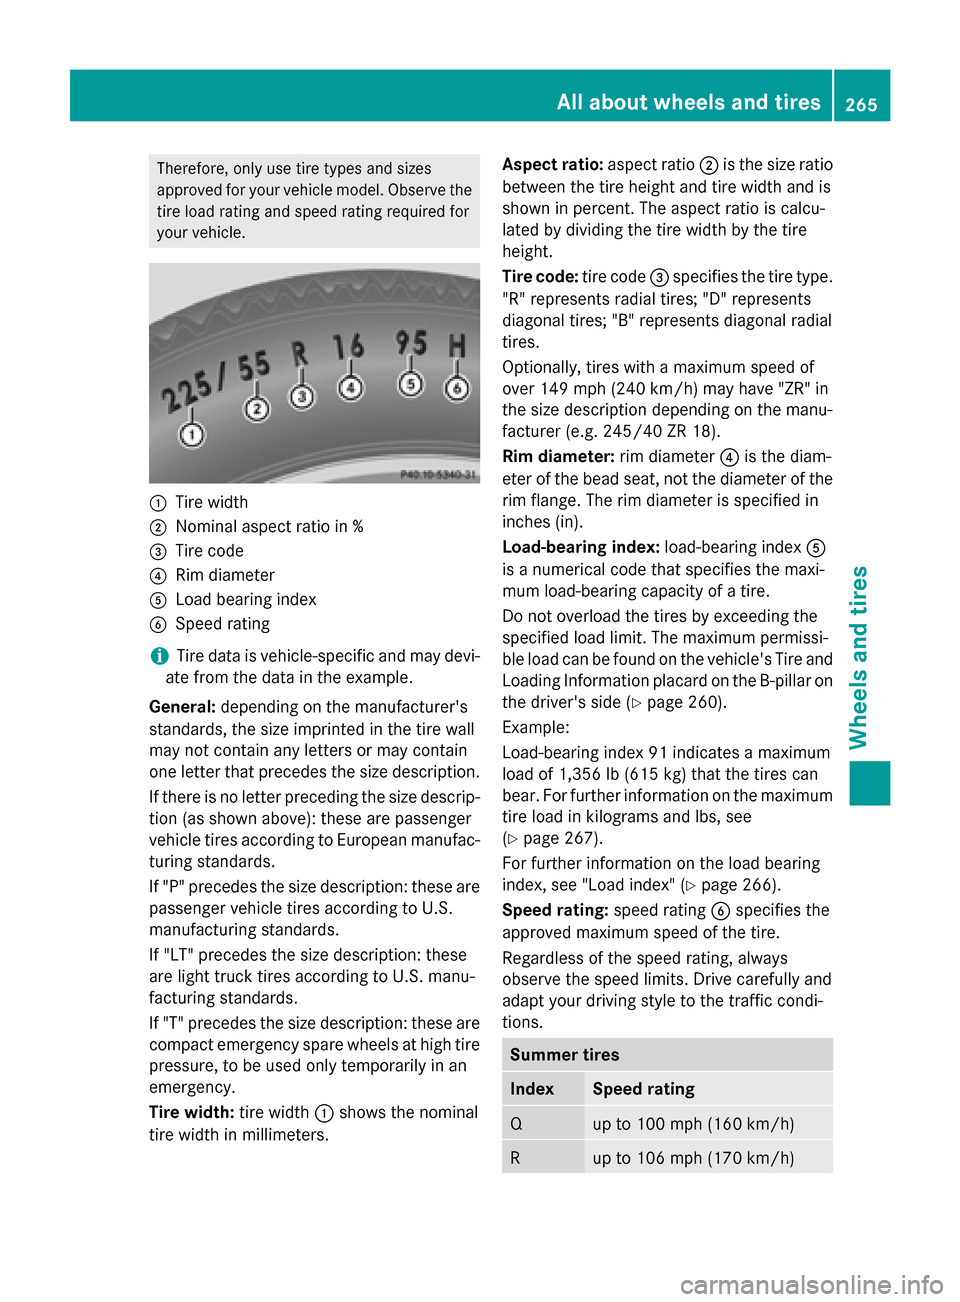
your vehicle. 0043
Tire width
0044 Nominal aspect ratio in %
0087 Tire code
0085 Rim diameter
0083 Load bearing index
0084 Speed rating
i Tire data is vehicle-specific and may devi-
ate from the data in the example.
General: depending on the manufacturer's
standards, the size imprinted in the tire wall
may not contain any letter sormay contain
one letter that precedes the size description.
If there is no letter preceding the size descrip-
tion (as shown above): these are passenger
vehicle tires accordin gtoEuropean manufac-
turing standards.
If "P" precedes the size description :these are
passenger vehicle tires accordin gtoU.S.
manufacturing standards.
If "LT" precedes the size description :these
are light truck tires accordin gtoU.S. manu-
facturin gstandards.
If "T" precedes the size description :these are
compact emergenc yspare wheels at high tire
pressure, to be used only temporarily in an
emergency.
Tire width: tire width0043shows the nominal
tire width in millimeters. Aspect ratio:
aspect ratio0044is the size ratio
between the tire height and tire width and is
shown in percent .The aspect ratio is calcu-
lated by dividing the tire width by the tire
height.
Tire code: tire code0087specifies the tire type.
"R" represent sradial tires; "D" represents
diagonal tires; "B" represent sdiagonal radial
tires.
Optionally, tires with amaximum speed of
over 149 mph (240 km/h) may have "ZR" in
the size description depending on the manu-
facturer (e.g. 245/40 ZR 18).
Rim diameter: rim diameter0085is the diam-
eter of the bead seat, not the diameter of the rim flange. The rim diameter is specified in
inches (in).
Load-bearing index: load-bearing index0083
is an umerical code that specifies the maxi-
mum load-bearing capacity of atire.
Do not overload the tires by exceeding the
specified load limit. The maximum permissi-
ble load can be found on the vehicle's Tire and
Loading Information placard on the B-pillar on the driver's side (Y page 260).
Example:
Load-bearing index 91 indicates amaximum
load of 1,356 lb (615 kg) that the tires can
bear. For further information on the maximum tire load in kilograms and lbs, see
(Y page 267).
For further information on the load bearing
index, see "Load index" (Y page 266).
Speed rating: speed rating0084specifies the
approved maximum speed of the tire.
Regardless of the speed rating, always
observe the speed limits. Drive carefully and
adapt your driving style to the traffic condi-
tions. Summer tires
Index Speed rating
Q up to 100 mph (160 km/h)
R up to 106 mph (170 km/h)All about wheelsa
nd tires
265Wheels and tires Z
Page 269 of 290
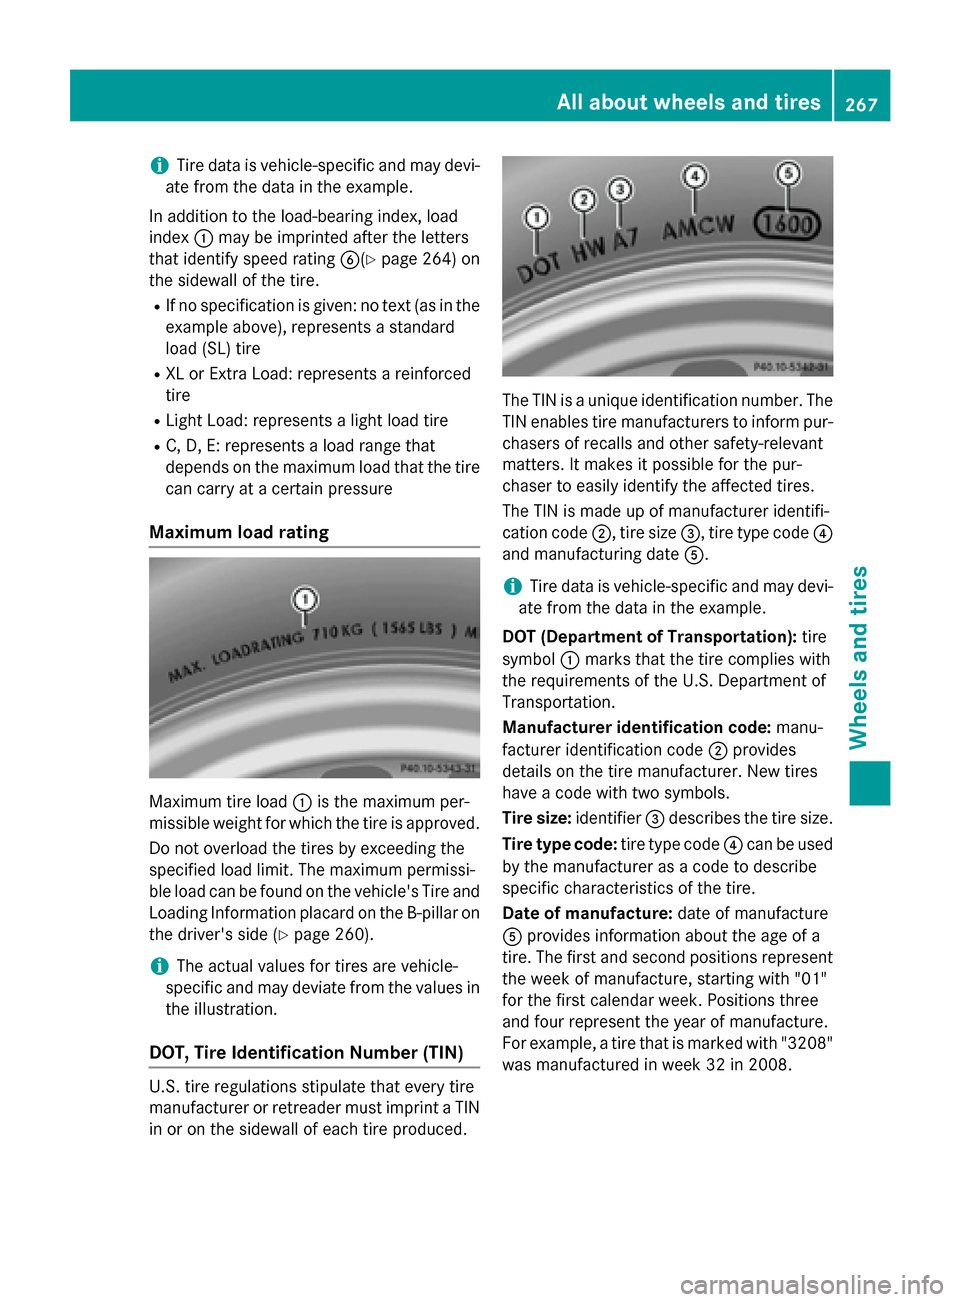
i
Tire data is vehicle-specific and may devi-
ate from the data in the example.
In addition to the load-bearing index, load
index 0043may be imprinted after the letters
that identify speed rating 0084(Ypage 264) on
the sidewall of the tire.
R If no specification is given: no text (as in the
example above), represent sastandard
load (SL) tire
R XL or Extra Load: represent sareinforced
tire
R Light Load: represent salight load tire
R C, D, E: represent saload range that
depends on the maximum load that the tire can carry at acertain pressure
Maximum load rating Maximum tire load
0043is the maximum per-
missible weight for which the tire is approved.
Do not overload the tires by exceedin gthe
specified load limit. The maximum permissi-
ble load can be found on the vehicle's Tire and Loading Information placard on the B-pillar onthe driver's side (Y page 260).
i The actual values for tires are vehicle-
specific and may deviate from the values in
the illustration.
DOT, Tire Identification Number (TIN) U.S.t
ire regulations stipulate that every tire
manufacturer or retreader must imprint aTIN
in or on the sidewall of each tire produced. The TIN is
aunique identification number. The
TIN enables tire manufacturers to inform pur-
chasers of recalls and other safety-relevant
matters. It makes it possible for the pur-
chaser to easily identify the affected tires.
The TIN is made up of manufacturer identifi-
cation code 0044,tire size 0087,tire type code 0085
and manufacturing date 0083.
i Tire data is vehicle-specific and may devi-
ate from the data in the example.
DOT (Department of Transportation): tire
symbol 0043marks that the tire complies with
the requirement softhe U.S.D epartment of
Transportation.
Manufacturer identification code: manu-
facturer identification code 0044provides
details on the tire manufacturer. New tires
have acode with two symbols.
Tire size: identifier0087describes the tire size.
Tire typec ode:tire type code 0085can be used
by the manufacturer as acode to describe
specific characteristics of the tire.
Date of manufacture: date of manufacture
0083 provides information about the age of a
tire. The first and second positions represent the week of manufacture, starting with "01"
for the first calendar week. Positions three
and four represent the year of manufacture.
For example, atire that is marked with "3208"
was manufactured in week 32 in 2008. All about wheelsa
nd tires
267Wheels and tires Z
Page 278 of 290
i
Notes on the vehicle equipment –always
equipt he vehicle with:
R tires of the same size on agiven axle
(left/right)
R with the same type of tires on all wheels
at ag iven time (summer tires, winter
tires)
i The following pagesc
ontain information
on approved wheel rims and tire sizes for
equipping yourv ehicle with winter tires.
Winter tires are not available at the factory as standard equipment or optional extras.
If you wish to equipy ourv ehicle with
approved winter tires, you willa lso require,
in certain circumstances, wheel rims of an
appropriate size, as the sizes of approved
winter tires can deviate from those of
standard tires. This is dependent on the
model and the equipment installe datthe
factory.
The tires and wheel rims, as well as further information, can be obtained at aqualified
specialist workshop. 276
Wheel and tire combinationsWheelsa
nd tires