2015 MERCEDES-BENZ SLK-Class vehicle settings
[x] Cancel search: vehicle settingsPage 75 of 358

The SmartKey centrally locks/unlocks:
R the doors
R the trunk lid
R the stowage compartment in the center
console
R the fuel filler flap
The turn signals flash once when unlocking
and three times when locking.
You can also set an audible signal to confirm that the vehicle has been locked. The audible
signal can be activated and deactivated using the on-board computer (Y page 207).
When it is dark, the surround lighting also
comes on if it is activated in the on-board
computer (Y page 206). KEYLESS-GO
General notes Bear in mind that the engine can be started by
any of the vehicle occupants if there is a KEY- LESS-GO key in the vehicle.
Locking/unlocking centrally You can start, lock or unlock the vehicle using
KEYLESS-GO. To do this, you only need carry
the SmartKey with you. You can combine the functions of KEYLESS-GO with those of a con-
ventional SmartKey. Unlock the vehicle by
using KEYLESS-GO, for instance, and lock it
using the 0037button on the SmartKey.
When locking or unlocking with KEYLESS-GO,
the distance between the key and the corre-
sponding door handle must not be greater
than 3 ft (1 m).
A check which periodically establishes a radio
connection between the vehicle and the
SmartKey determines whether a valid Smart- Key is in the vehicle. This occurs, for example:
R when the external door handles are
touched
R when starting the engine
R while the vehicle is in motion X
To unlock the vehicle: touch the inner
surface of the door handle.
X To lock the vehicle: touch sensor sur-
face 0043.
X Convenience closing feature: touch
recessed sensor surface 0044for an exten-
ded period.
Further information on the convenience
closing feature (Y page 85).
X To unlock the trunk lid: pull the handle on
the trunk lid.
The vehicle only unlocks the trunk lid. Changing the settings of the locking
system
You can change the settings of the locking
system. This means only the driver's door, the
lockable stowage compartments in the vehi-
cle interior and the fuel filler flap are unlocked when the vehicle is unlocked. This is useful if
you frequently travel on your own.
X To change the setting: press and hold
down the 0036and0037 buttons simulta-
neously for approximately six seconds until the battery check lamp flashes twice
(Y page 75).
i If the setting of the locking system is
changed within the signal range of the vehi- cle, pressing the 0037or0036 button:
R locks or
R unlocks the vehicle SmartKey
73Opening and closing Z
Page 76 of 358

The SmartKey now functions as follows:
X To unlock the driver's door: press the
0036 button once.
X To unlock centrally: press the0036but-
ton twice.
X To lock centrally: press the0037button.
The KEYLESS-GO function is changed as fol-
lows:
X To unlock the driver's door: touch the
inner surface of the door handle on the
driver's door.
X To unlock centrally: touch the inner sur-
face of the front-passenger door handle.
X To lock centrally: touch the outer sensor
surface on one of the door handles.
X To restore the factory settings: press
and hold down the 0036and0037 buttons
simultaneously for approximately six sec-
onds until the battery check lamp flashes
twice (Y page 75). Mechanical key
General notes If the vehicle can no longer be locked or
unlocked with the SmartKey, use the
mechanical key.
If you use the mechanical key to unlock and
open the driver's door or the trunk lid, the
anti-theft alarm system will be triggered
(Y page 69).
There are several ways to turn off the alarm:
X To turn the alarm off with the SmartKey:
press the 0036or0037 button on the
SmartKey.
or
X Insert the SmartKey into the ignition lock.
or
X To deactivate the alarm with KEYLESS-
GO: press the Start/Stop button in the igni-
tion lock. The SmartKey must be in the
vehicle. or
X Lock or unlock the vehicle using KEYLESS-
GO. The SmartKey must be outside the
vehicle.
If you unlock the vehicle using the mechanical key, the fuel filler flap will not be unlocked
automatically.
X To unlock the fuel filler flap: insert the
SmartKey into the ignition lock.
Removing the mechanical key X
Push release catch 0043in the direction of
the arrow and at the same time remove
mechanical key 0044from the SmartKey.
For further information about: R unlocking the driver's door (Y page 80)
R unlocking the trunk (Y page 82)
R locking the vehicle (Y page 80)
Inserting the mechanical key X
Push mechanical key 0044completely into
the SmartKey until it engages and release
catch 0043is back in its basic position. SmartKey battery
Important safety notes G
WARNING
Batteries contain toxic and corrosive substan- ces. If batteries are swallowed, it can result in 74
SmartKeyOpening and closing
Page 98 of 358
Useful information
i This Operator's manual describes all
models and all standard and optional equip- ment of your vehicle available at the time of
publication of the Operator's manual.
Country-specific differences are possible.
Please note that your vehicle may not be
equipped with all features described. This
also applies to safety-related systems and
functions.
i Read the information on qualified special-
ist workshops (Y page 26). Correct driver's seat position
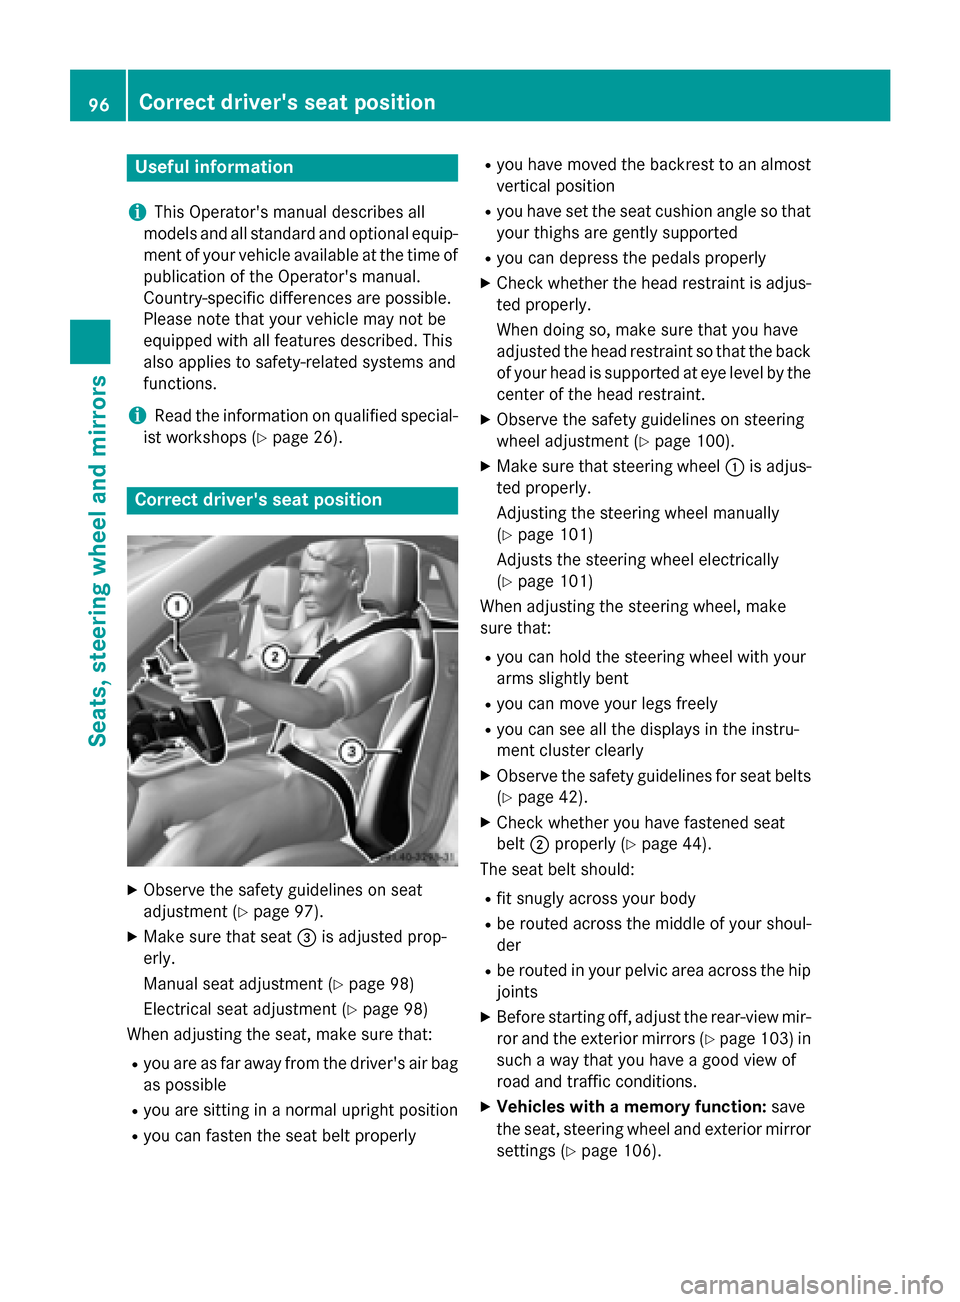
X
Observe the safety guidelines on seat
adjustment (Y page 97).
X Make sure that seat 0087is adjusted prop-
erly.
Manual seat adjustment (Y page 98)
Electrical seat adjustment (Y page 98)
When adjusting the seat, make sure that:
R you are as far away from the driver's air bag
as possible
R you are sitting in a normal upright position
R you can fasten the seat belt properly R
you have moved the backrest to an almost
vertical position
R you have set the seat cushion angle so that
your thighs are gently supported
R you can depress the pedals properly
X Check whether the head restraint is adjus-
ted properly.
When doing so, make sure that you have
adjusted the head restraint so that the back of your head is supported at eye level by the center of the head restraint.
X Observe the safety guidelines on steering
wheel adjustment (Y page 100).
X Make sure that steering wheel 0043is adjus-
ted properly.
Adjusting the steering wheel manually
(Y page 101)
Adjusts the steering wheel electrically
(Y page 101)
When adjusting the steering wheel, make
sure that:
R you can hold the steering wheel with your
arms slightly bent
R you can move your legs freely
R you can see all the displays in the instru-
ment cluster clearly
X Observe the safety guidelines for seat belts
(Y page 42).
X Check whether you have fastened seat
belt 0044properly (Y page 44).
The seat belt should:
R fit snugly across your body
R be routed across the middle of your shoul-
der
R be routed in your pelvic area across the hip
joints
X Before starting off, adjust the rear-view mir-
ror and the exterior mirrors (Y page 103) in
such a way that you have a good view of
road and traffic conditions.
X Vehicles with a memory function: save
the seat, steering wheel and exterior mirror settings (Y page 106). 96
Correct driver's seat positionSeats, steering wheel and mirrors
Page 103 of 358
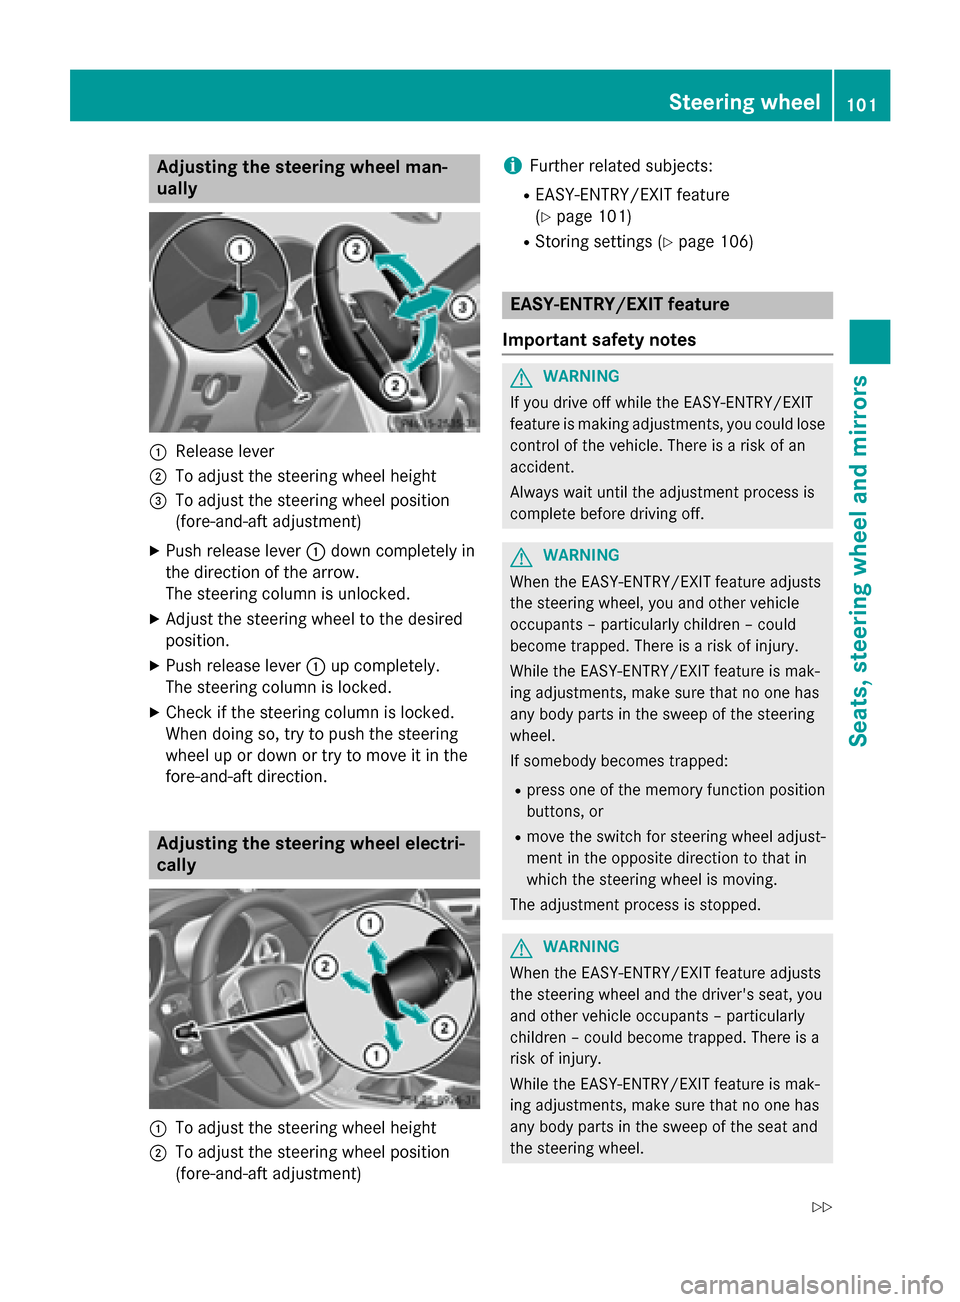
Adjusting the steering wheel man-
ually
0043
Release lever
0044 To adjust the steering wheel height
0087 To adjust the steering wheel position
(fore-and-aft adjustment)
X Push release lever 0043down completely in
the direction of the arrow.
The steering column is unlocked.
X Adjust the steering wheel to the desired
position.
X Push release lever 0043up completely.
The steering column is locked.
X Check if the steering column is locked.
When doing so, try to push the steering
wheel up or down or try to move it in the
fore-and-aft direction. Adjusting the steering wheel electri-
cally 0043
To adjust the steering wheel height
0044 To adjust the steering wheel position
(fore-and-aft adjustment) i
Further related subjects:
R EASY-ENTRY/EXIT feature
(Y page 101)
R Storing settings (Y page 106) EASY-ENTRY/EXIT feature
Important safety notes G
WARNING
If you drive off while the EASY-ENTRY/EXIT
feature is making adjustments, you could lose
control of the vehicle. There is a risk of an
accident.
Always wait until the adjustment process is
complete before driving off. G
WARNING
When the EASY-ENTRY/EXIT feature adjusts
the steering wheel, you and other vehicle
occupants – particularly children – could
become trapped. There is a risk of injury.
While the EASY-ENTRY/EXIT feature is mak-
ing adjustments, make sure that no one has
any body parts in the sweep of the steering
wheel.
If somebody becomes trapped:
R press one of the memory function position
buttons, or
R move the switch for steering wheel adjust-
ment in the opposite direction to that in
which the steering wheel is moving.
The adjustment process is stopped. G
WARNING
When the EASY-ENTRY/EXIT feature adjusts
the steering wheel and the driver's seat, you
and other vehicle occupants – particularly
children – could become trapped. There is a
risk of injury.
While the EASY-ENTRY/EXIT feature is mak-
ing adjustments, make sure that no one has
any body parts in the sweep of the seat and
the steering wheel. Steering wheel
101Seats, steering wheel and mirrors
Z
Page 108 of 358
X
Turn the SmartKey to position 2in the igni-
tion lock.
X Adjust the exterior mirror on the front-
passenger side using button 0044.
X Engage reverse gear.
The exterior mirror on the front-passenger
side moves to the stored parking position.
The exterior mirror on the front-passenger
side moves back to its original position:
R as soon as you exceed a speed of 9 mph
(15 km/h)
R if you press button 0043for the exterior mir-
ror on the driver's side Memory function
Storing settings
G
WARNING
If you use the memory function on the driver's side while driving, you could lose control of
the vehicle as a result of the adjustments
being made. There is a risk of an accident.
Only use the memory function on the driver's
side when the vehicle is stationary. G
WARNING
When the memory function adjusts the seat or steering wheel, you and other vehicle occu-
pants – particularly children – could become
trapped. There is a risk of injury.
While the memory function is making adjust-
ments, make sure that no one has any body
parts in the sweep of the seat or steering
wheel. If somebody becomes trapped, imme-
diately release the memory function position
button. The adjustment process is stopped. G
WARNING
When the memory function adjusts the seat,
you and other vehicle occupants – particularly children – could become trapped. There is a
risk of injury.
While the memory function is making adjust-
ments, make sure that no one has any body parts in the sweep of the seat. If somebody
becomes trapped, immediately release the
memory function position button. The adjust- ment process is stopped. G
WARNING
Children could become trapped if they acti-
vate the memory function, particularly when
unattended. There is a risk of injury.
When leaving the vehicle, always take the
SmartKey with you and lock the vehicle. Never leave children unsupervised in the vehicle. X
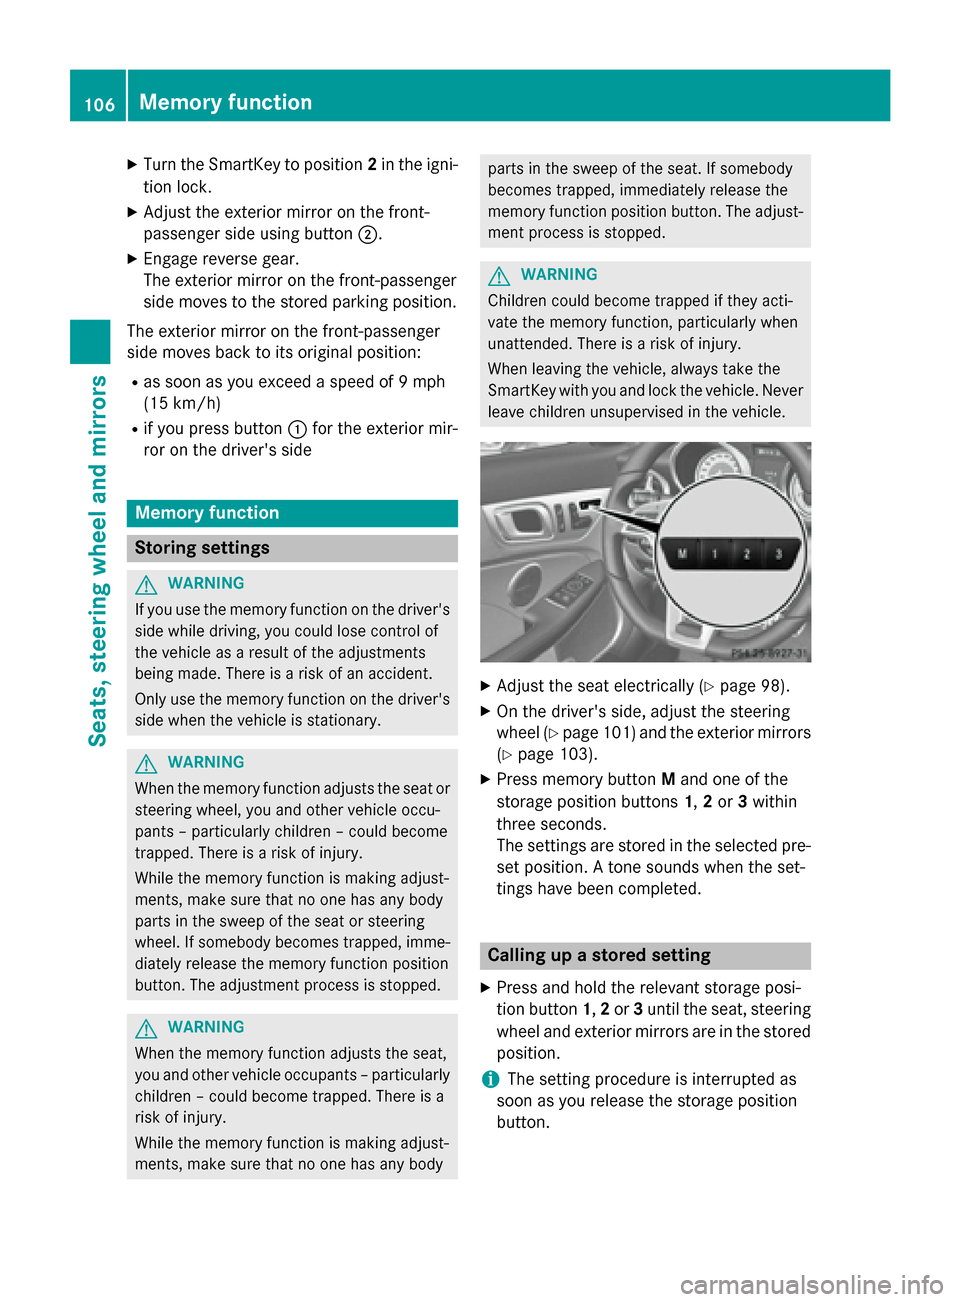
Adjust the seat electrically (Y page 98).
X On the driver's side, adjust the steering
wheel (Y page 101) and the exterior mirrors
(Y page 103).
X Press memory button Mand one of the
storage position buttons 1,2or 3within
three seconds.
The settings are stored in the selected pre- set position. A tone sounds when the set-
tings have been completed. Calling up a stored setting
X Press and hold the relevant storage posi-
tion button 1,2or 3until the seat, steering
wheel and exterior mirrors are in the stored position.
i The setting procedure is interrupted as
soon as you release the storage position
button. 106
Memory functionSeats, steering wheel and mirrors
Page 111 of 358
Automatic headlamp mode
G
WARNING
When the light switch is set to 0058, the low-
beam headlamps may not be switched on
automatically if there is fog, snow or other
causes of poor visibility due to the weather
conditions such as spray. There is a risk of an
accident.
In such situations, turn the light switch to
0058.
The automatic headlamp feature is only an
aid. The driver is responsible for the vehicle's lighting at all times.
0058 is the favored light switch setting. The
light setting is automatically selected accord- ing to the brightness of the ambient light
(exception: poor visibility due to weather con-
ditions such as fog, snow or spray):
R SmartKey in position 1in the ignition lock:
the parking lamps are switched on or off
automatically depending on the brightness of the ambient light.
R With the engine running: if you have acti-
vated the daytime running lamps function
via the on-board computer, the daytime
running lamps or the low-beam headlamps
and parking lamps are switched on or off
automatically depending on the brightnessof the ambient light.
X To switch on automatic headlamp
mode: turn the light switch to 0058.
Only for Canada:
The daytime running lamps improve the visi-
bility of your vehicle during the day. The day-
time running lamps function is required by law in Canada. It cannot therefore be deactivated.
When the engine is running and the vehicle is
stationary: if you move the selector lever from
a drive position to P, the daytime running
lamps/low-beam headlamps go out after
three minutes.
When the engine is running, the vehicle is
stationary and in bright ambient light: if you turn the light switch to
0060, the daytime
running lamps and parking lamps switch on.
If the engine is running and you turn the light switch to 0058, the manual settings take
precedence over the daytime running lamps.
USA only:
The daytime running lamps improve the visi-
bility of your vehicle during the day. To do this,
the daytime running lamps function must be
switched on using the on-board computer
(Y page 205).
If the engine is running and you turn the light
switch to 0060or0058, the manual settings
take precedence over the daytime running
lamps.
Low-beam headlamps G
WARNING
When the light switch is set to 0058, the low-
beam headlamps may not be switched on
automatically if there is fog, snow or other
causes of poor visibility due to the weather
conditions such as spray. There is a risk of an
accident.
In such situations, turn the light switch to
0058.
Even if the light sensor does not detect that it is dark, the parking lamps and low-beam
headlamps switch on when the ignition is
switched on and the light switch is set to the 0058 position. This is a particularly useful
function in the event of rain and fog.
X To switch on the low-beam headlamps:
turn the SmartKey in the ignition lock to
position 2or start the engine.
X Turn the light switch to 0058.
The green 0058indicator lamp in the instru-
ment cluster lights up.
Front fog lamps
In conditions where visibility is poor due to
fog, snow or rain, the fog lamps improve vis-
ibility as well as making it easier for other road
users to see you. They can be operated
together with the parking lamps or together Exterior lighting
109Lights and windshield wipers Z
Page 124 of 358

Useful information
i This Operator's manual describes all
models and all standard and optional equip- ment of your vehicle available at the time of
publication of the Operator's manual.
Country-specific differences are possible.
Please note that your vehicle may not be
equipped with all features described. This
also applies to safety-related systems and
functions.
i Read the information on qualified special-
ist workshops (Y page 26). Overview of climate control systems
General notes
Observe the settings recommended on the
following pages. The windows could other-
wise fog up.
To prevent the windows from fogging up:
R switch off climate control only briefly
R switch on air-recirculation mode only
briefly
R switch on the cooling with air dehumidifi-
cation function
R switch on the defrost windshield function
briefly, if required
Climate control regulates the temperature
and the humidity in the vehicle interior and
filters undesirable substances out of the air.
Climate control can only be operated when
the engine is running. Optimum operation is
only achieved with the side windows and roof closed.
The residual heat function can only be acti-
vated or deactivated with the ignition
switched off (Y page 133).
i When the weather is warm, ventilate the
vehicle for a brief period. This will speed up the cooling process and the desired vehicle
interior temperature will be reached more
quickly. i
The integrated filter filters out most par-
ticles of dust and soot and completely fil-
ters out pollen. It also reduces gaseous pol-
lutants and odors. A clogged filter reduces the amount of air supplied to the vehicle
interior. For this reason, you should alwaysobserve the interval for replacing the filter,which is specified in the Maintenance
Booklet. As it depends on environmental
conditions, e.g. heavy air pollution, the
interval may be shorter than stated in the
Maintenance Booklet. 122
Overview of climate control systemsClimate control
Page 126 of 358
0087
To set the air distribution (Y page 130)
0085 To defrost the windshield (Y page 131)
0083 To switch cooling with air dehumidification on/off (Y page 127)
0084 To activate/deactivate air-recirculation mode (Y page 133)
006B To set the airflow (Y page 130)
006C To switch the rear window defroster on/off (Y page 132)Notes on using the air-conditioning
system
Air-conditioning system Below, you can find a number of notes and
recommendations to help you use the air-
conditioning system optimally.
R Switch on cooling with air dehumidification
using the 005Abutton. The indicator lamp
in the 005Abutton lights up.
R Set the temperature to 72 ‡ (22 †).
R Recommendation for air distribution in
winter: set the009Band0061 settings.
Recommendation for air distribution in
summer: set the009Csetting.
R Only use the "Windshield defrosting" func-
tion briefly until the windshield is clear
again.
R Only use air-recirculation mode briefly, e.g.
if there are unpleasant outside odors or
when in a tunnel. The windows could oth-
erwise fog up, since no fresh air is drawn
into the vehicle in air-recirculation mode.
ECO start/stop function During automatic engine switch-off, the cli-
mate control system only operates at a
reduced capacity. If you require full climate
control capacity, the ECO start/stop function can be deactivated by pressing the ECO but-
ton (Y page 147). 124
Overview of climate control systemsClimate control