2015 MERCEDES-BENZ S-Class window
[x] Cancel search: windowPage 185 of 502

When the vehicle is heated, the following
functions are activated:
R Climate control system
R Blower
R Seat heating
R Steering wheel heating
R Armrest heating
R Exterior mirror heating
R Rear window defroster
i In contrast to the rest of the climate con-
trol functions, the seat heating/ventilation,
steering wheel heating and armrest heating only switch on if required.
If you have switched on the perfume atomizer or the ionization using COMAND, these will beactivated together with the "Pre-entry climate control at departure time".
Activating the perfume atomizer/ionization
(see separate COMAND operating instruc-
tions).
Setting the departure time You can set the departure time using the
instrument cluster or via the "Vehicle Home-
page" (Y
page 220). The activation of the
"Pre-entry climate control at departure time"
function can be linked to this departure time.
Your vehicle will then be cooled or heated
until the desired temperature is reached in
time for the set departure time. "Pre-entry
climate control at departure time" will be acti- vated a maximum of 55 minutes before
departure. If the departure is delayed, the
vehicle will be heated or cooled for a further
five minutes.
X To set the departure time: set the depar-
ture time via the instrument cluster. To set the departure time via the "Vehicle Home-
page" (Y page 220).
X To activate/deactivate "Pre-entry cli-
mate control at departure time": acti-
vate/deactivate "Pre-entry climate control
at departure time" via COMAND (see sep-
arate operating instructions). To activate/ deactivate the "Pre-entry climate control at
departure time" function via the Vehicle
Homepage (Y page 220).
When activating the "Pre-entry climate con-
trol at departure time" function: you can
select whether only the driver's area or the
whole vehicle interior should be heated or
cooled.
The "Pre-entry climate control at departure
time" function switches off automatically
when the vehicle is started. The following
functions remain active:
R Seat heating
R Seat ventilation
R Armrest heating
R Steering wheel heating
R Perfume atomizer
R Ionization
Switching off "Pre-entry climate control
at departure time": the activated "Pre-entry
climate control at departure time" can be
switched off using the rocker switch
(Y page 183).
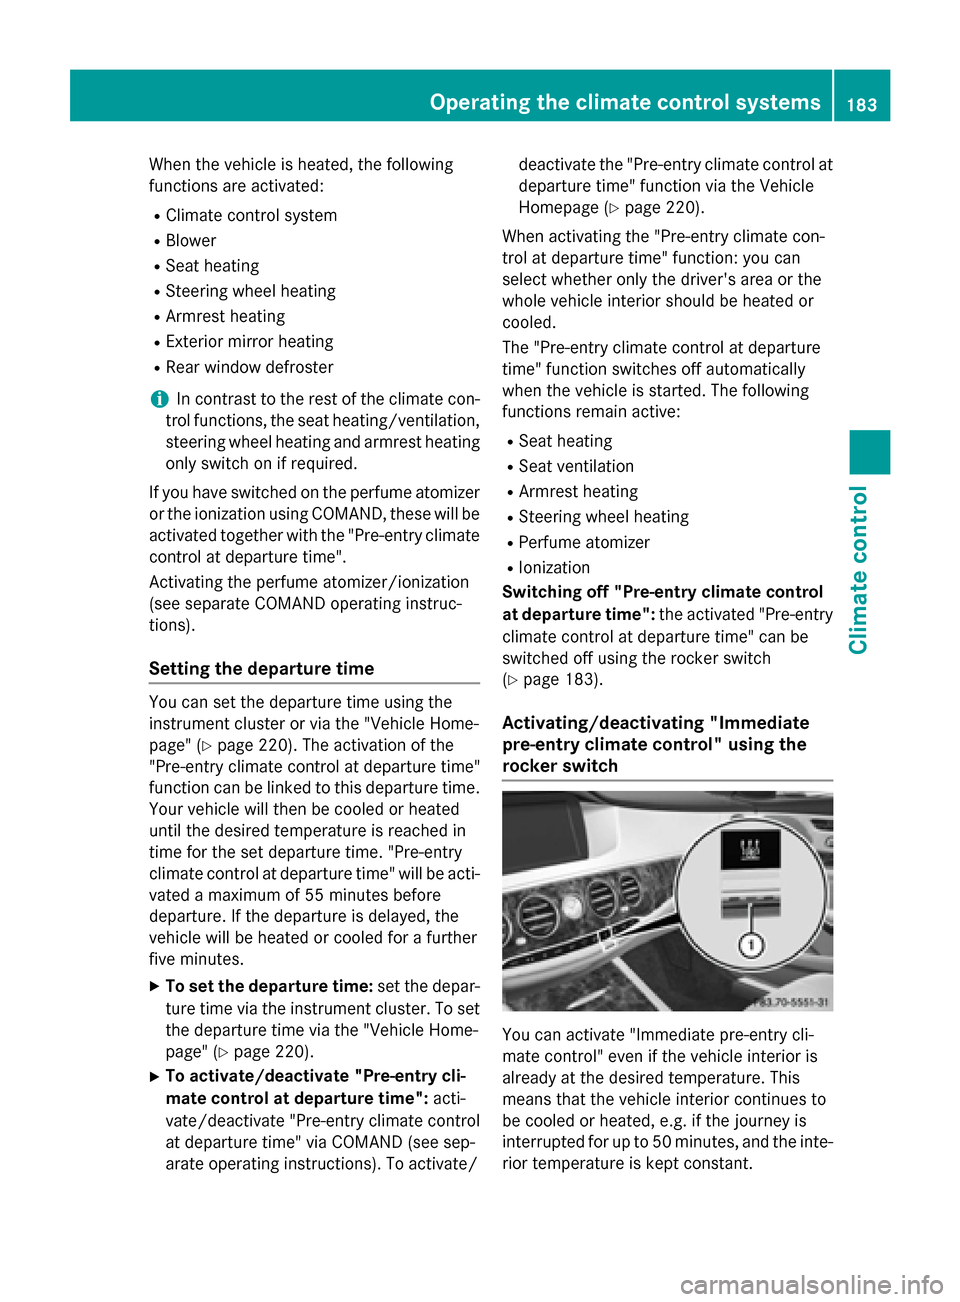
Activating/deactivating "Immediate
pre-entry climate control" using the
rocker switch You can activate "Immediate pre-entry cli-
mate control" even if the vehicle interior is
already at the desired temperature. This
means that the vehicle interior continues to
be cooled or heated, e.g. if the journey is
interrupted for up to 50 minutes, and the inte-
rior temperature is kept constant. Operating the climate control systems
183Climate control Z
Page 186 of 502

The colors of the indicator lamps in the rocker
switch have the following meanings:
R blue: cooling activated
R red: heating activated
R yellow: departure time preselected
X To activate/deactivate "Immediate pre-
entry climate control" : press rocker
switch :up or down.
The blue or red indicator lamp above the
rocker switch lights up or goes out. Setting the air vents
Important safety notes
G
WARNING
Very hot or very cold air can flow from the air vents. This could result in burns or frostbite in the immediate vicinity of the air vents. There
is a risk of injury.
Make sure that all vehicle occupants always
maintain a sufficient distance to the air out-
lets. If necessary, redirect the airflow to
another area of the vehicle interior.
In order to ensure the direct flow of fresh air
through the air vents into the vehicle interior,
please observe the following notes:
R keep the air inlet between the windshield
and the hood free of blockages, such as ice, snow or leaves.
R never cover the air vents or air intake grilles
in the vehicle interior. Setting the center air vents
:
Fixed center air vent
; Center air vent, right
= Center vent control, right
? Center vent control, left
A Center air vent, left
X To open/close: press control=or?.
The control pops out.
X Turn control =or? counter-clockwise or
clockwise.
X To adjust the air direction: hold rear air
vent ;orA by the middle fin and move up
or down or to the left or right. Setting the side air vents
:
Side window defroster vent
; Side air vent
= Thumbwheel for left side air vent 184
Setting the air ventsClimate control
Page 230 of 502

The AMG brake systems are designed for
heavy loads. This may lead to noise when
braking. This will depend on:
R speed
R braking force
R environmental conditions, such as temper-
ature and humidity
The wear of individual components of the
brake system, such as the brake pads/linings or brake discs, depends on the individual driv-
ing style and operating conditions.
For this reason, it is impossible to state a
mileage that will be valid under all circum-
stances. An aggressive driving style will lead
to high wear. You can obtain further informa-
tion about this from your authorized
Mercedes-Benz Center.
New and replaced brake pads and discs only
reach their optimum braking effect after sev-
eral hundred kilometers of driving. Compen-
sate for this by applying greater force to the
brake pedal. Keep this in mind, and adapt
your driving and braking accordingly during
this break-in period.
Excessive heavy braking results in corre-
spondingly high brake wear. Observe the
brake wear warning lamp in the instrument
cluster and note any brake status messages
in the multifunction display. Especially for
high performance driving, it is important to
maintain and have the brake system checked regularly. Driving on wet roads
Hydroplaning If water has accumulated to a certain depth
on the road surface, there is a danger of
hydroplaning occurring, even if:
R you drive at low speeds.
R the tires have adequate tread depth. For this reason, in the event of heavy rain or in
conditions in which hydroplaning may occur,
you must drive in the following manner:
R lower your speed.
R avoid ruts.
R avoid sudden steering movements.
R brake carefully.
Driving on flooded roads !
Do not drive through flooded areas.
Check the depth of any water before driving through it. Drive slowly through standing
water. Otherwise, water may enter the
vehicle interior or the engine compartment.
This can damage the electronic compo-
nents in the engine or the automatic trans- mission. Water can also be drawn in by the
engine's air suction nozzles and this can
cause engine damage. Winter driving
G
WARNING
If you shift down on a slippery road surface in an attempt to increase the engine's braking
effect, the drive wheels could lose their grip.
There is an increased danger of skidding and
accidents.
Do not shift down for additional engine brak-
ing on a slippery road surface. G
DANGER
If the exhaust pipe is blocked or adequate
ventilation is not possible, poisonous gases
such as carbon monoxide (CO) may enter the vehicle. This is the case, e.g. if the vehicle
becomes trapped in snow. There is a risk of
fatal injury.
If you leave the engine or the auxiliary heating
running, make sure the exhaust pipe and area
around the vehicle are clear of snow. To
ensure an adequate supply of fresh air, open a window on the side of the vehicle that is not
facing into the wind. 228
Driving tipsDriving and parking
Page 332 of 502

Display messages
Possible causes/consequences and
M
MSolutions 6
Left Side Curtain Left Side Curtain
Airbag Airbag
Malfunction
Malfunction
Service Required
Service Required
or Right Side Cur‐ Right Side Cur‐
tain Airbag Mal‐
tain Airbag Mal‐
function Service function Service
Required Required There is a malfunction in the left-hand or right-hand window cur-
tain air bag. The
6warning lamp also lights up in the instrument
cluster.
G WARNING
The left or right window curtain air bag may either be triggered
unintentionally or, in the event of an accident, may not be trig-
gered.
There is an increased risk of injury. X Visit a qualified specialist workshop. 330
Display
messagesOn-board computer and displays
Page 340 of 502

Display messages
Possible causes/consequences and
M
MSolutions #
Stop Vehicle See Stop Vehicle See
Operator's Manual Operator's Manual The battery is no longer being charged and the battery charge level
is too low.
A warning tone also sounds.
X Pull over and stop the vehicle safely and switch off the engine,
paying attention to road and traffic conditions.
X Secure the vehicle against rolling away (Y page 220).
X Observe the instructions in the #See SeeOperator's
Operator's Manual
Manual
display message.
X Consult a qualified specialist workshop. #
Start Engine See Start Engine See
Operator's Manual Operator's Manual The engine is switched off and the battery charge level is too low.
X Switch off electrical consumers that you do not need, such as
the rear window defroster and interior lighting.
X Leave the engine running for a few minutes or drive a long dis-
tance.
The battery is being charged. 4
Check Engine Oil Check Engine Oil
At Next Refueling At Next Refueling The engine oil level has dropped to the minimum level.
A warning tone also sounds.
! Avoid long journeys with too little engine oil. The engine will
otherwise be damaged.
X Check the oil level when next refueling, at the latest
(Y page 405).
X If necessary, add engine oil (Y page 407).
X Have the engine checked at a qualified specialist workshop if
engine oil needs to be added more often than usual.
Information on approved engine oils can be obtained from any
qualified specialist workshop or on the Internet at http://
bevo.mercedes-benz.com. 4
Check Engine Oil Check Engine Oil
Level Level
(Add
(Add1
1quart)
quart) The engine oil level has dropped to the minimum level.
! Avoid long journeys with too little engine oil. The engine will
otherwise be damaged.
X Check the oil level when next refueling, at the latest
(Y page 405).
X If necessary, add engine oil (Y page 407).
X Have the engine checked at a qualified specialist workshop if
engine oil needs to be added more often than usual.
Information on approved engine oils can be obtained from any
qualified specialist workshop or on the Internet at http://
bevo.mercedes-benz.com. 338
Display
messagesOn-board computer and displays
Page 355 of 502

Display messages
Possible causes/consequences and
M
MSolutions Front-Passenger
Front-Passenger
Seat Cannot Be Seat Cannot Be
Used Used
Visit
Visit Workshop
Workshop R
The front-passenger seat cannot be moved from the chauffeur
mode position into the normal position. There is a malfunction.
R The front-passenger seat head restraint is folded down and
there is a malfunction. The head restraint can no longer be fol-
ded up.
G WARNING
If head restraints are not adjusted correctly, they cannot provide
protection as intended.
There is an increased risk of injury in the head and neck area, e.g. in the event of an accident or when braking.
X Do not use the front-passenger seat.
X Visit a qualified specialist workshop. n
Before Before
oper.
oper.front-
front-
pass. seat from
pass. seat from
rear, deactiv. rear, deactiv.
override feature. override feature. You have attempted to adjust the front-passenger seat from the
rear while the override feature was activated.
X Deactivate the override feature for the rear side windows
(Y page 75).
X Adjusts the front-passenger seat from the rear (Y page 124).Ð
Power Power
Steering
Steering Mal‐
Mal‐
function See Oper‐
function See Oper‐
ator's Manual ator's Manual The power steering is malfunctioning.
A warning tone also sounds.
G WARNING
You will need to use more force to steer.
There is a risk of an accident. X Check whether you are able to apply the extra force required.
X If you are able to steer safely: carefully drive on to a qualified
specialist workshop.
X If you are unable to steer safely: do not drive on. Contact the
nearest qualified specialist workshop. Phone No Service Phone No Service Your vehicle is outside the network provider's transmitter/
receiver range.
X Wait until the mobile phone operational readiness symbol
appears in the multifunction display. ¥
Check Washer Fluid Check Washer Fluid The washer fluid level in the washer fluid reservoir has dropped
below the minimum.
X Add washer fluid (Y page 409). Display
messages
353On-board computer and displays Z
Page 383 of 502

?
Vanity mirror
A Mirror cover
Vanity mirror in the sun visor Mirror light
:only functions if the sun visor
is clipped into bracket ;and mirror cover A
has been folded up.
Glare from the side X
Fold down sun visor :.
X Pull sun visor :out of bracket =.
X Swing sun visor :to the side.
X Slide sun visor :horizontally as required.
X Fold down additional sun visor ;to the
windshield. Rear side window roller sunblinds
:
Front left
; Front right
= Rear right
? Rear left The sunblinds for the rear side windows can
be operated with the buttons for the side win-
dows.
The switches for all side windows are located
on the driver's door. There is also a switch on
each door for the corresponding side window.
The switches on the driver's door take prec-
edence.
X To close fully: pull the corresponding
switch when the side window is closed.
X To open fully: press the corresponding
switch.
i You can use the switches on the rear
doors to close the rear roller sunblinds for
the opposite side. Rear window roller sunblind
Important safety notes G
WARNING
When extending or retracting, parts of the
body could become trapped within the sweep of the roller sunblind. There is a risk of injury.
When extending or retracting, make sure that
no one has any parts of the body within the
sweep of the roller sunblind. If someone
becomes trapped, briefly press the button
again. The opening or closing procedure will
be stopped.
! Make sure that the roller sunblind can
move freely. Otherwise, the roller sunblind
or other objects could be damaged.
At temperatures below Ò4‡( Ò20 †) the roller
sunblind cannot be operated. Features
381Stowage and features Z
Page 384 of 502

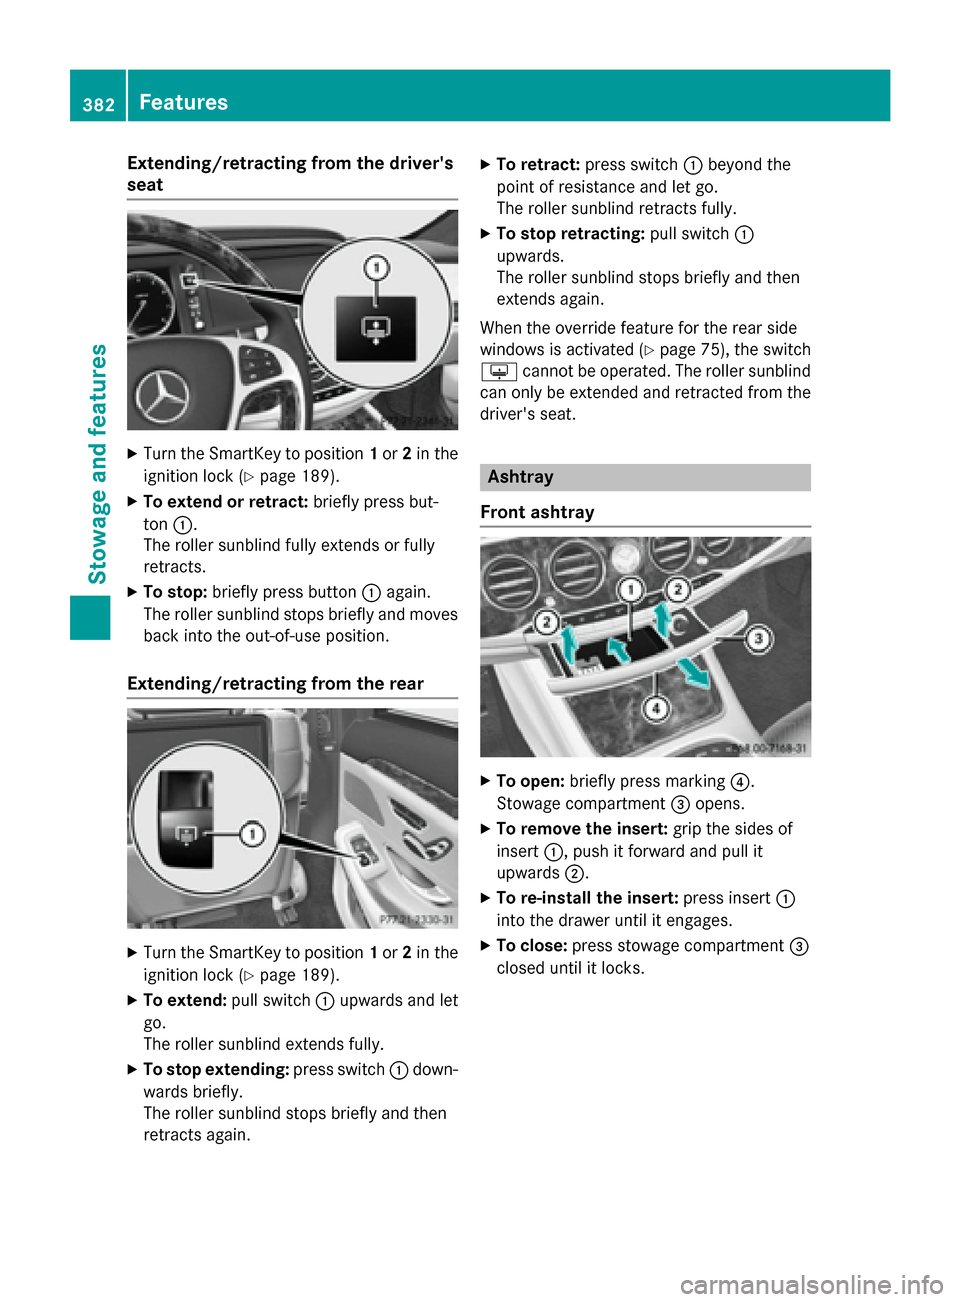
Extending/retracting from the driver's
seat X
Turn the SmartKey to position 1or 2in the
ignition lock (Y page 189).
X To extend or retract: briefly press but-
ton :.
The roller sunblind fully extends or fully
retracts.
X To stop: briefly press button :again.
The roller sunblind stops briefly and moves
back into the out-of-use position.
Extending/retracting from the rear X
Turn the SmartKey to position 1or 2in the
ignition lock (Y page 189).
X To extend: pull switch:upwards and let
go.
The roller sunblind extends fully.
X To stop extending: press switch:down-
wards briefly.
The roller sunblind stops briefly and then
retracts again. X
To retract: press switch :beyond the
point of resistance and let go.
The roller sunblind retracts fully.
X To stop retracting: pull switch:
upwards.
The roller sunblind stops briefly and then
extends again.
When the override feature for the rear side
windows is activated (Y page 75), the switch
u cannot be operated. The roller sunblind
can only be extended and retracted from the
driver's seat. Ashtray
Front ashtray X
To open: briefly press marking ?.
Stowage compartment =opens.
X To remove the insert: grip the sides of
insert :, push it forward and pull it
upwards ;.
X To re-install the insert: press insert:
into the drawer until it engages.
X To close: press stowage compartment =
closed until it locks. 382
FeaturesStowage and features