2015 MERCEDES-BENZ S-Class Remove seat belt
[x] Cancel search: Remove seat beltPage 74 of 502
Always comply with the manufacturer's
installation and operating instructions for the child restraint system used.
Before every trip, make sure that the LATCH-
type (ISOFIX) child restraint system is
engaged correctly in both LATCH-type (ISO-
FIX) securing rings
! When installing the child restraint system,
make sure that the seat belt for the middle seat does not get trapped. The seat belt
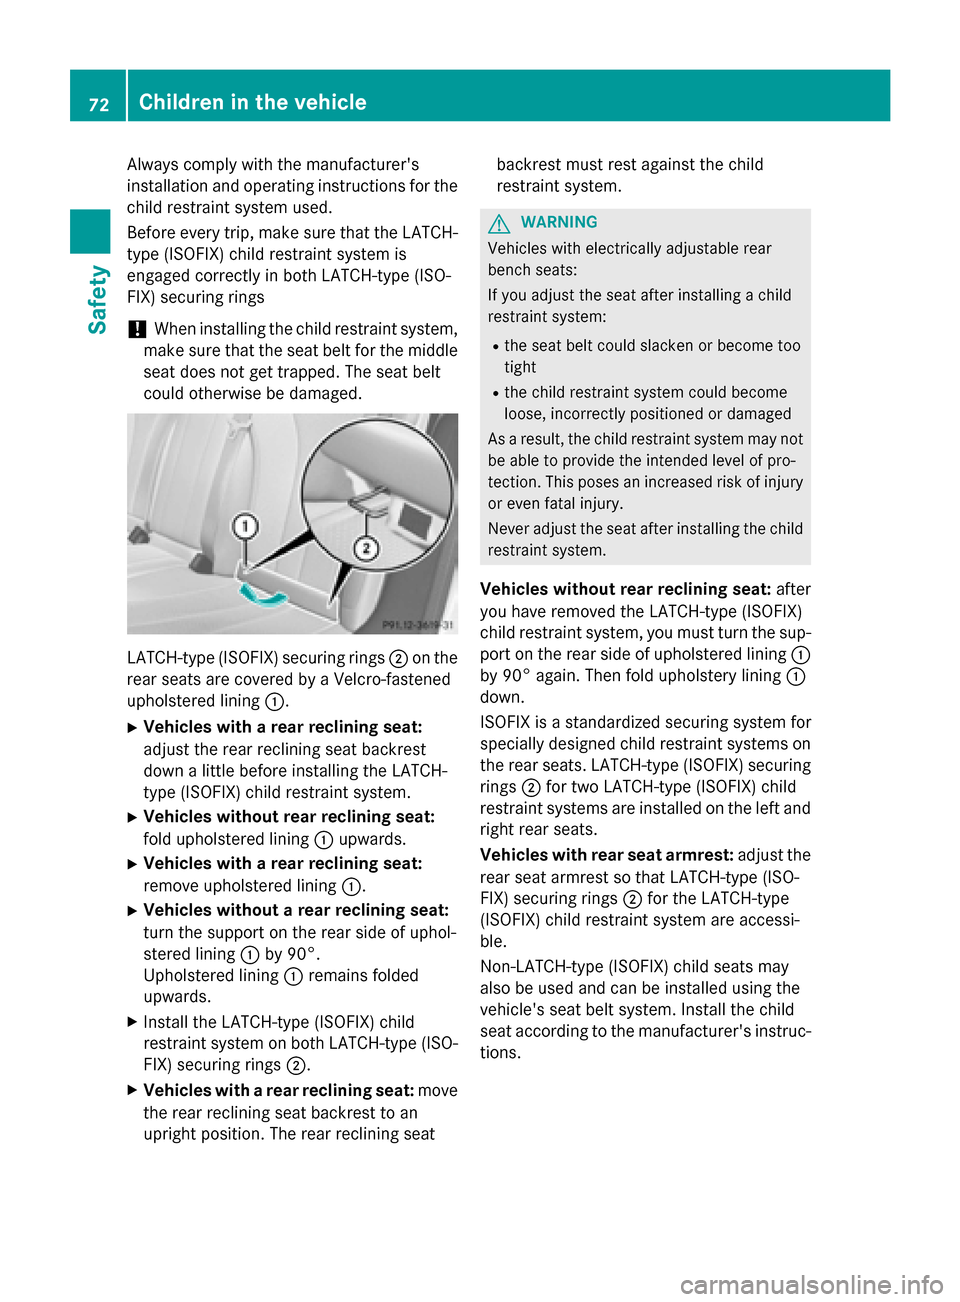
could otherwise be damaged. LATCH-type (ISOFIX) securing rings
;on the
rear seats are covered by a Velcro-fastened
upholstered lining :.
X Vehicles with a rear reclining seat:
adjust the rear reclining seat backrest
down a little before installing the LATCH-
type (ISOFIX) child restraint system.
X Vehicles without rear reclining seat:
fold upholstered lining :upwards.
X Vehicles with a rear reclining seat:
remove upholstered lining :.
X Vehicles without a rear reclining seat:
turn the support on the rear side of uphol-
stered lining :by 90°.
Upholstered lining :remains folded
upwards.
X Install the LATCH-type (ISOFIX) child
restraint system on both LATCH-type (ISO-
FIX) securing rings ;.
X Vehicles with a rear reclining seat: move
the rear reclining seat backrest to an
upright position. The rear reclining seat backrest must rest against the child
restraint system. G
WARNING
Vehicles with electrically adjustable rear
bench seats:
If you adjust the seat after installing a child
restraint system:
R the seat belt could slacken or become too
tight
R the child restraint system could become
loose, incorrectly positioned or damaged
As a result, the child restraint system may not
be able to provide the intended level of pro-
tection. This poses an increased risk of injury or even fatal injury.
Never adjust the seat after installing the child
restraint system.
Vehicles without rear reclining seat: after
you have removed the LATCH-type (ISOFIX)
child restraint system, you must turn the sup-
port on the rear side of upholstered lining :
by 90° again. Then fold upholstery lining :
down.
ISOFIX is a standardized securing system for
specially designed child restraint systems on
the rear seats. LATCH-type (ISOFIX) securing rings ;for two LATCH-type (ISOFIX) child
restraint systems are installed on the left and
right rear seats.
Vehicles with rear seat armrest: adjust the
rear seat armrest so that LATCH-type (ISO-
FIX) securing rings ;for the LATCH-type
(ISOFIX) child restraint system are accessi-
ble.
Non-LATCH-type (ISOFIX) child seats may
also be used and can be installed using the
vehicle's seat belt system. Install the child
seat according to the manufacturer's instruc- tions. 72
Children in the vehicleSafety
Page 129 of 502
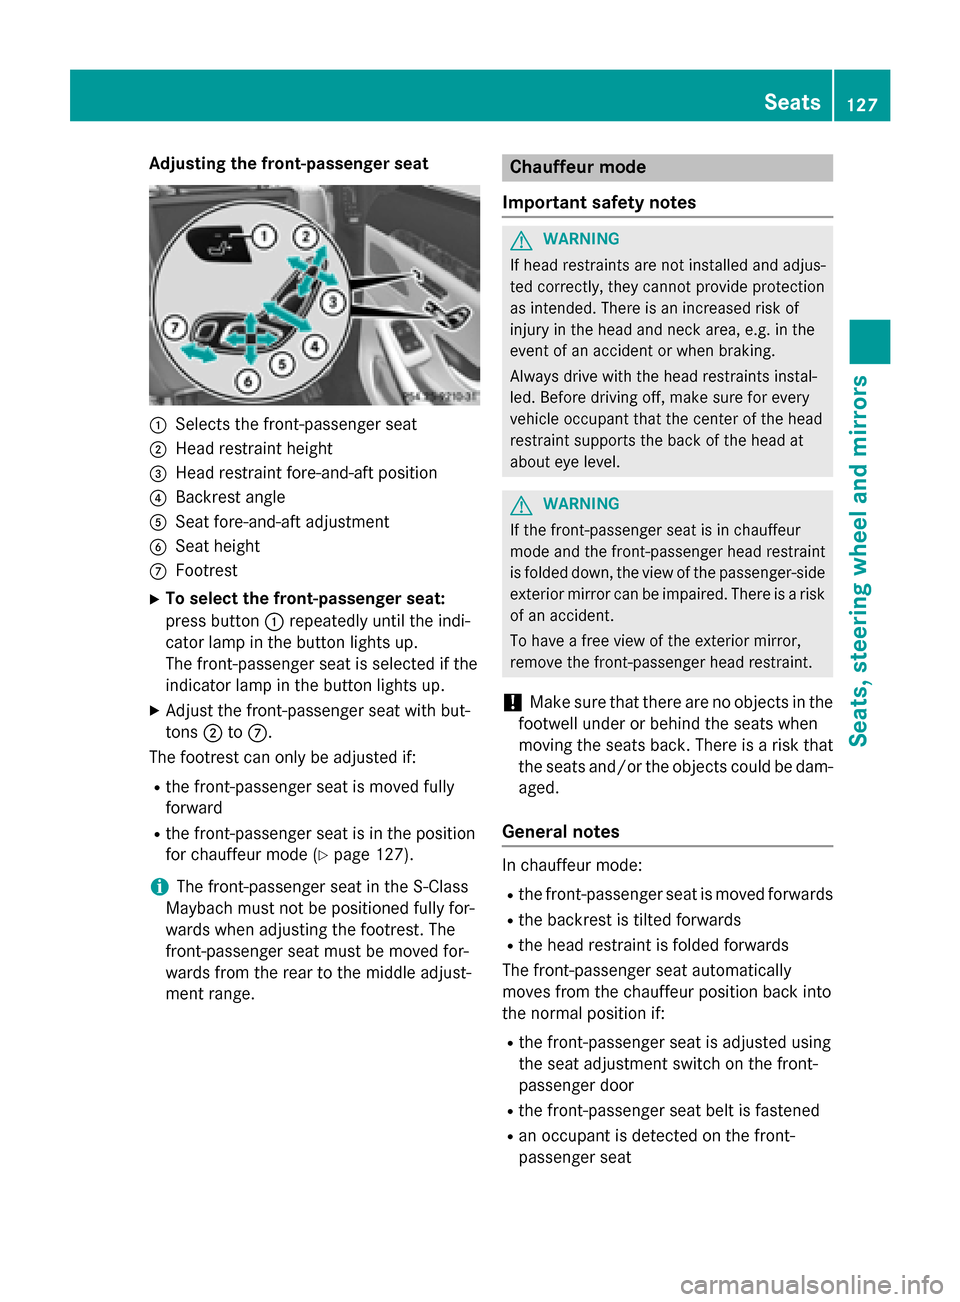
Adjusting the front-passenger seat
:
Selects the front-passenger seat
; Head restraint height
= Head restraint fore-and-aft position
? Backrest angle
A Seat fore-and-aft adjustment
B Seat height
C Footrest
X To select the front-passenger seat:
press button :repeatedly until the indi-
cator lamp in the button lights up.
The front-passenger seat is selected if the
indicator lamp in the button lights up.
X Adjust the front-passenger seat with but-
tons ;toC.
The footrest can only be adjusted if:
R the front-passenger seat is moved fully
forward
R the front-passenger seat is in the position
for chauffeur mode (Y page 127).
i The front-passenger seat in the S-Class
Maybach must not be positioned fully for-
wards when adjusting the footrest. The
front-passenger seat must be moved for-
wards from the rear to the middle adjust-
ment range. Chauffeur mode
Important safety notes G
WARNING
If head restraints are not installed and adjus-
ted correctly, they cannot provide protection
as intended. There is an increased risk of
injury in the head and neck area, e.g. in the
event of an accident or when braking.
Always drive with the head restraints instal-
led. Before driving off, make sure for every
vehicle occupant that the center of the head
restraint supports the back of the head at
about eye level. G
WARNING
If the front-passenger seat is in chauffeur
mode and the front-passenger head restraint
is folded down, the view of the passenger-side
exterior mirror can be impaired. There is a risk of an accident.
To have a free view of the exterior mirror,
remove the front-passenger head restraint.
! Make sure that there are no objects in the
footwell under or behind the seats when
moving the seats back. There is a risk that
the seats and/or the objects could be dam-
aged.
General notes In chauffeur mode:
R the front-passenger seat is moved forwards
R the backrest is tilted forwards
R the head restraint is folded forwards
The front-passenger seat automatically
moves from the chauffeur position back into
the normal position if:
R the front-passenger seat is adjusted using
the seat adjustment switch on the front-
passenger door
R the front-passenger seat belt is fastened
R an occupant is detected on the front-
passenger seat Seats
127Seats, steering wheel and mirrors Z
Page 130 of 502

R
the front-passenger seat head restraint is
inserted and the ignition is switched on
R the front-passenger seat backrest is moved
backwards or the seat is moved in a longi-
tudinal direction out of the chauffeur area
(Y page 130).
Positioning the front-passenger seat for
chauffeur mode General notes
Pay attention to the important safety notes
(Y
page 127). Adjust the seat for chauffeur
mode before the journey (Y page 128). Do not
remove the front-passenger seat head
restraint during the journey.
Adjusting from the rear compartment You can use the override button to disable
this function (Y page 75).
In order for the front-passenger seat to be
positioned in chauffeur mode:
R the SmartKey must be in the ignition lock
and in position 1or 2(Y page 189)
R the front-passenger seat may not be occu-
pied
R the front-passenger seat belt must not be
inserted into the buckle X
To select the front-passenger seat:
press button :repeatedly until the indi-
cator lamp in the button lights up.
The front-passenger seat is selected if the
indicator lamp in the button lights up.
X Press button ;forwards and hold it in this
position.
The seat moves forward.
The seat stops at the threshold of the area for chauffeur mode.
X Release button ;.
X Press and hold button ;again until the
front-passenger seat is in position for
chauffeur mode.
The head restraint on the front-passenger
seat folds forwards. The seat moves
forward.
The To
To view view the
theext.
ext. mirror,
mirror, adjust
adjust
front-passenger
front-passenger seat
seator
orremove
remove the
the
head
head restraint.
restraint. message appears in the
multifunction display (Y page 352).
i If the front-passenger seat is already at
the threshold to the area for the chauffeur
mode, the position for the chauffeur mode
is set immediately.
i The position for chauffeur mode can be
saved or set using the memory function of
the rear seat (Y page 145). For this the
indicator lamp on button :must be lit.
Adjusting from the driver's seat 128
SeatsSeats, steering
wheel and mirrors
Page 131 of 502
In order for the front-passenger seat to be
positioned in chauffeur mode:
R the SmartKey must be in the ignition lock
and in position 1or 2(Y page 189)
R the front-passenger seat may not be occu-
pied
R the front-passenger seat belt must not be
inserted into the buckle
X To select the front-passenger seat:
press button :repeatedly until the indi-
cator lamp in the button lights up.
The front-passenger seat is selected if the
indicator lamp in the button lights up.
X Press button ;forward and hold it.
The seat moves forward.
The seat stops at the threshold of the area for chauffeur mode.
X Release button ;.
X Press and hold button ;again until the
front-passenger seat is in position for
chauffeur mode.
The head restraint on the front-passenger
seat folds forwards. The seat moves
forward.
The To Toview
view the
theext.
ext. mirror,
mirror, adjust
adjust
front-passenger
front-passenger seat
seator
orremove
remove the
the
head
head restraint.
restraint. message appears in the
multifunction display (Y page 352).
i If the front-passenger seat is already at
the threshold to the area for the chauffeur
mode, the position for the chauffeur mode
is set immediately.
i The position for chauffeur mode cannot
be stored or set with the driver's seat mem-
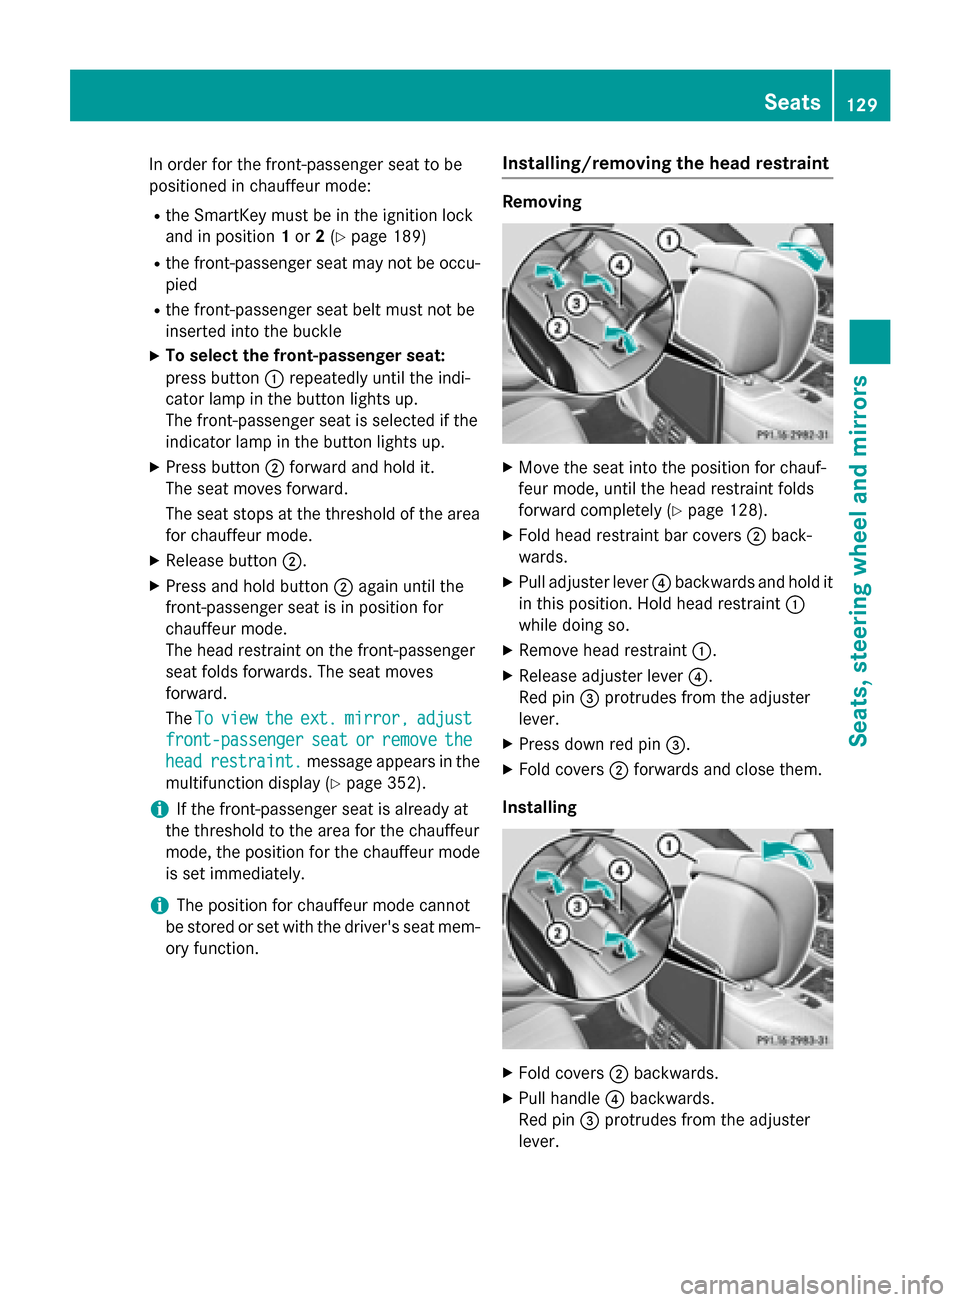
ory function. Installing/removing the head restraint Removing
X
Move the seat into the position for chauf-
feur mode, until the head restraint folds
forward completely (Y page 128).
X Fold head restraint bar covers ;back-
wards.
X Pull adjuster lever ?backwards and hold it
in this position. Hold head restraint :
while doing so.
X Remove head restraint :.
X Release adjuster lever ?.
Red pin =protrudes from the adjuster
lever.
X Press down red pin =.
X Fold covers ;forwards and close them.
Installing X
Fold covers ;backwards.
X Pull handle ?backwards.
Red pin =protrudes from the adjuster
lever. Seats
129Seats, steering wheel and mirrors Z
Page 133 of 502
to the area for chauffeur mode. The head
restraint folds into position.
i Further settings are available via the
memory adjustment buttons if the front-
passenger seat has been selected with but- ton :.
Adjusting from the front-passenger seat X Press any seat adjustment button.
The front-passenger seat moves into the
normal adjustment range at the threshold
of the area for chauffeur mode. The head
restraint folds into position.
Fully reclined position of the front-
passenger seat Adjusting
This function is only available on vehicles with
electrically adjustable rear seats.
You can move the front-passenger seat into a fully reclined position. The rear seat and front-
passenger seat then provide a continuous
surface.
To do so:
R move the seat cushion of the rear seat as
far back as possible in a longitudinal direc-
tion (Y page 123)
R move the front-passenger seat into posi-
tion for chauffeur mode (Y page 128)
R remove the front-passenger seat head
restraint (Y page 129)
R move the front-passenger seat so that the
backrest is in a fully reclined position
(Y page 122)
Exiting
To exit the fully reclined position:
R fold the backrest upright to a suitable posi-
tion
R install the head restraint (Y page 129) Adjusting the head restraints
Adjusting the front head restraints Important safety notes
G
WARNING
You could lose control of your vehicle if you do the following while driving:
R adjust the driver's seat, head restraint,
steering wheel or mirrors
R fasten the seat belt
There is a risk of an accident.
Adjust the driver's seat, head restraint, steer-
ing wheel and mirror and fasten your seat belt before starting the engine. G
WARNING
If head restraints are not installed and adjus-
ted correctly, they cannot provide protection
as intended. There is an increased risk of
injury in the head and neck area, e.g. in the
event of an accident or when braking.
Always drive with the head restraints instal-
led. Before driving off, make sure for every
vehicle occupant that the center of the head
restraint supports the back of the head at
about eye level.
General notes
Pay attention to the important safety notes
(Y page 121).
Do not rotate the head restraints of the front
and rear seats. Otherwise, you cannot adjust
the height and angle of the head restraints to
the correct position. Seats
131Seats, steering wheel and mirrors Z
Page 136 of 502
The supplementary cushion is attached to the
head restraint by three press studs.
Installing the supplementary cushion:
X Position the head restraint as far forwards
as possible (Y page 123).
X Hold supplementary cushion ;against
the head restraint and push press studs :
into the counterpieces.
Removing the supplementary cushion: X Position the head restraint as far forwards
as possible (Y page 123).
X Release press studs :and remove sup-
plementary cushion ;.
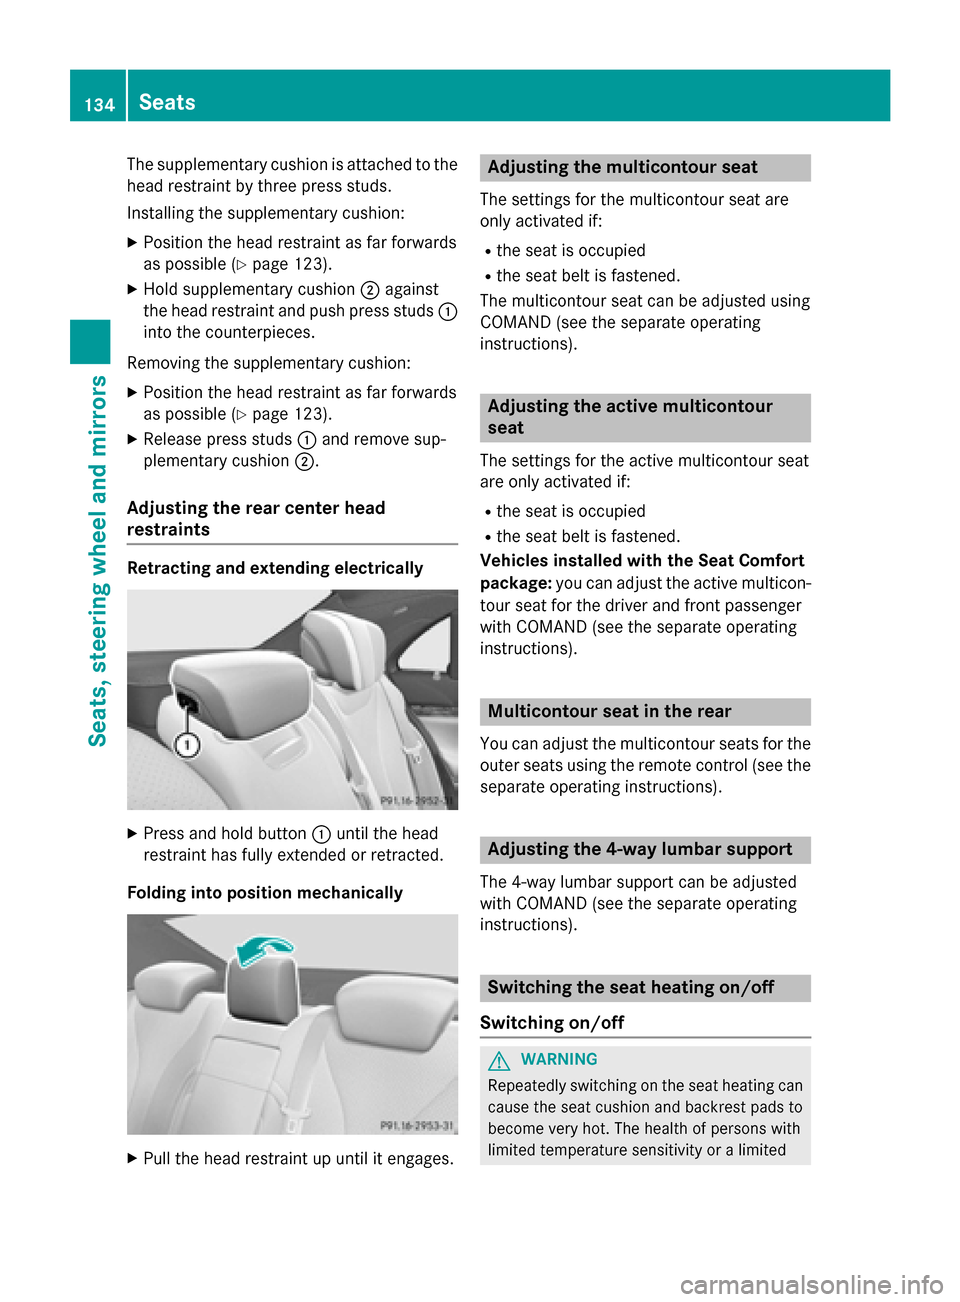
Adjusting the rear center head
restraints Retracting and extending electrically
X
Press and hold button :until the head
restraint has fully extended or retracted.
Folding into position mechanically X
Pull the head restraint up until it engages. Adjusting the multicontour seat
The settings for the multicontour seat are
only activated if:
R the seat is occupied
R the seat belt is fastened.
The multicontour seat can be adjusted using
COMAND (see the separate operating
instructions). Adjusting the active multicontour
seat
The settings for the active multicontour seat
are only activated if:
R the seat is occupied
R the seat belt is fastened.
Vehicles installed with the Seat Comfort
package: you can adjust the active multicon-
tour seat for the driver and front passenger
with COMAND (see the separate operating
instructions). Multicontour seat in the rear
You can adjust the multicontour seats for the
outer seats using the remote control (see the separate operating instructions). Adjusting the 4-way lumbar support
The 4-way lumbar support can be adjusted
with COMAND (see the separate operating
instructions). Switching the seat heating on/off
Switching on/off G
WARNING
Repeatedly switching on the seat heating can
cause the seat cushion and backrest pads to
become very hot. The health of persons with
limited temperature sensitivity or a limited 134
SeatsSeats, steering wheel and mirrors
Page 142 of 502

i
The steering wheel only moves upwards if
it has not already reached the upper stop.
The driver's seat only moves backwards if it is not already in the rearmost position.
Position of the steering wheel and the
driver's seat for driving The steering wheel and the driver's seat are
moved to the previously set position if:
R the driver's door is closed and you insert
the SmartKey into the ignition lock
R you close the driver's door when the igni-
tion is switched on
R you press the Start/Stop button once on
vehicles with KEYLESS-GO
i The steering wheel and the driver's seat
only return to the last set position when the
driving position is stored after seat or steer-
ing wheel adjustment (Y page 144).
The last position of the steering wheel or seat is stored if:
R the ignition is switched off
R the setting is stored with the memory func-
tion (Y page 144).
Crash-responsive EASY-EXIT feature If the crash-responsive EASY-EXIT feature is
triggered in an accident, the steering column
will move upwards when the driver's door is
opened or the SmartKey is removed from the ignition lock. This makes it easier to exit the
vehicle and rescue the occupants.
The crash-responsive EASY-EXIT feature is
only operational if the EASY-EXIT/ENTRY fea-
ture is activated in COMAND (see the sepa-
rate operating instructions). Mirrors
Rear-view mirror
X
Anti-glare mode: flick anti-glare lever :
forwards or back. Exterior mirrors
Important safety notes G
WARNING
You could lose control of your vehicle if you do the following while driving:
R adjust the driver's seat, head restraint,
steering wheel or mirrors
R fasten the seat belt
There is a risk of an accident.
Adjust the driver's seat, head restraint, steer-
ing wheel and mirror and fasten your seat belt before starting the engine. G
WARNING
The exterior mirror on the front-passenger
side reduces the size of the image. Visible
objects are actually closer than they appear.
This means that you could misjudge the dis-
tance from road users traveling behind, e.g.
when changing lane. There is a risk of an acci-
dent.
For this reason, always make sure of the
actual distance from the road users traveling
behind by glancing over your shoulder. 140
MirrorsSeats, steering wheel and mirrors
Page 224 of 502

Electric parking brake
General notes G
WARNING
If you leave children unsupervised in the vehi- cle, they could set it in motion by, for example:
R release the parking brake.
R shift the automatic transmission out of the
parking position P.
R start the engine.
In addition, they may operate vehicle equip-
ment and become trapped. There is a risk of
an accident and injury.
When leaving the vehicle, always take the
SmartKey with you and lock the vehicle. Never
leave children unsupervised in the vehicle.
The function of the electric parking brake is
dependent on the on-board voltage. If the on-
board voltage is low or there is a malfunction in the system, it may not be possible to apply
the released parking brake.
X If this is the case, only park the vehicle on
level ground and secure it to prevent it roll- ing away.
X Shift the automatic transmission to posi-
tion P.
It may not be possible to release an applied
parking brake if the on-board voltage is low or
there is a malfunction in the system. Contact a qualified specialist workshop.
The electric parking brake performs a func-
tion test at regular intervals while the engine
is switched off. The sounds that can be heard
while this is occurring are normal. Applying/releasing manually X
To engage: push handle :.
When the electric parking brake is applied, the red F(USA only) or !(Canada
only) indicator lamp lights up in the instru-
ment cluster.
The electric parking brake can also be
applied when the SmartKey is removed.
X To release: pull handle:.
The red F(USA only) or !(Canada
only) indicator lamp in the instrument clus-
ter goes out.
The electric parking brake can only be
released:
R when the SmartKey is in position 1or 2in
the ignition lock (Y page 189) or
R if the ignition was switched on using the
Start/Stop button.
Applying automatically The electric parking brake is automatically
applied when the transmission is in position
P
and:
R the engine is switched off or
R the driver is not wearing a seat belt and the
driver's door is opened.
To prevent the electric parking brake from
being automatically applied, pull handle :.222
ParkingDriving and parking