2015 MERCEDES-BENZ S-Class clock
[x] Cancel search: clockPage 101 of 502

X
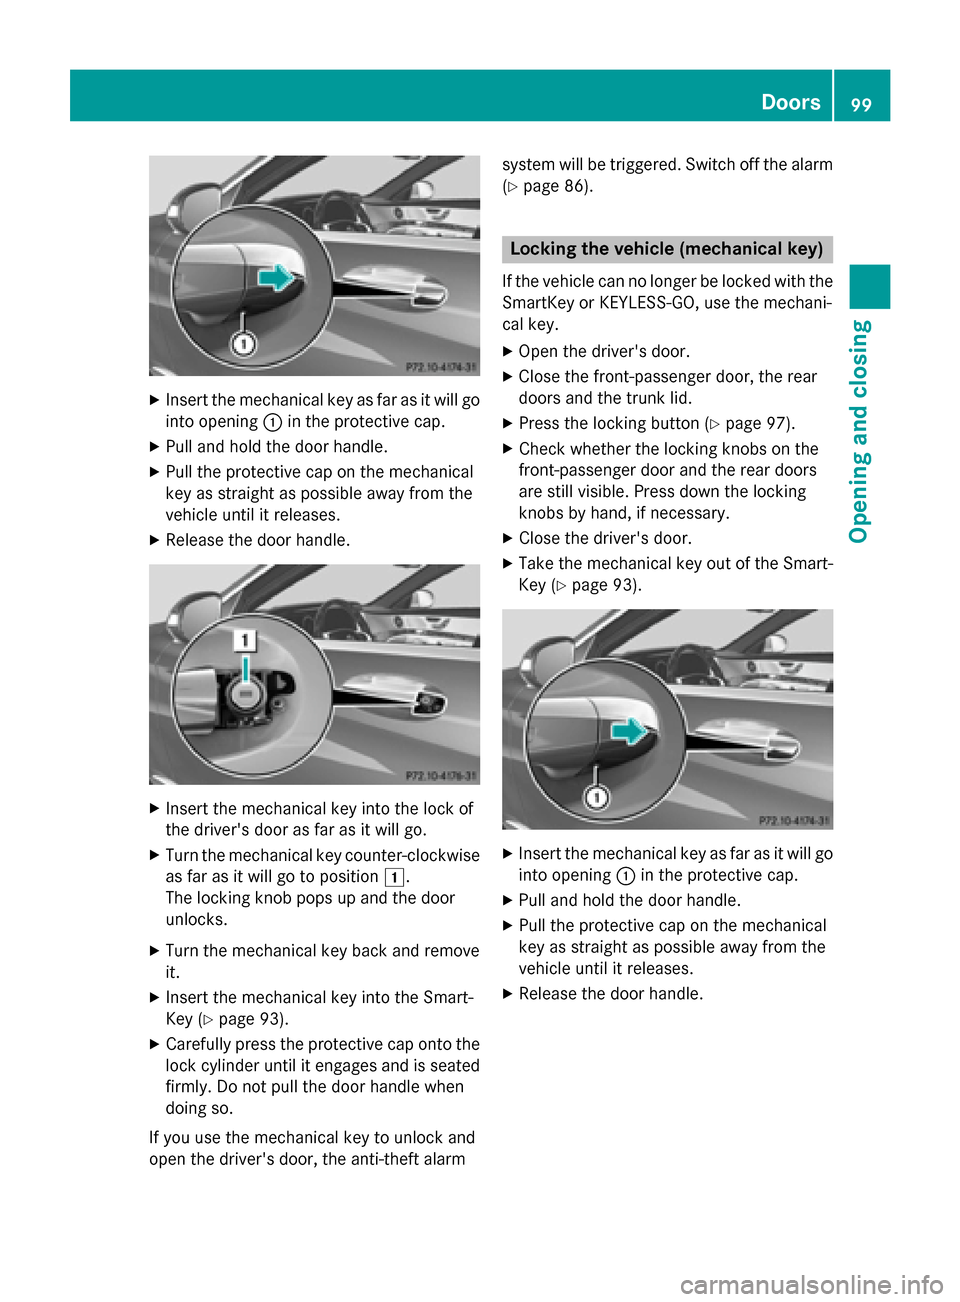
Insert the mechanical key as far as it will go
into opening :in the protective cap.
X Pull and hold the door handle.
X Pull the protective cap on the mechanical
key as straight as possible away from the
vehicle until it releases.
X Release the door handle. X
Insert the mechanical key into the lock of
the driver's door as far as it will go.
X Turn the mechanical key counter-clockwise
as far as it will go to position 1.
The locking knob pops up and the door
unlocks.
X Turn the mechanical key back and remove
it.
X Insert the mechanical key into the Smart-
Key (Y page 93).
X Carefully press the protective cap onto the
lock cylinder until it engages and is seated firmly. Do not pull the door handle when
doing so.
If you use the mechanical key to unlock and
open the driver's door, the anti-theft alarm system will be triggered. Switch off the alarm
(Y page 86). Locking the vehicle (mechanical key)
If the vehicle can no longer be locked with the SmartKey or KEYLESS-GO, use the mechani-
cal key.
X Open the driver's door.
X Close the front-passenger door, the rear
doors and the trunk lid.
X Press the locking button (Y page 97).
X Check whether the locking knobs on the
front-passenger door and the rear doors
are still visible. Press down the locking
knobs by hand, if necessary.
X Close the driver's door.
X Take the mechanical key out of the Smart-
Key (Y page 93). X
Insert the mechanical key as far as it will go
into opening :in the protective cap.
X Pull and hold the door handle.
X Pull the protective cap on the mechanical
key as straight as possible away from the
vehicle until it releases.
X Release the door handle. Doors
99Opening and closing Z
Page 102 of 502

X
Insert the mechanical key into the lock of
the driver's door as far as it will go.
X Turn the mechanical key clockwise as far as
it will go to position 1.
The locking knob drops down and the driv- er's door is locked.
X Turn the mechanical key back and remove
it.
X Make sure that the doors and the trunk lid
are locked.
X Insert the mechanical key into the Smart-
Key (Y page 93).
X Carefully press the protective cap onto the
lock cylinder until it engages and is seated
firmly. Do not pull the door handle when
doing so.
i If you lock the vehicle as described above,
the fuel filler flap is not locked. The anti-
theft alarm system is not armed. Trunk
Important safety notes
G
WARNING
If objects, luggage or loads are not secured or not secured sufficiently, they could slip, tip
over or be flung around and thereby hit vehicle
occupants. There is a risk of injury, particu-
larly in the event of sudden braking or a sud-
den change in direction.
Always store objects so that they cannot be
flung around. Secure objects, luggage or loads against slipping or tipping before the
journey.
! The trunk lid swings upwards when
opened. Therefore, make sure that there is
sufficient clearance above the trunk lid.
i You can limit the opening angle of the
trunk lid in COMAND; see the separate
operating instructions.
i The opening dimensions of the trunk lid
can be found in the "Vehicle data" section
(Y page 495).
Do not leave the SmartKey in the trunk. You
could otherwise lock yourself out.
You should preferably place luggage or loads
in the trunk. Observe the loading guidelines
(Y page 372). Obstacle recognition with trunk lid
reversing feature
On vehicles with trunk lid remote closing fea-
ture, the trunk lid is equipped with automatic obstacle recognition with reversing feature. If a solid object blocks or restricts the trunk lid
when automatically opening or closing, this
procedure is stopped. If the trunk lid is stop-
ped during the closing procedure, it will open
again automatically. The automatic obstacle
recognition with reversing feature is only an
aid. It is not a substitute for your attentive-
ness when opening and closing the trunk lid. G
WARNING
The reversing feature does not react:
R to soft, light and thin objects, e.g. small fin-
gers
R over the last 1/3 in (8 mm) of the closing
movement
This means that the reversing feature cannot
prevent someone being trapped in these sit-
uations. There is a risk of injury.
Make sure that no body parts are in close
proximity during the closing procedure. 100
TrunkOpening and closing
Page 107 of 502

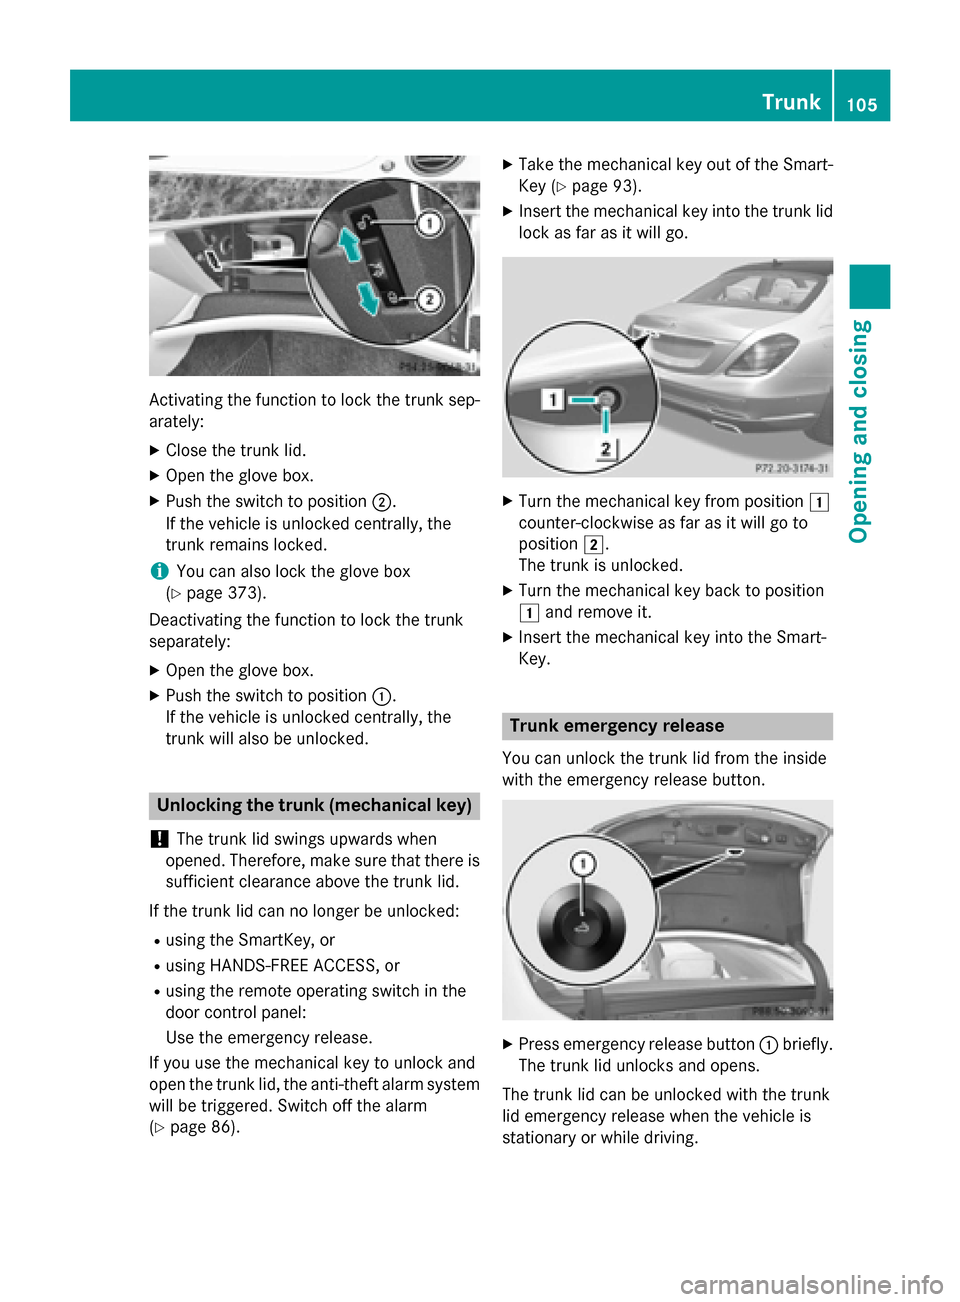
Activating the function to lock the trunk sep-
arately:
X Close the trunk lid.
X Open the glove box.
X Push the switch to position ;.
If the vehicle is unlocked centrally, the
trunk remains locked.
i You can also lock the glove box
(Y page 373).
Deactivating the function to lock the trunk
separately:
X Open the glove box.
X Push the switch to position :.
If the vehicle is unlocked centrally, the
trunk will also be unlocked. Unlocking the trunk (mechanical key)
! The trunk lid swings upwards when
opened. Therefore, make sure that there is sufficient clearance above the trunk lid.
If the trunk lid can no longer be unlocked: R using the SmartKey, or
R using HANDS-FREE ACCESS, or
R using the remote operating switch in the
door control panel:
Use the emergency release.
If you use the mechanical key to unlock and
open the trunk lid, the anti-theft alarm system
will be triggered. Switch off the alarm
(Y page 86). X
Take the mechanical key out of the Smart-
Key (Y page 93).
X Insert the mechanical key into the trunk lid
lock as far as it will go. X
Turn the mechanical key from position 1
counter-clockwise as far as it will go to
position 2.
The trunk is unlocked.
X Turn the mechanical key back to position
1 and remove it.
X Insert the mechanical key into the Smart-
Key. Trunk emergency release
You can unlock the trunk lid from the inside
with the emergency release button. X
Press emergency release button :briefly.
The trunk lid unlocks and opens.
The trunk lid can be unlocked with the trunk
lid emergency release when the vehicle is
stationary or while driving. Trunk
105Opening and closing Z
Page 186 of 502

The colors of the indicator lamps in the rocker
switch have the following meanings:
R blue: cooling activated
R red: heating activated
R yellow: departure time preselected
X To activate/deactivate "Immediate pre-
entry climate control" : press rocker
switch :up or down.
The blue or red indicator lamp above the
rocker switch lights up or goes out. Setting the air vents
Important safety notes
G
WARNING
Very hot or very cold air can flow from the air vents. This could result in burns or frostbite in the immediate vicinity of the air vents. There
is a risk of injury.
Make sure that all vehicle occupants always
maintain a sufficient distance to the air out-
lets. If necessary, redirect the airflow to
another area of the vehicle interior.
In order to ensure the direct flow of fresh air
through the air vents into the vehicle interior,
please observe the following notes:
R keep the air inlet between the windshield
and the hood free of blockages, such as ice, snow or leaves.
R never cover the air vents or air intake grilles
in the vehicle interior. Setting the center air vents
:
Fixed center air vent
; Center air vent, right
= Center vent control, right
? Center vent control, left
A Center air vent, left
X To open/close: press control=or?.
The control pops out.
X Turn control =or? counter-clockwise or
clockwise.
X To adjust the air direction: hold rear air
vent ;orA by the middle fin and move up
or down or to the left or right. Setting the side air vents
:
Side window defroster vent
; Side air vent
= Thumbwheel for left side air vent 184
Setting the air ventsClimate control
Page 187 of 502

X
To open/close: press control=.
The control pops out.
X Turn control =counter-clockwise or
clockwise.
X To adjust the air direction: hold side air
vent ;by the middle fin and move it up or
down or to the left or right. Setting the glove box air vent
! Close the air vent when heating the vehi-
cle.
At high outside temperatures, open the air
vent and activate the "cooling with air dehu- midification" function. Otherwise, temper-
ature-sensitive items stored in the glove
box could be damaged.
When the climate control system is activated, the glove box can be ventilated, for instance
to cool its contents. The level of airflow
depends on the airflow and air distribution
settings. :
Air vent thumbwheel
; Air vent
X To open/close: turn thumbwheel :to the
left or right. Setting the rear-compartment air
vents
Setting the center vents in the rear com-
partment :
Rear-compartment air vent, left
; Rear-compartment air vent, right
= Rear-compartment air vent control, right
? Rear control panel
A Rear-compartment air vent control, left
Vehicles with rear-compartment climate con-
trol
X To open/close: press control=orA.
The control pops out.
X Turn control =orA counter-clockwise or
clockwise.
X To adjust the air direction: hold the rear
air vent :or; by the middle fin and move
up or down or to the left or right. Setting the air vents
185Climate control Z
Page 188 of 502

Vehicles without rear-compartment climate
control (only Sedans and vehicles with an
extended wheelbase):
X To open/close: press control=.
The control pops out.
X Turn control =counter-clockwise or
clockwise.
X To adjust the air direction: hold rear air
vent :or; by the middle fin and move up
or down or to the left or right.
Setting the B-pillar air vent X
To open/close: turn thumbwheel ;to the
left or right.
X To adjust the air direction: hold B-pillar
air vent :by the middle fin handle and
move up or down or to the left or right. 186
Setting the air ventsClimate control
Page 209 of 502

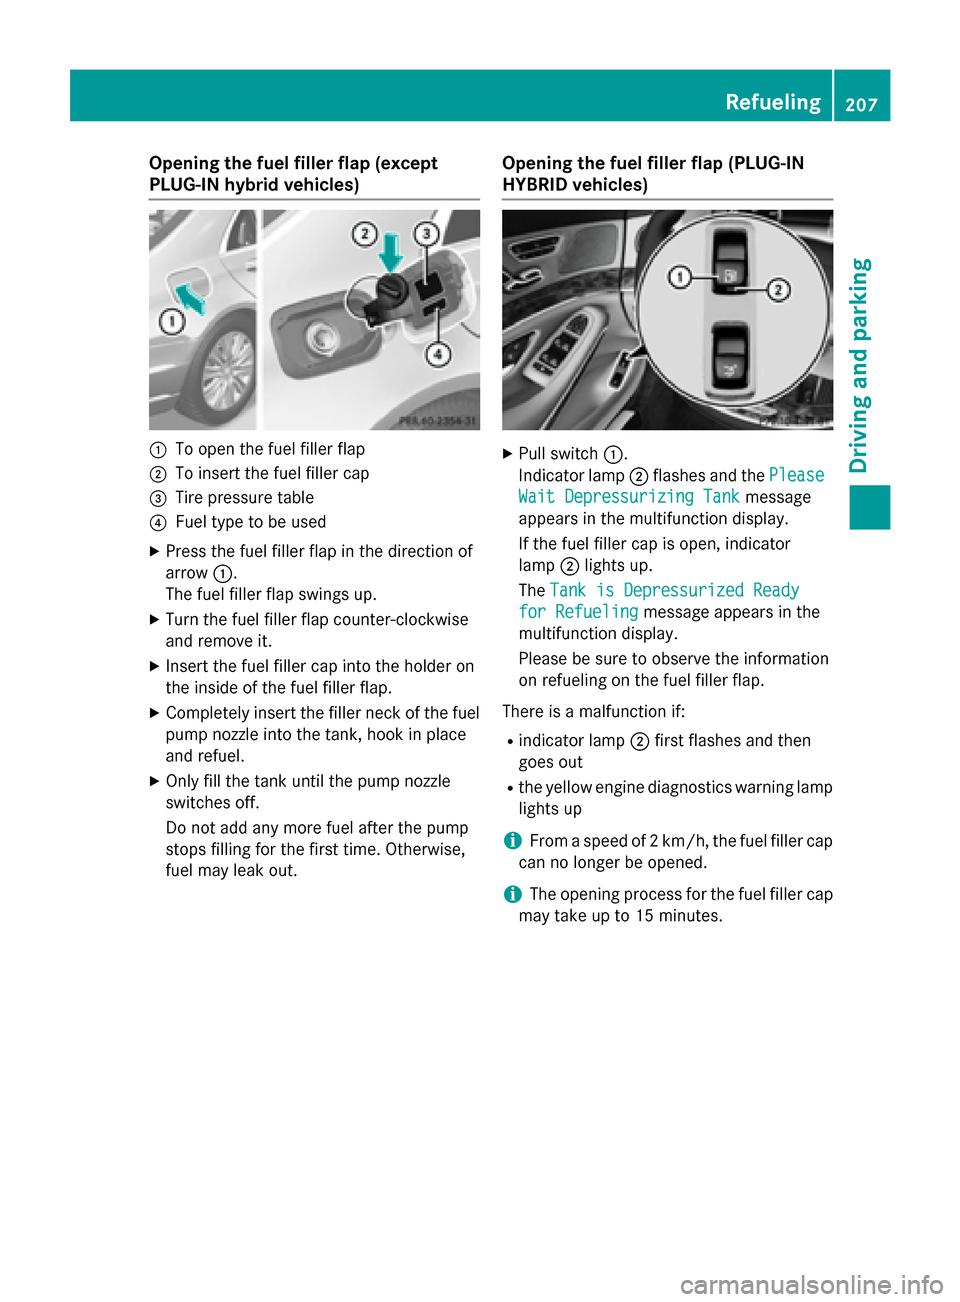
Opening the fuel filler flap (except
PLUG-IN hybrid vehicles)
:
To open the fuel filler flap
; To insert the fuel filler cap
= Tire pressure table
? Fuel type to be used
X Press the fuel filler flap in the direction of
arrow :.
The fuel filler flap swings up.
X Turn the fuel filler flap counter-clockwise
and remove it.
X Insert the fuel filler cap into the holder on
the inside of the fuel filler flap.
X Completely insert the filler neck of the fuel
pump nozzle into the tank, hook in place
and refuel.
X Only fill the tank until the pump nozzle
switches off.
Do not add any more fuel after the pump
stops filling for the first time. Otherwise,
fuel may leak out. Opening the fuel filler flap (PLUG-IN
HYBRID vehicles) X
Pull switch :.
Indicator lamp ;flashes and the Please Please
Wait Depressurizing Tank
Wait Depressurizing Tank message
appears in the multifunction display.
If the fuel filler cap is open, indicator
lamp ;lights up.
The Tank is Depressurized Ready Tank is Depressurized Ready
for Refueling
for Refueling message appears in the
multifunction display.
Please be sure to observe the information
on refueling on the fuel filler flap.
There is a malfunction if: R indicator lamp ;first flashes and then
goes out
R the yellow engine diagnostics warning lamp
lights up
i From a speed of 2 km/h, the fuel filler cap
can no longer be opened.
i The opening process for the fuel filler cap
may take up to 15 minutes. Refueling
207Driving and parking Z
Page 210 of 502

:
To insert the fuel filler cap
; Tire pressure table
= Fuel type to be used
X Turn the fuel filler flap counter-clockwise
and remove it.
X Insert the fuel filler cap into the holder on
the inside of the fuel filler flap.
X Completely insert the filler neck of the fuel
pump nozzle into the tank, hook in place
and refuel.
X Only fill the tank until the pump nozzle
switches off.
Do not add any more fuel after the pump
stops filling for the first time. Otherwise,
fuel may leak out.
Closing the fuel filler flap X
Replace the cap on the filler neck and turn
clockwise until it engages audibly.
X Close the fuel filler flap.
If you drive at speeds above 2 km/hw ith the
fuel filler flap open, the Tankklappe
Tankklappe offen offen
(Fuel filler flap open)
(Fuel filler flap open) message is
shown in the multifunction display.
i Close the fuel filler flap before locking the
vehicle.
i For further information on warning and
indicator lamps in the instrument cluster,
see (Y page 363).
i If you are driving with the fuel filler cap
open, the 8reserve fuel warning lamp
flashes. A message appears in the multi-
function display (Y page 339). In addition, the
;Check Engine warning
lamp may light up (Y page 363).
For further information on warning and indi- cator lamps in the instrument cluster, see
(Y page 363). 208
RefuelingDriving and parking