2015 MERCEDES-BENZ S-Class isofix
[x] Cancel search: isofixPage 9 of 502

Charging the high-voltage battery
(important safety notes) ...................209
Chauffeur mode
Display message ............................ 352
Fully reclined position .................... 131
General notes ................................ 127
Installing the head restraint ........... 129
Moving front-passenger seat into
the chauffeur position .................... 128
Moving the front-passenger seat
into the normal position ................. 130
Removing the head restraint .......... 129
Child
Restraint system .............................. 70
Child seat
Forward-facing restraint system ...... 74
LATCH-type (ISOFIX) child seat
anchors ............................................ 71
On the front-passenger sea t............ 74
Rearward-facing restraint system .... 74
Top Tether ....................................... 73
Child-proof locks
Important safety notes .................... 74
Rear doors ....................................... 75
Children
In the vehicle ................................... 69
Special seat belt retractor ............... 69
Cigarette lighter ................................ 383
Cleaning
Mirror turn signal ........................... 415
Climate control
Automatic climate control ............. 165
Controlling automaticall y............... 171
Cooling with air dehumidification .. 170
Defrosting the windows ................. 176
Defrosting the windshield .............. 175
ECO start/stop function ................ 169
General notes ................................ 164
Immediate pre-entry climate con-
trol ................................................. 183
Indicator lamp ................................ 171
Ionization ....................................... 180
Notes on using the automatic cli-
mate control .................................. 169
Overview of systems ...................... 164
Perfume atomizer .......................... 178 Pre-entry climate control at
departure time (REMOTE CLI-
MATE CONTROL) ........................... 182
Pre-entry climate control via key ... 180
Problem with the rear window
defroster ........................................ 177
Problems with cooling with air
dehumidification ............................ 171
Rear control panel ......................... 165
Refrigerant ..................................... 494
Refrigerant filling capacity ............. 495
Setting the air distribution ............. 174
Setting the air vents ...................... 184
Setting the airflow ......................... 174
Setting the climate mod e............... 173
Setting the temperature ................ 173
Switching air-recirculation mode
on/of f............................................ 177
Switching on/of f........................... 169
Switching residual heat on/off ...... 177
Switching the rear window
defroster on/of f............................ 176
Switching the synchronization
function on and off ........................ 175
Climate control system
Climate control .............................. 169
Cockpit
Overview .......................................... 34
COLLISION PREVENTION ASSIST
PLUS
Activating/deactivating ................. 309
Display message ............................ 325
Operation/note s.............................. 79
COMAND display
Cleaning ......................................... 417
Combination switch .......................... 152
Consumption statistics (on-board
computer) .......................................... 300
Convenience closing feature ............ 108
Convenience opening feature .......... 107
Coolant (engine)
Checking the level ......................... 408
Display message ............................ 336
Displaying the temperature (on-
board computer) ............................ 307
Filling capacity ............................... 493
Important safety notes .................. 493
Temperature gaug e........................ 294 Index
7
Page 14 of 502

Charging (mains socket) ................ 212
Charging (wallbox) ........................
.215
Charging cable warming ................ 211
Cruise range .................................. 211
Energy consumption ..................... .211
General notes .................................. 48
Method of operation ..................... .210
Outside temperatures .................... 211
Overvoltage protection .................. 212
Problems with the charging proc-
ess ................................................. 218
Terms of use .................................. 211
Vehicle fire ....................................... 48
Hill start assist .................................. 192
HOLD function
Activating ....................................... 243
Deactivating ................................... 243
Display message ............................ 346
Function/notes ............................ .242
Hood
Closing .......................................... .405
Display message ............................ 352
Important safety notes .................. 404
Opening ......................................... 404
Horn ...................................................... 34
Hybrid drive
Hybrid menu (on-board com-
puter) ............................................. 310
Hybrid system
Automatic deactivation .................... 46
Danger of electric shock .................. 46
Display message ............................ 340
High-voltage battery ........................ 48
Important safety notes .................... 46
Manual deactivatio n .........................47
Opening the hood ............................48
Warning lamp ................................. 366
Hybrid vehicles
Important safety notes .................... 46
Hydroplaning .....................................2 28I
Ignition lock see Key positions
Immobilizer .......................................... 86 Indicator and warning lamps
COLLISION PREVENTION ASSIST
PLUS .............................................. 367
Indicator lamps
see Warning and indicator lamps
Indicators
see Turn signals
Instrument cluster
Overview .......................................... 35
Warning and indicator lamps ........... 36
Instrument cluster lighting ................ 37
Interior lighting
Control .......................................... .155
Emergency lighting ........................ 156
Overview ........................................ 155
Reading lamp ................................. 155 J
Jack Using ............................................. 467
Jump starting (engine) ......................432 K
Key positions SmartKey ....................................... 189
Start/Stop button .......................... 189
KEYLESS-GO
Convenience closing feature .......... 108
Deactivation ..................................... 91
Locking ............................................ 91
Unlocking ......................................... 91
Kickdown
Driving tips ................................... .200
Knee bag .............................................. 58 L
Lamps see Warning and indicator lamps
Lane Keeping Assist
see Active Lane Keeping Assist
LATCH-type (ISOFIX) child seat
anchors ................................................ 71
License plate lamp (display mes-
sage) ................................................... 334
Light function, active
Display message ............................ 335 12
Index
Page 55 of 502

fail to deploy when necessary. This poses an
increased risk of injury or even fatal injury.
Never modify the seat belts, Emergency Ten-
sioning Devices, belt anchorages or inertia
reels. Make sure that the seat belts are
undamaged, not worn out and clean. Follow-
ing an accident, have the seat belts checked
immediately at a qualified specialist work-
shop.
Only use seat belts that have been approved
for your vehicle by Mercedes-Benz. Any such
modifications could invalidate the vehicle's
general operating permit.
Proper use of the seat belts Observe the safety notes on the seat belt
(Y page 51).
All vehicle occupants must be wearing the
seat belt correctly before beginning the jour-
ney. Also make sure that all vehicle occu-
pants are always wearing the seat belt cor-
rectly while the vehicle is in motion.
When fastening the seat belt, always make
sure that:
R the seat belt tongue is only inserted to the
belt buckle belonging to that seat.
R the seat belt is tight across your body.
Avoid wearing bulky clothing, e.g. a winter
coat.
R the seat belt is not twisted.
Only then can the forces which occur be
distributed over the area of the belt.
R the shoulder section of the belt is always
routed across the center of your shoulder.
The shoulder section of the belt must not
come into contact with your neck or be
routed under your arm. Where possible,
adjust the seat belt to the appropriate
height.
R the lap belt passes tightly and as low down
as possible across your lap.
The lap belt must always be routed across
your hip joints and not across your abdo-
men. This applies particularly to pregnant women. If necessary, push the lap belt
down to your hip joint and pull it tight using
the shoulder section of the belt.
R the seat belt is not routed across sharp,
pointed or fragile objects.
If you have such items located on or in your clothing, e.g. pens, keys or eyeglasses,
store these in a suitable place.
R only one person is using a seat belt at a
time.
Infants and children must never travel sit-
ting on the lap of a vehicle occupant. In the
event of an accident, they could be crushed
between the vehicle occupant and seat
belt.
R objects are never secured with a seat belt if
the seat belt is also being used by one of the vehicle's occupants.
Seat belts are only intended to secure and
restrain vehicle occupants. Always observe
the "Loading guidelines" for securing objects,
luggage or loads (Y page 372).
Rear beltbags i
Observe the "Important safety notes" sec-
tion (Y page 56).
Depending on the vehicle's equipment, the
outer rear seat belts are equipped with a belt bag. This can be seen from the BELTBAG iden-
tification on the rear seat belt. G
WARNING
In an accident, the belt bag may damage a
non-approved child restraint system. As a
result, the child restraint system may not be
able to provide the intended level of protec-
tion. This poses an increased risk of injury or
even fatal injury.
For this reason, a child restraint system with
an integrated seat belt should always be
installed using LATCH-type (ISOFIX). In a vehi- cle with optional belt bags for the rear seats,
you should only ever use a booster seat with
integrated backrest that has been tested and
approved by Mercedes-Benz in conjunction Occupant safety
53Safety
Z
Page 73 of 502

G
WARNING
Child restraint systems or their securing sys-
tems which have been damaged or subjected to a load in an accident can no longer protect
as intended. The child cannot then be
restrained in the event of an accident, heavy
braking or sudden changes of direction. There is an increased risk of injury, possibly even
fatal.
Replace child restraint systems which have
been damaged or subjected to a load in an
accident as soon as possible. Have the secur-
ing systems on the child restraint system
checked at a qualified specialist workshop,
before you install a child restraint system
again.
The securing systems of child restraint sys-
tems are:
R the seat belt system
R the LATCH-type (ISOFIX) securing rings
R the Top Tether anchorages
If it is absolutely necessary to carry a child on the front-passenger seat, be sure to observe
the information on the "Occupant Classifica-
tion System (OCS)" (Y page 59). There you
will also find information on deactivating the
front-passenger front air bag.
All child restraint systems must meet the fol- lowing standards:
R U.S. Federal Motor Vehicle Safety Stand-
ards 213 and 225
R Canadian Motor Vehicle Safety Standards
213 and 210.2
Confirmation that the child restraint system
corresponds to the standards can be found
on an instruction label on the child restraint
system. This confirmation can also be found
in the installation instructions that are inclu-
ded with the child restraint system.
Observe the warning labels in the vehicle inte-
rior and on the child restraint system. Vehicles with seat belt extenders:
when
securing a child in a child restraint system on
a rear seat, observe the following instruc-
tions:
R make sure that the seat belt on the child
restraint system is fastened according to
the manufacturer's installation instruc-
tions for the child restraint system.
R for child restraint systems with a belt
clamp: engage the belt tongue in the buckle
before you tighten the seat belt using the
belt clamp.
Vehicles with a rear reclining seat: when
installing a child restraint system, move the
rear reclining seat backrest to an almost ver-
tical position. The rear reclining seat backrest
must rest against the child restraint system.
Observe the notes on the cushion air bag
(Y page 59).
Vehicles with belt bags: only use a child
restraint system which has been approved by
Mercedes-Benz. Always observe the instruc-
tions and safety notes on belt bags for the
outer seat belts in the rear (Y page 53). LATCH-type (ISOFIX) child seat secur-
ing system G
WARNING
LATCH-type (ISOFIX) child restraint systems
do not offer sufficient protective effect for
children whose weight is greater than 48 lbs
(22 kg) who are secured using the safety belt integrated in the child restraint system. In the
event of an accident, a child might not be
restrained correctly. This poses an increased
risk of injury or even fatal injury.
If the child weighs more than 48 lbs (22 kg),
only use LATCH-type (ISOFIX) child restraint
systems with which the child is also secured
with the vehicle seat belt. Also secure the
child restraint system with the Top Tether
belt, if available. Children in the vehicle
71Safety Z
Page 74 of 502

Always comply with the manufacturer's
installation and operating instructions for the child restraint system used.
Before every trip, make sure that the LATCH-
type (ISOFIX) child restraint system is
engaged correctly in both LATCH-type (ISO-
FIX) securing rings
! When installing the child restraint system,
make sure that the seat belt for the middle seat does not get trapped. The seat belt
could otherwise be damaged. LATCH-type (ISOFIX) securing rings
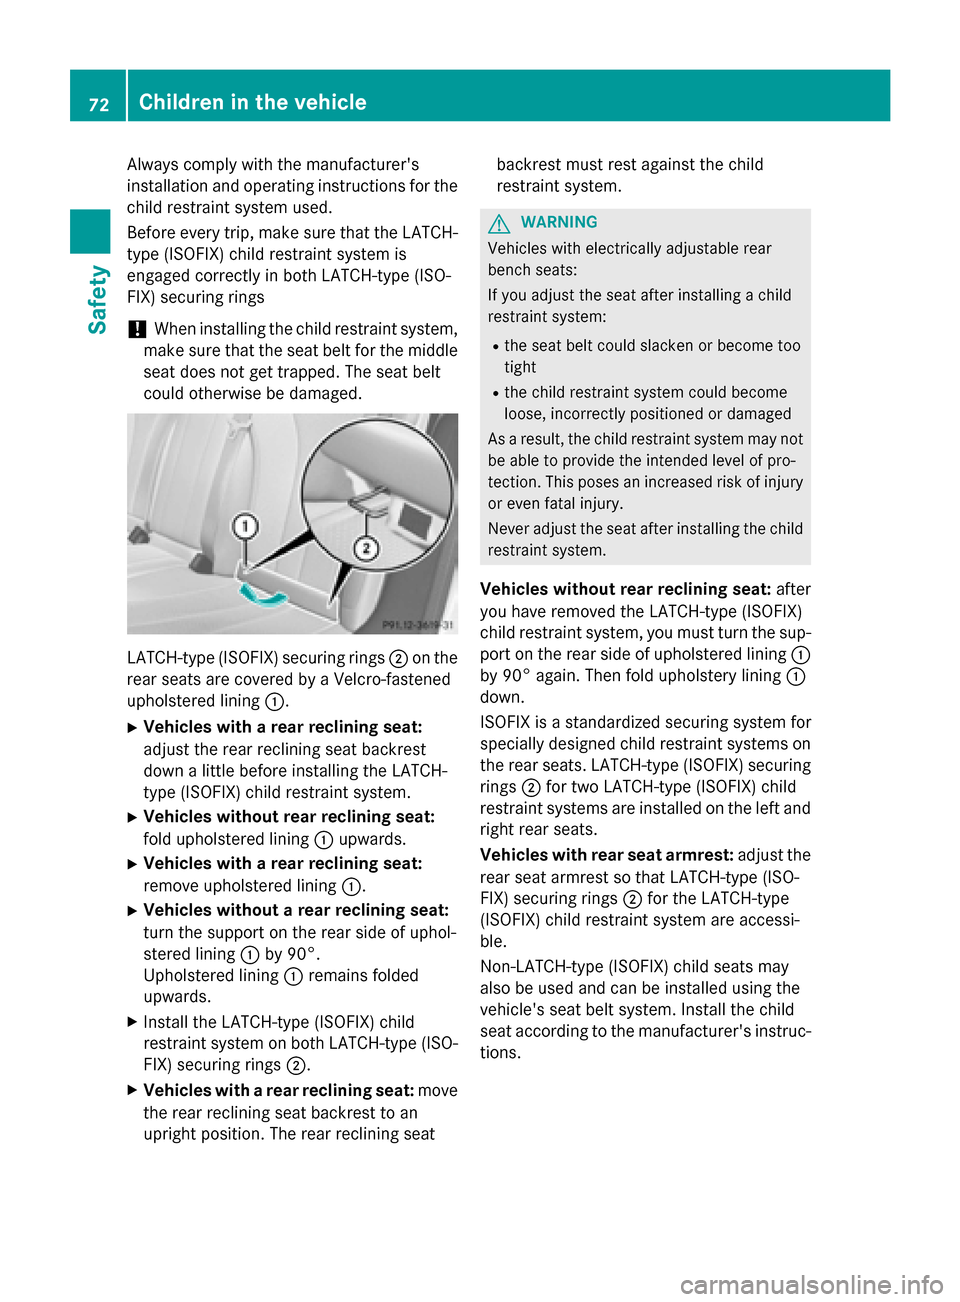
;on the
rear seats are covered by a Velcro-fastened
upholstered lining :.
X Vehicles with a rear reclining seat:
adjust the rear reclining seat backrest
down a little before installing the LATCH-
type (ISOFIX) child restraint system.
X Vehicles without rear reclining seat:
fold upholstered lining :upwards.
X Vehicles with a rear reclining seat:
remove upholstered lining :.
X Vehicles without a rear reclining seat:
turn the support on the rear side of uphol-
stered lining :by 90°.
Upholstered lining :remains folded
upwards.
X Install the LATCH-type (ISOFIX) child
restraint system on both LATCH-type (ISO-
FIX) securing rings ;.
X Vehicles with a rear reclining seat: move
the rear reclining seat backrest to an
upright position. The rear reclining seat backrest must rest against the child
restraint system. G
WARNING
Vehicles with electrically adjustable rear
bench seats:
If you adjust the seat after installing a child
restraint system:
R the seat belt could slacken or become too
tight
R the child restraint system could become
loose, incorrectly positioned or damaged
As a result, the child restraint system may not
be able to provide the intended level of pro-
tection. This poses an increased risk of injury or even fatal injury.
Never adjust the seat after installing the child
restraint system.
Vehicles without rear reclining seat: after
you have removed the LATCH-type (ISOFIX)
child restraint system, you must turn the sup-
port on the rear side of upholstered lining :
by 90° again. Then fold upholstery lining :
down.
ISOFIX is a standardized securing system for
specially designed child restraint systems on
the rear seats. LATCH-type (ISOFIX) securing rings ;for two LATCH-type (ISOFIX) child
restraint systems are installed on the left and
right rear seats.
Vehicles with rear seat armrest: adjust the
rear seat armrest so that LATCH-type (ISO-
FIX) securing rings ;for the LATCH-type
(ISOFIX) child restraint system are accessi-
ble.
Non-LATCH-type (ISOFIX) child seats may
also be used and can be installed using the
vehicle's seat belt system. Install the child
seat according to the manufacturer's instruc- tions. 72
Children in the vehicleSafety
Page 75 of 502

Top Tether
Introduction Top Tether provides an additional connection
between the child restraint system secured
with a LATCH-type (ISOFIX) child seat mount
and the vehicle. This helps reduce the risk of
injury even further. If the child restraint sys-
tem is equipped with a Top Tether belt, this
should always be used.
Important safety notes G
WARNING
If the rear seat backrests are not locked, they
could fold forwards in the event of an acci-
dent, heavy braking or sudden changes of
direction. As a result, child restraint systems
cannot perform their intended protective
function. Rear seat backrests that are not
locked can also cause additional injuries, e.g. in the event of an accident. This poses an
increased risk of injury or even fatal injury.
Always lock rear seat backrests after instal-
ling a Top Tether belt. Observe the lock veri-
fication indicator. Adjust the rear seat backr-
ests so that they are in an upright position. G
WARNING
Vehicles with electrically adjustable rear
bench seats:
If you adjust the seat after installing a child
restraint system:
R the seat belt could slacken or become too
tight
R the child restraint system could become
loose, incorrectly positioned or damaged
As a result, the child restraint system may not
be able to provide the intended level of pro-
tection. This poses an increased risk of injury or even fatal injury.
Never adjust the seat after installing the child
restraint system.
If the rear seat backrest is not engaged and
locked, this will be shown in the multifunction display in the instrument cluster. A warning
tone also sounds.
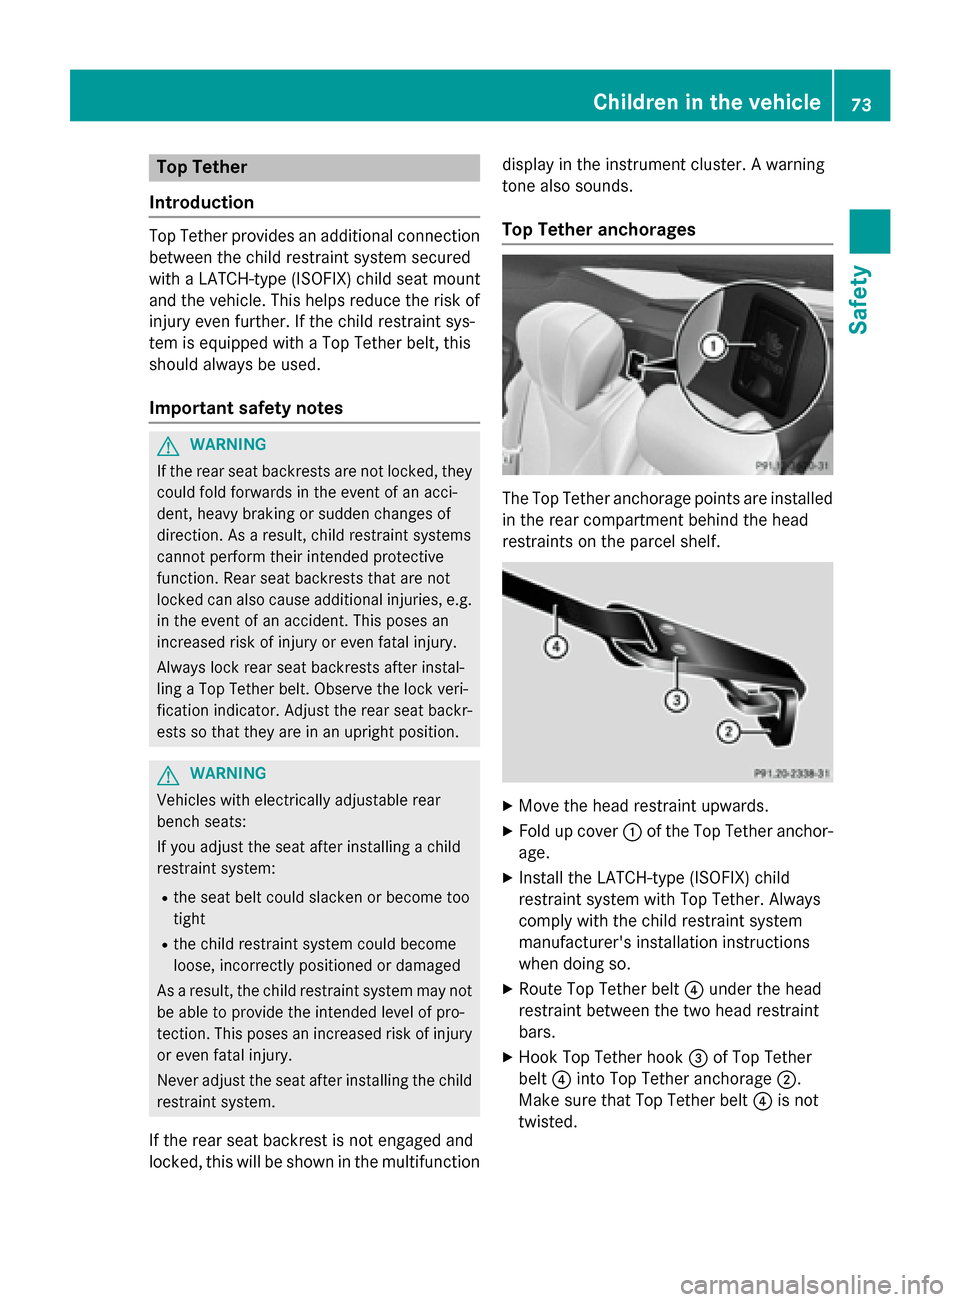
Top Tether anchorages The Top Tether anchorage points are installed
in the rear compartment behind the head
restraints on the parcel shelf. X
Move the head restraint upwards.
X Fold up cover :of the Top Tether anchor-
age.
X Install the LATCH-type (ISOFIX) child
restraint system with Top Tether. Always
comply with the child restraint system
manufacturer's installation instructions
when doing so.
X Route Top Tether belt ?under the head
restraint between the two head restraint
bars.
X Hook Top Tether hook =of Top Tether
belt ?into Top Tether anchorage ;.
Make sure that Top Tether belt ?is not
twisted. Children in the vehicle
73Safety Z