2015 MERCEDES-BENZ S-Class four wheel drive
[x] Cancel search: four wheel drivePage 6 of 502

1, 2, 3 ...
4ETS see ETS/4ETS (Electronic Trac-
tion System)
4MATIC (permanent four-wheel
drive) .................................................. 248
12 V socket
see Sockets
115 V socket ...................................... 385
360° camera
Cleaning .........................................4 16
Function/notes ............................ .260 A
ABS (Anti-lock Braking System) Display message ............................ 317
Function/notes ................................ 76
Important safety notes .................... 77
Warning lamp ................................. 358
Accident
Automatic measures after an acci-
dent ................................................. 68
Activating/deactivating cooling
with air dehumidification ................. 170
Activating/deactivating Night
View Assist Plus
With spotlight function ................... 268
Active Blind Spot Assist
Activating/deactivating (on-
board computer) ............................ 309
Display message ............................ 344
Function/informatio n.................... 270
Active Body Control (ABC)
Display message ............................ 342
Function/note s............................. 244
Active Lane Keeping Assist
Activating/deactivating (on-
board computer) ............................ 310
Display message ............................ 343
Function/information .................... 273
Active multicontour seat .................. 134
Active Parking Assist
Detecting parking spaces .............. 252
Display message ............................ 344
Exiting a parking space .................. 254
Function/note s............................. 251 Important safety notes .................. 251
Parking .......................................... 253
ADAPTIVE BRAKE ................................. 84
Adaptive Brake Assist
Function/note s................................ 81
Adaptive Damping System (ADS) ..... 247
Adaptive Highbeam Assist Plus
Display message ............................ 336
Function/note s............................. 153
Switching on/of f........................... 154
Additional speedometer ................... 313
Additives (engine oil) ........................ 492
Air bags
Belt bags .......................................... 53
Cushion air bags .............................. 59
Deployment ..................................... 65
Display message ............................ 332
Front air bag (driver, front
passenger) ....................................... 57
Important safety notes .................... 56
Introduction ..................................... 56
Knee bag .......................................... 58
PASSENGER AIR BAG indicator
lamps ............................................... 50
Side impact air ba g.......................... 58
Window curtain air ba g.................... 59
Air vents
Glove box ....................................... 185
Important safety notes .................. 184
Rear ............................................... 185
Setting ........................................... 184
Setting the center air vents ........... 184
Setting the side air vents ............... 184
Air-conditioning system
see Climate control
AIRMATIC
Display message ............................ 341
Function/note s............................. 246
Alarm
ATA (Anti-Theft Alarm system )......... 86
Switching off (ATA) .......................... 86
Switching the function on/off
(ATA) ................................................ 86
Alarm system
see ATA (Anti-Theft Alarm system)
Anti-lock braking system
see ABS (Anti-lock Braking System) 4
Index
Page 250 of 502

Comfort tuning
In comfort mode, the driving characteristics
of your vehicle are more comfortable. There-
fore, select this mode if you favor a more
comfortable driving style. Select comfort
mode also when driving fast on straight roads, e.g. on straight stretches of highway.
X If indicator lamp ;
; is not lit: press but-
ton :.
Indicator lamp ;lights up. Comfort tuning
is selected.
All vehicles except AMG vehicles: the
AIRMATIC COMFORT AIRMATIC COMFORT message appears in
the multifunction display.
AMG vehicles: theAMG
AMG Suspension Suspension Sys‐
Sys‐
tem
tem COMFORT
COMFORT message appears in the mul-
tifunction display.
If the driving speed is higher than 75 mph
(120 km/h), the vehicle is automatically low-
ered by another 0.4 in (10 mm) compared to
the normal level in comfort mode.
Load compensation The vehicle can compensate differences in
the vehicle level by raising or lowering the
axles. 4MATIC (permanent four-wheel drive)
4MATIC ensures that all four wheels are per-
manently driven. Together with ESP ®
, it
improves the traction of your vehicle when-
ever a drive wheel spins due to insufficient
grip. If you fail to adapt your driving style, 4MATIC
can neither reduce the risk of accident nor
override the laws of physics. 4MATIC cannot
take account of road, weather and traffic con-
ditions. 4MATIC is only an aid. You are
responsible for the distance to the vehicle in
front, for vehicle speed, for braking in good
time and for staying in your lane.
If a drive wheel spins due to insufficient grip:
R Only depress the accelerator pedal as far as
necessary when pulling away.
R Accelerate less when driving.
! Never tow the vehicle with one axle
raised. This may damage the transfer case.
Damage of this sort is not covered by the
Mercedes-Benz Limited Warranty. All
wheels must remain either on the ground or be fully raised. Observe the instructions for
towing the vehicle with all wheels in full
contact with the ground.
i In wintry driving conditions, the maximum
effect of 4MATIC can only be achieved if
you use winter tires (M+S tires), with snow
chains if necessary. PARKTRONIC
Important safety notes PARKTRONIC is an electronic parking aid with
ultrasonic sensors. It monitors the area
around your vehicle using six sensors in the
front bumper and six sensors in the rear
bumper. PARKTRONIC indicates visually and
audibly the distance between your vehicle
and an object.
PARKTRONIC is only an aid. It is not a replace-
ment for your attention to your immediate
surroundings. You are always responsible for
safe maneuvering, parking and exiting a park- ing space. When maneuvering, parking or
pulling out of a parking space, make sure that
there are no persons, animals or objects in
the area in which you are maneuvering. 248
Driving systemsDriving and parking
Page 302 of 502
depends on the engine installed and is
therefore not available in all vehicles.
PLUG-IN HYBRID vehicles: information on
total range and electric range can be found in
the "PLUG-IN HYBRID drive" section
(Y page 284).
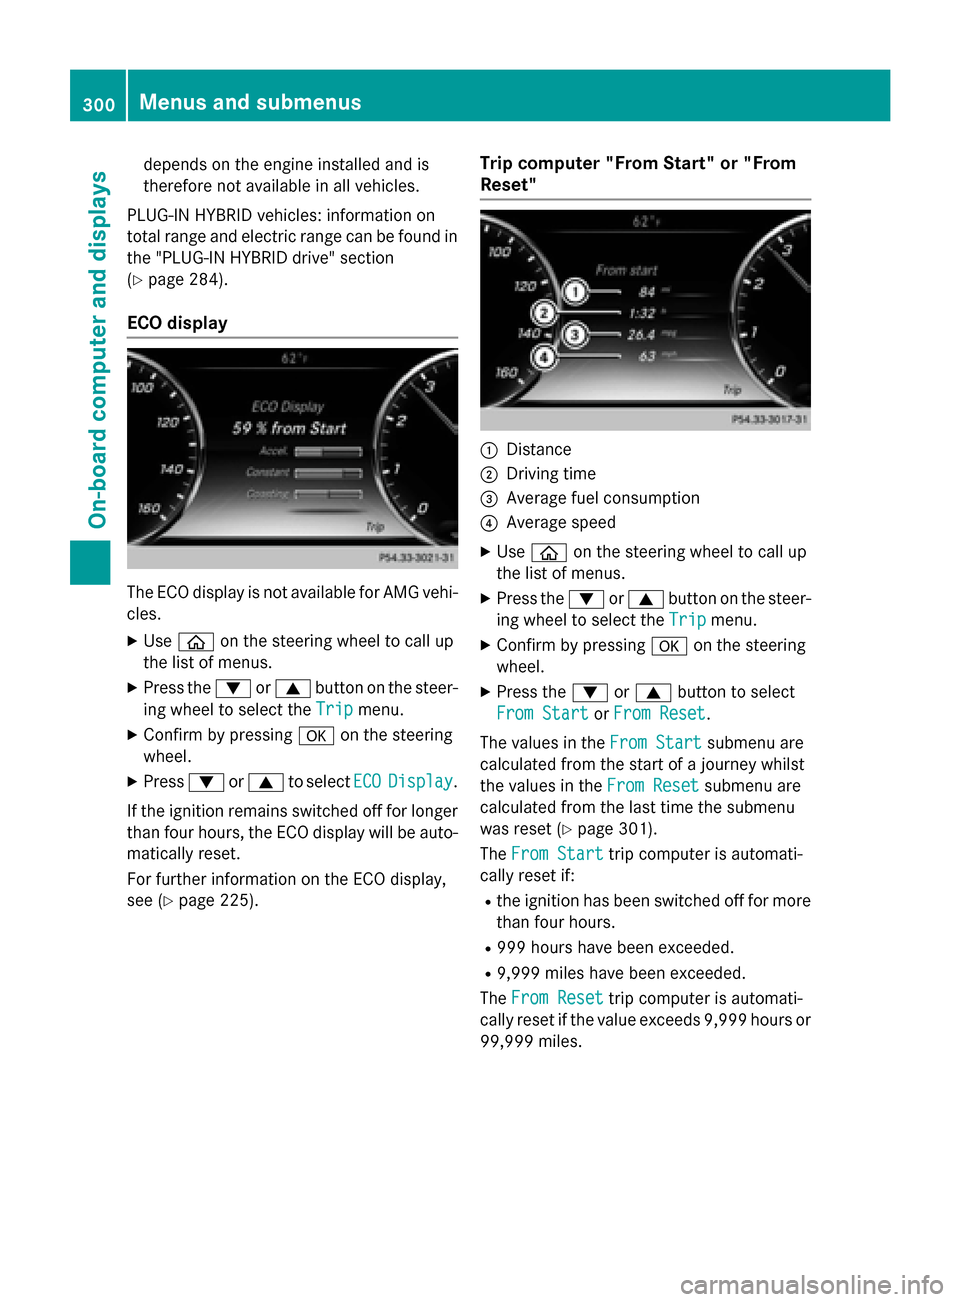
ECO display The ECO display is not available for AMG vehi-
cles.
X Use ò on the steering wheel to call up
the list of menus.
X Press the :or9 button on the steer-
ing wheel to select the Trip
Trip menu.
X Confirm by pressing aon the steering
wheel.
X Press :or9 to select ECO ECODisplay
Display.
If the ignition remains switched off for longer than four hours, the ECO display will be auto-
matically reset.
For further information on the ECO display,
see (Y page 225). Trip computer "From Start" or "From
Reset" :
Distance
; Driving time
= Average fuel consumption
? Average speed
X Use ò on the steering wheel to call up
the list of menus.
X Press the :or9 button on the steer-
ing wheel to select the Trip Tripmenu.
X Confirm by pressing aon the steering
wheel.
X Press the :or9 button to select
From Start
From Start orFrom Reset
From Reset.
The values in the From Start
From Start submenu are
calculated from the start of a journey whilst
the values in the From Reset From Resetsubmenu are
calculated from the last time the submenu
was reset (Y page 301).
The From Start
From Start trip computer is automati-
cally reset if:
R the ignition has been switched off for more
than four hours.
R 999 hours have been exceeded.
R 9,999 miles have been exceeded.
The From Reset
From Reset trip computer is automati-
cally reset if the value exceeds 9,999 hours or
99,999 miles. 300
Menus and submenusOn-board computer and displays
Page 451 of 502

X
Read the tire pressure and compare it with
the recommended value on the Tire and
Loading Information placard (Y page 445).
X If the tire pressure is too low, increase it to
the recommended value.
X If the tire pressure is too high, release air by
pressing down the metal pin in the valve.
Use the tip of a pen, for example. Then,
check the tire pressure again using the tire
pressure gauge.
X Screw the valve cap onto the valve.
X Repeat these steps for the other tires. Tire pressure monitor
General notes If a tire pressure monitor is installed, the vehi-
cle's wheels have sensors that monitor the
tire pressures in all four tires. The tire pres-
sure monitor warns you if the pressure drops
in one or more of the tires. The tire pressure
monitor only functions if the corresponding
sensors are installed in all wheels.
Information on tire pressures is displayed in
the multifunction display. After a few minutes of driving, the current tire pressure of each
tire is shown in the Service
Service menu of the mul-
tifunction display; see illustration (example). For information on the message display, refer
to the "Checking the tire pressure electroni-
cally" section (Y page 450).
Important safety notes G
WARNING
Each tire, including the spare (if provided),
should be checked at least once every two
weeks when cold and inflated to the pressure recommended by the vehicle manufacturer
on the Tire and Loading Information placard
on the driver's door B-pillar or the tire pres-
sure label on the inside of the fuel filler flap. If your vehicle has tires of a different size than
the size indicated on the Tire and Loading
Information placard or, if available, the tire
pressure label, you should determine the
proper tire pressure for those tires.
As an added safety feature, your vehicle has
been equipped with a tire pressure monitoring system (TPMS) that illuminates a low tire pres-
sure telltale when one or more of your tires
are significantly underinflated. Accordingly,
when the low tire pressure telltale lights up,
you should stop and check your tires as soon
as possible, and inflate them to the proper
pressure. Driving on a significantly underin-
flated tire causes the tire to overheat and can
lead to tire failure.
Underinflation also reduces fuel efficiency
and tire tread life, and may affect the vehicle's handling and stopping ability. Please note that
the TPMS is not a substitute for proper tire
maintenance, and it is the driver's responsi-
bility to maintain correct tire pressure, even if underinflation has not reached the level to
trigger illumination of the TPMS low tire pres-
sure telltale.
Your vehicle has also been equipped with a
TPMS malfunction indicator to indicate when
the system is not operating properly. The
TPMS malfunction indicator is combined with
the low tire pressure telltale. When the sys-
tem detects a malfunction, the warning lamp
will flash for approximately a minute and then remain continuously illuminated. This
sequence will be repeated every time the vehi-
cle is started as long as the malfunction
exists. When the malfunction indicator is illu- minated, the system may not be able to detect
or signal low tire pressure as intended.
TPMS malfunctions may occur for a variety of reasons, including the installation of incom-
patible replacement or alternate tires or
wheels on the vehicle that prevent the TPMS
from functioning properly. Always check the Ti
re pressure
449Wheels and tires
Z
Page 453 of 502

new sensors. As long as a clear allocation of
the tire pressure value to the individual
wheels is not possible, the Tire Pressure
Tire Pressure
Monitor Active Monitor Active display message is shown
instead of the tire pressure display. The tire
pressures are already being monitored.
Tire pressure monitor warning mes-
sages If the tire pressure monitor detects a pressure
loss in one or more tires, a warning message is shown in the multifunction display and the
yellow tire pressure monitor warning lamp
comes on.
R If the Please Correct Tire Pressure
Please Correct Tire Pressure
message appears in the multifunction dis-
play, the tire pressure in at least one tire is too low and must be corrected at the next
opportunity.
R If the Check
Check Tires Tiresmessage appears in the
multifunction display, the tire pressure in
one or more tires has dropped significantly and the tires must be checked.
R If the Warning Tire Malfunction
Warning Tire Malfunction
appears in the multifunction display, the
tire pressure in one or more tires has drop- ped suddenly and the tires must be
checked.
Observe the instructions and safety notes in
the display messages in the "Tires" section
(Y page 348).
i If the wheel positions on the vehicle are
rotated, the tire pressures may be dis-
played for the wrong positions for a short
time. This is rectified after a few minutes of driving, and the tire pressures are displayedfor the correct positions.
Restarting the tire pressure monitor When you restart the tire pressure monitor, all
existing warning messages are deleted and
the warning lamps go out. The monitor uses
the currently set tire pressures as the refer-
ence values for monitoring. In most cases, the
tire pressure monitor will automatically detect the new reference values after you
have changed the tire pressure. However, you
can also define reference values manually as described here. The tire pressure monitor
then monitors the new tire pressure values.
X Set the tire pressure to the value recom-
mended for the corresponding driving sit-
uation on the Tire and Loading Information
placard on the driver's side
B-pillar (Y page 445).
Additional tire pressure values for different loads can also be found on the tire pressure
table on the inside of the fuel filler flap
(Y page 445).
X Make sure that the tire pressure is correct
on all four wheels.
X Make sure that the SmartKey is in position
2 in the ignition lock.
X Use ò on the steering wheel to call up
the list of menus.
X Press the 9or: button on the steer-
ing wheel to select the Service
Service menu.
X Press the abutton.
X Press the 9or: button to select
Tire Pressure Tire Pressure.
X Press the abutton.
The multifunction display shows the cur-
rent tire pressure for the individual tires or
the Tire Tire pressure
pressure will
willbe
bedisplayed
displayed
after driving a few minutes after driving a few minutes mes-
sage.
X Press the :button.
The Use Current Pressures as New Use Current Pressures as New
Reference Values
Reference Values message appears in
the multifunction display.
If you wish to confirm the restart: X Press the abutton.
The Tire Press. Monitor Restarted
Tire Press. Monitor Restarted
message appears in the multifunction dis-
play.
After driving for a few minutes, the system checks whether the current tire pressures
are within the specified range. The new tire
pressures are then accepted as reference
values and monitored. Tire pressure
451Wheels and tires Z
Page 454 of 502

If you wish to cancel the restart:
X Press the %button.
The tire pressure values stored at the last
restart will continue to be monitored.
Radio type approval for the tire pres-
sure monitor Country Radio type approval number
USA FCC ID: MRXMW2433A
FCC ID: MRXGG4
FCC ID: MRXMC34MA4
Canada IC: 2546A-MW2433A
IC: 2546A-GG4
IC: 2546A-MC34MA4
Tire pressure loss warning system
(Canada only)
General notes While the vehicle is in motion, the tire pres-
sure loss warning system monitors the set
tire pressure using the rotational speed of the wheels. This enables the system to detect
significant pressure loss in a tire. If the speed
of rotation of a wheel changes as a result of a loss of pressure, a corresponding warning
message will appear in the multifunction dis- play.
You can recognize the tire pressure loss warn-
ing by the Run Flat Indicator Active
Run Flat Indicator Active
Press 'OK' to Restart Press 'OK' to Restart message which
appears in the Service
Servicemenu of the multi-
function display. Information on the message
display can be found in the "Restarting the tire
pressure loss warning system" section
(Y page 452).
Important safety notes The tire pressure warning system does not
warn you of an incorrectly set tire pressure.
Observe the notes on the recommended tire
pressure (Y page 445). The tire pressure loss warning does not
replace the need to regularly check the tire
pressure. An even loss of pressure on several
tires at the same time cannot be detected by
the tire pressure loss warning system.
The tire pressure monitor is not able to warn
you of a sudden loss of pressure, e.g. if the
tire is penetrated by a foreign object. In the
event of a sudden loss of pressure, bring the
vehicle to a halt by braking carefully. Avoid
abrupt steering maneuvers.
The function of the tire pressure loss warning system is limited or delayed if:
R snow chains are mounted on your vehicle's
tires.
R road conditions are wintry.
R you are driving on sand or gravel.
R you adopt a very sporty driving style (cor-
nering at high speeds or driving with high
rates of acceleration).
R you are driving with a heavy load (in the
vehicle or on the roof).
Restarting the tire pressure loss warn-
ing system Restart the tire pressure loss warning system
if you have:
R changed the tire pressure
R changed the wheels or tires
R mounted new wheels or tires
X Before restarting, make sure that the tire
pressures are set properly on all four tires
for the respective operating conditions.
The recommended tire pressure can be
found on the Tire and Loading Information
placard on the B-pillar on the driver's side.
Additionally, a tire pressure table is
attached to the fuel filler flap. The tire pres-
sure loss warning system can only give reli-
able warnings if you have set the correct
tire pressure. If an incorrect tire pressure is 452
Tire pressureWheels and ti
res
Page 455 of 502
set, these incorrect values will be moni-
tored.
X Also observe the notes in the section on tire
pressures (Y page 445).
X Make sure that the SmartKey is in position
2 in the ignition lock (Y page 189).
X Use ò on the steering wheel to call up
the list of menus.
X Press the 9or: button on the steer-
ing wheel to select the Service
Service menu.
X Press the abutton.
X Press the 9or: button to select
Tire Pressure Tire Pressure.
X Press the abutton.
The Run Flat Indicator Active
Run Flat Indicator Active
Press 'OK' to Restart
Press 'OK' to Restart message
appears in the multifunction display.
If you wish to confirm the restart: X Press the abutton.
The Tire Pressure Now OK?
Tire Pressure Now OK? message
appears in the multifunction display.
X Press the 9or: button to select
Yes
Yes.
X Press the abutton.
The Run Flat Indicator Restarted
Run Flat Indicator Restarted
message appears in the multifunction dis-
play.
After a teach-in period, the tire pressure
loss warning system will monitor the set
tire pressures of all four tires.
If you wish to cancel the restart:
X Press the %button.
or
X If the Tire Pressure Now OK? Tire Pressure Now OK? message
appears, use the 9or: button to
select Cancel
Cancel.
X Press the abutton.
The tire pressure values stored at the last
restart will continue to be monitored. Loading the vehicle
Instruction labels for tires and loads
G
WARNING
Overloaded tires can overheat, causing a
blowout. Overloaded tires can also impair the steering and driving characteristics and lead
to brake failure. There is a risk of accident.
Observe the load rating of the tires. The load
rating must be at least half of the GAWR of
your vehicle. Never overload the tires by
exceeding the maximum load.
Two instruction labels on your vehicle show
the maximum possible load.
(1) The Tire and Loading Information placard is on the B-pillar on the driver's side. The
Tire and Loading Information placard
shows the maximum permissible number
of occupants and the maximum permis-
sible vehicle load. It also contains details
of the tire sizes and corresponding pres-
sures for tires mounted at the factory.
(2) The vehicle identification plate is on the B-pillar on the driver's side. The vehicle
identification plate informs you of the
gross vehicle weight rating. It is made up
of the vehicle weight, all vehicle occu-
pants, the fuel and the cargo. You can
also find information about the maximum gross axle weight rating on the front and
rear axle.
The maximum gross axle weight rating is the maximum weight that can be carried
by one axle (front or rear axle). Never
exceed the maximum load or the maxi-
mum gross axle weight rating for the
front or rear axle. Loading the vehicle
453Wheels and tires Z
Page 460 of 502
All about wheels and tires
Uniform Tire Quality Grading Stand-
ards
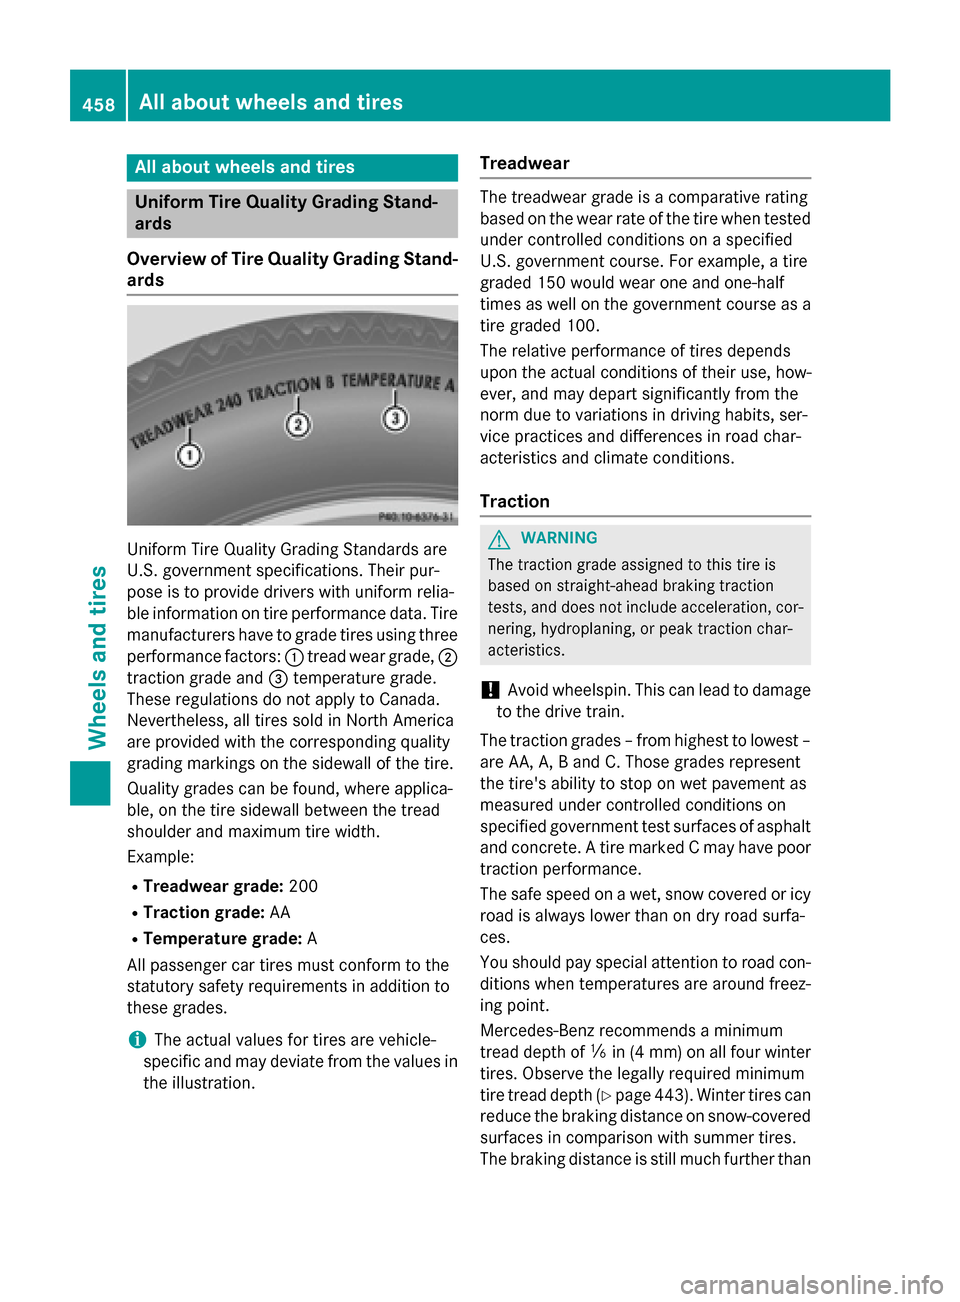
Overview of Tire Quality Grading Stand- ards Uniform Tire Quality Grading Standards are
U.S. government specifications. Their pur-
pose is to provide drivers with uniform relia-
ble information on tire performance data. Tire
manufacturers have to grade tires using three
performance factors: :tread wear grade, ;
traction grade and =temperature grade.
These regulations do not apply to Canada.
Nevertheless, all tires sold in North America
are provided with the corresponding quality
grading markings on the sidewall of the tire.
Quality grades can be found, where applica-
ble, on the tire sidewall between the tread
shoulder and maximum tire width.
Example:
R Treadwear grade: 200
R Traction grade: AA
R Temperature grade: A
All passenger car tires must conform to the
statutory safety requirements in addition to
these grades.
i The actual values for tires are vehicle-
specific and may deviate from the values in
the illustration. Treadwear The treadwear grade is a comparative rating
based on the wear rate of the tire when tested
under controlled conditions on a specified
U.S. government course. For example, a tire
graded 150 would wear one and one-half
times as well on the government course as a
tire graded 100.
The relative performance of tires depends
upon the actual conditions of their use, how-
ever, and may depart significantly from the
norm due to variations in driving habits, ser-
vice practices and differences in road char-
acteristics and climate conditions.
Traction G
WARNING
The traction grade assigned to this tire is
based on straight-ahead braking traction
tests, and does not include acceleration, cor- nering, hydroplaning, or peak traction char-
acteristics.
! Avoid wheelspin. This can lead to damage
to the drive train.
The traction grades – from highest to lowest –
are AA, A, B and C. Those grades represent
the tire's ability to stop on wet pavement as
measured under controlled conditions on
specified government test surfaces of asphalt
and concrete. A tire marked C may have poor
traction performance.
The safe speed on a wet, snow covered or icy road is always lower than on dry road surfa-
ces.
You should pay special attention to road con-
ditions when temperatures are around freez-
ing point.
Mercedes-Benz recommends a minimum
tread depth of ãin (4 mm) on all four winter
tires. Observe the legally required minimum
tire tread depth (Y page 443). Winter tires can
reduce the braking distance on snow-covered surfaces in comparison with summer tires.
The braking distance is still much further than 458
All about wheels and tiresWheels and ti
res