2015 MERCEDES-BENZ S-CLASS COUPE door lock
[x] Cancel search: door lockPage 349 of 417
After washing the vehicle, brake carefully
while paying attention to the traffic conditions in order to restore full braking efficiency.
! When DISTRONIC PLUS or the HOLD
function is activated, the vehicle brakes
automatically in certain situations.
To avoid damage to the vehicle, deactivate DISTRONIC PLUS and the HOLD function in the following or similar situations:
R when towing away
R in a car wash
! Make sure:
R the side windows are closed completely.
R the blower for the ventilation/heating is
switched off (OFF button is depressed).
R the windscreen wiper switch is at posi-
tion 0.
R the 360° camera or reversing camera is
switched off.
The vehicle could otherwise be damaged.
! If the key is within the rear detection
range of KEYLESS-GO, the following situa-
tions, for example, could lead to the boot lid opening unintentionally:
R using a car wash
R using a high-pressure cleaner
Make sure that the key is at least 3 m away from the vehicle.
! Make sure that the automatic transmis-
sion is in neutral position Nwhen washing
your vehicle in a tow-through car wash. The
vehicle may otherwise be damaged.
R Operating with the key:
Do not remove the key from the ignition
lock. Do not open the driver's door when
the engine is switched off or at very low
speeds. Otherwise, when in transmission position Dor Rthe automatic transmis-
sion will automatically switch to park
position Pand block the wheels.
R Operating with the Start/Stop button: Do not open the driver's door when the
engine is switched off or at very low
speeds. Otherwise, when in transmission
position Dor Rthe automatic transmis-
sion will automatically switch to park
position Pand block the wheels.
Observe the following to make sure that the
automatic transmission stays in neutral posi-
tion N:
Operating with the key:
X Make sure the ignition is switched on.
X Make sure that the vehicle is stationary.
X Depress the brake pedal and keep it
depressed.
X Select neutral N.
X Release the brake pedal.
X Release the electric parking brake, if nec-
essary.
X Switch off the ignition and leave the key in
the ignition lock.
Operating with the Start/Stop button:
X Make sure the ignition is switched on.
X Make sure that the vehicle is stationary.
X Depress the brake pedal and keep it
depressed.
X Engage park position P.
X Release the brake pedal.
X Remove the Start/Stop button from the
ignition lock (Y page 161).
X Insert the key into the ignition lock.
X Switch on the ignition.
X Depress the brake pedal and keep it
depressed.
X Select neutral N.
X Release the brake pedal.
X Release the electric parking brake, if nec-
essary.
X Switch off the ignition and leave the key in
the ignition lock.
You can wash the vehicle in an automatic car
wash from the very start. 346
CareMaintenance and care
Page 361 of 417
X
Open the boot lid.
X Lift the boot floor upwards (Y page 321) or
detach the tool bag Velcro fasteners. Flat tyre
Preparing the vehicle
Your vehicle may be equipped with: R tyres with run-flat characteristics
(MOExtended tyres) (Y page 358)
Vehicle preparation is not necessary on
vehicles with MOExtended tyres.
R a TIREFIT kit (Y page 357)
Vehicles with MOExtended tyres are not
equipped with a TIREFIT kit at the factory. It is
therefore recommended that you additionally equip your vehicle with a TIREFIT kit if you fit tyres that do not feature run-flat characteris- tics, e.g. winter tyres. A TIREFIT kit can be
obtained from a qualified specialist work-
shop.
Information on changing/fitting a wheel
(Y page 385).
X Stop the vehicle as far away as possible
from traffic on solid, non-slippery and level
ground.
X Switch on the hazard warning lamps.
X Safeguard the vehicle against rolling away
(Y page 181).
X If possible, bring the front wheels into the
straight-ahead position.
X Switch off the engine.
X Open the driver's door.
The on-board electronics now have status
0. This is the same as the key having been
removed.
X Remove the Start/Stop button from the
ignition lock (Y page 161).
or, if the key is inserted in the ignition lock: X Remove the key from the ignition lock.
X Make sure that the passengers are not
endangered as they do so. Make sure that
no one is near the danger area while a wheel is being changed. Anyone who is not
directly assisting in the wheel change
should, for example, stand behind the bar-
rier.
X Get out of the vehicle. Pay attention to traf-
fic conditions when doing so.
X Close the driver's door.
X Place the warning triangle at a suitable dis-
tance (Y page 356). Observe legal require-
ments. MOExtended tyres (tyres with run-flat
characteristics)
General notes With MOExtended tyres (tyres with run-flat
characteristics), you can continue to drive
your vehicle even if there is a total loss of
pressure in one or more tyres. The affected
tyre must not show any clearly visible dam-
age.
You can recognise MOExtended tyres by the
MOExtended marking which appears on the
tyre wall. You will find this marking next to the
tyre size designation, the load-bearing capa-
city and the speed index.
MOExtended tyres may only be used in con-
junction with an activated tyre pressure loss
warning system or tyre pressure monitor.
If a pressure loss warning message
appears in the multifunction display:
R observe the instructions in the display mes-
sages (Y page 295)
R check the tyre for damage
R if driving on, observe the following notes
The driving distance possible in run-flat mode is approximately 80 km when the vehicle is
partially laden and approximately 30 km
when the vehicle is fully laden. 358
Flat tyreBreakdown assistance
Page 373 of 417
!
Observe the following points when towing
with a tow rope:
R secure the tow rope on the same side on
both vehicles.
R make sure that the tow rope is not longer
than legally permitted. Mark the tow rope
in the middle, e.g. with a white cloth
(30 x 30 cm). This makes other road
users aware that a vehicle is being
towed.
R only secure the tow rope to the towing
eye.
R observe the brake lamps of the towing
vehicle while driving. Always maintain a
distance so that the tow rope does not
sag.
R do not use steel cables or chains to tow
your vehicle. You could otherwise dam-
age the vehicle.
! Do not use the towing eyes for recovery
purposes as this could damage the vehicle.
If in doubt, recover the vehicle with a crane.
! When towing, pull away slowly and
smoothly. If the tractive power is too high,
the vehicles could be damaged.
! Shift the automatic transmission to
Nand
do not open the driver's or front passeng-
er's door during towing. The automatic
transmission may otherwise shift to posi-
tion P, which could damage the transmis-
sion.
! You may tow the vehicle for a maximum of
50km. A towing speed of 50 km/h must not be exceeded.
For towing distances over 50 km, the entire
vehicle must be lifted up and transported.
Observe the legal requirements for the rele-
vant countries when towing.
It is better to have the vehicle transported
than to have it towed.
If the vehicle has suffered transmission dam-
age, have it transported on a transporter or
trailer. The automatic transmission must be in posi-
tion
Nwhen the vehicle is being towed away.
If the automatic transmission cannot be shif- ted to position N, have the vehicle transpor-
ted on a transporter or trailer.
The battery must be connected and charged. Otherwise, you:
R cannot turn the key in the ignition lock to
position 2
R cannot release the electric parking brake
R cannot shift the automatic transmission to
position N
i Deactivate the automatic locking feature
before the vehicle is towed away
(Y page 92). You could otherwise be locked
out when pushing or towing the vehicle.
i Deactivate tow-away protection before
the vehicle is towed away (Y page 81). Fitting/removing the towing eye
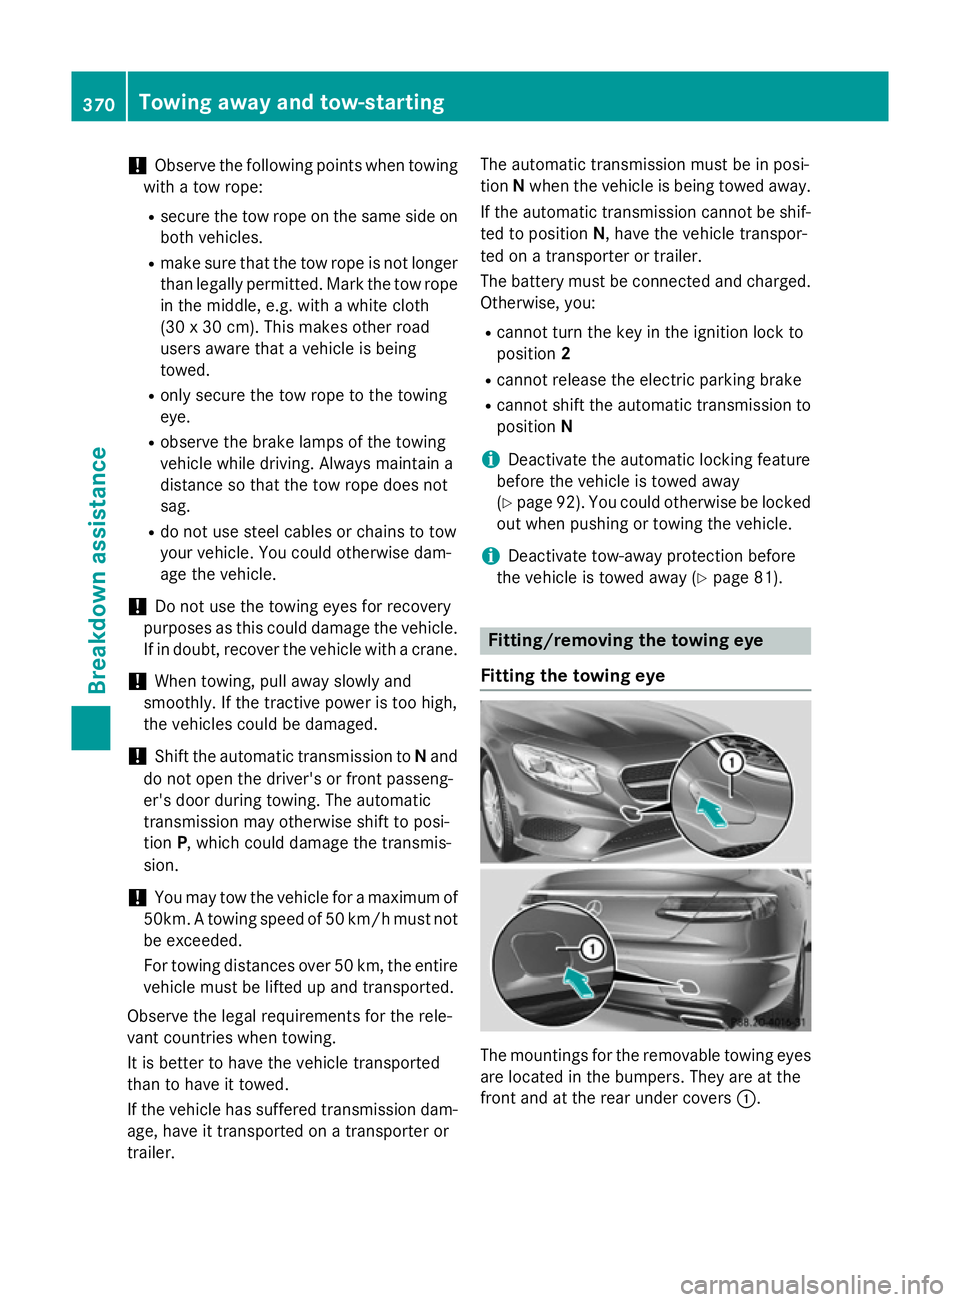
Fitting the towing eye The mountings for the removable towing eyes
are located in the bumpers. They are at the
front and at the rear under covers :.370
Towing away and tow-startingBreakdown assistance
Page 374 of 417

X
Remove the towing eye from the vehicle
tool kit/stowage tray (Y page 357).
X Press the mark on cover :inwards in the
direction of the arrow.
X Remove cover :from the opening.
X Screw in the towing eye clockwise as far as
it will go and tighten it.
Removing the towing eye X
Loosen the towing eye and unscrew it.
X Attach cover :to the bumper and press
until it engages.
X Place the towing eye in the vehicle tool kit/
stowage tray. Towing the vehicle with both axles on
the ground
It is important that you observe the safety
instructions when towing away your vehicle
(Y page 369).
The automatic transmission automatically
shifts to position Pwhen you open the driver's
or front-passenger door or when you remove the key from the ignition lock.
In order to ensure that the automatic trans-
mission stays in position Nwhen towing the
vehicle, you must observe the following
points:
X You must use the key instead of the Start/
Stop button (Y page 161).
X Make sure that the vehicle is stationary and
that the key is in position 0in the ignition
lock.
X Turn the key to position 2in the ignition
lock.
X Depress and hold the brake pedal.
X Shift the automatic transmission to posi-
tion N.
X Release the brake pedal.
X Release the electric parking brake. X
Leave the key in position 2in the ignition
lock.
X Switch on the hazard warning lamps
(Y page 128).
i In order to signal a change of direction
when towing the vehicle with the hazard
warning lamps switched on, use the com-
bination switch as usual. In this case, only
the turn signals for the desired direction
flash. When you reset the combination
switch, the hazard warning lamps start
flashing again. Towing the vehicle away with the rear
axle raised
Only vehicles without 4MATIC can be
towed away with the rear axle raised.
! The ignition must be switched off if you
are towing the vehicle with the rear axle
raised. Intervention by ESP ®
could other-
wise damage the brake system.
! Vehicles with 4MATIC must not be towed
with the front or rear axle raised; otherwise,
the transmission may be damaged.
! Vehicles with automatic transmission
must not be towed with the rear axle raised.
The car/trailer combination may otherwise swerve or even overturn. Transporting the vehicle
! You may only secure the vehicle by the
wheels, not by parts of the vehicle such as
axle or steering components. Otherwise,
the vehicle could be damaged.
The towing eye can be used to pull the vehicle
onto a trailer or transporter for transporta-
tion.
X Turn the key to position 2in the ignition
lock.
X Shift the automatic transmission to posi-
tion N. Towing away and tow-starting
371Breakdown assistance Z
Page 389 of 417
Interchanging the wheels
G
WARNING
Interchanging the front and rear wheels may
severely impair the driving characteristics if
the wheels or tyres have different dimensions. The wheel brakes or suspension components may also be damaged. There is a risk of acci-
dent.
Interchange front and rear wheels only if the
wheels and tyres are of the same dimensions.
! On vehicles fitted with a tyre pressure
monitor, electronic components are loca-
ted in the wheel.
Tyre-fitting tools should not be applied in
the area of the valve, as this could damage
the electronic components.
Only have tyres changed at a qualified spe- cialist workshop.
Interchanging the front and rear wheels of
differing dimensions can render the general
operating permit invalid.
Observe the instructions and safety notes in
the "Fitting a wheel" section (Y page 386).
The wear patterns on the front and rear tyres differ depending on the operating conditions.Interchange the wheels before a clear wear
pattern has formed on the tyres. Front tyres
typically wear more on the shoulders and the
rear tyres in the centre.
On vehicles that have the same size front and
rear wheels, you can interchange the wheels
every 5,000 to 10,000 km depending on the
degree of tyre wear. Ensure the direction of
rotation is maintained.
Clean the contact surfaces of the wheel and
the brake disc thoroughly every time a wheel is interchanged. Check the tyre pressure and,
if necessary, restart the tyre pressure loss
warning system (Y page 385) or the tyre pres-
sure monitor (Y page 383) . Direction of rotation
Tyres with a specified direction of rotation
have additional benefits, e.g. if there is a risk of aquaplaning. These advantages can only begained if the tyres are fitted corresponding to
the direction of rotation.
An arrow on the sidewall of the tyre indicates
its correct direction of rotation. Storing wheels
Store wheels in a cool, dry and preferably
dark place if they are not being used. Protect the tyres against oil, grease, petrol and diesel. Fitting a wheel
Preparing the vehicle X
Stop the vehicle on solid, non-slippery and
level ground.
X Apply the electric parking brake manually.
X Move the front wheels to the straight-
ahead position.
X Shift the transmission to position P.
X Make sure that "normal" level is selected
for AIRMATIC (Y page 210).
X Switch off the engine.
X Open the driver's door.
The on-board electronics now have status
0. This is the same as the key having been
removed.
X Remove the Start/Stop button from the
ignition lock (Y page 161).
or, if the key is inserted in the ignition lock: X Remove the key from the ignition lock.
X If included in the vehicle equipment,
remove the tyre-change tool kit from the
vehicle.
X Safeguard the vehicle against rolling away.
i Apart from some country-specific var-
iants, vehicles are not equipped with tyre-
changing tools. Some tools for changing a 386
Changing a wheelWheels and ty
res
Page 391 of 417
used incorrectly, it could tip over while the
vehicle is raised.
R the jack is designed only to raise and hold
the vehicle for a short time while a wheel
is being changed. It is not suitable for per-
forming maintenance work under the vehi-
cle.
R avoid changing the wheel on uphill and
downhill slopes.
R before raising the vehicle, safeguard it from
rolling away by applying the parking brake
and positioning wheel chocks. Do not
release the parking brake while the vehicle is raised.
R the jack must be placed on a firm, flat and
non-slip surface. On a loose surface, a
large, flat load-bearing underlay must be
used. On a slippery surface, a non-slip
underlay must be used, e.g. rubber mats.
R do not use wooden blocks or similar
objects as a jack underlay. Otherwise, the
jack will not be able to achieve its load-
bearing capacity due to the restricted
height.
R make sure that the distance between the
underside of the tyres and the ground does not exceed 3 cm.
R never place your hands or feet under the
raised vehicle.
R do not lie under the vehicle.
R do not start the engine when the vehicle is
raised.
R do not open or close a door or the boot lid
when the vehicle is raised.
R make sure that no persons are present in
the vehicle when the vehicle is raised.
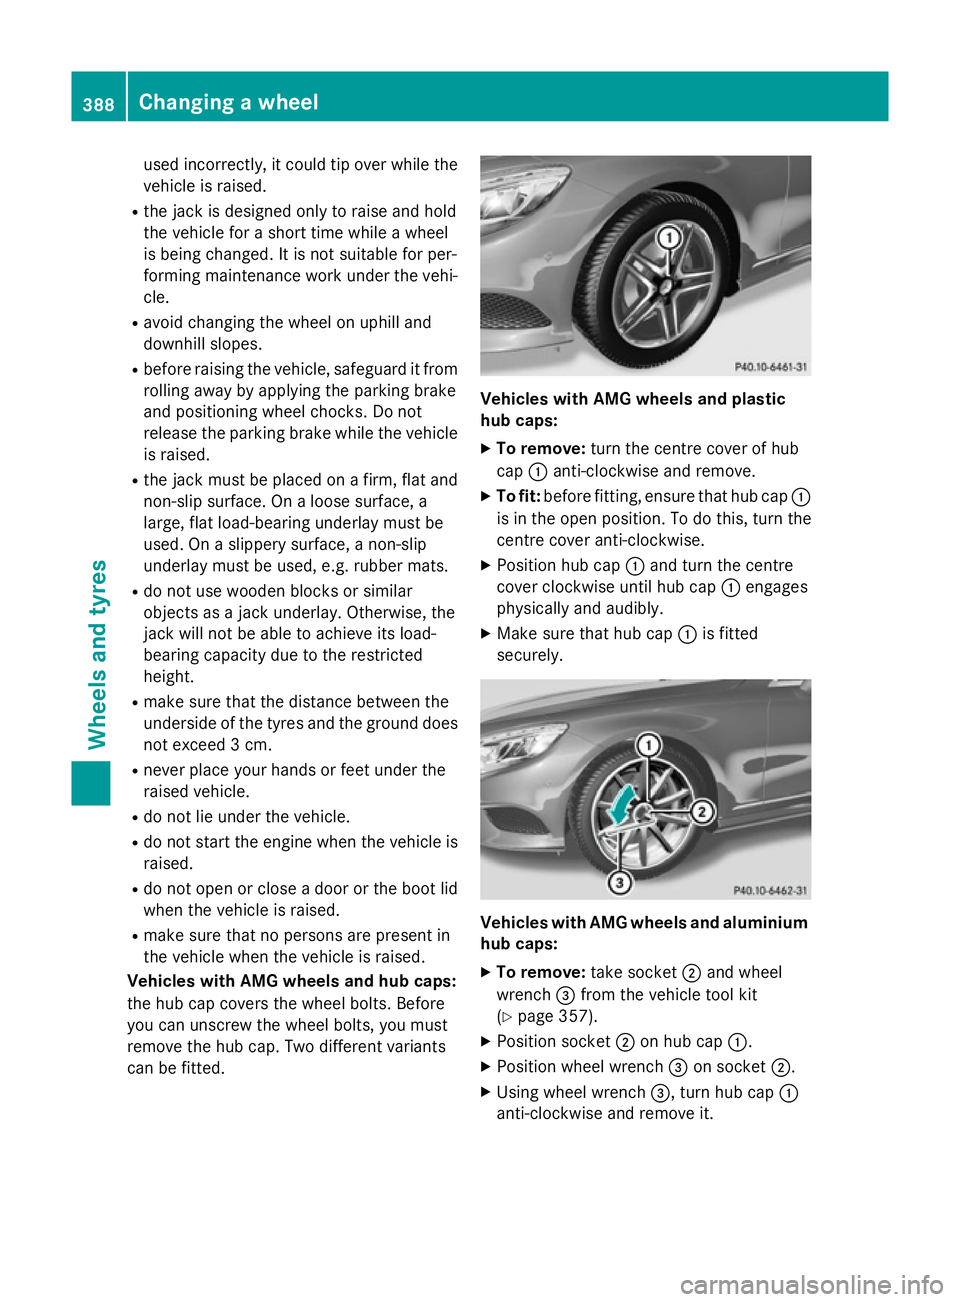
Vehicles with AMG wheels and hub caps:
the hub cap covers the wheel bolts. Before
you can unscrew the wheel bolts, you must
remove the hub cap. Two different variants
can be fitted. Vehicles with AMG wheels and plastic
hub caps:
X To remove: turn the centre cover of hub
cap :anti-clockwise and remove.
X To fit: before fitting, ensure that hub cap :
is in the open position. To do this, turn the
centre cover anti-clockwise.
X Position hub cap :and turn the centre
cover clockwise until hub cap :engages
physically and audibly.
X Make sure that hub cap :is fitted
securely. Vehicles with AMG wheels and aluminium
hub caps:
X To remove: take socket;and wheel
wrench =from the vehicle tool kit
(Y page 357).
X Position socket ;on hub cap :.
X Position wheel wrench =on socket ;.
X Using wheel wrench =, turn hub cap:
anti-clockwise and remove it. 388
Changing a wheelWheels and ty
res