2015 MERCEDES-BENZ S-CLASS COUPE dashboard
[x] Cancel search: dashboardPage 14 of 417

Exhaust pipe
Cleaning ........................................ .351
Exterior lighting
Cleaning ......................................... 349
see Lights
Exterior mirrors
Adjusting ....................................... 120
Anti-dazzle mode (automatic) ....... .121
Folding in/out (automatically) ....... 120
Folding in/out (electrically) ........... 120
Out of position (troubleshooting) ... 121
Parking position ............................. 121
Resetting ....................................... 120
Storing settings (memory func-
tion) ............................................... 123 F
Fault message see Display messages
Features ............................................. 322
Filler cap
see Fuel filler flap
Fire extinguisher ............................... 356
First-aid kit ......................................... 356
Fitting a wheel
Fitting a wheel ............................... 390
Lowering the vehicle ...................... 390
Preparing the vehicle ..................... 386
Raising the vehicl e......................... 387
Removing a whee l.......................... 389
Securing the vehicle against roll-
ing away ........................................ 387
Flat tyre
Changing a wheel/fitting the
spare whee l................................... 385
MOExtended tyre s......................... 358
Preparing the vehicle ..................... 358
TIREFIT kit ...................................... 359
Floormat ............................................. 335
Foglamps (extended range) .............. 130
Frequencies
Garage door opener ....................... 332
Mobile phone ................................. 402
Two-way radio ................................ 402
Front-passenger front airbag deac-
tivation
Display message ............................ 279 Front-passenger front airbag deac-
tivation system
Operation ......................................... 52
Problems ......................................... 56
System self-test ............................... 55
Front-passenger seat
Adjusting from the driver's seat ..... 110
Fuel
Additives ........................................ 407
Consumption information .............. 407
Consumption statistics .................. 250
Displaying the current consump-
tion ................................................ 249
Displaying the rang e...................... 249
E10 ................................................ 405
Fuel gaug e....................................... 32
Grade (petrol) ................................ 405
Important safety notes .................. 405
Notes for Mercedes‑AMG vehi-
cles ................................................ 406
Problem (malfunction) ................... 181
Refuelling ....................................... 178
Tank content/reserve fue l............. 405
Fuel filler flap
Opening ......................................... 179
Fuel level
Calling up the range (on-board
computer) ...................................... 249
Gaug e.............................................. 32
Fuel tank
Capacity ........................................ 405
Problem (malfunction) ................... 181
Fuses
Allocation chart ............................. 374
Before changing ............................. 372
Dashboard fuse box ....................... 373
Fuse box in the boot ...................... 374
Fuse box in the engine compart-
ment .............................................. 373
Fuse box in the front-passenger
footwell .......................................... 373
Important safety notes .................. 372 G
Garage door opener Clearing the memory ..................... 332
Frequencies ................................... 332 Index
11
Page 26 of 417

Protection of the environment
General notes
H
Environmental note
Daimler's declared policy is one of compre-
hensive environmental protection.
Our objectives are to use the natural resour-
ces which form the basis of our existence on
this planet sparingly and in a manner which
takes the requirements of both nature and
humanity into consideration.
You too can help to protect the environment
by operating your vehicle in an environmen-
tally-responsible manner.
Fuel consumption and the rate of engine,
transmission, brake and tyre wear depend on
the following factors:
R operating conditions of your vehicle
R your personal driving style
You can influence both factors. Therefore,
please bear the following in mind:
Operating conditions:
R avoid short trips, as these increase fuel
consumption.
R observe the correct tyre pressure.
R do not carry any unnecessary weight in the
vehicle.
R remove the roof rack once you no longer
need it.
R a regularly serviced vehicle will contribute
to environmental protection. You should
therefore adhere to the service intervals.
R all maintenance work should be carried out
at a qualified specialist workshop.
Personal driving style:
R do not depress the accelerator pedal when
starting the engine.
R do not warm up the engine when the vehicle
is stationary.
R drive carefully and maintain a safe distance
from the vehicle in front.
R avoid frequent, sudden acceleration and
braking. R
change gear in good time and use each gear
only up to Ôof its maximum engine speed.
R switch off the engine in stationary traffic.
R monitor the vehicle's fuel consumption. Returning an end-of-life vehicle
EU countries only:
Mercedes-Benz will take back your old vehicle to dispose of it in an environmentally-respon-sible manner in accordance with the Euro-
pean Union (EU) End of Life Vehicles Direc-
tive.
There is a network of return points and dis-
assembly plants available. You can return
your vehicle to these plants free of charge.
This makes a valuable contribution to the
recycling process and the conservation of
resources.
For further information on recycling old vehi- cles, recovery and the terms of the policy,
visit the Mercedes-Benz homepage. Genuine Mercedes-Benz parts
H
Environmental note
Daimler AG also supplies reconditioned
assemblies and parts which are of the same
quality as new parts. For these, the same war-
ranty applies as for new parts.
! Airbags and seat belt tensioners, as well
as control units and sensors for these
restraint systems, may be installed in the
following areas of your vehicle:
R doors
R door pillars
R door sills
R seats
R dashboard
R instrument cluster
R centre console Introduction
23 Z
Page 52 of 417
In order to avoid such risks, always ensure
that all vehicle occupants:
R fasten their seatbelts correctly, including
pregnant women
R are seated correctly and maintain the fur-
thest possible distance from the airbags
R observe the following notes
Always ensure that there are no objects loca-
ted between the airbag and the vehicle occu-
pant.
R Adjust the seats properly before beginning
your journey. Always make sure that the
seat is in an almost upright position. The
centre of the head restraint must support
the head at about eye level.
R Move the driver's and front-passenger
seats as far back as possible. The driver's
seat position must allow the vehicle to be
driven safely.
R Only hold the steering wheel on the out-
side. This allows the airbag to be fully
deployed.
R Always lean against the backrest while driv-
ing. Do not lean forwards or lean against
the door or side window. You may other-
wise be in the deployment area of the air-
bags.
R Always keep your feet in the footwell in
front of the seat. Do not put your feet on the dashboard, for example. Your feet may oth-
erwise be in the deployment area of the
airbag.
R Always secure persons less than 1.50 mtall
in suitable restraint systems. Up to this
height, the seat belt cannot be worn cor-
rectly.
If a child is travelling in your vehicle, also
observe the following notes:
R Always secure children under twelve years
of age and less than 1.50 mtall in suitable
child restraint systems.
R Child restraint systems should be fitted to
the rear seats. R
Only secure a child to the front-passenger
seat when the front-passenger front airbag
is disabled, and only then in a rearward-
facing child restraint system. If the
PASSENGER AIR BAG OFF indicator lamp is
permanently lit, the front-passenger front
airbag is disabled (Y page 43).
R Always observe the instructions and safety
notes on the automatic front-passenger
front airbag deactivation system
(Y page 51) and on "Children in the vehi-
cle" (Y page 60) in addition to the child
restraint system manufacturer's installa-
tion instructions.
Objects in the vehicle interior may pre-
vent the airbag from functioning cor-
rectly. Before starting your journey and to
avoid risks resulting from the speed of the
airbag as it deploys, make sure that:
R there are no people, animals or objects
between the vehicle occupants and an air-
bag.
Do not place any objects on the dashboard,
e.g. above the front-passenger front airbag.
R there are no objects between the seat, door
and B-pillar.
R no hard objects, e.g. coat hangers, are
hanging on the grab handles or coat hooks.
R no accessories, such as cup holders, are
attached to the vehicle within the deploy-
ment area of an airbag, e.g. to doors, side
windows, rear side trim or side walls.
R no heavy, sharp-edged or fragile objects
are in the pockets of your clothing. Store
such objects in a suitable place. G
WARNING
If you modify an airbag cover or affix objects
such as stickers to it, the airbag can no longer function correctly. There is an increased risk
of injury.
Never modify an airbag cover or affix objects
to it. Occupant safety
49Safety Z
Page 56 of 417
front airbag both before and during the jour-
ney.
If a person is sitting on the front-passenger
seat, this person must sit:
R with the seat belt fastened correctly
R in an almost upright position with their
back against the seat backrest
R with their feet resting on the floor, if possi-
ble
If the front passenger does not observe these
conditions, the automatic front-passenger
front airbag deactivation system may be influ- enced, e.g. because the front passenger:
R transfers their weight by supporting them-
selves on a vehicle armrest
R sits in such a way that their weight is raised
from the seat cushion
The front-passenger front airbag may be dis-
abled by mistake as a result of these or similar
actions. In this case, the PASSENGER AIR
BAG OFF indicator lamp lights up perma-
nently. The front-passenger front airbag does not then deploy during an accident. G
WARNING
If the PASSENGER AIRBAG OFF indicator lamp is lit, the front-passenger front airbag is disa-
bled. It will not be deployed in the event of an
accident and cannot perform its intended pro-
tective function. A person in the front-
passenger seat could then, for example, come
into contact with the vehicle's interior, espe-
cially if the person is sitting too close to the
dashboard. This poses an increased risk of
injury or even fatal injury.
When the front-passenger seat is occupied,
always make sure that:
R the classification of the person in the front-
passenger seat is correct and that the front-
passenger front airbag is enabled or disa-
bled in accordance with the person in the
front-passenger seat.
R the front-passenger seat has been moved
back as far back as possible.
R the person is seated correctly. Make sure, both before and during the jour-
ney, that the status of the front-passenger
front airbag is correct. G
WARNING
If you secure a child on the co-driver's seat in a rearward-facing child restraint system and
the PASSENGER AIR BAG ON indicator lamp
lights up, the co-driver's airbag could be
deployed in the event of an accident. The childcould be struck by the airbag. There is an
increased risk of injury, possibly even fatal.
In this case, always ensure that the co-driver's
airbag is disabled. The PASSENGER AIRBAG
OFF indicator lamp must light up.
If the PASSENGER AIR BAG OFF indicator
lamp remains off and/or the PASSENGER AIR BAG ON indicator lamp lights up, do not install
a rearward-facing child restraint system on
the front-passenger seat. Further information can be found under "Problems with the auto-matic front-passenger front airbag deactiva-
tion system" (Y page 56). G
WARNING
If you secure a child in a forward-facing child
restraint system on the front-passenger seat
and you position the front-passenger seat too close to the dashboard, in the event of an
accident, the child could:
R come into contact with the vehicle's inte-
rior if the PASSENGER AIR BAG OFF indi-
cator lamp is lit, for example
R be struck by the airbag if the PASSENGER
AIR BAG ON indicator lamp is lit
This poses an increased risk of injury or even fatal injury.
Always move the front-passenger seat as far
back as possible and fully retract the seat
cushion length. Always make sure that the
shoulder belt strap is correctly routed from
the vehicle seat-belt extender to the shoulder
belt guide on the child restraint system. The
shoulder belt strap must be routed forwards
and downwards from the retracted seat-belt
extender. If necessary, adjust the front- Occupant safety
53Safety
Z
Page 67 of 417
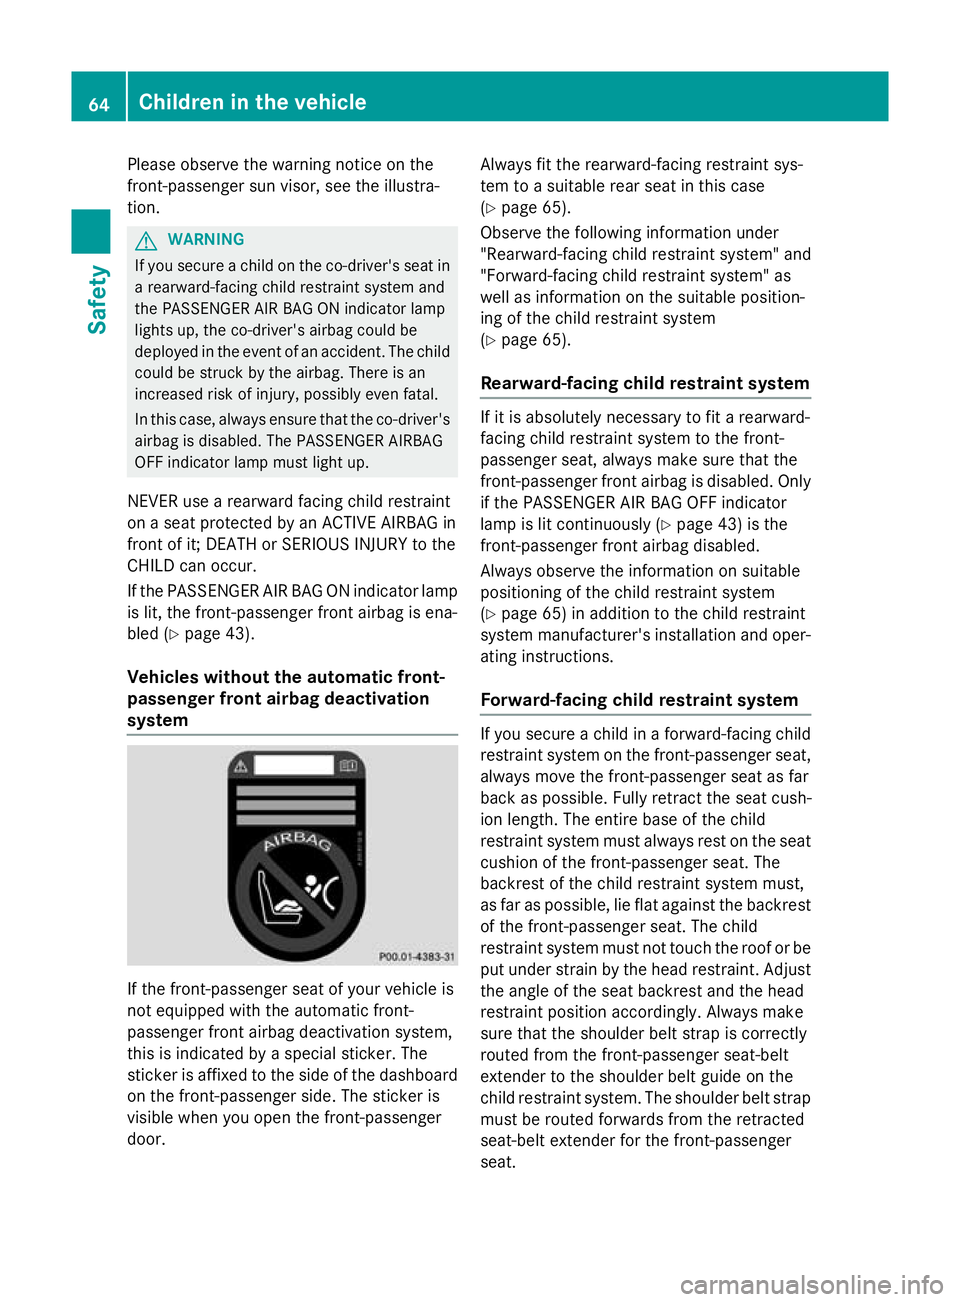
Please observe the warning notice on the
front-passenger sun visor, see the illustra-
tion. G
WARNING
If you secure a child on the co-driver's seat in a rearward-facing child restraint system and
the PASSENGER AIR BAG ON indicator lamp
lights up, the co-driver's airbag could be
deployed in the event of an accident. The childcould be struck by the airbag. There is an
increased risk of injury, possibly even fatal.
In this case, always ensure that the co-driver's
airbag is disabled. The PASSENGER AIRBAG
OFF indicator lamp must light up.
NEVER use a rearward facing child restraint
on a seat protected by an ACTIVE AIRBAG in
front of it; DEATH or SERIOUS INJURY to the
CHILD can occur.
If the PASSENGER AIR BAG ON indicator lamp
is lit, the front-passenger front airbag is ena-
bled (Y page 43).
Vehicles without the automatic front-
passenger front airbag deactivation
system If the front-passenger seat of your vehicle is
not equipped with the automatic front-
passenger front airbag deactivation system,
this is indicated by a special sticker. The
sticker is affixed to the side of the dashboard
on the front-passenger side. The sticker is
visible when you open the front-passenger
door. Always fit the rearward-facing restraint sys-
tem to a suitable rear seat in this case
(Y
page 65).
Observe the following information under
"Rearward-facing child restraint system" and
"Forward-facing child restraint system" as
well as information on the suitable position-
ing of the child restraint system
(Y page 65).
Rearward-facing child restraint system If it is absolutely necessary to fit a rearward-
facing child restraint system to the front-
passenger seat, always make sure that the
front-passenger front airbag is disabled. Only
if the PASSENGER AIR BAG OFF indicator
lamp is lit continuously (Y page 43) is the
front-passenger front airbag disabled.
Always observe the information on suitable
positioning of the child restraint system
(Y page 65) in addition to the child restraint
system manufacturer's installation and oper-
ating instructions.
Forward-facing child restraint system If you secure a child in a forward-facing child
restraint system on the front-passenger seat,
always move the front-passenger seat as far
back as possible. Fully retract the seat cush-
ion length. The entire base of the child
restraint system must always rest on the seat cushion of the front-passenger seat. The
backrest of the child restraint system must,
as far as possible, lie flat against the backrest
of the front-passenger seat. The child
restraint system must not touch the roof or be
put under strain by the head restraint. Adjust the angle of the seat backrest and the head
restraint position accordingly. Always make
sure that the shoulder belt strap is correctly
routed from the front-passenger seat-belt
extender to the shoulder belt guide on the
child restraint system. The shoulder belt strap
must be routed forwards from the retracted
seat-belt extender for the front-passenger
seat. 64
Children in the vehicleSafety
Page 113 of 417
heating should also not be used to dry
the seats.
R clean the seat covers as recommended;
see "Interior care".
R do not transport heavy loads on the
seats. Do not place sharp objects on the seat cushions, e.g. knives, nails or tools. The seats should only be occupied by
passengers, if possible.
R when the seat heating is in operation, do
not cover the seats with insulating mate-
rials, e.g. blankets, coats, bags, seat cov- ers, child seats or booster seats.
! Make sure that there are no objects in the
footwell under or behind the seats when
moving the seats back. There is a risk that
the seats and/or the objects could be dam- aged. Adjusting the seats
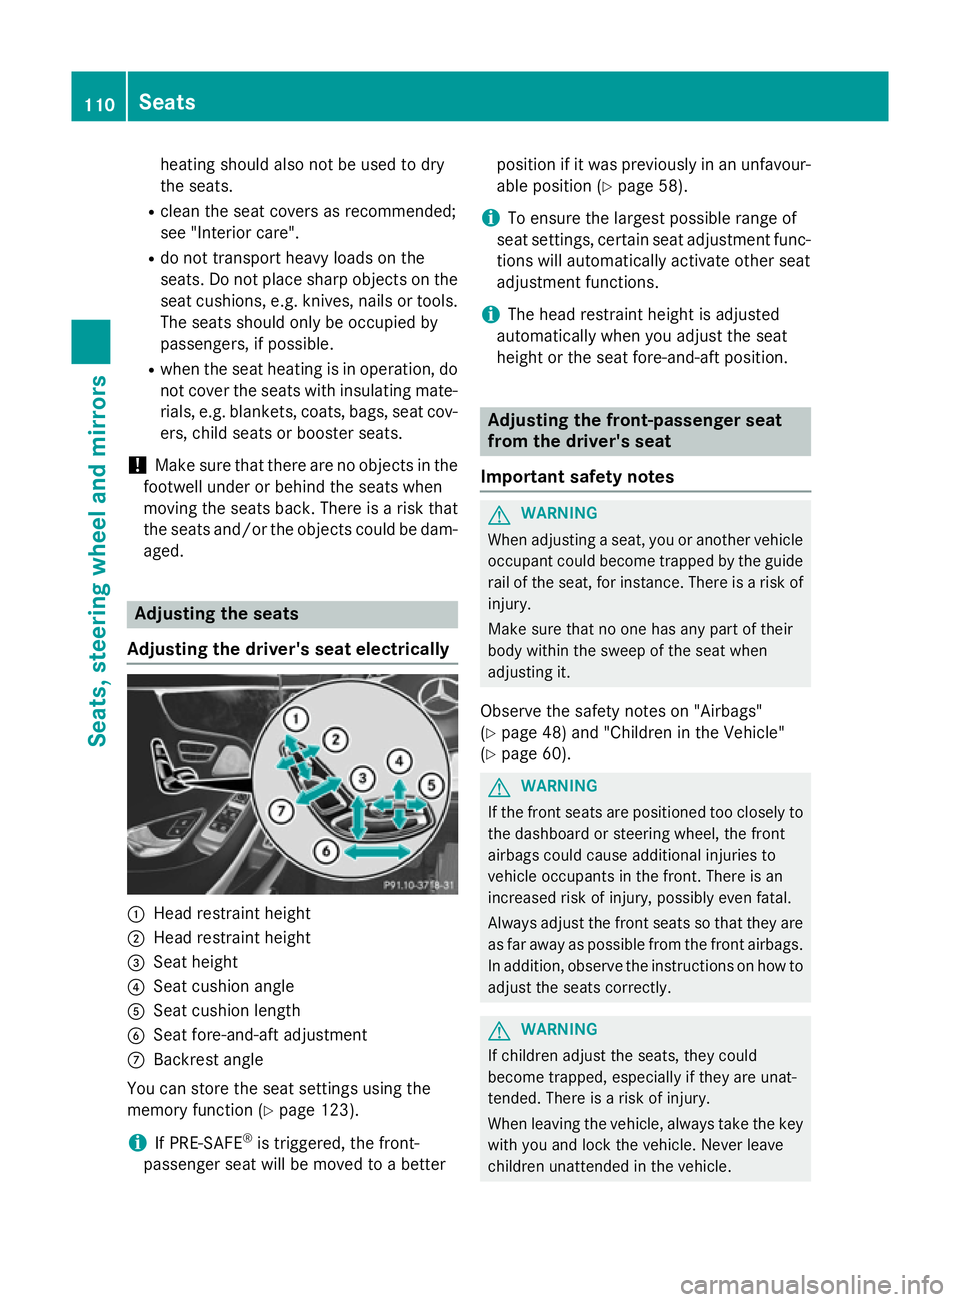
Adjusting the driver's seat electrically :
Head restraint height
; Head restraint height
= Seat height
? Seat cushion angle
A Seat cushion length
B Seat fore-and-aft adjustment
C Backrest angle
You can store the seat settings using the
memory function (Y page 123).
i If PRE-SAFE ®
is triggered, the front-
passenger seat will be moved to a better position if it was previously in an unfavour-
able position (Y page 58).
i To ensure the largest possible range of
seat settings, certain seat adjustment func- tions will automatically activate other seat
adjustment functions.
i The head restraint height is adjusted
automatically when you adjust the seat
height or the seat fore-and-aft position. Adjusting the front-passenger seat
from the driver's seat
Important safety notes G
WARNING
When adjusting a seat, you or another vehicle occupant could become trapped by the guiderail of the seat, for instance. There is a risk of
injury.
Make sure that no one has any part of their
body within the sweep of the seat when
adjusting it.
Observe the safety notes on "Airbags"
(Y page 48) and "Children in the Vehicle"
(Y page 60). G
WARNING
If the front seats are positioned too closely to the dashboard or steering wheel, the front
airbags could cause additional injuries to
vehicle occupants in the front. There is an
increased risk of injury, possibly even fatal.
Always adjust the front seats so that they are
as far away as possible from the front airbags.
In addition, observe the instructions on how to
adjust the seats correctly. G
WARNING
If children adjust the seats, they could
become trapped, especially if they are unat-
tended. There is a risk of injury.
When leaving the vehicle, always take the key with you and lock the vehicle. Never leave
children unattended in the vehicle. 110
SeatsSeats, steering wheel and mirrors
Page 250 of 417

j
Active Parking Assist
(Ypage 215)
_ Adaptive Highbeam Assist Plus
(Ypage 130)
a DISTRONIC PLUS Steering
Assist and Stop&Go Pilot
(Ypage 203)
- - - mph - - - mph Additional speedometer
(Y
page 264)
120 km/h! 120 km/h! Maximum permissible speed
exceeded (only for certain coun-
tries) Head-up display
General notes The head-up display projects information
from the navigation system and the driver
assistance system above the dashboard into
the driver's field of vision.
A requirement for the display of the contents
is that the following functions are available in the vehicle and are switched on:
R Cruise control and SPEEDTRONIC
R DISTRONIC PLUS
R Traffic Sign Assist
R Navigation
The head-up display allows the driver to see
all of the information without having to take
their eyes off the road.
Important safety notes The head-up display is only an aid and is not a
substitute for attentive driving.
Speed limits and overtaking restrictions are
not always correctly displayed. Traffic signs
always have priority over the Traffic Sign
Assist display.
The visibility of the head-up display is influ-
enced by the following conditions:
R the driver's seat position
R the positioning of the display image
R the general light conditions R
sunglasses with polarisation filters
R wet road surfaces
R blocking of sunlight by objects on the dis-
play cover
In the event of extreme sunlight, sections of
the display may fade. This can be reversed by
switching the head-up display off and on
again.
i Vehicles with the head-up display are
equipped with a special windscreen.
Should repairs be necessary, have the
windscreen replaced at a qualified special-
ist workshop.
Displays and operation Switching the head-up display on/off
X
Press button :.
When the head-up display is switched on,
the display appears in the driver's field of
vision. Displays and operation
247On-board computer and displays Z
Page 376 of 417
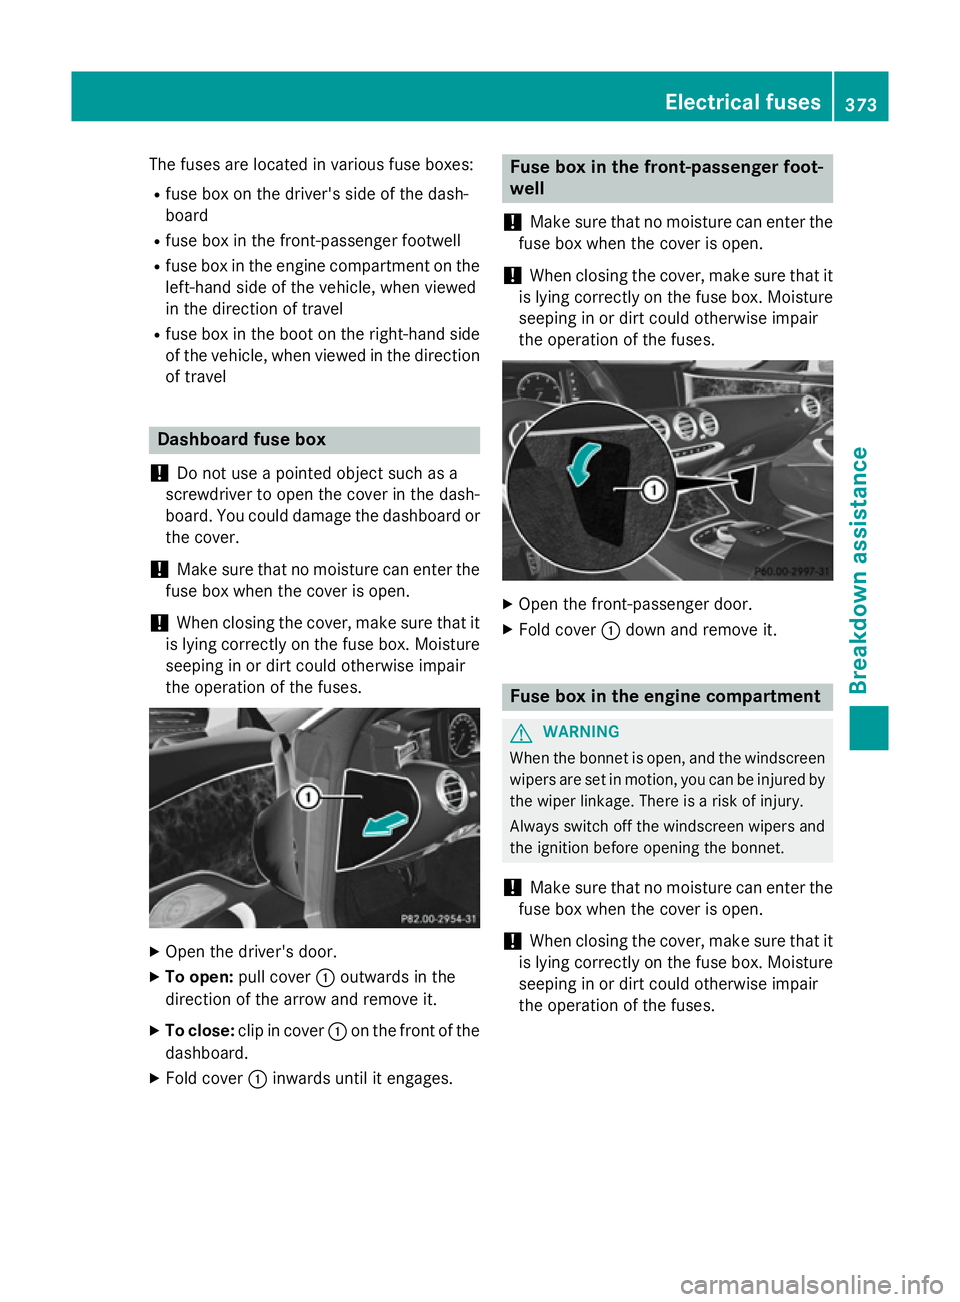
The fuses are located in various fuse boxes:
R fuse box on the driver's side of the dash-
board
R fuse box in the front-passenger footwell
R fuse box in the engine compartment on the
left-hand side of the vehicle, when viewed
in the direction of travel
R fuse box in the boot on the right-hand side
of the vehicle, when viewed in the direction
of travel Dashboard fuse box
! Do not use a pointed object such as a
screwdriver to open the cover in the dash-
board. You could damage the dashboard or
the cover.
! Make sure that no moisture can enter the
fuse box when the cover is open.
! When closing the cover, make sure that it
is lying correctly on the fuse box. Moisture
seeping in or dirt could otherwise impair
the operation of the fuses. X
Open the driver's door.
X To open: pull cover :outwards in the
direction of the arrow and remove it.
X To close: clip in cover :on the front of the
dashboard.
X Fold cover :inwards until it engages. Fuse box in the front-passenger foot-
well
! Make sure that no moisture can enter the
fuse box when the cover is open.
! When closing the cover, make sure that it
is lying correctly on the fuse box. Moisture seeping in or dirt could otherwise impair
the operation of the fuses. X
Open the front-passenger door.
X Fold cover :down and remove it. Fuse box in the engine compartment
G
WARNING
When the bonnet is open, and the windscreen wipers are set in motion, you can be injured by
the wiper linkage. There is a risk of injury.
Always switch off the windscreen wipers and
the ignition before opening the bonnet.
! Make sure that no moisture can enter the
fuse box when the cover is open.
! When closing the cover, make sure that it
is lying correctly on the fuse box. Moisture
seeping in or dirt could otherwise impair
the operation of the fuses. Electrical fuses
373Breakdown assistance Z