2015 MERCEDES-BENZ S-CLASS COUPE clock
[x] Cancel search: clockPage 96 of 417

X
To power close a door: push the door into
the lock up to the first detent position.
Power closing will pull the door fully closed.
X To power close the boot lid: lightly push
the boot lid closed.
The power closing function pulls the boot
lid closed. Unlocking the driver's door (emer-
gency key element)
If the vehicle can no longer unlocked with the key or KEYLESS-GO, use the emergency key
element.
X Take the emergency key element out of the
key (Y page 87). X
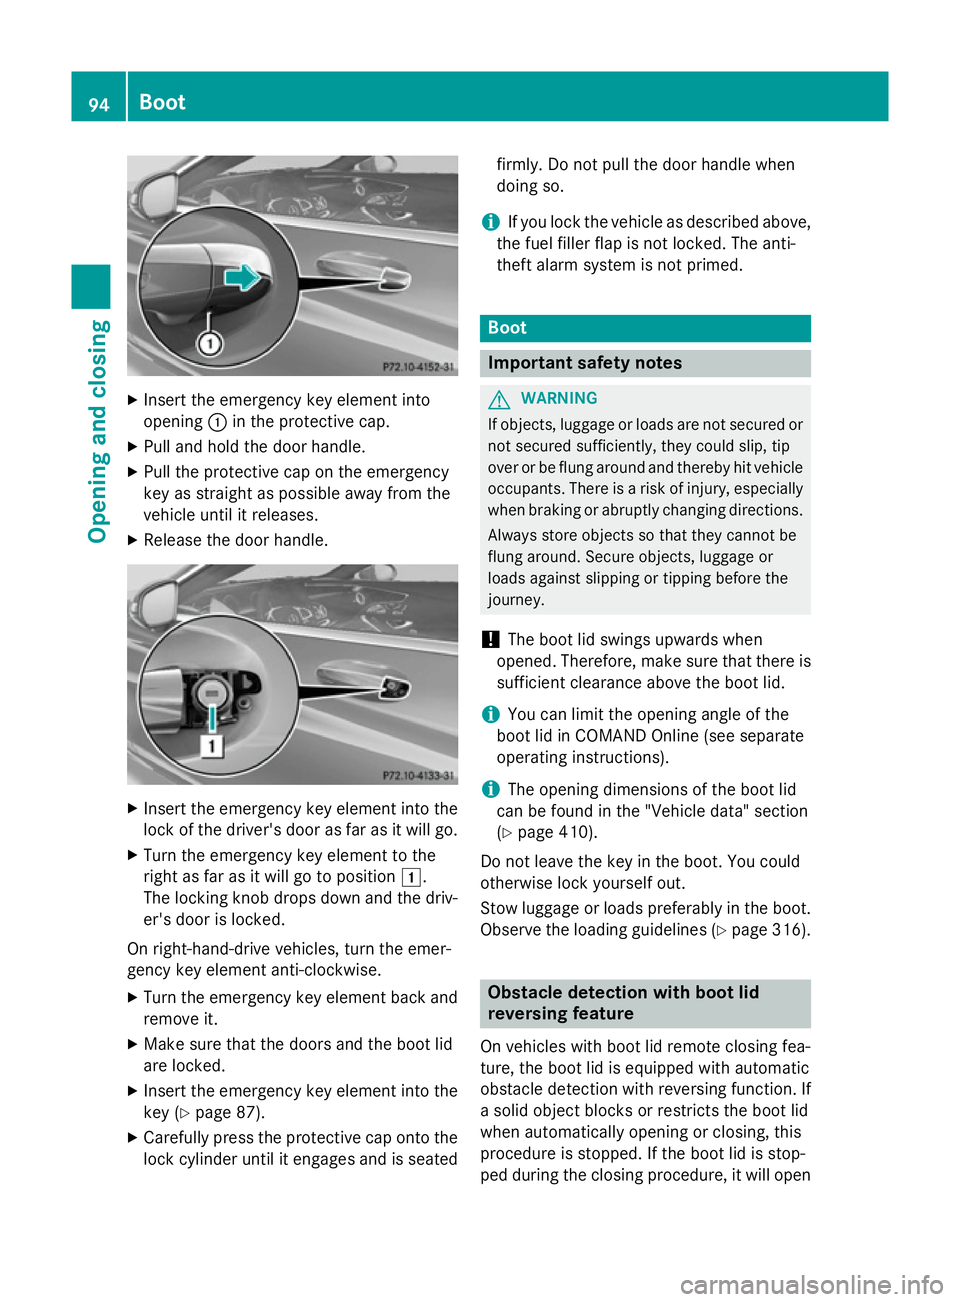
Insert the emergency key element into
opening :in the protective cap.
X Pull and hold the door handle.
X Pull the protective cap on the emergency
key as straight as possible away from the
vehicle until it releases.
X Release the door handle. X
Insert the emergency key element into the
lock of the driver's door as far as it will go.
X Turn the emergency key element to the left
as far as it will go to position 1.
The locking knob pops up and the door
unlocks.
On right-hand-drive vehicles, turn the emer-
gency key element clockwise. X Turn the emergency key element back and
remove it.
X Insert the emergency key element into the
key (Y page 87).
X Carefully press the protective cap onto the
lock cylinder until it engages and is seated
firmly. Do not pull the door handle when
doing so.
If you use the emergency key element to
unlock and open the driver's door, the anti-
theft alarm system will be triggered. Switch
off the alarm (Y page 80). Locking the vehicle (emergency key
element)
If the vehicle can no longer be locked with the
key or KEYLESS-GO, use the emergency key
element.
X Open the driver's door.
X Close the front-passenger door and the
boot lid.
X Press the locking button (Y page 91).
X Check whether the locking knob on the
front-passenger door is still visible. Press
the locking knob down by hand if neces-
sary.
X Close the driver's door.
X Take the emergency key element out of the
key (Y page 87). Doors
93Opening and closing Z
Page 97 of 417

X
Insert the emergency key element into
opening :in the protective cap.
X Pull and hold the door handle.
X Pull the protective cap on the emergency
key as straight as possible away from the
vehicle until it releases.
X Release the door handle. X
Insert the emergency key element into the
lock of the driver's door as far as it will go.
X Turn the emergency key element to the
right as far as it will go to position 1.
The locking knob drops down and the driv-
er's door is locked.
On right-hand-drive vehicles, turn the emer-
gency key element anti-clockwise. X Turn the emergency key element back and
remove it.
X Make sure that the doors and the boot lid
are locked.
X Insert the emergency key element into the
key (Y page 87).
X Carefully press the protective cap onto the
lock cylinder until it engages and is seated firmly. Do not pull the door handle when
doing so.
i If you lock the vehicle as described above,
the fuel filler flap is not locked. The anti-
theft alarm system is not primed. Boot
Important safety notes
G
WARNING
If objects, luggage or loads are not secured or not secured sufficiently, they could slip, tip
over or be flung around and thereby hit vehicle
occupants. There is a risk of injury, especially when braking or abruptly changing directions.
Always store objects so that they cannot be
flung around. Secure objects, luggage or
loads against slipping or tipping before the
journey.
! The boot lid swings upwards when
opened. Therefore, make sure that there is sufficient clearance above the boot lid.
i You can limit the opening angle of the
boot lid in COMAND Online (see separate
operating instructions).
i The opening dimensions of the boot lid
can be found in the "Vehicle data" section
(Y page 410).
Do not leave the key in the boot. You could
otherwise lock yourself out.
Stow luggage or loads preferably in the boot.
Observe the loading guidelines (Y page 316). Obstacle detection with boot lid
reversing feature
On vehicles with boot lid remote closing fea-
ture, the boot lid is equipped with automatic
obstacle detection with reversing function. If
a solid object blocks or restricts the boot lid
when automatically opening or closing, this
procedure is stopped. If the boot lid is stop-
ped during the closing procedure, it will open 94
BootOpening and closing
Page 102 of 417

X
Slide the tip of the emergency key element
into opening =and turn.
The lock cover is levered off. 1
Basic position
2 To unlock
X Insert the emergency key element into the
lock as far as the stop.
X Turn the emergency key element from posi-
tion 1anti-clockwise as far as it will go to
position 2.
The boot is unlocked and opens slightly.
X Turn the emergency key element back to
position 1and remove it.
X Insert the emergency key element into the
key.
X Close the lock cover.
X Swing cover ;upwards until it engages.
X Fold up the rear seat armrest. Side windows
Important safety notes
G
WARNING
While opening the side windows, body parts
could become trapped between the side win- dow and the door frame as the side window
moves. There is a risk of injury.
Make sure that nobody touches the side win-
dow during the opening procedure. If some-
body becomes trapped, release the switch or pull the switch to close the side window again. G
WARNING
While closing the side windows, body parts in the closing area could become trapped. There is a risk of injury.
When closing make sure that no parts of the
body are in the closing area. If somebody
becomes trapped, release the switch or press
the switch to open the side window again. G
WARNING
If children operate the side windows they
could become trapped, particularly if they are left unsupervised. There is a risk of injury.
Activate the override feature for the rear side
windows. When leaving the vehicle, always
take the key with you and lock the vehicle.
Never leave children unattended in the vehi-
cle. Side window reversing feature
The front side windows are equipped with an
automatic reversing feature. If a solid object
blocks or restricts the upward movement of
one of the front side windows during the auto- matic closing process, the side window opens again automatically. During the manual clos-
ing process, the side window only opens
again automatically after the corresponding
switch is released. However, the automatic
reversing feature is only an aid, not a substi-
tute for your attention when closing the side
window. Side windows
99Opening and closing Z
Page 159 of 417

Adjusting the centre air vents
:
Fixed centre air vent
; Centre air vents, right
= Centre vent control, right
? Centre vent control, left
A Centre air vents, left
X To open/close: press control=or?.
The control pops out.
X Turn control =or? to anti-clockwise or
clockwise.
X To adjust the air direction: hold rear air
vent ;orA by the middle fin and move up
or down or to the left or right. Adjusting the side air vents
:
Side window demister vent
; Side air vent
= Control for left side air vent X
To open/close: press control=.
The control pops out.
X Turn control =to anti-clockwise or clock-
wise.
X To adjust the air direction: hold side air
vent ;by the middle fin and move it up or
down or to the left or right. Adjusting the glove compartment air
vent
! Close the air vent when heating the vehi-
cle.
At high outside temperatures, open the air
vent and activate the "cooling with air dehu- midification" function. Otherwise, temper-
ature-sensitive items stored in the glove
compartment could be damaged.
When automatic climate control is activated,
the glove compartment can be ventilated, for
instance to cool its contents. The level of air- flow depends on the airflow and air distribu-
tion settings. :
Air vent thumbwheel
; Air vent
X To open or close: turn control:to the
right or left. 156
Adjusting the air ventsClimate cont
rol
Page 160 of 417

Setting the rear-compartment air
vents X
To open/close: press control=.
The control pops out.
X Turn control =to the anti-clockwise or to
clockwise.
X To adjust the air direction: hold rear air
vent :or; by the middle fin and move up
or down or to the left or right. Adjusting the air vents
157Climate control Z
Page 183 of 417

X
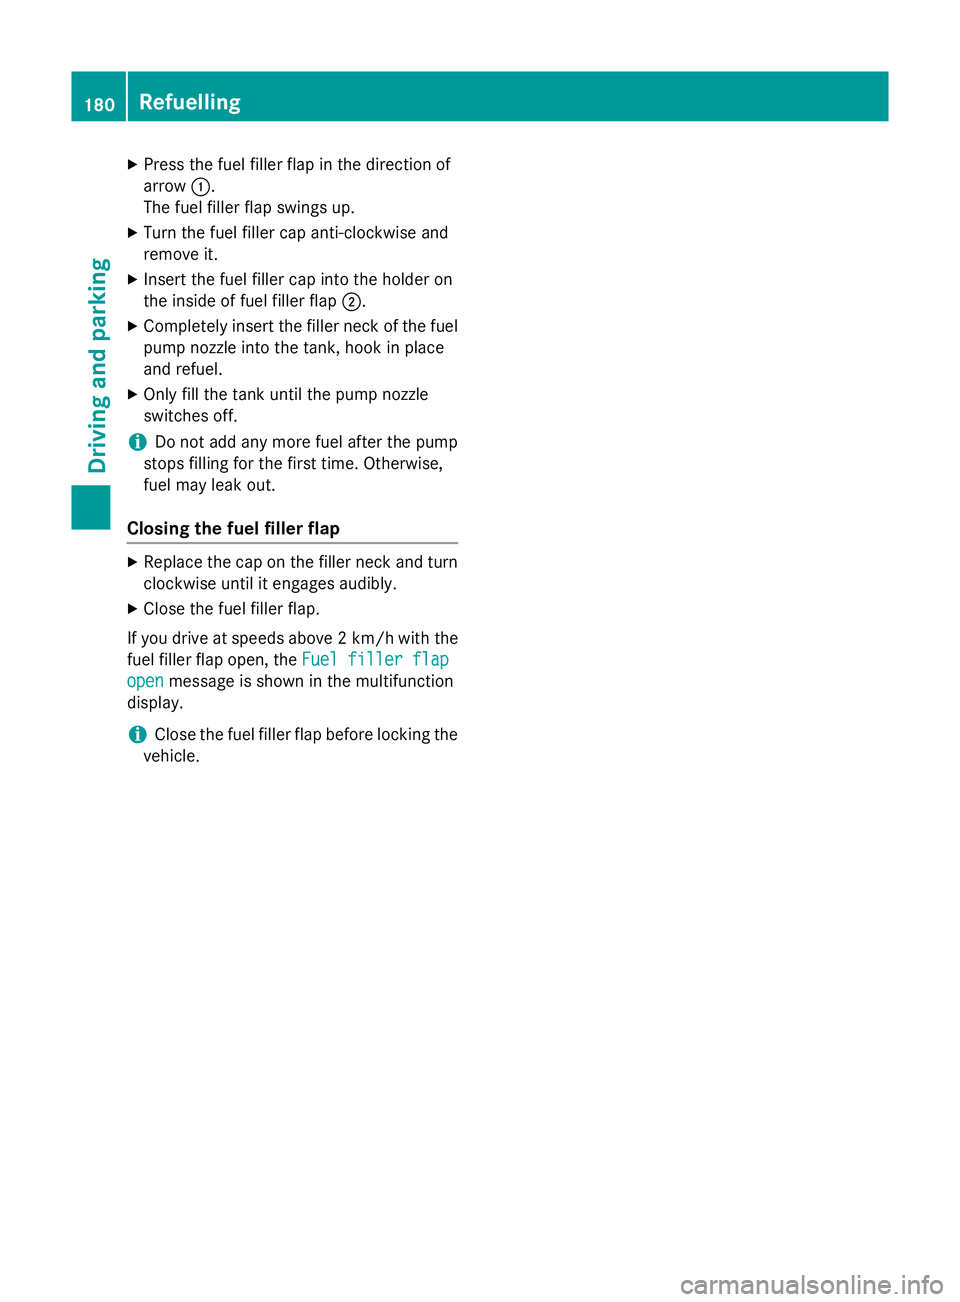
Press the fuel filler flap in the direction of
arrow :.
The fuel filler flap swings up.
X Turn the fuel filler cap anti-clockwise and
remove it.
X Insert the fuel filler cap into the holder on
the inside of fuel filler flap ;.
X Completely insert the filler neck of the fuel
pump nozzle into the tank, hook in place
and refuel.
X Only fill the tank until the pump nozzle
switches off.
i Do not add any more fuel after the pump
stops filling for the first time. Otherwise,
fuel may leak out.
Closing the fuel filler flap X
Replace the cap on the filler neck and turn
clockwise until it engages audibly.
X Close the fuel filler flap.
If you drive at speeds above 2 km/hw ith the
fuel filler flap open, the Fuel
Fuel filler filler flap
flap
open
open message is shown in the multifunction
display.
i Close the fuel filler flap before locking the
vehicle. 180
RefuellingDriving and parking
Page 247 of 417

Useful information
i This Owner's Manual describes all mod-
els, series and optional equipment for your
vehicle that were available at the time of
going to press. National variations are pos- sible. Note that your vehicle may not be
equipped with all of the functions descri-
bed. This is also the case for systems and
functions relevant to safety.
i Read the information on qualified special-
ist workshops: (Y page 26). Important safety notes
G
WARNING
Operating the integrated information systems and communications equipment in the vehicle
while driving will distract you from traffic con-
ditions. You could then lose control of the
vehicle. There is a risk of an accident.
Only operate these devices if road traffic con-
ditions permit. If you are unsure about the
surrounding conditions, pull over to a safe
location and make entries only while the vehi-
cle is stationary.
You must observe the legal requirements for
the country in which you are currently driving when operating the on-board computer. G
WARNING
If the instrument cluster has failed or there is a malfunction, you may not know about
safety-related function restrictions. The oper-ating safety of your vehicle may be affected.
There is a risk of an accident.
Immediately stop the vehicle while paying
attention to the traffic conditions and consult
a qualified specialist workshop. G
WARNING
If the instrument cluster has failed or mal-
functioned, you may not recognise function
restrictions relevant to safety. The operating safety of your vehicle may be impaired. There
is a risk of an accident.
Drive on carefully. Have the vehicle checked
at a qualified specialist workshop immedi-
ately.
If the operating safety of your vehicle is
impaired, park the vehicle safely as soon as
possible. Contact a qualified specialist work-
shop.
The on-board computer only shows messages
or warnings from certain systems in the mul- tifunction display. You should therefore make
sure your vehicle is operating safely at all
times.
For an overview; see the instrument cluster
illustration (Y page 32). Displays and operation
Instrument cluster lighting
The light sensor in the instrument cluster
automatically controls the brightness of the
multifunction display. In daylight, the displays
in the instrument cluster are illuminated. A
dimming function is not possible in daylight.
The lighting in the instrument cluster, in the
displays and the controls in the vehicle inte-
rior can be adjusted using the brightness con-
trol knob.
The brightness control is located between the instrument cluster and the COMAND Display
(Y page 34).
X Turn the brightness control knob clockwise
or anti-clockwise.
If the light switch (Y page 128) is set to
Ã, TorL, the brightness is
dependent upon the brightness of the
ambient light. Rev counter
! Do not drive in the overrevving range.
Doing so will damage the engine. 244
Displays and operationOn-board computer and displays
Page 320 of 417

R
Close lockable stowage compartments
while driving.
R Stow and secure objects that are heavy,
hard, pointy, sharp-edged, fragile or too
large in the boot.
Observe the loading guidelines (Y page 316).
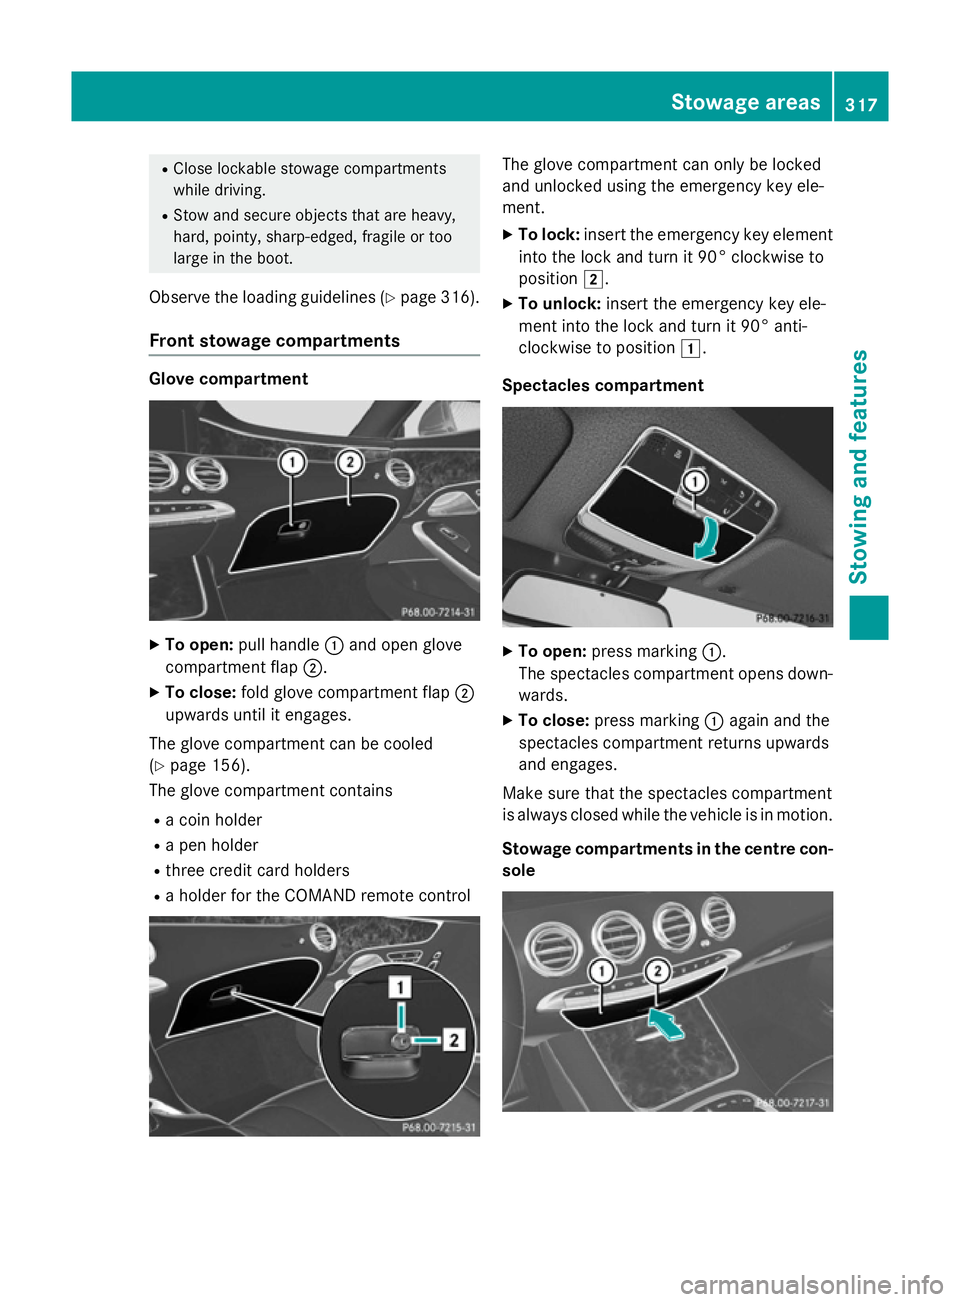
Front stowage compartments Glove compartment
X
To open: pull handle :and open glove
compartment flap ;.
X To close: fold glove compartment flap ;
upwards until it engages.
The glove compartment can be cooled
(Y page 156).
The glove compartment contains
R a coin holder
R a pen holder
R three credit card holders
R a holder for the COMAND remote control The glove compartment can only be locked
and unlocked using the emergency key ele-
ment.
X To lock: insert the emergency key element
into the lock and turn it 90° clockwise to
position 2.
X To unlock: insert the emergency key ele-
ment into the lock and turn it 90° anti-
clockwise to position 1.
Spectacles compartment X
To open: press marking :.
The spectacles compartment opens down- wards.
X To close: press marking :again and the
spectacles compartment returns upwards
and engages.
Make sure that the spectacles compartment
is always closed while the vehicle is in motion.
Stowage compartments in the centre con-
sole Stowage areas
317Stowing and features Z