2015 MERCEDES-BENZ S-CLASS COUPE warning
[x] Cancel search: warningPage 329 of 417
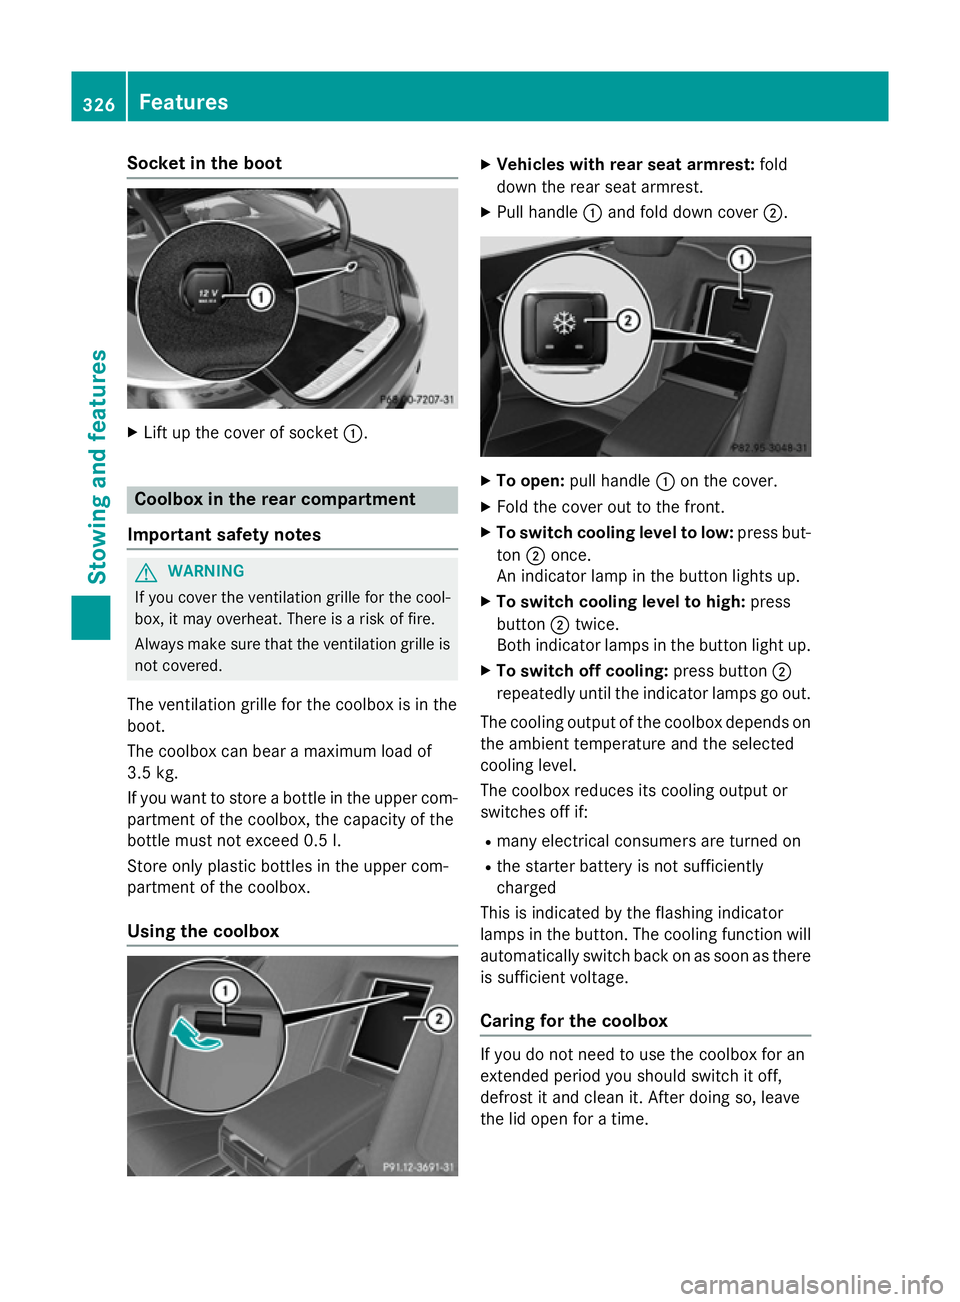
Socket in the boot
X
Lift up the cover of socket :.Coolbox in the rear compartment
Important safety notes G
WARNING
If you cover the ventilation grille for the cool-
box, it may overheat. There is a risk of fire.
Always make sure that the ventilation grille is not covered.
The ventilation grille for the coolbox is in the
boot.
The coolbox can bear a maximum load of
3.5 kg.
If you want to store a bottle in the upper com-
partment of the coolbox, the capacity of the
bottle must not exceed 0.5 l.
Store only plastic bottles in the upper com-
partment of the coolbox.
Using the coolbox X
Vehicles with rear seat armrest: fold
down the rear seat armrest.
X Pull handle :and fold down cover ;. X
To open: pull handle :on the cover.
X Fold the cover out to the front.
X To switch cooling level to low: press but-
ton ;once.
An indicator lamp in the button lights up.
X To switch cooling level to high: press
button ;twice.
Both indicator lamps in the button light up.
X To switch off cooling: press button;
repeatedly until the indicator lamps go out.
The cooling output of the coolbox depends on
the ambient temperature and the selected
cooling level.
The coolbox reduces its cooling output or
switches off if:
R many electrical consumers are turned on
R the starter battery is not sufficiently
charged
This is indicated by the flashing indicator
lamps in the button. The cooling function will automatically switch back on as soon as there
is sufficient voltage.
Caring for the coolbox If you do not need to use the coolbox for an
extended period you should switch it off,
defrost it and clean it. After doing so, leave
the lid open for a time.326
FeaturesStowing and features
Page 331 of 417

Breakdown assistance call button
X
To call breakdown assistance: press but-
ton :for breakdown assistance.
The breakdown assistance call is initiated.
The Connecting Connecting call
callmessage appears in
the multifunction display. The audio system is muted.
Only in certain countries: a voice message
prompts you to confirm the data transmis-
sion. After confirmation, the required vehi-
cle data is transmitted. During data trans-
mission, you will see a corresponding sym-
bol in the display. This may take a moment. You are then connected to an employee.
X To end a call: press the~button on the
multifunction steering wheel.
or
X Press the corresponding COMAND Online
button for ending a phone call.
Info call button This function is not available in all countries. X
To call: press info call button :.
The breakdown assistance call is initiated.
The Connecting Connecting call
callmessage appears in
the multifunction display. The audio system is muted.
Only in certain countries: a voice message
prompts you to confirm the data transmis-
sion. After confirmation, the required vehi- cle data is transmitted. During data trans-
mission, you will see a corresponding sym-
bol in the display. This may take a moment.
You are then connected to an employee.
X To end a call: press the~button on the
multifunction steering wheel.
or
X Press the corresponding COMAND Online
button for ending a phone call. Mobile phone
Important safety notes G
WARNING
Operating mobile communications equip-
ment while driving distracts you from paying
attention to traffic conditions. This could also cause you to lose control of the vehicle. There
is a risk of an accident.
Use this device only when the vehicle is sta-
tionary.
You must observe the legal requirements for
the country in which you are currently driving when operating mobile communications
equipment in the vehicle.
If it is permitted by law to operate communi-
cations equipment while the vehicle is in
motion, you may only do so if the traffic sit-
uation permits. You may otherwise be dis-
tracted from the traffic conditions, cause an
accident and injure yourself and others.
Excessive levels of electromagnetic radiation
may cause damage to your health and to the
health of others. The use of an exterior aerial
takes into consideration the scientific discus- 328
FeaturesSto
wing an d features
Page 333 of 417
Garage door opener
General notes The HomeLink
®
garage door opener integra-
ted in the rear-view mirror allows you to oper- ate up to three different door and gate sys-
tems.
Once programmed, the integrated garage
door opener in the rear-view mirror will
assume the function of the garage door sys-
tem's remote control. Please also read the
operating instructions for the garage door
system.
When programming a garage door opener,
park the vehicle outside the garage. Do not
run the engine while programming.
The garage door opener is only available for
certain countries. Observe the legal require-
ments for each individual country.
The HomeLink ®
garage door opener is com-
patible with most European garage and gate
opener drives. More information on Home-
Link ®
and/or compatible products is availa-
ble:
R at a qualified specialist workshop
R via the HomeLink ®
Hotline
(0) 08000 466 354 65 or alternatively
+49 (0) 6838 907-277
R on the Internet at http://
www.homelink.com
Important safety notes G
WARNING
When you operate or program the garage door with the integrated garage door opener, per-
sons in the range of movement of the garage
door can become trapped or struck by the
garage door. There is a risk of injury.
When using the integrated garage door
opener, always make sure that nobody is
within the range of movement of the garage
door. G
WARNING
Combustion engines emit poisonous exhaust
gases such as carbon monoxide. Inhaling
these exhaust gases leads to poisoning. There is a risk of fatal injury. Therefore never leave
the engine running in enclosed spaces with-
out sufficient ventilation.
Programming Programming buttons
Pay attention to the "Important safety notes"
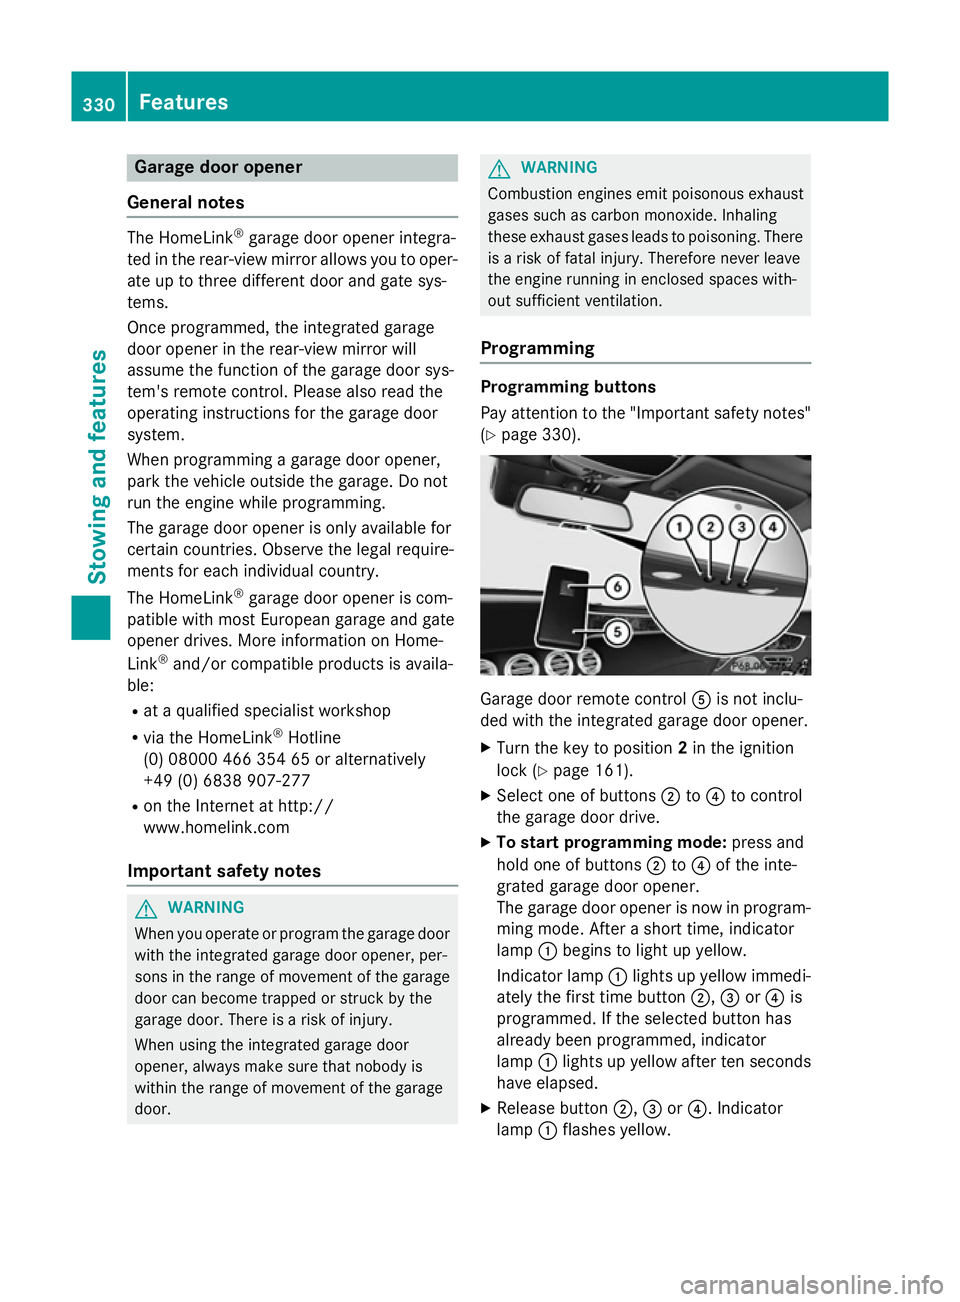
(Y page 330). Garage door remote control
Ais not inclu-
ded with the integrated garage door opener.
X Turn the key to position 2in the ignition
lock (Y page 161).
X Select one of buttons ;to? to control
the garage door drive.
X To start programming mode: press and
hold one of buttons ;to? of the inte-
grated garage door opener.
The garage door opener is now in program- ming mode. After a short time, indicator
lamp :begins to light up yellow.
Indicator lamp :lights up yellow immedi-
ately the first time button ;,=or? is
programmed. If the selected button has
already been programmed, indicator
lamp :lights up yellow after ten seconds
have elapsed.
X Release button ;,=or?. Indicator
lamp :flashes yellow. 330
FeaturesStowing and features
Page 338 of 417
America
Country Radio type approval num-
ber
Frequency range (MHz)
BB (Barba-
dos) Registration not required
MHz: 27, 40, 433, 868
CL (Chile) 38447/F-23 No.3.3634
MHz: 40, 433
3943/DFRS05165/F-50
MHz: 280 to 433
GF (French
Guyana) Article 6 of Directive
1999/5/EC R&TTE 10668
13 May 05
MHz: 27, 30, 40, 433, 868
GP (Guade-
loupe) Article 6 of Directive
1999/5/EC R&TTE 10668
13 May 05
MHz: 27, 30, 40, 433, 868
MQ (Martini-
que) Article 6 of Directive
1999/5/EC R&TTE 11 July
05
MHz: 27, 30, 40, 433, 868
MX (Mexico) MHz: 280 to 390
Asia
Country Radio type approval num-
ber
Frequency range (MHz)
AE (United
Arab Emi-
rates) 1623/5/10-2/26/76
MHz: 433
JO (Jordan) TRC/LPD/2005/23
MHz: 27, 30, 40, 433, 868
KW (Kuwait) 5 October 2005
MHz: 27, 30, 40, 418, 433,
868
SA (Saudi
Arabia) 11_02_05/5024-5-6
MHz: 418, 433 Country Radio type approval num-
ber
Frequency range (MHz)
SY (Syria) 279/4/14 / 05 March 06
TR (Turkey) National Certification 23
July 07
MHz: 433
Australia
Country Radio type approval num-
ber
Frequency range (MHz)
AU (Aus-
tralia) 28 June 2005
MHz: 27, 30, 40, 433, 868
NZ (New
Zealand) 20 March 06
MHz: 27, 30, 40, 433
Floormats
G
WARNING
Objects in the driver's footwell may restrict
the clearance around the pedals or block a
depressed pedal. This jeopardises the oper-
ating and road safety of the vehicle. There is a risk of an accident.
Stow all objects securely in the vehicle so that
they do not get into the driver's footwell.
Always fit the floormats securely and as pre-
scribed in order to ensure that there is always sufficient room for the pedals. Do not use
loose floormats and do not place several floor-mats on top of one another. Features
335Stowing and featu res Z
Page 341 of 417
Useful information
i This Owner's Manual describes all mod-
els, series and optional equipment for your
vehicle that were available at the time of
going to press. National variations are pos- sible. Note that your vehicle may not be
equipped with all of the functions descri-
bed. This is also the case for systems and
functions relevant to safety.
i Read the information on qualified special-
ist workshops: (Y page 26). Engine compartment
Bonnet
Important safety notes G
WARNING
An unlocked bonnet may open up when the
vehicle is in motion and block your view. There is a risk of an accident.
Never unlock the bonnet when driving. Before
every trip, ensure that the bonnet is locked. G
WARNING
When being opened and closed, the bonnet
may suddenly fall into the closed position.
There is a risk of injury to persons in the range of movement of the bonnet.
Open and close the bonnet only when nobody
is in the range of movement. G
WARNING
If you open the bonnet while the engine is
overheating or while there is a fire in the
engine compartment, you could come into
contact with hot gases or other leaking ser-
vice products. There is a danger of injury.
Allow an overheating engine to cool down
before opening the bonnet. If there is a fire in the engine compartment, leave the bonnet
closed and notify the fire brigade. G
WARNING
There are moving components in the engine
compartment. Certain components may con-
tinue to move or suddenly move again even
after the ignition has been switched off, e.g.
the radiator fan. There is a risk of injury.
If you have to carry out work in the engine
compartment:
R switch off the ignition
R never touch the dangerous areas surround-
ing moving components, e.g. the rotation
area of the fan
R remove jewellery and watches
R keep items of clothing and hair, for exam-
ple, away from moving parts. G
WARNING
The ignition system and the fuel injection sys- tem operate with a high voltage. If you touch
the live components, you could receive an
electric shock. There is a danger of injury.
Never touch components of the ignition sys-
tem or the fuel injection system when the
ignition is switched on.
Active bonnet (pedestrian protection) Operating principle
! A triggered active bonnet must be
repaired at a qualified specialist workshop
after it has been reset. The active bonnet
function will then be available again. The
additional pedestrian protection provided
by the active bonnet will then be restored.
The active bonnet is only available in certain
countries.
The active bonnet can reduce the risk of injury to pedestrians in certain accident situations.
Raising the active bonnet increases the clear- ance to hard components, such as the engine.
If the active bonnet has been triggered, it is
raised at the rear in the area around the hinge
by approximately 85 mm.
For the drive to the workshop, reset the trig-
gered active bonnet yourself. If the active 338
Engine compartmentMaintenance and care
Page 342 of 417
bonnet has been triggered, pedestrian pro-
tection may be limited.
Resetting G
WARNING
Certain components in the engine compart-
ment could be very hot, e.g. the engine, the
radiator and parts of the exhaust system.
There is a risk of injury when accessing the
engine compartment.
As far as possible, allow the engine to cool
down and only touch the components descri- bed in the following. X
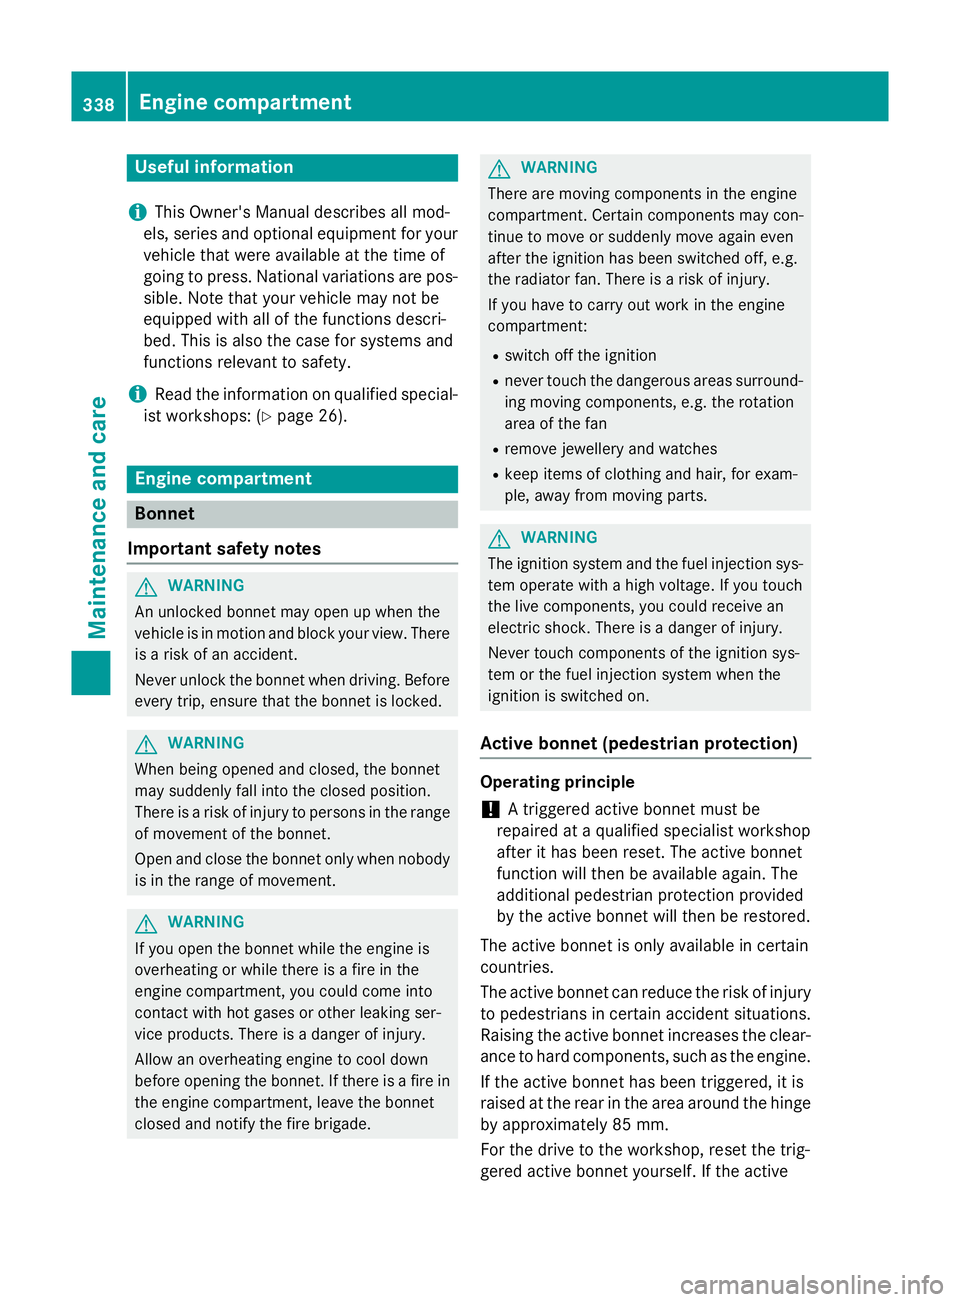
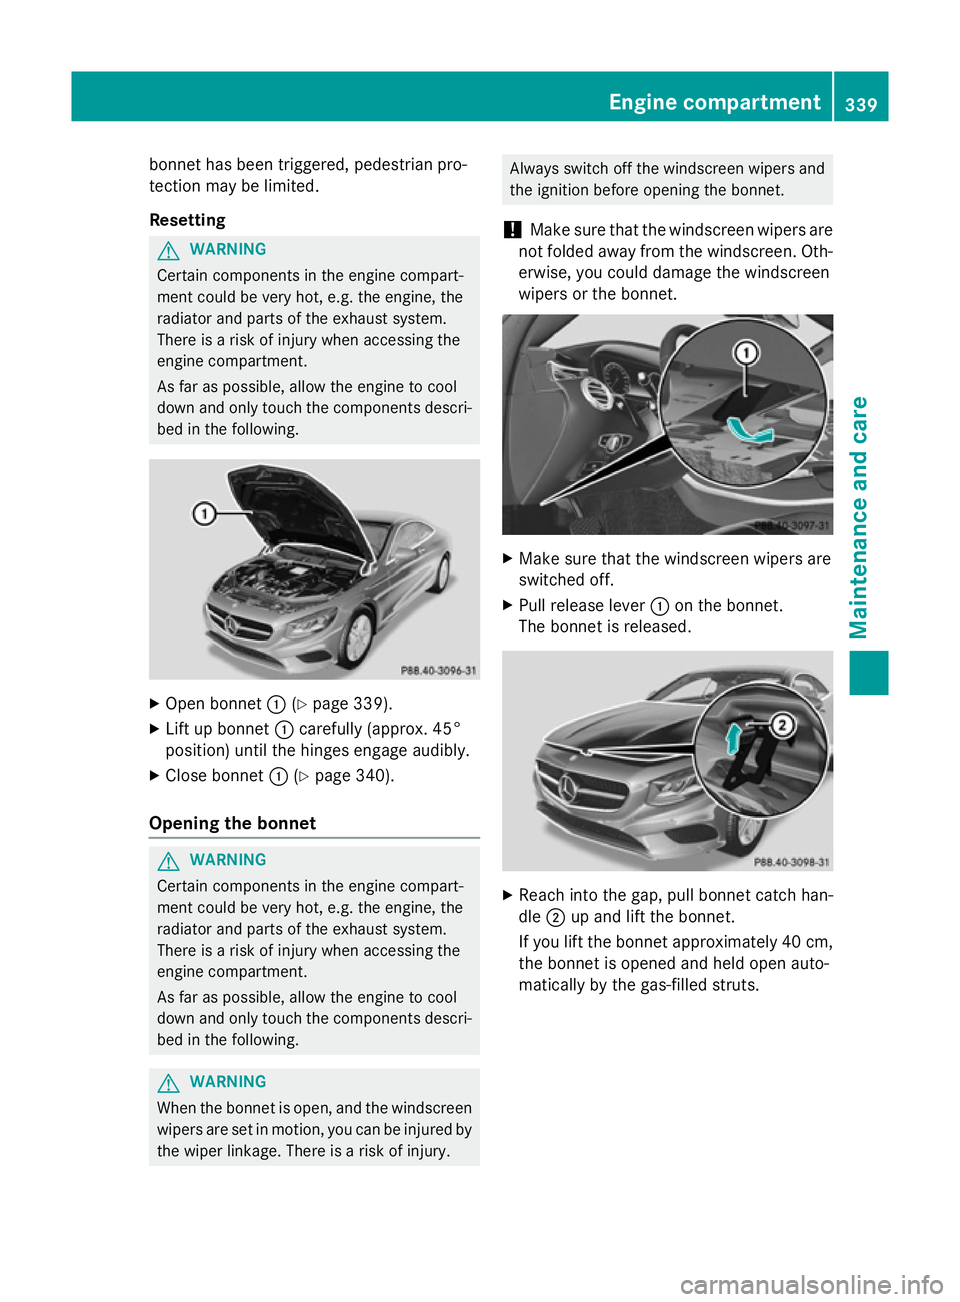
Open bonnet :(Ypage 339).
X Lift up bonnet :carefully (approx. 45°
position) until the hinges engage audibly.
X Close bonnet :(Ypage 340).
Opening the bonnet G
WARNING
Certain components in the engine compart-
ment could be very hot, e.g. the engine, the
radiator and parts of the exhaust system.
There is a risk of injury when accessing the
engine compartment.
As far as possible, allow the engine to cool
down and only touch the components descri- bed in the following. G
WARNING
When the bonnet is open, and the windscreen wipers are set in motion, you can be injured by
the wiper linkage. There is a risk of injury. Always switch off the windscreen wipers and
the ignition before opening the bonnet.
! Make sure that the windscreen wipers are
not folded away from the windscreen. Oth-
erwise, you could damage the windscreen
wipers or the bonnet. X
Make sure that the windscreen wipers are
switched off.
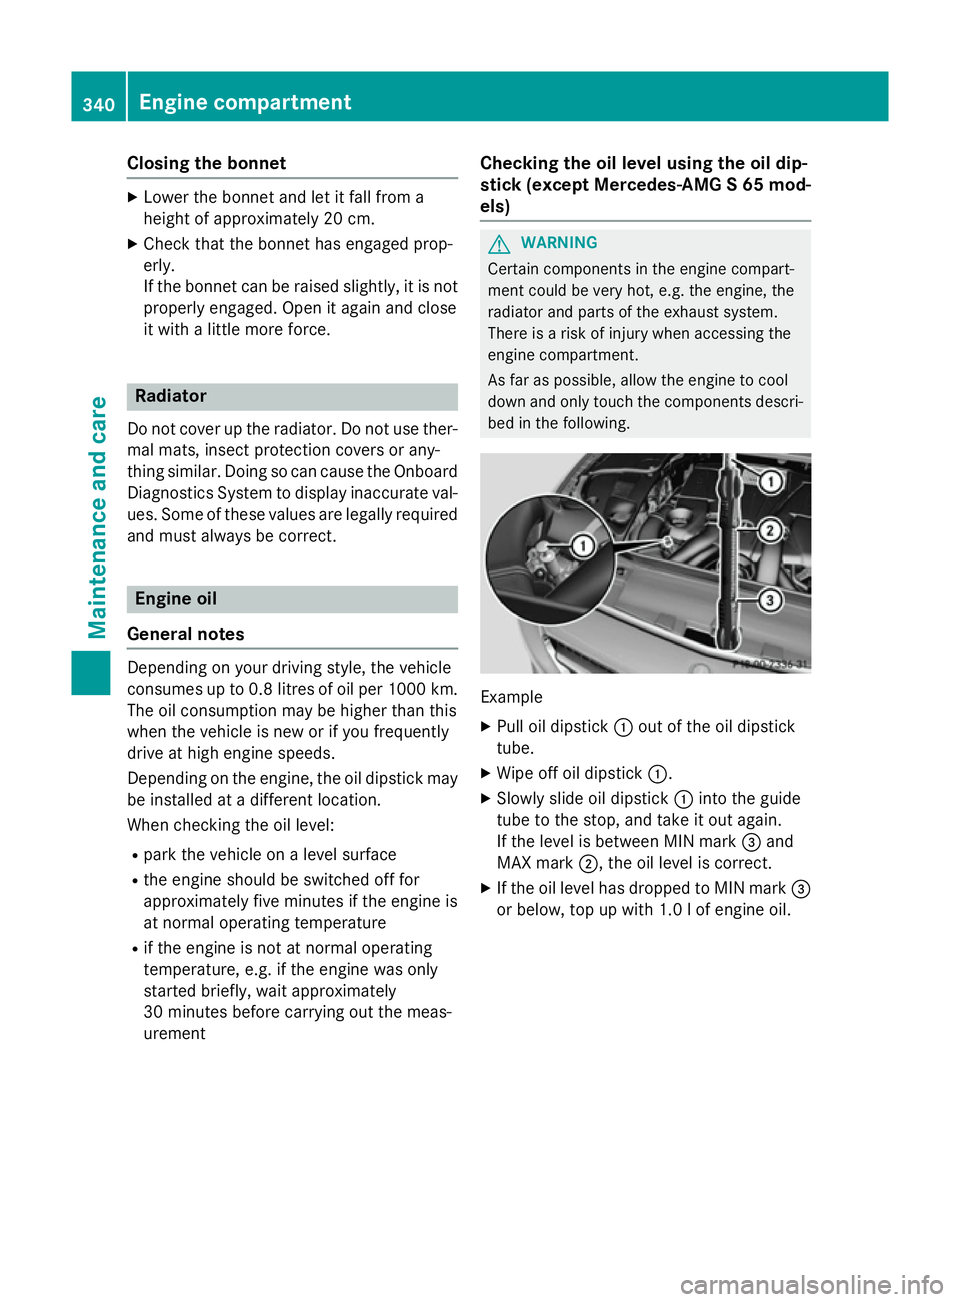
X Pull release lever :on the bonnet.
The bonnet is released. X
Reach into the gap, pull bonnet catch han-
dle ;up and lift the bonnet.
If you lift the bonnet approximately 40 cm, the bonnet is opened and held open auto-
matically by the gas-filled struts. Engine compartment
339Maintenance and care Z
Page 343 of 417
Closing the bonnet
X
Lower the bonnet and let it fall from a
height of approximately 20 cm.
X Check that the bonnet has engaged prop-
erly.
If the bonnet can be raised slightly, it is not
properly engaged. Open it again and close
it with a little more force. Radiator
Do not cover up the radiator. Do not use ther-
mal mats, insect protection covers or any-
thing similar. Doing so can cause the Onboard Diagnostics System to display inaccurate val-
ues. Some of these values are legally required
and must always be correct. Engine oil
General notes Depending on your driving style, the vehicle
consumes up to 0.8 litres of oil per 1000 km.
The oil consumption may be higher than this
when the vehicle is new or if you frequently
drive at high engine speeds.
Depending on the engine, the oil dipstick may
be installed at a different location.
When checking the oil level:
R park the vehicle on a level surface
R the engine should be switched off for
approximately five minutes if the engine is
at normal operating temperature
R if the engine is not at normal operating
temperature, e.g. if the engine was only
started briefly, wait approximately
30 minutes before carrying out the meas-
urement Checking the oil level using the oil dip-
stick (except Mercedes-AMG S 65 mod-
els) G
WARNING
Certain components in the engine compart-
ment could be very hot, e.g. the engine, the
radiator and parts of the exhaust system.
There is a risk of injury when accessing the
engine compartment.
As far as possible, allow the engine to cool
down and only touch the components descri- bed in the following. Example
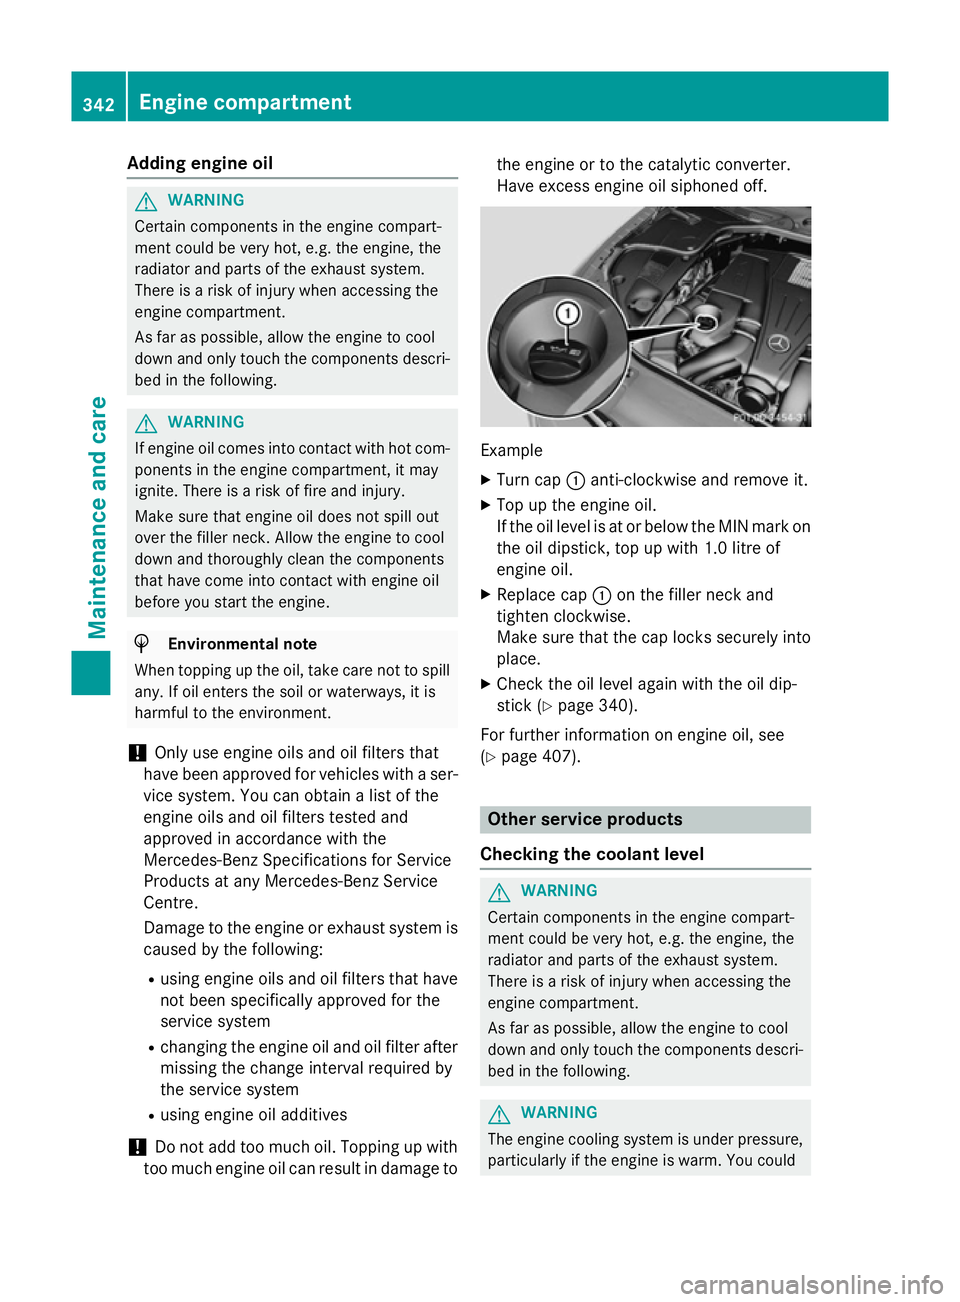
X Pull oil dipstick :out of the oil dipstick
tube.
X Wipe off oil dipstick :.
X Slowly slide oil dipstick :into the guide
tube to the stop, and take it out again.
If the level is between MIN mark =and
MAX mark ;, the oil level is correct.
X If the oil level has dropped to MIN mark =
or below, top up with 1.0 l of engine oil. 340
Engine compartmentMaintenance and care
Page 345 of 417
Adding engine oil
G
WARNING
Certain components in the engine compart-
ment could be very hot, e.g. the engine, the
radiator and parts of the exhaust system.
There is a risk of injury when accessing the
engine compartment.
As far as possible, allow the engine to cool
down and only touch the components descri- bed in the following. G
WARNING
If engine oil comes into contact with hot com- ponents in the engine compartment, it may
ignite. There is a risk of fire and injury.
Make sure that engine oil does not spill out
over the filler neck. Allow the engine to cool
down and thoroughly clean the components
that have come into contact with engine oil
before you start the engine. H
Environmental note
When topping up the oil, take care not to spill
any. If oil enters the soil or waterways, it is
harmful to the environment.
! Only use engine oils and oil filters that
have been approved for vehicles with a ser-
vice system. You can obtain a list of the
engine oils and oil filters tested and
approved in accordance with the
Mercedes-Benz Specifications for Service
Products at any Mercedes-Benz Service
Centre.
Damage to the engine or exhaust system is caused by the following:
R using engine oils and oil filters that have
not been specifically approved for the
service system
R changing the engine oil and oil filter after
missing the change interval required by
the service system
R using engine oil additives
! Do not add too much oil. Topping up with
too much engine oil can result in damage to the engine or to the catalytic converter.
Have excess engine oil siphoned off.
Example
X Turn cap :anti-clockwise and remove it.
X Top up the engine oil.
If the oil level is at or below the MIN mark on
the oil dipstick, top up with 1.0 litre of
engine oil.
X Replace cap :on the filler neck and
tighten clockwise.
Make sure that the cap locks securely into place.
X Check the oil level again with the oil dip-
stick (Y page 340).
For further information on engine oil, see
(Y page 407). Other service products
Checking the coolant level G
WARNING
Certain components in the engine compart-
ment could be very hot, e.g. the engine, the
radiator and parts of the exhaust system.
There is a risk of injury when accessing the
engine compartment.
As far as possible, allow the engine to cool
down and only touch the components descri- bed in the following. G
WARNING
The engine cooling system is under pressure, particularly if the engine is warm. You could 342
Engine compartmentMaintenance and care