2015 MERCEDES-BENZ GLE SUV tyre pressure
[x] Cancel search: tyre pressurePage 252 of 453
vehicle with a difference in speed of less than
12 km/h, a delayed warning occurs.
The yellow indicator lamp goes out if reverse
gear is engaged. Active Blind Spot Assist is not
operational.
The brightness of the indicator/warning lamps
is adjusted automatically according to the
brightness of the surroundings.
Visual and acoustic collision warning
If you switch on the turn signals to change lanes
and a vehicle is detected in the side monitoring range, you receive a visual and acoustic collision
warning. You then hear a double warning tone
and red warning lamp :flashes. If the turn sig-
nal remains on, detected vehicles are indicated
by the flashing of red warning lamp :. There are
no further warning tones.
Course-correcting brake application If Active Blind Spot Assist detects a risk of a side
impact in the monitoring range, a course-cor-
recting brake application is carried out. This is
designed to help you avoid a collision. G
WARNING
A course-correcting brake application cannot always prevent a collision. There is a risk of an
accident.
Always steer, brake or accelerate yourself,
especially if Active Blind Spot Assist warns
you or makes a course-correcting brake appli-
cation. Always maintain a safe distance at the sides. If a course-correcting brake application occurs,
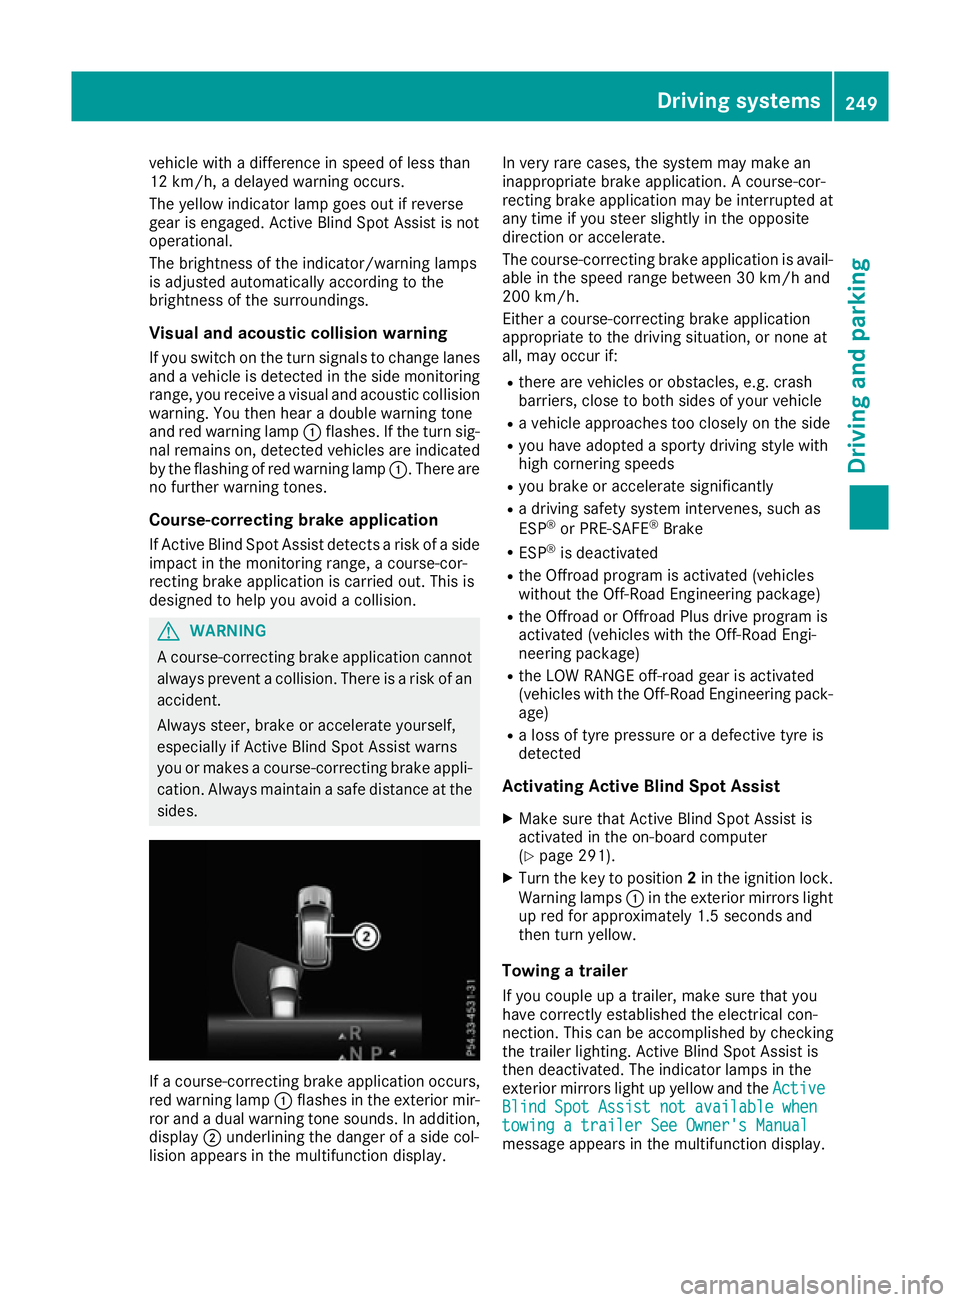
red warning lamp :flashes in the exterior mir-
ror and a dual warning tone sounds. In addition, display ;underlining the danger of a side col-
lision appears in the multifunction display. In very rare cases, the system may make an
inappropriate brake application. A course-cor-
recting brake application may be interrupted at
any time if you steer slightly in the opposite
direction or accelerate.
The course-correcting brake application is avail-
able in the speed range between 30 km/h and
200 km/h.
Either a course-correcting brake application
appropriate to the driving situation, or none at
all, may occur if:
R there are vehicles or obstacles, e.g. crash
barriers, close to both sides of your vehicle
R a vehicle approaches too closely on the side
R you have adopted a sporty driving style with
high cornering speeds
R you brake or accelerate significantly
R a driving safety system intervenes, such as
ESP ®
or PRE-SAFE ®
Brake
R ESP ®
is deactivated
R the Offroad program is activated (vehicles
without the Off-Road Engineering package)
R the Offroad or Offroad Plus drive program is
activated (vehicles with the Off-Road Engi-
neering package)
R the LOW RANGE off-road gear is activated
(vehicles with the Off-Road Engineering pack-
age)
R a loss of tyre pressure or a defective tyre is
detected
Activating Active Blind Spot Assist
X Make sure that Active Blind Spot Assist is
activated in the on-board computer
(Y page 291).
X Turn the key to position 2in the ignition lock.
Warning lamps :in the exterior mirrors light
up red for approximately 1.5 seconds and
then turn yellow.
Towing a trailer
If you couple up a trailer, make sure that you
have correctly established the electrical con-
nection. This can be accomplished by checking
the trailer lighting. Active Blind Spot Assist is
then deactivated. The indicator lamps in the
exterior mirrors light up yellow and the Active Active
Blind Spot Assist not available when
Blind Spot Assist not available when
towing a trailer See Owner's Manual towing a trailer See Owner's Manual
message appears in the multifunction display. Driving systems
249Driving and parking Z
Page 254 of 453
The warning vibration occurs earlier if:
R you approach the outer lane marking on a
bend
R the road has very wide lanes, e.g. a motorway
R the system detects solid lane markings
The warning vibration occurs later if:
R the road has narrow lanes
R you cut the corner on a bend
Lane-correcting brake application G
WARNING
A lane-correcting brake application cannot
always bring the vehicle back into the original lane. There is a risk of an accident.
Always steer, brake or accelerate yourself,
especially if Active Lane Keeping Assist warns
you or makes a lane-correcting brake appli-
cation. G
WARNING
Active Lane Keeping Assist does not detect
traffic conditions or road users. In very rare
cases, the system may make an inappropriate brake application, e.g. after intentionally driv-
ing over a solid lane marking. There is a risk of an accident.
An inappropriate brake application may be
interrupted at any time if you steer slightly in
the opposite direction. Always make sure that
there is sufficient distance to the side for
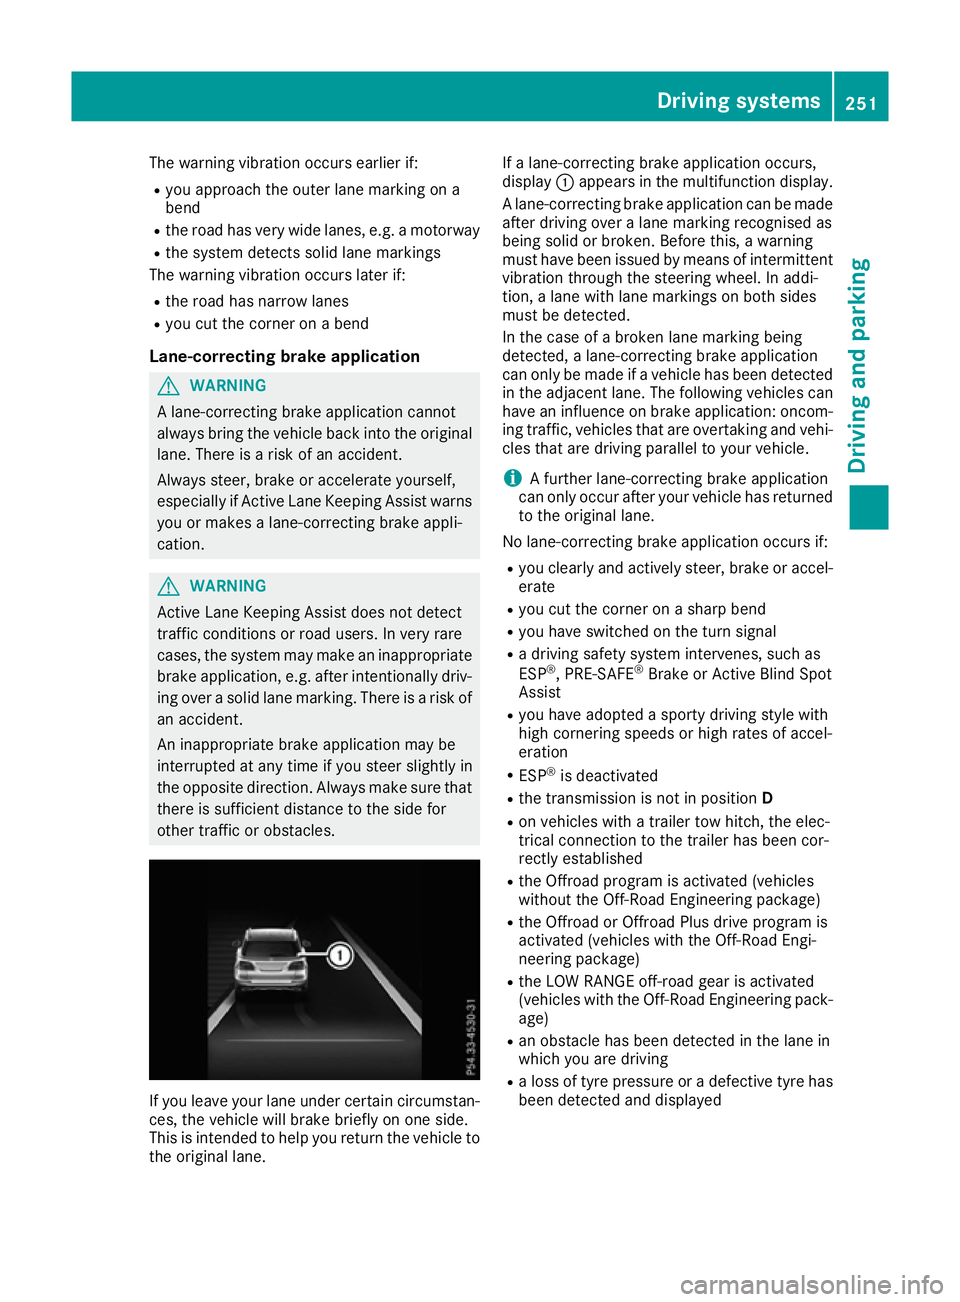
other traffic or obstacles. If you leave your lane under certain circumstan-
ces, the vehicle will brake briefly on one side.
This is intended to help you return the vehicle to
the original lane. If a lane-correcting brake application occurs,
display
:appears in the multifunction display.
A lane-correcting brake application can be made
after driving over a lane marking recognised as
being solid or broken. Before this, a warning
must have been issued by means of intermittent
vibration through the steering wheel. In addi-
tion, a lane with lane markings on both sides
must be detected.
In the case of a broken lane marking being
detected, a lane-correcting brake application
can only be made if a vehicle has been detected
in the adjacent lane. The following vehicles can have an influence on brake application: oncom- ing traffic, vehicles that are overtaking and vehi-
cles that are driving parallel to your vehicle.
i A further lane-correcting brake application
can only occur after your vehicle has returned
to the original lane.
No lane-correcting brake application occurs if: R you clearly and actively steer, brake or accel-
erate
R you cut the corner on a sharp bend
R you have switched on the turn signal
R a driving safety system intervenes, such as
ESP ®
, PRE-SAFE ®
Brake or Active Blind Spot
Assist
R you have adopted a sporty driving style with
high cornering speeds or high rates of accel-
eration
R ESP ®
is deactivated
R the transmission is not in position D
R on vehicles with a trailer tow hitch, the elec-
trical connection to the trailer has been cor-
rectly established
R the Offroad program is activated (vehicles
without the Off-Road Engineering package)
R the Offroad or Offroad Plus drive program is
activated (vehicles with the Off-Road Engi-
neering package)
R the LOW RANGE off-road gear is activated
(vehicles with the Off-Road Engineering pack-
age)
R an obstacle has been detected in the lane in
which you are driving
R a loss of tyre pressure or a defective tyre has
been detected and displayed Driving systems
251Driving and parking Z
Page 256 of 453
Important safety notes
G
WARNING
If the speed driven and the set speed deviate and you activate DSR on a slippery road sur-
face, the wheels may lose traction. This
increases the risk of skidding and having an
accident.
Before switching DSR on, please take into
consideration the road surface and the differ-
ence between driving speed and the set
speed.
If you fail to adapt your driving style, DSR can
neither reduce the risk of accident nor override the laws of physics. DSR cannot take account ofroad, weather and traffic conditions. DSR is only
an aid. You are responsible for the distance to
the vehicle in front, for vehicle speed, for brak-
ing in good time and for staying in lane.
You are always responsible for keeping control
of the vehicle and for assessing whether the
downhill gradient can be managed. DSR may not
always be able to keep to the set speed, depend-
ing on road surface and tyre conditions. Select a set speed suitable for the prevailing conditions
and when necessary, apply the brakes manually.
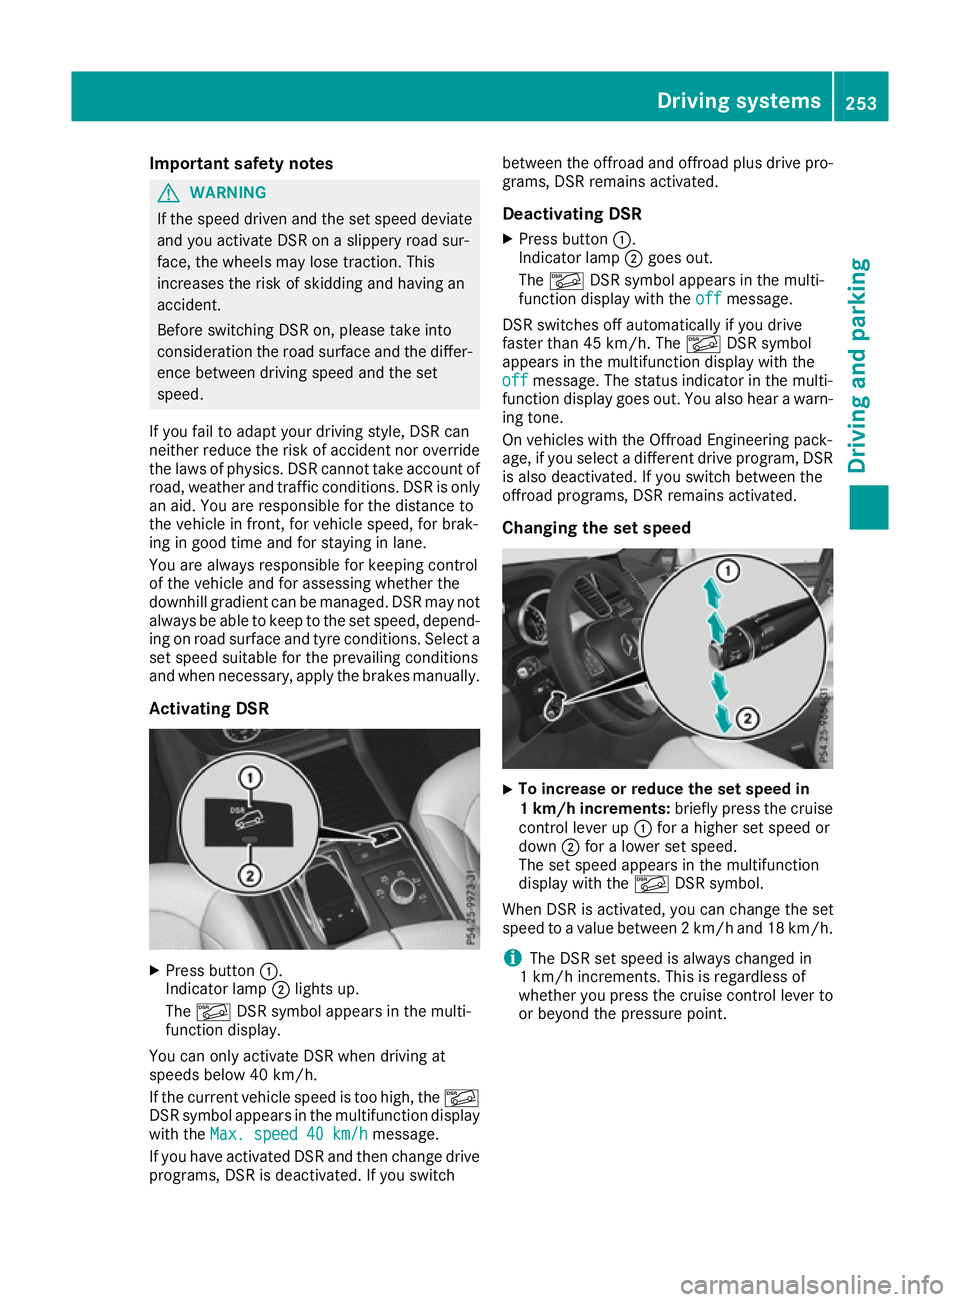
Activating DSR X
Press button :.
Indicator lamp ;lights up.
The à DSR symbol appears in the multi-
function display.
You can only activate DSR when driving at
speeds below 40 km/h.
If the current vehicle speed is too high, the Ã
DSR symbol appears in the multifunction display
with the Max. speed 40 km/h
Max. speed 40 km/h message.
If you have activated DSR and then change drive programs, DSR is deactivated. If you switch between the offroad and offroad plus drive pro-
grams, DSR remains activated.
Deactivating DSR
X Press button :.
Indicator lamp ;goes out.
The à DSR symbol appears in the multi-
function display with the off offmessage.
DSR switches off automatically if you drive
faster than 45 km/h. The ÃDSR symbol
appears in the multifunction display with the
off off message. The status indicator in the multi-
function display goes out. You also hear a warn-
ing tone.
On vehicles with the Offroad Engineering pack-
age, if you select a different drive program, DSR is also deactivated. If you switch between the
offroad programs, DSR remains activated.
Changing the set speed X
To increase or reduce the set speed in
1 km/h increments:
briefly press the cruise
control lever up :for a higher set speed or
down ;for a lower set speed.
The set speed appears in the multifunction
display with the ÃDSR symbol.
When DSR is activated, you can change the set
speed to a value between 2 km/h and 18 km/h.
i The DSR set speed is always changed in
1 km/h increments. This is regardless of
whether you press the cruise control lever to or beyond the pressure point. Driving systems
253Driving and parking Z
Page 276 of 453
To avoid hazardous situations:
R make sure to check the noseweight before
each journey
R use a drawbar noseweight as close as possi-
ble to the maximum noseweight
R do not exceed the maximum permissible
noseweight
R do not use a noseweight lower than the min-
imum noseweight
When reversing the vehicle towards the trailer,
make sure there is nobody between the trailer
and the vehicle.
Couple and uncouple the trailer carefully. If you do not couple the trailer to the towing vehicle
correctly, the trailer could become detached.
Make sure that the following values are not
exceeded:
R the permissible trailer drawbar noseweight
R the permissible trailer load
R the permissible rear axle load of the towing
vehicle
R the maximum permissible gross vehicle
weight of both the towing vehicle and the
trailer
The applicable permissible values, which must
not be exceeded, can be found:
R in your vehicle documents
R on the identification plates of the trailer tow
hitch and the trailer
R on the vehicle identification plate
If the values differ, the lowest value applies.
You will find the values approved by the manu-
facturer on the vehicle identification plates and
those for the towing vehicle under "Technical
data" (Y page 447).
When towing a trailer, your vehicle's handling
characteristics will be different in comparison to
when driving without a trailer.
The vehicle/trailer combination:
R is heavier
R is restricted in its acceleration and gradient-
climbing capability
R has an increased braking distance
R is affected more by strong crosswinds
R demands more sensitive steering
R has a larger turning circle
This can impair the vehicle's handling charac-
teristics. Adapt your driving style accordingly.
Maintain a safe distance. Drive carefully. When towing a trailer, always adjust your speed
to the current road and weather conditions. Do
not exceed the maximum permissible speed for
your vehicle/trailer combination. Notes on towing a trailer
General notes Check the tyre pressures when towing a trailer.
You will find the values in the tyre pressure table in the vehicle fuel filler flap (Y page 408).
Please note that when towing a trailer, the fol-
lowing driving systems have limited availability
or are not available at all.
R PARKTRONIC (Y page 225)
R Blind Spot Assist (Y page 244)
R Active Lane Keeping Assist (Y page 250)
R Active Parking Assist (Y page 228)
On vehicles without level control, the height of
the ball coupling will alter according to the load
placed on the vehicle. If necessary, use a trailer with a height-adjustable drawbar.
You will find fitting dimensions and loads under
"Technical data" (Y page 446).
Driving tips Observe the information on ESP
®
trailer stabili-
sation (Y page 77) and on pulling away with a
trailer (Y page 161).
Select the Comfortdrive program using the
DYNAMIC SELECT controller (Y page 166).
The maximum permissible speed for vehicle/
trailer combinations depends on the type of
trailer. Before beginning the journey, check the
trailer's documents to see what the maximum
permitted speed is. Observe the legally prescri-
bed maximum speed in the relevant country.
For certain Mercedes-Benz vehicles, the maxi-
mum permissible rear axle load is increased
when towing a trailer. See the "Technical data"
section to find out whether this applies to your
vehicle (Y page 447). If you utilise any of the
added maximum rear axle load when towing a
trailer, the vehicle/trailer combination may not
exceed a maximum speed of 100 km/hf or rea-
sons concerning the operating permit. This also
applies in countries in which the permissible
maximum speed for vehicle/trailer combina-
tions is above 100 km/h. Towing a trailer
273Driving and parking Z
Page 279 of 453
X
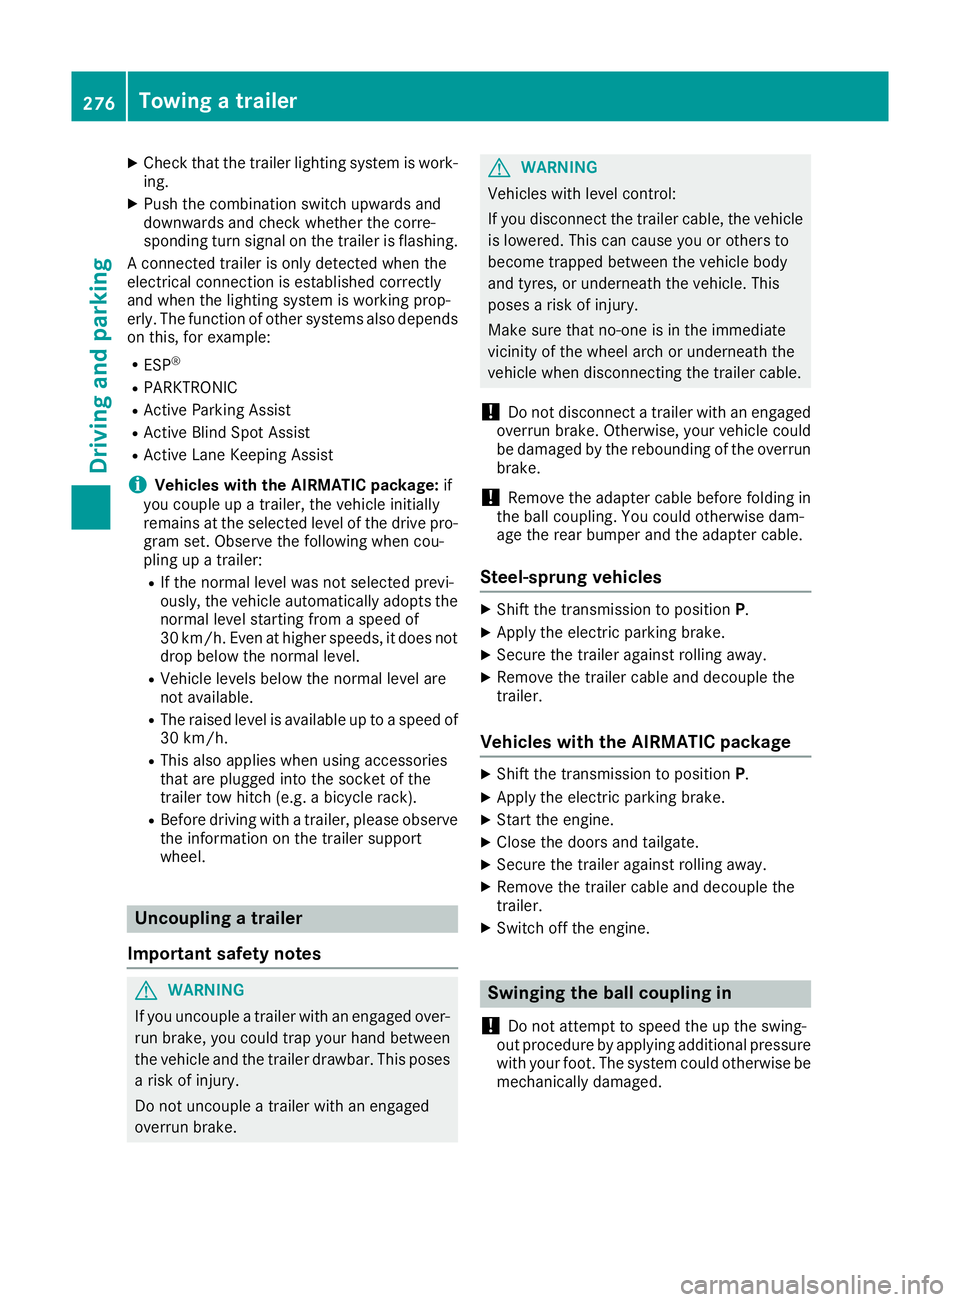
Check that the trailer lighting system is work-
ing.
X Push the combination switch upwards and
downwards and check whether the corre-
sponding turn signal on the trailer is flashing.
A connected trailer is only detected when the
electrical connection is established correctly
and when the lighting system is working prop-
erly. The function of other systems also depends on this, for example:
R ESP ®
R PARKTRONIC
R Active Parking Assist
R Active Blind Spot Assist
R Active Lane Keeping Assist
i Vehicles with the AIRMATIC package:
if
you couple up a trailer, the vehicle initially
remains at the selected level of the drive pro- gram set. Observe the following when cou-
pling up a trailer:
R If the normal level was not selected previ-
ously, the vehicle automatically adopts the
normal level starting from a speed of
30 km/h. Even at higher speeds, it does not drop below the normal level.
R Vehicle levels below the normal level are
not available.
R The raised level is available up to a speed of
30 km/h.
R This also applies when using accessories
that are plugged into the socket of the
trailer tow hitch (e.g. a bicycle rack).
R Before driving with a trailer, please observe
the information on the trailer support
wheel. Uncoupling a trailer
Important safety notes G
WARNING
If you uncouple a trailer with an engaged over- run brake, you could trap your hand between
the vehicle and the trailer drawbar. This poses a risk of injury.
Do not uncouple a trailer with an engaged
overrun brake. G
WARNING
Vehicles with level control:
If you disconnect the trailer cable, the vehicle is lowered. This can cause you or others to
become trapped between the vehicle body
and tyres, or underneath the vehicle. This
poses a risk of injury.
Make sure that no-one is in the immediate
vicinity of the wheel arch or underneath the
vehicle when disconnecting the trailer cable.
! Do not disconnect a trailer with an engaged
overrun brake. Otherwise, your vehicle could
be damaged by the rebounding of the overrun
brake.
! Remove the adapter cable before folding in
the ball coupling. You could otherwise dam-
age the rear bumper and the adapter cable.
Steel-sprung vehicles X
Shift the transmission to position P.
X Apply the electric parking brake.
X Secure the trailer against rolling away.
X Remove the trailer cable and decouple the
trailer.
Vehicles with the AIRMATIC package X
Shift the transmission to position P.
X Apply the electric parking brake.
X Start the engine.
X Close the doors and tailgate.
X Secure the trailer against rolling away.
X Remove the trailer cable and decouple the
trailer.
X Switch off the engine. Swinging the ball coupling in
! Do not attempt to speed the up the swing-
out procedure by applying additional pressure
with your foot. The system could otherwise be
mechanically damaged. 276
Towing a trailerDriving and parking
Page 294 of 453
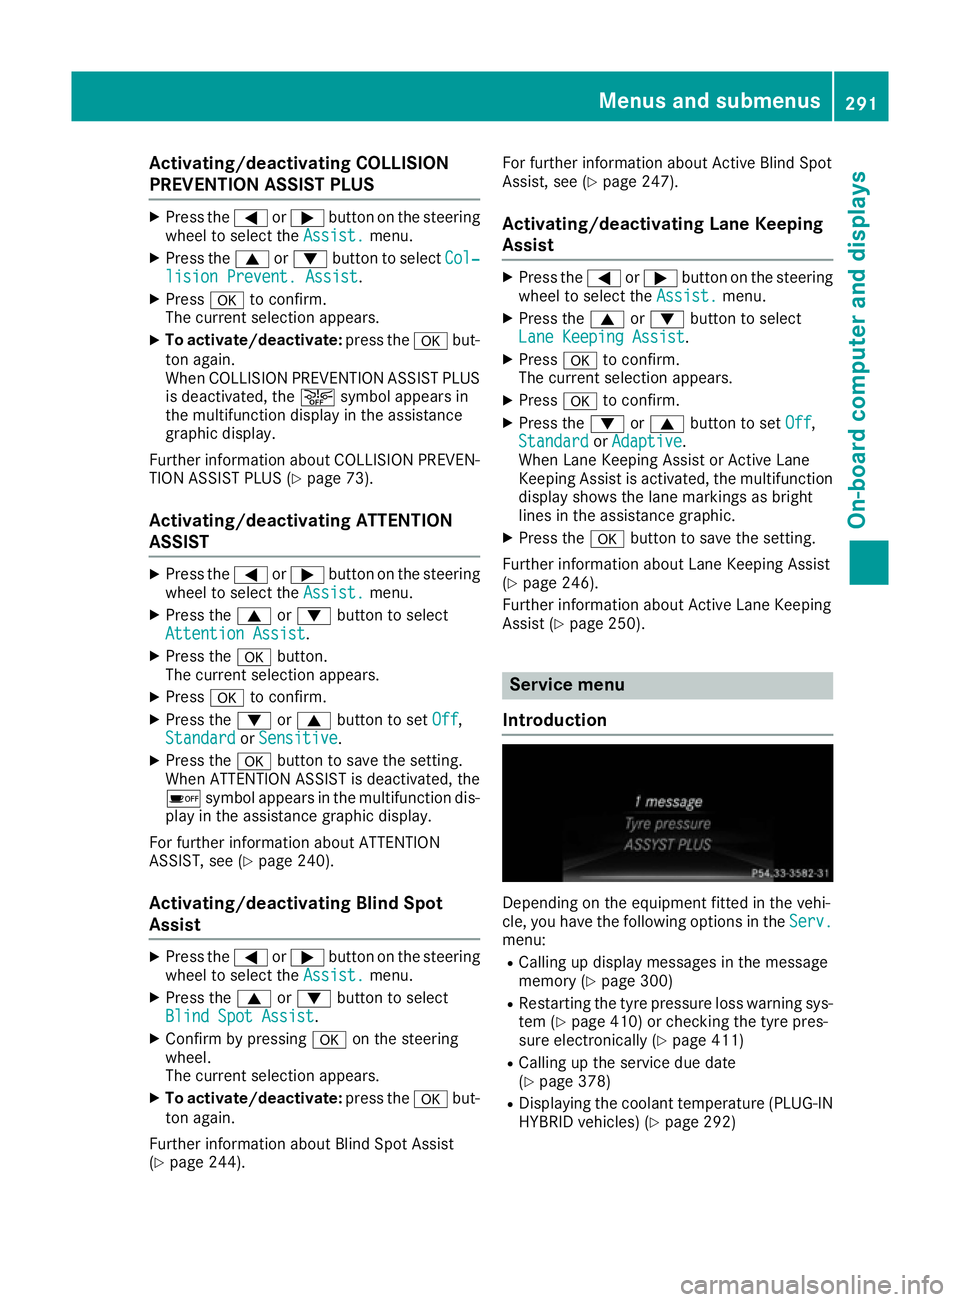
Activating/deactivating COLLISION
PREVENTION ASSIST PLUS X
Press the =or; button on the steering
wheel to select the Assist.
Assist. menu.
X Press the 9or: button to select Col‐
Col‐
lision Prevent. Assist
lision Prevent. Assist .
X Press ato confirm.
The current selection appears.
X To activate/deactivate: press theabut-
ton again.
When COLLISION PREVENTION ASSIST PLUS
is deactivated, the æsymbol appears in
the multifunction display in the assistance
graphic display.
Further information about COLLISION PREVEN- TION ASSIST PLUS (Y page 73).
Activating/deactivating ATTENTION
ASSIST X
Press the =or; button on the steering
wheel to select the Assist. Assist.menu.
X Press the 9or: button to select
Attention Assist
Attention Assist .
X Press the abutton.
The current selection appears.
X Press ato confirm.
X Press the :or9 button to set Off
Off,
Standard
Standard orSensitive
Sensitive .
X Press the abutton to save the setting.
When ATTENTION ASSIST is deactivated, the
é symbol appears in the multifunction dis-
play in the assistance graphic display.
For further information about ATTENTION
ASSIST, see (Y page 240).
Activating/deactivating Blind Spot
Assist X
Press the =or; button on the steering
wheel to select the Assist. Assist.menu.
X Press the 9or: button to select
Blind Spot Assist
Blind Spot Assist .
X Confirm by pressing aon the steering
wheel.
The current selection appears.
X To activate/deactivate: press theabut-
ton again.
Further information about Blind Spot Assist
(Y page 244). For further information about Active Blind Spot
Assist, see (Y
page 247).
Activating/deactivating Lane Keeping
Assist X
Press the =or; button on the steering
wheel to select the Assist. Assist.menu.
X Press the 9or: button to select
Lane Keeping Assist
Lane Keeping Assist .
X Press ato confirm.
The current selection appears.
X Press ato confirm.
X Press the :or9 button to set Off
Off,
Standard
Standard orAdaptive
Adaptive.
When Lane Keeping Assist or Active Lane
Keeping Assist is activated, the multifunction display shows the lane markings as bright
lines in the assistance graphic.
X Press the abutton to save the setting.
Further information about Lane Keeping Assist
(Y page 246).
Further information about Active Lane Keeping
Assist (Y page 250). Service menu
Introduction Depending on the equipment fitted in the vehi-
cle, you have the following options in the
Serv. Serv.
menu:
R Calling up display messages in the message
memory (Y page 300)
R Restarting the tyre pressure loss warning sys-
tem (Y page 410) or checking the tyre pres-
sure electronically (Y page 411)
R Calling up the service due date
(Y page 378)
R Displaying the coolant temperature (PLUG-IN
HYBRID vehicles) (Y page 292) Menus and sub
menus
291On-board computer and displays Z
Page 333 of 453
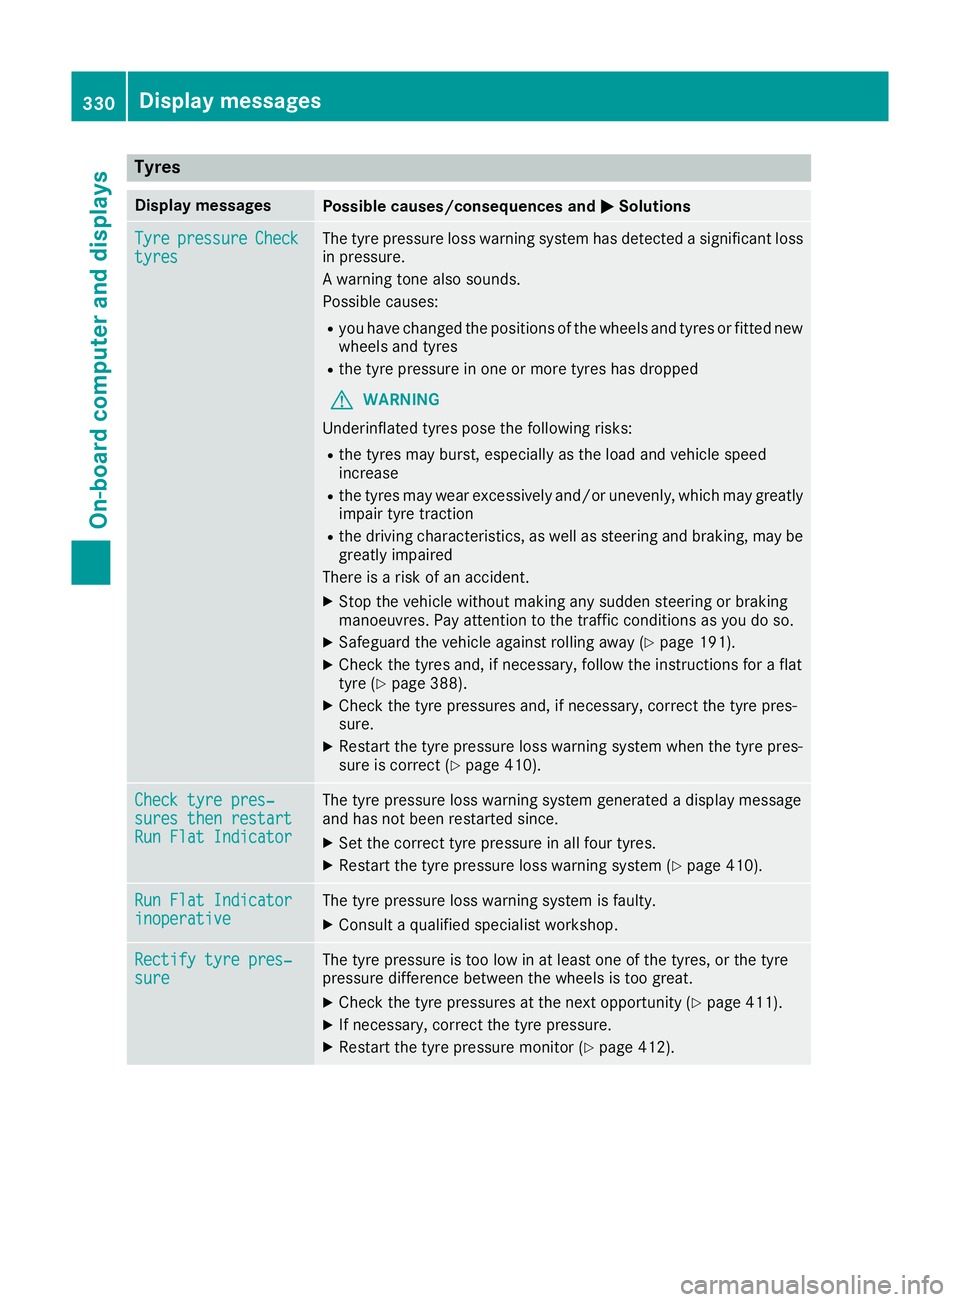
Tyres
Display messages
Possible causes/consequences and
M
MSolutions Tyre
Tyre
pressure
pressure Check
Check
tyres
tyres The tyre pressure loss warning system has detected a significant loss
in pressure.
A warning tone also sounds.
Possible causes:
R you have changed the positions of the wheels and tyres or fitted new
wheels and tyres
R the tyre pressure in one or more tyres has dropped
G WARNING
Underinflated tyres pose the following risks:
R the tyres may burst, especially as the load and vehicle speed
increase
R the tyres may wear excessively and/or unevenly, which may greatly
impair tyre traction
R the driving characteristics, as well as steering and braking, may be
greatly impaired
There is a risk of an accident.
X Stop the vehicle without making any sudden steering or braking
manoeuvres. Pay attention to the traffic conditions as you do so.
X Safeguard the vehicle against rolling away (Y page 191).
X Check the tyres and, if necessary, follow the instructions for a flat
tyre (Y page 388).
X Check the tyre pressures and, if necessary, correct the tyre pres-
sure.
X Restart the tyre pressure loss warning system when the tyre pres-
sure is correct (Y page 410). Check tyre pres‐ Check tyre pres‐
sures then restart sures then restart
Run Flat Indicator Run Flat Indicator The tyre pressure loss warning system generated a display message
and has not been restarted since.
X Set the correct tyre pressure in all four tyres.
X Restart the tyre pressure loss warning system (Y page 410).Run Flat Indicator Run Flat Indicator
inoperative inoperative The tyre pressure loss warning system is faulty.
X Consult a qualified specialist workshop. Rectify tyre pres‐
Rectify tyre pres‐
sure sure The tyre pressure is too low in at least one of the tyres, or the tyre
pressure difference between the wheels is too great.
X Check the tyre pressures at the next opportunity (Y page 411).
X If necessary, correct the tyre pressure.
X Restart the tyre pressure monitor (Y page 412).330
Display
messagesOn-board computer and displays
Page 334 of 453
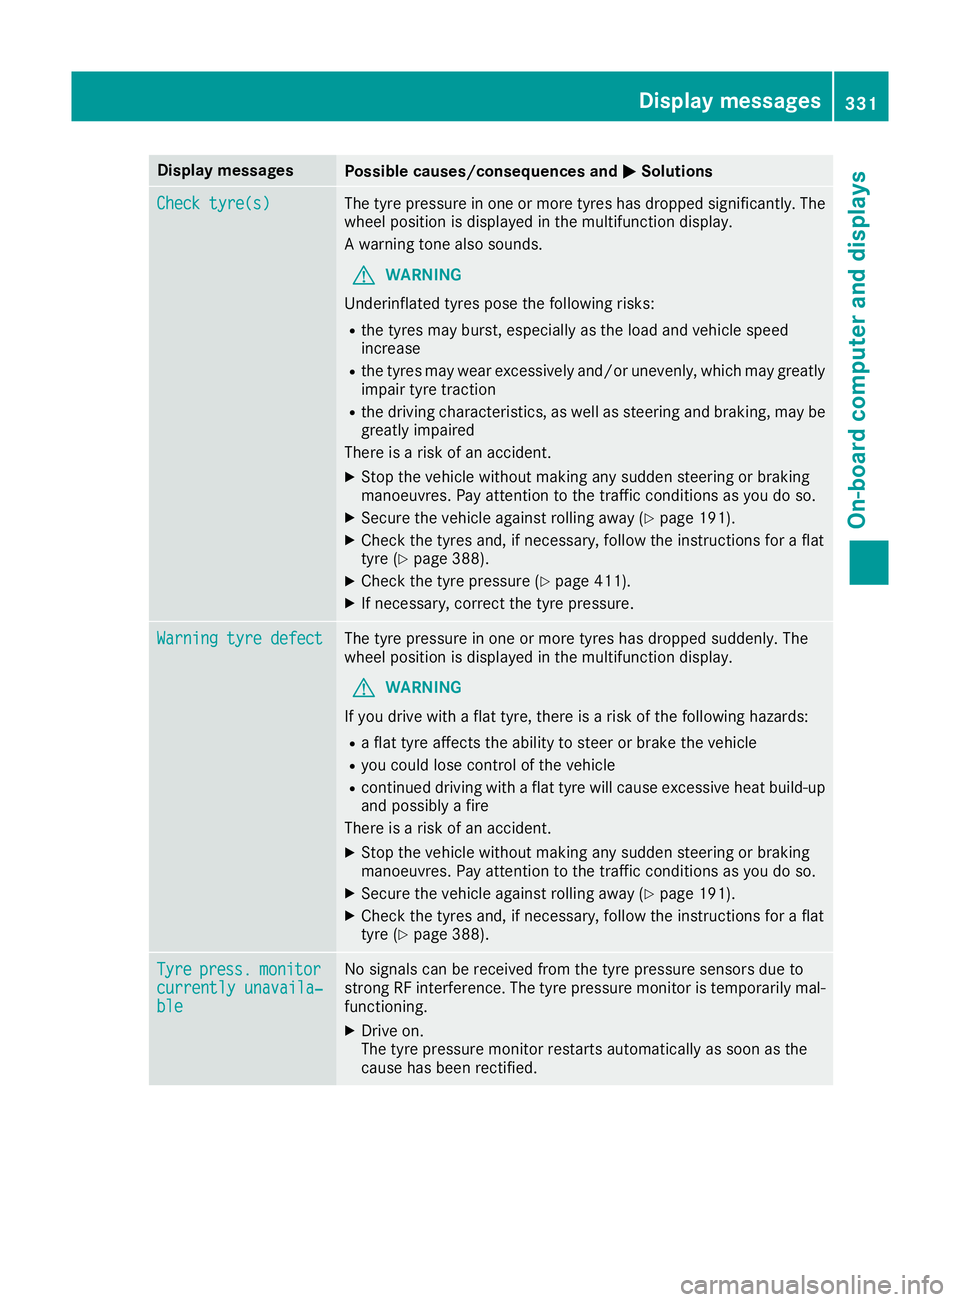
Display messages
Possible causes/consequences and
M
MSolutions Check tyre(s)
Check tyre(s) The tyre pressure in one or more tyres has dropped significantly. The
wheel position is displayed in the multifunction display.
A warning tone also sounds.
G WARNING
Underinflated tyres pose the following risks:
R the tyres may burst, especially as the load and vehicle speed
increase
R the tyres may wear excessively and/or unevenly, which may greatly
impair tyre traction
R the driving characteristics, as well as steering and braking, may be
greatly impaired
There is a risk of an accident.
X Stop the vehicle without making any sudden steering or braking
manoeuvres. Pay attention to the traffic conditions as you do so.
X Secure the vehicle against rolling away (Y page 191).
X Check the tyres and, if necessary, follow the instructions for a flat
tyre (Y page 388).
X Check the tyre pressure (Y page 411).
X If necessary, correct the tyre pressure. Warning tyre defect Warning tyre defect The tyre pressure in one or more tyres has dropped suddenly. The
wheel position is displayed in the multifunction display.
G WARNING
If you drive with a flat tyre, there is a risk of the following hazards: R a flat tyre affects the ability to steer or brake the vehicle
R you could lose control of the vehicle
R continued driving with a flat tyre will cause excessive heat build-up
and possibly a fire
There is a risk of an accident.
X Stop the vehicle without making any sudden steering or braking
manoeuvres. Pay attention to the traffic conditions as you do so.
X Secure the vehicle against rolling away (Y page 191).
X Check the tyres and, if necessary, follow the instructions for a flat
tyre (Y page 388). Tyre Tyre
press.
press. monitor
monitor
currently unavaila‐
currently unavaila‐
ble ble No signals can be received from the tyre pressure sensors due to
strong RF interference. The tyre pressure monitor is temporarily mal-
functioning.
X Drive on.
The tyre pressure monitor restarts automatically as soon as the
cause has been rectified. Display
messages
331On-board computer and displays Z