2015 MERCEDES-BENZ GLE SUV tyre pressure
[x] Cancel search: tyre pressurePage 416 of 453
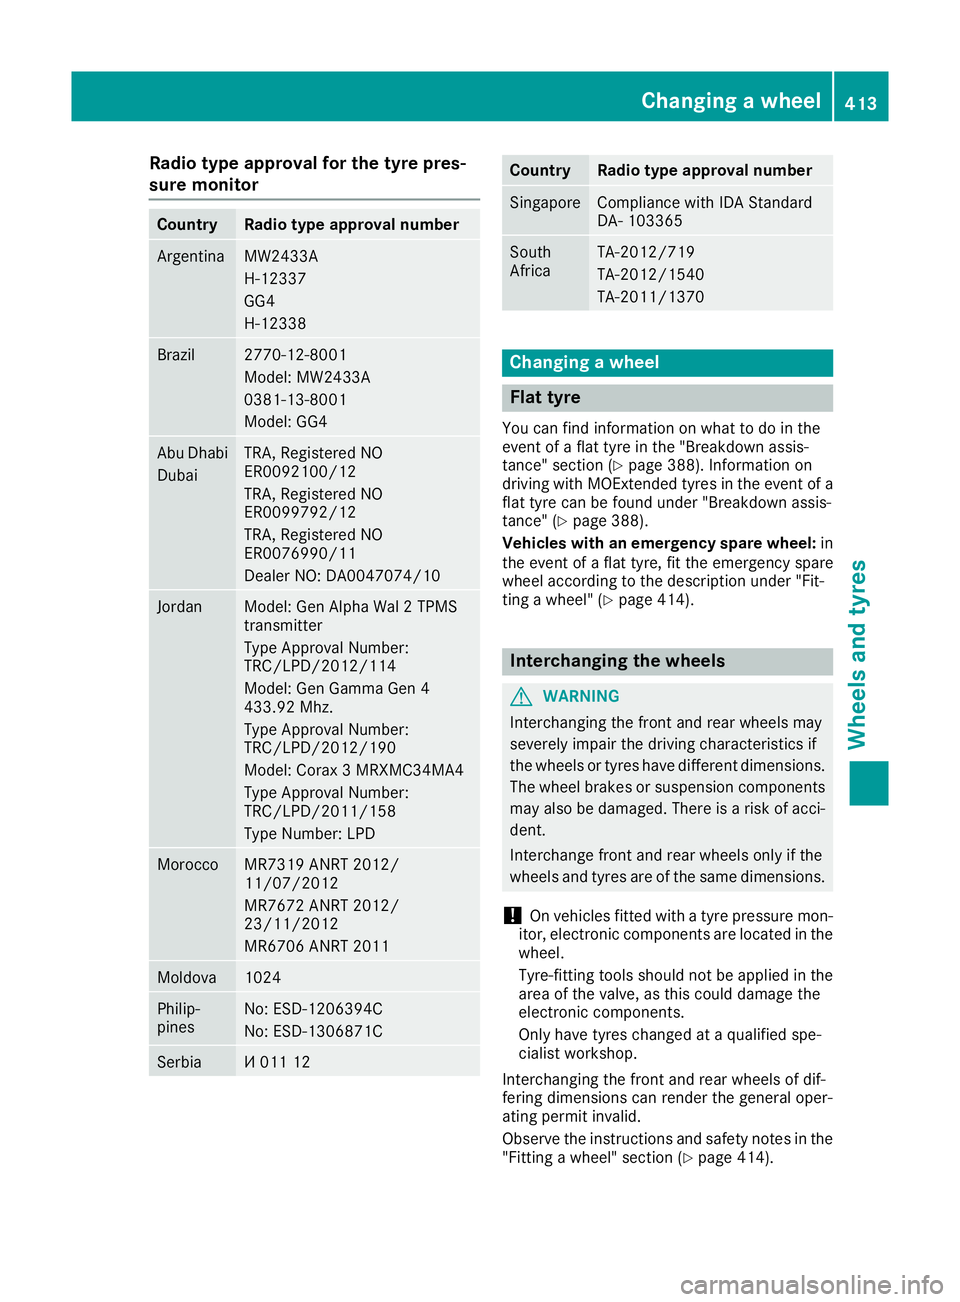
Radio type approval for the tyre pres-
sure monitor Country Radio type approval number
Argentina MW2433A
H-12337
GG4
H-12338
Brazil 2770-12-8001
Model: MW2433A
0381-13-8001
Model: GG4
Abu Dhabi
Dubai TRA, Registered NO
ER0092100/12
TRA, Registered NO
ER0099792/12
TRA, Registered NO
ER0076990/11
Dealer NO: DA0047074/10
Jordan Model: Gen Alpha Wal 2 TPMS
transmitter
Type Approval Number:
TRC/LPD/2012/114
Model: Gen Gamma Gen 4
433.92 Mhz.
Type Approval Number:
TRC/LPD/2012/190
Model: Corax 3 MRXMC34MA4
Type Approval Number:
TRC/LPD/2011/158
Type Number: LPD Morocco MR7319 ANRT 2012/
11/07/2012
MR7672 ANRT 2012/
23/11/2012
MR6706 ANRT 2011
Moldova 1024
Philip-
pines No: ESD-1206394C
No: ESD-1306871C
Serbia И 011 12 Country Radio type approval number
Singapore Compliance with IDA Standard
DA- 103365
South
Africa TA-2012/719
TA-2012/1540
TA-2011/1370
Changing a wheel
Flat tyre
You can find information on what to do in the
event of a flat tyre in the "Breakdown assis-
tance" section (Y page 388). Information on
driving with MOExtended tyres in the event of a flat tyre can be found under "Breakdown assis-
tance" (Y page 388).
Vehicles with an emergency spare wheel: in
the event of a flat tyre, fit the emergency spare
wheel according to the description under "Fit-
ting a wheel" (Y page 414). Interchanging the wheels
G
WARNING
Interchanging the front and rear wheels may
severely impair the driving characteristics if
the wheels or tyres have different dimensions. The wheel brakes or suspension components may also be damaged. There is a risk of acci-
dent.
Interchange front and rear wheels only if the
wheels and tyres are of the same dimensions.
! On vehicles fitted with a tyre pressure mon-
itor, electronic components are located in the wheel.
Tyre-fitting tools should not be applied in thearea of the valve, as this could damage the
electronic components.
Only have tyres changed at a qualified spe-
cialist workshop.
Interchanging the front and rear wheels of dif-
fering dimensions can render the general oper-
ating permit invalid.
Observe the instructions and safety notes in the "Fitting a wheel" section (Y page 414). Changing a wheel
413Wheels and tyres Z
Page 417 of 453
The wear patterns on the front and rear tyres
differ depending on the operating conditions.
Interchange the wheels before a clear wear pat-
tern has formed on the tyres. Front tyres typi-
cally wear more on the shoulders and the rear
tyres in the centre.
On vehicles that have the same size front and
rear wheels, you can interchange the wheels
every 5,000 to 10,000 km depending on the
degree of tyre wear. Ensure that the direction of
rotation is maintained.
Clean the contact surfaces of the wheel and the
brake disc thoroughly every time a wheel is
interchanged. Check the tyre pressure and, if
necessary, restart the tyre pressure loss warn-
ing system or the tyre pressure monitor. Direction of rotation
Tyres with a specified direction of rotation have additional benefits, e.g. if there is a risk of aqua- planing. These advantages can only be gained if
the tyres are fitted corresponding to the direc-
tion of rotation.
An arrow on the sidewall of the tyre indicates its correct direction of rotation. Storing wheels
Store wheels that are not being used in a cool,
dry and preferably dark place. Protect the tyres
against oil, grease, petrol and diesel. Fitting a wheel
Preparing the vehicle X
Vehicles with an emergency spare wheel:
when fitting the emergency spare wheel in the
event of a flat tyre, observe the additional
notes on vehicle preparation under "Flat tyre"
(Y page 388).
X Stop the vehicle on solid, non-slippery and
level ground.
X Apply the electric parking brake manually.
X Unload heavy luggage.
X Move the front wheels to the straight-ahead
position.
X Shift the transmission to position P.X
Vehicles with the AIRMATIC package:
make sure that the normal vehicle level is
selected (Y page 222).
X Vehicles with the Off-Road Engineering
package:
make sure that the normal vehicle
level is selected (Y page 216).
X Switch off the engine.
X Vehicles without KEYLESS-GO: remove the
key from the ignition lock.
X Vehicles with KEYLESS-GO: open the driv-
er's door.
The on-board electronics now have status 0.
This is the same as the key having been
removed.
X Vehicles with KEYLESS-GO: remove the
Start/Stop button from the ignition lock
(Y page 158).
X If included in the vehicle equipment, remove
the tyre-change tool kit from the vehicle.
X Safeguard the vehicle against rolling away.
i Apart from certain country-specific varia-
tions, vehicles are not equipped with a tyre-
change tool kit. For information on which
tools are required to perform a wheel change
on your vehicle, consult a Mercedes-Benz
Service Centre.
Necessary tyre-changing tools may include,
for example:
R Jack
R Wheel chock
R Wheel wrench
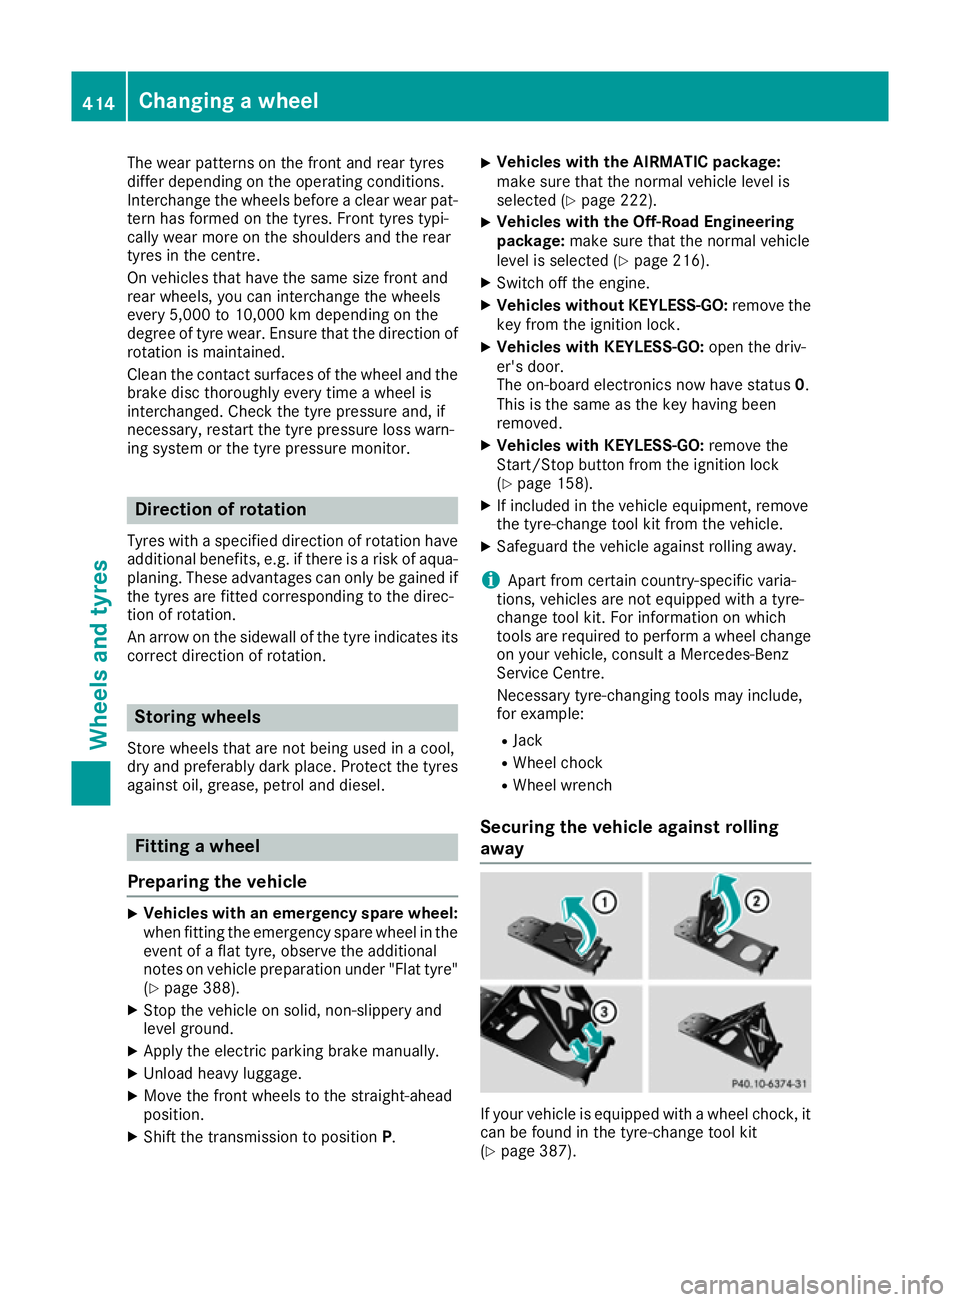
Securing the vehicle against rolling
away If your vehicle is equipped with a wheel chock, it
can be found in the tyre-change tool kit
(Y page 387). 414
Changing a wheelWheels and tyres
Page 420 of 453
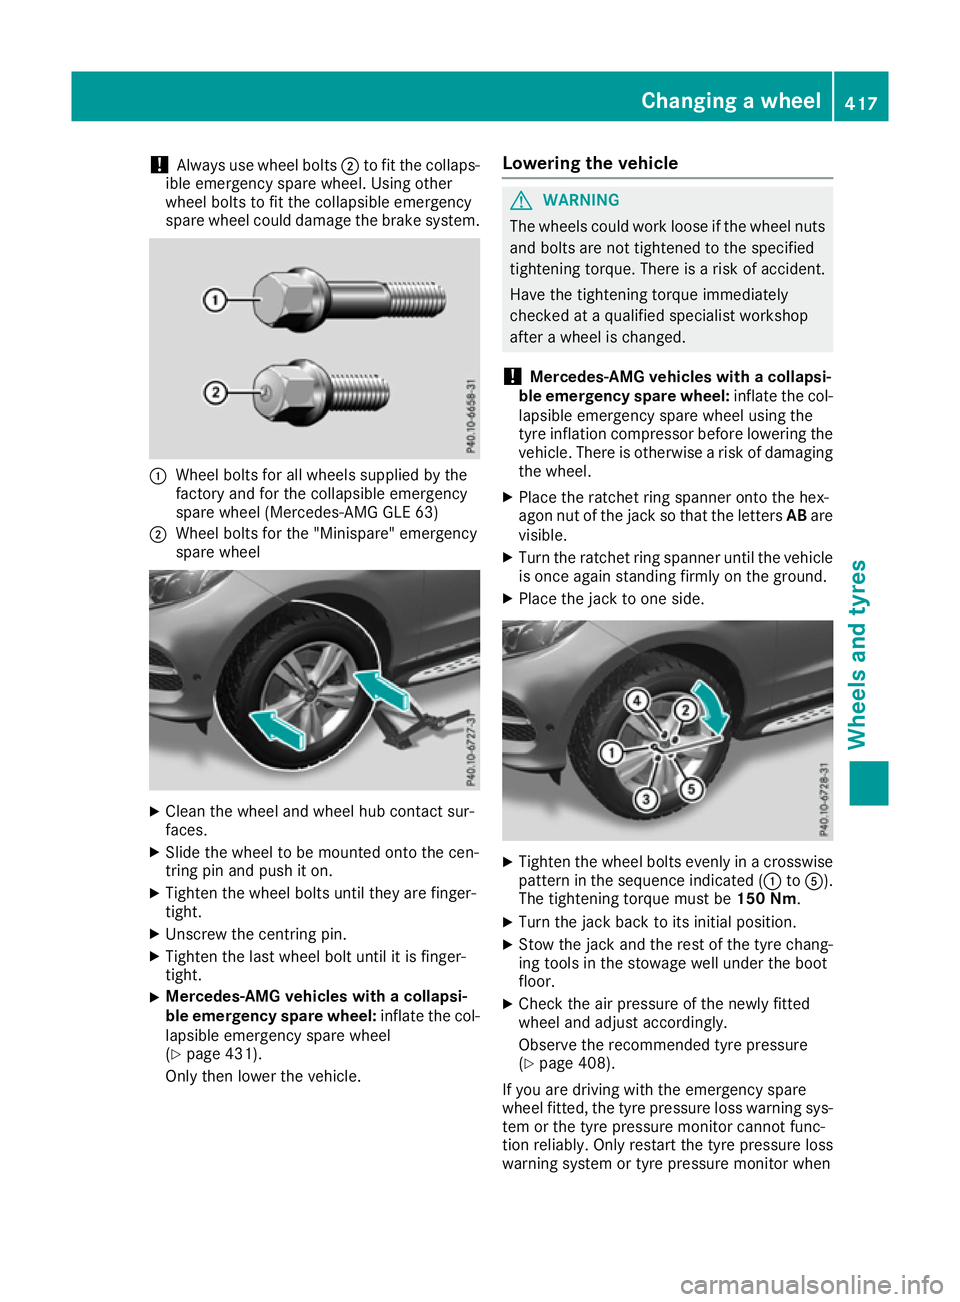
!
Always use wheel bolts
;to fit the collaps-
ible emergency spare wheel. Using other
wheel bolts to fit the collapsible emergency
spare wheel could damage the brake system. :
Wheel bolts for all wheels supplied by the
factory and for the collapsible emergency
spare wheel (Mercedes-AMG GLE 63)
; Wheel bolts for the "Minispare" emergency
spare wheel X
Clean the wheel and wheel hub contact sur-
faces.
X Slide the wheel to be mounted onto the cen-
tring pin and push it on.
X Tighten the wheel bolts until they are finger-
tight.
X Unscrew the centring pin.
X Tighten the last wheel bolt until it is finger-
tight.
X Mercedes-AMG vehicles with a collapsi-
ble emergency spare wheel:
inflate the col-
lapsible emergency spare wheel
(Y page 431).
Only then lower the vehicle. Lowering the vehicle G
WARNING
The wheels could work loose if the wheel nuts and bolts are not tightened to the specified
tightening torque. There is a risk of accident.
Have the tightening torque immediately
checked at a qualified specialist workshop
after a wheel is changed.
! Mercedes-AMG vehicles with a collapsi-
ble emergency spare wheel: inflate the col-
lapsible emergency spare wheel using the
tyre inflation compressor before lowering the vehicle. There is otherwise a risk of damaging
the wheel.
X Place the ratchet ring spanner onto the hex-
agon nut of the jack so that the letters ABare
visible.
X Turn the ratchet ring spanner until the vehicle
is once again standing firmly on the ground.
X Place the jack to one side. X
Tighten the wheel bolts evenly in a crosswise
pattern in the sequence indicated (: toA).
The tightening torque must be 150 Nm.
X Turn the jack back to its initial position.
X Stow the jack and the rest of the tyre chang-
ing tools in the stowage well under the boot
floor.
X Check the air pressure of the newly fitted
wheel and adjust accordingly.
Observe the recommended tyre pressure
(Y page 408).
If you are driving with the emergency spare
wheel fitted, the tyre pressure loss warning sys-
tem or the tyre pressure monitor cannot func-
tion reliably. Only restart the tyre pressure loss
warning system or tyre pressure monitor when Changing a wheel
417Wheels and tyres Z
Page 421 of 453
the defective wheel has been replaced with a
new wheel.
Vehicles with a tyre pressure monitor: all fit-
ted wheels must be equipped with functioning
sensors. Wheel and tyre combinations
General notes
! For safety reasons, Mercedes-Benz recom-
mends that you only use tyres and wheels
which have been approved by Mercedes-Benz specifically for your vehicle.
These are specially adapted to the control
systems, such as ABS or ESP ®
and are
marked as follows:
R MO = Mercedes-Benz Original
R MOE = Mercedes-Benz Original Extended
(tyres featuring run-flat characteristics)
R MO1 = Mercedes-Benz Original (only cer-
tain AMG tyres)
Mercedes-Benz Original Extended tyres may
only be used on wheels that have been spe-
cifically approved by Mercedes-Benz.
Only use tyres, wheels or accessories tested
and approved by Mercedes-Benz. Certain
characteristics, e.g. handling, vehicle noise
emissions or fuel consumption, may other-
wise be adversely affected. In addition, when driving with a load, tyre dimension variations
could cause the tyres to come into contact
with the bodywork and axle components. This
could result in damage to the tyres or the
vehicle.
Mercedes-Benz accepts no liability for dam-
age resulting from the use of tyres, wheels or accessories other than those tested and
approved.
Further information about wheels, tyres and
approved combinations can be obtained from
any qualified specialist workshop.
! Retreaded tyres are neither tested nor rec-
ommended by Mercedes-Benz, since previ-
ous damage cannot always be detected on
retreaded tyres. As a result, Mercedes-Benz
cannot guarantee vehicle safety if retreaded
tyres are fitted. Do not fit used tyres if you
have no information about their previous
usage. !
Large wheels: the lower the section width
for a certain wheel size, the lower the ride
comfort is on poor road surfaces. Roll comfort and suspension comfort are reduced and therisk of damage to the wheels and tyres as a
result of driving over obstacles increases.
Overview of abbreviations used in the following
tyre tables:
R BA: both axles
R FA: front axle
R RA: rear axle
The recommended tyre pressures can be found in the tyre pressure table on the fuel filler flap.
For further information on tyre pressure, see
(Y page 408). Check tyre pressures regularly
and only when the tyres are cold.
Notes on the vehicle equipment – always fit the
vehicle:
R with tyres of the same size across an axle
(left/right)
R with the same type of tyres at a given time
(summer tyres, winter tyres, MOExtended
tyres)
Vehicles with MOExtended tyres are not equip-
ped with a TIREFIT kit at the factory. It is there-
fore recommended that you additionally equip
your vehicle with a TIREFIT kit if you fit tyres that do not feature run-flat characteristics, e.g. win-
ter tyres. A TIREFIT kit can be obtained from a
qualified specialist workshop.
i Not all wheel/tyre combinations can be fit-
ted at the factory in all countries. 418
Wheel and tyre combinationsWheels and tyres
Page 432 of 453
You should regularly check the pressure of the
emergency spare wheel, particularly prior to
long trips, and correct the pressure as neces-
sary (Y page 408). The value on the wheel or as
given in the "Wheels and tyres" section is valid
(Y page 432).
An emergency spare wheel may also be fitted
against the direction of rotation. Observe the
time restriction on use as well as the speed lim-
itation specified on the emergency spare wheel.
Replace the tyres after six years at the latest,
regardless of wear. This also applies to the
emergency spare wheel.
i If you are driving with the emergency spare
wheel fitted, the tyre pressure loss warning
system or the tyre pressure monitor cannot
function reliably. Only restart the tyre pres-
sure loss warning system or tyre pressure
monitor when the defective wheel has been
replaced with a new wheel.
Vehicles with tyre pressure monitor: after
fitting an emergency spare wheel, the system
may still display the tyre pressure of the
removed wheel for a few minutes. The value
displayed for the position where the emer-
gency spare wheel is fitted is not the same as the current tyre pressure of the emergency
spare wheel. Removing/stowing the emergency
spare wheel
Vehicles with a "Minispare" emergency
spare wheel under the luggage com-
partment floor Observe the instructions and safety notes in the
"Fitting a wheel" section (Y page 414).
The "Minispare" emergency spare wheel can be found in the stowage well under the luggage
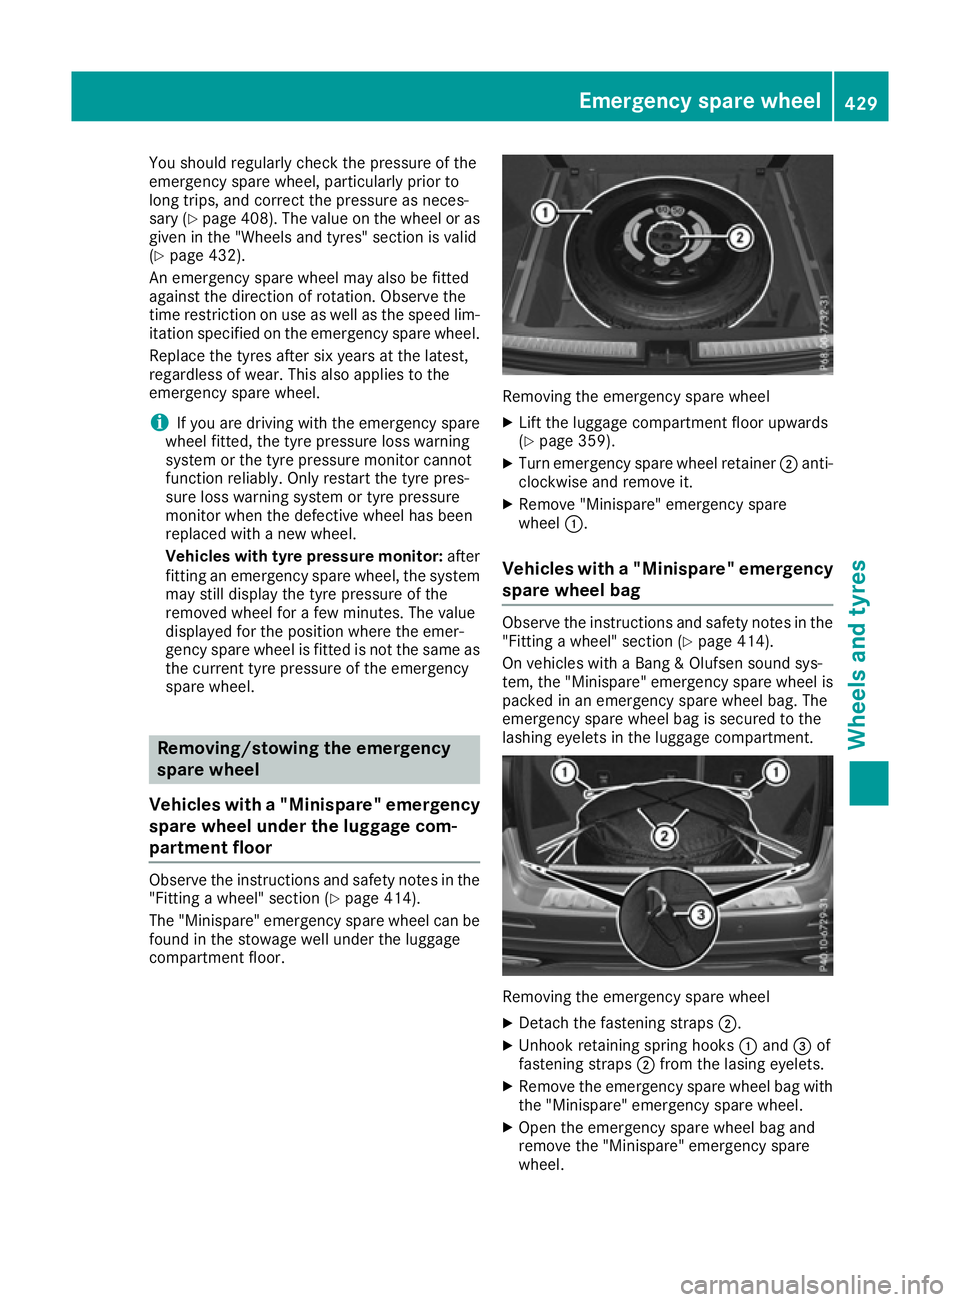
compartment floor. Removing the emergency spare wheel
X Lift the luggage compartment floor upwards
(Y page 359).
X Turn emergency spare wheel retainer ;anti-
clockwise and remove it.
X Remove "Minispare" emergency spare
wheel :.
Vehicles with a "Minispare" emergency
spare wheel bag Observe the instructions and safety notes in the
"Fitting a wheel" section (Y page 414).
On vehicles with a Bang & Olufsen sound sys-
tem, the "Minispare" emergency spare wheel is
packed in an emergency spare wheel bag. The
emergency spare wheel bag is secured to the
lashing eyelets in the luggage compartment. Removing the emergency spare wheel
X Detach the fastening straps ;.
X Unhook retaining spring hooks :and =of
fastening straps ;from the lasing eyelets.
X Remove the emergency spare wheel bag with
the "Minispare" emergency spare wheel.
X Open the emergency spare wheel bag and
remove the "Minispare" emergency spare
wheel. Emergency spare wheel
429Wheels and tyres Z
Page 434 of 453
Stowing the emergency spare wheel
X Place the collapsible emergency spare wheel
into the emergency spare wheel bag and
close the emergency spare wheel bag.
X Place the emergency spare wheel bag with
the collapsible emergency spare wheel into
the luggage compartment with the carrying
strap at the back.
X Hook retaining spring hooks :of fastening
strap ;into the lashing eyelets.
X Tighten fastening strap ;.Inflating the collapsible emergency
spare wheel (Mercedes-AMG GLE 63)
! Inflate the collapsible emergency spare
wheel using the tyre inflation compressor
before lowering the vehicle. The wheel rim
could otherwise be damaged.
! Do not operate the tyre inflation compres-
sor for longer than eight minutes at a time
without a break. It may otherwise overheat.
The tyre inflation compressor can be oper-
ated again once it has cooled down.
Comply with the manufacturer's safety instruc-
tions on the tyre inflation compressor label and
on the tyre sealant bottle.
X Mount the collapsible emergency spare wheel
as described (Y page 414).
The collapsible emergency spare wheel must
be mounted before it is inflated.
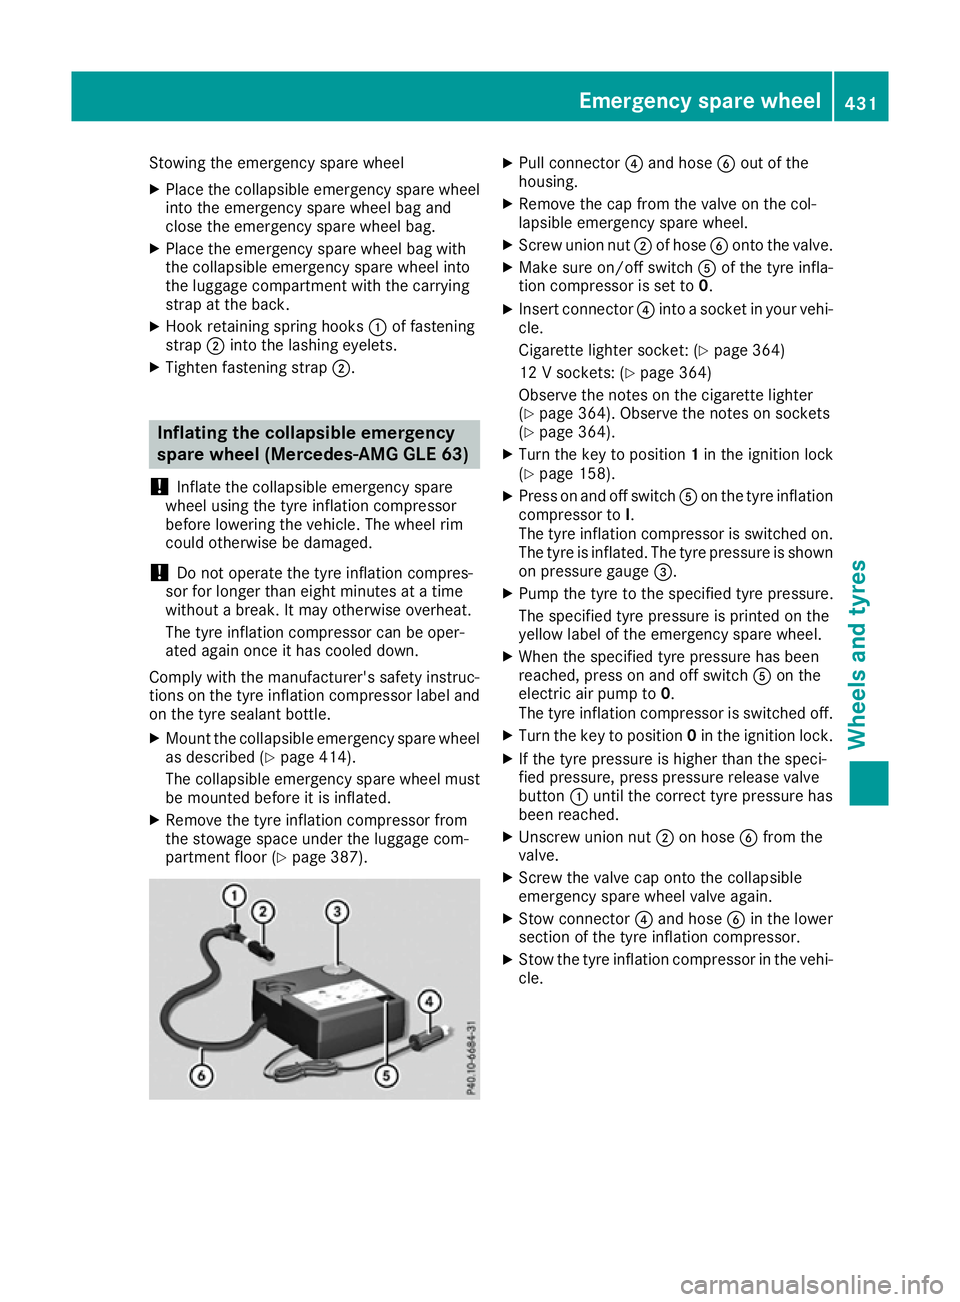
X Remove the tyre inflation compressor from
the stowage space under the luggage com-
partment floor (Y page 387). X
Pull connector ?and hose Bout of the
housing.
X Remove the cap from the valve on the col-
lapsible emergency spare wheel.
X Screw union nut ;of hose Bonto the valve.
X Make sure on/off switch Aof the tyre infla-
tion compressor is set to 0.
X Insert connector ?into a socket in your vehi-
cle.
Cigarette lighter socket: (Y page 364)
12 V sockets: (Y page 364)
Observe the notes on the cigarette lighter
(Y page 364). Observe the notes on sockets
(Y page 364).
X Turn the key to position 1in the ignition lock
(Y page 158).
X Press on and off switch Aon the tyre inflation
compressor to I.
The tyre inflation compressor is switched on.
The tyre is inflated. The tyre pressure is shown
on pressure gauge =.
X Pump the tyre to the specified tyre pressure.
The specified tyre pressure is printed on the
yellow label of the emergency spare wheel.
X When the specified tyre pressure has been
reached, press on and off switch Aon the
electric air pump to 0.
The tyre inflation compressor is switched off.
X Turn the key to position 0in the ignition lock.
X If the tyre pressure is higher than the speci-
fied pressure, press pressure release valve
button :until the correct tyre pressure has
been reached.
X Unscrew union nut ;on hose Bfrom the
valve.
X Screw the valve cap onto the collapsible
emergency spare wheel valve again.
X Stow connector ?and hose Bin the lower
section of the tyre inflation compressor.
X Stow the tyre inflation compressor in the vehi-
cle. Emergency spare wheel
431Wheels and tyres Z
Page 435 of 453
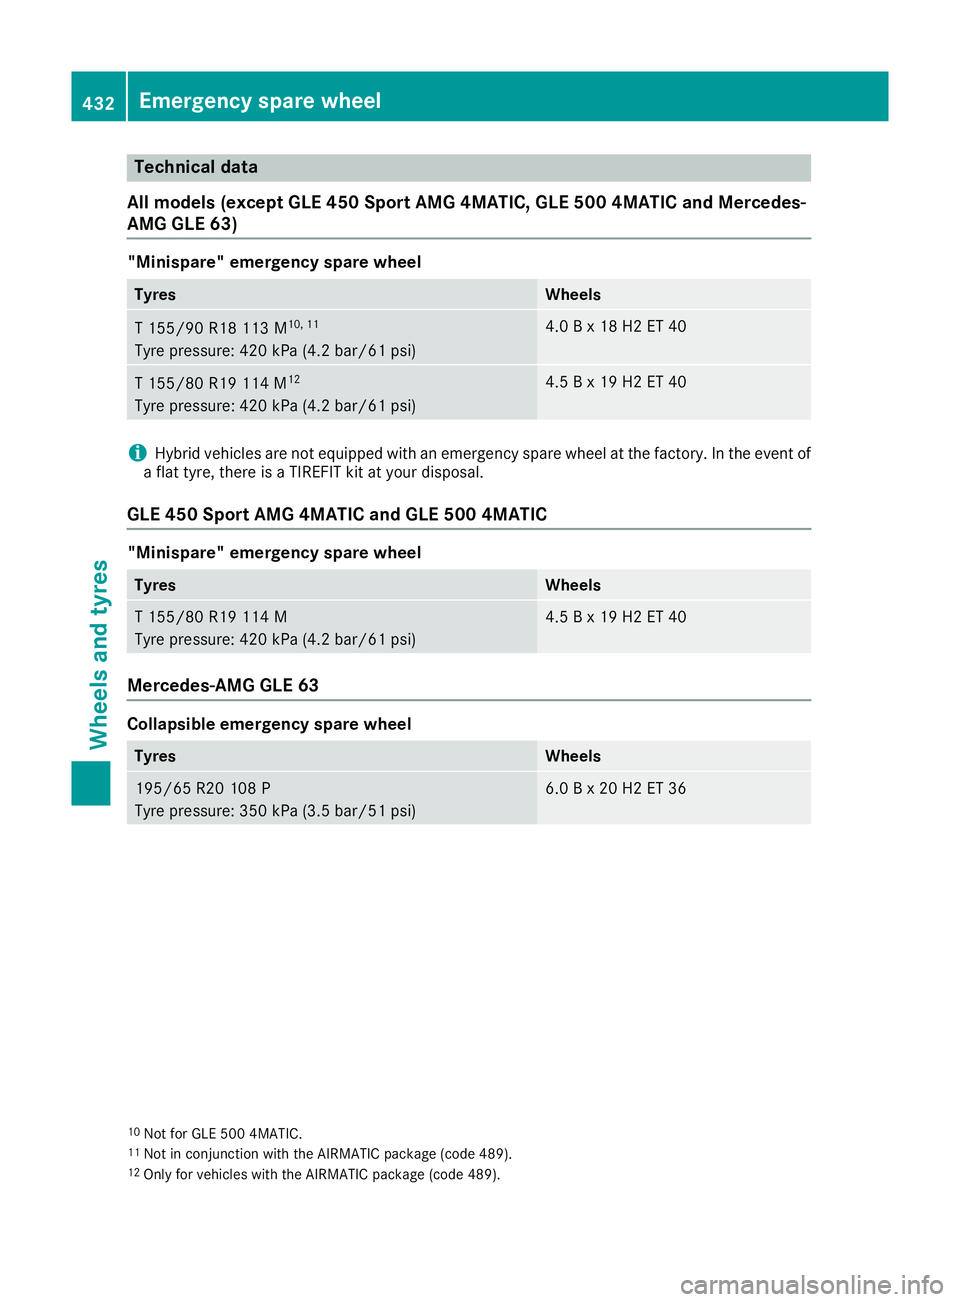
Technical data
All models (except GLE 450 Sport AMG 4MATIC, GLE 500 4MATIC and Mercedes-
AMG GLE 63) "Minispare" emergency spare wheel
Tyres Wheels
T 155/90 R18 113 M
10, 11
Tyre pressure: 420 kPa (4.2 bar/61 psi) 4.0 B x 18 H2 ET 40
T 155/8
0 R19 114 M 12
Tyre pressure : 420 kPa (4.2 ba r/61 psi) 4.5
B x 19 H2 ET 40 i
Hybrid vehicles are not equipped with an emergency spare wheel at the factory. In the event of
a flat tyre, there is a TIREFIT kit at your disposal.
GLE 450 Sport AMG 4MATIC and GLE 500 4MATIC "Minispare" emergency spare wheel
Tyres Wheels
T 155/80 R19 114 M
Tyre pressure: 420 kPa (4.2 ba r/61 psi) 4.5
B x 19 H2 ET 40 Mercedes-AMG GLE 63
Collapsible emergency spare wheel
Tyres Wheels
195/65 R20 108 P
Tyre pressure: 350 kPa (3.5 ba
r/51 psi) 6.0
B x 20 H2 ET 36 10
Not for GLE 500 4MATIC.
11 Not in conjunction with the AIRMATIC package (code 489).
12 Only for vehicles with the AIRMATIC package (code 489). 432
Emergency spare wheelWheels and tyres