2015 MERCEDES-BENZ GLE SUV lock
[x] Cancel search: lockPage 261 of 453
Messages in the multifunction display
If a gear change process has not been successful, the following messages may be displayed in the
multifunction display: Display messages
Possible causes/consequences and
M
MSolutions LOW RANGE Max.
LOW RANGE Max.
speed 40 km/h speed 40 km/h You have been driving faster than 40 km/h. Additionally, the indicator
lamp on the button in the centre console blinks.
X Drive more slowly to carry out the gear change process. LOW RANGE Shift to
LOW RANGE Shift to
position N briefly position N briefly The transmission is in position
Dand you are driving at below
40 km/h.
X Shift the transmission to Nto complete the gear change process. LOW RANGE Shifting
LOW RANGE Shifting
cancelled Please cancelled Please
reactivate reactivate The gear change process was not carried out.
X Maintain all gear change conditions and carry out the gear change
process again. LOW RANGE Stop
LOW RANGE Stop
Apply parking brake Apply parking brake A warning tone also sounds. The gear change process has not been
completed. LOW RANGE is in the neutral position. There is no con-
nection between the engine and the drive wheels.
! Do not drive any further. You could otherwise damage the vehi-
cle’s drive train.
X Stop the vehicle. Take into account the road and traffic conditions
when doing so.
X Apply the electric parking brake (Y page 192).
X Repeat the gear change process.
If the gear change process has been carried out, the LOW RANGE LOW RANGE
Stop Apply parking brake
Stop Apply parking brake message disappears.Driving dynamics display in the
COMAND display (vehicles with the Off-
road Engineering-package) General notes
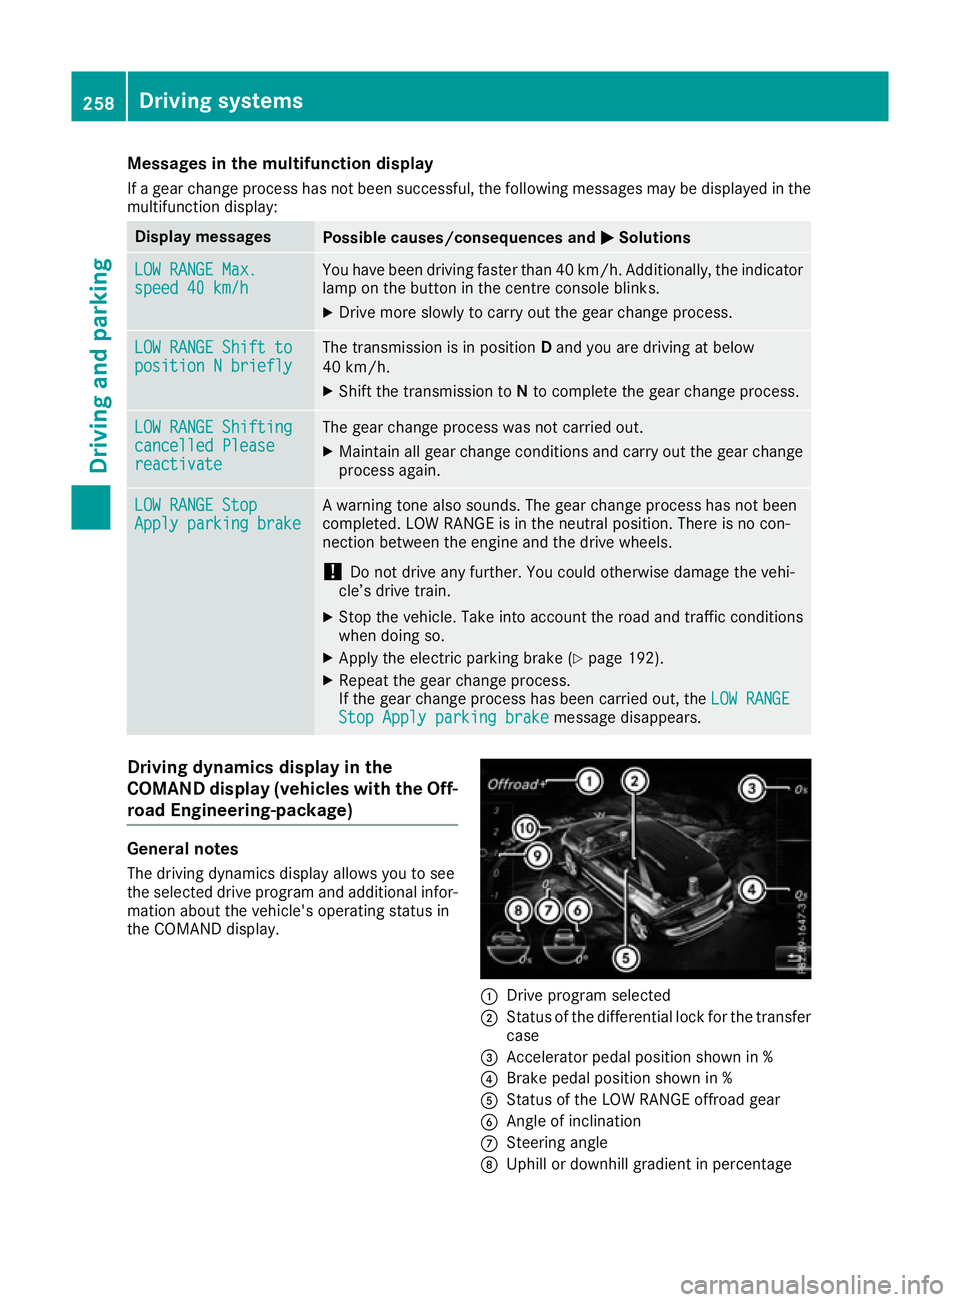
The driving dynamics display allows you to see
the selected drive program and additional infor-
mation about the vehicle's operating status in
the COMAND display. :
Drive program selected
; Status of the differential lock for the transfer
case
= Accelerator pedal position shown in %
? Brake pedal position shown in %
A Status of the LOW RANGE offroad gear
B Angle of inclination
C Steering angle
D Uphill or downhill gradient in percentage 258
Driving systemsDriving and parking
Page 266 of 453
If manual gearshifting is deactivated, the auto-
matic transmission shifts:
R into the drive program that was last selected,
and
R into the driving mode that was last selected
If you change the drive program, the operating
mode that was last selected is stored for approx-
imately 60 seconds. After this time, the HYBRID
operating mode is automatically activated.
Operating the on-board computer You can display the current operating condition
of the hybrid drive system in the multifunction
display and the multimedia system in the form of
an energy flow display (Y page 263).
In the display of the multimedia system, you can
also call up a graphic display of the fuel con-
sumption and generated electricity
(Y page 266). Menus and submenus
Selecting displays in the display of the
multimedia system X
Press the Øbutton on the multimedia sys-
tem.
The vehicle menu appears.
X To select Energy flow
Energy flow: turn and press the
controller.
The energy flow is displayed.
or X To select Consumption
Consumption: turn and press the
controller.
Fuel consumption and the electric energy
generated are displayed.
X To exit the display: press the %button on
the controller.
Selecting the energy flow display in the multifunction display X
Press the =or; button on the steering
wheel to select the Trip Tripmenu.
X Use : or9 to select Energy flow
Energy flow.
X Confirm by pressing aon the steering
wheel.
The active components of the hybrid drive
system are highlighted in the energy flow dis-
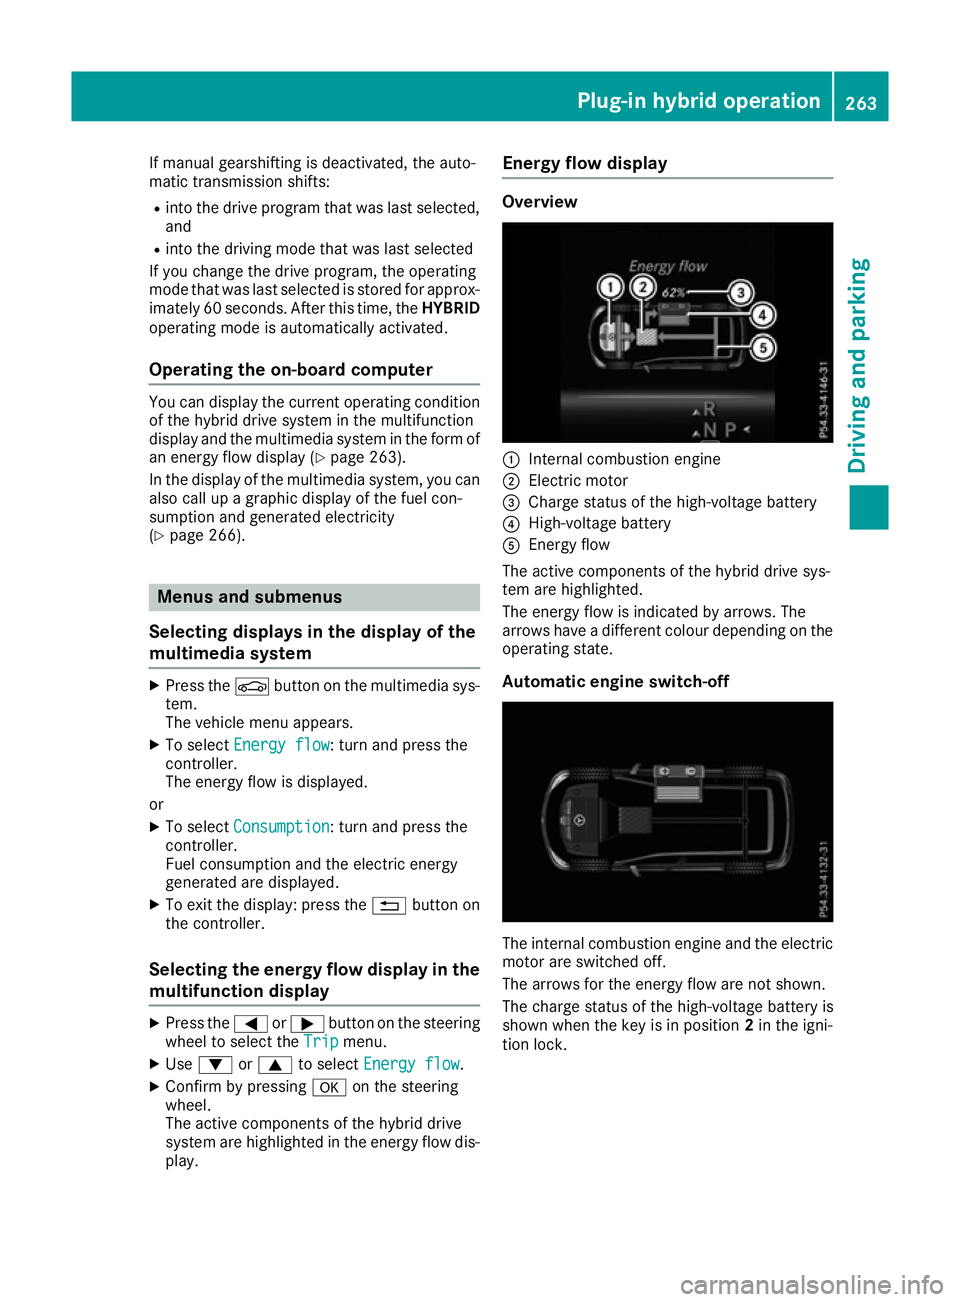
play. Energy flow display Overview
:
Internal combustion engine
; Electric motor
= Charge status of the high-voltage battery
? High-voltage battery
A Energy flow
The active components of the hybrid drive sys-
tem are highlighted.
The energy flow is indicated by arrows. The
arrows have a different colour depending on the operating state.
Automatic engine switch-off The internal combustion engine and the electric
motor are switched off.
The arrows for the energy flow are not shown.
The charge status of the high-voltage battery is
shown when the key is in position 2in the igni-
tion lock. Plug-in hybrid operation
263Driving and parking Z
Page 275 of 453
Hybrid drive system
Problem
Possible causes/consequences and
M
MSolutions The hybrid drive system
has been switched off
automatically. You have been in an accident.
The hybrid drive system remains switched off if:
R the internal combustion engine cannot be restarted after a few
seconds.
R the red 6restraint system warning lamp in the instrument clus-
ter is lit.
X Consult a qualified specialist workshop. The hybrid drive system
has been switched off
automatically. The multi-
function display also
shows a display mes-
sage. An electrical short circuit has occurred in the hybrid drive system or an
electrical connection has been disconnected.
X Observe the additional display messages in the multifunction dis-
play (Y page 300).
X Consult a qualified specialist workshop. Towing a trailer
Important safety notes
G
WARNING
Vehicles with level control:
The vehicle level may be changed uninten-
tionally, e.g. by other persons. If this happens while you are coupling or decoupling a trailer,
you could become trapped. In addition, other
people could become trapped if their limbs
are between the vehicle body and the wheels or underneath the vehicle. There is a risk of
injury.
When coupling or decoupling a trailer, make
sure that no one:
R opens or closes the doors or the tailgate
R initiates a level change or turns the
DYNAMIC SELECT Controller
R locks or unlocks the vehicle G
WARNING
You could lose control of the vehicle/trailer
combination if it begins to swerve. The vehi-
cle/trailer combination could even overturn.
There is a risk of an accident.
On no account should you attempt to
straighten out the vehicle/trailer combina- tion by increasing speed. Decrease your
speed and do not countersteer. Brake if nec-
essary. G
WARNING
If the maximum permissible load for a carrier system is exceeded, the carrier could come
loose from the vehicle and endanger other
road users. There is a risk of an accident and injury.
Never exceed the maximum permissible load
when using a carrier.
Exceeding the maximum permissible nose-
weight of the trailer drawbar on the ball coupling
may cause damage to the following:
R your vehicle
R the trailer
R the ball coupling
R trailer tow hitch
The vehicle/trailer combination could become
unstable.
If the noseweight used is lower than the mini-
mum permissible noseweight, the vehicle/
trailer combination could also become unstable. 272
Towing a trailerDriving and parking
Page 277 of 453
When towing a trailer, your vehicle's handling
characteristics will be different in comparison to
when driving without a trailer and it will con-
sume more fuel.
Use the left-hand gearshift paddle to shift to a
lower gear on long and steep downhill gradients.
This also applies if you have activated cruise
control, SPEEDTRONIC or DISTRONIC PLUS.
This will use the braking effect of the engine, so
less braking will be required to maintain vehicle
speed. This relieves the load on the brake sys-
tem and prevents the brakes from overheating
and wearing too quickly. If you need additional
braking, depress the brake pedal repeatedly
rather than continuously.
Driving tips If the trailer swings from side to side:
X Do not accelerate.
X Do not countersteer.
X Brake if necessary.
R Maintain a greater distance to the vehicle in
front than when driving without a trailer.
R Avoid braking abruptly. If possible, brake gen-
tly at first to allow the trailer to run on. Then,
increase the braking force rapidly.
R The values given for gradient-climbing capa-
bilities from a standstill refer to sea level.
When driving in mountainous areas, note that
the power output of the engine, and conse-
quently the vehicle's gradient-climbing capa-
bility, decrease with increasing altitude. Swinging out the ball coupling
G
WARNING
If the ball coupling is not engaged, the trailer
may come loose. There is a risk of an accident.
Make sure that the ball coupling is securely
engaged and locked in position.
! Do not attempt to speed the up the swing-
out procedure by applying additional pressure
with your foot. The system could otherwise be
mechanically damaged. To fold out the ball coupling, you have two
options:
R use the switch in the driver's door (all vehicles
except PLUG-IN HYBRID vehicles)
R use the switch in the tailgate
The trailer power socket is integrated into the
ball coupling and swivels out with it.
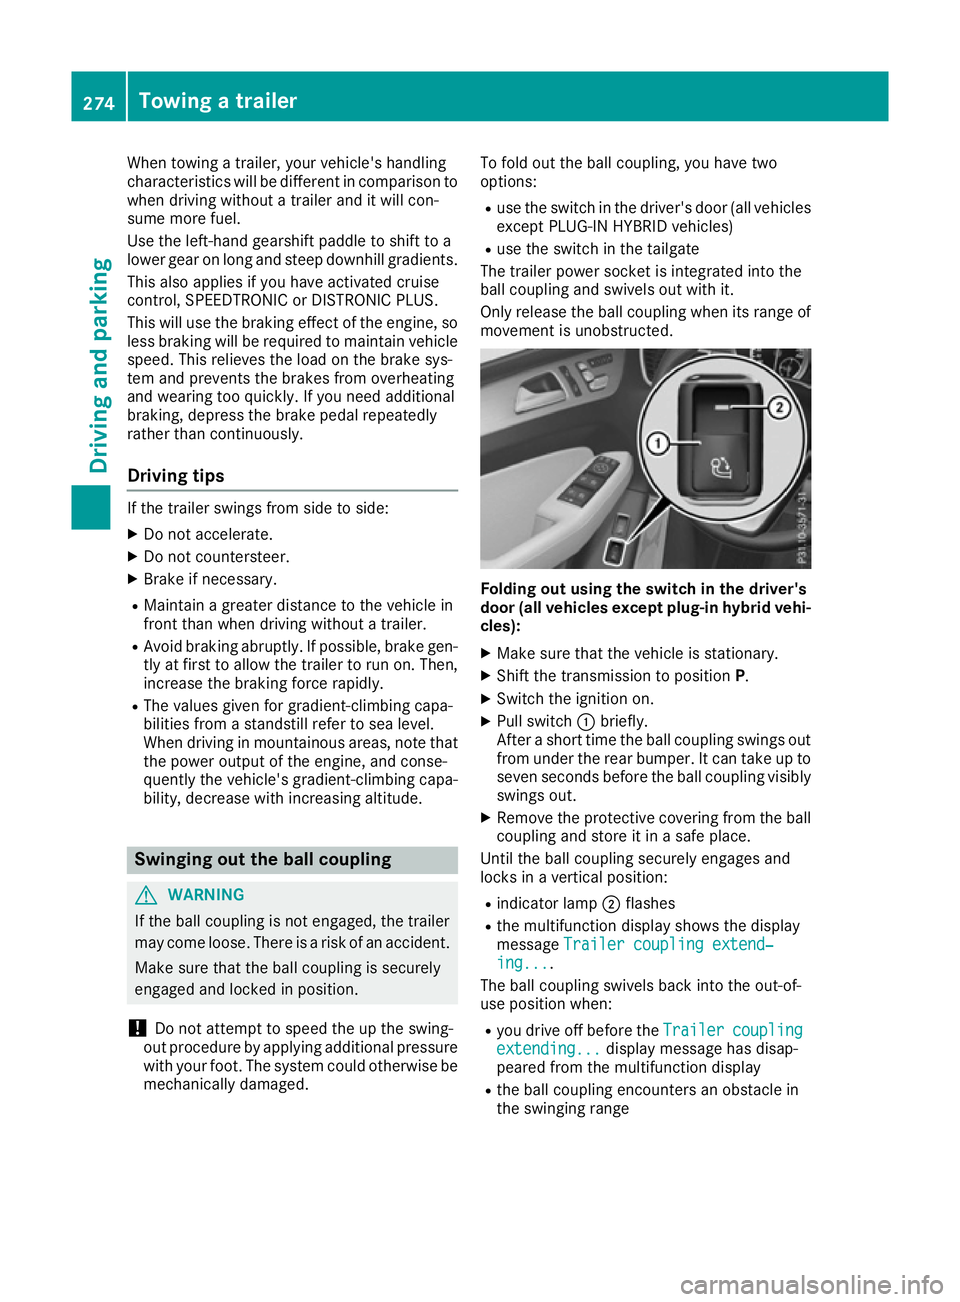
Only release the ball coupling when its range of movement is unobstructed. Folding out using the switch in the driver's
door (all vehicles except plug-in hybrid vehi-
cles):
X Make sure that the vehicle is stationary.
X Shift the transmission to position P.
X Switch the ignition on.
X Pull switch :briefly.
After a short time the ball coupling swings out from under the rear bumper. It can take up to
seven seconds before the ball coupling visibly
swings out.
X Remove the protective covering from the ball
coupling and store it in a safe place.
Until the ball coupling securely engages and
locks in a vertical position:
R indicator lamp ;flashes
R the multifunction display shows the display
message Trailer coupling extend‐ Trailer coupling extend‐
ing...
ing....
The ball coupling swivels back into the out-of-
use position when:
R you drive off before the Trailer
Trailercoupling
coupling
extending...
extending... display message has disap-
peared from the multifunction display
R the ball coupling encounters an obstacle in
the swinging range 274
Towing a trailerDriving and parking
Page 278 of 453
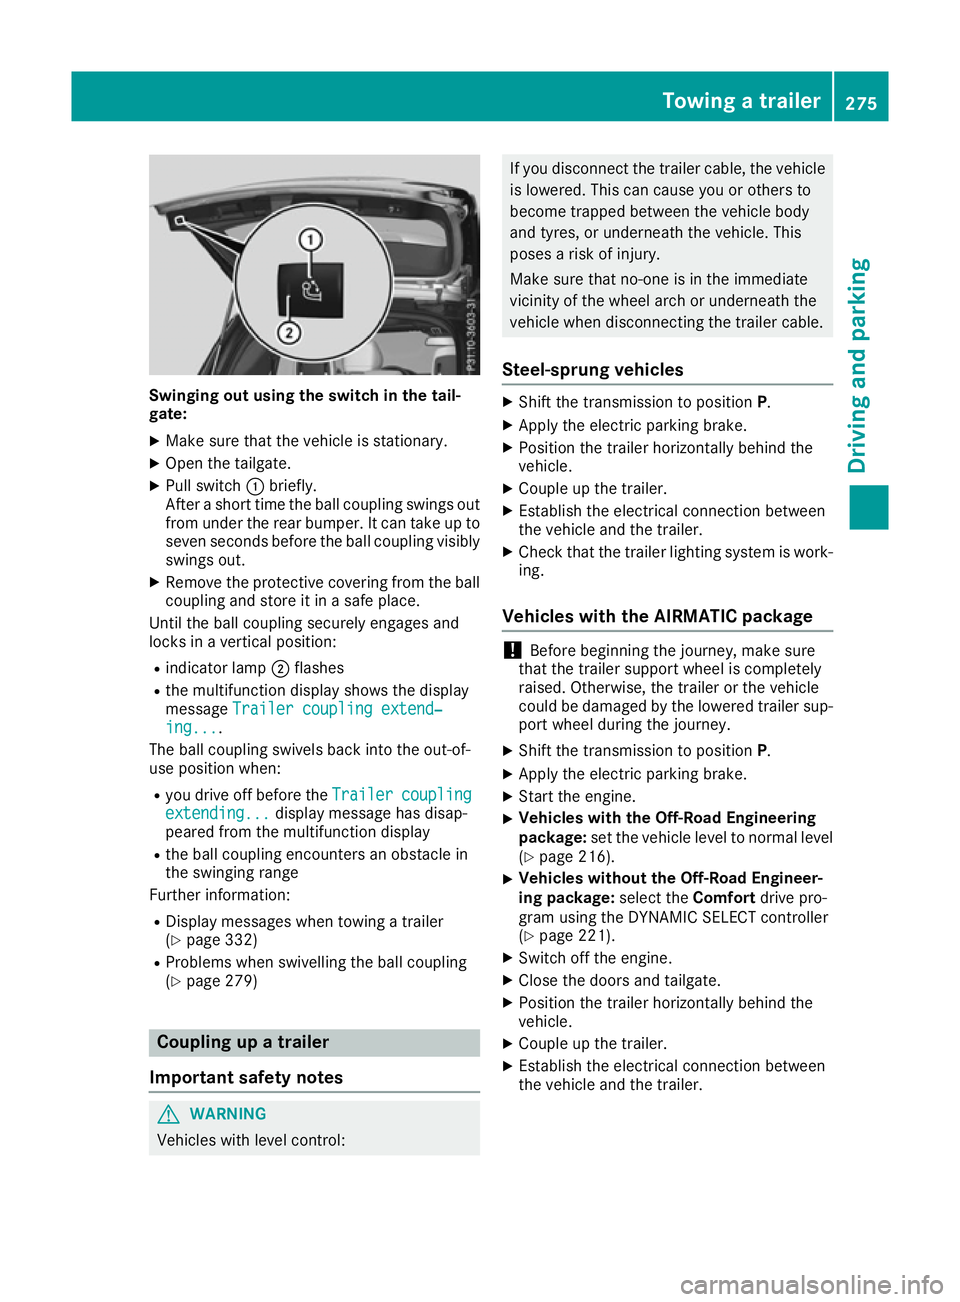
Swinging out using the switch in the tail-
gate:
X Make sure that the vehicle is stationary.
X Open the tailgate.
X Pull switch :briefly.
After a short time the ball coupling swings out from under the rear bumper. It can take up to
seven seconds before the ball coupling visibly
swings out.
X Remove the protective covering from the ball
coupling and store it in a safe place.
Until the ball coupling securely engages and
locks in a vertical position:
R indicator lamp ;flashes
R the multifunction display shows the display
message Trailer coupling extend‐ Trailer coupling extend‐
ing...
ing....
The ball coupling swivels back into the out-of-
use position when:
R you drive off before the Trailer Trailercoupling
coupling
extending...
extending... display message has disap-
peared from the multifunction display
R the ball coupling encounters an obstacle in
the swinging range
Further information:
R Display messages when towing a trailer
(Y page 332)
R Problems when swivelling the ball coupling
(Y page 279) Coupling up a trailer
Important safety notes G
WARNING
Vehicles with level control: If you disconnect the trailer cable, the vehicle
is lowered. This can cause you or others to
become trapped between the vehicle body
and tyres, or underneath the vehicle. This
poses a risk of injury.
Make sure that no-one is in the immediate
vicinity of the wheel arch or underneath the
vehicle when disconnecting the trailer cable.
Steel-sprung vehicles X
Shift the transmission to position P.
X Apply the electric parking brake.
X Position the trailer horizontally behind the
vehicle.
X Couple up the trailer.
X Establish the electrical connection between
the vehicle and the trailer.
X Check that the trailer lighting system is work-
ing.
Vehicles with the AIRMATIC package !
Before beginning the journey, make sure
that the trailer support wheel is completely
raised. Otherwise, the trailer or the vehicle
could be damaged by the lowered trailer sup- port wheel during the journey.
X Shift the transmission to position P.
X Apply the electric parking brake.
X Start the engine.
X Vehicles with the Off-Road Engineering
package:
set the vehicle level to normal level
(Y page 216).
X Vehicles without the Off-Road Engineer-
ing package:
select theComfortdrive pro-
gram using the DYNAMIC SELECT controller
(Y page 221).
X Switch off the engine.
X Close the doors and tailgate.
X Position the trailer horizontally behind the
vehicle.
X Couple up the trailer.
X Establish the electrical connection between
the vehicle and the trailer. Towing a trailer
275Driving and parking Z
Page 280 of 453
Fold the ball coupling back in if you are not using
the trailer tow hitch. To fold the ball coupling in,
you have two options:
R use the switch in the driver's door (all vehicles
except PLUG-IN HYBRID vehicles)
R use the switch in the tailgate
Only release the ball coupling when its range of
movement is unobstructed. Folding in using the switch in the driver's
door (all vehicles except plug-in hybrid vehi-
cles):
X Make sure that the vehicle is stationary and
the trailer cables are disconnected.
X Place the protective covering on the ball cou-
pling.
X Shift the transmission to position P.
X Switch the ignition on.
X Pull switch :briefly.
After a short time the ball coupling swings in
under the rear bumper. It can take up to seven seconds before the ball coupling visibly
swings in.
Until the ball coupling securely engages and
locks under the bumper:
R indicator lamp ;flashes
R the multifunction display shows the display
message Trailer coupling extend‐
Trailer coupling extend‐
ing... ing....
The ball coupling swivels back into the out-of-
use position when:
R you drive off before the Trailer
Trailer coupling
coupling
extending... extending... display message has disap-
peared from the multifunction display
R the ball coupling encounters an obstacle in
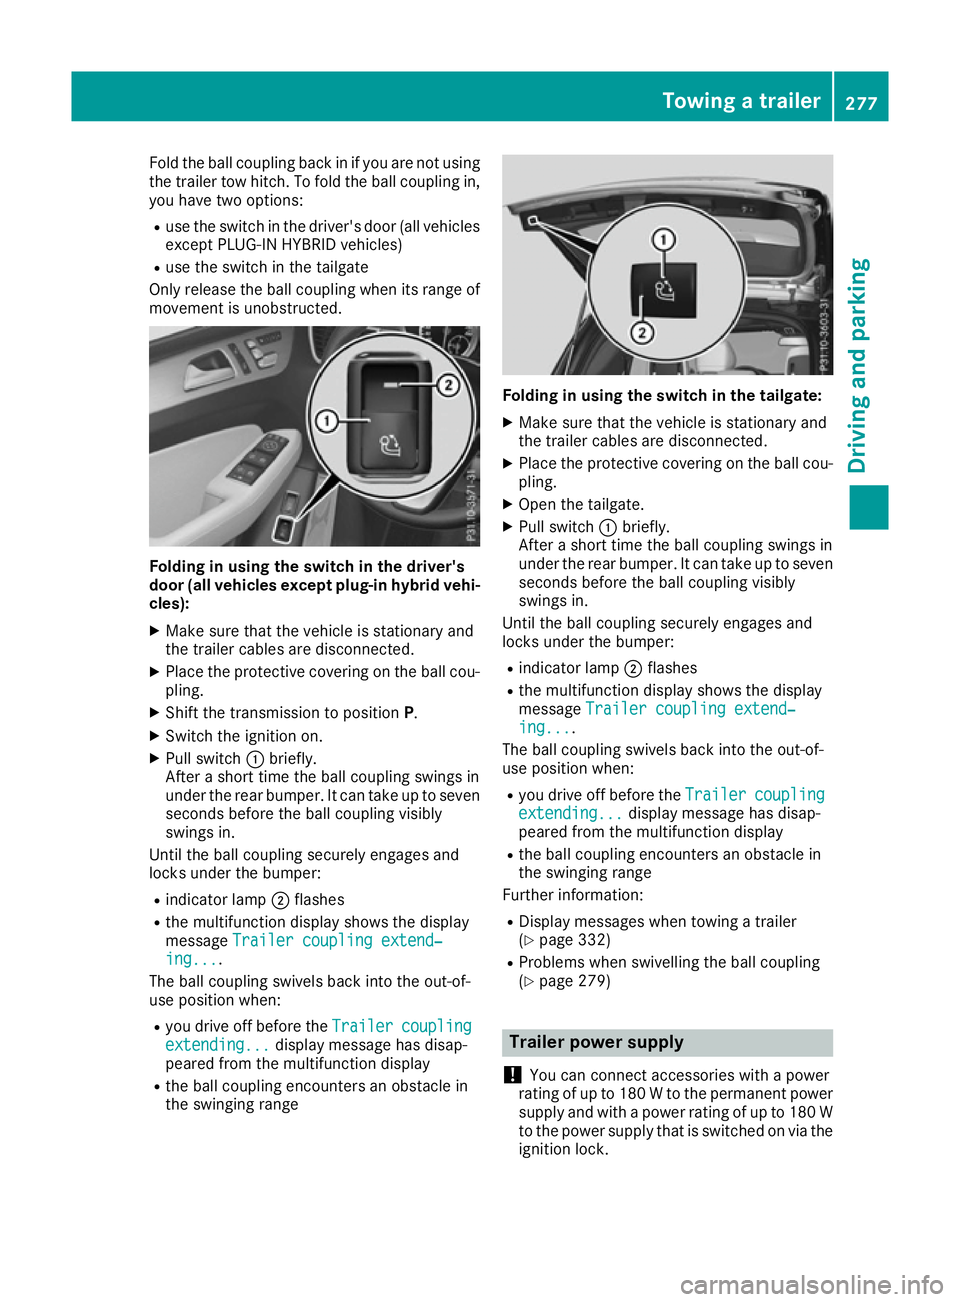
the swinging range Folding in using the switch in the tailgate:
X Make sure that the vehicle is stationary and
the trailer cables are disconnected.
X Place the protective covering on the ball cou-
pling.
X Open the tailgate.
X Pull switch :briefly.
After a short time the ball coupling swings in
under the rear bumper. It can take up to seven seconds before the ball coupling visibly
swings in.
Until the ball coupling securely engages and
locks under the bumper:
R indicator lamp ;flashes
R the multifunction display shows the display
message Trailer coupling extend‐
Trailer coupling extend‐
ing... ing....
The ball coupling swivels back into the out-of-
use position when:
R you drive off before the Trailer
Trailercoupling
coupling
extending...
extending... display message has disap-
peared from the multifunction display
R the ball coupling encounters an obstacle in
the swinging range
Further information:
R Display messages when towing a trailer
(Y page 332)
R Problems when swivelling the ball coupling
(Y page 279) Trailer power supply
! You can connect accessories with a power
rating of up to 180 W to the permanent power supply and with a power rating of up to 180 Wto the power supply that is switched on via the
ignition lock. Towing a trailer
277Driving and parking Z
Page 281 of 453
The trailer battery may not be charged from
the power supply.
When it leaves the factory, your vehicle's trailer
socket is equipped with a permanent power
supply and a power supply that is switched on
via the ignition lock.
The permanent power supply is supplied via
trailer socket pin 9.
The power supply that is switched on via the
ignition lock is supplied via trailer socket pin 10.
The trailer's permanent power supply is
switched off in the event of low vehicle supply
voltage and after six hours at the latest.
You can find more information about fitting the
trailer electrics at a qualified specialist work-
shop.
X To switch the connected power supply on
or off: turn the key to position 2or 0respec-
tively (Y page 158). Failure check for LEDs
If LED lamps are fitted in the trailer, a malfunc-
tion message may appear in the multifunction
display even if there is no fault. The reason for
the error message may be that the current has
fallen below the minimum of 50 mA.
To ensure reliable indication of the failure, each LED chain in the trailer lighting must be guaran-
teed a minimum current of 50 mA. Trailer with 7-pin connector
General notes Trailer with 7-pin connector:
you can connect
to the 13-pin socket on the ball coupling using
an adapter or, if necessary, an adapter cable.
Both can be obtained at a qualified specialist
workshop.
Fitting the adapter !
Make sure that there is sufficient cable play
so that the cable cannot become detached
when cornering.
! Remove the adapter cable before folding in
the ball coupling. You could otherwise dam-
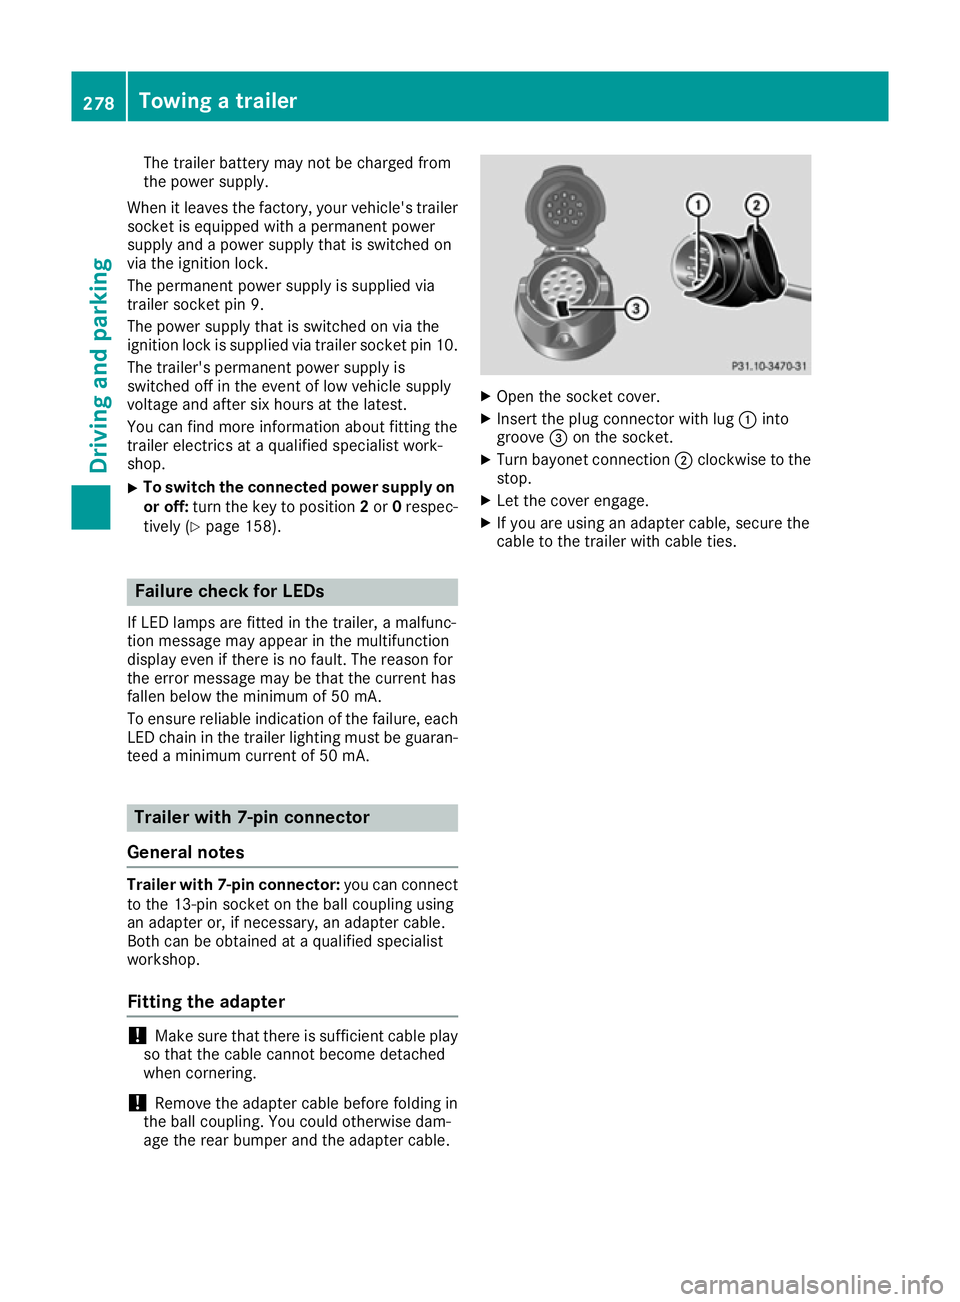
age the rear bumper and the adapter cable. X
Open the socket cover.
X Insert the plug connector with lug :into
groove =on the socket.
X Turn bayonet connection ;clockwise to the
stop.
X Let the cover engage.
X If you are using an adapter cable, secure the
cable to the trailer with cable ties. 278
Towing a trailerDriving and parking
Page 282 of 453
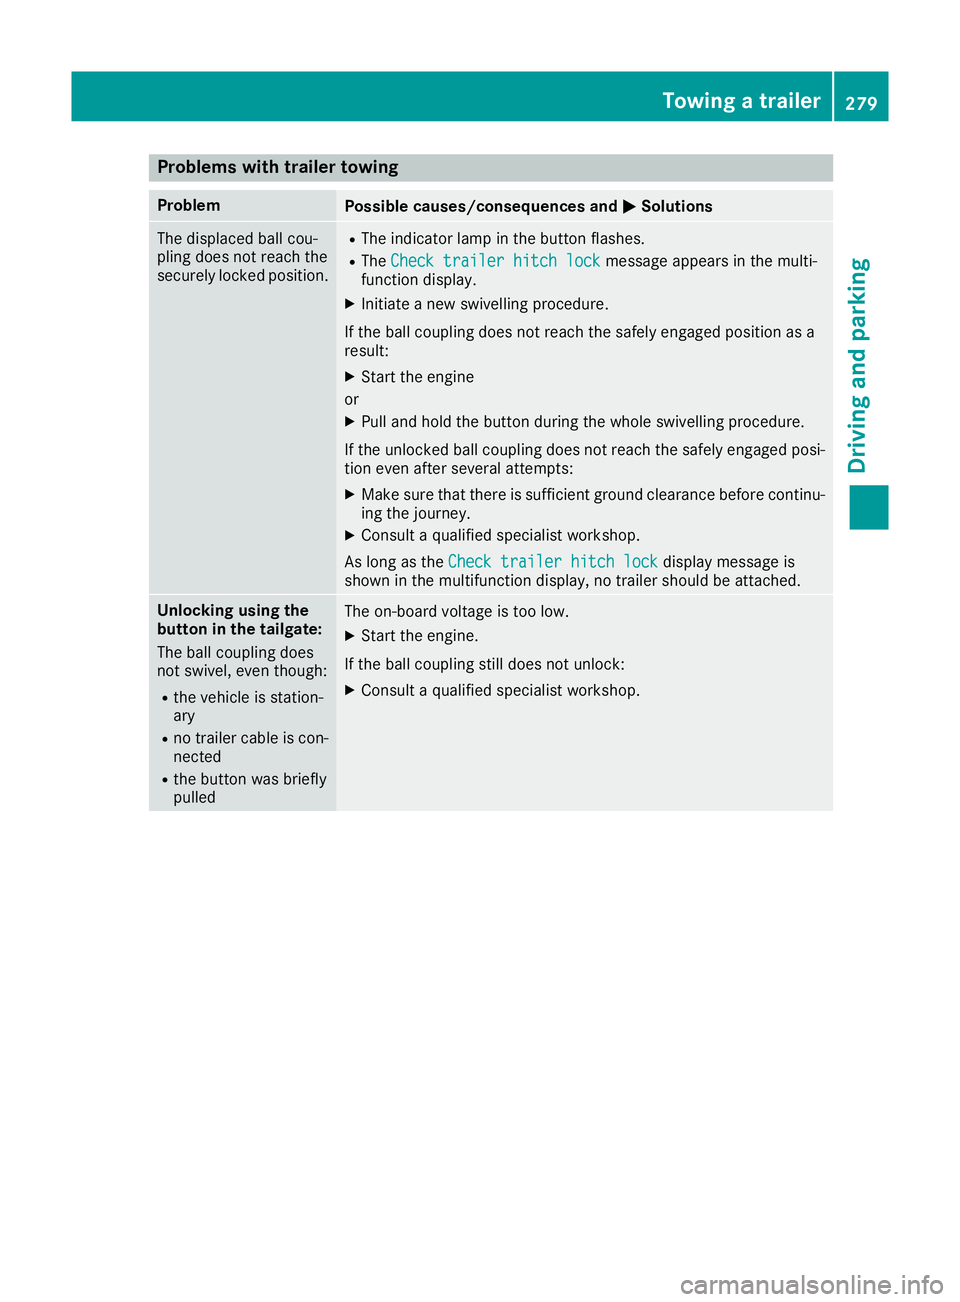
Problems with trailer towing
Problem
Possible causes/consequences and
M
MSolutions The displaced ball cou-
pling does not reach the
securely locked position. R
The indicator lamp in the button flashes.
R The Check trailer hitch lock Check trailer hitch lock message appears in the multi-
function display.
X Initiate a new swivelling procedure.
If the ball coupling does not reach the safely engaged position as a
result:
X Start the engine
or
X Pull and hold the button during the whole swivelling procedure.
If the unlocked ball coupling does not reach the safely engaged posi- tion even after several attempts:
X Make sure that there is sufficient ground clearance before continu-
ing the journey.
X Consult a qualified specialist workshop.
As long as the Check trailer hitch lock
Check trailer hitch lock display message is
shown in the multifunction display, no trailer should be attached. Unlocking using the
button in the tailgate:
The ball coupling does
not swivel, even though:
R
the vehicle is station-
ary
R no trailer cable is con-
nected
R the button was briefly
pulled The on-board voltage is too low.
X Start the engine.
If the ball coupling still does not unlock:
X Consult a qualified specialist workshop. Towing a trailer
279Driving and parking Z