2015 MERCEDES-BENZ GLE SUV turn signal bulb
[x] Cancel search: turn signal bulbPage 9 of 453
C
Calling up a fault see Display messages
Car
see Vehicle
Car wash (care) ................................ .379
Care
360° camera ................................. 383
Automatic car wash ....................... 379
Carpets .......................................... 385
Display .......................................... .384
Exhaust pipe .................................. 383
Exterior lighting ............................ .382
Gear or selector lever .................... 384
High-pressure cleaner .................... 380
Interior .......................................... .384
Matt paintwork .............................. 381
Notes ............................................. 378
Paint .............................................. 380
Plastic trim ................................... .384
Reversing camera .......................... 383
Roof lining ...................................... 385
Seat belt ........................................ 385
Seat cover ..................................... 385
Sensors ......................................... 382
Side running board ........................ 382
Steering wheel ............................... 384
Trim pieces ................................... .384
Washing by hand ........................... 380
Wheels .......................................... .381
Windows ........................................ 381
Wiper blades .................................. 382
Wooden trim .................................. 384
CD player (on-board computer) ........287
Central locking
Automatic locking (on-board com-puter) ............................................. 294
Locking/unlocking (key) .................. 85
Centre console
Lower section .................................. 37
Upper section .................................. 36
Changing bulbs
Dipped-beam headlamps .............. .129
Main-beam headlamps ................... 129
Turn signals (front) ......................... 130 Charging
see Charging the high-voltage bat-
tery (important safety notes)
Charging cable
Connection ................................... .188
Control panel ......................... 185, 186
Disconnecting ................................ 188
Heating up ..................................... 185
Important safety notes .................. 185
Indicator lamps .............................. 187
Storing .......................................... .185
Charging the high-voltage battery
(important safety notes) ................... 182
Child
Restraint system .............................. 59
Child seat
Forward-facing restraint system ...... 63
ISOFIX .............................................. 60
On the front-passenger sea t............ 62
Rearward-facing restraint system .... 63
Recommendations ........................... 67
Suitable positions ............................ 63
Top Tether ....................................... 60
Child-proof locks
Important safety notes .................... 68
Rear doors ....................................... 69
Cigarette lighter ................................ 364
Cleaning
Mirror turn signal ........................... 382
Trailer tow hitch ............................. 383
Climate control
Auxiliary heating/ventilation .......... 149
Controlling automaticall y............... 141
Convenience opening/closing
(air-recirculation mode) ................. 145
Cooling with air dehumidification .. 139
Demisting the windows .................. 143
Demisting the windscreen ............. 143
Immediate pre-entry climate con-
trol ................................................. 149
Indicator lamp ................................ 141
Information about using
THERMATIC automatic climate
control ........................................... 137
Information on using
THERMOTRONIC automatic cli-
mate control .................................. 139
Ionisation ....................................... 146 6
Index
Page 17 of 453
Foglamps (extended range) ........... 125
Hazard warning lamps ................... 124
Headlamp flashe r........................... 124
Headlamp range ............................ 123
Light switch ................................... 121
Main-beam headlamp s................... 123
Motorway mode ............................. 125
Off-road lights ................................ 125
Parking lamps ................................ 122
Rear foglamp ................................. 122
Side lamps ..................................... 122
Switching the daytime driving
lights on/off (on-board com-
puter) ............................................. 293
Turn signals ................................... 123
see Interior lighting
LIM indicator lamp
Cruise control ................................ 203
DISTRONIC PLUS ........................... 208
Variable SPEEDTRONIC ................. 205
Limiting the speed
see SPEEDTRONIC
Loading guidelines ............................ 351
Locking
see Central locking
Locking (doors)
Automatic ........................................ 92
Emergency locking ........................... 93
From inside (central locking but-
ton) .................................................. 91
Locking centrally
see Central locking
Locking verification signal (on-
board computer) ............................... 295
LOW RANGE
Display message ............................ 324
Off-road gear ................................. 255
LOW RANGE off-road gear ................ 255
Luggage compartment cover
Notes/function .............................. 356
Luggage compartment enlarge-
ment
Important safety notes .................. 354
Luggage compartment floor
Important safety notes .................. 359
opening/closing ............................ 359
stowage well, under ....................... 359 Lumbar support
Adjusting (on the seat) .................. 112
Luxury head restraint ....................... 110 M
M+S tyres ........................................... 407
Main-beam headlamps
Adaptive Highbeam Assist PLUS .... 126
Changing bulb s.............................. 129
Display message ............................ 314
Switching on/of f........................... 123
Maintenance
see ASSYST PLUS
Matt finish (cleaning instructions) .. 381
Maximum charge current
Setting (charging cable) ................. 186
Setting (on-board computer) .......... 292
Media Interface
USB port in the armrest of the
centre console ............................... 352
see Separate operating instructions
Memory card (audio) ......................... 287
Memory function ............................... 120
Mercedes-Benz Contact
Display message ............................ 306
Mercedes-Benz emergency call
system
Switch in the overhead control
panel .............................................. 365
Mercedes-Benz Intelligent Drive
360°camera .................................. 236
Active Blind Spot Assist ................. 247
Active Lane Keeping Assist ............ 250
Active Parking Assist ..................... 228
ATTENTION ASSIST ........................ 240
Blind Spot Assist ............................ 244
DISTRONIC PLUS ........................... 207
DISTRONIC PLUS with Steering
Assist and Stop&Go Pilot ............... 214
General notes ................................ 203
Lane Keeping Assist ...................... 246
PARKTRONIC ................................. 225
PRE-SAFE ®
PLUS (anticipatory
occupant protection PLUS) .............. 57
Reversing camera .......................... 232
Traffic Sign Assist .......................... 242 14
Index
Page 25 of 453
With both axles on the ground .......4
01
Towing eye ......................................... 387
Traffic Sign Assist
Activating/deactivating the warn-ing function ................................... .290
Display message ............................ 325
Function/notes ............................ .242
Important safety notes .................. 242
Instrument cluster display ............. 243
Trailer coupling
see Towing a trailer
Trailer towing
7-pin connector ............................ .278
Blind Spot Assist ............................ 246
Cleaning the trailer tow hitch ......... 383
Coupling up a trailer ..................... .275
Decoupling a trailer ....................... 276
Driving tips ................................... .273
Important safety notes .................. 272
Lights display message .................. 313
Mounting dimensions .................... 446
Parktronic ...................................... 225
Power supply ................................. 277
Problem (fault) ............................... 279
Trailer loads ................................... 447
Transmission
see Automatic transmission
Transmission position display ......... 168
Transmission position display
(DIRECT SELECT lever) ......................168
Transporting the vehicle .................. 401
Travelling uphill
Brow of hill ..................................... 202
Driving downhill ............................ .202
Maximum gradient-climbing capa-
bility ............................................... 202
Trim pieces (cleaning instruc-
tions) ................................................. .384
Trip computer (on-board com-
puter) ................................................. .284
Trip meter
Calling up ....................................... 284
Resetting (on-board computer) ...... 285
Turn signals
Changing bulbs (front) ................... 130
Switching on/off ........................... 123 TV
Operating (on-board computer) ..... 288
see Separate operating instructions
Two-way radio
Frequencies ................................... 433
Installation ..................................... 433
Transmission output (maximum ).... 433
Type identification plate
see Vehicle identification plate
Tyre inflation compressor
see TIREFIT kit
Tyre pressure
Calling up (on-board computer) ..... 411
Display message ............................ 330
Not reached (TIREFIT) .................... 391
Reached (TIREFIT) .......................... 391
Recommended ............................... 408
Tyre pressure loss warning
General notes ................................ 410
Important safety notes .................. 410
Restarting ...................................... 410
Tyre pressure monitor
Checking the tyre pressure elec-
tronically ........................................ 411
Function/note s............................. 411
General notes ................................ 411
Important safety notes .................. 411
Radio type approval for the tyre
pressure monitor ........................... 413
Restarting ...................................... 412
Warning lamp ................................. 350
Warning message .......................... 412
Tyres
Changing a whee l.......................... 413
Checking ........................................ 406
Direction of rotation ...................... 414
Display message ............................ 330
General notes ................................ 418
Important safety notes .................. 405
Information on driving .................... 405
M+S tyres ...................................... 407
MOExtended tyre s......................... 407
Replacing ....................................... 413
Service life ..................................... 406
Storing ........................................... 414
Tyre size (data ).............................. 418
Tyre tread ...................................... 406
Wheel and tyre combinations ........ 419 22
Index
Page 131 of 453
Crash-responsive emergency lighting
The interior lighting is activated automatically if
the vehicle is involved in an accident.
X To switch off the crash-responsive emer-
gency lighting: press the hazard warning
lamp button.
or X Lock and then unlock the vehicle using the
key. Replacing bulbs (vehicles with LED
headlamps)
The front and rear light clusters of your vehicle
are equipped with LED light bulbs. Do not
replace the bulbs yourself. Contact a qualified
specialist workshop which has the necessary
specialist knowledge and tools to carry out the
work required.
Lamps are an important aspect of vehicle safety.
You must therefore make sure that these func-
tion correctly at all times. Have the headlamp
setting checked regularly. Replacing bulbs (vehicles with halo-
gen headlamps) Important safety notes
G
WARNING
Bulbs, lamps and plug connectors can
become very hot during use. When replacing a bulb, you could burn yourself on these com-
ponents. There is a risk of injury.
Allow these components to cool down before replacing the bulb.
Do not use a bulb that has been dropped or if its glass tube has been scratched.
The bulb may explode if:
R you touch it
R it is hot
R you drop it
R you scratch it
Only operate bulbs in enclosed lamps designed
for that purpose. Only fit spare bulbs of the same
type and the specified voltage. Marks on the glass tube reduce the service life
of the bulbs. Do not touch the glass tube with
your bare hands. If necessary, clean the glass
tube when cold with alcohol or spirit and rub it
off with a lint-free cloth.
Protect bulbs from moisture during operation.
Do not allow bulbs to come into contact with
liquids.
Only replace the bulbs listed (Y page 128).
Have the bulbs that you cannot replace yourself
replaced at a qualified specialist workshop.
If you require assistance replacing bulbs, con-
sult a qualified specialist workshop.
If the new bulb still does not light up, consult a
qualified specialist workshop.
Headlamps and lights are an important aspect of
vehicle safety. You must therefore make sure
that these function correctly at all times. Have
the headlamp setting checked regularly. Overview of bulb replacement – bulbs
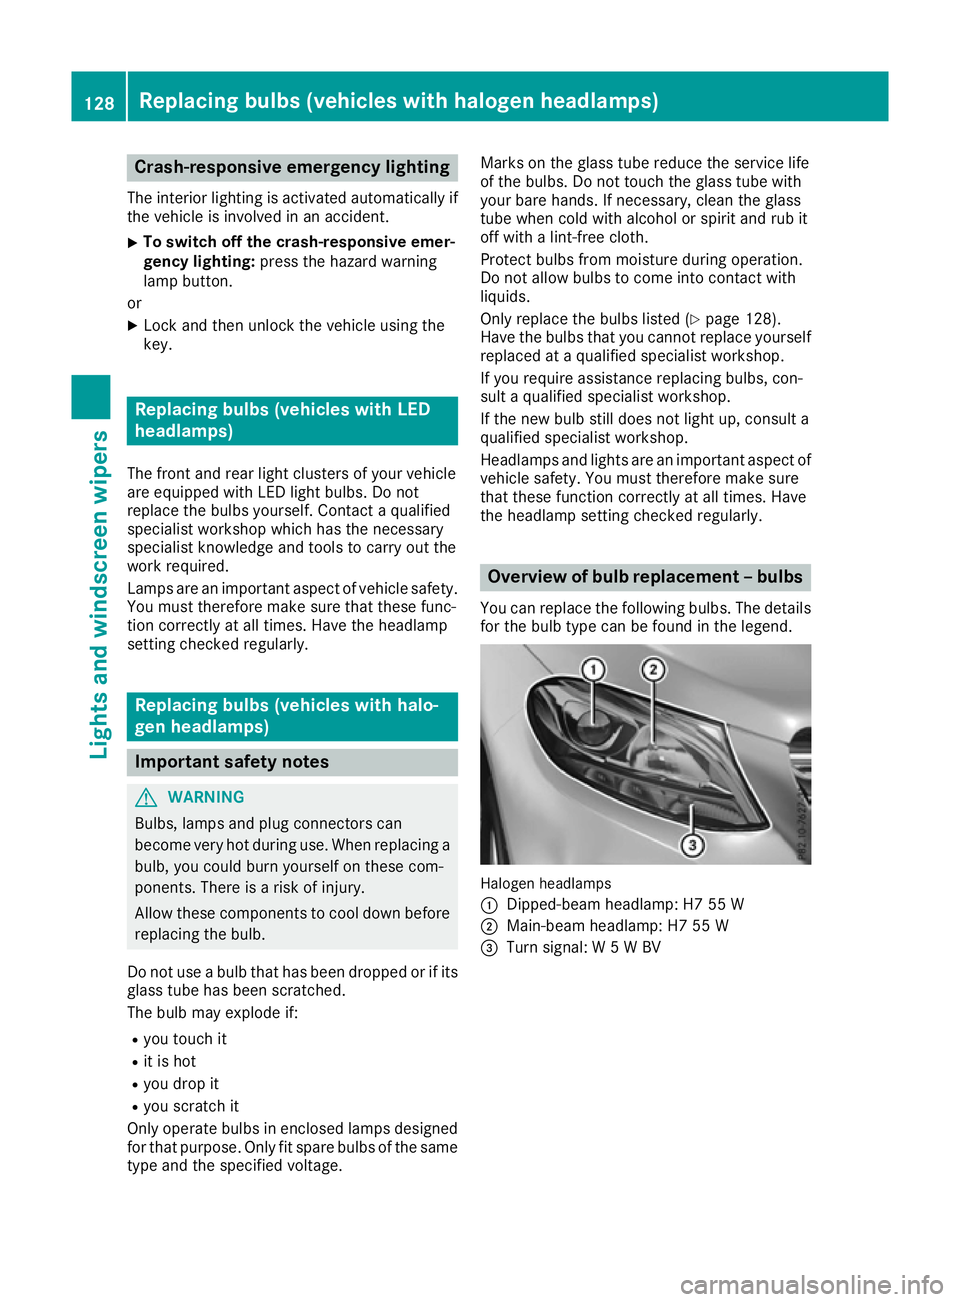
You can replace the following bulbs. The details
for the bulb type can be found in the legend. Halogen headlamps
:
Dipped-beam headlamp: H7 55 W
; Main-beam headlamp: H7 55 W
= Turn signal: W 5 W BV 128
Replacing bulbs (vehicles with halogen headlamps)Lights and windscreen wipers
Page 133 of 453
Turn signals
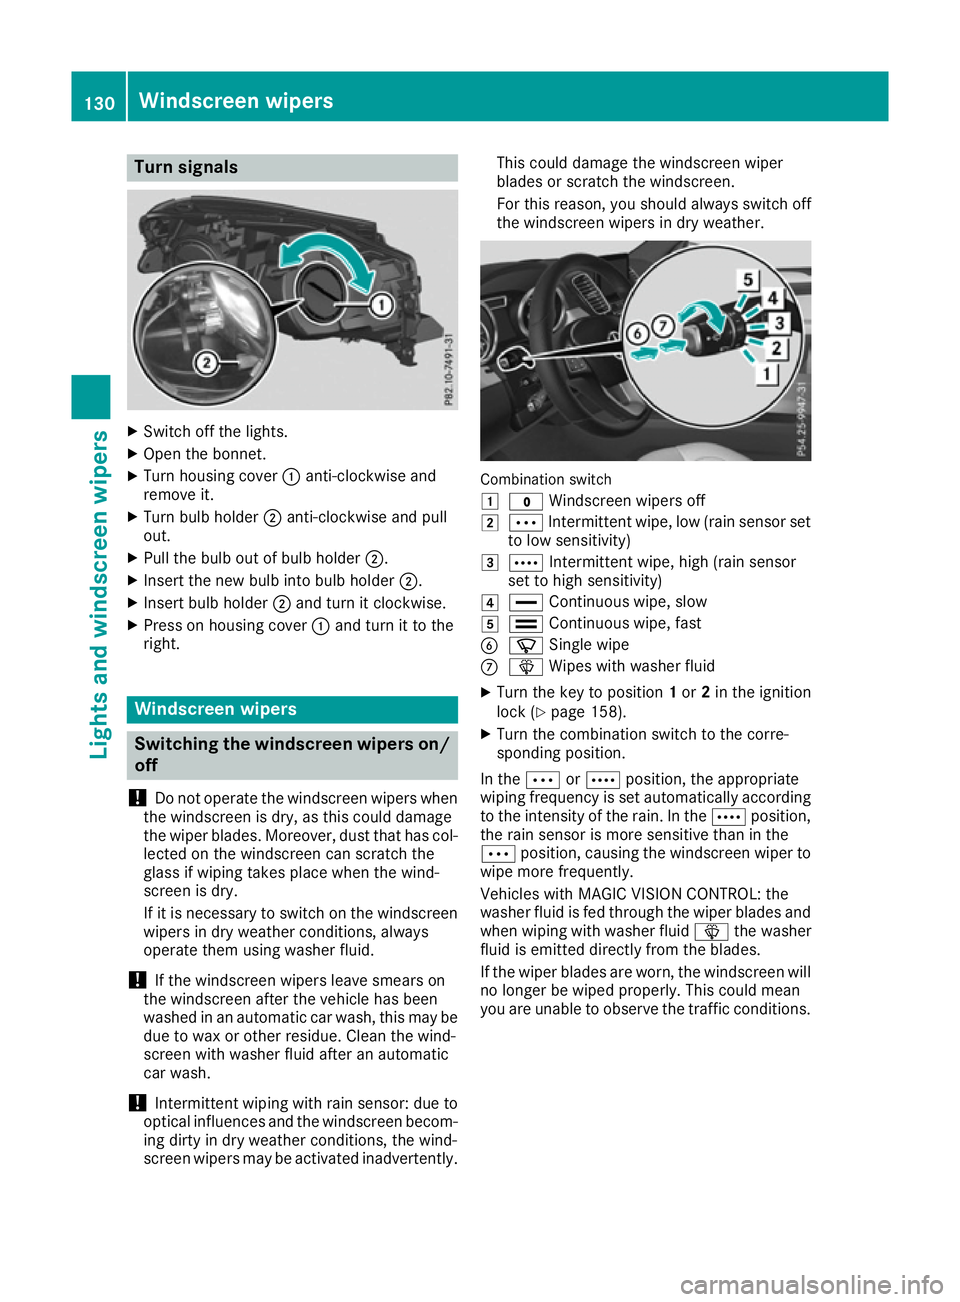
X
Switch off the lights.
X Open the bonnet.
X Turn housing cover :anti-clockwise and
remove it.
X Turn bulb holder ;anti-clockwise and pull
out.
X Pull the bulb out of bulb holder ;.
X Insert the new bulb into bulb holder ;.
X Insert bulb holder ;and turn it clockwise.
X Press on housing cover :and turn it to the
right. Windscreen wipers
Switching the windscreen wipers on/
off
! Do not operate the windscreen wipers when
the windscreen is dry, as this could damage
the wiper blades. Moreover, dust that has col-
lected on the windscreen can scratch the
glass if wiping takes place when the wind-
screen is dry.
If it is necessary to switch on the windscreen wipers in dry weather conditions, always
operate them using washer fluid.
! If the windscreen wipers leave smears on
the windscreen after the vehicle has been
washed in an automatic car wash, this may be
due to wax or other residue. Clean the wind-
screen with washer fluid after an automatic
car wash.
! Intermittent wiping with rain sensor: due to
optical influences and the windscreen becom-
ing dirty in dry weather conditions, the wind-
screen wipers may be activated inadvertently. This could damage the windscreen wiper
blades or scratch the windscreen.
For this reason, you should always switch off
the windscreen wipers in dry weather. Combination switch
1
$ Windscreen wipers off
2 Ä Intermittent wipe, low (rain sensor set
to low sensitivity)
3 Å Intermittent wipe, high (rain sensor
set to high sensitivity)
4 ° Continuous wipe, slow
5 ¯ Continuous wipe, fast
B í Single wipe
C î Wipes with washer fluid
X Turn the key to position 1or 2in the ignition
lock (Y page 158).
X Turn the combination switch to the corre-
sponding position.
In the ÄorÅ position, the appropriate
wiping frequency is set automatically according to the intensity of the rain. In the Åposition,
the rain sensor is more sensitive than in the
Ä position, causing the windscreen wiper to
wipe more frequently.
Vehicles with MAGIC VISION CONTROL: the
washer fluid is fed through the wiper blades and when wiping with washer fluid îthe washer
fluid is emitted directly from the blades.
If the wiper blades are worn, the windscreen will
no longer be wiped properly. This could mean
you are unable to observe the traffic conditions. 130
Windscreen
wipersLights and windscreen wipers
Page 316 of 453
Display messages
Possible causes/consequences and
M
MSolutions Further information on the automatic front-passenger front airbag
deactivation feature (Y page 51).Lights
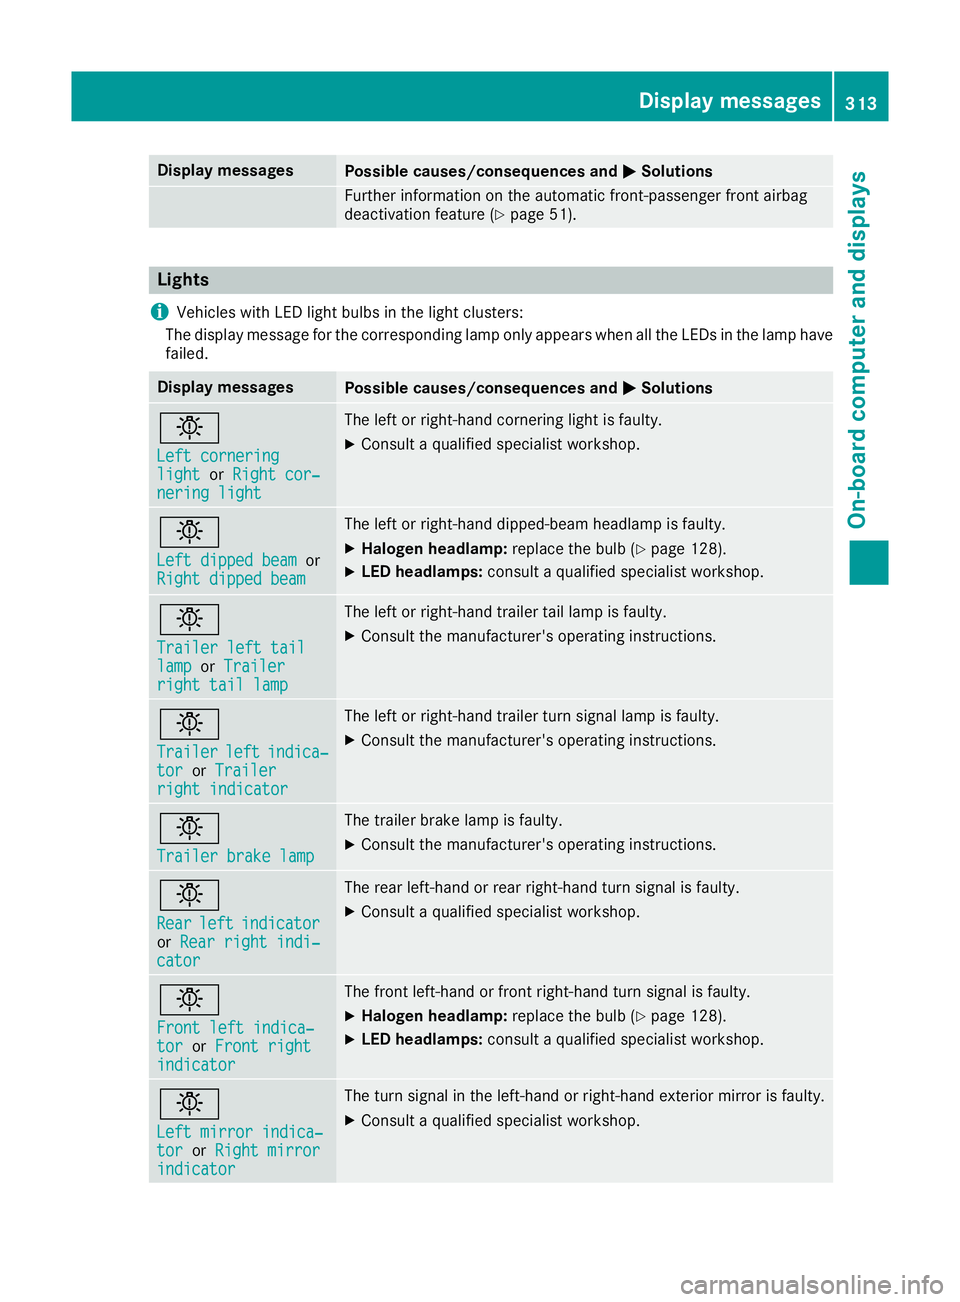
i Vehicles with LED light bulbs in the light clusters:
The display message for the corresponding lamp only appears when all the LEDs in the lamp have
failed. Display messages
Possible causes/consequences and
M
MSolutions b
Left cornering Left cornering
light light
orRight cor‐
Right cor‐
nering light
nering light The left or right-hand cornering light is faulty.
X Consult a qualified specialist workshop. b
Left dipped beam Left dipped beam
or
Right dipped beam
Right dipped beam The left or right-hand dipped-beam headlamp is faulty.
X Halogen headlamp: replace the bulb (Ypage 128).
X LED headlamps: consult a qualified specialist workshop. b
Trailer left tail Trailer left tail
lamp lamp
orTrailer
Trailer
right tail lamp
right tail lamp The left or right-hand trailer tail lamp is faulty.
X Consult the manufacturer's operating instructions. b
Trailer Trailer
left
leftindica‐
indica‐
tor
tor orTrailer
Trailer
right indicator right indicator The left or right-hand trailer turn signal lamp is faulty.
X
Consult the manufacturer's operating instructions. b
Trailer brake lamp Trailer brake lamp The trailer brake lamp is faulty.
X Consult the manufacturer's operating instructions. b
Rear Rear
left
leftindicator
indicator
or Rear right indi‐
Rear right indi‐
cator
cator The rear left-hand or rear right-hand turn signal is faulty.
X Consult a qualified specialist workshop. b
Front left indica‐ Front left indica‐
tor tor
orFront right
Front right
indicator
indicator The front left-hand or front right-hand turn signal is faulty.
X Halogen headlamp: replace the bulb (Ypage 128).
X LED headlamps: consult a qualified specialist workshop. b
Left mirror indica‐ Left mirror indica‐
tor tor
orRight mirror
Right mirror
indicator
indicator The turn signal in the left-hand or right-hand exterior mirror is faulty.
X Consult a qualified specialist workshop. Display
messages
313On-board computer and displays Z