2015 MERCEDES-BENZ GLE COUPE tyre pressure
[x] Cancel search: tyre pressurePage 229 of 393
R
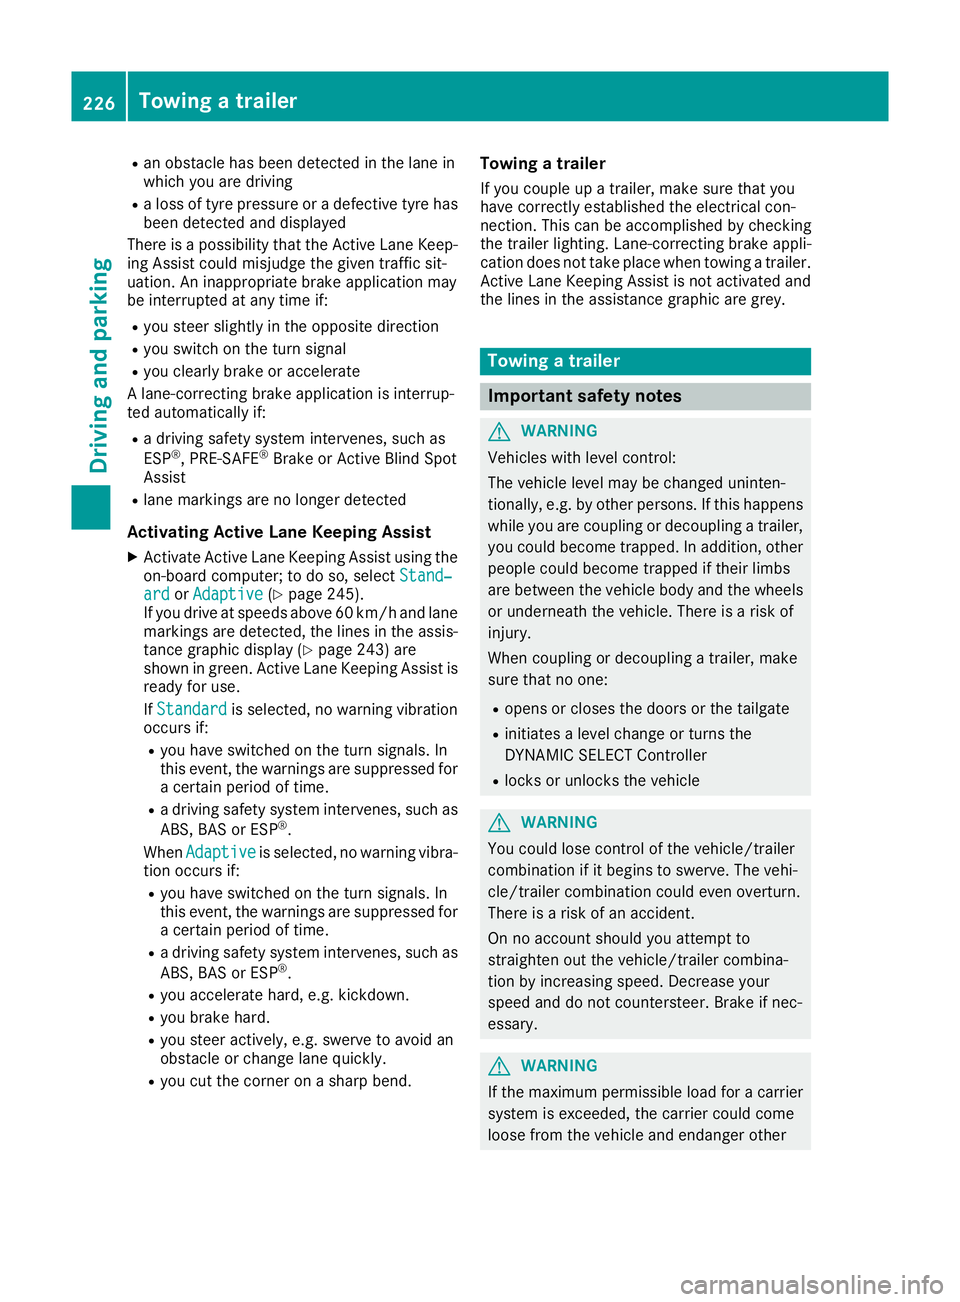
an obstacle has been detected in the lane in
which you are driving
R a loss of tyre pressure or a defective tyre has
been detected and displayed
There is a possibility that the Active Lane Keep-
ing Assist could misjudge the given traffic sit-
uation. An inappropriate brake application may
be interrupted at any time if:
R you steer slightly in the opposite direction
R you switch on the turn signal
R you clearly brake or accelerate
A lane-correcting brake application is interrup-
ted automatically if:
R a driving safety system intervenes, such as
ESP ®
, PRE-SAFE ®
Brake or Active Blind Spot
Assist
R lane markings are no longer detected
Activating Active Lane Keeping Assist
X Activate Active Lane Keeping Assist using the
on-board computer; to do so, select Stand‐
Stand‐
ard ard orAdaptive
Adaptive (Ypage 245).
If you drive at speeds above 60 km/h and lane
markings are detected, the lines in the assis- tance graphic display (Y page 243) are
shown in green. Active Lane Keeping Assist is
ready for use.
If Standard
Standard is selected, no warning vibration
occurs if:
R you have switched on the turn signals. In
this event, the warnings are suppressed for a certain period of time.
R a driving safety system intervenes, such as
ABS, BAS or ESP ®
.
When Adaptive
Adaptive is selected, no warning vibra-
tion occurs if:
R you have switched on the turn signals. In
this event, the warnings are suppressed for
a certain period of time.
R a driving safety system intervenes, such as
ABS, BAS or ESP ®
.
R you accelerate hard, e.g. kickdown.
R you brake hard.
R you steer actively, e.g. swerve to avoid an
obstacle or change lane quickly.
R you cut the corner on a sharp bend. Towing a trailer
If you couple up a trailer, make sure that you
have correctly established the electrical con-
nection. This can be accomplished by checking
the trailer lighting. Lane-correcting brake appli-
cation does not take place when towing a trailer. Active Lane Keeping Assist is not activated and
the lines in the assistance graphic are grey. Towing a trailer
Important safety notes
G
WARNING
Vehicles with level control:
The vehicle level may be changed uninten-
tionally, e.g. by other persons. If this happens while you are coupling or decoupling a trailer,
you could become trapped. In addition, other
people could become trapped if their limbs
are between the vehicle body and the wheels or underneath the vehicle. There is a risk of
injury.
When coupling or decoupling a trailer, make
sure that no one:
R opens or closes the doors or the tailgate
R initiates a level change or turns the
DYNAMIC SELECT Controller
R locks or unlocks the vehicle G
WARNING
You could lose control of the vehicle/trailer
combination if it begins to swerve. The vehi-
cle/trailer combination could even overturn.
There is a risk of an accident.
On no account should you attempt to
straighten out the vehicle/trailer combina-
tion by increasing speed. Decrease your
speed and do not countersteer. Brake if nec-
essary. G
WARNING
If the maximum permissible load for a carrier system is exceeded, the carrier could come
loose from the vehicle and endanger other 226
Towing a trailerDriving and parking
Page 230 of 393

road users. There is a risk of an accident and
injury.
Never exceed the maximum permissible load
when using a carrier.
Exceeding the maximum permissible nose-
weight of the trailer drawbar on the ball coupling may cause damage to the following:
R your vehicle
R the trailer
R the ball coupling
R trailer tow hitch
The vehicle/trailer combination could become
unstable.
If the noseweight used is lower than the mini-
mum permissible noseweight, the vehicle/
trailer combination could also become unstable. To avoid hazardous situations:
R make sure to check the noseweight before
each journey
R use a drawbar noseweight as close as possi-
ble to the maximum noseweight
R do not exceed the maximum permissible
noseweight
R do not use a noseweight lower than the min-
imum noseweight
When reversing the vehicle towards the trailer,
make sure there is nobody between the trailer
and the vehicle.
Couple and uncouple the trailer carefully. If you
do not couple the trailer to the towing vehicle
correctly, the trailer could become detached.
Make sure that the following values are not
exceeded:
R the permissible trailer drawbar noseweight
R the permissible trailer load
R the permissible rear axle load of the towing
vehicle
R the maximum permissible gross vehicle
weight of both the towing vehicle and the
trailer
The applicable permissible values, which must
not be exceeded, can be found:
R in your vehicle documents
R on the identification plates of the trailer tow
hitch and the trailer
R on the vehicle identification plate
If the values differ, the lowest value applies. You will find the values approved by the manu-
facturer on the vehicle identification plates and those for the towing vehicle under "Technical
data" (Y page 385).
When towing a trailer, your vehicle's handling
characteristics will be different in comparison to
when driving without a trailer.
The vehicle/trailer combination:
R is heavier
R is restricted in its acceleration and gradient-
climbing capability
R has an increased braking distance
R is affected more by strong crosswinds
R demands more sensitive steering
R has a larger turning circle
This can impair the vehicle's handling charac-
teristics. Adapt your driving style accordingly.
Maintain a safe distance. Drive carefully.
When towing a trailer, always adjust your speed to the current road and weather conditions. Do
not exceed the maximum permissible speed for
your vehicle/trailer combination. Notes on towing a trailer
General notes Check the tyre pressures when towing a trailer.
You will find the values in the tyre pressure table in the vehicle fuel filler flap (Y page 351).
Please note that when towing a trailer, the fol-
lowing driving systems have limited availability
or are not available at all.
R PARKTRONIC (Y page 199)
R Blind Spot Assist (Y page 218)
R Active Lane Keeping Assist (Y page 224)
R Active Parking Assist (Y page 202)
On vehicles without level control, the height of
the ball coupling will alter according to the load
placed on the vehicle. If necessary, use a trailer
with a height-adjustable drawbar.
You will find fitting dimensions and loads under "Technical data" (Y page 384).
Driving tips Observe the information on ESP
®
trailer stabili-
sation (Y page 71) and on pulling away with a
trailer (Y page 149). Towing a trailer
227Driving and parking Z
Page 248 of 393
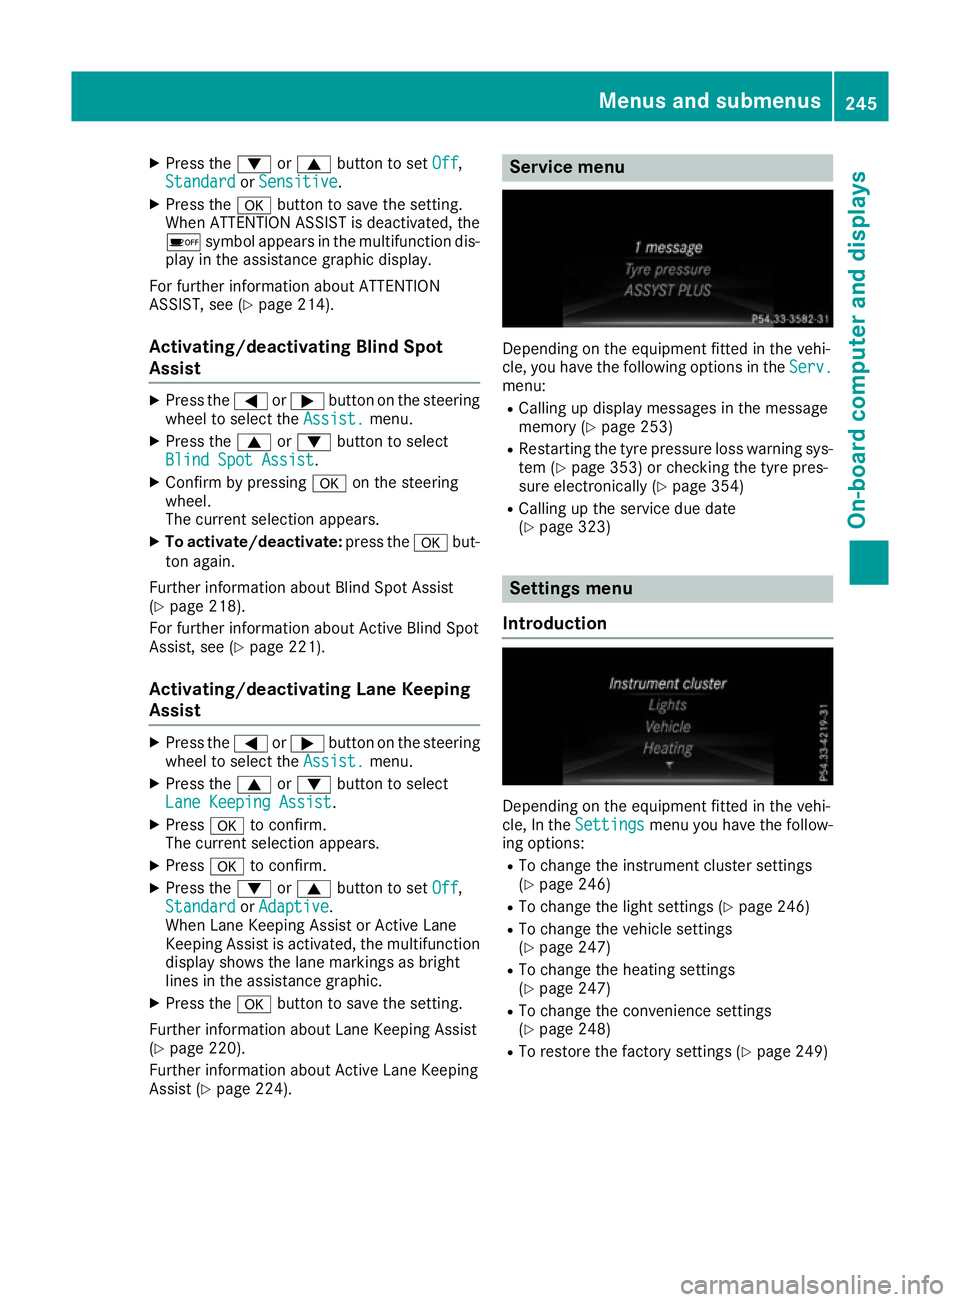
X
Press the :or9 button to set Off Off,
Standard Standard orSensitive
Sensitive.
X Press the abutton to save the setting.
When ATTENTION ASSIST is deactivated, the
é symbol appears in the multifunction dis-
play in the assistance graphic display.
For further information about ATTENTION
ASSIST, see (Y page 214).
Activating/deactivating Blind Spot
Assist X
Press the =or; button on the steering
wheel to select the Assist. Assist.menu.
X Press the 9or: button to select
Blind Spot Assist
Blind Spot Assist.
X Confirm by pressing aon the steering
wheel.
The current selection appears.
X To activate/deactivate: press theabut-
ton again.
Further information about Blind Spot Assist
(Y page 218).
For further information about Active Blind Spot
Assist, see (Y page 221).
Activating/deactivating Lane Keeping
Assist X
Press the =or; button on the steering
wheel to select the Assist. Assist.menu.
X Press the 9or: button to select
Lane Keeping Assist
Lane Keeping Assist.
X Press ato confirm.
The current selection appears.
X Press ato confirm.
X Press the :or9 button to set Off
Off,
Standard
Standard orAdaptive
Adaptive.
When Lane Keeping Assist or Active Lane
Keeping Assist is activated, the multifunction display shows the lane markings as bright
lines in the assistance graphic.
X Press the abutton to save the setting.
Further information about Lane Keeping Assist
(Y page 220).
Further information about Active Lane Keeping
Assist (Y page 224). Service menu
Depending on the equipment fitted in the vehi-
cle, you have the following options in the
Serv. Serv.
menu:
R Calling up display messages in the message
memory (Y page 253)
R Restarting the tyre pressure loss warning sys-
tem (Y page 353) or checking the tyre pres-
sure electronically (Y page 354)
R Calling up the service due date
(Y page 323) Settings menu
Introduction Depending on the equipment fitted in the vehi-
cle, In the Settings Settings menu you have the follow-
ing options:
R To change the instrument cluster settings
(Y page 246)
R To change the light settings (Y page 246)
R To change the vehicle settings
(Y page 247)
R To change the heating settings
(Y page 247)
R To change the convenience settings
(Y page 248)
R To restore the factory settings (Y page 249) Menus and submenus
245On-board computer and displays Z
Page 282 of 393
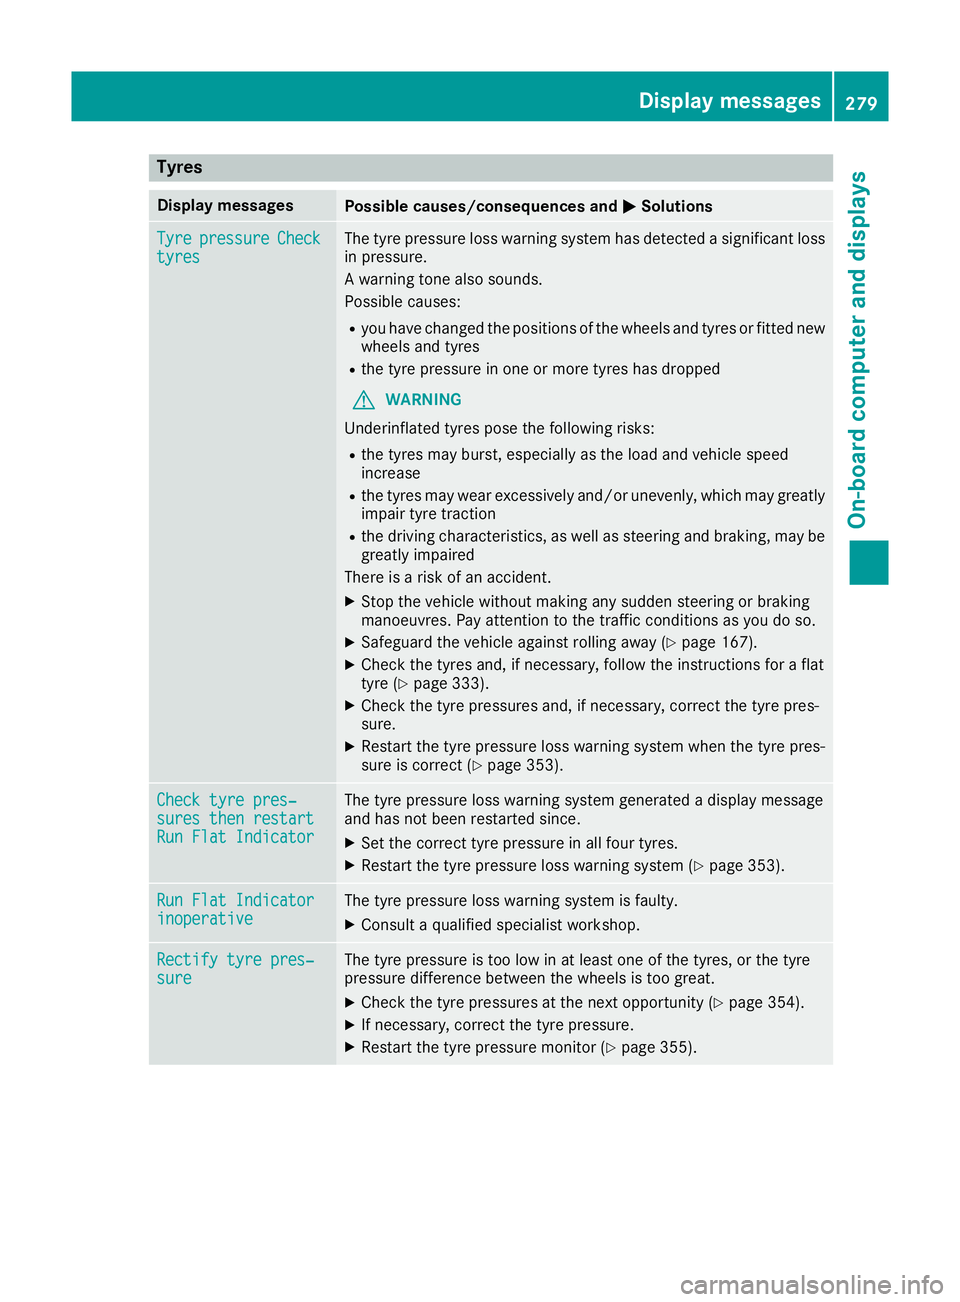
Tyres
Display messages
Possible causes/consequences and
M
MSolutions Tyre
Tyre
pressure
pressure Check
Check
tyres
tyres The tyre pressure loss warning system has detected a significant loss
in pressure.
A warning tone also sounds.
Possible causes:
R you have changed the positions of the wheels and tyres or fitted new
wheels and tyres
R the tyre pressure in one or more tyres has dropped
G WARNING
Underinflated tyres pose the following risks:
R the tyres may burst, especially as the load and vehicle speed
increase
R the tyres may wear excessively and/or unevenly, which may greatly
impair tyre traction
R the driving characteristics, as well as steering and braking, may be
greatly impaired
There is a risk of an accident.
X Stop the vehicle without making any sudden steering or braking
manoeuvres. Pay attention to the traffic conditions as you do so.
X Safeguard the vehicle against rolling away (Y page 167).
X Check the tyres and, if necessary, follow the instructions for a flat
tyre (Y page 333).
X Check the tyre pressures and, if necessary, correct the tyre pres-
sure.
X Restart the tyre pressure loss warning system when the tyre pres-
sure is correct (Y page 353). Check tyre pres‐ Check tyre pres‐
sures then restart sures then restart
Run Flat Indicator Run Flat Indicator The tyre pressure loss warning system generated a display message
and has not been restarted since.
X Set the correct tyre pressure in all four tyres.
X Restart the tyre pressure loss warning system (Y page 353).Run Flat Indicator Run Flat Indicator
inoperative inoperative The tyre pressure loss warning system is faulty.
X Consult a qualified specialist workshop. Rectify tyre pres‐
Rectify tyre pres‐
sure sure The tyre pressure is too low in at least one of the tyres, or the tyre
pressure difference between the wheels is too great.
X Check the tyre pressures at the next opportunity (Y page 354).
X If necessary, correct the tyre pressure.
X Restart the tyre pressure monitor (Y page 355). Display
messages
279On-board computer and displays Z
Page 283 of 393
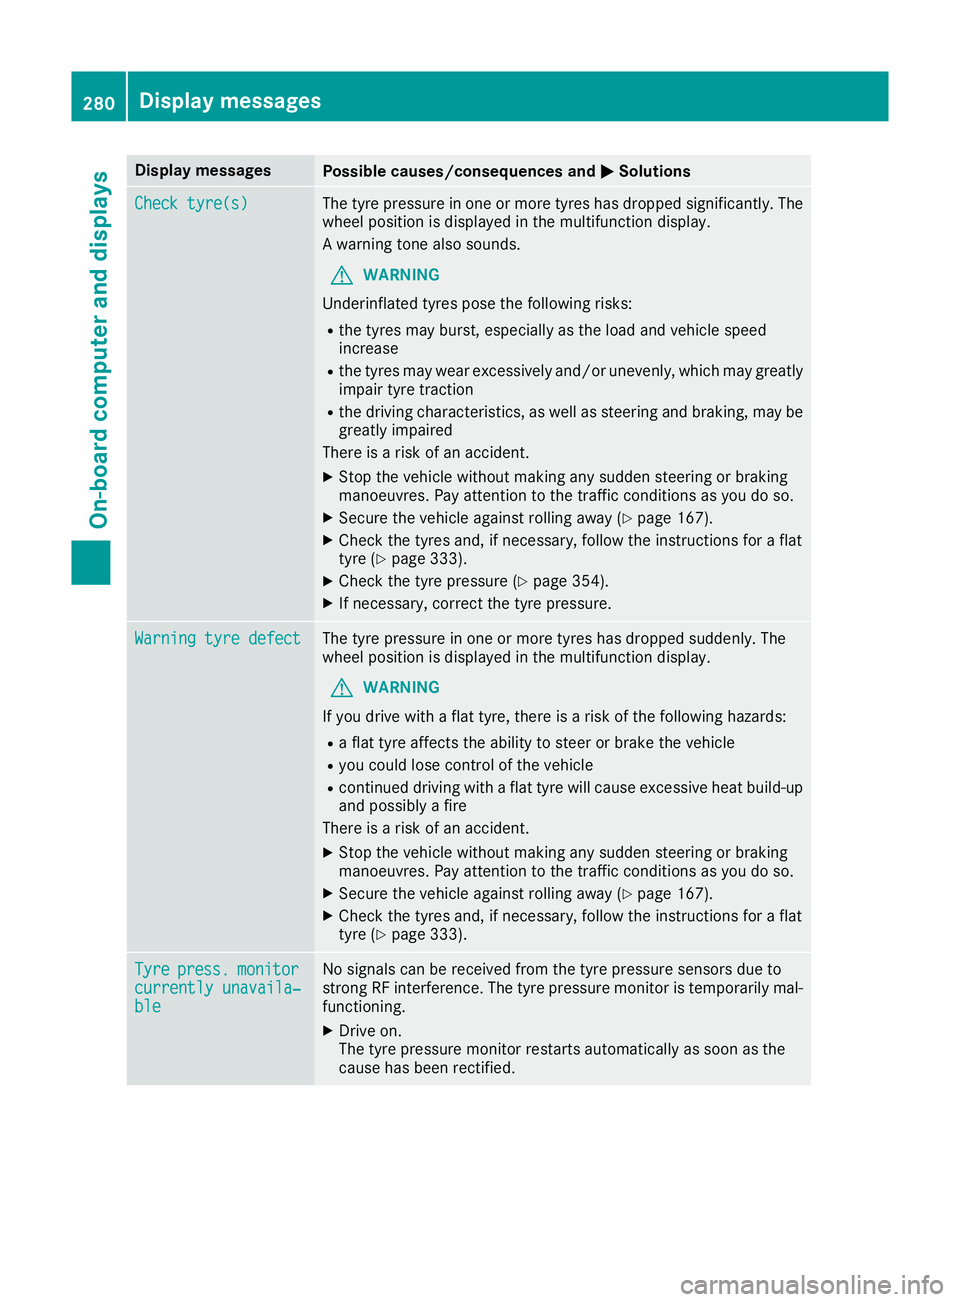
Display messages
Possible causes/consequences and
M
MSolutions Check tyre(s)
Check tyre(s) The tyre pressure in one or more tyres has dropped significantly. The
wheel position is displayed in the multifunction display.
A warning tone also sounds.
G WARNING
Underinflated tyres pose the following risks:
R the tyres may burst, especially as the load and vehicle speed
increase
R the tyres may wear excessively and/or unevenly, which may greatly
impair tyre traction
R the driving characteristics, as well as steering and braking, may be
greatly impaired
There is a risk of an accident.
X Stop the vehicle without making any sudden steering or braking
manoeuvres. Pay attention to the traffic conditions as you do so.
X Secure the vehicle against rolling away (Y page 167).
X Check the tyres and, if necessary, follow the instructions for a flat
tyre (Y page 333).
X Check the tyre pressure (Y page 354).
X If necessary, correct the tyre pressure. Warning tyre defect Warning tyre defect The tyre pressure in one or more tyres has dropped suddenly. The
wheel position is displayed in the multifunction display.
G WARNING
If you drive with a flat tyre, there is a risk of the following hazards: R a flat tyre affects the ability to steer or brake the vehicle
R you could lose control of the vehicle
R continued driving with a flat tyre will cause excessive heat build-up
and possibly a fire
There is a risk of an accident.
X Stop the vehicle without making any sudden steering or braking
manoeuvres. Pay attention to the traffic conditions as you do so.
X Secure the vehicle against rolling away (Y page 167).
X Check the tyres and, if necessary, follow the instructions for a flat
tyre (Y page 333). Tyre Tyre
press.
press. monitor
monitor
currently unavaila‐
currently unavaila‐
ble ble No signals can be received from the tyre pressure sensors due to
strong RF interference. The tyre pressure monitor is temporarily mal-
functioning.
X Drive on.
The tyre pressure monitor restarts automatically as soon as the
cause has been rectified. 280
Display
messagesOn-board computer and displays
Page 284 of 393
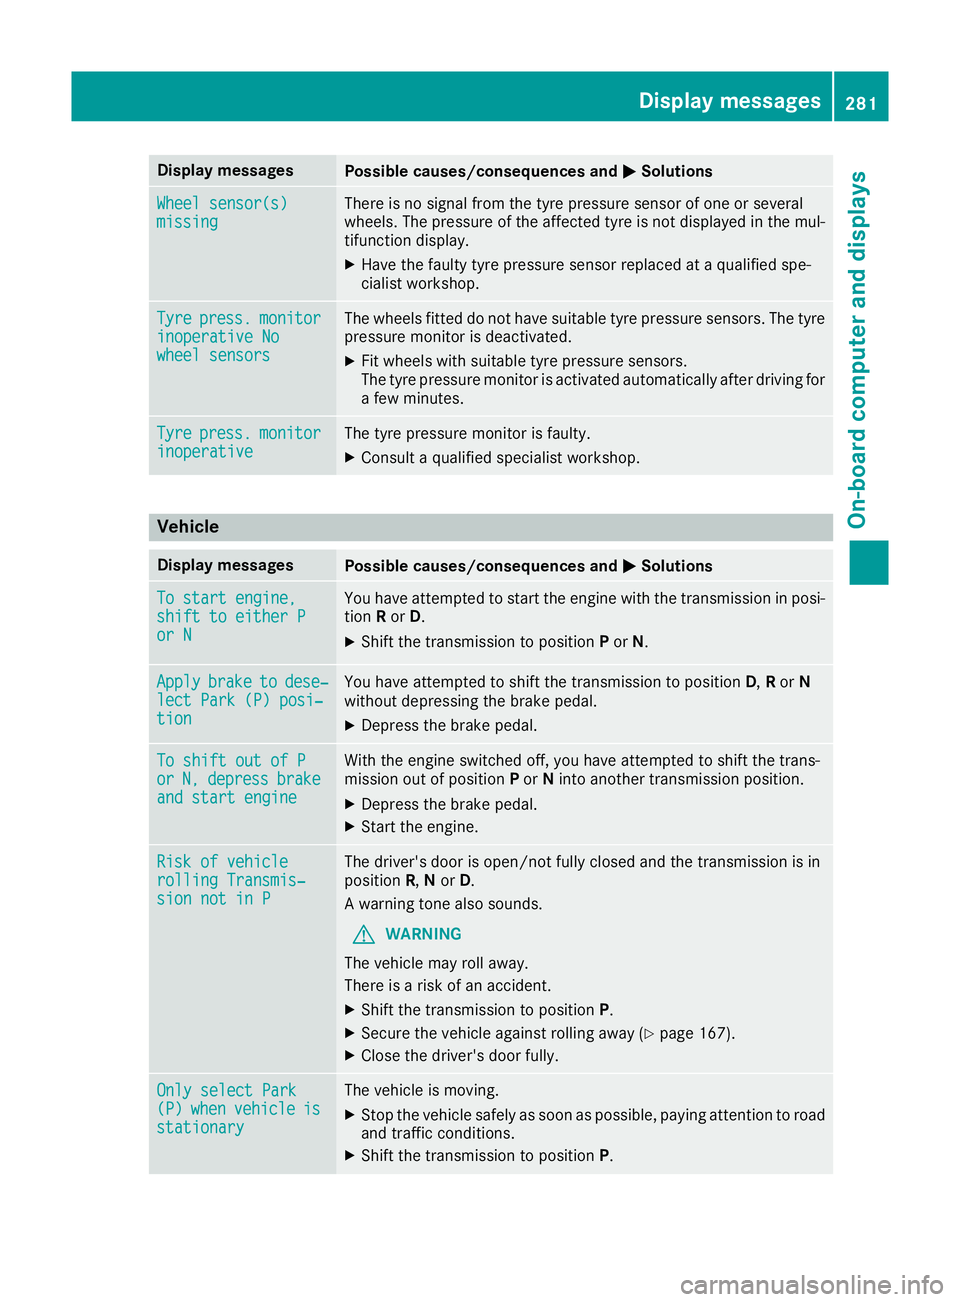
Display messages
Possible causes/consequences and
M
MSolutions Wheel sensor(s)
Wheel sensor(s)
missing missing There is no signal from the tyre pressure sensor of one or several
wheels. The pressure of the affected tyre is not displayed in the mul-
tifunction display.
X Have the faulty tyre pressure sensor replaced at a qualified spe-
cialist workshop. Tyre Tyre
press.
press. monitor
monitor
inoperative No
inoperative No
wheel sensors wheel sensors The wheels fitted do not have suitable tyre pressure sensors. The tyre
pressure monitor is deactivated.
X Fit wheels with suitable tyre pressure sensors.
The tyre pressure monitor is activated automatically after driving for
a few minutes. Tyre Tyre
press.
press. monitor
monitor
inoperative
inoperative The tyre pressure monitor is faulty.
X Consult a qualified specialist workshop. Vehicle
Display messages
Possible causes/consequences and
M
MSolutions To start engine,
To start engine,
shift to either P shift to either P
or N or N You have attempted to start the engine with the transmission in posi-
tion Ror D.
X Shift the transmission to position Por N. Apply
Apply
brake
braketo
todese‐
dese‐
lect Park (P) posi‐
lect Park (P) posi‐
tion tion You have attempted to shift the transmission to position
D,Ror N
without depressing the brake pedal.
X Depress the brake pedal. To shift out of P
To shift out of P
or or
N,
N,depress
depress brake
brake
and start engine
and start engine With the engine switched off, you have attempted to shift the trans-
mission out of position Por Ninto another transmission position.
X Depress the brake pedal.
X Start the engine. Risk of vehicle
Risk of vehicle
rolling Transmis‐ rolling Transmis‐
sion not in P sion not in P The driver's door is open/not fully closed and the transmission is in
position R,Nor D.
A warning tone also sounds.
G WARNING
The vehicle may roll away.
There is a risk of an accident.
X Shift the transmission to position P.
X Secure the vehicle against rolling away (Y page 167).
X Close the driver's door fully. Only select Park Only select Park
(P) (P)
when
when vehicle
vehicle is
is
stationary
stationary The vehicle is moving.
X
Stop the vehicle safely as soon as possible, paying attention to road
and traffic conditions.
X Shift the transmission to position P. Display
messages
281On-board computer and displays Z
Page 301 of 393
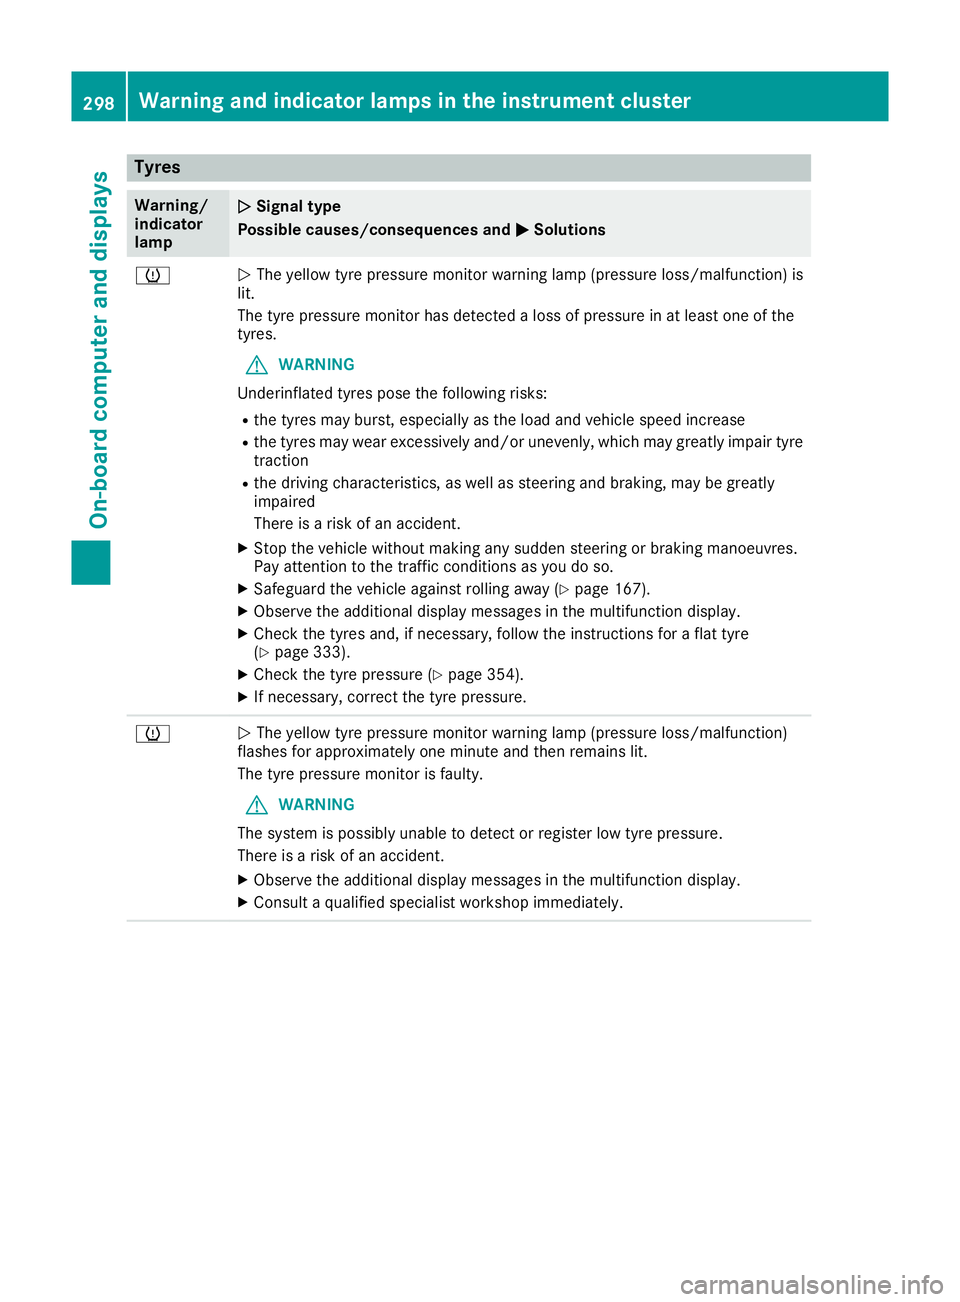
Tyres
Warning/
indicator
lamp
N N
Signal type
Possible causes/consequences and M
MSolutions h
N
The yellow tyre pressure monitor warning lamp (pressure loss/malfunction) is
lit.
The tyre pressure monitor has detected a loss of pressure in at least one of the
tyres.
G WARNING
Underinflated tyres pose the following risks:
R the tyres may burst, especially as the load and vehicle speed increase
R the tyres may wear excessively and/or unevenly, which may greatly impair tyre
traction
R the driving characteristics, as well as steering and braking, may be greatly
impaired
There is a risk of an accident.
X Stop the vehicle without making any sudden steering or braking manoeuvres.
Pay attention to the traffic conditions as you do so.
X Safeguard the vehicle against rolling away (Y page 167).
X Observe the additional display messages in the multifunction display.
X Check the tyres and, if necessary, follow the instructions for a flat tyre
(Y page 333).
X Check the tyre pressure (Y page 354).
X If necessary, correct the tyre pressure. h
N
The yellow tyre pressure monitor warning lamp (pressure loss/malfunction)
flashes for approximately one minute and then remains lit.
The tyre pressure monitor is faulty.
G WARNING
The system is possibly unable to detect or register low tyre pressure.
There is a risk of an accident.
X Observe the additional display messages in the multifunction display.
X Consult a qualified specialist workshop immediately. 298
Warning and indicator lamps in the instrument clusterOn-board computer and displays
Page 328 of 393
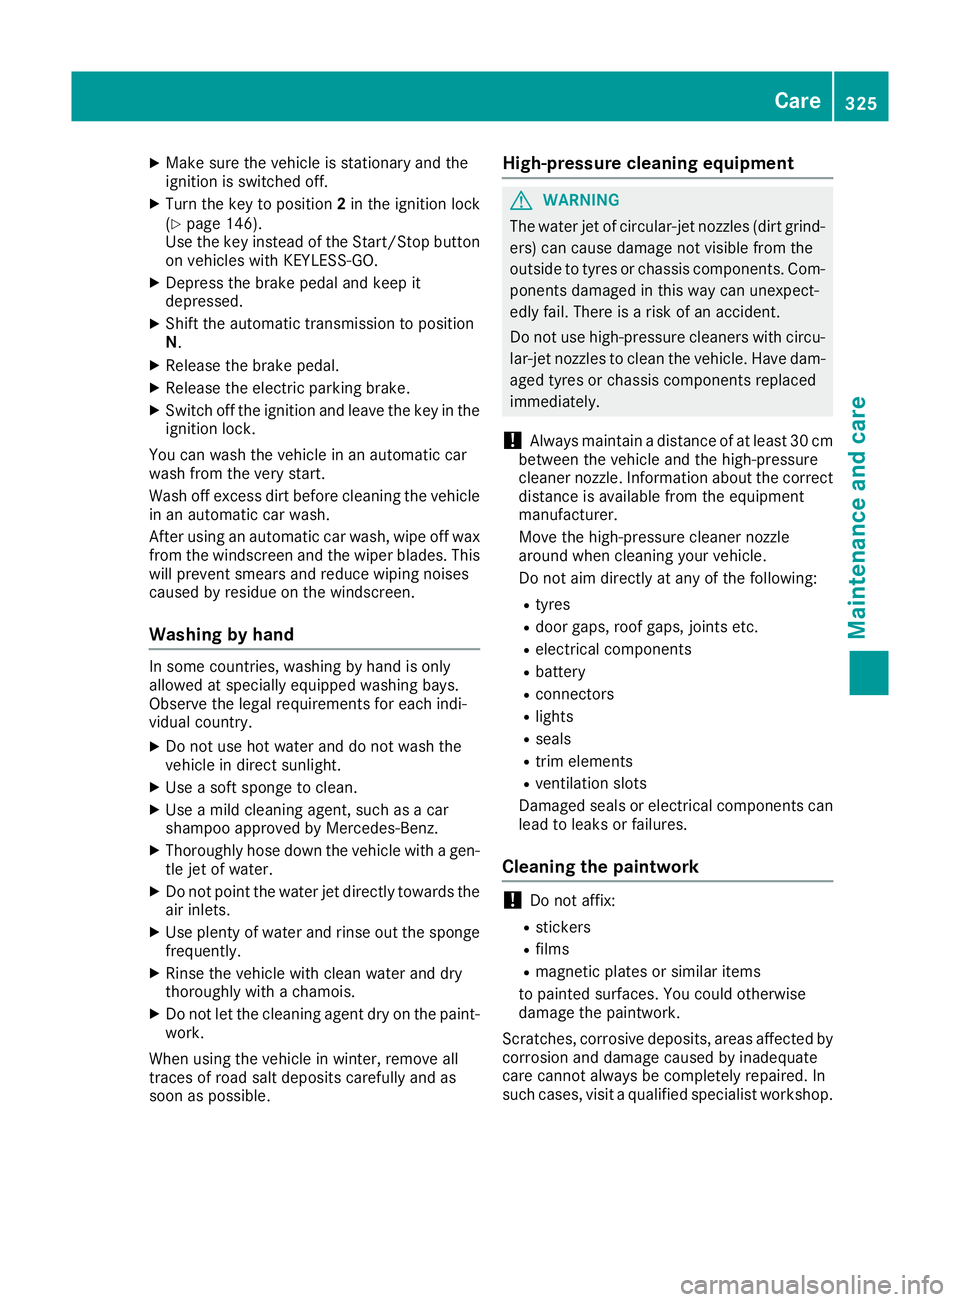
X
Make sure the vehicle is stationary and the
ignition is switched off.
X Turn the key to position 2in the ignition lock
(Y page 146).
Use the key instead of the Start/Stop button on vehicles with KEYLESS-GO.
X Depress the brake pedal and keep it
depressed.
X Shift the automatic transmission to position
N.
X Release the brake pedal.
X Release the electric parking brake.
X Switch off the ignition and leave the key in the
ignition lock.
You can wash the vehicle in an automatic car
wash from the very start.
Wash off excess dirt before cleaning the vehicle
in an automatic car wash.
After using an automatic car wash, wipe off wax from the windscreen and the wiper blades. This
will prevent smears and reduce wiping noises
caused by residue on the windscreen.
Washing by hand In some countries, washing by hand is only
allowed at specially equipped washing bays.
Observe the legal requirements for each indi-
vidual country.
X Do not use hot water and do not wash the
vehicle in direct sunlight.
X Use a soft sponge to clean.
X Use a mild cleaning agent, such as a car
shampoo approved by Mercedes-Benz.
X Thoroughly hose down the vehicle with a gen-
tle jet of water.
X Do not point the water jet directly towards the
air inlets.
X Use plenty of water and rinse out the sponge
frequently.
X Rinse the vehicle with clean water and dry
thoroughly with a chamois.
X Do not let the cleaning agent dry on the paint-
work.
When using the vehicle in winter, remove all
traces of road salt deposits carefully and as
soon as possible. High-pressure cleaning equipment G
WARNING
The water jet of circular-jet nozzles (dirt grind- ers) can cause damage not visible from the
outside to tyres or chassis components. Com-
ponents damaged in this way can unexpect-
edly fail. There is a risk of an accident.
Do not use high-pressure cleaners with circu-
lar-jet nozzles to clean the vehicle. Have dam- aged tyres or chassis components replaced
immediately.
! Always maintain a distance of at least 30 cm
between the vehicle and the high-pressure
cleaner nozzle. Information about the correct
distance is available from the equipment
manufacturer.
Move the high-pressure cleaner nozzle
around when cleaning your vehicle.
Do not aim directly at any of the following:
R tyres
R door gaps, roof gaps, joints etc.
R electrical components
R battery
R connectors
R lights
R seals
R trim elements
R ventilation slots
Damaged seals or electrical components can
lead to leaks or failures.
Cleaning the paintwork !
Do not affix:
R stickers
R films
R magnetic plates or similar items
to painted surfaces. You could otherwise
damage the paintwork.
Scratches, corrosive deposits, areas affected by
corrosion and damage caused by inadequate
care cannot always be completely repaired. In
such cases, visit a qualified specialist workshop. Care
325Maintenance and care Z