2015 MERCEDES-BENZ GLE COUPE ECO mode
[x] Cancel search: ECO modePage 7 of 393
Triggering ......................................... 49
Windowbag ...................................... 44
AIRMATIC package
ADS (Adaptive Damping System) ... 195
Function/notes ............................. 194
Alarm
ATA (Anti-Theft Alarm system) ......... 75
Switching off (ATA) .......................... 75
Switching the function on/off
(ATA) ................................................ 75
AMG
RIDE CONTROL sports suspen-
sion ................................................ 198
AMG menu (on-board computer) ..... 250
Anti-glare film .................................... 317
Approach/departure angle .............. 177
Aquaplaning ....................................... 173
Ashtray ............................................... 308
Assistance display (on-board com-
puter) .................................................. 243
Assistance menu (on-board com-
puter) .................................................. 243
ASSYST PLUS
Displaying a service message ........ 323
Hiding a service message .............. 323
Resetting the service interval dis-
play ................................................ 323
Service message ............................3 22
Special service requirements ......... 323
ATA (Anti-Theft Alarm system)
Activating/deactivating ................... 75
Function .......................................... .75
Switching off the alarm .................... 75
ATTENTION ASSIST
Activating/deactivating ................. 244
Display message ............................ 272
Function/note s............................. 214
Audio menu (on-board computer) .... 241
AUTO lights
Display message ............................ 268
see Lights
Automatic engine start (ECO start/
stop function) .................................... 150
Automatic engine switch-off (ECO
start/stop function) .......................... 150 Automatic front-passenger front
airbag deactivation
Display message ............................ 264
Automatic front-passenger front
airbag deactivation system
Operation ......................................... 45
Problems ......................................... 49
System self-test ............................... 47
Automatic headlamp mode .............. 115
Automatic transmission
Accelerator pedal position ............. 156
Changing gear ............................... 156
DIRECT SELECT lever ..................... 154
Display message ............................ 281
Drive program display .................... 154
Drive programs .............................. 158
Driving tips .................................... 156
DYNAMIC SELECT controlle r......... 153
Emergency running mode .............. 161
Engaging drive position .................. 156
Engaging neutral ............................ 155
Engaging park position automati-
cally ............................................... 155
Engaging reverse gear ................... 155
Engaging the park position ............ 154
Gliding mod e................................. 157
Kickdown ....................................... 157
Manual shifting .............................. 158
Oil temperature (on-board com-
puter, Mercedes-AMG vehicles) ..... 250
Overview ........................................ 154
Problem (fault) ............................... 161
Pulling away ................................... 149
Starting the engine ........................ 148
Steering wheel gearshift paddle s... 158
Trailer towing ................................. 157
Transmission position display ........ 154
Transmission positions .................. 156
Automatic transmission emer-
gency running mode ......................... 161
Auxiliary heating
Setting ........................................... 247
Auxiliary heating/ventilation
Display message ............................ 284
Important safety notes .................. 138
Problem (display message) ............ 142
Remote control .............................. 139
Setting the departure time ............. 140 4
Index
Page 9 of 393
Roof linin
g ...................................... 330
Se at belt ........................................ 330
Seat cover .................................... .330
Sensors ......................................... 327
Side running board ........................ 327
Steering wheel ............................... 329
Trim pieces ................................... .329
Washing by hand ........................... 325
Wheels .......................................... .326
Windows ........................................ 326
Wiper blades .................................. 327
Wooden trim .................................. 329
CD player (on-board computer) ........241
Central locking
Automatic locking (on-board com-
puter) ............................................. 247
Locking/unlocking (key ).................. 79
Centre console
Lower section .................................. 34
Upper section .................................. 33
Child
Restraint system .............................. 53
Child seat
Forward-facing restraint system ...... 57
ISOFIX .............................................. 54
On the front-passenger sea t............ 56
Rearward-facing restraint system .... 57
Recommendations ........................... 61
Suitable positions ............................ 57
Top Tether ....................................... 54
Child-proof locks
Important safety notes .................... 62
Rear doors ....................................... 63
Cigarette lighter ................................ 309
Cleaning
Mirror turn signal ........................... 327
Trailer tow hitch ............................. 328
Climate control
Auxiliary heating/ventilation .......... 138
Controlling automaticall y............... 132
Convenience opening/closing
(air-recirculation mode) ................. 136
Cooling with air dehumidification .. 130
Demisting the windows .................. 134
Demisting the windscreen ............. 134
Indicator lamp ................................ 132 Information about using
THERMATIC automatic climate
control ........................................... 128
Information on using
THERMOTRONIC automatic cli-
mate control .................................. 130
Ionisation ....................................... 137
Overview of systems ...................... 126
Problem with the rear window
heating .......................................... 136
Problems with cooling with air
dehumidification ............................ 132
Rear control panel ......................... 129
Setting the air distribution ............. 133
Setting the air vents ...................... 142
Setting the airflow ......................... 133
Setting the climate mode (AIR
FLOW) ............................................ 132
Setting the temperature ................ 132
Switching air-recirculation mode
on/of f............................................ 136
Switching on/of f........................... 130
Switching residual heat on/off ...... 137
Switching the rear window heat-
ing on/of f...................................... 135
Switching the ZONE function on/
off .................................................. 134
THERMATIC automatic climate
control (2-zone) ............................. 127
THERMOTRONIC (3-zone) auto-
matic climate control ..................... 129
Coat hooks ......................................... 304
Cockpit
Overview .......................................... 27
see Instrument cluster
Collapsible emergency spare
wheel
see Emergency spare wheel
COLLISION PREVENTION ASSIST
PLUS
Activating/deactivating ................. 244
Display message ............................ 260
Operation/note s.............................. 67
COMAND display
Cleaning ......................................... 329
Combination switch .......................... 117
Consumption statistics (on-board
computer) .......................................... 238 6
Index
Page 26 of 393
You could jeopardise the operating safety of
your vehicle if you use parts, tyres and wheels as
well as accessories relevant to safety which
have not been approved by Mercedes-Benz. This
could lead to malfunctions in safety-relevant
systems, e.g. the brake system. Only use genu- ine Mercedes-Benz parts or parts of equal qual-
ity. Only use tyres, wheels and accessories that
have been specifically approved for your vehi-
cle.
Mercedes-Benz tests genuine parts and conver-
sion parts and accessories that have been spe-
cifically approved for your vehicle for their reli-
ability, safety and suitability. Despite ongoing
market research, Mercedes-Benz is unable to
assess other parts. Mercedes-Benz therefore
accepts no responsibility for the use of such
parts in Mercedes-Benz vehicles, even if they
have been officially approved or independently
approved by a testing centre.
In Germany, certain parts are only officially
approved for installation or modification if they
comply with legal requirements. This also
applies to some other countries. All genuine
Mercedes-Benz parts meet the approval
requirements. The use of non-approved parts
may invalidate the vehicle's general operating
permit.
This is the case:
R if they cause a change of the vehicle type from
that for which the vehicle's general operating
permit was granted
R if other road users could be endangered
R if the emission or noise levels are adversely
affected
Always specify the vehicle identification number (VIN) (Y page 373) when ordering genuine
Mercedes-Benz parts. Owner's Manual
Vehicle equipment
i This Owner's Manual describes all models
and all standard and optional equipment
available for your vehicle at the time of pub-
lication of the Owner's Manual. Country-spe-
cific differences are possible. Note that your
vehicle may not be fitted with all features
described. This is also the case for systems
and functions relevant to safety. Therefore,
the equipment on your vehicle may differ from that in the descriptions and illustrations. The original purchase contract documentation
for your vehicle contains a list of all of the sys-
tems in your vehicle.
Should you have any questions concerning
equipment and operation, please consult a
Mercedes-Benz Service Centre.
The Owner's Manual and Service Booklet are
important documents and should kept in the
vehicle. Operating safety
Important safety notes
G
WARNING
If you do not have the prescribed service/
maintenance work or necessary repairs car-
ried out, this could result in malfunctions or
system failures. There is a risk of an accident. Always have the prescribed service/mainte-
nance work as well as necessary repairs car-
ried out at a qualified specialist workshop. G
WARNING
Flammable material such as leaves, grass or
twigs may ignite if they come into contact with hot parts of the exhaust system. There is a risk of fire.
When driving off road or on unpaved roads,
check the vehicle's underside regularly. In
particular, remove parts of plants or other
flammable materials which have become
trapped. In the case of damage, contact a
qualified specialist workshop. G
WARNING
Modifications to electronic components, their software as well as wiring could affect their
function and/or the operation of other net-
worked components. This could in particular
also be the case for systems relevant to
safety. They might not function properly any-
more and/or jeopardise the operational
safety of the vehicle. There is an increased
risk of an accident and injury.
Do not attempt to modify the wiring as well as
electronic components or their software. Introduction
23 Z
Page 40 of 393
Useful information
i This Owner's Manual describes all models,
series and optional equipment for your vehi-
cle that were available at the time of going to
press. National variations are possible. Note
that your vehicle may not be equipped with all
of the functions described. This is also the
case for systems and functions relevant to
safety.
i Read the information on qualified specialist
workshops: (Y page 25). Panic alarm
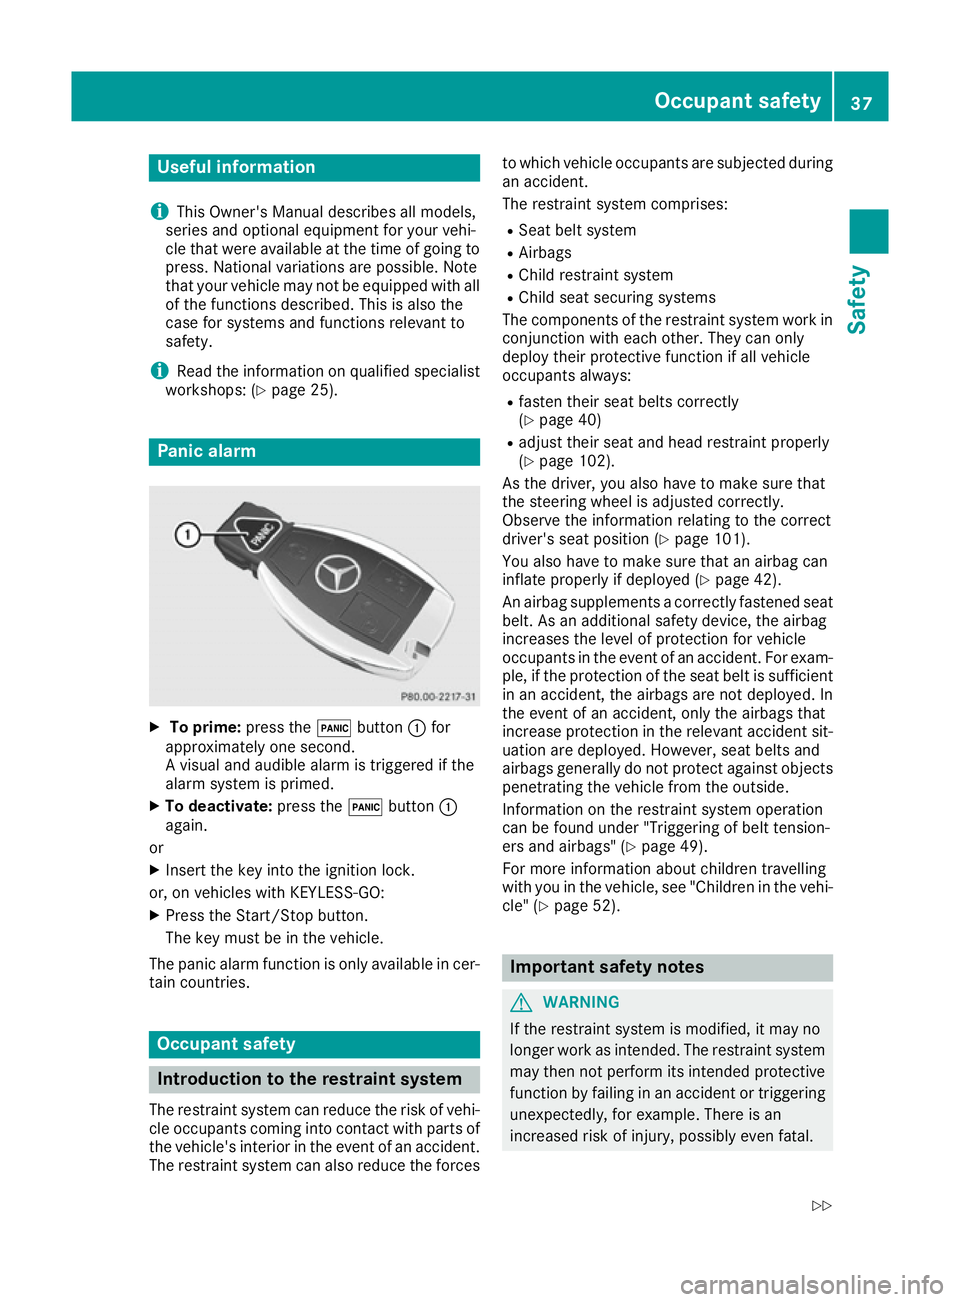
X
To prime: press the!button :for
approximately one second.
A visual and audible alarm is triggered if the
alarm system is primed.
X To deactivate: press the!button :
again.
or
X Insert the key into the ignition lock.
or, on vehicles with KEYLESS‑GO: X Press the Start/Stop button.
The key must be in the vehicle.
The panic alarm function is only available in cer- tain countries. Occupant safety
Introduction to the restraint system
The restraint system can reduce the risk of vehi- cle occupants coming into contact with parts of
the vehicle's interior in the event of an accident.
The restraint system can also reduce the forces to which vehicle occupants are subjected during
an accident.
The restraint system comprises:
R Seat belt system
R Airbags
R Child restraint system
R Child seat securing systems
The components of the restraint system work in
conjunction with each other. They can only
deploy their protective function if all vehicle
occupants always:
R fasten their seat belts correctly
(Y page 40)
R adjust their seat and head restraint properly
(Y page 102).
As the driver, you also have to make sure that
the steering wheel is adjusted correctly.
Observe the information relating to the correct
driver's seat position (Y page 101).
You also have to make sure that an airbag can
inflate properly if deployed (Y page 42).
An airbag supplements a correctly fastened seat belt. As an additional safety device, the airbag
increases the level of protection for vehicle
occupants in the event of an accident. For exam-
ple, if the protection of the seat belt is sufficient in an accident, the airbags are not deployed. In
the event of an accident, only the airbags that
increase protection in the relevant accident sit- uation are deployed. However, seat belts and
airbags generally do not protect against objects penetrating the vehicle from the outside.
Information on the restraint system operation
can be found under "Triggering of belt tension-
ers and airbags" (Y page 49).
For more information about children travelling
with you in the vehicle, see "Children in the vehi-
cle" (Y page 52). Important safety notes
G
WARNING
If the restraint system is modified, it may no
longer work as intended. The restraint system
may then not perform its intended protective function by failing in an accident or triggering
unexpectedly, for example. There is an
increased risk of injury, possibly even fatal. Occupant safety
37Safety
Z
Page 60 of 393
Rearward-facing child restraint system
If it is absolutely necessary to fit a rearward-
facing child restraint system to the front-
passenger seat, always make sure that the
front-passenger front airbag is disabled. Only if
the PASSENGER AIR BAG OFF indicator lamp is
lit continuously (Y page 38) is the front-
passenger front airbag disabled.
Always observe the information on suitable
positioning of the child restraint system
(Y page 57) in addition to the child restraint
system manufacturer's installation and operat-
ing instructions.
Forward-facing child restraint system If it is absolutely necessary to fit a forward-
facing child restraint system to the front-
passenger seat, always move the front-
passenger seat as far back as possible. The
entire base of the child restraint system must
always rest on the seat cushion of the front-
passenger seat. The backrest of the child
restraint system must, as far as possible, lie flat
against the backrest of the front-passenger
seat. The child restraint system must not touch the roof or be put under strain by the head
restraint. Adjust the angle of the seat backrest
and the head restraint position accordingly.
Always make sure that the shoulder belt strap is
correctly routed from the vehicle belt outlet to
the shoulder belt guide on the child restraint
system. The shoulder belt strap must be routed forwards and downwards from the vehicle belt
outlet. If necessary, adjust the vehicle belt out-
let and the front-passenger seat accordingly.
Always observe the information on suitable
positioning of the child restraint system
(Y page 57) in addition to the child restraint
system manufacturer's installation and operat-
ing instructions. Suitable positioning of the child
restraint system
Introduction Only child restraint systems which are approved
in accordance with the ECE standard ECE R44
are permitted for use in the vehicle.
"Universal" category child restraint systems can
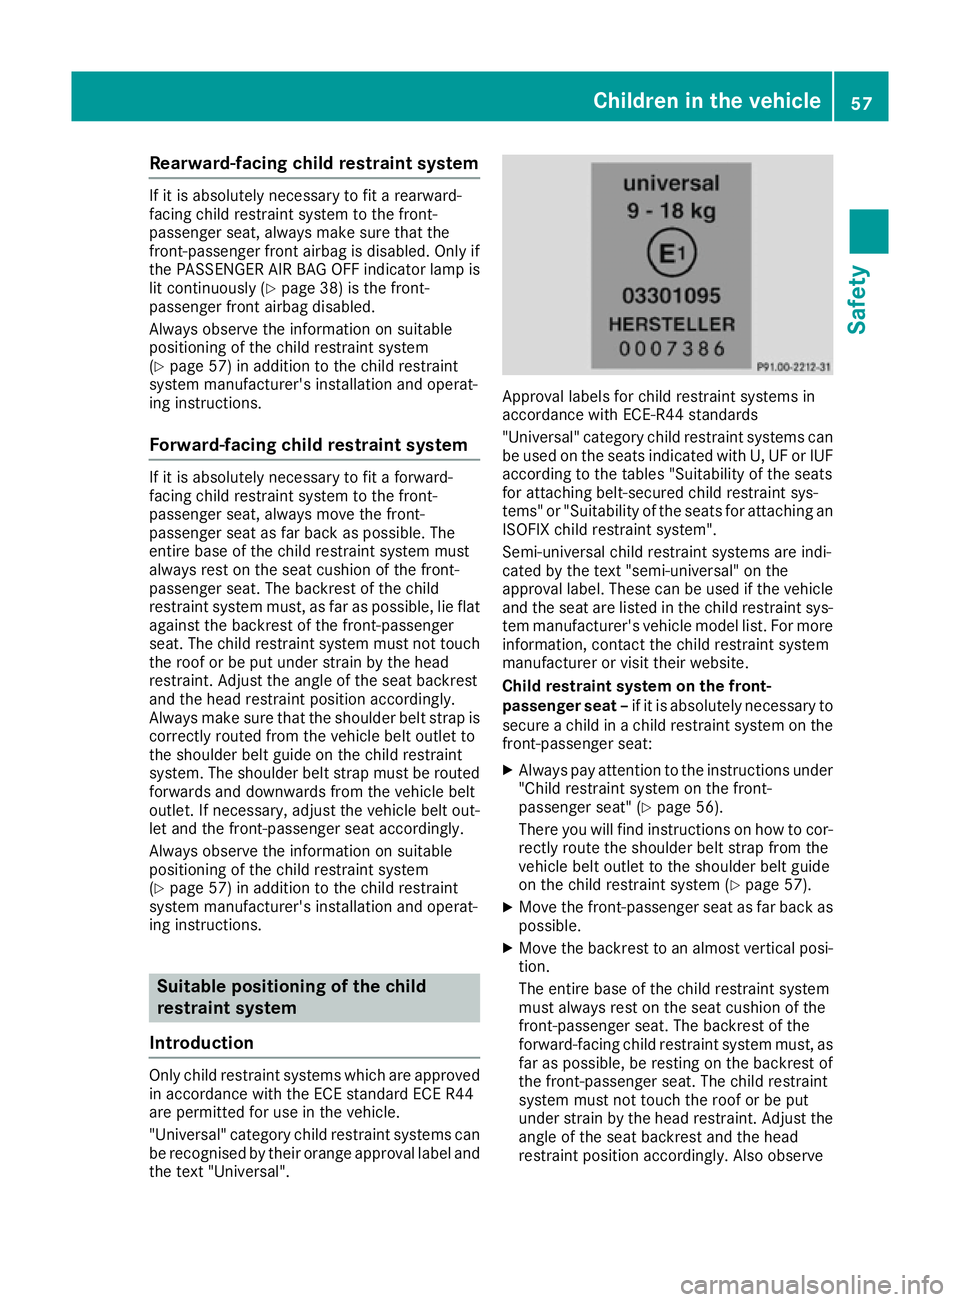
be recognised by their orange approval label and the text "Universal". Approval labels for child restraint systems in
accordance with ECE-R44 standards
"Universal" category child restraint systems can
be used on the seats indicated with U, UF or IUF according to the tables "Suitability of the seats
for attaching belt-secured child restraint sys-
tems" or "Suitability of the seats for attaching an
ISOFIX child restraint system".
Semi-universal child restraint systems are indi-
cated by the text "semi-universal" on the
approval label. These can be used if the vehicle and the seat are listed in the child restraint sys-
tem manufacturer's vehicle model list. For more
information, contact the child restraint system
manufacturer or visit their website.
Child restraint system on the front-
passenger seat – if it is absolutely necessary to
secure a child in a child restraint system on the front-passenger seat:
X Always pay attention to the instructions under
"Child restraint system on the front-
passenger seat" (Y page 56).
There you will find instructions on how to cor- rectly route the shoulder belt strap from the
vehicle belt outlet to the shoulder belt guide
on the child restraint system (Y page 57).
X Move the front-passenger seat as far back as
possible.
X Move the backrest to an almost vertical posi-
tion.
The entire base of the child restraint system
must always rest on the seat cushion of the
front-passenger seat. The backrest of the
forward-facing child restraint system must, as far as possible, be resting on the backrest of
the front-passenger seat. The child restraint
system must not touch the roof or be put
under strain by the head restraint. Adjust the
angle of the seat backrest and the head
restraint position accordingly. Also observe Children in the vehicle
57Safety Z
Page 63 of 393
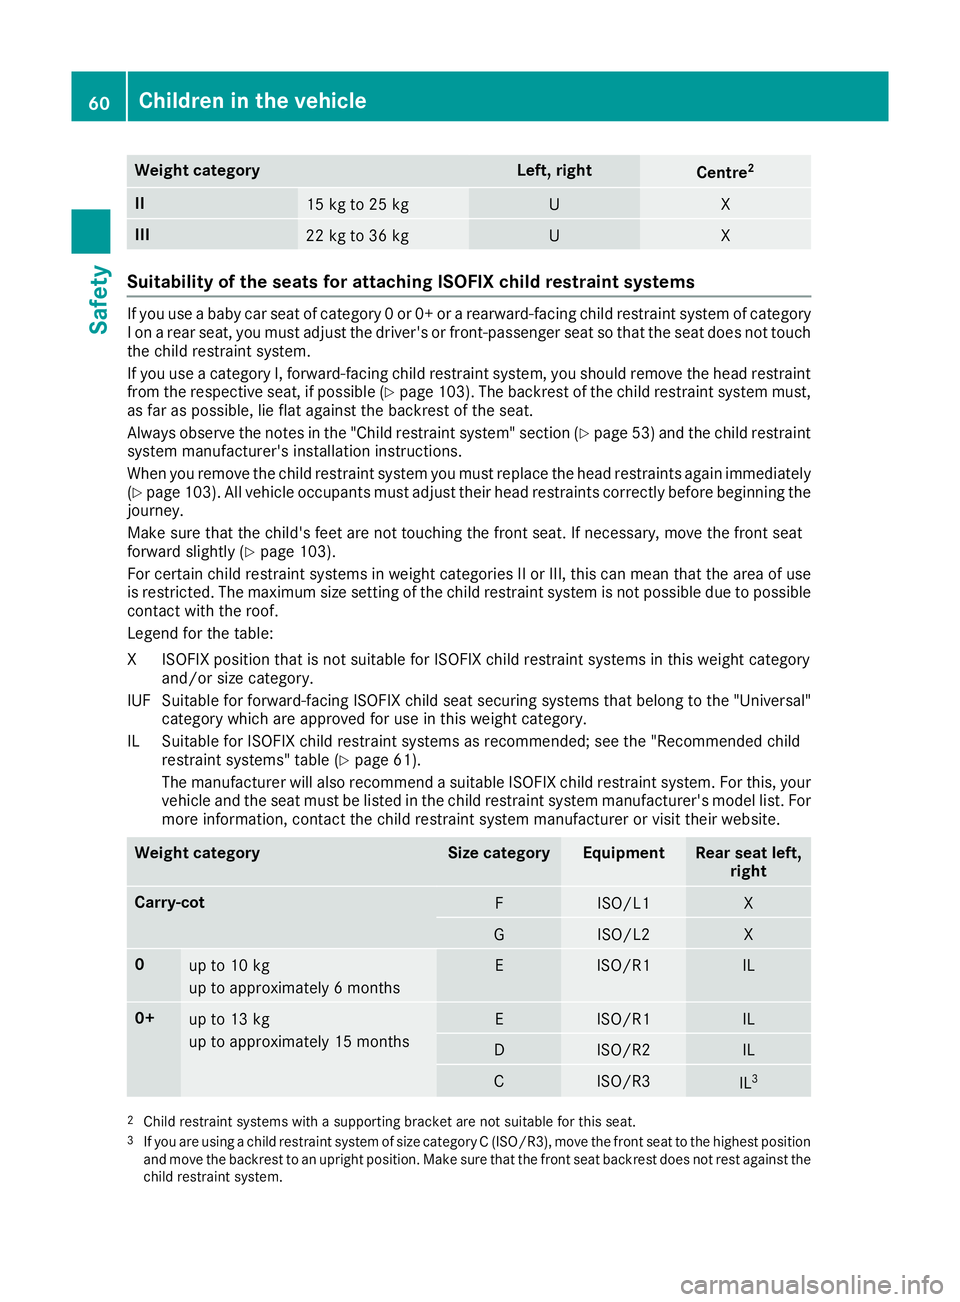
Weight category Left, right
Centre
2 II
15 kg to 25 kg U X
III
22 kg to 36 kg U X
Suitability of the seats for attaching ISOFIX child restraint systems
If you use a baby car seat of category 0 or 0+ or a rearward-facing child restraint system of category
I on a rear seat, you must adjust the driver's or front-passenger seat so that the seat does not touch the child restraint system.
If you use a category I, forward-facing child restraint system, you should remove the head restraintfrom the respective seat, if possible (Y page 103). The backrest of the child restraint system must,
as far as possible, lie flat against the backrest of the seat.
Always observe the notes in the "Child restraint system" section (Y page 53) and the child restraint
system manufacturer's installation instructions.
When you remove the child restraint system you must replace the head restraints again immediately (Y page 103). All vehicle occupants must adjust their head restraints correctly before beginning the
journey.
Make sure that the child's feet are not touching the front seat. If necessary, move the front seat
forward slightly (Y page 103).
For certain child restraint systems in weight categories II or III, this can mean that the area of use is restricted. The maximum size setting of the child restraint system is not possible due to possible
contact with the roof.
Legend for the table:
XI SOFIX position that is not suitable for ISOFIX child restraint systems in this weight category
and/or size category.
IUF Suitable for forward-facing ISOFIX child seat securing systems that belong to the "Universal" category which are approved for use in this weight category.
IL Suitable for ISOFIX child restraint systems as recommended; see the "Recommended child restraint systems" table (Y page 61).
The manufacturer will also recommend a suitable ISOFIX child restraint system. For this, your
vehicle and the seat must be listed in the child restraint system manufacturer's model list. For more information, contact the child restraint system manufacturer or visit their website. Weight category Size category Equipment Rear seat left,
right Carry-cot
F ISO/L1 X
G ISO/L2 X
0
up to 10 kg
up to approximately 6 months E ISO/R1 IL
0+
up to 13 kg
up to approximately 15 months E ISO/R1 IL
D ISO/R2 IL
C ISO/R3
IL
3 2
Child restraint systems with a supporting bracket are not suitable for this seat.
3 If you are using a child restraint system of size category C (ISO/R3), move the front seat to the highest position
and move the backrest to an upright position. Make sure that the front seat backrest does not rest against the
child restraint system. 60
Children in the vehicleSafety
Page 116 of 393
The rear-view mirror and the exterior mirror on
the driver's side automatically go into anti-daz-
zle mode if the following conditions are met
simultaneously:
R the ignition is switched on and
R incident light from headlamps strikes the sen-
sor in the rear-view mirror
The mirrors do not dip if reverse gear is engaged or if the interior lighting is switched on. Parking position of the exterior mirror
on the front-passenger side
Setting and storing the parking position You can set the front-passenger side exterior
mirror so that you can see the rear wheel on that side as soon as you engage reverse gear. You
can store this position.
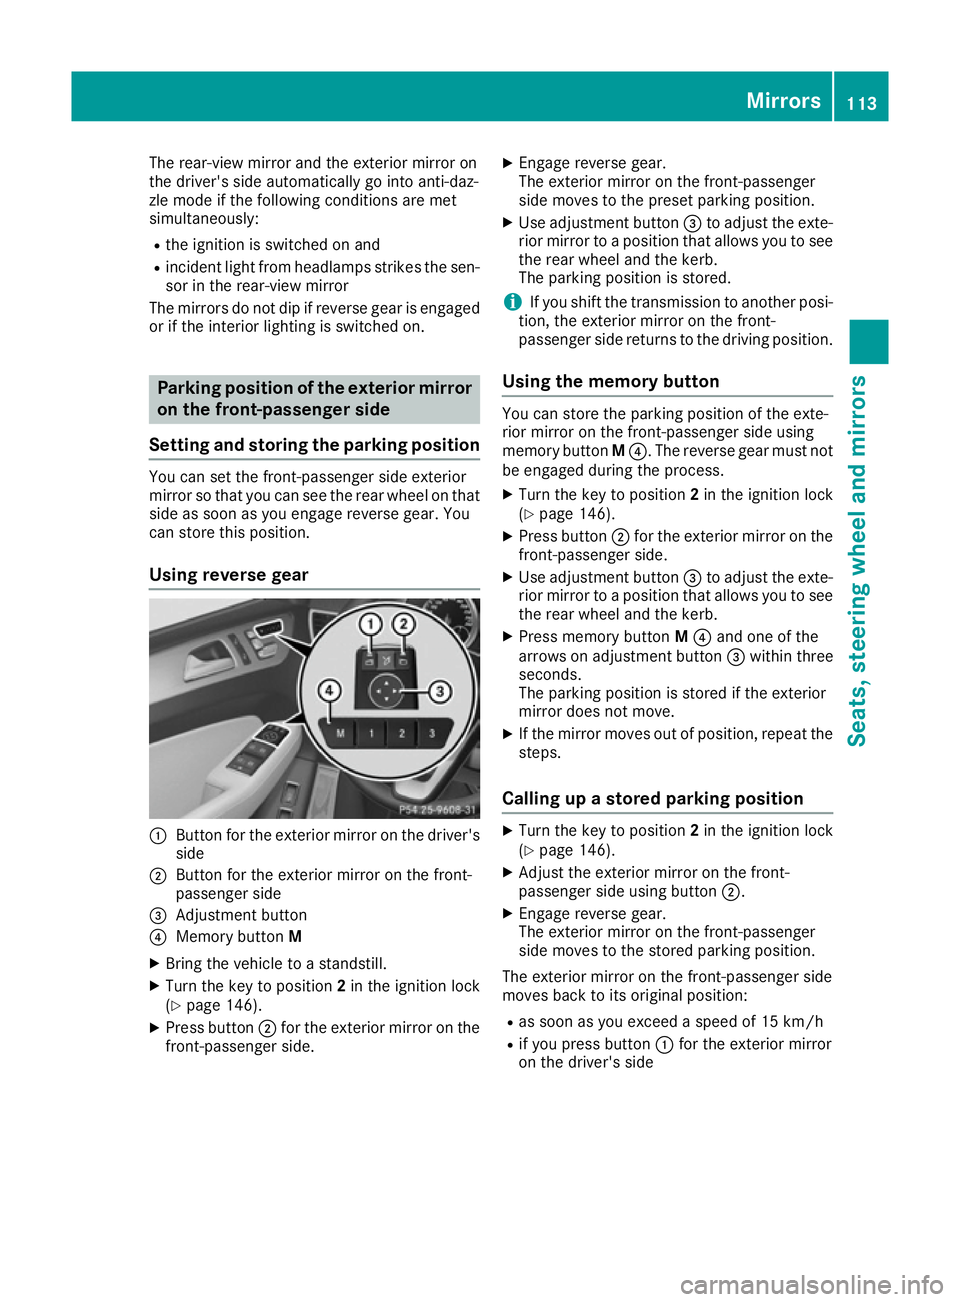
Using reverse gear :
Button for the exterior mirror on the driver's
side
; Button for the exterior mirror on the front-
passenger side
= Adjustment button
? Memory button M
X Bring the vehicle to a standstill.
X Turn the key to position 2in the ignition lock
(Y page 146).
X Press button ;for the exterior mirror on the
front-passenger side. X
Engage reverse gear.
The exterior mirror on the front-passenger
side moves to the preset parking position.
X Use adjustment button =to adjust the exte-
rior mirror to a position that allows you to see
the rear wheel and the kerb.
The parking position is stored.
i If you shift the transmission to another posi-
tion, the exterior mirror on the front-
passenger side returns to the driving position.
Using the memory button You can store the parking position of the exte-
rior mirror on the front-passenger side using
memory button
M?. The reverse gear must not
be engaged during the process.
X Turn the key to position 2in the ignition lock
(Y page 146).
X Press button ;for the exterior mirror on the
front-passenger side.
X Use adjustment button =to adjust the exte-
rior mirror to a position that allows you to see
the rear wheel and the kerb.
X Press memory button M? and one of the
arrows on adjustment button =within three
seconds.
The parking position is stored if the exterior
mirror does not move.
X If the mirror moves out of position, repeat the
steps.
Calling up a stored parking position X
Turn the key to position 2in the ignition lock
(Y page 146).
X Adjust the exterior mirror on the front-
passenger side using button ;.
X Engage reverse gear.
The exterior mirror on the front-passenger
side moves to the stored parking position.
The exterior mirror on the front-passenger side
moves back to its original position: R as soon as you exceed a speed of 15 km/h
R if you press button :for the exterior mirror
on the driver's side Mirrors
113Seats, steering wheel and mirrors Z
Page 118 of 393
Useful information
i This Owner's Manual describes all models,
series and optional equipment for your vehi-
cle that were available at the time of going to
press. National variations are possible. Note
that your vehicle may not be equipped with all
of the functions described. This is also the
case for systems and functions relevant to
safety.
i Read the information on qualified specialist
workshops: (Y page 25). Exterior lighting
General notes
For reasons of safety, Mercedes-Benz recom-
mends that you drive with the lights switched on
even during the daytime. In some countries,
operation of the headlamps varies due to legal
requirements and self-imposed obligations. Driving abroad
General notes If your journey takes you to countries where
vehicles are driven on the opposite side of the
road to the country in which the vehicle is reg-
istered, your headlamps must be switched to
symmetrical dipped beam as soon as possible
after crossing the border. This prevents oncom-
ing traffic from being dazzled. Symmetrical
lights do not illuminate as large an area of the
edge of the carriageway.
Vehicles with Intelligent Light System X
Before crossing the border, set the head-
lamps to symmetrical dipped beam and after
returning back to asymmetrical dipped beam via the "Dipped-beam headlamps for driving
on the right/left" function in the on-board
computer (Y page 246).
If the headlamps are converted to symmetrical
dipped beam, the "motorway mode" and "exten- ded range foglamps" functions are not available. Setting the exterior lighting
Setting options Exterior lighting can be set by:
R using the light switch
R using the combination switch (Y page 117)
R using the on-board computer (Y page 246)
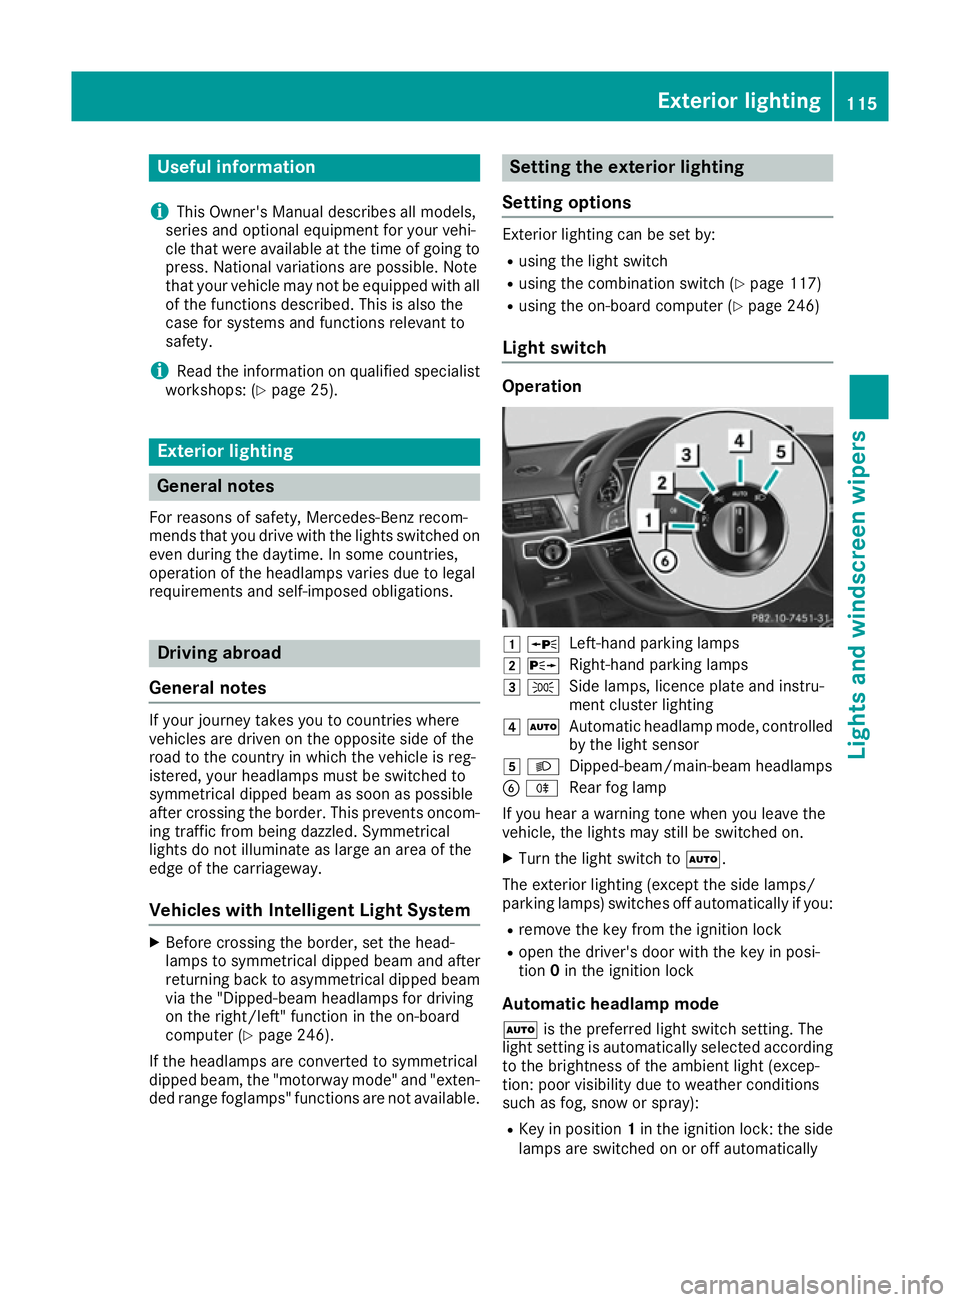
Light switch Operation
1
W
Left-hand parking lamps
2 X
Right-hand parking lamps
3 T
Side lamps, licence plate and instru-
ment cluster lighting
4 Ã
Automatic headlamp mode, controlled
by the light sensor
5 L
Dipped-beam/main-beam headlamps
B R
Rear fog lamp
If you hear a warning tone when you leave the
vehicle, the lights may still be switched on.
X Turn the light switch to Ã.
The exterior lighting (except the side lamps/
parking lamps) switches off automatically if you: R remove the key from the ignition lock
R open the driver's door with the key in posi-
tion 0in the ignition lock
Automatic headlamp mode
à is the preferred light switch setting. The
light setting is automatically selected according to the brightness of the ambient light (excep-
tion: poor visibility due to weather conditions
such as fog, snow or spray):
R Key in position 1in the ignition lock: the side
lamps are switched on or off automatically Exterior lighting
115Lights and windscreen wipers