2015 MERCEDES-BENZ GLE COUPE wiper fluid
[x] Cancel search: wiper fluidPage 24 of 393

Windows
Cleaning ......................................... 326
see Side windows
Windscreen
Demisting ...................................... 134
Windscreen washer fluid
see Windscreen washer system
Windscreen washer system
Important safety notes .................. 381
Topping up .................................... .322
Windscreen wipers
Problem (malfunction) ................... 125
Replacing the wiper blades ............ 122
Switching on/off ........................... 121
Winter driving
General notes ................................ 350
Winter operation
Overview ........................................ 350
Radiator cover ............................... 319
Slippery road surfaces ................... 174
Snow chains .................................. 351
Winter tyres
Limiting the speed (on-board com-
puter) ............................................. 247
M+S tyres ...................................... 350
Wiper blades
Cleaning ......................................... 327
Important safety notes .................. 122
Replacing ....................................... 122
Replacing (windscreen) .................. 122
Wooden trim (cleaning instruc-
tions) ................................................. .329 Z
ZONE function Switching on/off ........................... 134 Index
21
Page 124 of 393

=
v Switches the rear interior lighting on/
off
? | Switches the front interior lighting/
automatic interior lighting control off
A p Switches the right-hand front reading
lamp on/off
B Switches the automatic interior lighting con-
trol on Interior lighting control
General notes In order to prevent the vehicle's battery from
discharging, the interior lighting functions are
automatically deactivated after some time
except for when the key is in position 2in the
ignition lock.
The colour and brightness for the ambient light-
ing may be set via the multimedia system (see
the separate operating instructions).
Automatic interior lighting control X
To switch on: set the switch to centre posi-
tion B.
X To switch off: set the switch to the |
position.
The interior lighting automatically switches on if you:
R unlock the vehicle
R open a door
R remove the key from the ignition lock
The interior lighting is activated for a short time
when the key is removed from the ignition lock.
This delayed switch-off can be adjusted via the
multimedia system (see the separate operating
instructions).
Manual interior lighting control X
To switch the front interior lighting on: set
the switch to the cposition.
X To switch off the interior lighting: set the
switch to the |position or (if the door is
closed) to the centre position.
X To switch the rear interior lighting on/off:
press the ubutton.
X To switch the reading lamps on/off: press
the p button. Crash-responsive emergency lighting
The interior lighting is activated automatically if
the vehicle is involved in an accident.
X To switch off the crash-responsive emer-
gency lighting: press the hazard warning
lamp button.
or X Lock and then unlock the vehicle using the
key. Replacing bulbs (vehicles with LED
headlamps)
The front and rear light clusters of your vehicle
are equipped with LED light bulbs. Do not
replace the bulbs yourself. Contact a qualified
specialist workshop which has the necessary
specialist knowledge and tools to carry out the
work required.
Lamps are an important aspect of vehicle safety.
You must therefore make sure that these func-
tion correctly at all times. Have the headlamp
setting checked regularly. Windscreen wipers
Switching the windscreen wipers on/
off
! Do not operate the windscreen wipers when
the windscreen is dry, as this could damage
the wiper blades. Moreover, dust that has col- lected on the windscreen can scratch the
glass if wiping takes place when the wind-
screen is dry.
If it is necessary to switch on the windscreen
wipers in dry weather conditions, always
operate them using washer fluid.
! If the windscreen wipers leave smears on
the windscreen after the vehicle has been
washed in an automatic car wash, this may be
due to wax or other residue. Clean the wind-
screen with washer fluid after an automatic
car wash.
! Intermittent wiping with rain sensor: due to
optical influences and the windscreen becom- ing dirty in dry weather conditions, the wind-
screen wipers may be activated inadvertently. Windscreen wipers
121Lights and windscreen wipers Z
Page 125 of 393

This could damage the windscreen wiper
blades or scratch the windscreen.
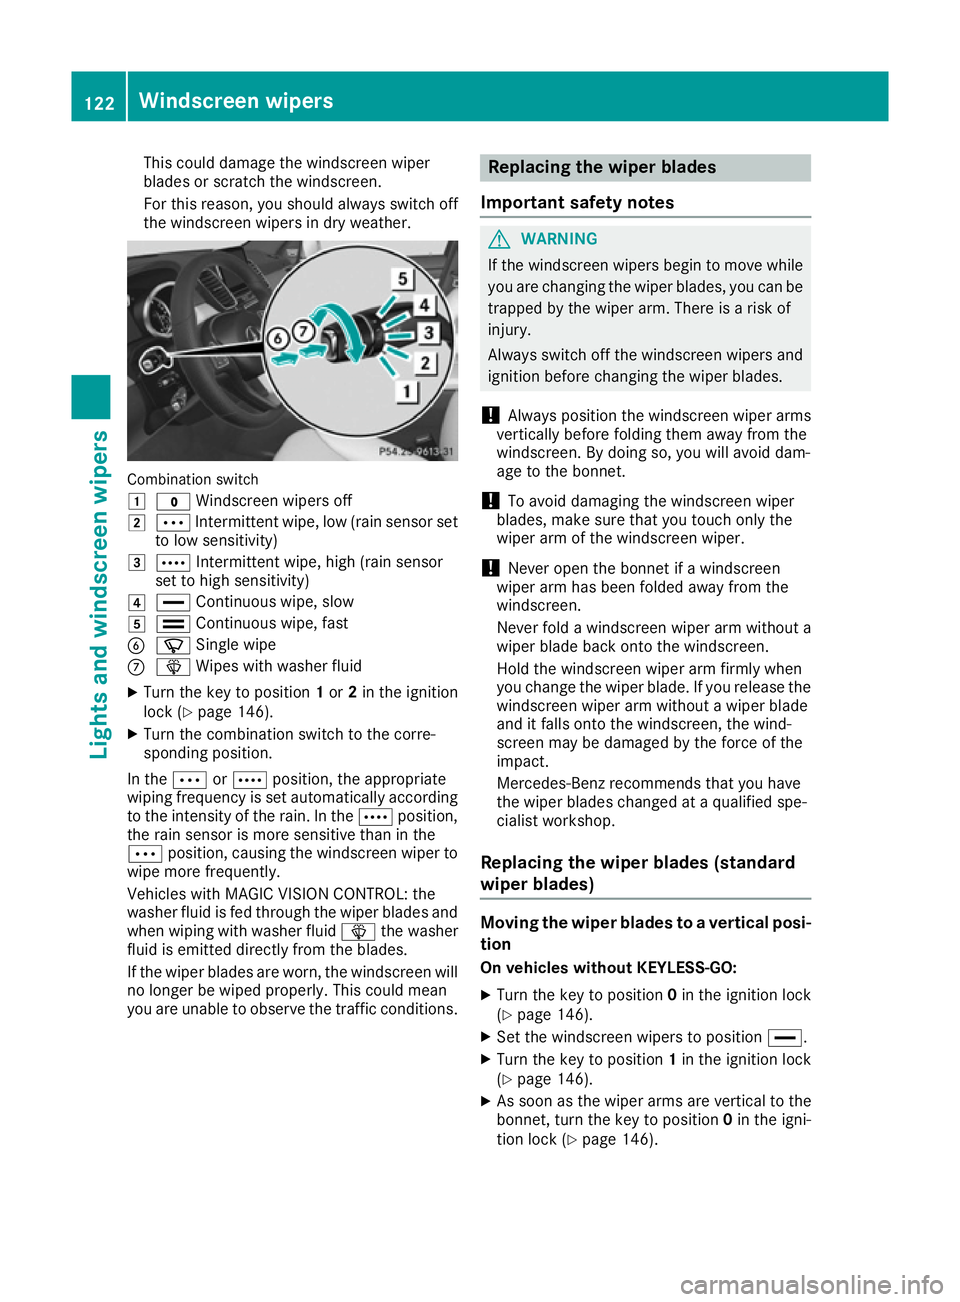
For this reason, you should always switch off the windscreen wipers in dry weather. Combination switch
1
$ Windscreen wipers off
2 Ä Intermittent wipe, low (rain sensor set
to low sensitivity)
3 Å Intermittent wipe, high (rain sensor
set to high sensitivity)
4 ° Continuous wipe, slow
5 ¯ Continuous wipe, fast
B í Single wipe
C î Wipes with washer fluid
X Turn the key to position 1or 2in the ignition
lock (Y page 146).
X Turn the combination switch to the corre-
sponding position.
In the ÄorÅ position, the appropriate
wiping frequency is set automatically according to the intensity of the rain. In the Åposition,
the rain sensor is more sensitive than in the
Ä position, causing the windscreen wiper to
wipe more frequently.
Vehicles with MAGIC VISION CONTROL: the
washer fluid is fed through the wiper blades and when wiping with washer fluid îthe washer
fluid is emitted directly from the blades.
If the wiper blades are worn, the windscreen will
no longer be wiped properly. This could mean
you are unable to observe the traffic conditions. Replacing the wiper blades
Important safety notes G
WARNING
If the windscreen wipers begin to move while
you are changing the wiper blades, you can be trapped by the wiper arm. There is a risk of
injury.
Always switch off the windscreen wipers and
ignition before changing the wiper blades.
! Always position the windscreen wiper arms
vertically before folding them away from the
windscreen. By doing so, you will avoid dam-
age to the bonnet.
! To avoid damaging the windscreen wiper
blades, make sure that you touch only the
wiper arm of the windscreen wiper.
! Never open the bonnet if a windscreen
wiper arm has been folded away from the
windscreen.
Never fold a windscreen wiper arm without a
wiper blade back onto the windscreen.
Hold the windscreen wiper arm firmly when
you change the wiper blade. If you release the windscreen wiper arm without a wiper blade
and it falls onto the windscreen, the wind-
screen may be damaged by the force of the
impact.
Mercedes-Benz recommends that you have
the wiper blades changed at a qualified spe-
cialist workshop.
Replacing the wiper blades (standard
wiper blades) Moving the wiper blades to a vertical posi-
tion
On vehicles without KEYLESS-GO:
X Turn the key to position 0in the ignition lock
(Y page 146).
X Set the windscreen wipers to position °.
X Turn the key to position 1in the ignition lock
(Y page 146).
X As soon as the wiper arms are vertical to the
bonnet, turn the key to position 0in the igni-
tion lock (Y page 146).122
Windscreen wipersLights and windscreen wipers
Page 329 of 393

X
Remove impurities immediately, where pos-
sible, whilst avoiding rubbing too hard.
X Soak insect remains with insect remover and
rinse off the treated areas afterwards.
X Soak bird droppings with water and rinse off
the treated areas afterwards.
X Remove coolant, brake fluid, tree resin, oils,
fuels and greases by rubbing gently with a
cloth soaked in petroleum ether or lighter
fluid.
X Use tar remover to remove tar stains.
X Use silicone remover to remove wax.
Care and treatment of matt paintwork !
Never polish the vehicle or the light alloy
wheels. Polishing makes the paintwork shiny.
! The following may cause the paint to
become shiny and thus reduce the matt
effect:
R vigorous rubbing with unsuitable materials
R frequent use of car washes
R washing the vehicle in direct sunlight
! Never use paint cleaner, buffing or polishing
products, or gloss preserver, e.g. wax. These
products are only suitable for high-gloss sur-
faces. Their use on vehicles with matt paint-
work leads to considerable surface damage
(shiny, spotted areas).
Always have paintwork repairs carried out at a
qualified specialist workshop.
! Do not use wash programs with a hot wax
treatment under any circumstances.
Observe these notes if your vehicle has a clear
matt finish. This will help you to avoid damage to the paintwork due to incorrect treatment.
These notes also apply to light-alloy wheels with a clear matt finish.
i The vehicle should preferably be washed by
hand using a soft sponge, car shampoo and
plenty of water.
i Use only insect remover and car shampoo
from the range of recommended and
approved Mercedes-Benz care products. Cleaning vehicle parts
Cleaning the wheels G
WARNING
The water jet of circular-jet nozzles (dirt grind- ers) can cause damage not visible from the
outside to tyres or chassis components. Com-
ponents damaged in this way can unexpect-
edly fail. There is a risk of an accident.
Do not use high-pressure cleaners with circu-
lar-jet nozzles to clean the vehicle. Have dam- aged tyres or chassis components replaced
immediately.
! Do not use acidic wheel cleaning products
to remove brake dust. This could damage
wheel bolts and brake components.
! Do not park up the vehicle for an extended
period straight after cleaning it, particularly
after having cleaned the wheels with wheel
cleaner. Wheel cleaners could cause
increased corrosion of the brake discs and
brake pads/linings. For this reason, you
should drive for a few minutes after cleaning. Braking heats the brake discs and the brake
pads/linings, thus drying them. The vehicle
can then be parked up.
Cleaning the windows G
WARNING
If the windscreen wipers are set in motion
when cleaning the windscreen or wiper
blades, you could become trapped. There is a danger of injury.
Always switch off the windscreen wipers and
the ignition before cleaning the windscreen orwiper blades.
! Do not use dry cloths, abrasive products,
solvents or cleaning agents containing sol-
vents to clean the inside of the windows. Do
not touch the insides of the windows with
hard objects, e.g. an ice scraper or ring. There is otherwise a risk of damaging the windows.
! Clean the water drainage channels of the
windscreen and the rear window at regular
intervals. Deposits such as leaves, petals and pollen may under certain circumstances pre- 326
CareMaintenance and care