2015 MERCEDES-BENZ GLE COUPE roof rack
[x] Cancel search: roof rackPage 25 of 393
Protection of the environment
General notes
H
Environmental note
Daimler's declared policy is one of compre-
hensive environmental protection.
Our objectives are to use the natural resour-
ces which form the basis of our existence on
this planet sparingly and in a manner which
takes the requirements of both nature and
humanity into consideration.
You too can help to protect the environment
by operating your vehicle in an environmen-
tally-responsible manner.
Fuel consumption and the rate of engine,
transmission, brake and tyre wear depend on
the following factors:
R operating conditions of your vehicle
R your personal driving style
You can influence both factors. Therefore,
please bear the following in mind:
Operating conditions:
R avoid short trips, as these increase fuel
consumption.
R observe the correct tyre pressure.
R do not carry any unnecessary weight in the
vehicle.
R remove the roof rack once you no longer
need it.
R a regularly serviced vehicle will contribute
to environmental protection. You should
therefore adhere to the service intervals.
R all maintenance work should be carried out
at a qualified specialist workshop.
Personal driving style:
R do not depress the accelerator pedal when
starting the engine.
R do not warm up the engine when the vehicle
is stationary.
R drive carefully and maintain a safe distance
from the vehicle in front.
R avoid frequent, sudden acceleration and
braking. R
change gear in good time and use each gear
only up to Ôof its maximum engine speed.
R switch off the engine in stationary traffic.
R monitor the vehicle's fuel consumption. Returning an end-of-life vehicle
EU countries only:
Mercedes-Benz will take back your old vehicle to
dispose of it in an environmentally-responsible
manner in accordance with the European Union (EU) End of Life Vehicles Directive.
There is a network of return points and disas-
sembly plants available. You can return your
vehicle to these plants free of charge. This
makes a valuable contribution to the recycling
process and the conservation of resources.
For further information on recycling old vehi-
cles, recovery and the terms of the policy, visit
the Mercedes-Benz homepage. Genuine Mercedes-Benz parts
H
Environmental note
Daimler AG also supplies reconditioned
assemblies and parts which are of the same
quality as new parts. For these, the same war-
ranty applies as for new parts.
! Airbags and seat belt tensioners, as well as
control units and sensors for these restraint
systems, may be installed in the following
areas of your vehicle:
R doors
R door pillars
R door sills
R seats
R dashboard
R instrument cluster
R centre console
Do not install accessories such as audio sys-
tems in these areas. Do not carry out repairs
or welding. You could impair the operating
efficiency of the restraint systems.
Have accessories retrofitted at a qualified
specialist workshop. 22
Introduction
Page 62 of 393
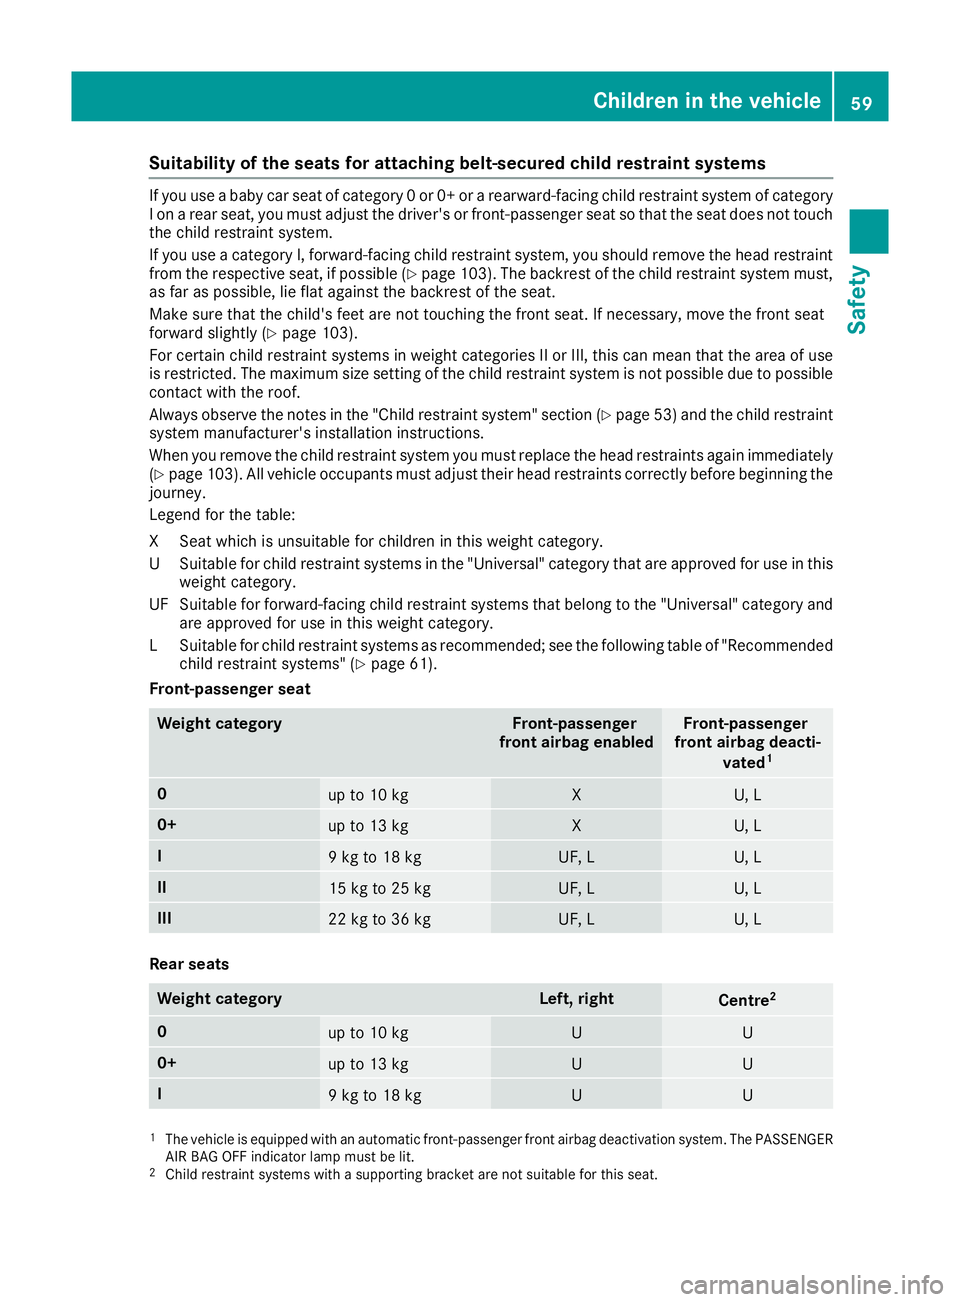
Suitability of the seats for attaching belt-secured child restraint systems
If you use a baby car seat of category 0 or 0+ or a rearward-facing child restraint system of category
I on a rear seat, you must adjust the driver's or front-passenger seat so that the seat does not touch
the child restraint system.
If you use a category I, forward-facing child restraint system, you should remove the head restraint from the respective seat, if possible (Y page 103). The backrest of the child restraint system must,
as far as possible, lie flat against the backrest of the seat.
Make sure that the child's feet are not touching the front seat. If necessary, move the front seat
forward slightly (Y page 103).
For certain child restraint systems in weight categories II or III, this can mean that the area of use is restricted. The maximum size setting of the child restraint system is not possible due to possible
contact with the roof.
Always observe the notes in the "Child restraint system" section (Y page 53) and the child restraint
system manufacturer's installation instructions.
When you remove the child restraint system you must replace the head restraints again immediately (Y page 103). All vehicle occupants must adjust their head restraints correctly before beginning the
journey.
Legend for the table:
XS eat which is unsuitable for children in this weight category.
US uitable for child restraint systems in the "Universal" category that are approved for use in this
weight category.
UF Suitable for forward-facing child restraint systems that belong to the "Universal" category and are approved for use in this weight category.
LS uitable for child restraint systems as recommended; see the following table of "Recommended
child restraint systems" (Y page 61).
Front-passenger seat Weight category Front-passenger
front airbag enabled Front-passenger
front airbag deacti-
vated1 0
up to 10 kg X U, L
0+
up to 13 kg X U, L
I
9 kg to 18 kg UF, L U, L
II
15 kg to 25 kg UF, L U, L
III
22 kg to 36 kg UF, L U, L
Rear seats
Weight category Left, right
Centre
2 0
up to 10 kg U U
0+
up to 13 kg U U
I
9 kg to 18 kg U U
1
The vehicle is equipped with an automatic front-passenger front airbag deactivation system. The PASSENGER
AIR BAG OFF indicator lamp must be lit.
2 Child restraint systems with a supporting bracket are not suitable for this seat. Children in the vehicle
59Safety Z
Page 63 of 393
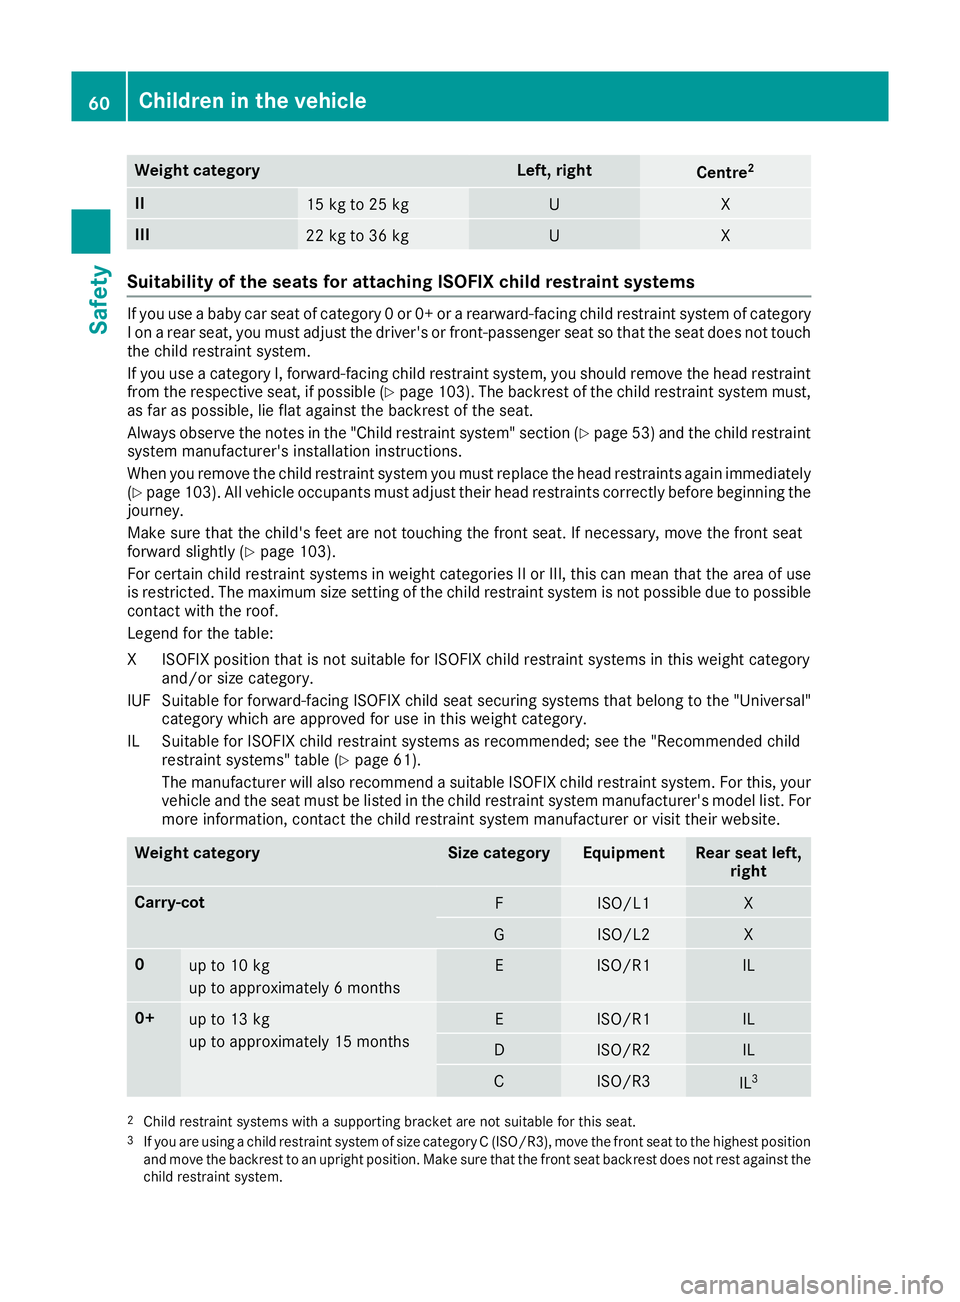
Weight category Left, right
Centre
2 II
15 kg to 25 kg U X
III
22 kg to 36 kg U X
Suitability of the seats for attaching ISOFIX child restraint systems
If you use a baby car seat of category 0 or 0+ or a rearward-facing child restraint system of category
I on a rear seat, you must adjust the driver's or front-passenger seat so that the seat does not touch the child restraint system.
If you use a category I, forward-facing child restraint system, you should remove the head restraintfrom the respective seat, if possible (Y page 103). The backrest of the child restraint system must,
as far as possible, lie flat against the backrest of the seat.
Always observe the notes in the "Child restraint system" section (Y page 53) and the child restraint
system manufacturer's installation instructions.
When you remove the child restraint system you must replace the head restraints again immediately (Y page 103). All vehicle occupants must adjust their head restraints correctly before beginning the
journey.
Make sure that the child's feet are not touching the front seat. If necessary, move the front seat
forward slightly (Y page 103).
For certain child restraint systems in weight categories II or III, this can mean that the area of use is restricted. The maximum size setting of the child restraint system is not possible due to possible
contact with the roof.
Legend for the table:
XI SOFIX position that is not suitable for ISOFIX child restraint systems in this weight category
and/or size category.
IUF Suitable for forward-facing ISOFIX child seat securing systems that belong to the "Universal" category which are approved for use in this weight category.
IL Suitable for ISOFIX child restraint systems as recommended; see the "Recommended child restraint systems" table (Y page 61).
The manufacturer will also recommend a suitable ISOFIX child restraint system. For this, your
vehicle and the seat must be listed in the child restraint system manufacturer's model list. For more information, contact the child restraint system manufacturer or visit their website. Weight category Size category Equipment Rear seat left,
right Carry-cot
F ISO/L1 X
G ISO/L2 X
0
up to 10 kg
up to approximately 6 months E ISO/R1 IL
0+
up to 13 kg
up to approximately 15 months E ISO/R1 IL
D ISO/R2 IL
C ISO/R3
IL
3 2
Child restraint systems with a supporting bracket are not suitable for this seat.
3 If you are using a child restraint system of size category C (ISO/R3), move the front seat to the highest position
and move the backrest to an upright position. Make sure that the front seat backrest does not rest against the
child restraint system. 60
Children in the vehicleSafety
Page 308 of 393
Stowage well under the luggage com-
partment floor
Important safety notes G
WARNING
If you drive when the luggage compartment
floor is open, objects could be flung around,
thus striking vehicle occupants. There is a risk of injury, especially when braking or abruptly
changing directions.
Always close the luggage compartment floor
before a journey.
The TIREFIT kit, tyre-change tool kit, etc. are
located in the stowage compartment.
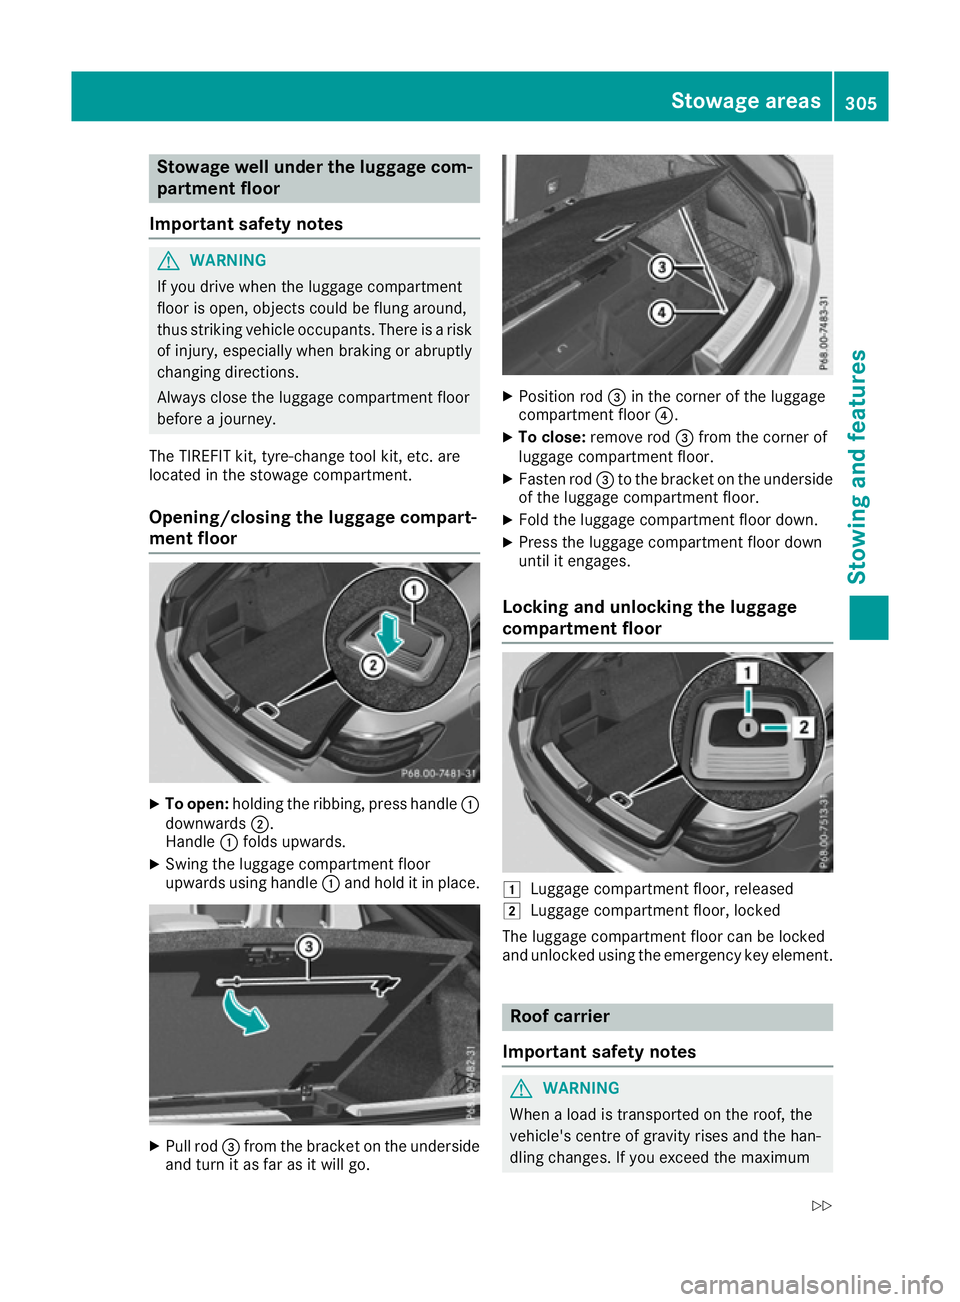
Opening/closing the luggage compart-
ment floor X
To open: holding the ribbing, press handle :
downwards ;.
Handle :folds upwards.
X Swing the luggage compartment floor
upwards using handle :and hold it in place. X
Pull rod =from the bracket on the underside
and turn it as far as it will go. X
Position rod =in the corner of the luggage
compartment floor ?.
X To close: remove rod =from the corner of
luggage compartment floor.
X Fasten rod =to the bracket on the underside
of the luggage compartment floor.
X Fold the luggage compartment floor down.
X Press the luggage compartment floor down
until it engages.
Locking and unlocking the luggage
compartment floor 1
Luggage compartment floor, released
2 Luggage compartment floor, locked
The luggage compartment floor can be locked
and unlocked using the emergency key element. Roof carrier
Important safety notes G
WARNING
When a load is transported on the roof, the
vehicle's centre of gravity rises and the han-
dling changes. If you exceed the maximum Stowage areas
305Stowing and features
Z
Page 309 of 393
roof load, the handling as well as steering and
braking characteristics are severely affected.
There is a risk of an accident.
Always observe the maximum roof load and
adapt your driving style.
! Mercedes-Benz recommends that you only
use roof carriers that have been tested and
approved for Mercedes-Benz vehicles. This
helps to prevent damage to the vehicle.
Position the load on the roof carrier in such a way that the vehicle will not sustain damage
even when it is in motion.
Depending on the vehicle equipment, ensure
that when the roof carrier is fitted you can:
R raise the sliding sunroof fully
R open the panorama sliding sunroof fully
R open the tailgate fully
You will find information on the maximum roof
load in the "Technical data" section
(Y page 381).
An incorrectly secured roof carrier or roof load
may become detached from the vehicle. You
must therefore ensure that you observe the roof
carrier manufacturer's installation instructions.
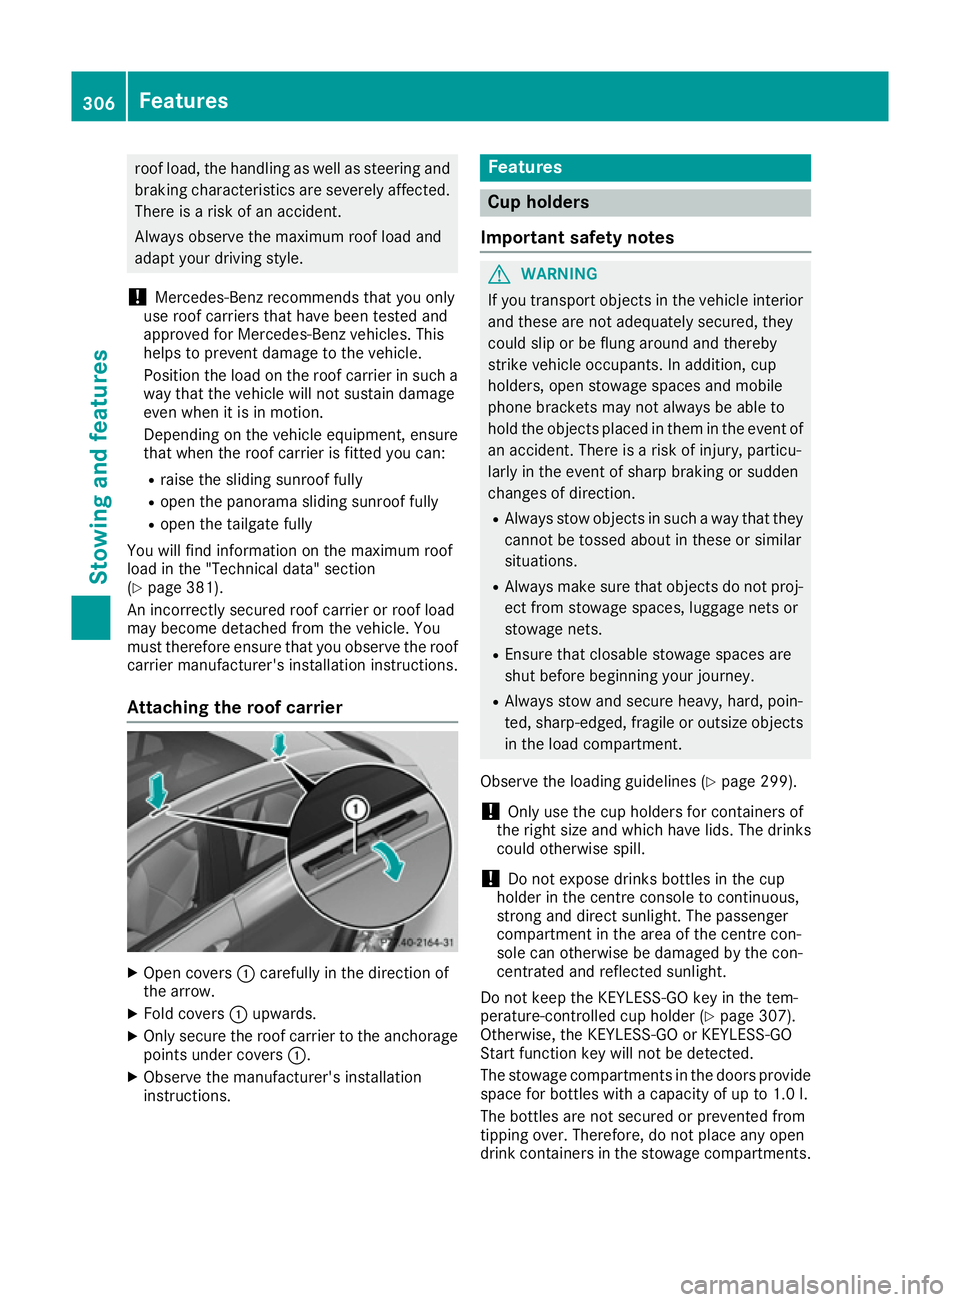
Attaching the roof carrier X
Open covers :carefully in the direction of
the arrow.
X Fold covers :upwards.
X Only secure the roof carrier to the anchorage
points under covers :.
X Observe the manufacturer's installation
instructions. Features
Cup holders
Important safety notes G
WARNING
If you transport objects in the vehicle interior and these are not adequately secured, they
could slip or be flung around and thereby
strike vehicle occupants. In addition, cup
holders, open stowage spaces and mobile
phone brackets may not always be able to
hold the objects placed in them in the event of an accident. There is a risk of injury, particu-
larly in the event of sharp braking or sudden
changes of direction.
R Always stow objects in such a way that they
cannot be tossed about in these or similar
situations.
R Always make sure that objects do not proj-
ect from stowage spaces, luggage nets or
stowage nets.
R Ensure that closable stowage spaces are
shut before beginning your journey.
R Always stow and secure heavy, hard, poin-
ted, sharp-edged, fragile or outsize objects
in the load compartment.
Observe the loading guidelines (Y page 299).
! Only use the cup holders for containers of
the right size and which have lids. The drinks
could otherwise spill.
! Do not expose drinks bottles in the cup
holder in the centre console to continuous,
strong and direct sunlight. The passenger
compartment in the area of the centre con-
sole can otherwise be damaged by the con-
centrated and reflected sunlight.
Do not keep the KEYLESS-GO key in the tem-
perature-controlled cup holder (Y page 307).
Otherwise, the KEYLESS-GO or KEYLESS-GO
Start function key will not be detected.
The stowage compartments in the doors provide
space for bottles with a capacity of up to 1.0 l.
The bottles are not secured or prevented from
tipping over. Therefore, do not place any open
drink containers in the stowage compartments. 306
FeaturesStowing and features
Page 333 of 393
Cleaning the seat covers
General notes
! Do not use a microfibre cloth to clean covers
made out of real leather, artificial leather or
DINAMICA. If used frequently, this can dam-
age the cover.
i Note that regular care is essential to make
sure that the appearance and comfort of the
covers are retained over time.
Genuine leather seat covers
! To retain the natural appearance of the
leather, observe the following cleaning
instructions:
R Clean genuine leather covers carefully with
a damp cloth and then wipe the covers
down with a dry cloth.
R Make sure that the leather does not
become soaked. It may otherwise become
rough and cracked.
R Only use leather care agents that have
been tested and approved by Mercedes-
Benz. You can obtain these from a qualified
specialist workshop.
Leather is a natural product.
It has natural surface properties, e.g.: R unevenness in structure
R marks caused by growth and injury
R subtle colour differences
These are characteristics of leather and not
material faults.
Seat covers from other materials ! Observe the following when cleaning:
R clean artificial leather covers with a cloth
moistened with a solution containing 1%
detergent (e.g. washing-up liquid).
R clean cloth covers with a microfibre cloth
moistened with a solution containing 1%
detergent (e.g. washing-up liquid). Rub
carefully, and always wipe entire seat sec-
tions to avoid leaving visible lines. Leave
the seat to dry afterwards. Cleaning results depend on the type of dirt and how long it
has been there.
R Clean DINAMICA covers with a damp cloth.
Make sure that you wipe entire seat sec-
tions to avoid leaving visible lines. Cleaning the seat belts G
WARNING
Seat belts may be severely weakened if
bleached or coloured. This may lead to the
seat belts, for example, tearing or failing in an accident. There is an increased risk of injury,
possibly even fatal.
Never bleach or colour seat belts.
! Do not clean the seat belts using chemical
cleaning agents. Do not dry the seat belts at
temperatures above 80 † or in direct sun-
light.
X Use clean, lukewarm water and soap solution.
Cleaning the roof lining and carpets X
Roof lining: if it is very dirty, use a soft brush
or dry shampoo.
X Carpets: use the carpet and textile cleaning
agents recommended and approved by
Mercedes-Benz. 330
CareMaintenance and care