2015 MERCEDES-BENZ GLC SUV tow bar
[x] Cancel search: tow barPage 17 of 497
KEYLESS-GO
Convenience closing ...................... 112
Deactivation .................................... .95
Locking ............................................ 95
Removing the Start/Stop button ... 189
Unlocking .........................................95
Kickdown
Driving tips .................................... 200
Manual gearshifting ...................... .202
Kneebag ............................................... 55 L
Lamps see Warning and indicator lamps
Lane Keeping Assist
Activating/deactivating ................. 280
Activating/deactivating (on-
board computer) ............................ 329
Display message ............................ 361
Function/informatio n.................... 279
see Active Lane Keeping Assist
Lane package ..................................... 276
Lashing eyelets ................................. 396
Level control (display message) ...... 361
Licence plate lamp (display mes-
sage) ................................................... 351
Light sensor (display message) ....... 352
Lights
Activating/deactivating the Intel-
ligent Light System ........................ 331
Active light function ....................... 142
Adaptive Highbeam Assist PLUS .... 143
Automatic headlamp mode ............ 139
Cornering light function ................. 142
Dipped-beam headlamp s............... 139
Driving abroad ............................... 138
Foglamps (extended range) ........... 143
General notes ................................ 138
Hazard warning lamps ................... 141
Headlamp flashe r........................... 141
Headlamp range ............................ 140
Intelligent Light System (func-
tion) ............................................... 141
Light switch ................................... 138
Main-beam headlamp s................... 141
Misted up headlamp s.................... 144
Motorway mode ............................. 142 Off-road lights ................................ 143
Parking lamps ................................ 140
Rear foglamp ................................. 139
Setting exterior lighting ................. 138
Side lamps ..................................... 140
Turn signals ................................... 140
see Interior lighting
LIM indicator lamp
Cruise control ................................ 231
DISTRONIC PLUS ........................... 237
Variable SPEEDTRONIC ................. 234
Limiting the speed
see SPEEDTRONIC
Loading guidelines ............................ 390
Locking
see Central locking
Locking (doors)
Automatic ...................................... 102
Emergency locking ........................ 103
From inside (central locking but-
ton) ................................................ 101
Locking centrally
see Central locking
Luggage compartment
Opening/closing (from outside,
HANDS-FREE ACCESS) .................. 106
Luggage compartment cover
Important safety notes .................. 397
Notes/function .............................. 397
Luggage compartment enlarge-
ment ................................................... 393
Luggage compartment floor
Important safety notes .................. 400
opening/closing .................... 400, 401
stowage well, under ....................... 400
Lumbar support
Adjusting the 4-way lumbar sup-
port ................................................ 125 M
M+S tyres ........................................... 456
Main-beam headlamps
Adaptive Highbeam Assist PLUS .... 143
Changing bulbs .............................. 147
Display message ............................ 351
Switching on/of f........................... 141
Matt finish (cleaning instructions) .. 42314
Index
Page 22 of 497
Introduction .....................................46
Warning lamp ................................. 383
Warning lamp (function) ...................47
Rev counter ........................................ 313
Reversing camera
Cleaning instructions ..................... 425
Displays in the Audio display ......... 263
Displays in the COMAND display ... 263
Function/notes ............................ .262
Switching on/off ........................... 263
Reversing feature
Panorama sliding sunroof .............. 114
Roller sunblinds ............................ .116
Side windows ................................. 110
Tailgate .......................................... 104
Reversing lamp
Changing bulbs .............................. 148
Reversing lamp (display message) .. 352
Roller sunblind
Panorama sliding sunroof .............. 115
Roller sunblinds (panorama sliding
sunroof)
Operating ....................................... 116
Roof carrier ........................................ 402
Roof lining and carpets (cleaning
instructions) ...................................... 428
Roof load (maximum) ........................ 488S
Safety Children in the vehicle ..................... 65
Hybrid drive system ......................... 44
see Operating safety
Safety net
Attaching ....................................... 398
Important safety information ......... 398
Safety notes
Hybrid vehicles ................................ 44
SD memory card
Selecting ........................................ 323
Seat
Folding the backrest (rear com-
partment) forwards/back ...... 393, 394
Seat belt
Centre rear-compartment sea t........ 51
Correct usage .................................. 50 Seat belts
Adjusting the driver's and front-
passenger seat belt ......................... 52
Adjusting the height ......................... 50
Cleaning ......................................... 428
Fastening ......................................... 50
Important safety guidelines ............. 49
Introduction ..................................... 48
Rear seat belt status indicator ......... 52
Releasing ......................................... 51
Warning lamp ................................. 376
Warning lamp (function) ................... 52
Seats
Adjusting (electrically) ................... 123
Adjusting (manually and electri-
cally) .............................................. 122
Adjusting the 4-way lumbar sup-
port ................................................ 125
Adjusting the head restraint .......... 123
Calling up a stored setting (mem-
ory function) .................................. 135
Cleaning the cover ......................... 427
Correct driver's seat position ........ 120
Important safety notes .................. 121
Seat heating .................................. 125
Seat heating problem .................... 127
Seat ventilation .............................. 127
Seat ventilation problem ................ 128
Storing settings (memory func-
tion) ............................................... 135
Switching seat heating on/of f....... 125
Switching the seat ventilation on/
off .................................................. 127
Section
PLUG-IN HYBRID operation ............ 286
Securing a load
see Stowage space
Securing luggage ............................... 396
Selector lever
Cleaning ......................................... 427
see Automatic transmission
Sensors (cleaning instructions) ....... 425
Service menu (on-board com-
puter) .................................................. 326
Service message
see ASSYST PLUS Index
19
Page 257 of 497
When the vehicle has been lowered, indi-
cator lamp ;remains lit.
i Lowering is interrupted if:
R a vehicle door is opened
R button :was briefly pulled again
R the vehicle is moving faster than
2 km/h
i The vehicle is automatically set to the
level of the most recently selected drive
program (Y page 195) if you drive faster
than 2 km/h.
Raising the rear of the vehicle To raise using the button in the left-hand-
side luggage compartment trim:
X Pull switch :briefly.
Indicator lamp ;goes out.
The vehicle is raised by 40 mm.
i The vehicle is automatically set to the
level of the most recently selected drive
program (Y page 195) if you drive faster
than 2 km/h.
X If the vehicle can no longer be raised
when stationary: start the engine.
The process will then be continued.
i If you drive off when the rear of the vehicle
has been lowered, the ÁVehicle
Vehicle ris‐ ris‐
ing Please wait
ing Please wait display may appear in
the multifunction display. 4MATIC (permanent all-wheel drive)
4MATIC ensures that all four wheels are per-
manently driven. Together with ESP ®
, it
improves the traction of your vehicle when-
ever a drive wheel spins due to insufficient
grip.
If you fail to adapt your driving style, 4MATIC can neither reduce the risk of an accident nor
override the laws of physics. 4MATIC cannot
take account of road, weather and traffic con- ditions. 4MATIC is only an aid. You are
responsible for the distance to the vehicle in front, for vehicle speed, for braking in good
time and for staying in the lane.
If a drive wheel spins due to insufficient grip:
R when pulling away, only depress the accel-
erator pedal as far as is necessary
R accelerate less when driving
! Never tow the vehicle with one axle
raised. This may damage the transfer case.
Damage of this sort is not covered by the
Mercedes-Benz implied warranty. All
wheels must remain either on the ground or be fully raised. Observe the instructions for
towing the vehicle with all wheels in full
contact with the ground.
i In wintry driving conditions, the maximum
effect of 4MATIC can only be achieved if
you use winter tyres (M+S tyres), with snow
chains if necessary. PARKTRONIC
Important safety notes PARKTRONIC is an electronic parking aid with
ultrasonic sensors. It monitors the area
around your vehicle using six sensors in the
front bumper and six sensors in the rear
bumper. PARKTRONIC indicates visually and
audibly the distance between your vehicle
and an object.
PARKTRONIC is only an aid. It is not a substi-
tute for your attention to the immediate sur-
roundings. The responsibility for safe
manoeuvring and parking remains with you.
Make sure that there are no persons, animals
or objects in range while manoeuvring and
parking.
! When parking, pay particular attention to
objects above or below the sensors, such
as flower pots or trailer drawbars.
PARKTRONIC does not detect such objects
when they are in the immediate vicinity of
the vehicle. You could damage the vehicle
or the objects. 254
Driving systemsDriving and parking
Page 266 of 497
Activating/deactivating the reversing
camera X
To activate: make sure that the key is in
position 2in the ignition lock.
X Make sure that the Activation by R
Activation by R
gear
gear function is selected in Audio 20 or
COMAND Online (see the Digital Owner's
Manual).
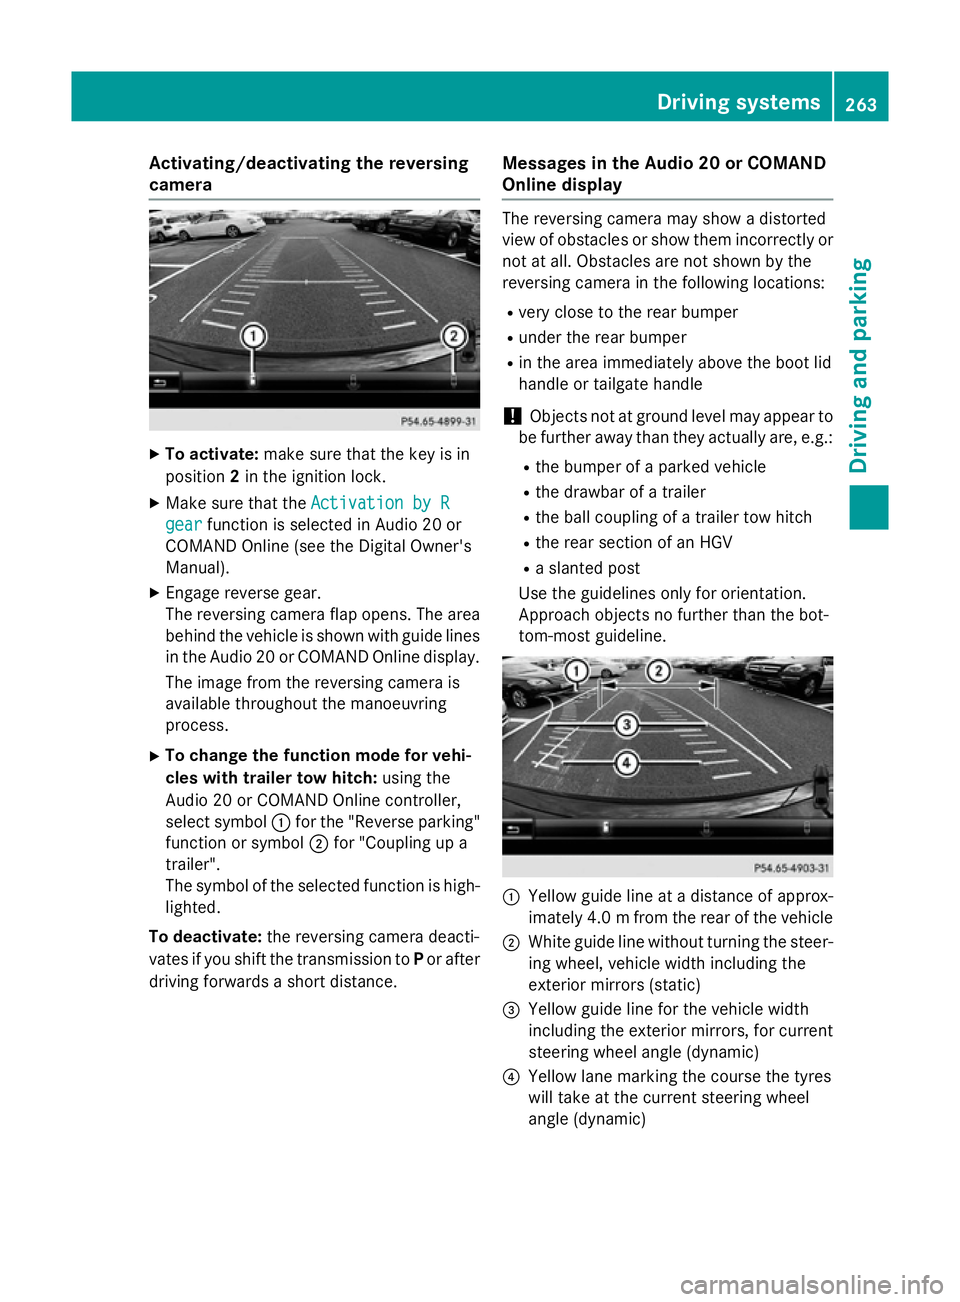
X Engage reverse gear.
The reversing camera flap opens. The area
behind the vehicle is shown with guide lines
in the Audio 20 or COMAND Online display.
The image from the reversing camera is
available throughout the manoeuvring
process.
X To change the function mode for vehi-
cles with trailer tow hitch: using the
Audio 20 or COMAND Online controller,
select symbol :for the "Reverse parking"
function or symbol ;for "Coupling up a
trailer".
The symbol of the selected function is high-
lighted.
To deactivate: the reversing camera deacti-
vates if you shift the transmission to Por after
driving forwards a short distance. Messages in the Audio 20 or COMAND
Online display The reversing camera may show a distorted
view of obstacles or show them incorrectly or
not at all. Obstacles are not shown by the
reversing camera in the following locations:
R very close to the rear bumper
R under the rear bumper
R in the area immediately above the boot lid
handle or tailgate handle
! Objects not at ground level may appear to
be further away than they actually are, e.g.:
R the bumper of a parked vehicle
R the drawbar of a trailer
R the ball coupling of a trailer tow hitch
R the rear section of an HGV
R a slanted post
Use the guidelines only for orientation.
Approach objects no further than the bot-
tom-most guideline. :
Yellow guide line at a distance of approx-
imately 4.0 mfrom the rear of the vehicle
; White guide line without turning the steer-
ing wheel, vehicle width including the
exterior mirrors (static)
= Yellow guide line for the vehicle width
including the exterior mirrors, for current
steering wheel angle (dynamic)
? Yellow lane marking the course the tyres
will take at the current steering wheel
angle (dynamic) Driving systems
263Driving and parking Z
Page 269 of 497
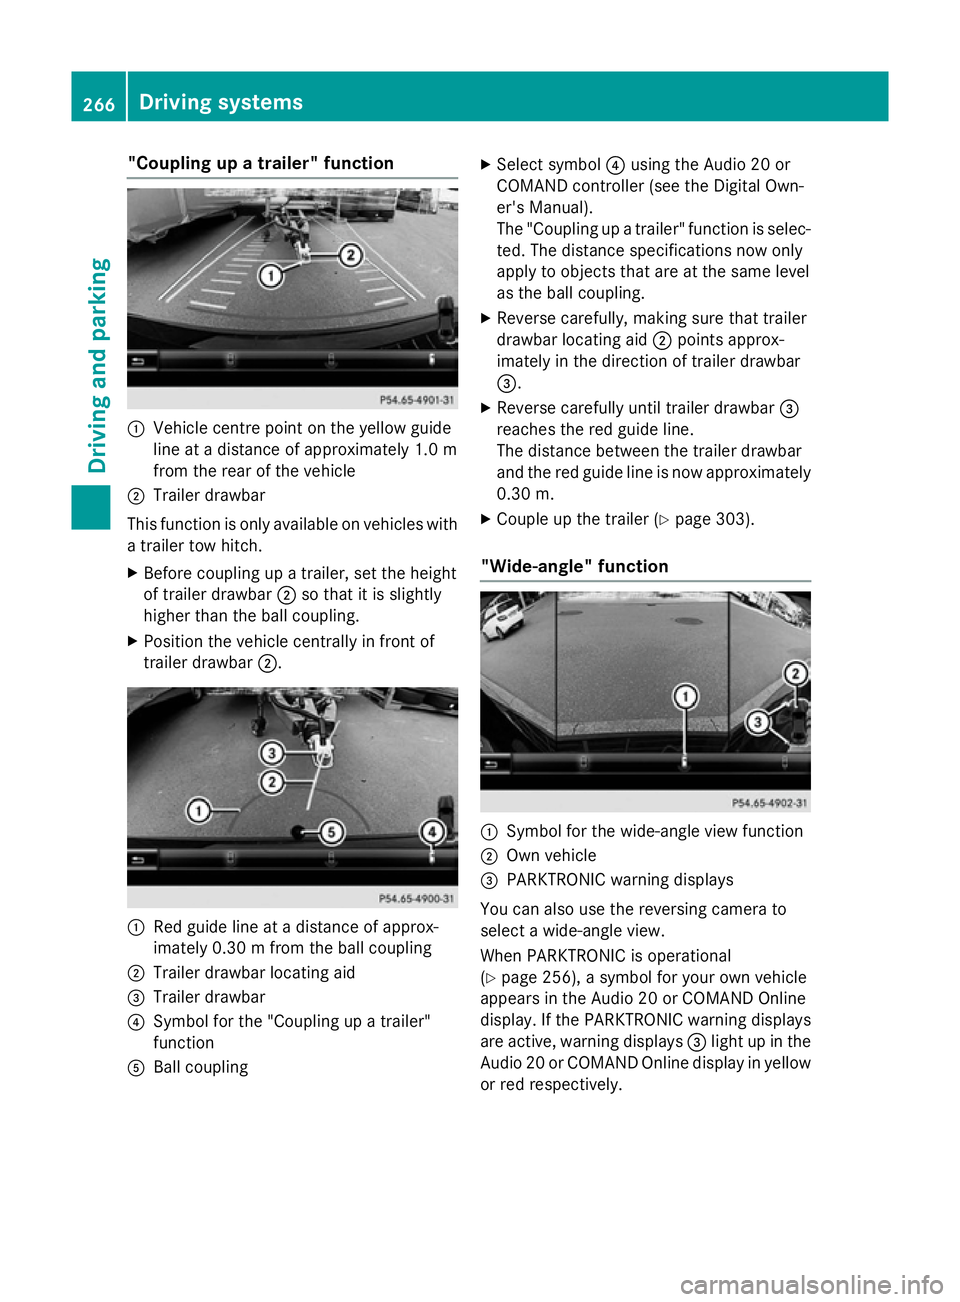
"Coupling up a trailer" function
:
Vehicle centre point on the yellow guide
line at a distance of approximately 1.0 m
from the rear of the vehicle
; Trailer drawbar
This function is only available on vehicles with
a trailer tow hitch.
X Before coupling up a trailer, set the height
of trailer drawbar ;so that it is slightly
higher than the ball coupling.
X Position the vehicle centrally in front of
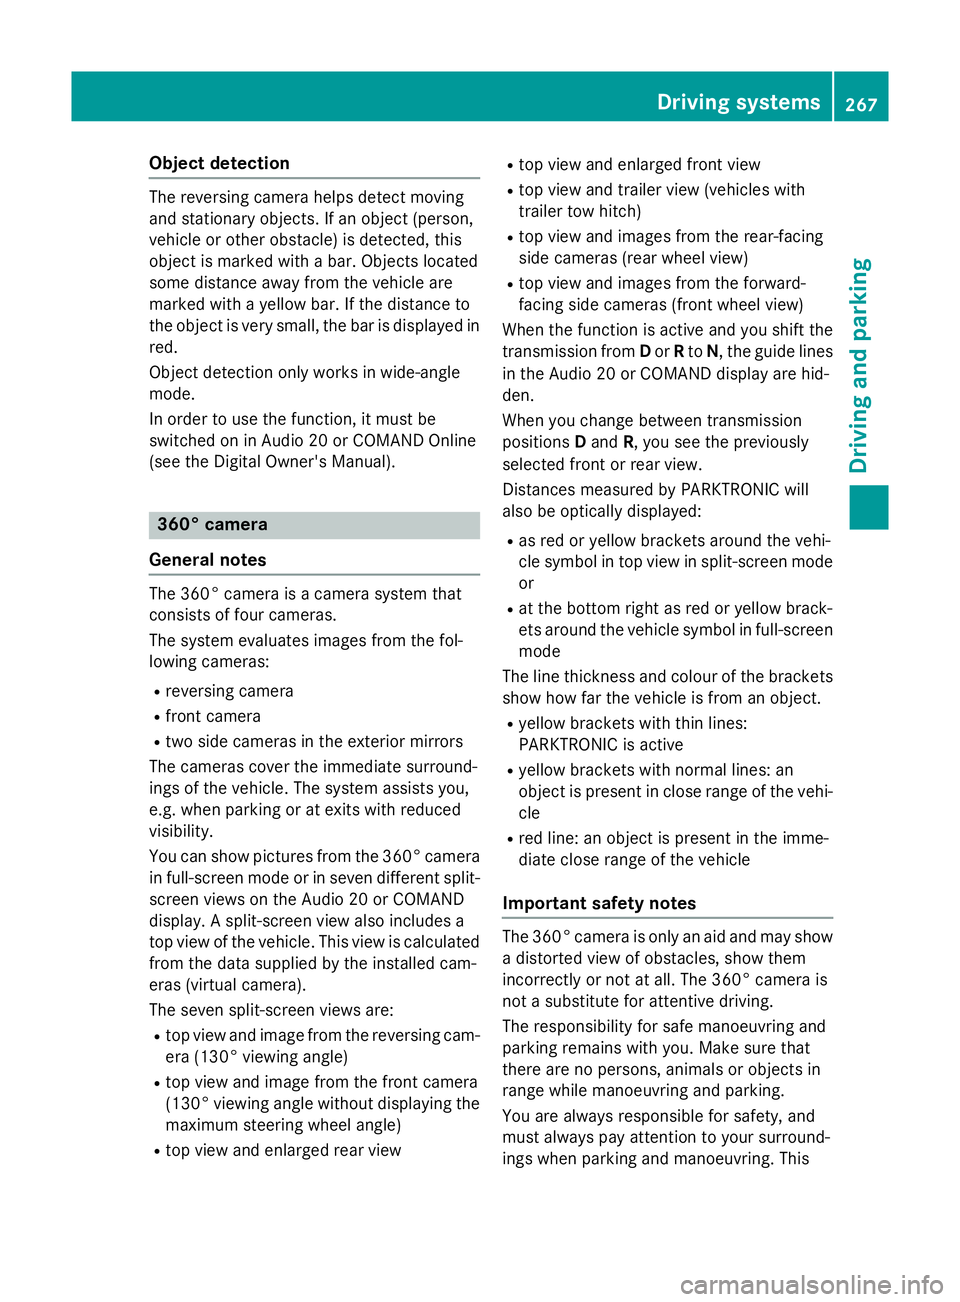
trailer drawbar ;. :
Red guide line at a distance of approx-
imately 0.30 m from the ball coupling
; Trailer drawbar locating aid
= Trailer drawbar
? Symbol for the "Coupling up a trailer"
function
A Ball coupling X
Select symbol ?using the Audio 20 or
COMAND controller (see the Digital Own-
er's Manual).
The "Coupling up a trailer" function is selec- ted. The distance specifications now only
apply to objects that are at the same level
as the ball coupling.
X Reverse carefully, making sure that trailer
drawbar locating aid ;points approx-
imately in the direction of trailer drawbar
=.
X Reverse carefully until trailer drawbar =
reaches the red guide line.
The distance between the trailer drawbar
and the red guide line is now approximately 0.30 m.
X Couple up the trailer (Y page 303).
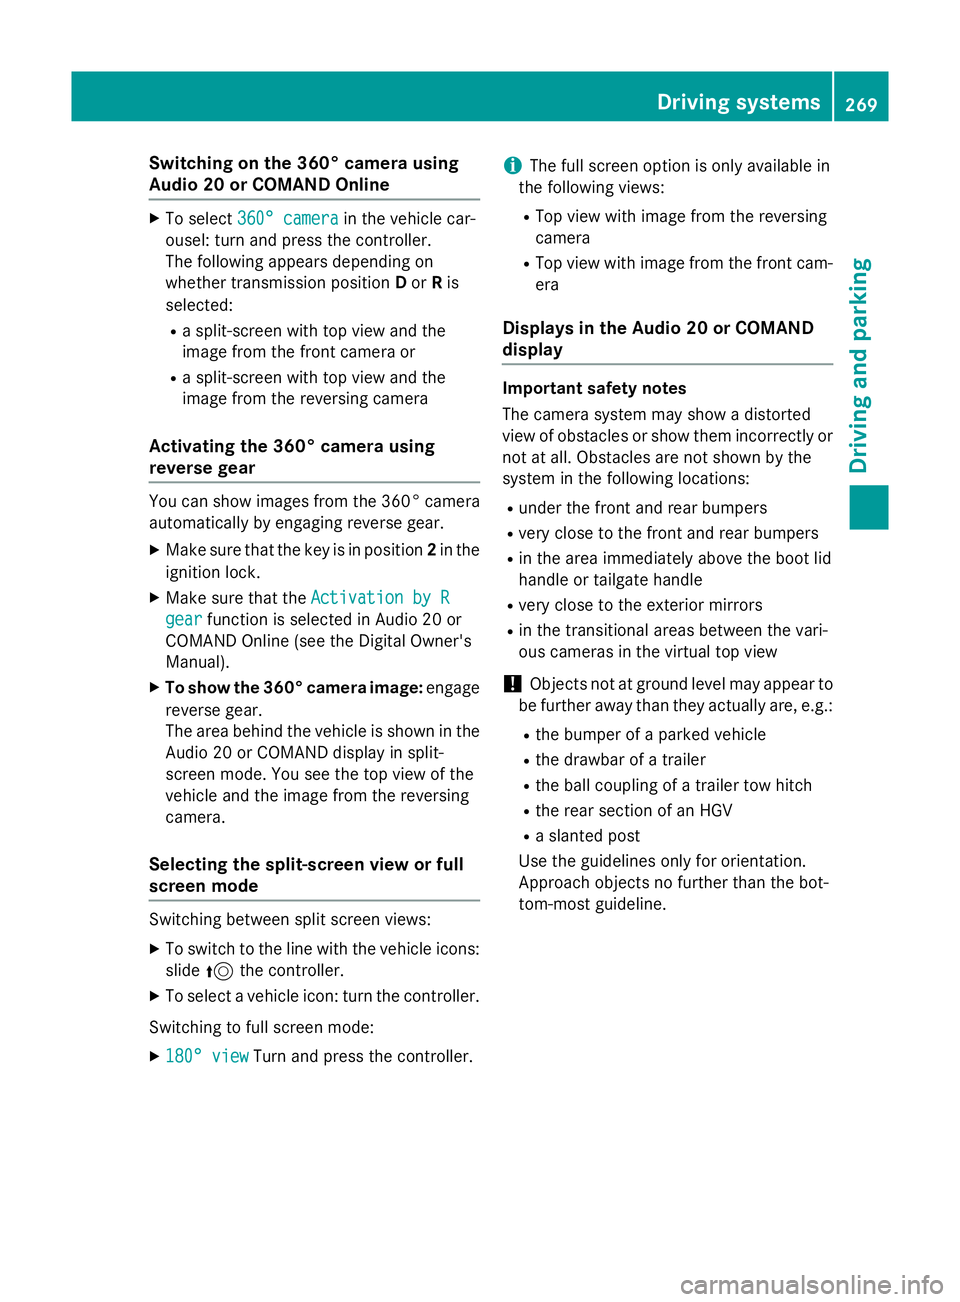
"Wide-angle" function :
Symbol for the wide-angle view function
; Own vehicle
= PARKTRONIC warning displays
You can also use the reversing camera to
select a wide-angle view.
When PARKTRONIC is operational
(Y page 256), a symbol for your own vehicle
appears in the Audio 20 or COMAND Online
display. If the PARKTRONIC warning displays
are active, warning displays =light up in the
Audio 20 or COMAND Online display in yellow or red respectively. 266
Driving systemsDriving and parking
Page 270 of 497
Object detection
The reversing camera helps detect moving
and stationary objects. If an object (person,
vehicle or other obstacle) is detected, this
object is marked with a bar. Objects located
some distance away from the vehicle are
marked with a yellow bar. If the distance to
the object is very small, the bar is displayed in
red.
Object detection only works in wide-angle
mode.
In order to use the function, it must be
switched on in Audio 20 or COMAND Online
(see the Digital Owner's Manual). 360° camera
General notes The 360° camera is a camera system that
consists of four cameras.
The system evaluates images from the fol-
lowing cameras:
R reversing camera
R front camera
R two side cameras in the exterior mirrors
The cameras cover the immediate surround-
ings of the vehicle. The system assists you,
e.g. when parking or at exits with reduced
visibility.
You can show pictures from the 360° camera in full-screen mode or in seven different split-
screen views on the Audio 20 or COMAND
display. A split-screen view also includes a
top view of the vehicle. This view is calculated
from the data supplied by the installed cam-
eras (virtual camera).
The seven split-screen views are:
R top view and image from the reversing cam-
era (130° viewing angle)
R top view and image from the front camera
(130° viewing angle without displaying the
maximum steering wheel angle)
R top view and enlarged rear view R
top view and enlarged front view
R top view and trailer view (vehicles with
trailer tow hitch)
R top view and images from the rear-facing
side cameras (rear wheel view)
R top view and images from the forward-
facing side cameras (front wheel view)
When the function is active and you shift the
transmission from Dor Rto N, the guide lines
in the Audio 20 or COMAND display are hid-
den.
When you change between transmission
positions Dand R, you see the previously
selected front or rear view.
Distances measured by PARKTRONIC will
also be optically displayed:
R as red or yellow brackets around the vehi-
cle symbol in top view in split-screen mode
or
R at the bottom right as red or yellow brack-
ets around the vehicle symbol in full-screen
mode
The line thickness and colour of the brackets show how far the vehicle is from an object.
R yellow brackets with thin lines:
PARKTRONIC is active
R yellow brackets with normal lines: an
object is present in close range of the vehi-
cle
R red line: an object is present in the imme-
diate close range of the vehicle
Important safety notes The 360° camera is only an aid and may show
a distorted view of obstacles, show them
incorrectly or not at all. The 360° camera is
not a substitute for attentive driving.
The responsibility for safe manoeuvring and
parking remains with you. Make sure that
there are no persons, animals or objects in
range while manoeuvring and parking.
You are always responsible for safety, and
must always pay attention to your surround-
ings when parking and manoeuvring. This Driving systems
267Driving and parking Z
Page 272 of 497
Switching on the 360° camera using
Audio 20 or COMAND Online X
To select 360° camera
360° camera in the vehicle car-
ousel: turn and press the controller.
The following appears depending on
whether transmission position Dor Ris
selected:
R a split-screen with top view and the
image from the front camera or
R a split-screen with top view and the
image from the reversing camera
Activating the 360° camera using
reverse gear You can show images from the 360° camera
automatically by engaging reverse gear.
X Make sure that the key is in position 2in the
ignition lock.
X Make sure that the Activation by R Activation by R
gear
gear function is selected in Audio 20 or
COMAND Online (see the Digital Owner's
Manual).
X To show the 360° camera image: engage
reverse gear.
The area behind the vehicle is shown in the
Audio 20 or COMAND display in split-
screen mode. You see the top view of the
vehicle and the image from the reversing
camera.
Selecting the split-screen view or full
screen mode Switching between split screen views:
X To switch to the line with the vehicle icons:
slide 5the controller.
X To select a vehicle icon: turn the controller.
Switching to full screen mode:
X 180° view
180° view Turn and press the controller. i
The full screen option is only available in
the following views:
R Top view with image from the reversing
camera
R Top view with image from the front cam-
era
Displays in the Audio 20 or COMAND
display Important safety notes
The camera system may show a distorted
view of obstacles or show them incorrectly or
not at all. Obstacles are not shown by the
system in the following locations:
R under the front and rear bumpers
R very close to the front and rear bumpers
R in the area immediately above the boot lid
handle or tailgate handle
R very close to the exterior mirrors
R in the transitional areas between the vari-
ous cameras in the virtual top view
! Objects not at ground level may appear to
be further away than they actually are, e.g.:
R the bumper of a parked vehicle
R the drawbar of a trailer
R the ball coupling of a trailer tow hitch
R the rear section of an HGV
R a slanted post
Use the guidelines only for orientation.
Approach objects no further than the bot-
tom-most guideline. Driving systems
269Driving and parking Z
Page 275 of 497
apply to objects that are at the same level
as the ball coupling.
X Reverse carefully, making sure trailer draw-
bar locating aid ;points approximately in
the direction of the trailer drawbar.
X Reverse carefully until the trailer drawbar
reaches red guide line ?.
The distance between the trailer drawbar
and the red guide line is now approximately 0.30 m.
X Couple up the trailer (Y page 303).
i For technical reasons, the ball coupling of
the trailer tow hitch in the Audio/COMAND
display is visible either only in a limited
manner or not at all.
The lines are shown at the level of the trailer
tow hitch.
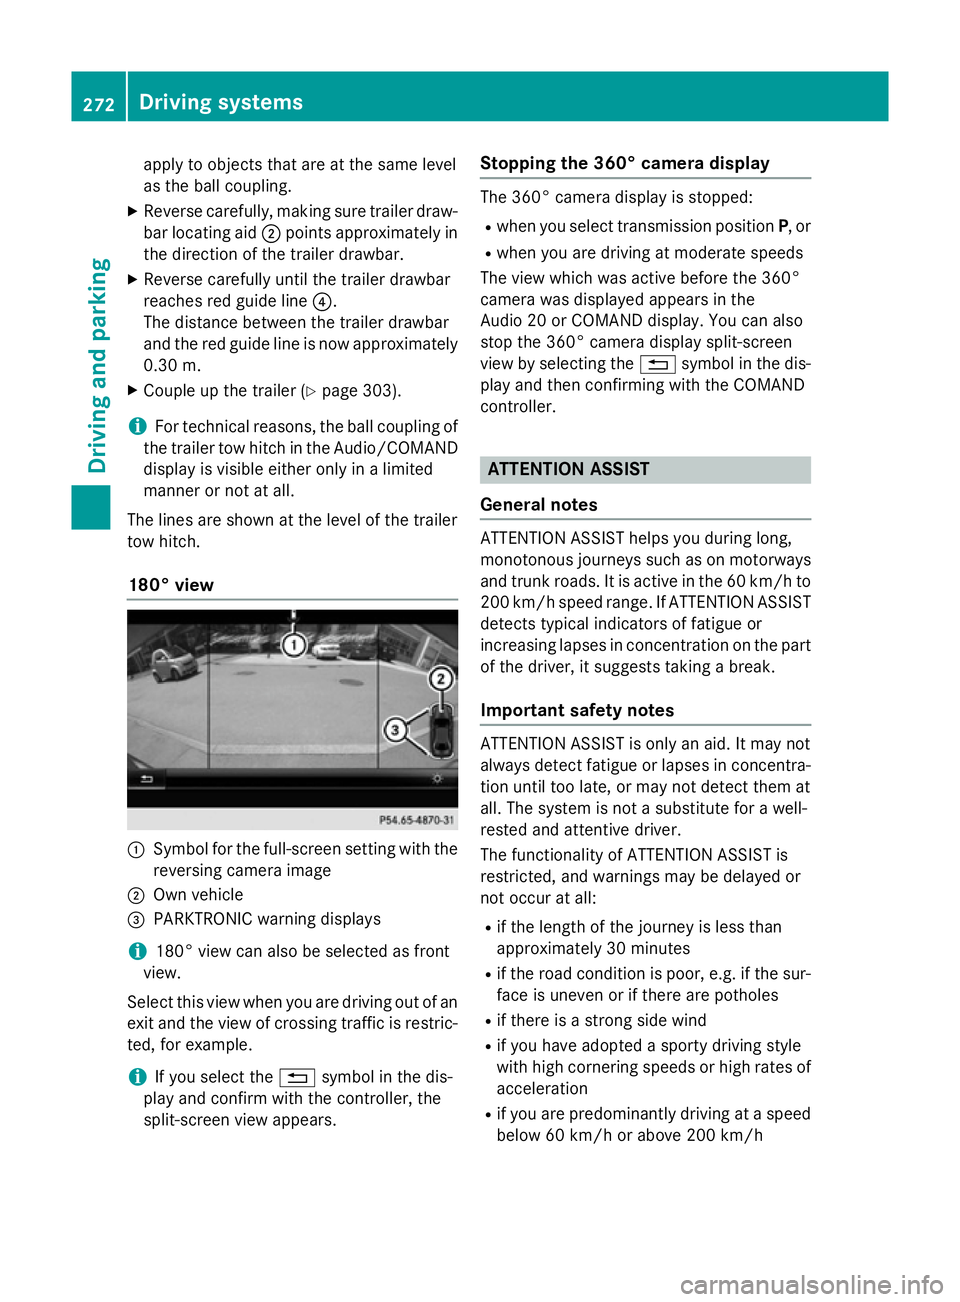
180° view :
Symbol for the full-screen setting with the
reversing camera image
; Own vehicle
= PARKTRONIC warning displays
i 180° view can also be selected as front
view.
Select this view when you are driving out of an
exit and the view of crossing traffic is restric- ted, for example.
i If you select the
%symbol in the dis-
play and confirm with the controller, the
split-screen view appears. Stopping the 360° camera display The 360° camera display is stopped:
R
when you select transmission position P, or
R when you are driving at moderate speeds
The view which was active before the 360°
camera was displayed appears in the
Audio 20 or COMAND display. You can also
stop the 360° camera display split-screen
view by selecting the %symbol in the dis-
play and then confirming with the COMAND
controller. ATTENTION ASSIST
General notes ATTENTION ASSIST helps you during long,
monotonous journeys such as on motorways
and trunk roads. It is active in the 60 km/h to
200 km/h speed range. If ATTENTION ASSIST detects typical indicators of fatigue or
increasing lapses in concentration on the part
of the driver, it suggests taking a break.
Important safety notes ATTENTION ASSIST is only an aid. It may not
always detect fatigue or lapses in concentra-
tion until too late, or may not detect them at
all. The system is not a substitute for a well-
rested and attentive driver.
The functionality of ATTENTION ASSIST is
restricted, and warnings may be delayed or
not occur at all:
R if the length of the journey is less than
approximately 30 minutes
R if the road condition is poor, e.g. if the sur-
face is uneven or if there are potholes
R if there is a strong side wind
R if you have adopted a sporty driving style
with high cornering speeds or high rates of
acceleration
R if you are predominantly driving at a speed
below 60 km/h or above 200 km/h 272
Driving systemsDriving and parking