2015 MERCEDES-BENZ GLC SUV washer fluid
[x] Cancel search: washer fluidPage 23 of 497
Service products
AdBlue ®
special additives .............. 484
Brake fluid .....................................4 86
Coolant (engine) ............................ 487
Engine oil ....................................... 485
Fuel ................................................ 480
Important safety notes .................. 480
Washer fluid ................................... 487
Setting the charge current (on-
board computer) ............................... 329
Setting the departure time (on-
board computer) ............................... 330
Settings
Factory (on-board computer) ......... 334
On-board computer ....................... 327
Side lamps
Switching on/off ........................... 140
Side windows
Convenience closing ..................... .111
Convenience opening .................... 111
Important safety notes .................. 109
Opening/closing ............................ 110
Problem (malfunction) ................... 113
Resetting ....................................... 112
Reversing feature ........................... 110
Sidebag ................................................ 55
Ski/snowboard bag .......................... 393
Sliding sunroof
see Panorama sliding sunroof
Snow chains ...................................... 457
Socket (12 V)
Centre console .............................. 406
General notes ................................ 405
Luggage compartment ................... 406
Rear compartment ......................... 406
Socket (230 V) ................................... 406
Specialist workshop ............................ 28
Spectacles compartment ................. 391
Speed, controlling
see Cruise control
Speedometer
Activating/deactivating the addi-
tional speedometer ........................ 333
Digital ............................................ 319
In the Instrument cluster ................. 34
Segments ...................................... 313
Selecting a display unit .................. 332 see Instrument cluster
SPEEDTRONIC
Deactivating variable ..................... 235
Display message ............................ 365
Function/notes ............................ .233
General notes ................................ 233
Important safety notes .................. 233
LIM indicator lamp ......................... 234
Permanent ..................................... 236
Selecting ........................................ 234
Setting the speed .......................... 235
Storing the current spee d.............. 234
Storing the current speed or call-
ing up the last stored speed .......... 235
Switching to passive ...................... 235
Variabl e......................................... 234
Start/Stop button
Starting the engine ........................ 190
Start/stop function
see ECO start/stop function
Starting (engine) ................................ 189
STEER CONTROL .................................. 90
Steering
Display message ............................ 374
Warning lamps ............................... 388
Steering Assist and Stop&Go Pilot
(DISTRONIC PLUS)
Display message ............................ 365
Steering assistant STEER CON-
TROL
see STEER CONTROL
Steering wheel
Adjusting (electrically) ................... 129
Adjusting (manually) ...................... 128
Button overview ............................... 37
Buttons (on-board computer) ......... 314
Cleaning ......................................... 427
EASY ENTRY/EXIT feature ............. 130
Important safety notes .................. 128
Steering wheel heating .................. 129
Storing settings (memory func-
tion) ............................................... 135
Steering wheel gearshift paddles .... 201
Steering wheel heating
Problem (malfunction) ................... 130
Switching on/of f........................... 129
Stowage areas ................................... 39020
Index
Page 26 of 497
Snow chains .................................. 457
Storing ........................................... 464
Summer tyres in winter ................. 456
Tyre size (data ).............................. 468
Tyre tread ...................................... 455
Wheel and tyre combinations ........ 470
see Flat tyre U
Unlocking Emergency unlocking ..................... 102
From inside the vehicle (central
unlocking button) ........................... 101 V
Vanity mirror (in sun visor) .............. 404
Variable SPEEDTRONIC
see SPEEDTRONIC
Vehicle
Correct use ...................................... 28
Data acquisition ............................... 29
Display message ............................ 369
Electronics ..................................... 478
Equipment ....................................... 26
Implied warranty .............................. 28
Individual settings .......................... 327
Leaving parked up ......................... 222
Locking (in an emergency) ............. 103
Locking (key) ................................... 95
Lowering ........................................ 467
Operating safety .............................. 26
Parking .......................................... 219
Pulling away ................................... 190
Raising ........................................... 465
Registration ..................................... 28
Securing from rolling away ............ 465
Towing away .................................. 445
Transporting .................................. 448
Unlocking (in an emergency) ......... 102
Unlocking (key) ................................ 95
Vehicle data ................................... 488
Vehicle data
Boot load (maximum) ..................... 488
Roof load (maximum) ..................... 488
Vehicle data (off-road driving)
Approach/departure angle ............ 489 Maximum gradient climbing abil-
ity .................................................. 489
Maximum water depth ................... 489
Vehicle dimensions ........................... 488
Vehicle emergency locking .............. 103
Vehicle identification number
see VIN
Vehicle identification plate .............. 480
Vehicle level
AIR BODY CONTROL ...................... 252
Display message ............................ 359
Vehicle tool kit .................................. 432
Video
Operating the DVD ......................... 323
VIN
Seat ............................................... 480
Type plate ...................................... 480 W
Warning and indicator lamps ABS ................................................ 379
Brakes ........................................... 377
Distance warning signal ................. 386
ESP ®
.............................................. 381
ESP ®
OFF ....................................... 383
Fuel tank ........................................ 384
General notes ................................ 375
Hybrid drive system ....................... 377
LIM (cruise control )........................ 231
LIM (DISTRONIC PLUS) .................. 237
LIM (variable SPEEDTRONIC) ......... 234
Overview .......................................... 36
Parking brake ................................ 383
PASSENGER AIR BAG ...................... 48
RBS (Recuperative Brake Sys-
tem) ............................................... 377
Reserve fuel ................................... 384
Seat belt ........................................ 376
Steering ......................................... 388
Tyre pressure monitor ................... 387
Warning triangle ................................ 431
Warnings
Stickers ........................................... 44
Washer fluid
Display message ............................ 374
Wheel and tyre combinations
Tyres .............................................. 470 Index
23
Page 27 of 497
Wheel bolt tightening torque
........... 467
Wheel chock ...................................... 465
Wheels
Changing a wheel .......................... 463
Changing/replacing ....................... 463
Checking ........................................ 455
Cleaning ......................................... 423
Emergency spare wheel ................. 474
Fitting a new wheel ........................ 467
Fitting a wheel .............................. .464
General notes ................................ 468
Important safety notes .................. 454
Information on driving .................... 454
Removing a wheel .......................... 466
Snow chains .................................. 457
Storing .......................................... .464
Tightening torque ........................... 467
Wheel size/tyre size ..................... .468
Windowbag
Display message ............................ 347
Operation ......................................... 56
Windows
Cleaning ......................................... 424
see Side windows
Windscreen
Demisting ...................................... 168
Windscreen washer fluid
see Windscreen washer system
Windscreen washer system
Important safety notes .................. 487
Topping up ..................................... 418
Windscreen wipers
Problem (malfunction) ................... 154
Rear window wiper ........................ 151
Replacing the wiper blades ............ 151
Switching on/off ........................... 150
Winter operation
Important safety notes .................. 456
Radiator cover ............................... 416
Slippery road surfaces ................... 226
Snow chains .................................. 457
Summer tyres ................................ 456
Winter tyres
Limiting the speed (on-board com-
puter) ............................................. 333
M+S tyres ...................................... 456
Wiper blades
Cleaning ......................................... 424 Important safety notes .................. 151
Replacing ....................................... 151
Replacing (on the rear window) ..... 153
Replacing (windscreen) .................. 151
Wooden trim (cleaning instruc-
tions) ................................................. .427 24
Index
Page 153 of 497
X
Position trim Dand engage it in place by
tapping it with your hand.
X Before beginning the installation, check
that all of the metal clips are inserted in the
parts which were placed on one side: 2
clips ;in the upper section of handle =
and 4 clips Ain trim B.
X If not, remove the missing metal clips from
the panel apertures in the tailgate and
insert them in the corresponding positions.
X Grasp trim Band connect plug connector
C to the surround lighting.
i The surround lighting only illuminates
when the tailgate has been shut and reop-
ened.
X Vehicles with EASY-PACK tailgate: push in
the plug connector for the switch of the
EASY-PACK tailgate in the top right of the
trim.
X Vehicles with electric fold-out trailer tow
hitch: push in the plug connector for the
electric fold-out trailer tow hitch in the top
left of the trim.
X Position trim Band engage it in place by
tapping it with your hand, starting from the
outside.
X Clip in the lower section of handle :again.
X Insert and engage the upper section of han-
dle =into lower section :.Windscreen wipers
Switching the windscreen wipers on/
off
! Do not operate the windscreen wipers
when the windscreen is dry, as this could
damage the wiper blades. Moreover, dust
that has collected on the windscreen can
scratch the glass if wiping takes place when the windscreen is dry.
If it is necessary to switch on the wind-
screen wipers in dry weather conditions,
always operate them using washer fluid. !
If the windscreen wipers leave smears on
the windscreen after the vehicle has been
washed in an automatic car wash, this may
be due to wax or other residue. Clean the
windscreen with washer fluid after an auto- matic car wash.
! Intermittent wiping with rain sensor: due
to optical influences and the windscreen
becoming dirty in dry weather conditions,
the windscreen wipers may be activated
inadvertently. This could damage the wind- screen wiper blades or scratch the wind-
screen.
For this reason, you should always switch
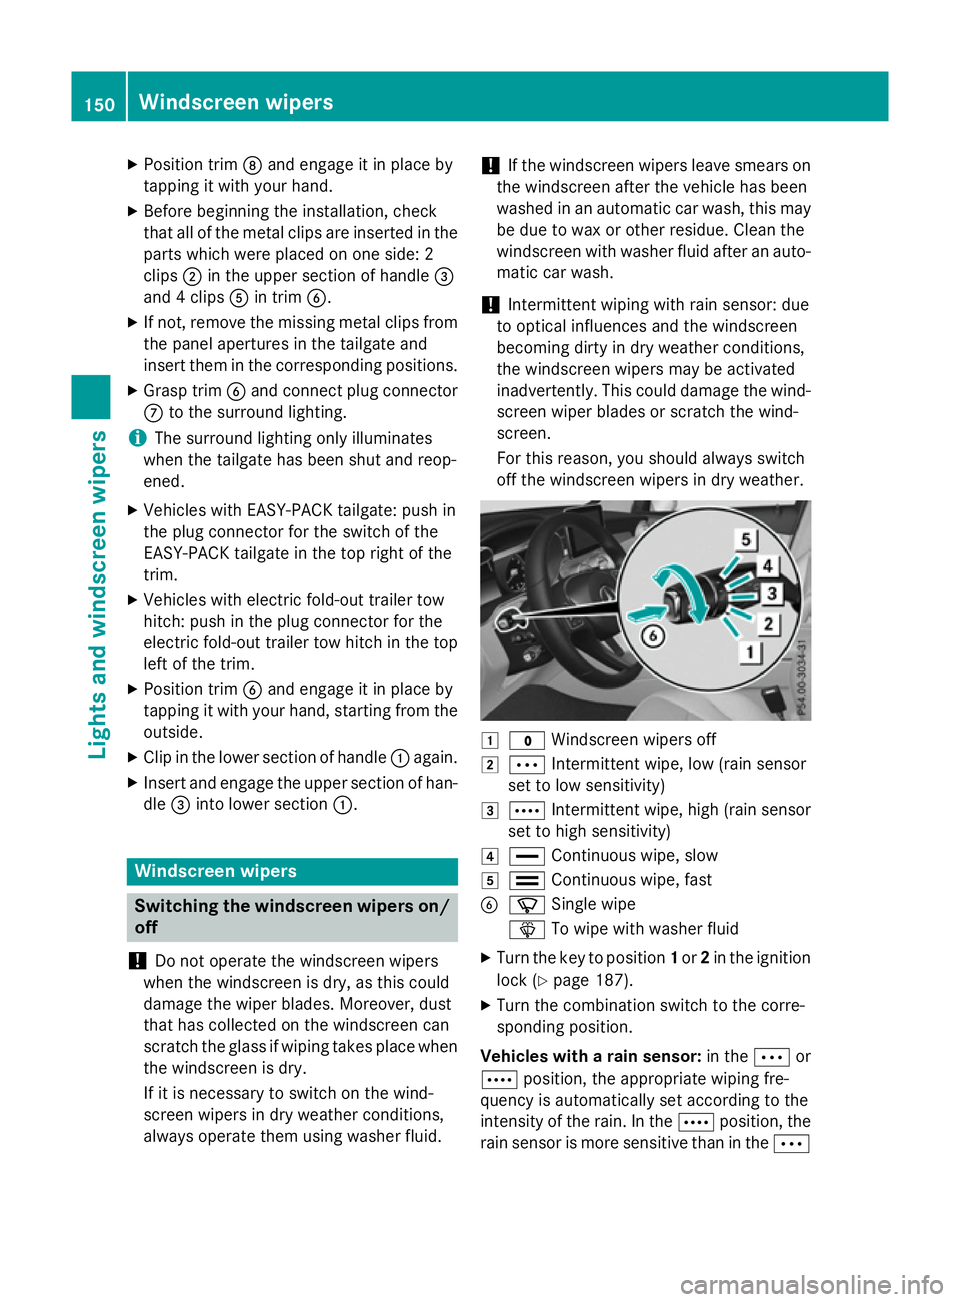
off the windscreen wipers in dry weather. 1
$ Windscreen wipers off
2 Ä Intermittent wipe, low (rain sensor
set to low sensitivity)
3 Å Intermittent wipe, high (rain sensor
set to high sensitivity)
4 ° Continuous wipe, slow
5 ¯ Continuous wipe, fast
B í Single wipe
î To wipe with washer fluid
X Turn the key to position 1or 2in the ignition
lock (Y page 187).
X Turn the combination switch to the corre-
sponding position.
Vehicles with a rain sensor: in theÄor
Å position, the appropriate wiping fre-
quency is automatically set according to the
intensity of the rain. In the Åposition, the
rain sensor is more sensitive than in the Ä150
Windscreen wipersLights and windscreen wipers
Page 154 of 497
position, causing the windscreen wiper to
wipe more frequently.
If the wiper blades are worn, the windscreen
will no longer be wiped properly. This could
prevent you from observing the traffic condi-
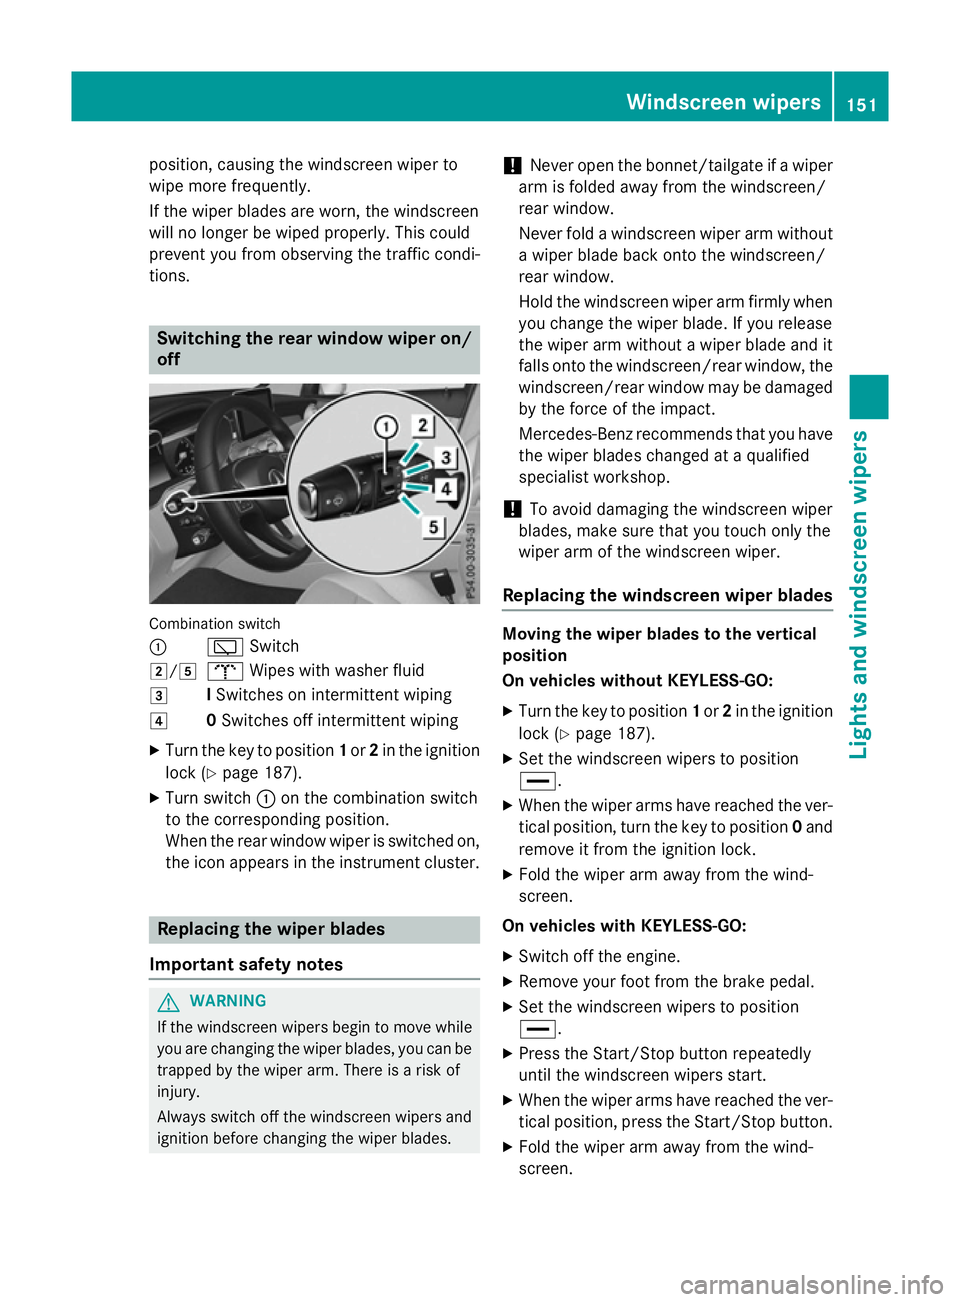
tions. Switching the rear window wiper on/
off Combination switch
:
èSwitch
2/5 bWipes with washer fluid
3 ISwitches on intermittent wiping
4 0Switches off intermittent wiping
X Turn the key to position 1or 2in the ignition
lock (Y page 187).
X Turn switch :on the combination switch
to the corresponding position.
When the rear window wiper is switched on,
the icon appears in the instrument cluster. Replacing the wiper blades
Important safety notes G
WARNING
If the windscreen wipers begin to move while
you are changing the wiper blades, you can be trapped by the wiper arm. There is a risk of
injury.
Always switch off the windscreen wipers and
ignition before changing the wiper blades. !
Never open the bonnet/tailgate if a wiper
arm is folded away from the windscreen/
rear window.
Never fold a windscreen wiper arm without a wiper blade back onto the windscreen/
rear window.
Hold the windscreen wiper arm firmly when
you change the wiper blade. If you release
the wiper arm without a wiper blade and it
falls onto the windscreen/rear window, the windscreen/rear window may be damaged
by the force of the impact.
Mercedes-Benz recommends that you have the wiper blades changed at a qualified
specialist workshop.
! To avoid damaging the windscreen wiper
blades, make sure that you touch only the
wiper arm of the windscreen wiper.
Replacing the windscreen wiper blades Moving the wiper blades to the vertical
position
On vehicles without KEYLESS-GO:
X Turn the key to position 1or 2in the ignition
lock (Y page 187).
X Set the windscreen wipers to position
°.
X When the wiper arms have reached the ver-
tical position, turn the key to position 0and
remove it from the ignition lock.
X Fold the wiper arm away from the wind-
screen.
On vehicles with KEYLESS-GO:
X Switch off the engine.
X Remove your foot from the brake pedal.
X Set the windscreen wipers to position
°.
X Press the Start/Stop button repeatedly
until the windscreen wipers start.
X When the wiper arms have reached the ver-
tical position, press the Start/Stop button.
X Fold the wiper arm away from the wind-
screen. Windscreen wipers
151Lights and windscreen wipers Z
Page 157 of 497
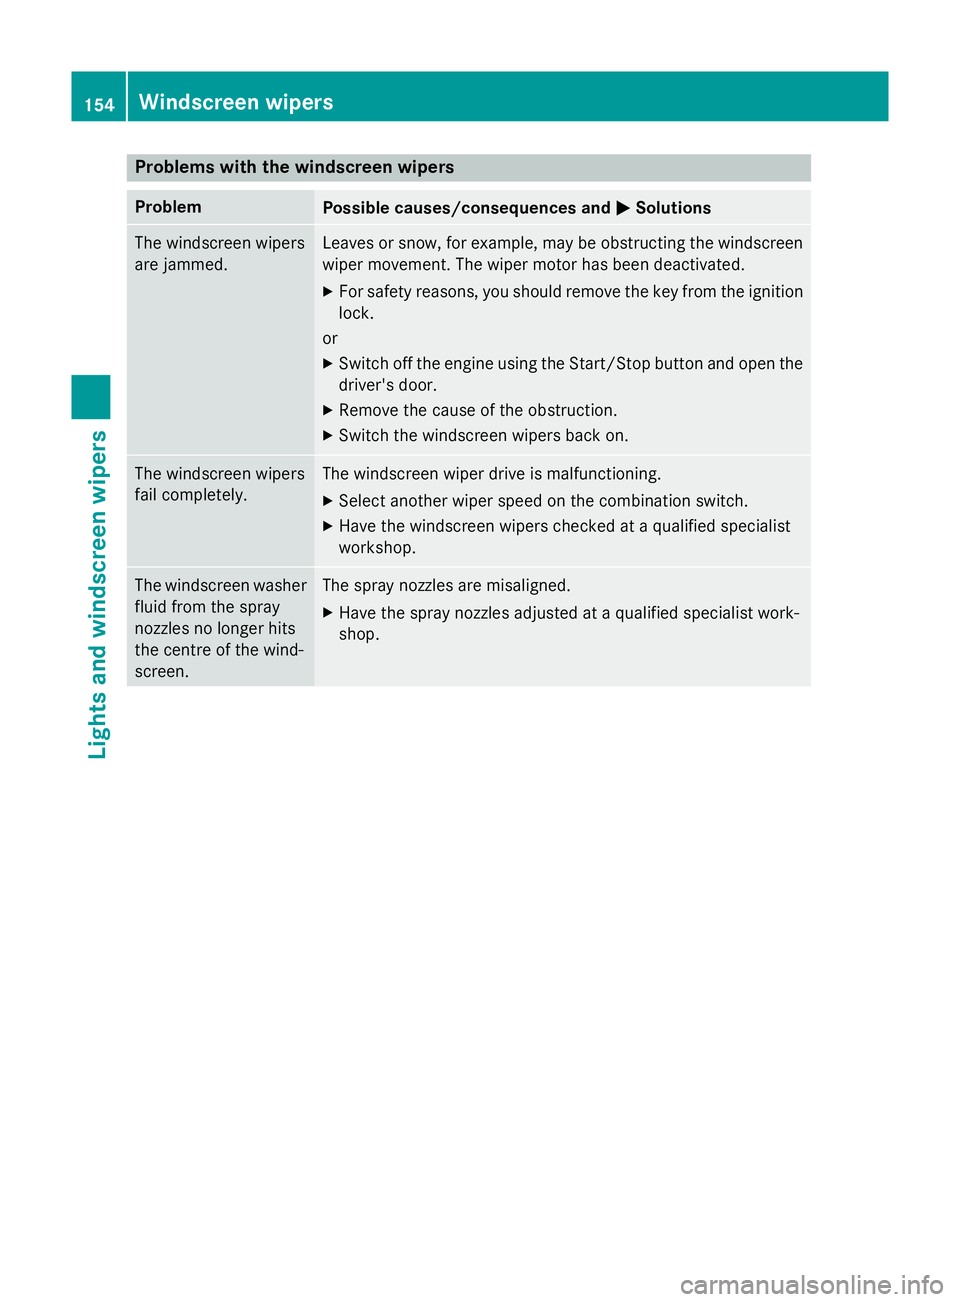
Problems with the windscreen wipers
Problem
Possible causes/consequences and
M
MSolutions The windscreen wipers
are jammed. Leaves or snow, for example, may be obstructing the windscreen
wiper movement. The wiper motor has been deactivated.
X For safety reasons, you should remove the key from the ignition
lock.
or
X Switch off the engine using the Start/Stop button and open the
driver's door.
X Remove the cause of the obstruction.
X Switch the windscreen wipers back on. The windscreen wipers
fail completely. The windscreen wiper drive is malfunctioning.
X Select another wiper speed on the combination switch.
X Have the windscreen wipers checked at a qualified specialist
workshop. The windscreen washer
fluid from the spray
nozzles no longer hits
the centre of the wind-
screen. The spray nozzles are misaligned.
X Have the spray nozzles adjusted at a qualified specialist work-
shop. 154
Windscreen wipersLights and windscreen wipers
Page 377 of 497
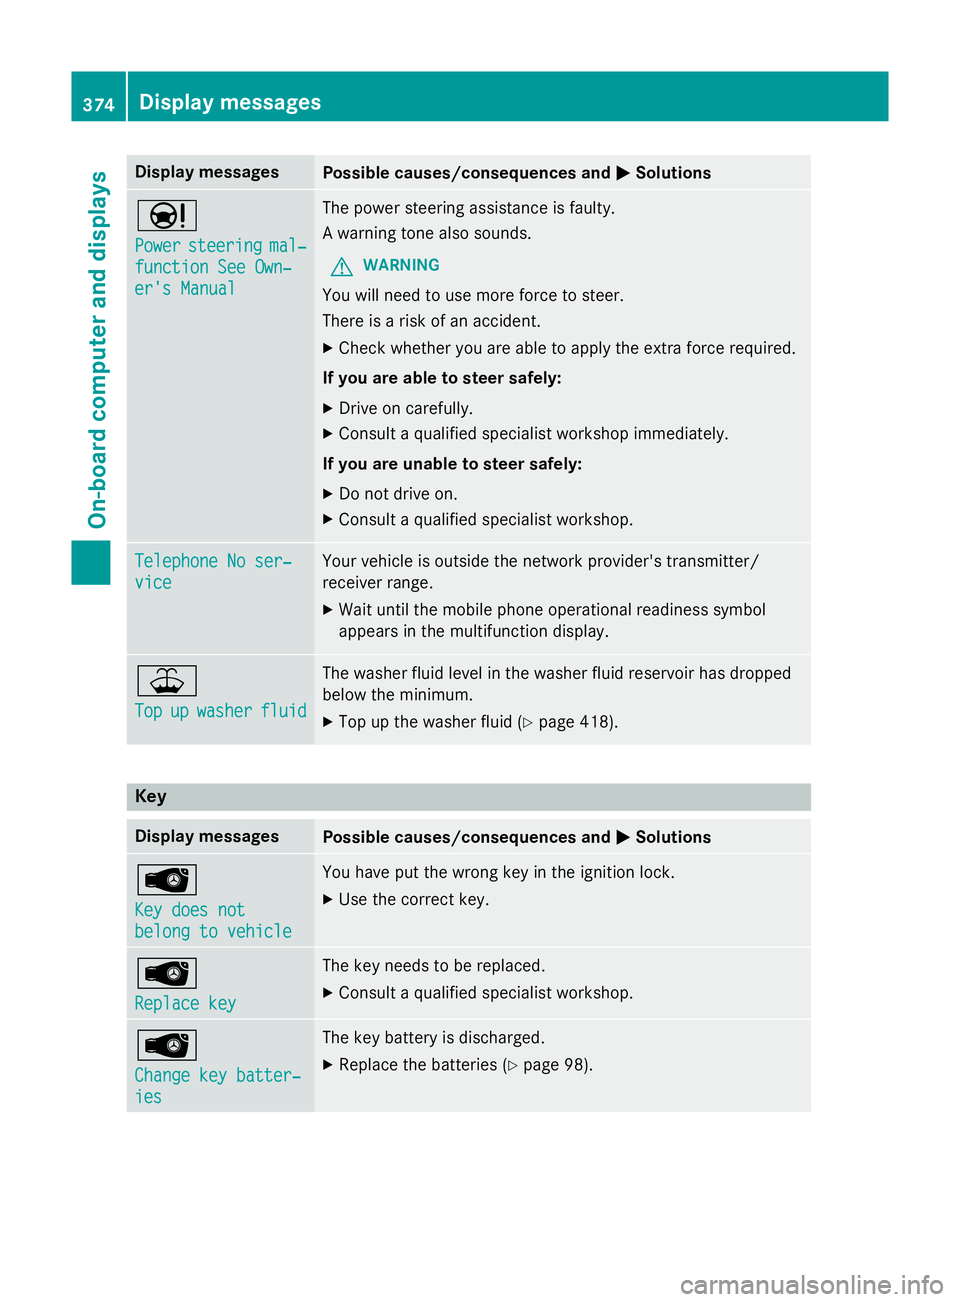
Display messages
Possible causes/consequences and
M
MSolutions Ð
Power Power
steering
steering mal‐
mal‐
function See Own‐
function See Own‐
er's Manual er's Manual The power steering assistance is faulty.
A warning tone also sounds.
G WARNING
You will need to use more force to steer.
There is a risk of an accident. X Check whether you are able to apply the extra force required.
If you are able to steer safely: X Drive on carefully.
X Consult a qualified specialist workshop immediately.
If you are unable to steer safely:
X Do not drive on.
X Consult a qualified specialist workshop. Telephone No ser‐ Telephone No ser‐
vice vice Your vehicle is outside the network provider's transmitter/
receiver range.
X Wait until the mobile phone operational readiness symbol
appears in the multifunction display. ¥
Top Top
up
upwasher
washer fluid
fluid The washer fluid level in the washer fluid reservoir has dropped
below the minimum.
X Top up the washer fluid (Y page 418).Key
Display messages
Possible causes/consequences and
M MSolutions Â
Key does not Key does not
belong to vehicle belong to vehicle You have put the wrong key in the ignition lock.
X Use the correct key. Â
Replace key Replace key The key needs to be replaced.
X Consult a qualified specialist workshop. Â
Change key batter‐ Change key batter‐
ies ies The key battery is discharged.
X Replace the batteries (Y page 98).374
Display
messagesOn-board computer and displays
Page 421 of 497
Let the engine cool down before you open the
cap. Wear gloves and eye protection. Open
the cap slowly to release the pressure. X
Park the vehicle on a level surface.
Only check the coolant level if the vehicle is
on a level surface and the engine has
cooled down.
X Turn the key to position 2in the ignition
lock (Y page 187).
or
X On vehicles with KEYLESS-GO, press the
Start/Stop button twice (Y page 187).
X Check the coolant temperature display in
the instrument cluster (Y page 313).
The coolant temperature must be below
70 †.
X Turn the key to position 0(Y page 187).
or
X On vehicles with KEYLESS-GO, pull the
Start/Stop button from the ignition lock
(Y page 187).
X Slowly turn cap :half a turn anti-clock-
wise to allow excess pressure to escape.
X Turn cap :further anti-clockwise and
remove it.
If the coolant is at the level of marker bar =
in the filler neck when cold, there is enough
coolant in coolant expansion tank ;.
If the coolant level is approximately 1.5 cm above marker bar =in the filler neck when
warm, there is enough coolant in coolant
expansion tank ;. X
If necessary, top up with coolant that has
been tested and approved by Mercedes-
Benz.
X Replace cap :and turn it clockwise as far
as it will go.
Further information on coolant (Y page 487).
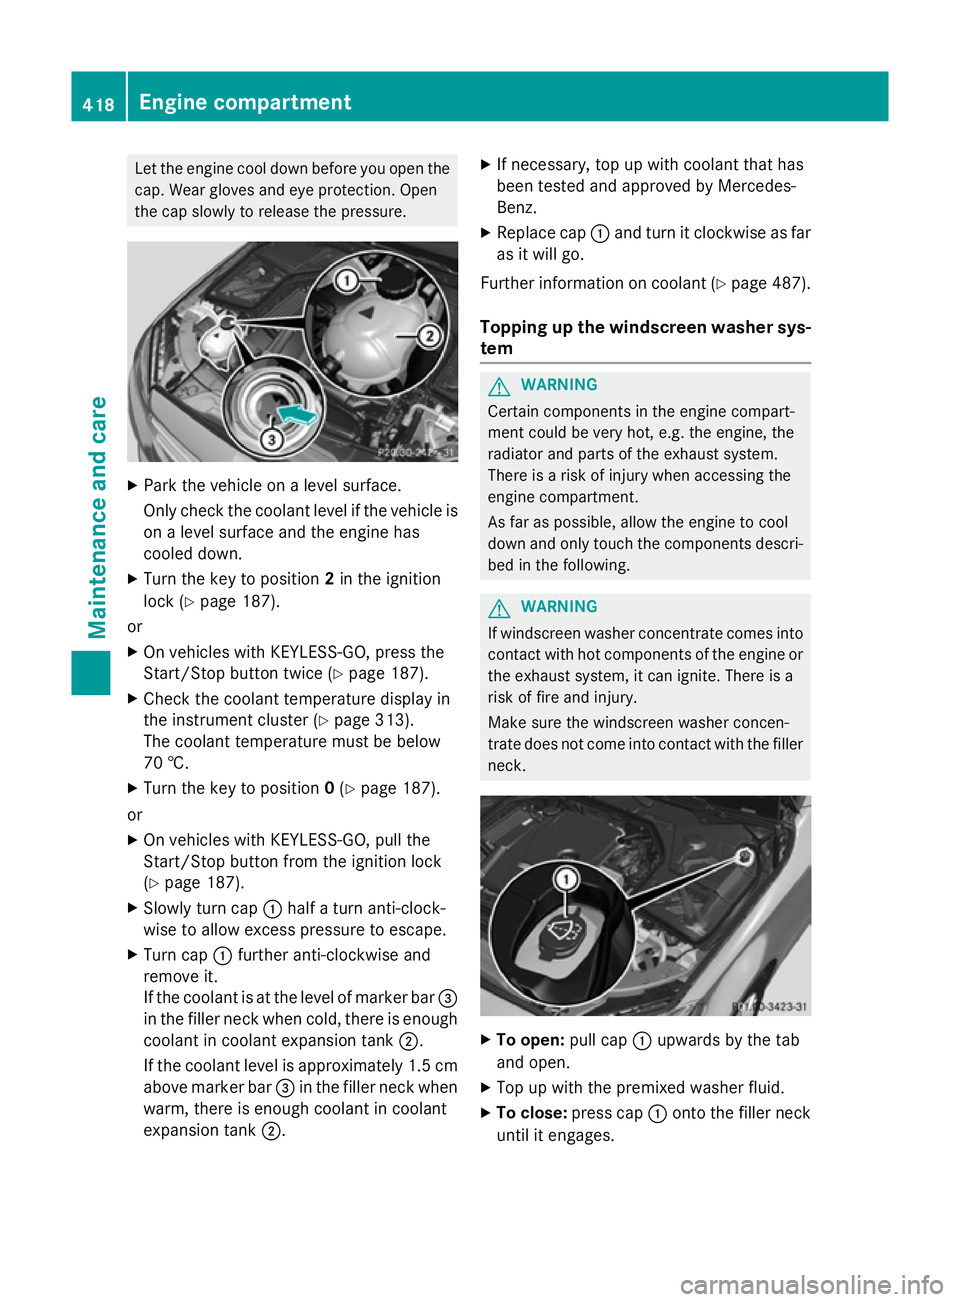
Topping up the windscreen washer sys- tem G
WARNING
Certain components in the engine compart-
ment could be very hot, e.g. the engine, the
radiator and parts of the exhaust system.
There is a risk of injury when accessing the
engine compartment.
As far as possible, allow the engine to cool
down and only touch the components descri- bed in the following. G
WARNING
If windscreen washer concentrate comes into contact with hot components of the engine or
the exhaust system, it can ignite. There is a
risk of fire and injury.
Make sure the windscreen washer concen-
trate does not come into contact with the filler neck. X
To open: pull cap:upwards by the tab
and open.
X Top up with the premixed washer fluid.
X To close: press cap :onto the filler neck
until it engages. 418
Engine compartmentMaintenance and care