2015 MERCEDES-BENZ GLC SUV fuse box location
[x] Cancel search: fuse box locationPage 15 of 497

Front-passenger front airbag deac-
tivation
Display message ............................ 349
Front-passenger front airbag deac-
tivation system
Operation ........................................ .57
Problems ......................................... 61
System self-test ...............................59
Fuel
Additives ........................................ 483
Consumption information .............. 484
Consumption statistics .................. 319
Displaying the current consump-
tion ................................................ 318
Displaying the range ...................... 318
Driving tips .................................... 222
E10 ................................................ 482
Fuel gauge ...................................... .34
Grade (petrol) ................................ 482
Important safety notes .................. 481
Low outside temperatures ............ .483
Problem (malfunction) ................... 206
Quality (diesel )............................... 483
Refuelling ....................................... 203
Tank content/reserve fue l............. 482
Fuel filler flap
Opening ......................................... 205
Fuel filter (white display message) .. 356
Fuel level
Calling up the range (on-board
computer) ...................................... 318
Gaug e.............................................. 34
Fuel tank
Capacity ........................................ 482
Problem (malfunction) ................... 206
Fuses
Allocation chart ............................. 451
Before changing ............................. 449
Dashboard fuse box ....................... 449
Fuse box in the engine compart-
ment .............................................. 450
Fuse box in the front-passenger
footwell .......................................... 449
Fuse box in the luggage compart-
ment .............................................. 451
Important safety notes .................. 448 G
Gearshift paddles see Steering wheel gearshift paddles
Genuine Mercedes-Benz parts ........... 25
Glove compartment .......................... 391 H
HANDS-FREE ACCESS ....................... 106
Hazard warning lamps ...................... 141
Head restraint
General notes ................................ 124
Head restraints
Adjusting (electrically) ................... 124
Adjusting (manually) ...................... 124
Adjusting (rear) .............................. 125
Adjusting the fore-and-aft posi-
tion manually ................................. 124
Fitting/removing (rear) .................. 125
Important safety notes .................. 123
Head-up display
Adjusting the brightness ................ 331
Displays and operating .................. 316
Function/note s............................. 315
Important safety notes .................. 316
Selecting displays .......................... 330
Setting the position ....................... 331
Storing settings (memory func-
tion) ............................................... 135
Headlamp
Cleaning system (notes) ................ 487
Headlamp flasher .............................. 141
Headlamps
Misting up ...................................... 144
see Automatic headlamp mode
Heating
see Climate control
High-pressure cleaners .................... 422
High-voltage battery
Battery car e................................... 212
Charging (charging station) ............ 217
Charging (mains socket) ................ 213
Charging (wallbox) ......................... 216
Charging cable heating up ............. 212
Energy consumption ...................... 212
General notes .................................. 45
Method of operation ...................... 211 12
Index
Page 452 of 497

Always replace faulty fuses with specified new
fuses of the correct amperage.
Blown fuses must be replaced with fuses of
the same rating, which you can recognise by
the colour and fuse rating. The fuse ratings
are listed in the fuse allocation chart.
If the newly inserted fuse also blows, have the
cause traced and rectified at a qualified spe-
cialist workshop, e.g. a Mercedes-Benz Ser-
vice Centre.
! Only use fuses that have been approved
for Mercedes-Benz vehicles and which
have the correct fuse rating for the system concerned. Otherwise, components or sys-
tems could be damaged.
The fuses in your vehicle disconnect faulty
circuits. If a fuse blows, all the components on
the circuit and their functions will fail. Before replacing a fuse
Observe the important safety notes
(Y page 448)
X Secure the vehicle against rolling away
(Y page 219).
X Switch off the engine.
X Switch off all electrical consumers.
X Remove the key from the ignition lock.
or, on vehicles with KEYLESS-GO start func-
tion or KEYLESS ‑GO:
X Open the driver's door.
The on-board electronics now have status
0. This is the same as the key having been
removed.
The driver's door can be closed again.
All indicator lamps in the instrument cluster
must be off.
The fuses are located in various fuse boxes:
R fuse box on the driver's side of the dash-
board
R fuse box in the front-passenger footwell R
fuse box in the engine compartment on the
driver's side
R fuse box under the luggage compartment
floor on the right-hand side of the vehicle,
when viewed in the direction of travel
The fuse allocation chart is on the fuse box in
the luggage compartment (Y page 451). Dashboard fuse box
! Do not use a pointed object such as a
screwdriver to open the cover in the dash-
board. You could damage the dashboard or
the cover.
! Make sure that no moisture can enter the
fuse box when the cover is open.
! When closing the cover, make sure that it
is lying correctly on the fuse box. Moisture seeping in or dirt could otherwise impair
the operation of the fuses. X
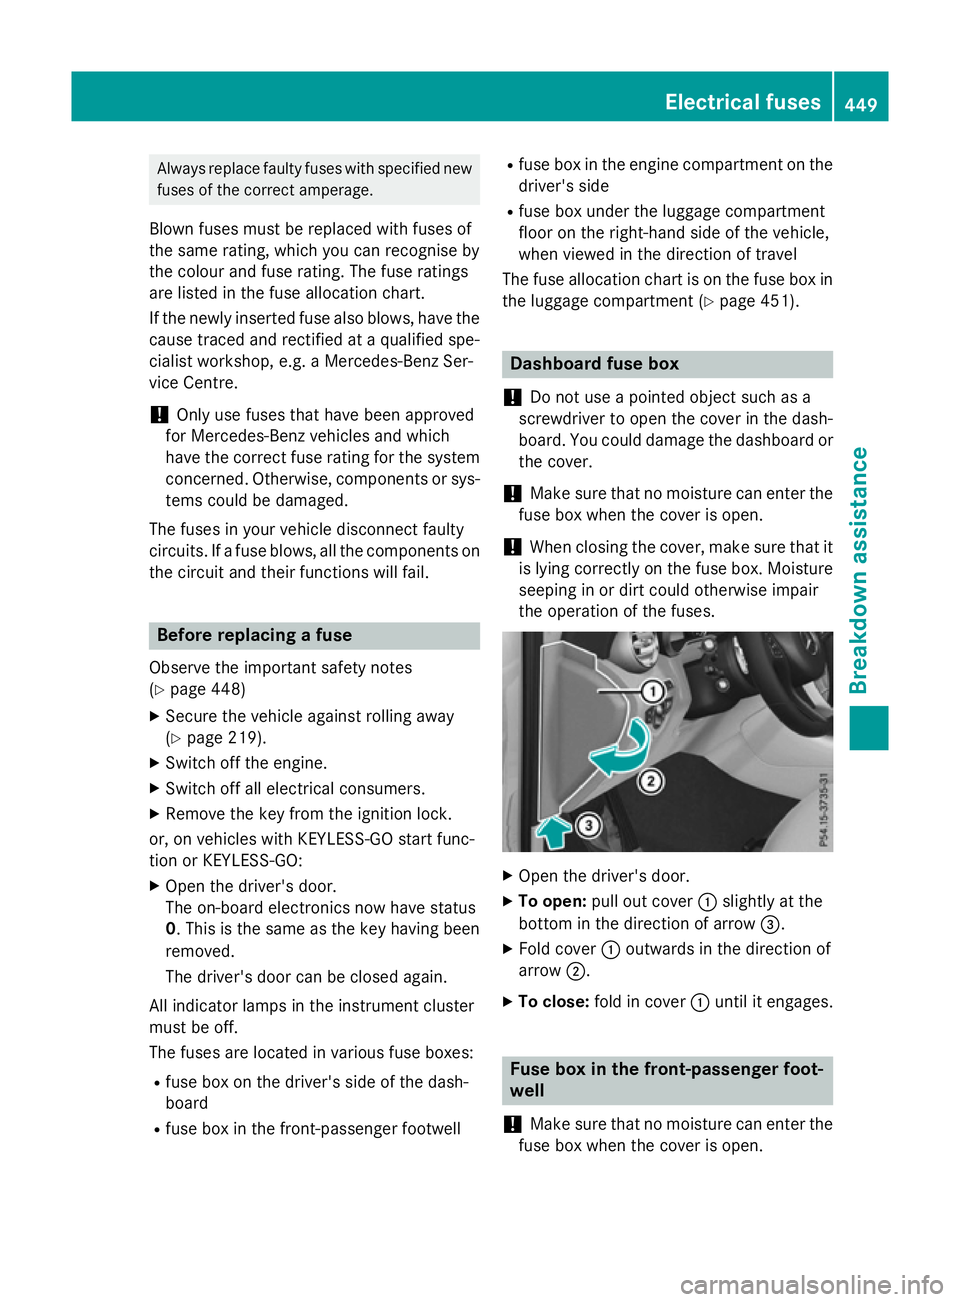
Open the driver's door.
X To open: pull out cover :slightly at the
bottom in the direction of arrow =.
X Fold cover :outwards in the direction of
arrow ;.
X To close: fold in cover :until it engages. Fuse box in the front-passenger foot-
well
! Make sure that no moisture can enter the
fuse box when the cover is open. Electrical fuses
449Breakdown assis tance Z
Page 454 of 497

Fuse box in the luggage compartment
! Make sure that no moisture can enter the
fuse box when the cover is open.
! When closing the cover, make sure that it
is lying correctly on the fuse box. Moisture seeping in or dirt could otherwise impair
the operation of the fuses. X
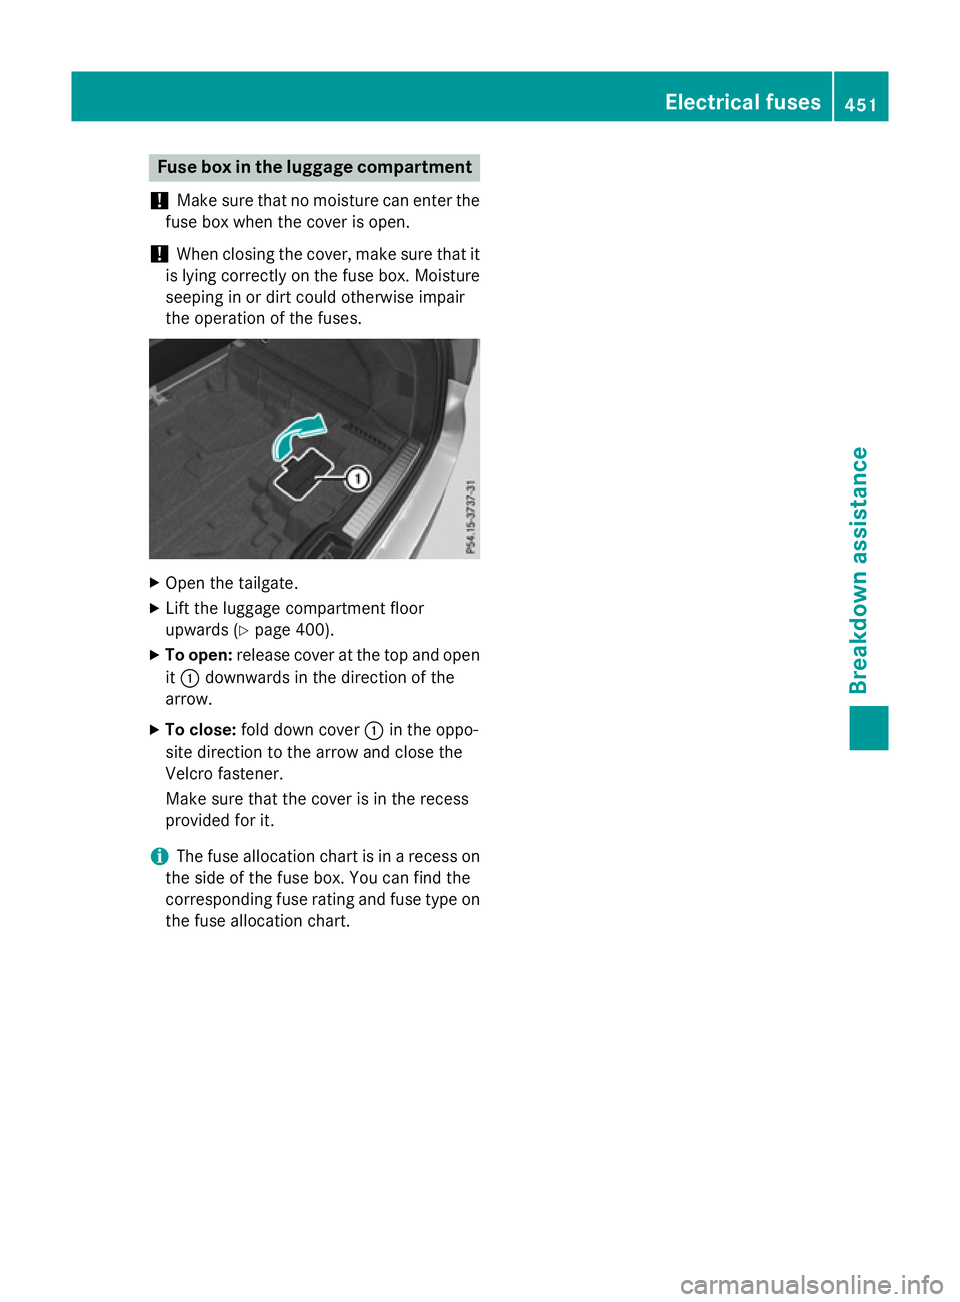
Open the tailgate.
X Lift the luggage compartment floor
upwards (Y page 400).
X To open: release cover at the top and open
it : downwards in the direction of the
arrow.
X To close: fold down cover :in the oppo-
site direction to the arrow and close the
Velcro fastener.
Make sure that the cover is in the recess
provided for it.
i The fuse allocation chart is in a recess on
the side of the fuse box. You can find the
corresponding fuse rating and fuse type on the fuse allocation chart. Electrical fuses
451Breakdown assistance Z