2015 MERCEDES-BENZ GLC SUV clock
[x] Cancel search: clockPage 106 of 497
X
Take the emergency key element out of the
key (Y page 97). X
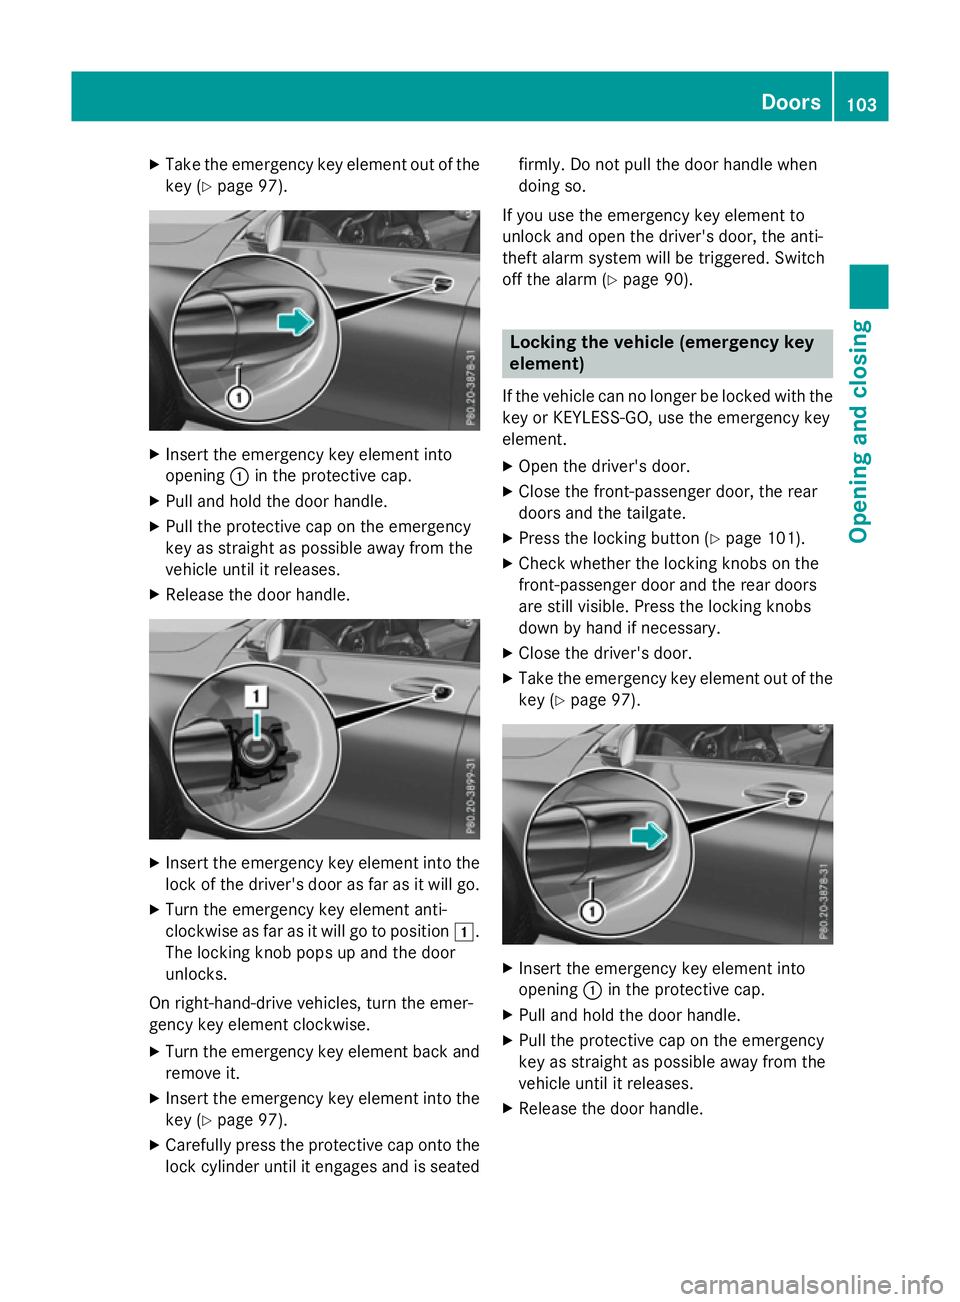
Insert the emergency key element into
opening :in the protective cap.
X Pull and hold the door handle.
X Pull the protective cap on the emergency
key as straight as possible away from the
vehicle until it releases.
X Release the door handle. X
Insert the emergency key element into the
lock of the driver's door as far as it will go.
X Turn the emergency key element anti-
clockwise as far as it will go to position 1.
The locking knob pops up and the door
unlocks.
On right-hand-drive vehicles, turn the emer-
gency key element clockwise.
X Turn the emergency key element back and
remove it.
X Insert the emergency key element into the
key (Y page 97).
X Carefully press the protective cap onto the
lock cylinder until it engages and is seated firmly. Do not pull the door handle when
doing so.
If you use the emergency key element to
unlock and open the driver's door, the anti-
theft alarm system will be triggered. Switch
off the alarm (Y page 90). Locking the vehicle (emergency key
element)
If the vehicle can no longer be locked with the key or KEYLESS-GO, use the emergency key
element.
X Open the driver's door.
X Close the front-passenger door, the rear
doors and the tailgate.
X Press the locking button (Y page 101).
X Check whether the locking knobs on the
front-passenger door and the rear doors
are still visible. Press the locking knobs
down by hand if necessary.
X Close the driver's door.
X Take the emergency key element out of the
key (Y page 97). X
Insert the emergency key element into
opening :in the protective cap.
X Pull and hold the door handle.
X Pull the protective cap on the emergency
key as straight as possible away from the
vehicle until it releases.
X Release the door handle. Doors
103Opening and closing Z
Page 107 of 497
X
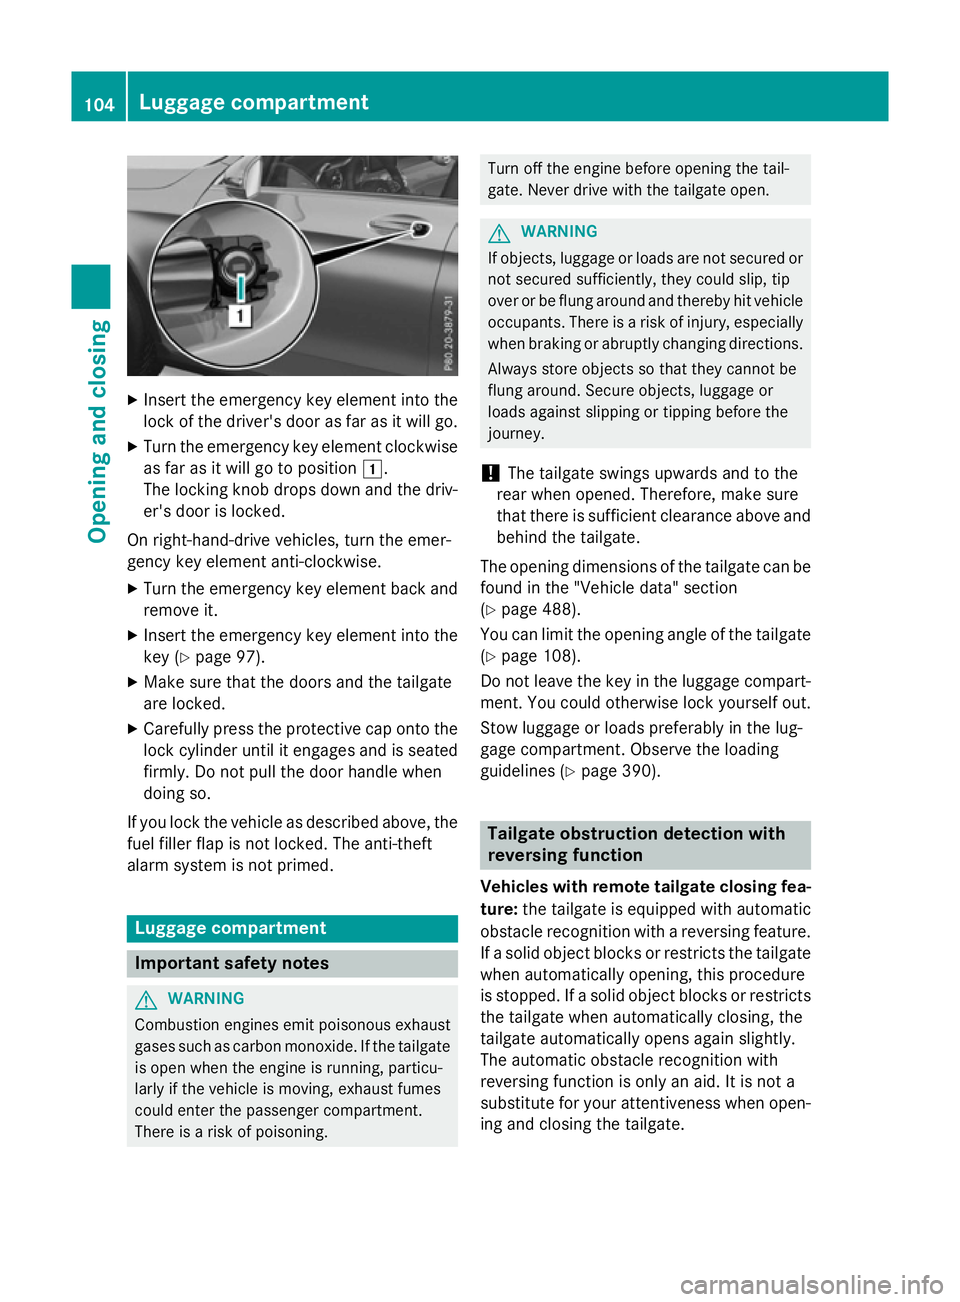
Insert the emergency key element into the
lock of the driver's door as far as it will go.
X Turn the emergency key element clockwise
as far as it will go to position 1.
The locking knob drops down and the driv- er's door is locked.
On right-hand-drive vehicles, turn the emer-
gency key element anti-clockwise.
X Turn the emergency key element back and
remove it.
X Insert the emergency key element into the
key (Y page 97).
X Make sure that the doors and the tailgate
are locked.
X Carefully press the protective cap onto the
lock cylinder until it engages and is seated firmly. Do not pull the door handle when
doing so.
If you lock the vehicle as described above, the
fuel filler flap is not locked. The anti-theft
alarm system is not primed. Luggage compartment
Important safety notes
G
WARNING
Combustion engines emit poisonous exhaust
gases such as carbon monoxide. If the tailgate is open when the engine is running, particu-
larly if the vehicle is moving, exhaust fumes
could enter the passenger compartment.
There is a risk of poisoning. Turn off the engine before opening the tail-
gate. Never drive with the tailgate open. G
WARNING
If objects, luggage or loads are not secured or not secured sufficiently, they could slip, tip
over or be flung around and thereby hit vehicle
occupants. There is a risk of injury, especially when braking or abruptly changing directions.
Always store objects so that they cannot be
flung around. Secure objects, luggage or
loads against slipping or tipping before the
journey.
! The tailgate swings upwards and to the
rear when opened. Therefore, make sure
that there is sufficient clearance above and behind the tailgate.
The opening dimensions of the tailgate can be
found in the "Vehicle data" section
(Y page 488).
You can limit the opening angle of the tailgate
(Y page 108).
Do not leave the key in the luggage compart- ment. You could otherwise lock yourself out.
Stow luggage or loads preferably in the lug-
gage compartment. Observe the loading
guidelines (Y page 390). Tailgate obstruction detection with
reversing function
Vehicles with remote tailgate closing fea- ture: the tailgate is equipped with automatic
obstacle recognition with a reversing feature. If a solid object blocks or restricts the tailgate
when automatically opening, this procedure
is stopped. If a solid object blocks or restricts the tailgate when automatically closing, the
tailgate automatically opens again slightly.
The automatic obstacle recognition with
reversing function is only an aid. It is not a
substitute for your attentiveness when open- ing and closing the tailgate. 104
Luggage compartmentOpening and closing
Page 150 of 497
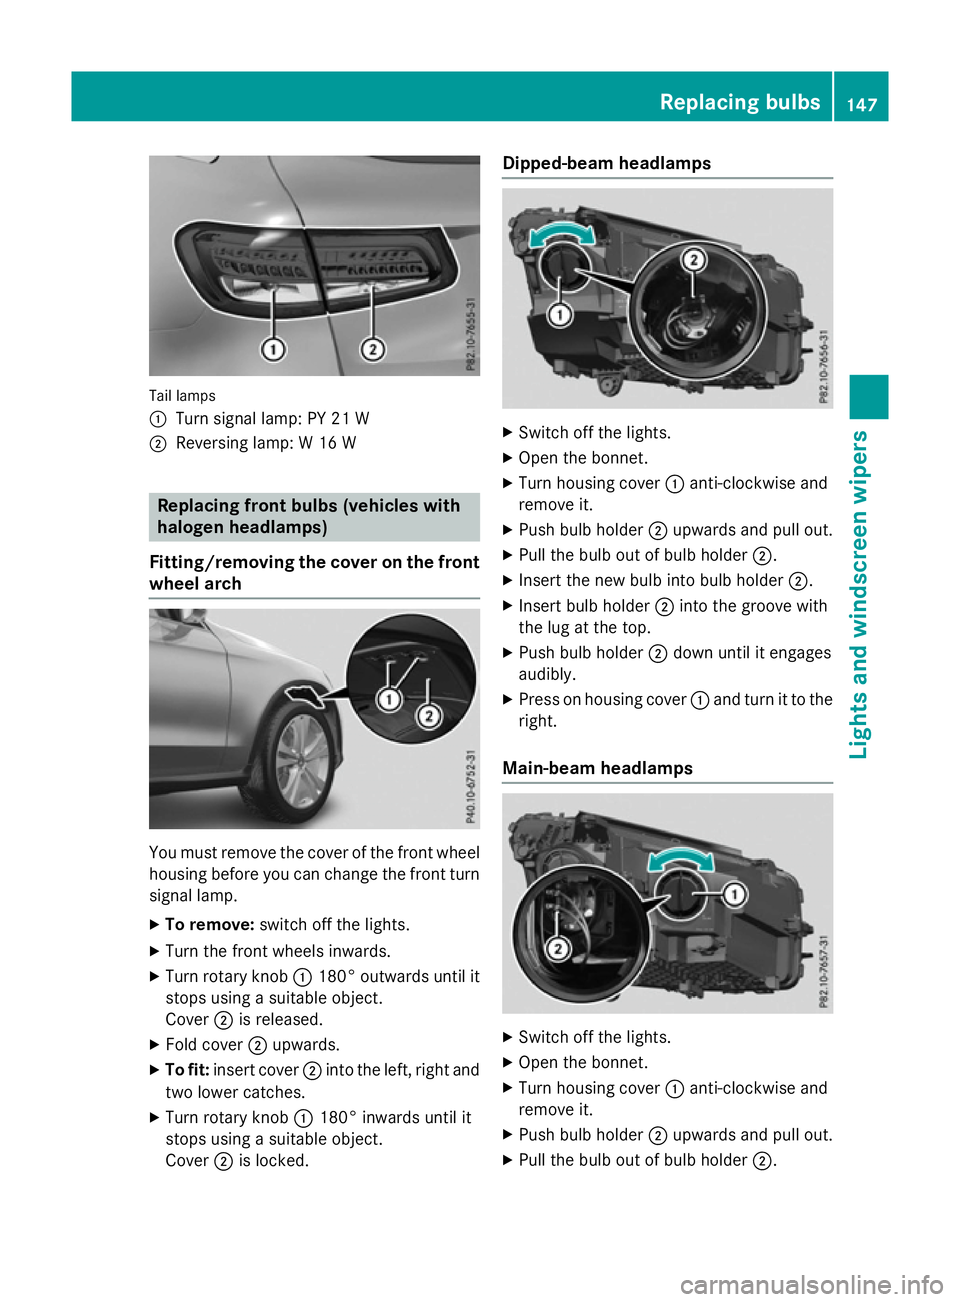
Tail lamps
:
Turn signal lamp: PY 21 W
; Reversing lamp: W 16 W Replacing front bulbs (vehicles with
halogen headlamps)
Fitting/removing the cover on the front wheel arch You must remove the cover of the front wheel
housing before you can change the front turn signal lamp.
X To remove: switch off the lights.
X Turn the front wheels inwards.
X Turn rotary knob :180° outwards until it
stops using a suitable object.
Cover ;is released.
X Fold cover ;upwards.
X To fit: insert cover ;into the left, right and
two lower catches.
X Turn rotary knob :180° inwards until it
stops using a suitable object.
Cover ;is locked. Dipped-beam headlamps
X
Switch off the lights.
X Open the bonnet.
X Turn housing cover :anti-clockwise and
remove it.
X Push bulb holder ;upwards and pull out.
X Pull the bulb out of bulb holder ;.
X Insert the new bulb into bulb holder ;.
X Insert bulb holder ;into the groove with
the lug at the top.
X Push bulb holder ;down until it engages
audibly.
X Press on housing cover :and turn it to the
right.
Main-beam headlamps X
Switch off the lights.
X Open the bonnet.
X Turn housing cover :anti-clockwise and
remove it.
X Push bulb holder ;upwards and pull out.
X Pull the bulb out of bulb holder ;. Replacing bulbs
147Lights and windscreen wipers Z
Page 151 of 497
X
Insert the new bulb into bulb holder ;.
X Insert bulb holder ;into the groove with
the lug at the top.
X Push bulb holder ;down until it engages
audibly.
X Press on housing cover :and turn it to the
right.
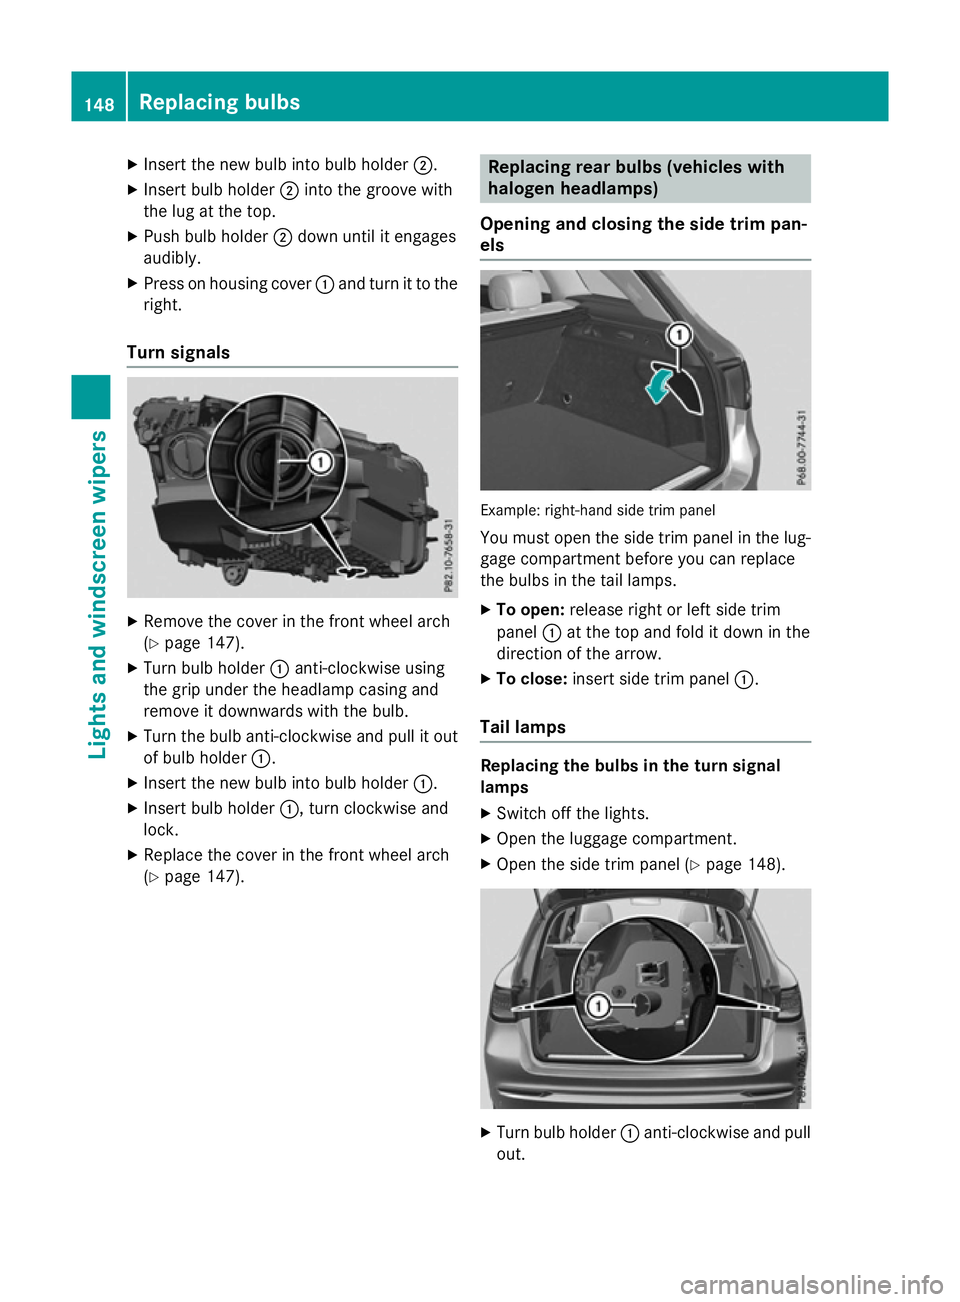
Turn signals X
Remove the cover in the front wheel arch
(Y page 147).
X Turn bulb holder :anti-clockwise using
the grip under the headlamp casing and
remove it downwards with the bulb.
X Turn the bulb anti-clockwise and pull it out
of bulb holder :.
X Insert the new bulb into bulb holder :.
X Insert bulb holder :, turn clockwise and
lock.
X Replace the cover in the front wheel arch
(Y page 147). Replacing rear bulbs (vehicles with
halogen headlamps)
Opening and closing the side trim pan-
els Example: right-hand side trim panel
You must open the side trim panel in the lug-gage compartment before you can replace
the bulbs in the tail lamps.
X To open: release right or left side trim
panel :at the top and fold it down in the
direction of the arrow.
X To close: insert side trim panel :.
Tail lamps Replacing the bulbs in the turn signal
lamps
X Switch off the lights.
X Open the luggage compartment.
X Open the side trim panel (Y page 148). X
Turn bulb holder :anti-clockwise and pull
out. 148
Replacing bulbsLights and windscreen wipers
Page 152 of 497
X
Turn the bulb anti-clockwise, applying
slight pressure, and remove it from the bulb
holder :.
X Insert the new bulb into bulb holder :and
turn it clockwise.
X Insert bulb holder :and turn it clockwise.
X Close the side trim panel (Y page 148).
Replacing reversing lamps
Due to their location, have the bulbs in the
reversing lamp in the tailgate replaced at a
qualified specialist workshop.
X Switch off the lights.
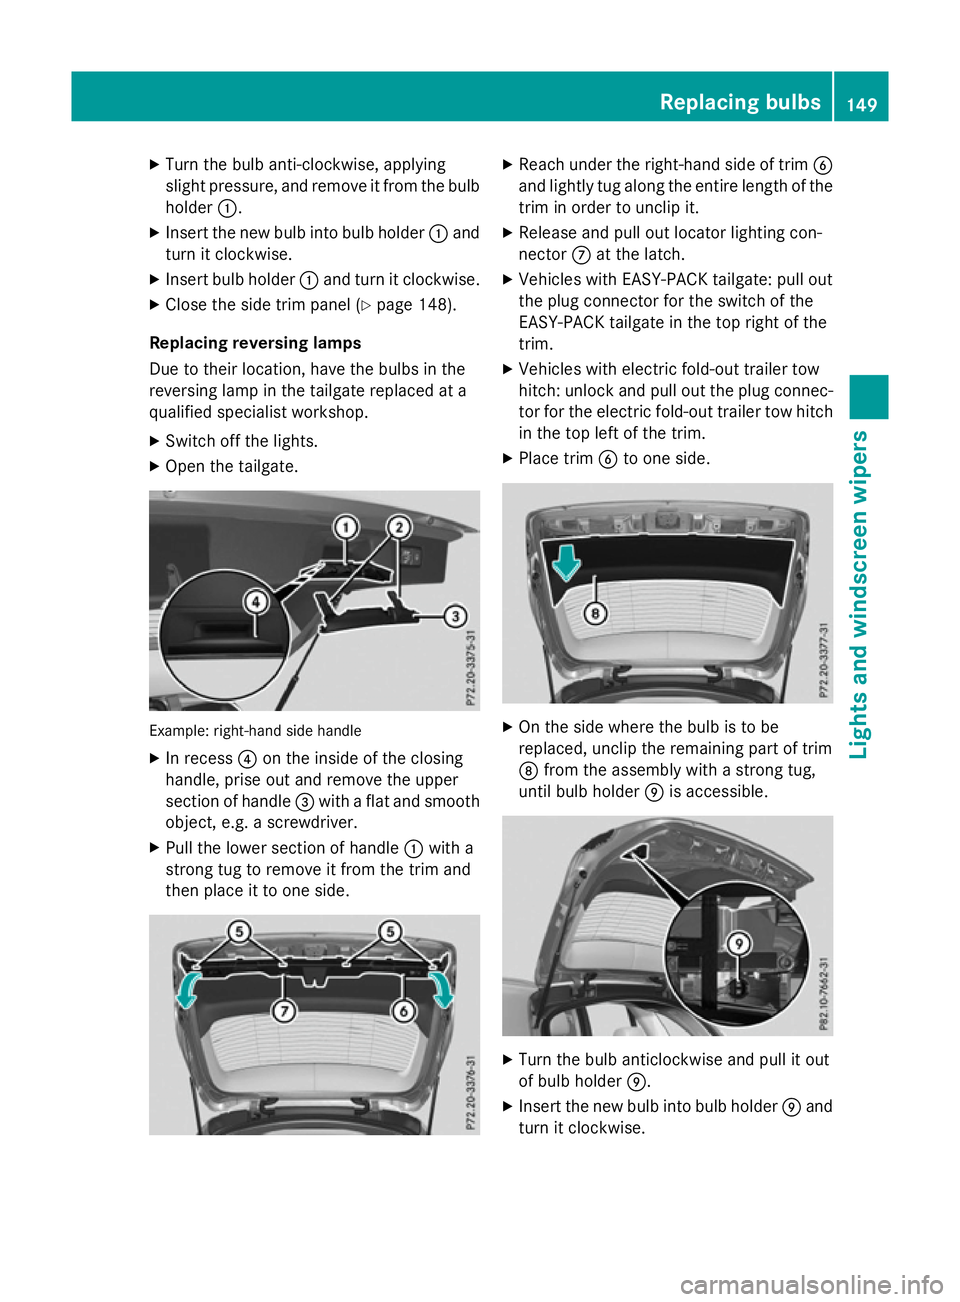
X Open the tailgate. Example: right-hand side handle
X In recess ?on the inside of the closing
handle, prise out and remove the upper
section of handle =with a flat and smooth
object, e.g. a screwdriver.
X Pull the lower section of handle :with a
strong tug to remove it from the trim and
then place it to one side. X
Reach under the right-hand side of trim B
and lightly tug along the entire length of the trim in order to unclip it.
X Release and pull out locator lighting con-
nector Cat the latch.
X Vehicles with EASY-PACK tailgate: pull out
the plug connector for the switch of the
EASY-PACK tailgate in the top right of the
trim.
X Vehicles with electric fold-out trailer tow
hitch: unlock and pull out the plug connec-
tor for the electric fold-out trailer tow hitch
in the top left of the trim.
X Place trim Bto one side. X
On the side where the bulb is to be
replaced, unclip the remaining part of trim
D from the assembly with a strong tug,
until bulb holder Eis accessible. X
Turn the bulb anticlockwise and pull it out
of bulb holder E.
X Insert the new bulb into bulb holder Eand
turn it clockwise. Replacing bulbs
149Lights and windscreen wipers Z
Page 208 of 497
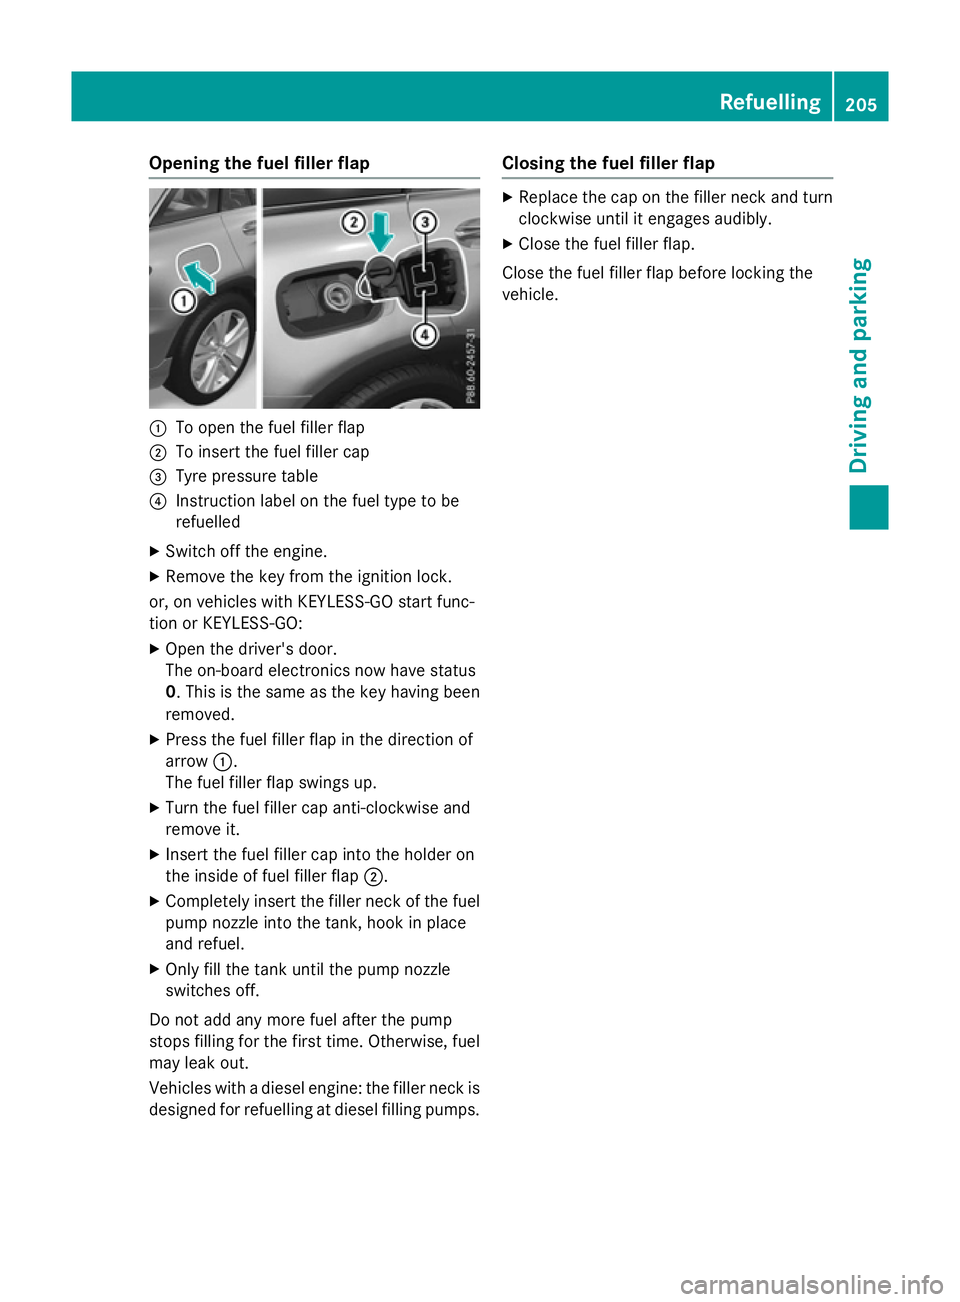
Opening the fuel filler flap
:
To open the fuel filler flap
; To insert the fuel filler cap
= Tyre pressure table
? Instruction label on the fuel type to be
refuelled
X Switch off the engine.
X Remove the key from the ignition lock.
or, on vehicles with KEYLESS-GO start func-
tion or KEYLESS‑ GO:
X Open the driver's door.
The on-board electronics now have status
0. This is the same as the key having been
removed.
X Press the fuel filler flap in the direction of
arrow :.
The fuel filler flap swings up.
X Turn the fuel filler cap anti-clockwise and
remove it.
X Insert the fuel filler cap into the holder on
the inside of fuel filler flap ;.
X Completely insert the filler neck of the fuel
pump nozzle into the tank, hook in place
and refuel.
X Only fill the tank until the pump nozzle
switches off.
Do not add any more fuel after the pump
stops filling for the first time. Otherwise, fuel
may leak out.
Vehicles with a diesel engine: the filler neck is designed for refuelling at diesel filling pumps. Closing the fuel filler flap X
Replace the cap on the filler neck and turn
clockwise until it engages audibly.
X Close the fuel filler flap.
Close the fuel filler flap before locking the
vehicle. Refuelling
205Driving and parking Z
Page 211 of 497
with the vehicle parked on a level surface.
Fluctuations in capacity will thus be avoi-
ded. Filling a vehicle standing on an uneven surface is not permitted. There is a danger
of overfilling, which can cause damage to
BlueTEC exhaust gas aftertreatment com-
ponents.
! Surfaces which have come into contact
with AdBlue ®
while refilling should be
rinsed immediately with water, or remove
AdBlue ®
with a moist cloth and cold water.
If AdBlue ®
has already crystallised, use a
sponge and cold water to clean the area.
AdBlue ®
residue crystallises after a certain
amount of time and soils the affected sur-
faces.
! AdBlue ®
is not a fuel additive and must
not be added to the fuel tank. If AdBlue ®
is
added to the fuel tank, this can lead to
engine damage.
Have the AdBlue ®
tank refilled at a qualified
specialist workshop. However, you can also
top up the AdBlue ®
tank:
R at a filling station with an AdBlue ®
filling
pump
R with AdBlue ®
refill bottles
R with an AdBlue ®
refill canister
When the pump nozzle switches off automat- ically during filling at a filling pump, the
AdBlue ®
tank has been completely filled. Do
not fill the AdBlue ®
tank any further. AdBlue ®
may leak out.
To avoid transporting already opened refill
containers in the vehicle, completely empty
refill bottles or canisters when filling the
AdBlue ®
tank, if possible.
Further information on AdBlue ®
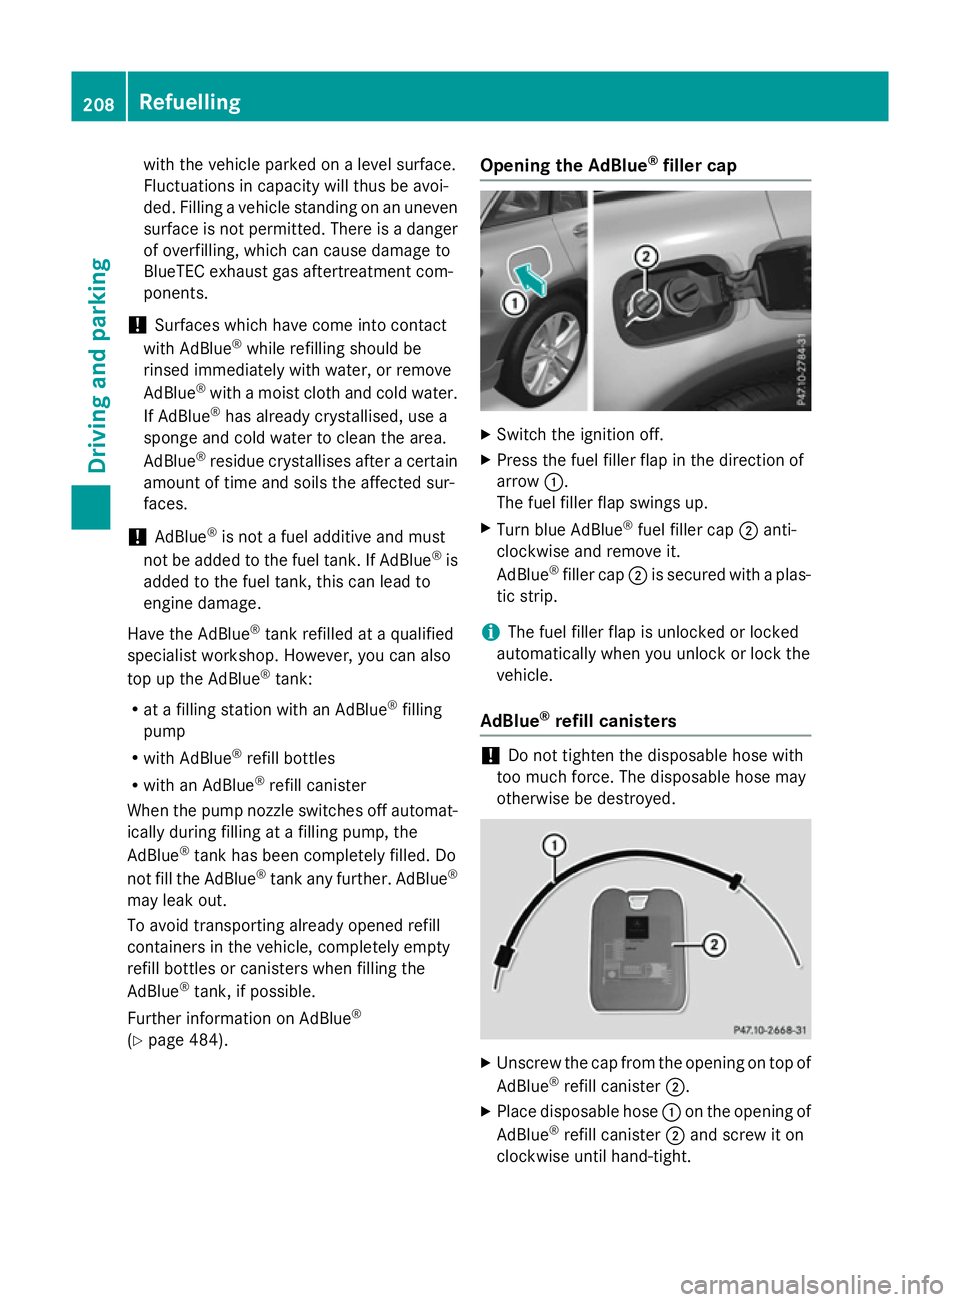
(Y page 484). Opening the AdBlue
®
filler cap X
Switch the ignition off.
X Press the fuel filler flap in the direction of
arrow :.
The fuel filler flap swings up.
X Turn blue AdBlue ®
fuel filler cap ;anti-
clockwise and remove it.
AdBlue ®
filler cap ;is secured with a plas-
tic strip.
i The fuel filler flap is unlocked or locked
automatically when you unlock or lock the
vehicle.
AdBlue ®
refill canisters !
Do not tighten the disposable hose with
too much force. The disposable hose may
otherwise be destroyed. X
Unscrew the cap from the opening on top of
AdBlue ®
refill canister ;.
X Place disposable hose :on the opening of
AdBlue ®
refill canister ;and screw it on
clockwise until hand-tight. 208
RefuellingDriving and parking
Page 212 of 497
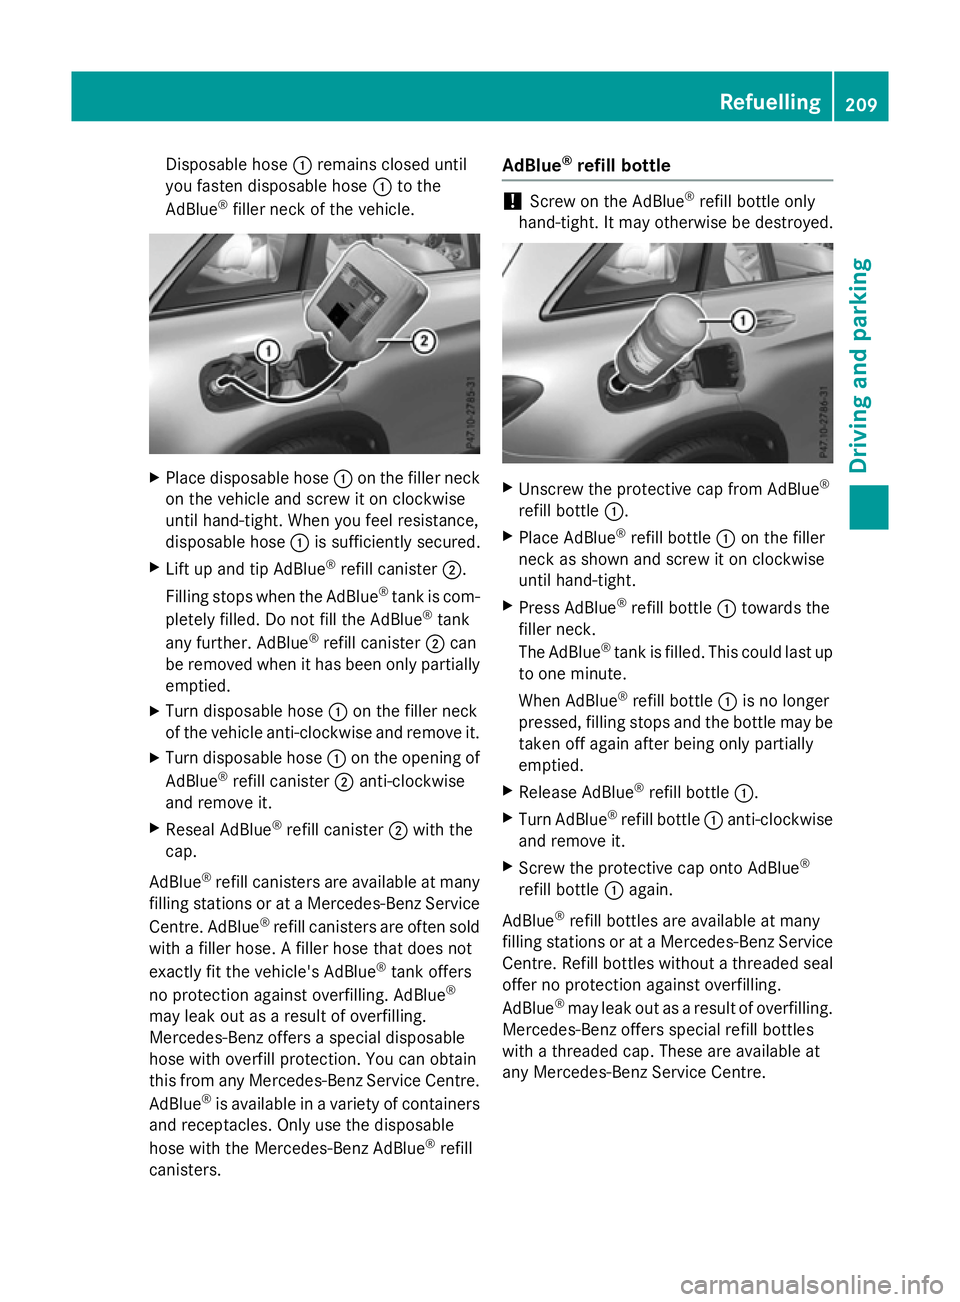
Disposable hose
:remains closed until
you fasten disposable hose :to the
AdBlue ®
filler neck of the vehicle. X
Place disposable hose :on the filler neck
on the vehicle and screw it on clockwise
until hand-tight. When you feel resistance,
disposable hose :is sufficiently secured.
X Lift up and tip AdBlue ®
refill canister ;.
Filling stops when the AdBlue ®
tank is com-
pletely filled. Do not fill the AdBlue ®
tank
any further. AdBlue ®
refill canister ;can
be removed when it has been only partially emptied.
X Turn disposable hose :on the filler neck
of the vehicle anti-clockwise and remove it.
X Turn disposable hose :on the opening of
AdBlue ®
refill canister ;anti-clockwise
and remove it.
X Reseal AdBlue ®
refill canister ;with the
cap.
AdBlue ®
refill canisters are available at many
filling stations or at a Mercedes-Benz Service
Centre. AdBlue ®
refill canisters are often sold
with a filler hose. A filler hose that does not
exactly fit the vehicle's AdBlue ®
tank offers
no protection against overfilling. AdBlue ®
may leak out as a result of overfilling.
Mercedes-Benz offers a special disposable
hose with overfill protection. You can obtain
this from any Mercedes-Benz Service Centre.
AdBlue ®
is available in a variety of containers
and receptacles. Only use the disposable
hose with the Mercedes-Benz AdBlue ®
refill
canisters. AdBlue
®
refill bottle !
Screw on the AdBlue ®
refill bottle only
hand-tight. It may otherwise be destroyed. X
Unscrew the protective cap from AdBlue ®
refill bottle :.
X Place AdBlue ®
refill bottle :on the filler
neck as shown and screw it on clockwise
until hand-tight.
X Press AdBlue ®
refill bottle :towards the
filler neck.
The AdBlue ®
tank is filled. This could last up
to one minute.
When AdBlue ®
refill bottle :is no longer
pressed, filling stops and the bottle may be
taken off again after being only partially
emptied.
X Release AdBlue ®
refill bottle :.
X Turn AdBlue ®
refill bottle :anti-clockwise
and remove it.
X Screw the protective cap onto AdBlue ®
refill bottle :again.
AdBlue ®
refill bottles are available at many
filling stations or at a Mercedes-Benz Service Centre. Refill bottles without a threaded seal
offer no protection against overfilling.
AdBlue ®
may leak out as a result of overfilling.
Mercedes-Benz offers special refill bottles
with a threaded cap. These are available at
any Mercedes-Benz Service Centre. Refuelling
209Driving and parking Z