2015 MERCEDES-BENZ GLC SUV isofix
[x] Cancel search: isofixPage 10 of 497
Matt paintwork .............................. 423
Notes ............................................. 420
Paint ..............................................4 23
Plastic trim ................................... .427
Reversing camera .......................... 425
Roof lining ...................................... 428
Seat belt ........................................ 428
Seat cover ..................................... 427
Sensors ......................................... 425
Side running board ........................ 425
Steering wheel ............................... 427
Trim pieces ................................... .427
Washing by hand ........................... 422
Wheels .......................................... .423
Windows ........................................ 424
Wiper blades .................................. 424
Wooden trim .................................. 427
CD player (on-board computer) ........323
Central locking
Locking/unlocking (key ).................. 95
Centre console
Lower section .................................. 40
Upper section .................................. 39
Changing bulbs
Dipped-beam headlamp s............... 147
Main-beam headlamp s................... 147
Opening and closing the side trim panels ............................................ 148
Reversing lamps ............................ 148
Turn signals (front) ......................... 148
Turn signals (rear) .......................... 148
Changing the media source ............. 322
Charging
see Charging the high-voltage bat-
tery (important safety notes)
Charging cable
Connection .................................... 215
Control panel ................................. 213
Disconnecting ................................ 216
Heating up ..................................... 212
Important safety notes .................. 213
Indicator lamps .............................. 214
Storing ........................................... 213
Charging the high-voltage battery
(important safety notes) ................... 210
Child
Restraint system .............................. 66 Child seat
Forward-facing restraint system ...... 71
ISOFIX .............................................. 67
On the front-passenger sea t............ 69
Rearward-facing restraint system .... 70
Recommendations ........................... 75
Suitable positions ............................ 71
Top Tether ....................................... 68
Child-proof locks
Important safety notes .................... 77
Rear doors ....................................... 77
Cigarette lighter ................................ 405
Cleaning
Mirror turn signal ........................... 424
Trailer tow hitch ............................. 426
Climate control
Auxiliary heating/ventilation .......... 178
Control panel for THERMATIC
automatic climate control (2-
zone) .............................................. 157
Controlling automaticall y............... 164
Convenience opening/closing
(air-recirculation mode) ................. 170
Cooling with air dehumidification .. 162
Demisting the windows .................. 168
Demisting the windscreen ............. 168
ECO start/stop function ................ 162
ECO start/stop function
(THERMATIC 2-zone) ...................... 159
Immediate pre-entry climate con-
trol ................................................. 177
Indicator lamp ................................ 164
Information about using
THERMATIC automatic climate
control (2 ‑zone) ............................. 158
Information on using
THERMOTRONIC automatic cli-
mate control .................................. 161
Ionisation ....................................... 174
Overview of systems ...................... 156
Perfume atomizer .......................... 172
Pre-entry climate control at
departure time ............................... 176
Pre-entry climate control via key ... 174
Problem with the rear window
heating .......................................... 170
Problems with cooling with air
dehumidification ............................ 164 Index
7
Page 16 of 497
Outside temperatures .................... 211
Problems during charging .............. 218
Protective device ........................... 212
Range ............................................ 212
Terms of use ..................................2 12
Vehicle fire ....................................... 45
Hill start assist .................................. 191
HOLD function
Activating ....................................... 248
Activation conditions ..................... 247
Deactivating ................................... 248
Display message ............................ 363
Function/notes ............................ .247
General notes ................................ 247
Horn ...................................................... 32
HUD
see Head-up display
Hybrid drive system
Automatic switch off ........................ 44
Danger of electric shock .................. 44
Display message ............................ 357
General notes .................................. 44
High-voltage battery ........................ 45
Important safety notes .................... 44
Manual switch off ............................ 44
Opening the bonnet ......................... 46
Warning lamp ................................. 377
Hybrid vehicles
Important safety notes .................... 44 I
Ignition lock see Key positions
Immobiliser .......................................... 90
Indicator and warning lamp
Restraint system ............................ 383
Indicator and warning lamps
COLLISION PREVENTION ASSIST
PLUS .............................................. 386
Coolant .......................................... 384
Engine diagnostics ......................... 384
Indicator lamps
Display message ............................ 351
see Warning and indicator lamps
Insect protection on the radiator .... 416
Instrument cluster
Overview .......................................... 34 Warning and indicator lamps ........... 36
Instrument cluster lighting .............. 312
Intelligent Light System
Activating/deactivating ................. 331
Display message ............................ 352
Overview ........................................ 141
Setting the dipped-beam head-
lamps for driving on the right/left .. 332
Interior lighting
Control .......................................... .145
Emergency lighting ........................ 146
Overview ........................................ 145
Reading lamp ................................. 145
Interior motion sensor
Deactivating ..................................... 92
Function .......................................... .91
Priming ............................................ 91
Switching off .................................... 92
ISOFIX child seat securing system ....67 J
Jack Storage location ............................4 32
Using ............................................. 465
Jump starting (engine) ......................443 K
Key Changing the battery ....................... 98
Checking the battery ....................... 98
Convenience closing feature .......... 112
Convenience opening feature ....... .111
Display message ............................ 374
Door central locking/unlocking ....... 95
Emergency key element ................... 97
Important safety notes .................... 94
KEYLESS-GO start function .............. 96
Loss ................................................. 99
Modifying the programming ............. 96
Overview .......................................... 94
Positions (ignition lock) ................. 187
Problem (malfunction) ..................... 99
Starting the engine ........................ 189
Key positions
Key ................................................ 187
Start/Stop button .......................... 187 Index
13
Page 70 of 497
load in an accident. Have the child restraint
securing systems checked in a qualified spe-
cialist workshop before fitting a child restraint
system again.
The securing systems of child restraint sys-
tems are:
R the seat belt system
R the ISOFIX or i-Size securing rings
R the Top Tether anchorages
If it is absolutely necessary to fit a child
restraint system to the front-passenger seat,
always observe the information on "Child
restraint systems on the front-passenger
seat" (Y page 69).
Observe the warning labels in the vehicle inte-
rior and on the child restraint system.
i It is advisable to use Mercedes-Benz care
products to clean child restraint systems
recommended by Mercedes-Benz. You can obtain information about this at any
Mercedes-Benz Service Centre. ISOFIX and i-Size child restraint sys-
tems
G
WARNING
ISOFIX child restraint systems or i-Size child
restraint systems do not offer sufficient pro-
tection for children whose weight is greater
than 22 kg, who are secured using the safety belt integrated in the child restraint system.
The child could, for example, not be restrained
correctly in the event of an accident. This
poses an increased risk of injury or even fatal
injury.
If the child weighs more than 22 kg, only use
ISOFIX child restraint systems or i-Size child
restraint systems with which the child is also
secured with the vehicle seat belt. Also secure the child restraint system with the Top Tether
belt, if available.
When fitting a child restraint system, be sure to observe the manufacturer's installation and operating instructions and the instruc-
tions for correct use of the child restraint sys-
tem (Y page 71).
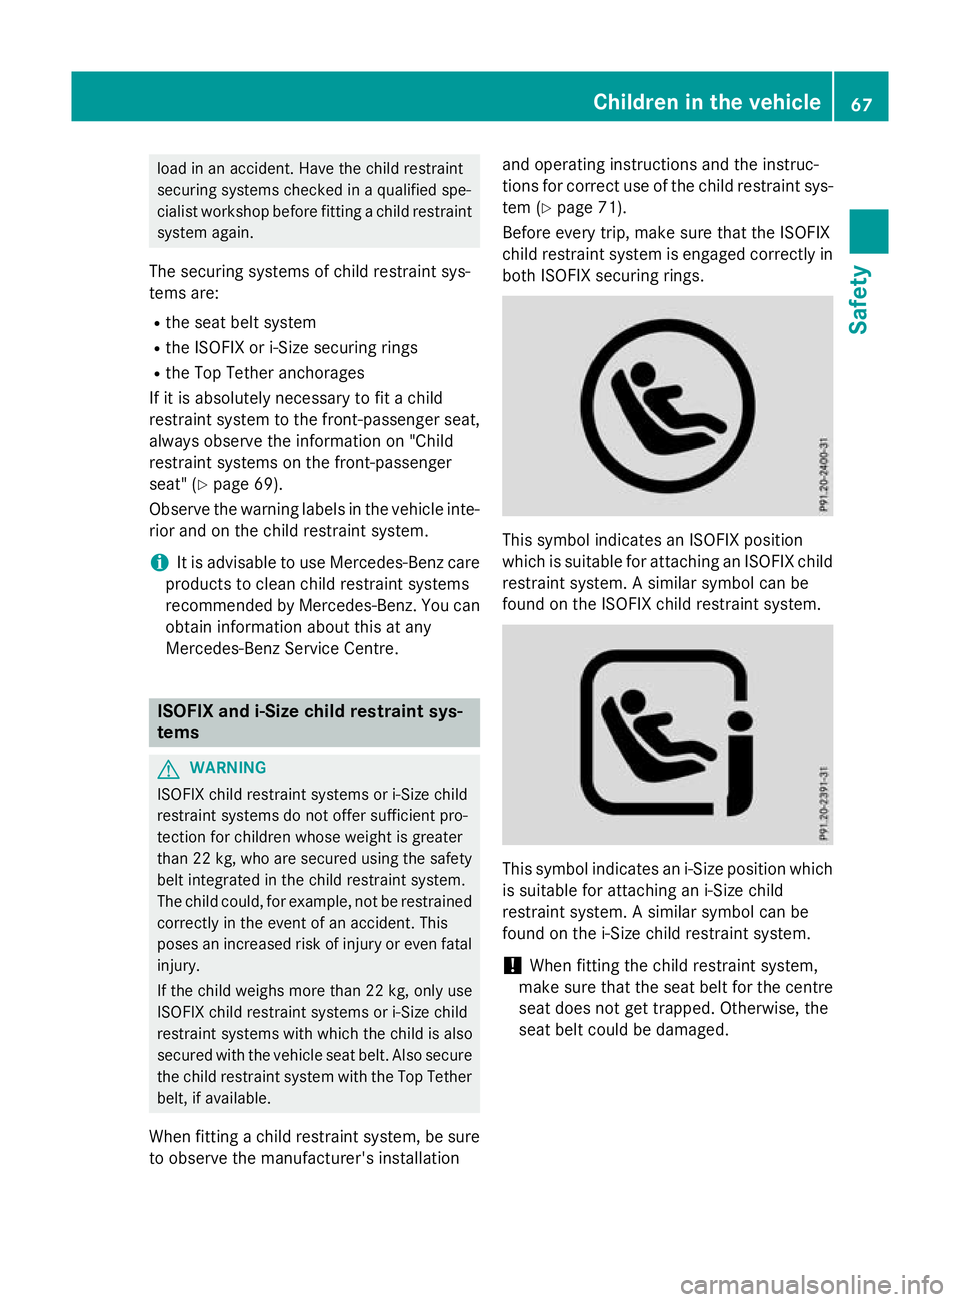
Before every trip, make sure that the ISOFIX
child restraint system is engaged correctly in both ISOFIX securing rings. This symbol indicates an ISOFIX position
which is suitable for attaching an ISOFIX child
restraint system. A similar symbol can be
found on the ISOFIX child restraint system. This symbol indicates an i‑Size position which
is suitable for attaching an i-Size child
restraint system. A similar symbol can be
found on the i-Size child restraint system.
! When fitting the child restraint system,
make sure that the seat belt for the centre
seat does not get trapped. Otherwise, the
seat belt could be damaged. Children in the vehicle
67Safety Z
Page 71 of 497
:
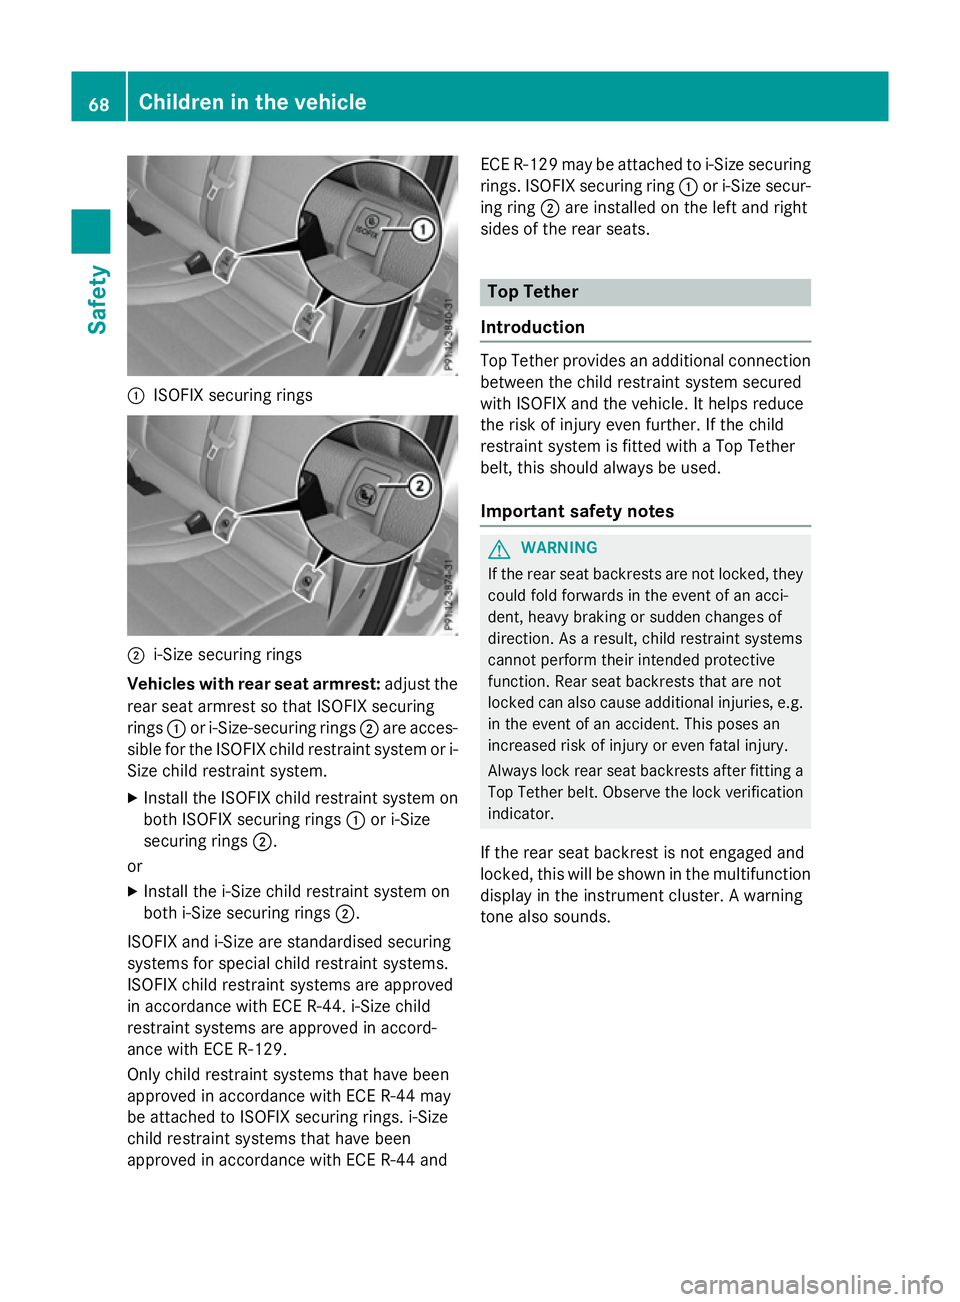
ISOFIX securing rings ;
i-Size securing rings
Vehicles with rear seat armrest: adjust the
rear seat armrest so that ISOFIX securing
rings :or i-Size-securing rings ;are acces-
sible for the ISOFIX child restraint system or i-
Size child restraint system.
X Install the ISOFIX child restraint system on
both ISOFIX securing rings :or i-Size
securing rings ;.
or
X Install the i-Size child restraint system on
both i-Size securing rings ;.
ISOFIX and i-Size are standardised securing
systems for special child restraint systems.
ISOFIX child restraint systems are approved
in accordance with ECE R-44. i-Size child
restraint systems are approved in accord-
ance with ECE R-129.
Only child restraint systems that have been
approved in accordance with ECE R-44 may
be attached to ISOFIX securing rings. i-Size
child restraint systems that have been
approved in accordance with ECE R-44 and ECE R-129 may be attached to i-Size securing
rings. ISOFIX securing ring :or i-Size secur-
ing ring ;are installed on the left and right
sides of the rear seats. Top Tether
Introduction Top Tether provides an additional connection
between the child restraint system secured
with ISOFIX and the vehicle. It helps reduce
the risk of injury even further. If the child
restraint system is fitted with a Top Tether
belt, this should always be used.
Important safety notes G
WARNING
If the rear seat backrests are not locked, they
could fold forwards in the event of an acci-
dent, heavy braking or sudden changes of
direction. As a result, child restraint systems
cannot perform their intended protective
function. Rear seat backrests that are not
locked can also cause additional injuries, e.g. in the event of an accident. This poses an
increased risk of injury or even fatal injury.
Always lock rear seat backrests after fitting a Top Tether belt. Observe the lock verificationindicator.
If the rear seat backrest is not engaged and
locked, this will be shown in the multifunction
display in the instrument cluster. A warning
tone also sounds. 68
Children in the vehicleSafety
Page 72 of 497
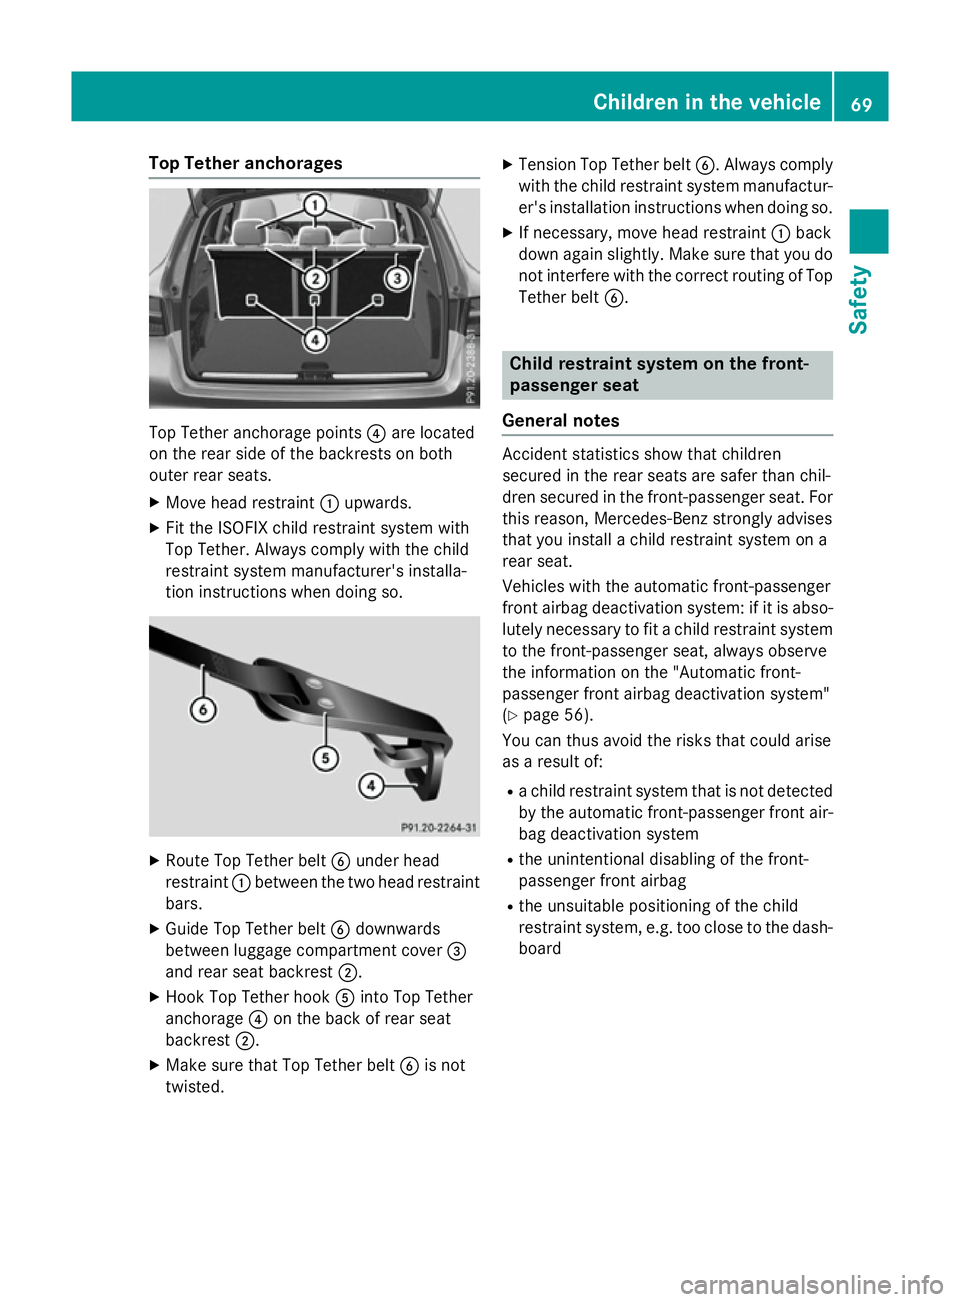
Top Tether anchorages
Top Tether anchorage points
?are located
on the rear side of the backrests on both
outer rear seats.
X Move head restraint :upwards.
X Fit the ISOFIX child restraint system with
Top Tether. Always comply with the child
restraint system manufacturer's installa-
tion instructions when doing so. X
Route Top Tether belt Bunder head
restraint :between the two head restraint
bars.
X Guide Top Tether belt Bdownwards
between luggage compartment cover =
and rear seat backrest ;.
X Hook Top Tether hook Ainto Top Tether
anchorage ?on the back of rear seat
backrest ;.
X Make sure that Top Tether belt Bis not
twisted. X
Tension Top Tether belt B. Always comply
with the child restraint system manufactur- er's installation instructions when doing so.
X If necessary, move head restraint :back
down again slightly. Make sure that you do
not interfere with the correct routing of Top Tether belt B. Child restraint system on the front-
passenger seat
General notes Accident statistics show that children
secured in the rear seats are safer than chil-
dren secured in the front-passenger seat. For
this reason, Mercedes-Benz strongly advises
that you install a child restraint system on a
rear seat.
Vehicles with the automatic front-passenger
front airbag deactivation system: if it is abso- lutely necessary to fit a child restraint system
to the front-passenger seat, always observe
the information on the "Automatic front-
passenger front airbag deactivation system"
(Y page 56).
You can thus avoid the risks that could arise
as a result of:
R a child restraint system that is not detected
by the automatic front-passenger front air- bag deactivation system
R the unintentional disabling of the front-
passenger front airbag
R the unsuitable positioning of the child
restraint system, e.g. too close to the dash-
board Children in the vehicle
69Safety Z
Page 74 of 497
Forward-facing child restraint system
If it is absolutely necessary to fit a forward-
facing child restraint system to the front-
passenger seat, always move the front-
passenger seat as far back as possible. Fully
retract the seat cushion length. The entire
base of the child restraint system must
always rest on the seat cushion of the front-
passenger seat. The backrest of the child
restraint system must, as far as possible, lie
flat against the backrest of the front-
passenger seat. The child restraint system
must not touch the roof or be put under strain
by the head restraint. Adjust the angle of the
seat backrest and the head restraint position accordingly. Always make sure that the shoul-
der belt strap is correctly routed from the
vehicle belt outlet to the shoulder belt guide
on the child restraint system. The shoulder
belt strap must be routed forwards and down- wards from the vehicle belt outlet. If neces-
sary, adjust the vehicle belt outlet and the
front-passenger seat accordingly.
Always observe the information on suitable
positioning of the child restraint system
(Y page 71) in addition to the child restraint
system manufacturer's installation and oper-
ating instructions. Suitable positioning of the child
restraint system
Introduction Only child restraint systems approved in
accordance with the ECE standards ECE R44
or ECE R129 (i-Size child restraint systems)
are permitted for use in the vehicle.
For certain child restraint systems in weight
categories II or III, this can mean that the area
of use is restricted. The maximum size setting of the child restraint system is not possible
due to possible contact with the roof.
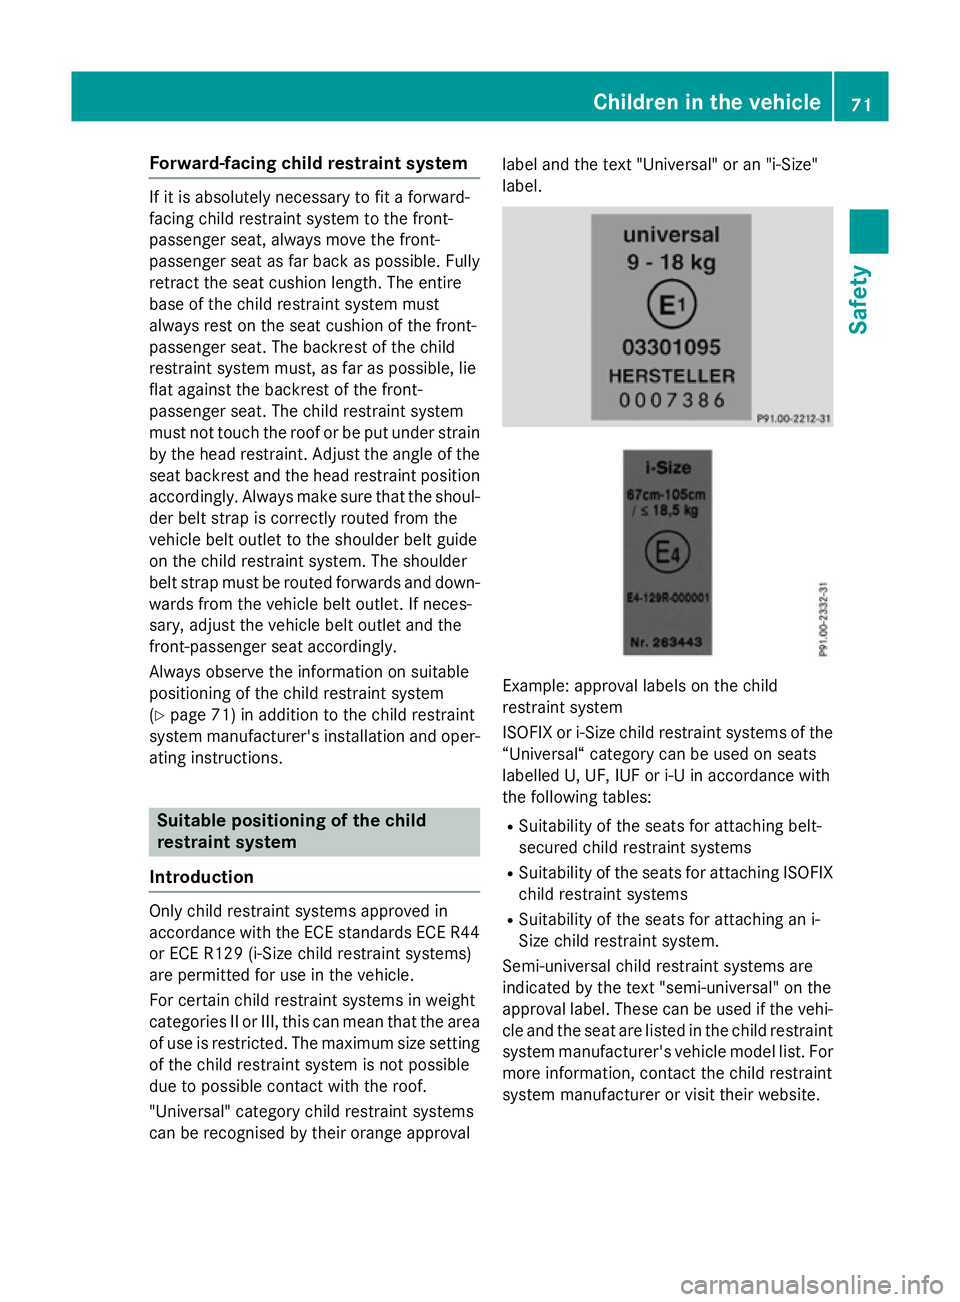
"Universal" category child restraint systems
can be recognised by their orange approval label and the text "Universal" or an "i-Size"
label.
Example: approval labels on the child
restraint system
ISOFIX or i-Size child restraint systems of the
“Universal“ category can be used on seats
labelled U, UF, IUF or i-U in accordance with
the following tables:
R Suitability of the seats for attaching belt-
secured child restraint systems
R Suitability of the seats for attaching ISOFIX
child restraint systems
R Suitability of the seats for attaching an i-
Size child restraint system.
Semi-universal child restraint systems are
indicated by the text "semi-universal" on the
approval label. These can be used if the vehi- cle and the seat are listed in the child restraint
system manufacturer's vehicle model list. For more information, contact the child restraint
system manufacturer or visit their website. Children in the vehicle
71Safety Z
Page 77 of 497
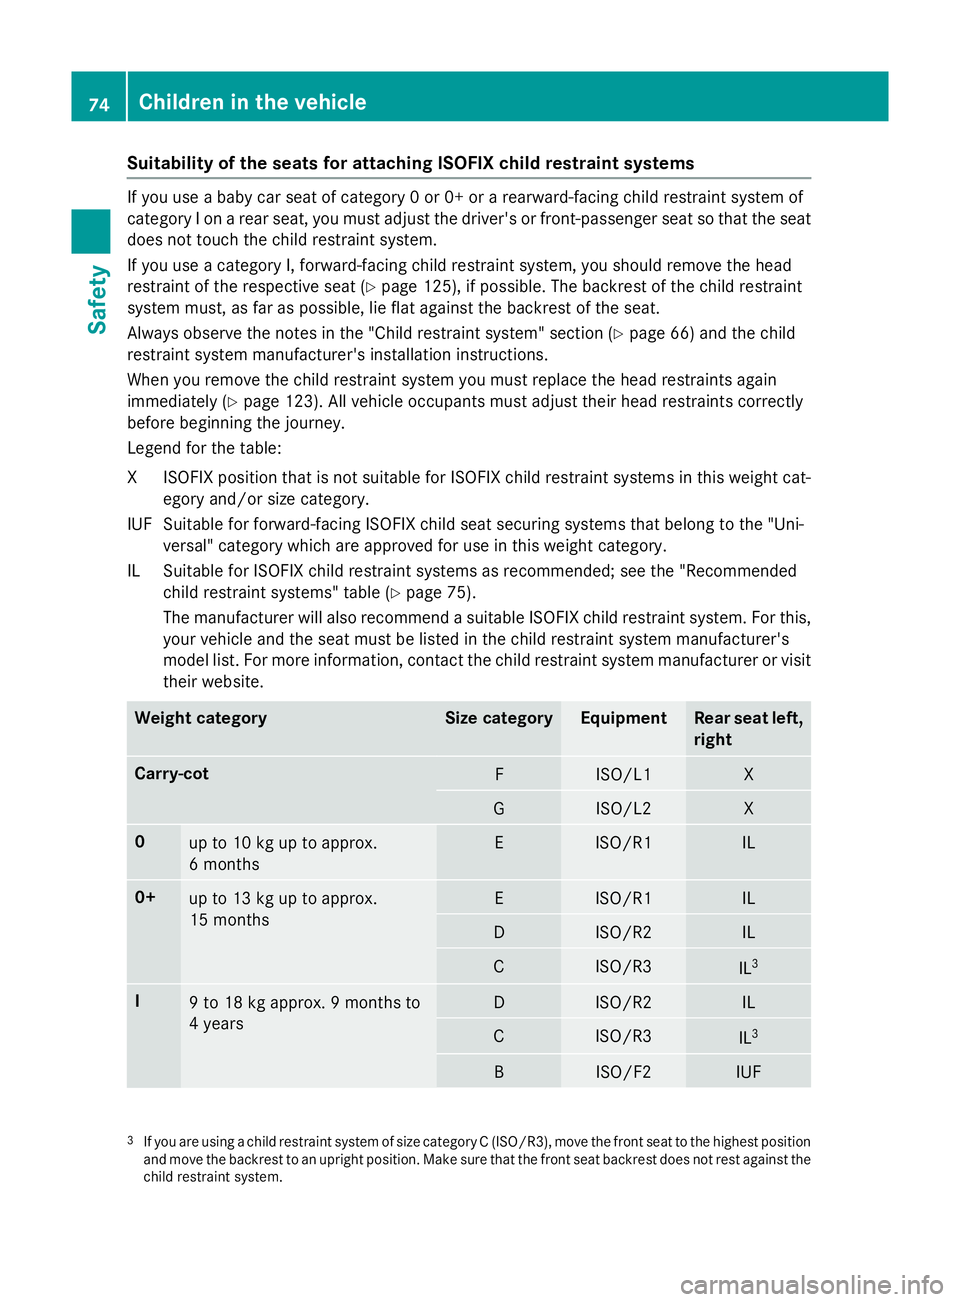
Suitability of the seats for attaching ISOFIX child restraint systems
If you use a baby car seat of category 0 or 0+ or a rearward-facing child restraint system of
category I on a rear seat, you must adjust the driver's or front-passenger seat so that the seat
does not touch the child restraint system.
If you use a category I, forward-facing child restraint system, you should remove the head
restraint of the respective seat (Y page 125), if possible. The backrest of the child restraint
system must, as far as possible, lie flat against the backrest of the seat.
Always observe the notes in the "Child restraint system" section (Y page 66) and the child
restraint system manufacturer's installation instructions.
When you remove the child restraint system you must replace the head restraints again
immediately (Y page 123). All vehicle occupants must adjust their head restraints correctly
before beginning the journey.
Legend for the table:
XI SOFIX position that is not suitable for ISOFIX child restraint systems in this weight cat-
egory and/or size category.
IUF Suitable for forward-facing ISOFIX child seat securing systems that belong to the "Uni- versal" category which are approved for use in this weight category.
IL Suitable for ISOFIX child restraint systems as recommended; see the "Recommended child restraint systems" table (Y page 75).
The manufacturer will also recommend a suitable ISOFIX child restraint system. For this,
your vehicle and the seat must be listed in the child restraint system manufacturer's
model list. For more information, contact the child restraint system manufacturer or visit
their website. Weight category Size category Equipment Rear seat left,
right Carry-cot
F ISO/L1 X
G ISO/L2 X
0
up to 10 kg up to approx.
6 months E ISO/R1 IL
0+
up to 13 kg up to approx.
15 months E ISO/R1 IL
D ISO/R2 IL
C ISO/R3
IL
3 I
9 to 18 kg approx. 9 months to
4 years D ISO/R2 IL
C ISO/R3
IL
3 B ISO/F2 IUF
3
If you are using a child restraint system of size category C (ISO/R3), move the front seat to the highest position
and move the backrest to an upright position. Make sure that the front seat backrest does not rest against the
child restraint system. 74
Children in the vehicleSafety
Page 79 of 497
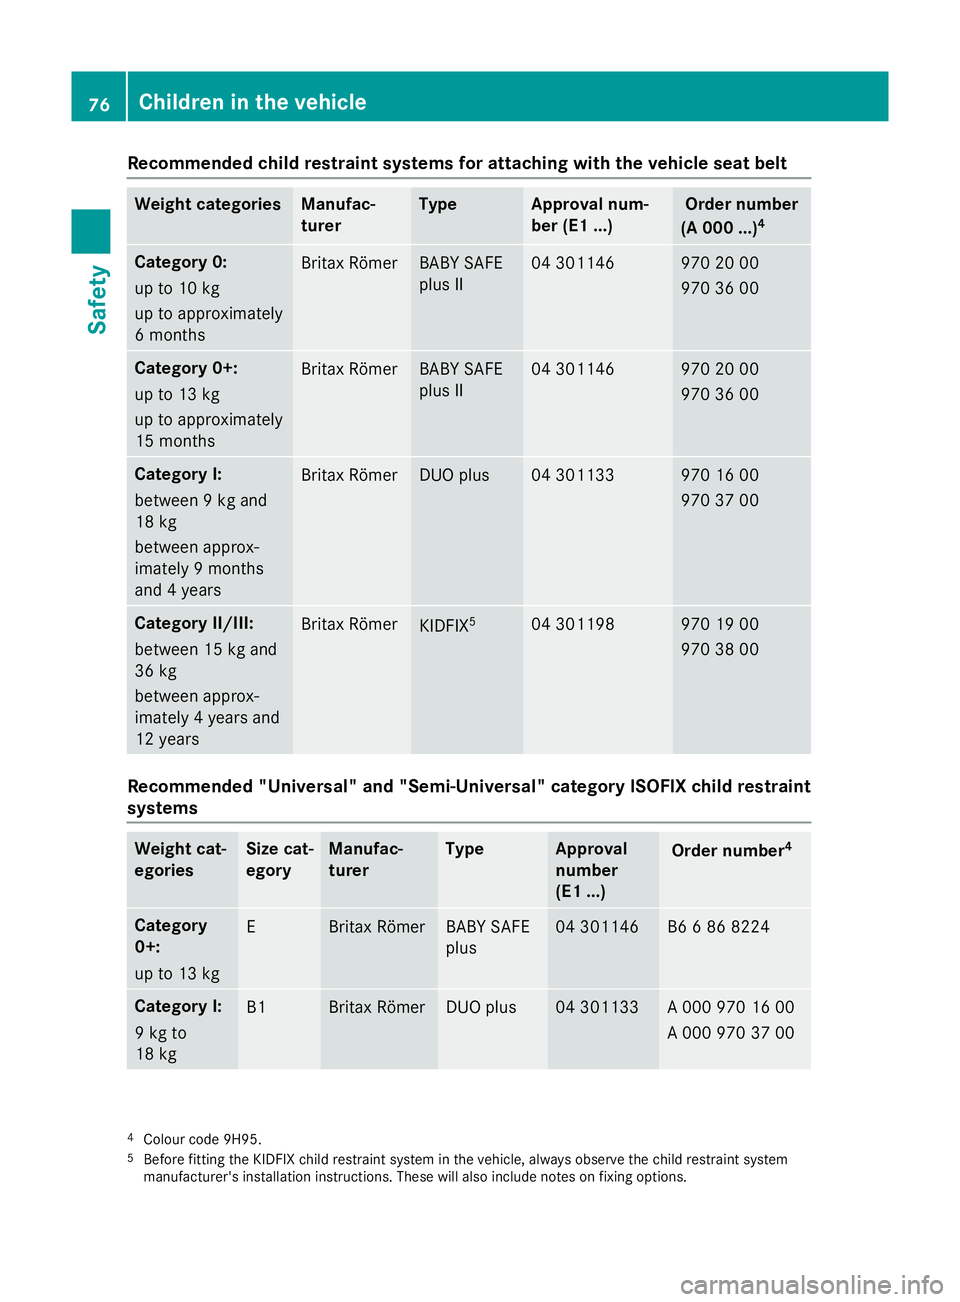
Recommended child restraint systems for attaching with the vehicle seat belt
Weight categories Manufac-
turer Type Approval num-
ber (E1 ...) Order number
(A 000 ...) 4 Category 0:
up to 10 kg
up to approximately
6 months
Britax Römer BABY SAFE
plus II 04 301146 970 20 00
970 36 00
Category 0+:
up to 13 kg
up to approximately
15 months
Britax Römer BABY SAFE
plus II 04 301146 970 20 00
970 36 00
Category I:
between 9 kg and
18 kg
between approx-
imately 9 months
and 4 years
Britax Römer DUO plus 04 301133 970 16 00
970 37 00
Category II/III:
between 15 kg and
36 kg
between approx-
imately 4 years and
12 years
Britax Römer
KIDFIX
5 04 301198 970 19 00
970 38 00
Recommended "Universal" and "Semi-Universal" category ISOFIX child restraint
systems Weight cat-
egories Size cat-
egory Manufac-
turer Type Approval
number
(E1 ...)
Order number
4 Category
0+:
up to 13 kg
E Britax Römer BABY SAFE
plus 04 301146 B6 6 86 8224
Category I:
9 kg to
18 kg
B1 Britax Römer DUO plus 04 301133 A 000 970 16 00
A 000 970 37 00
4
Colour code 9H95.
5 Before fitting the KIDFIX child restraint system in the vehicle, always observe the child restraint system
manufacturer's installation instructions. These will also include notes on fixing options. 76
Children in the vehicleSafety