2015 MERCEDES-BENZ GLC SUV dimensions
[x] Cancel search: dimensionsPage 24 of 497
Stowage compartment
Map pockets ..................................3 92
Stowage compartments
Armrest (under) ............................ .392
Centre console .............................. 391
Cup holder ..................................... 402
Door ............................................... 392
Glove compartment ....................... 391
Important safety information ......... 390
Rear ............................................... 392
Spectacles compartment .............. .391
see Stowage areas
Stowage net ....................................... 392
Stowage space
Stowage net ................................... 392
Summer tyres
In winter ........................................ 456
Sun blind
Rear side windows ......................... 404
Sun visor ............................................ 404
Suspension settings
AIR BODY CONTROL ..................... .253
Switching the auxiliary heating/
ventilation
On/off .......................................... .179 T
Tail lamps see Lights
Tailgate
Display message ............................ 371
Emergency unlocking ..................... 109
Limiting the opening angle ............. 108
Obstruction detectio n.................... 104
Opening dimensions ...................... 488
Opening/closing ............................ 104
Opening/closing (automatically
from inside) ................................... 108
Opening/closing (automatically
from outside) ................................. 105
Opening/closing (manually from
outside) ......................................... 105
Technical data
Capacities ...................................... 480
Emergency spare wheel ................. 476
Information .................................... 478
Trailer load s................................... 491 Tyres/wheels ................................. 468
Vehicle data ................................... 488
Telephone
Accepting a call (multifunction
steering wheel) .............................. 325
Display message ............................ 374
Introduction ................................... 324
Menu (on-board computer) ............ 324
Number from the phone book ........ 325
Redialling ....................................... 326
Rejecting/ending a call ................. 325
Telephone compartment ................ 392
Temperature
Coolant (display in the instrumentcluster) .......................................... 313
Coolant (on-board computer) ......... 327
Outside temperature ...................... 313
Setting (climate control )................ 165
TEMPOMAT
Function/note s............................. 230
TIREFIT kit .......................................... 435
Tyre pressure not reached ............. 436
Tyre pressure reached ................... 437
Top Tether ............................................ 68
Total distance recorder .................... 318
Tow-away protection
Activating ......................................... 91
Deactivating ..................................... 91
Function ........................................... 91
Tow-starting
Emergency engine starting ............ 448
Important safety notes .................. 445
Towing
Important safety notes .................. 445
Notes for 4MATIC vehicles ............ 448
Transporting the vehicle ................ 448
Towing a trailer
Active Blind Spot Assist ................. 283
Active Lane Keeping Assist ............ 286
Active Parking Assist ..................... 257
Axle load, permissibl e.................... 492
ESP ®
(Electronic Stability Pro-
gram) ............................................... 86
Failure check for LEDs ................... 307
General notes ................................ 303
Pulling away with a traile r.............. 191
Swinging out the ball coupling ....... 304 Index
21
Page 25 of 497
Swinging the ball coupling in ......... 306
Trailer tow hitch display message .. 372
Towing away
Fitting the towing eye .................... 447
Removing the towing eye ............... 447
With both axles on the ground ....... 447
Towing eye ......................................... 432
Traffic Sign Assist
Activating ....................................... 275
Activating/deactivating the warn-ing function .................................... 327
Display message ............................ 363
Function/note s............................. 274
Important safety notes .................. 274
Instrument cluster display ............. 275
Trailer coupling
see Towing a trailer
Trailer towing
7-pin connecto r............................. 308
Blind Spot Assist ............................ 278
Cleaning the trailer tow hitch ......... 426
Coupling up a traile r...................... 305
Decoupling a traile r....................... 306
Driving tips .................................... 303
Important safety notes .................. 302
Lights display message .................. 350
Mounting dimensions .................... 490
Parktronic ...................................... 254
Power supply ................................. 307
Problem (fault) ............................... 309
Trailer load s................................... 491
Transfer case ..................................... 203
Transmission
see Automatic transmission
Transmission position display ......... 198
Transmission position display
(DIRECT SELECT lever) ...................... 198
Transporting the vehicle .................. 448
Travelling uphill
Brow of hill ..................................... 230
Driving downhill ............................. 230
Maximum gradient-climbing capa-
bility ............................................... 230
Trim pieces (cleaning instruc-
tions) .................................................. 427
Trip computer (on-board com-
puter) .................................................. 319 Trip meter
Calling up ....................................... 318
Resetting (on-board computer) ...... 319
Turn signals
Changing bulbs (front) ................... 148
Changing bulbs (rear) .................... 148
Switching on/of f........................... 140
TV
Operating (on-board computer) ..... 324
Two-way radio
Frequencies ................................... 478
Installation ..................................... 478
Transmission output (maximum) .... 478
Type identification plate
see Vehicle identification plate
Tyre changing tool kit ....................... 433
Tyre pressure
Calling up (on-board computer) ..... 460
Display message ............................ 367
Not reached (TIREFIT) .................... 436
Reached (TIREFIT) .......................... 437
Recommended ............................... 458
Tyre pressure loss warning
General notes ................................ 459
Important safety notes .................. 459
Restarting ...................................... 460
Tyre pressure monitor
Checking the tyre pressure elec-
tronically ........................................ 461
Function/note s............................. 460
General notes ................................ 460
Important safety notes .................. 461
Radio type approval for the tyre
pressure monitor ........................... 463
Restarting ...................................... 462
Warning lamp ................................. 387
Warning message .......................... 462
Tyres
Changing a whee l.......................... 463
Checking ........................................ 455
Direction of rotation ...................... 464
Display message ............................ 367
General notes ................................ 468
Important safety notes .................. 454
Information on driving .................... 454
MOExtended tyre s......................... 456
Replacing ....................................... 463
Service life ..................................... 455 22
Index
Page 26 of 497
Snow chains .................................. 457
Storing ........................................... 464
Summer tyres in winter ................. 456
Tyre size (data ).............................. 468
Tyre tread ...................................... 455
Wheel and tyre combinations ........ 470
see Flat tyre U
Unlocking Emergency unlocking ..................... 102
From inside the vehicle (central
unlocking button) ........................... 101 V
Vanity mirror (in sun visor) .............. 404
Variable SPEEDTRONIC
see SPEEDTRONIC
Vehicle
Correct use ...................................... 28
Data acquisition ............................... 29
Display message ............................ 369
Electronics ..................................... 478
Equipment ....................................... 26
Implied warranty .............................. 28
Individual settings .......................... 327
Leaving parked up ......................... 222
Locking (in an emergency) ............. 103
Locking (key) ................................... 95
Lowering ........................................ 467
Operating safety .............................. 26
Parking .......................................... 219
Pulling away ................................... 190
Raising ........................................... 465
Registration ..................................... 28
Securing from rolling away ............ 465
Towing away .................................. 445
Transporting .................................. 448
Unlocking (in an emergency) ......... 102
Unlocking (key) ................................ 95
Vehicle data ................................... 488
Vehicle data
Boot load (maximum) ..................... 488
Roof load (maximum) ..................... 488
Vehicle data (off-road driving)
Approach/departure angle ............ 489 Maximum gradient climbing abil-
ity .................................................. 489
Maximum water depth ................... 489
Vehicle dimensions ........................... 488
Vehicle emergency locking .............. 103
Vehicle identification number
see VIN
Vehicle identification plate .............. 480
Vehicle level
AIR BODY CONTROL ...................... 252
Display message ............................ 359
Vehicle tool kit .................................. 432
Video
Operating the DVD ......................... 323
VIN
Seat ............................................... 480
Type plate ...................................... 480 W
Warning and indicator lamps ABS ................................................ 379
Brakes ........................................... 377
Distance warning signal ................. 386
ESP ®
.............................................. 381
ESP ®
OFF ....................................... 383
Fuel tank ........................................ 384
General notes ................................ 375
Hybrid drive system ....................... 377
LIM (cruise control )........................ 231
LIM (DISTRONIC PLUS) .................. 237
LIM (variable SPEEDTRONIC) ......... 234
Overview .......................................... 36
Parking brake ................................ 383
PASSENGER AIR BAG ...................... 48
RBS (Recuperative Brake Sys-
tem) ............................................... 377
Reserve fuel ................................... 384
Seat belt ........................................ 376
Steering ......................................... 388
Tyre pressure monitor ................... 387
Warning triangle ................................ 431
Warnings
Stickers ........................................... 44
Washer fluid
Display message ............................ 374
Wheel and tyre combinations
Tyres .............................................. 470 Index
23
Page 107 of 497
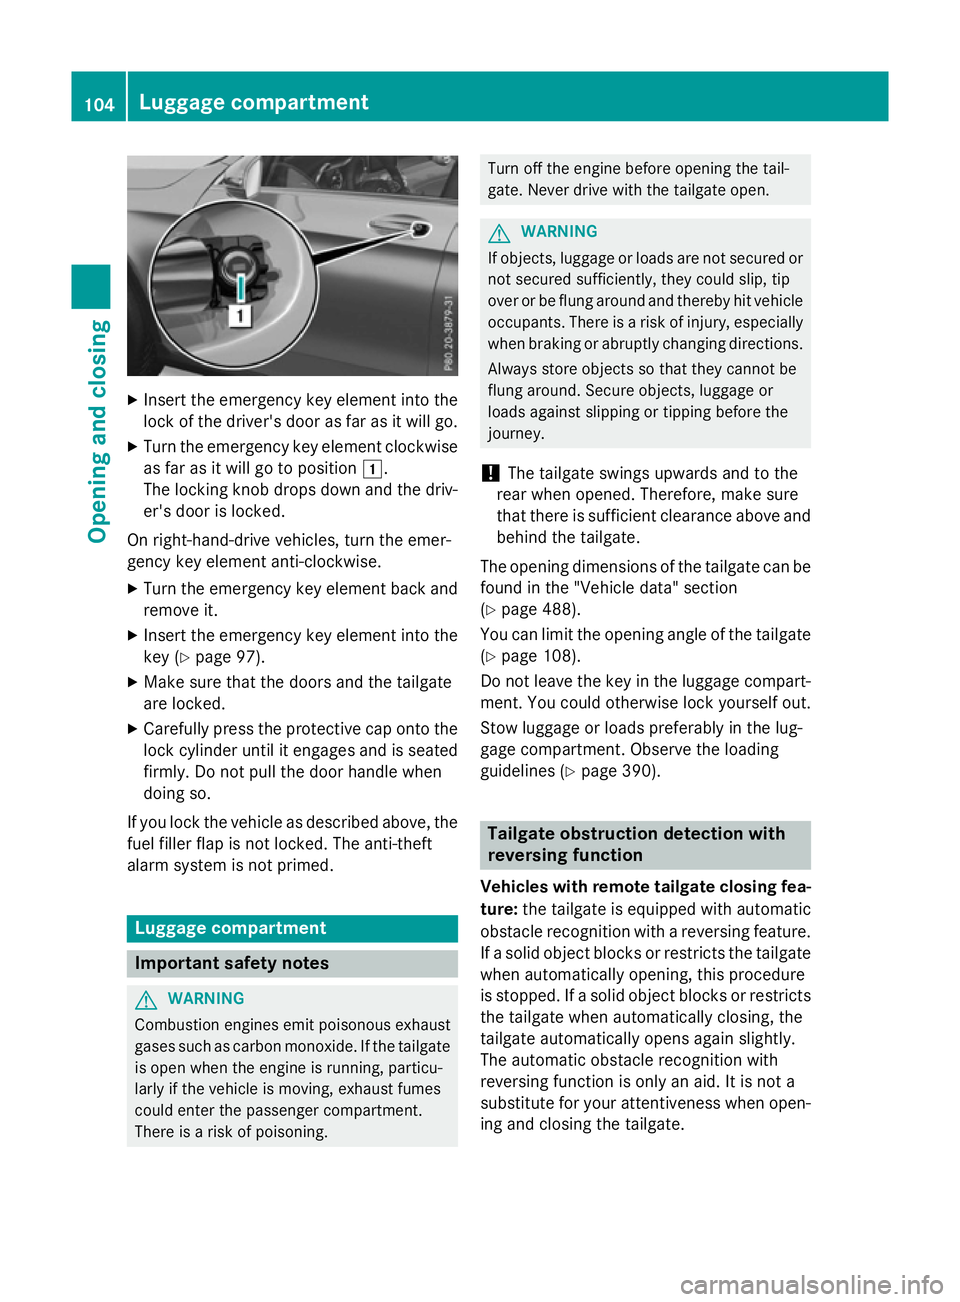
X
Insert the emergency key element into the
lock of the driver's door as far as it will go.
X Turn the emergency key element clockwise
as far as it will go to position 1.
The locking knob drops down and the driv- er's door is locked.
On right-hand-drive vehicles, turn the emer-
gency key element anti-clockwise.
X Turn the emergency key element back and
remove it.
X Insert the emergency key element into the
key (Y page 97).
X Make sure that the doors and the tailgate
are locked.
X Carefully press the protective cap onto the
lock cylinder until it engages and is seated firmly. Do not pull the door handle when
doing so.
If you lock the vehicle as described above, the
fuel filler flap is not locked. The anti-theft
alarm system is not primed. Luggage compartment
Important safety notes
G
WARNING
Combustion engines emit poisonous exhaust
gases such as carbon monoxide. If the tailgate is open when the engine is running, particu-
larly if the vehicle is moving, exhaust fumes
could enter the passenger compartment.
There is a risk of poisoning. Turn off the engine before opening the tail-
gate. Never drive with the tailgate open. G
WARNING
If objects, luggage or loads are not secured or not secured sufficiently, they could slip, tip
over or be flung around and thereby hit vehicle
occupants. There is a risk of injury, especially when braking or abruptly changing directions.
Always store objects so that they cannot be
flung around. Secure objects, luggage or
loads against slipping or tipping before the
journey.
! The tailgate swings upwards and to the
rear when opened. Therefore, make sure
that there is sufficient clearance above and behind the tailgate.
The opening dimensions of the tailgate can be
found in the "Vehicle data" section
(Y page 488).
You can limit the opening angle of the tailgate
(Y page 108).
Do not leave the key in the luggage compart- ment. You could otherwise lock yourself out.
Stow luggage or loads preferably in the lug-
gage compartment. Observe the loading
guidelines (Y page 390). Tailgate obstruction detection with
reversing function
Vehicles with remote tailgate closing fea- ture: the tailgate is equipped with automatic
obstacle recognition with a reversing feature. If a solid object blocks or restricts the tailgate
when automatically opening, this procedure
is stopped. If a solid object blocks or restricts the tailgate when automatically closing, the
tailgate automatically opens again slightly.
The automatic obstacle recognition with
reversing function is only an aid. It is not a
substitute for your attentiveness when open- ing and closing the tailgate. 104
Luggage compartmentOpening and closing
Page 109 of 497
!
The tailgate swings upwards and to the
rear when opened. Therefore, make sure
that there is sufficient clearance above and behind the tailgate.
Two warning tones sound while the tailgate is
opening or closing.
The opening dimensions of the tailgate can be found in the "Vehicle data" section
(Y page 488).
Opening automatically You can open the tailgate automatically with
the key or the handle in the tailgate.
X Press and hold the Fbutton on the key
until the tailgate opens.
or
X When the tailgate is unlocked, pull the han-
dle and let it go again immediately.
or
X With the tailgate stopped in an intermedi-
ate position, pull the tailgate upwards.
You can release the tailgate as soon as the tailgate starts to open.
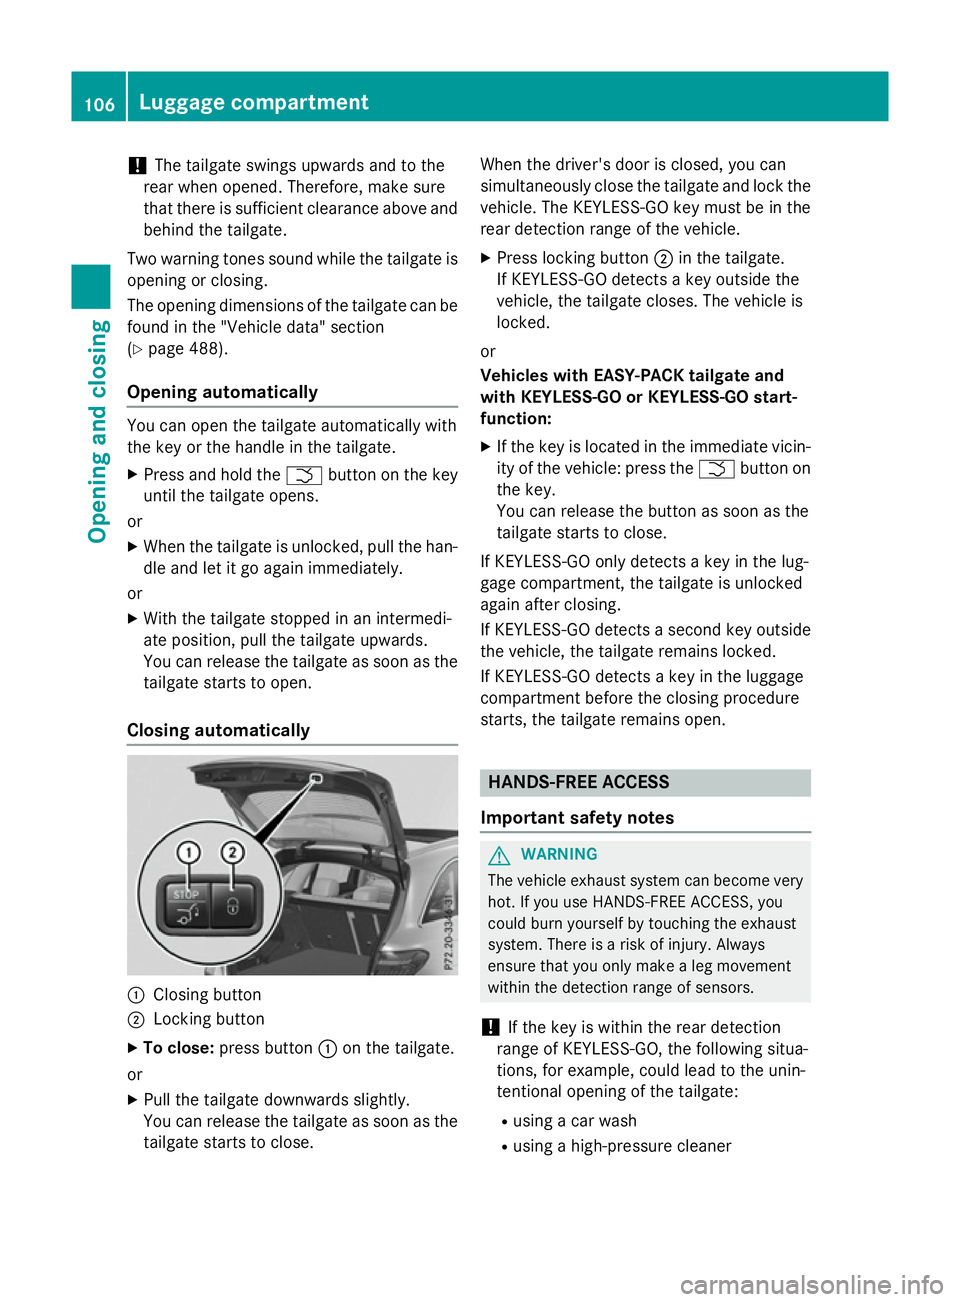
Closing automatically :
Closing button
; Locking button
X To close: press button :on the tailgate.
or
X Pull the tailgate downwards slightly.
You can release the tailgate as soon as the tailgate starts to close. When the driver's door is closed, you can
simultaneously close the tailgate and lock the
vehicle. The KEYLESS-GO key must be in the
rear detection range of the vehicle.
X Press locking button ;in the tailgate.
If KEYLESS-GO detects a key outside the
vehicle, the tailgate closes. The vehicle is
locked.
or
Vehicles with EASY-PACK tailgate and
with KEYLESS-GO or KEYLESS-GO start-
function: X If the key is located in the immediate vicin-
ity of the vehicle: press the Fbutton on
the key.
You can release the button as soon as the
tailgate starts to close.
If KEYLESS-GO only detects a key in the lug-
gage compartment, the tailgate is unlocked
again after closing.
If KEYLESS-GO detects a second key outside the vehicle, the tailgate remains locked.
If KEYLESS-GO detects a key in the luggage
compartment before the closing procedure
starts, the tailgate remains open. HANDS-FREE ACCESS
Important safety notes G
WARNING
The vehicle exhaust system can become very
hot. If you use HANDS-FREE ACCESS, you
could burn yourself by touching the exhaust
system. There is a risk of injury. Always
ensure that you only make a leg movement
within the detection range of sensors.
! If the key is within the rear detection
range of KEYLESS-GO, the following situa-
tions, for example, could lead to the unin-
tentional opening of the tailgate:
R using a car wash
R using a high-pressure cleaner 106
Luggage compartmentOpening and closing
Page 111 of 497
Repeat the kicking movement more quickly if
this occurs.
To stop the opening or closing procedure:
R move your foot in sensor detection
range :under the bumper, or
R pull the handle on the outside of the tail-
gate, or
R press the closing button on the tailgate, or
R press the Fbutton on the key
If the tailgate closing procedure has been
stopped:
R move your foot under the bumper again and
the tailgate will open
If the tailgate opening procedure has been
stopped:
R move your foot under the bumper again and
the tailgate will close Opening and closing automatically
from the inside
Important safety notes G
WARNING
Parts of the body could become trapped dur-
ing automatic closing of the tailgate. More-
over, people, e.g. children, may be standing in the closing area or may enter the closing area
during the closing process. There is a risk of
injury.
Make sure that nobody is in the vicinity of the closing area during the closing process.
Use one of the following options to stop the
closing process:
R press the Fbutton on the key
R pull or press the remote operating switch
on the driver's door
R press the closing or locking button on the
tailgate
R pull the handle on the tailgate
Vehicles with HANDS-FREE ACCESS: it is
also possible to stop the closing process by performing a kicking movement under the
rear bumper.
! The tailgate swings upwards and to the
rear when opened. Therefore, make sure
that there is sufficient clearance above and behind the tailgate.
Two warning tones sound while the tailgate is opening or closing.
The opening dimensions of the tailgate can be
found in the "Vehicle data" section
(Y page 488).
Opening and closing X
To open: pull remote operating switch :
for the tailgate until the tailgate opens.
X To close: turn the key to position 1or 2in
the ignition lock (Y page 187).
X Press and hold remote operating switch for
tailgate :until the tailgate is completely
closed.
When the vehicle is stationary, you can close
the tailgate from the driver's seat. When the
vehicle is also unlocked, you can also open
the tailgate from inside. Limiting the opening angle of the tail-
gate
General notes !
Make sure there is sufficient clearance to
open the tailgate fully when setting the
opening angle. The tailgate could otherwise 108
Luggage compartmentOpening and closing
Page 112 of 497
be damaged. Ideally, set the opening angle
outside.
You can limit the opening angle of the tail-
gate. This is possible in the top half of its
opening range, up to approximately 20 cm
before the stop.
To open the tailgate fully, pull the handle on
the outside of the tailgate again after it has
stopped automatically. This does not delete
the stored position.
Activating X
To open the tailgate: pull the handle on
the tailgate.
X To stop the opening procedure at the
desired position: press the closing button
in the tailgate or pull the handle on the out-
side of the tailgate again.
X To save the position: press and hold the
closing button in the tailgate until two short
tones sound.
The opening angle limiter is activated. The
tailgate then stops in the stored position
when opened.
Deactivating X
Press and hold the closing button in the
tailgate until you hear a short tone. Emergency release
General notes !
The tailgate swings upwards and to the
rear when opened. Therefore, make sure
that there is sufficient clearance above and behind the tailgate.
The opening dimensions of the tailgate can be
found in the "Vehicle data" section
(Y page 488). Use the emergency key element if the tailgate
can no longer be unlocked:
R using the key
R using HANDS-FREE ACCESS
R using the remote operating switch in the
door control panel
Opening X
Remove the luggage compartment cover
(Y page 397).
X Fold the rear seat backrest forwards
(Y page 393).
X Take the emergency key element out of the
key (Y page 97).
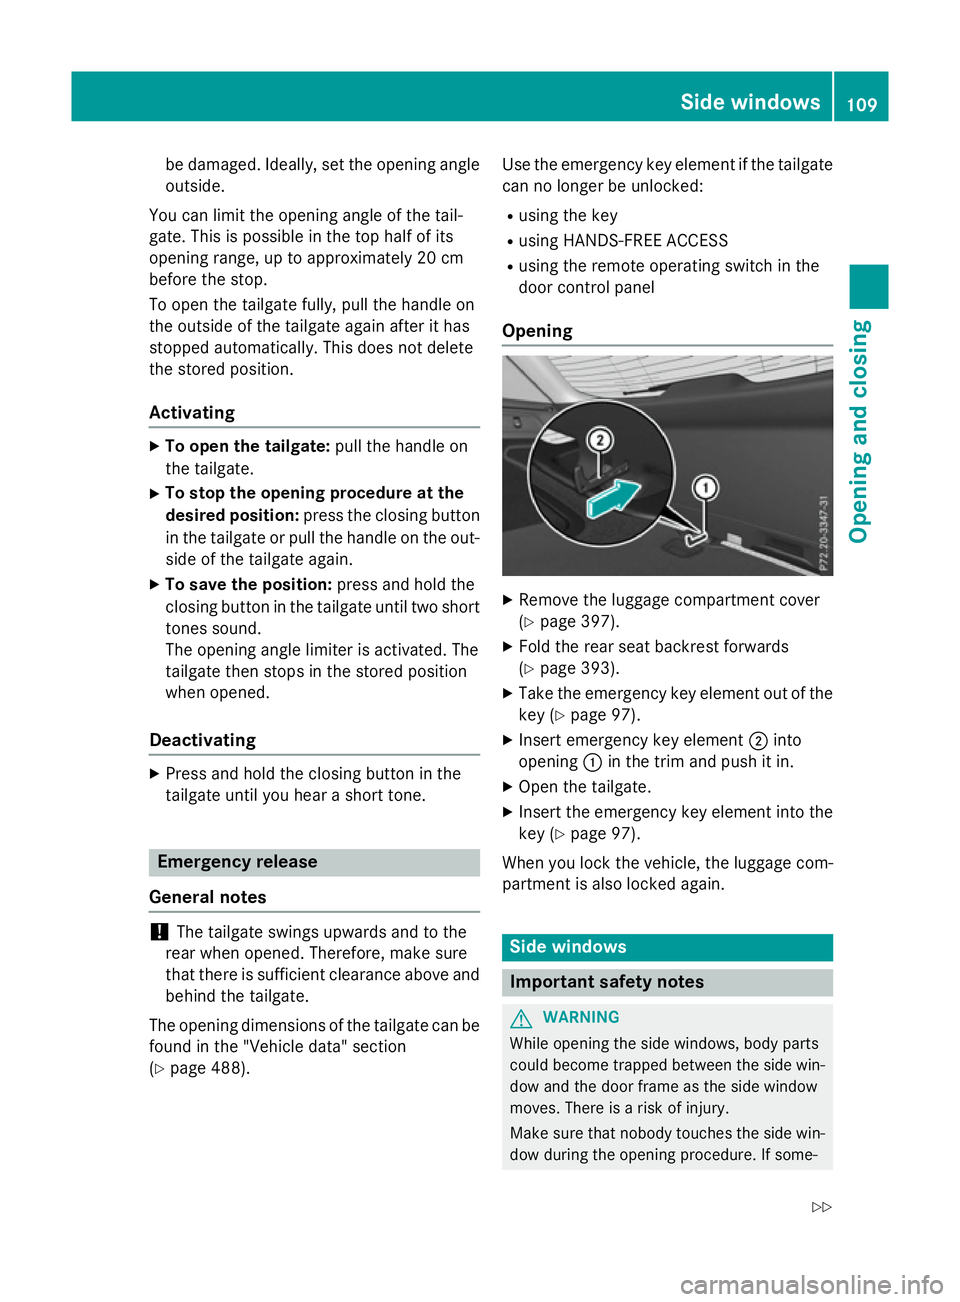
X Insert emergency key element ;into
opening :in the trim and push it in.
X Open the tailgate.
X Insert the emergency key element into the
key (Y page 97).
When you lock the vehicle, the luggage com-
partment is also locked again. Side windows
Important safety notes
G
WARNING
While opening the side windows, body parts
could become trapped between the side win- dow and the door frame as the side window
moves. There is a risk of injury.
Make sure that nobody touches the side win-
dow during the opening procedure. If some- Side windows
109Opening and closing
Z
Page 306 of 497
Make sure that the following values are not
exceeded:
R the permissible trailer drawbar noseweight
R the permissible trailer load
R the permissible rear axle load of the towing
vehicle
R the maximum permissible gross vehicle
weight of both the towing vehicle and the
trailer
The applicable permissible values, which
must not be exceeded, can be found:
R in your vehicle documents
R on the identification plates of the trailer tow
hitch and the trailer
R on the vehicle identification plate
If the values differ, the lowest value applies.
You will find the values approved by the man-
ufacturer on the vehicle identification plates
and those for the towing vehicle under "Tech- nical data" (Y page 491). G
WARNING
If you release the ball coupling or it does not
engage correctly when folding in, it will swing out. Within pivoting range of the ball coupling,
there is an increased risk of an accident and
injury.
Only release the ball coupling if the pivoting
range is unobstructed. Always make sure that the ball coupling engages when folding in.
When reversing the vehicle towards the
trailer, make sure there is nobody between
the trailer and the vehicle.
Couple and uncouple the trailer carefully. If
you do not couple the trailer to the towing
vehicle correctly, the trailer could become
detached.
When towing a trailer, your vehicle's handling
characteristics will be different in comparison to when driving without a trailer.
The vehicle/trailer combination:
R is heavier
R is restricted in its acceleration and gradi-
ent-climbing capability R
has an increased braking distance
R is affected more by strong crosswinds
R demands more sensitive steering
R has a larger turning circle
This can impair the vehicle's handling char-
acteristics. Adapt your driving style accord-
ingly. Maintain a safe distance. Drive care-
fully.
When towing a trailer, always adjust your
speed to the current road and weather con-
ditions. Do not exceed the maximum permis-
sible speed for your vehicle/trailer combina-
tion. Notes on towing a trailer
General notes When towing a trailer, set the tyre pressure on
the rear axle of the towing vehicle for the
maximum load. Further information on the
tyre pressure table in the fuel filler flap
(Y page 458).
On vehicles without level control, the height
of the ball coupling will alter according to the load placed on the vehicle. If necessary, use a
trailer with a height-adjustable drawbar.
You will find fitting dimensions and loads
under "Technical data" (Y page 490).
Driving tips Observe the notes on ESP
®
trailer stabilisa-
tion (Y page 86).
The maximum permissible speed for vehicle/
trailer combinations depends on the type of
trailer. Before beginning the journey, check
the trailer's documents to see what the max- imum permitted speed is. Observe the legally
prescribed maximum speed in the relevant
country.
For certain Mercedes-Benz vehicles, the max-
imum permissible rear axle load is increased
when towing a trailer. See the "Technical
data" section to find out whether this applies to your vehicle (Y page 491). If you utilise any Towing a trailer
303Driving and parking Z