2015 MERCEDES-BENZ GLC SUV tire pressure
[x] Cancel search: tire pressurePage 24 of 497
Stowage compartment
Map pockets ..................................3 92
Stowage compartments
Armrest (under) ............................ .392
Centre console .............................. 391
Cup holder ..................................... 402
Door ............................................... 392
Glove compartment ....................... 391
Important safety information ......... 390
Rear ............................................... 392
Spectacles compartment .............. .391
see Stowage areas
Stowage net ....................................... 392
Stowage space
Stowage net ................................... 392
Summer tyres
In winter ........................................ 456
Sun blind
Rear side windows ......................... 404
Sun visor ............................................ 404
Suspension settings
AIR BODY CONTROL ..................... .253
Switching the auxiliary heating/
ventilation
On/off .......................................... .179 T
Tail lamps see Lights
Tailgate
Display message ............................ 371
Emergency unlocking ..................... 109
Limiting the opening angle ............. 108
Obstruction detectio n.................... 104
Opening dimensions ...................... 488
Opening/closing ............................ 104
Opening/closing (automatically
from inside) ................................... 108
Opening/closing (automatically
from outside) ................................. 105
Opening/closing (manually from
outside) ......................................... 105
Technical data
Capacities ...................................... 480
Emergency spare wheel ................. 476
Information .................................... 478
Trailer load s................................... 491 Tyres/wheels ................................. 468
Vehicle data ................................... 488
Telephone
Accepting a call (multifunction
steering wheel) .............................. 325
Display message ............................ 374
Introduction ................................... 324
Menu (on-board computer) ............ 324
Number from the phone book ........ 325
Redialling ....................................... 326
Rejecting/ending a call ................. 325
Telephone compartment ................ 392
Temperature
Coolant (display in the instrumentcluster) .......................................... 313
Coolant (on-board computer) ......... 327
Outside temperature ...................... 313
Setting (climate control )................ 165
TEMPOMAT
Function/note s............................. 230
TIREFIT kit .......................................... 435
Tyre pressure not reached ............. 436
Tyre pressure reached ................... 437
Top Tether ............................................ 68
Total distance recorder .................... 318
Tow-away protection
Activating ......................................... 91
Deactivating ..................................... 91
Function ........................................... 91
Tow-starting
Emergency engine starting ............ 448
Important safety notes .................. 445
Towing
Important safety notes .................. 445
Notes for 4MATIC vehicles ............ 448
Transporting the vehicle ................ 448
Towing a trailer
Active Blind Spot Assist ................. 283
Active Lane Keeping Assist ............ 286
Active Parking Assist ..................... 257
Axle load, permissibl e.................... 492
ESP ®
(Electronic Stability Pro-
gram) ............................................... 86
Failure check for LEDs ................... 307
General notes ................................ 303
Pulling away with a traile r.............. 191
Swinging out the ball coupling ....... 304 Index
21
Page 25 of 497
Swinging the ball coupling in ......... 306
Trailer tow hitch display message .. 372
Towing away
Fitting the towing eye .................... 447
Removing the towing eye ............... 447
With both axles on the ground ....... 447
Towing eye ......................................... 432
Traffic Sign Assist
Activating ....................................... 275
Activating/deactivating the warn-ing function .................................... 327
Display message ............................ 363
Function/note s............................. 274
Important safety notes .................. 274
Instrument cluster display ............. 275
Trailer coupling
see Towing a trailer
Trailer towing
7-pin connecto r............................. 308
Blind Spot Assist ............................ 278
Cleaning the trailer tow hitch ......... 426
Coupling up a traile r...................... 305
Decoupling a traile r....................... 306
Driving tips .................................... 303
Important safety notes .................. 302
Lights display message .................. 350
Mounting dimensions .................... 490
Parktronic ...................................... 254
Power supply ................................. 307
Problem (fault) ............................... 309
Trailer load s................................... 491
Transfer case ..................................... 203
Transmission
see Automatic transmission
Transmission position display ......... 198
Transmission position display
(DIRECT SELECT lever) ...................... 198
Transporting the vehicle .................. 448
Travelling uphill
Brow of hill ..................................... 230
Driving downhill ............................. 230
Maximum gradient-climbing capa-
bility ............................................... 230
Trim pieces (cleaning instruc-
tions) .................................................. 427
Trip computer (on-board com-
puter) .................................................. 319 Trip meter
Calling up ....................................... 318
Resetting (on-board computer) ...... 319
Turn signals
Changing bulbs (front) ................... 148
Changing bulbs (rear) .................... 148
Switching on/of f........................... 140
TV
Operating (on-board computer) ..... 324
Two-way radio
Frequencies ................................... 478
Installation ..................................... 478
Transmission output (maximum) .... 478
Type identification plate
see Vehicle identification plate
Tyre changing tool kit ....................... 433
Tyre pressure
Calling up (on-board computer) ..... 460
Display message ............................ 367
Not reached (TIREFIT) .................... 436
Reached (TIREFIT) .......................... 437
Recommended ............................... 458
Tyre pressure loss warning
General notes ................................ 459
Important safety notes .................. 459
Restarting ...................................... 460
Tyre pressure monitor
Checking the tyre pressure elec-
tronically ........................................ 461
Function/note s............................. 460
General notes ................................ 460
Important safety notes .................. 461
Radio type approval for the tyre
pressure monitor ........................... 463
Restarting ...................................... 462
Warning lamp ................................. 387
Warning message .......................... 462
Tyres
Changing a whee l.......................... 463
Checking ........................................ 455
Direction of rotation ...................... 464
Display message ............................ 367
General notes ................................ 468
Important safety notes .................. 454
Information on driving .................... 454
MOExtended tyre s......................... 456
Replacing ....................................... 463
Service life ..................................... 455 22
Index
Page 152 of 497
X
Turn the bulb anti-clockwise, applying
slight pressure, and remove it from the bulb
holder :.
X Insert the new bulb into bulb holder :and
turn it clockwise.
X Insert bulb holder :and turn it clockwise.
X Close the side trim panel (Y page 148).
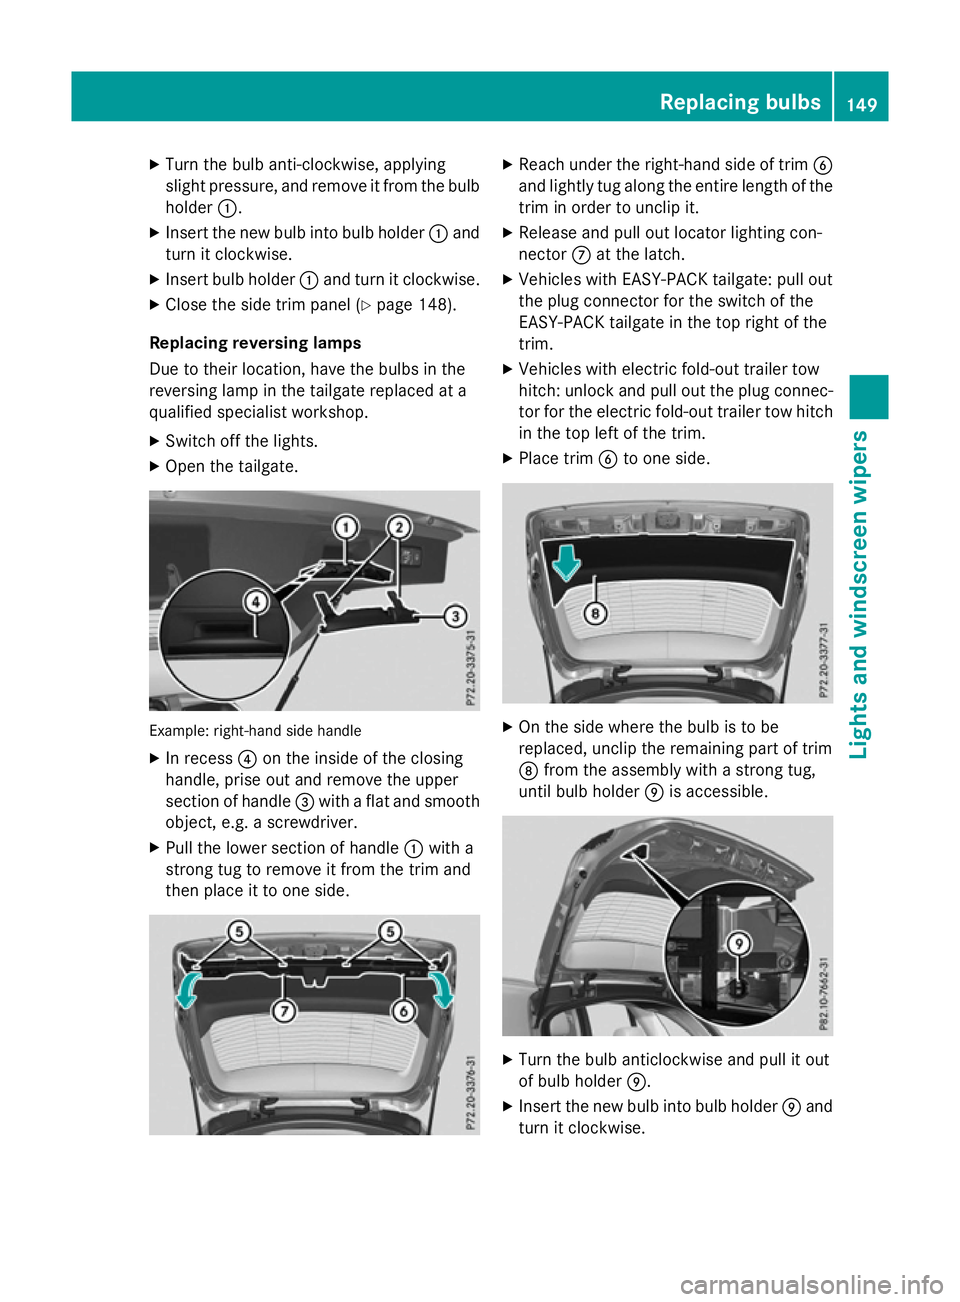
Replacing reversing lamps
Due to their location, have the bulbs in the
reversing lamp in the tailgate replaced at a
qualified specialist workshop.
X Switch off the lights.
X Open the tailgate. Example: right-hand side handle
X In recess ?on the inside of the closing
handle, prise out and remove the upper
section of handle =with a flat and smooth
object, e.g. a screwdriver.
X Pull the lower section of handle :with a
strong tug to remove it from the trim and
then place it to one side. X
Reach under the right-hand side of trim B
and lightly tug along the entire length of the trim in order to unclip it.
X Release and pull out locator lighting con-
nector Cat the latch.
X Vehicles with EASY-PACK tailgate: pull out
the plug connector for the switch of the
EASY-PACK tailgate in the top right of the
trim.
X Vehicles with electric fold-out trailer tow
hitch: unlock and pull out the plug connec-
tor for the electric fold-out trailer tow hitch
in the top left of the trim.
X Place trim Bto one side. X
On the side where the bulb is to be
replaced, unclip the remaining part of trim
D from the assembly with a strong tug,
until bulb holder Eis accessible. X
Turn the bulb anticlockwise and pull it out
of bulb holder E.
X Insert the new bulb into bulb holder Eand
turn it clockwise. Replacing bulbs
149Lights and windscreen wipers Z
Page 231 of 497
The following driving systems are specially
adapted for driving over easily negotiable off-
road terrain:
R Off-road program (Y page 250)
R Off-road ABS (Y page 79)
R Off-road 4ETS (Y page 85)
R Off-road ESP ®
(Y page 85)
R DSR (Downhill Speed Regulation)
(Y page 248)
Observe the following notes:
R Stop the vehicle before driving off-road. If
necessary, activate the off-road program
(Y page 250).
R To avoid damaging the vehicle, make sure
there is always sufficient ground clearance.
R Make sure that items of luggage and loads
are stowed safely and are well secured
(Y page 396).
R Always keep the engine running and in gear
when driving on a downhill gradient. Acti-
vate DSR (Y page 248).
R Drive slowly and evenly, if necessary at
walking pace.
R Ensure that the wheels are in contact with
the ground at all times.
R Drive with extreme care on unknown off-
road routes where visibility is poor. For
safety reasons, get out of the vehicle first
and survey the off-road route.
R Check the depth of water before fording
rivers and streams.
R Watch out for obstacles.
R Take care when turning on an uphill or
downhill slope or when driving across a
slope. The vehicle could otherwise tip over.
R Always keep the side windows and the pan-
orama sliding sunroof closed during the
journey.
R Do not deviate from marked routes.
Do not use the HOLD function when driving
off-road, on steep uphill or downhill gradients or on slippery or loose surfaces. The HOLD
function cannot hold the vehicle on such sur-
faces. Checklist before driving off-road X
Engine oil level: check the engine oil and
top it up if necessary.
When driving on steep gradients, the oil
level must be sufficiently high to ensure a
correct oil supply in the vehicle.
X Wheels and tyres: check the tyre tread
depth and tyre pressure.
X Check for damage and remove any foreign
objects, e.g. small stones, from the
wheels/tyres.
X Replace any missing valve caps.
X Replace dented or damaged wheels.
X Wheels: dented or bent wheels can lead to
a loss of tyre pressure and damage to the
tyre bead. Before driving off-road, check
the wheels and replace them if necessary.
Checklist after driving off-road !
If you detect damage to the vehicle after
driving off-road, have the vehicle checked
immediately at a qualified specialist work-
shop.
X Deactivate the off-road program
(Y page 250).
X Deactivate DSR (Y page 248).
X Clean the headlamps and rear lights and
check for damage.
X Clean the front and rear licence plates.
X Clean the wheels/tyres with a water jet and
remove any foreign objects.
X Clean the wheels, wheel arches and the
vehicle underside with a water jet; check
for any foreign objects and damage.
X Check whether twigs or other parts of
plants have become trapped. These
increase the risk of fire and can damage
fuel pipes, brake hoses or the rubber bel-
lows of the axle joints and propeller shafts.
X After the trip, examine without fail the
entire undercarriage, wheels, tyres, brakes,
bodywork structure, steering, chassis and
exhaust system for damage. 228
Driving tipsDriving and parking
Page 300 of 497
rily. The selected gear and
Mappear in the
multifunction display.
Activating when driving with the combustion
engine:
X Pull the left or right steering wheel gearshift
paddle (Y page 201).
Manual gearshifting is activated tempora-
rily. The selected gear and Mappear in the
multifunction display.
The ECO start/stop function is not available
when manually changing gear.
Further information on the manual drive pro-
gram (Y page 201).
Haptic accelerator pedal General notes
The haptic accelerator pedal helps you to
reduce the fuel consumption and emissions
of your vehicle.
There are two different functions available for
this purpose:
R an additional point of resistance in E-MODE
operating mode (Y page 290)
R a double pulse in drive program E
(Y page 295)
Additional point of resistance in the hap-
tic accelerator pedal
The maximum available electric performance
is indicated by a tangible point of resistance
in the haptic accelerator pedal.
The additional point of resistance is available in E-MODE operating mode (Y page 290).
If you depress the haptic accelerator pedal
beyond the pressure point, the combustion
engine is switched on.
Double pulses in the haptic accelerator
pedal
A noticeable double pulse in the haptic accel-
erator pedal is a recommendation that you
should release the accelerator pedal. By this
means, in HYBRID,E-MODE orE-SAVE oper-
ating mode the combustion engine can be switched off and disconnected from the
power train (overrun mode).
The double pulse is available in drive program
E (Y page 295).
After the accelerator pedal has been
released, the coasting characteristics of the
vehicle are adapted to the traffic conditions
To avoid getting too close to the vehicle in
front, you must apply the brakes manually
when necessary.
Driving tips General driving tips
Drive carefully and maintain a suitable dis-
tance from the vehicle in front. Avoid frequent
and sudden acceleration as well as abrupt
braking.
During partial electric drive, pulling away and acceleration, the electric motor supports the internal combustion engine.
During overrun in transmission position Dand
braking, the electric motor operates as an
alternator.
Further information on the ECO start/stop
function (Y page 298).
Additional driving tips (Y page 222).
Stationary vehicle
If the vehicle is stopped, the combustion
engine is, for the most part, switched off.
Automatic climate control continues to func-
tion. The electro-mechanically assisted steer-
ing gear allows use of the power steering
without loss of comfort.
Acceleration
Depending on the operating mode, pulling
away and driving under low load conditions
are performed:
R entirely by electric propulsion
R in combination with the internal combus-
tion engine
When accelerating at an increased or full
load, boost mode is utilised. The electric
motor supports the internal combustion PLUG‑IN HYBRID operation
297Driving and parking Z
Page 437 of 497
X
Close the driver's door.
X Place the warning triangle at a suitable dis-
tance (Y page 431). Observe legal require-
ments. MOExtended tyres (tyres with run-flat
characteristics)
General notes With MOExtended tyres (tyres with run-flat
characteristics), you can continue to drive
your vehicle even if there is a total loss of
pressure in one or more tyres. The affected
tyre must not show any clearly visible dam-
age.
You can recognise MOExtended tyres by the
MOExtended marking which appears on the
tyre wall. You will find this marking next to the
tyre size designation, the load-bearing capa-
city and the speed index.
MOExtended tyres may only be used in con-
junction with an activated tyre pressure loss
warning system or tyre pressure monitor.
If a pressure loss warning message
appears in the multifunction display:
R observe the instructions in the display mes-
sages (Y page 367)
R check the tyre for damage
R if driving on, observe the following notes
The driving distance possible in run-flat mode is approximately 80 km when the vehicle is
partially laden and approximately 30 km
when the vehicle is fully laden.
In addition to the vehicle load, the driving dis- tance possible depends upon:
R vehicle speed
R road condition
R outside temperature
The driving distance possible in run-flat mode may be reduced by extreme driving condi-
tions/manoeuvres, or it can be increased
through a moderate style of driving. The driving distance possible in run-flat mode
is counted from the moment the tyre pressure loss warning appears in the multifunction dis-
play.
You must not exceed a maximum speed of
80 km/h.
When replacing one or all tyres, observe the
following specifications for your vehicle's
tyres:
R size
R the type and
R the "MOExtended" mark
If a tyre has gone flat and cannot be replaced
with an MOExtended tyre, a standard tyre
may be used as a temporary measure. Make
sure that you use the proper size and type
(summer or winter tyre).
Vehicles with MOExtended tyres are not
equipped with a TIREFIT kit at the factory. It is therefore recommended that you additionallyequip your vehicle with a TIREFIT kit if you fit
tyres that do not feature run-flat characteris- tics, e.g. winter tyres. A TIREFIT kit can be
obtained from a qualified specialist work-
shop.
Important safety notes G
WARNING
When driving in emergency mode, the driving characteristics deteriorate, e.g. when corner-
ing, accelerating quickly and when braking.
There is a risk of accident.
Do not exceed the stated maximum speed.
Avoid abrupt steering and driving manoeu-
vres, and driving over obstacles (kerbs, pot-
holes, off-road). This applies in particular to a laden vehicle.
Stop driving in emergency mode if:
R you hear banging noises.
R the vehicle starts to shake.
R you see smoke and smell rubber.
R ESP ®
is intervening constantly.
R there are tears in the sidewalls of the tyre. 434
Flat tyreBreakdown assistance
Page 438 of 497
After driving in emergency mode, have the
wheel rims checked at a qualified specialist
workshop with regard to their further use. The faulty tyre must be replaced. TIREFIT kit
Important safety notes TIREFIT is a tyre sealant.
You can use TIREFIT to seal punctures of up to
4 mm, particularly those in the tyre tread. You
can use TIREFIT at outside temperatures
down to Ò20 †. G
WARNING
In the following situations, the tyre sealant is
unable to provide sufficient breakdown assis- tance, as it is unable to seal the tyre properly:
R there are cuts or punctures in the tyre
larger than those mentioned above.
R the wheel rim is damaged.
R you have driven at very low tyre pressures
or on a flat tyre.
There is a risk of an accident.
Do not drive any further. Contact a qualified
specialist workshop. G
WARNING
The tyre sealant is harmful and causes irrita-
tion. It must not come into contact with your
skin, eyes or clothing or be swallowed. Do not inhale TIREFIT fumes. Keep tyre sealant away
from children. There is a risk of injury.
If you come into contact with the tyre sealant,
observe the following:
R Rinse off the tyre sealant from your skin
immediately with water.
R If the tyre sealant comes into contact with
your eyes, immediately rinse them thor-
oughly with clean water.
R If tyre sealant is swallowed, immediately
rinse your mouth out thoroughly and drink
plenty of water. Do not induce vomiting,
and seek medical attention immediately. R
Immediately change out of clothing which
has come into contact with tyre sealant.
R If an allergic reaction occurs, seek medical
attention immediately.
! Do not operate the tyre inflation com-
pressor for longer than eight minutes at a
time without a break. It may otherwise
overheat.
The tyre inflation compressor can be oper-
ated again once it has cooled down.
Comply with the manufacturer's safety
instructions on the sticker on the tyre infla-
tion compressor.
Using the TIREFIT kit X
Do not remove any foreign objects which
have penetrated the tyre, e.g. screws or
nails.
X Remove the tyre sealant bottle, the accom-
panying TIREFIT sticker and the tyre infla-
tion compressor from the stowage well
underneath the luggage compartment floor
(Y page 432).
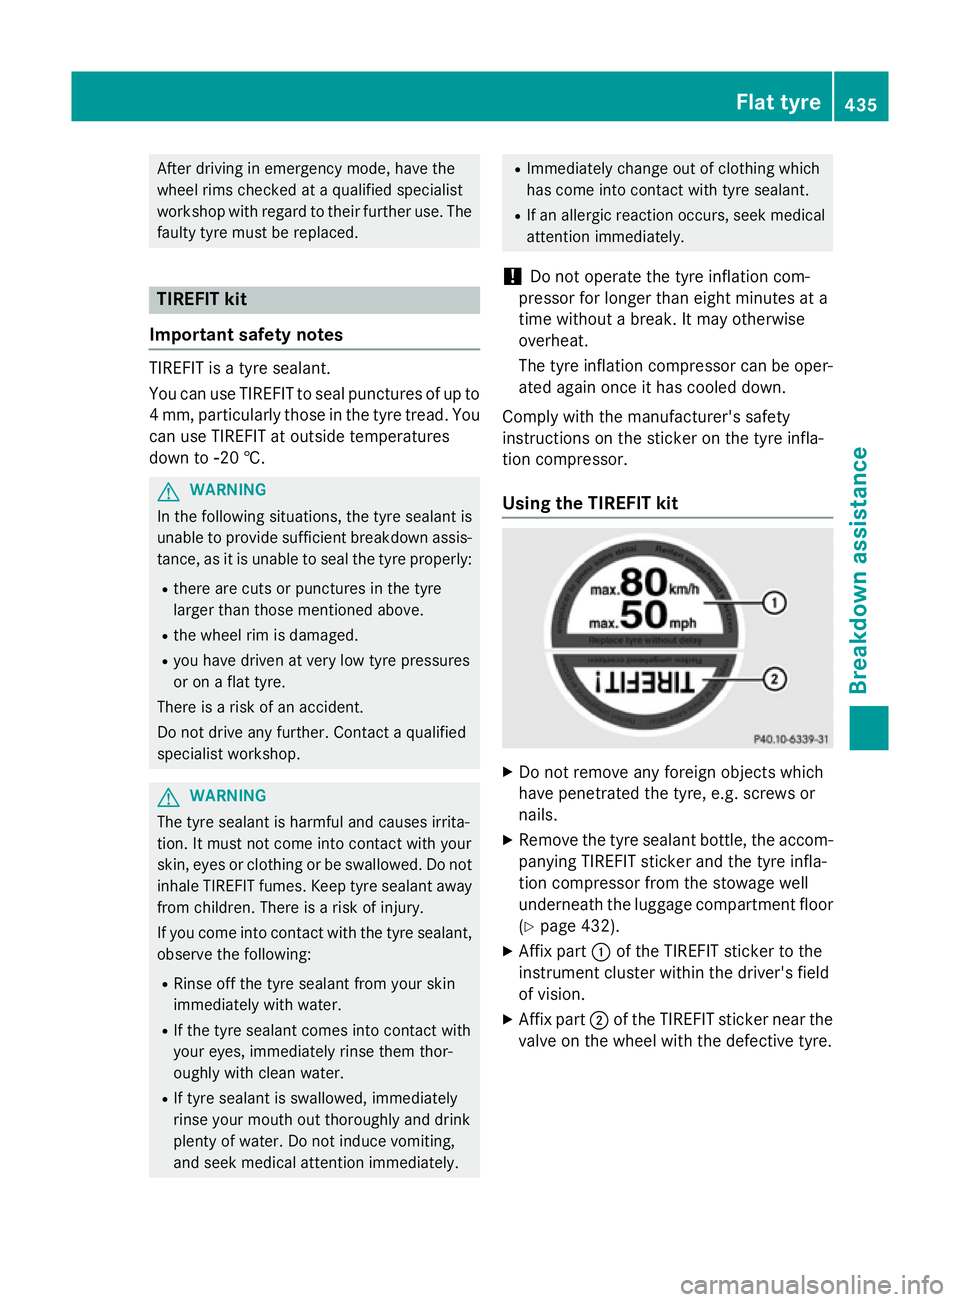
X Affix part :of the TIREFIT sticker to the
instrument cluster within the driver's field
of vision.
X Affix part ;of the TIREFIT sticker near the
valve on the wheel with the defective tyre. Flat tyre
435Breakdown assis tance Z
Page 440 of 497
impair the vehicle's braking and driving char-
acteristics. There is a risk of accident.
Do not continue driving. Contact a qualified
specialist workshop.
Tyre pressure reached G
WARNING
A tyre temporarily sealed with tyre sealant
impairs the driving characteristics and is not
suitable for higher speeds. There is a risk of
accident.
You should therefore adapt your driving style
accordingly and drive carefully. Do not exceed the specified maximum speed with a tyre that
has been repaired using tyre sealant.
The maximum permissible speed for a tyre
sealed with tyre sealant is 80 km/h. The
upper part of the TIREFIT sticker must be
affixed to the instrument cluster where it will be easily seen by the driver.
! After use, excess tyre sealant may run out
of the filler hose. This could cause stains.
Therefore, place the tyre sealant bottle with
filler hose in the plastic bag which is con-
tained the TIREFIT kit. H
Environmental note
Have the used tyre sealant bottle disposed of
professionally, e.g. at a qualified specialist
workshop.
If a tyre pressure of 180 kPa (1.8 bar/26 psi)
has been attained after five minutes:
X Switch off the tyre inflation compressor.
X Unscrew the filler hose from the valve of
the faulty tyre. X
Stow the tyre sealant bottle, the tyre infla-
tion compressor and the warning triangle.
X Pull away immediately.
X Stop after driving for approximately ten
minutes and check the tyre pressure with
the tyre inflation compressor.
The tyre pressure must now be at least
130 kPa (1.3 bar/19 psi). G
WARNING
If the required tyre pressure is not reached
after driving for a short period, the tyre is too badly damaged. The tyre sealant cannot
repair the tyre in this instance. Damaged tyres and a tyre pressure that is too low can signif-
icantly impair the vehicle's braking and driv-
ing characteristics. There is a risk of accident.
Do not continue driving. Contact a qualified
specialist workshop.
i In your vehicle, you will find a sticker with
the Mercedes-Benz Service24h telephone
number, e.g. on the B-pillar on the driver's
side.
X Correct the tyre pressure if it is still at least
130 kPa (1.3 bar/19 psi). See the tyre
pressure table on the fuel filler flap for val-
ues.
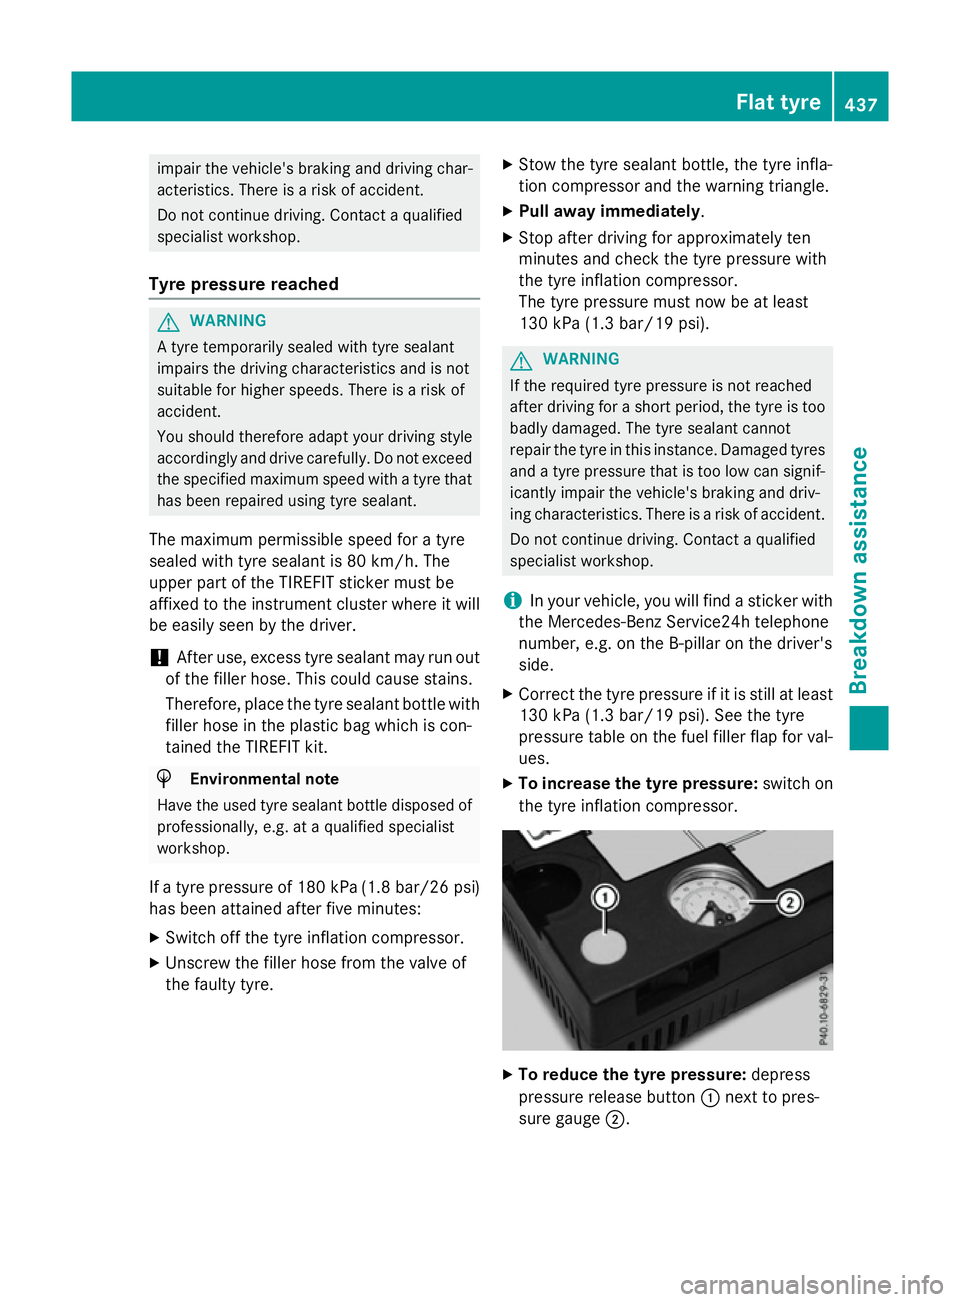
X To increase the tyre pressure: switch on
the tyre inflation compressor. X
To reduce the tyre pressure: depress
pressure release button :next to pres-
sure gauge ;. Flat tyre
437Breakdown assistance Z