2015 MERCEDES-BENZ GLC SUV instrument cluster
[x] Cancel search: instrument clusterPage 207 of 497
vapours. Keep fuels out of the reach of chil-
dren.
If you or others come into contact with fuel,
observe the following:
R Wash the fuel off any affected areas of skin
with water and soap immediately.
R If you get fuel in your eyes, rinse them thor-
oughly with clean water immediately. Seek
immediate medical attention.
R If fuel is swallowed, seek immediate medi-
cal attention. Do not induce vomiting.
R Change any clothing that has come into
contact with fuel immediately. G
WARNING
Electrostatic charge can cause sparks and
thereby ignite fuel vapours. There is a risk of
fire and explosion.
Always touch the vehicle body before opening the fuel filler flap or touching the fuel pump
nozzle. This discharges any electrostatic
charge that may have built up.
Do not get into the vehicle again during the
refuelling process. Otherwise, electrostatic
charge could build up again. G
WARNING
Vehicles with a diesel engine:
If you mix diesel fuel with petrol, the flash
point of this fuel mixture is lower than that of pure diesel fuel. When the engine is running,
components in the exhaust system may over-
heat unnoticed. There is a risk of fire.
Never refuel with petrol. Never add petrol to
diesel fuel.
! Do not use diesel to refuel vehicles with a
petrol engine. Do not switch on the ignition if you accidentally refuel with the wrong
fuel. Otherwise, the fuel will enter the fuel
system. Even small amounts of the wrong
fuel can result in damage to the fuel system
and the engine. Notify a qualified specialist
workshop and have the fuel tank and fuel
lines drained completely. !
Do not use petrol to refuel vehicles with a
diesel engine. Do not switch on the ignition if you accidentally refuel with the wrong
fuel. Otherwise, fuel can enter the fuel sys-tem. Even small amounts of the wrong fuel
could result in damage to the fuel system
and the engine. The repair costs are high.
Notify a qualified specialist workshop and
have the fuel tank and fuel lines drained
completely.
! Overfilling the fuel tank could damage the
fuel system.
! Take care not to spill any fuel on painted
surfaces. You could otherwise damage the
paintwork.
! Use a filter when adding fuel from a fuel
can. The fuel lines and/or the fuel injection
system could otherwise be blocked by par- ticles from the fuel can.
If you overfill the fuel tank, some fuel may
spray out when you remove the fuel pump
nozzle.
Further information on fuel and fuel quality
(Y page 480). Refuelling
General notes Observe the important safety notes
(Y
page 203).
If you unlock/lock the vehicle from the out-
side, the fuel filler flap also unlocks/locks.
The position of the 8fuel filler cap is dis-
played in the instrument cluster. The arrow
next to the filling pump indicates the side of
the vehicle. 204
RefuellingDriving and parking
Page 223 of 497
Switching off the engine
Important safety notes G
WARNING
The automatic transmission switches to neu-
tral position Nwhen you switch off the engine.
The vehicle may roll away. There is a risk of an
accident.
After switching off the engine, always switch
to parking position P. Prevent the parked vehi-
cle from rolling away by applying the parking
brake.
Vehicles with automatic transmission X
Apply the electric parking brake.
X Shift the transmission to position P.
X With the key: turn the key to position 0in
the ignition lock and remove it.
The immobiliser is activated.
X With the Start/Stop button: press the
Start/Stop button (Y page 187).
The engine stops and all the indicator
lamps in the instrument cluster go out.
When the driver's door is closed, this cor-
responds to key position 1. When the driv-
er's door is open, this corresponds to key
position 0: "key removed".
If you switch the engine off with the trans-
mission in position Ror D, the automatic
transmission shifts to Nautomatically.
With the key: if you then open the driver's
door or the front-passenger door or remove
the key from the ignition, the automatic trans- mission shifts to Pautomatically.
With the Start/Stop button: if you then
open the driver's door or the front-passenger
door, the automatic transmission shifts to P
automatically.
If you want the automatic transmission to
remain in neutral N, e.g. when having the
vehicle cleaned in an automatic car wash with a towing system: With the key:
X Switch the ignition on.
X Depress the brake pedal and keep it
depressed.
X Shift to neutral N.
X Release the brake pedal.
X Release the electric parking brake.
X Switch off the ignition and leave the key in
the ignition lock.
With the Start/Stop button:
X Switch the ignition on.
X Depress the brake pedal and keep it
depressed.
X Remove the Start/Stop button from the
ignition lock.
X Insert the key into the ignition lock.
X Shift to neutral N.
X Release the brake pedal.
X Release the electric parking brake.
X Switch off the ignition and leave the key in
the ignition lock.
The engine can be switched off while the vehi-
cle is in motion by pressing and holding the
Start/Stop button for about three seconds.
This function operates independently of the
ECO start/stop automatic engine switch-off
function. Electric parking brake
General notes G
WARNING
If you leave children unattended in the vehi-
cle, they may be able to set the vehicle in
motion if, for example, they:
R release the parking brake
R shift the automatic transmission out of park
position P
R start the engine 220
ParkingDriving and parking
Page 224 of 497
In addition, they may operate vehicle equip-
ment and become trapped. There is a risk of
an accident and injury.
When leaving the vehicle, always take the key with you and lock the vehicle. Never leave
children unattended in the vehicle.
The function of the electric parking brake is
dependent on the on-board voltage. If the on-
board voltage is low or if there is a malfunc-
tion in the system, it may not be possible to
apply the released parking brake.
X If this is the case, only park the vehicle on
level ground and secure it to prevent it from
rolling away.
X Shift the automatic transmission to posi-
tion P.
It may not be possible to release an applied
parking brake if the on-board voltage is low or if there is a malfunction in the system. Con-
tact a qualified specialist workshop.
The electric parking brake carries out a func-
tion check at regular intervals when the
engine is switched off. Noises that occur are
normal.
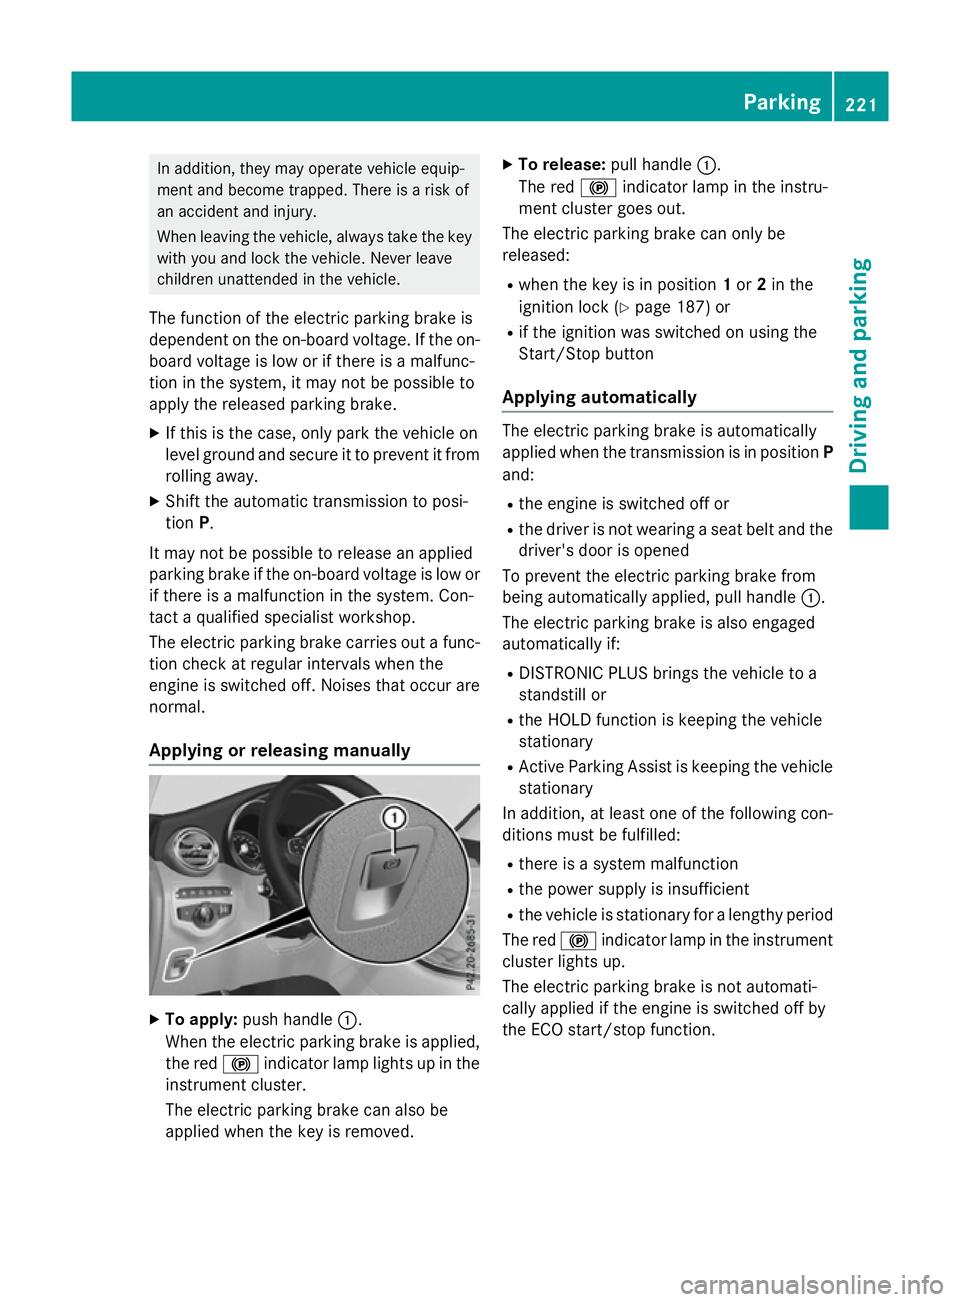
Applying or releasing manually X
To apply: push handle :.
When the electric parking brake is applied, the red !indicator lamp lights up in the
instrument cluster.
The electric parking brake can also be
applied when the key is removed. X
To release: pull handle:.
The red !indicator lamp in the instru-
ment cluster goes out.
The electric parking brake can only be
released:
R when the key is in position 1or 2in the
ignition lock (Y page 187) or
R if the ignition was switched on using the
Start/Stop button
Applying automatically The electric parking brake is automatically
applied when the transmission is in position
P
and:
R the engine is switched off or
R the driver is not wearing a seat belt and the
driver's door is opened
To prevent the electric parking brake from
being automatically applied, pull handle :.
The electric parking brake is also engaged
automatically if:
R DISTRONIC PLUS brings the vehicle to a
standstill or
R the HOLD function is keeping the vehicle
stationary
R Active Parking Assist is keeping the vehicle
stationary
In addition, at least one of the following con-
ditions must be fulfilled:
R there is a system malfunction
R the power supply is insufficient
R the vehicle is stationary for a lengthy period
The red !indicator lamp in the instrument
cluster lights up.
The electric parking brake is not automati-
cally applied if the engine is switched off by
the ECO start/stop function. Parking
221Driving and parking Z
Page 226 of 497
Service Booklet or by the service interval
display.
Fuel consumption also increases when driv-
ing in cold weather, in stop-start traffic, on
short journeys and in hilly terrain. ECO display
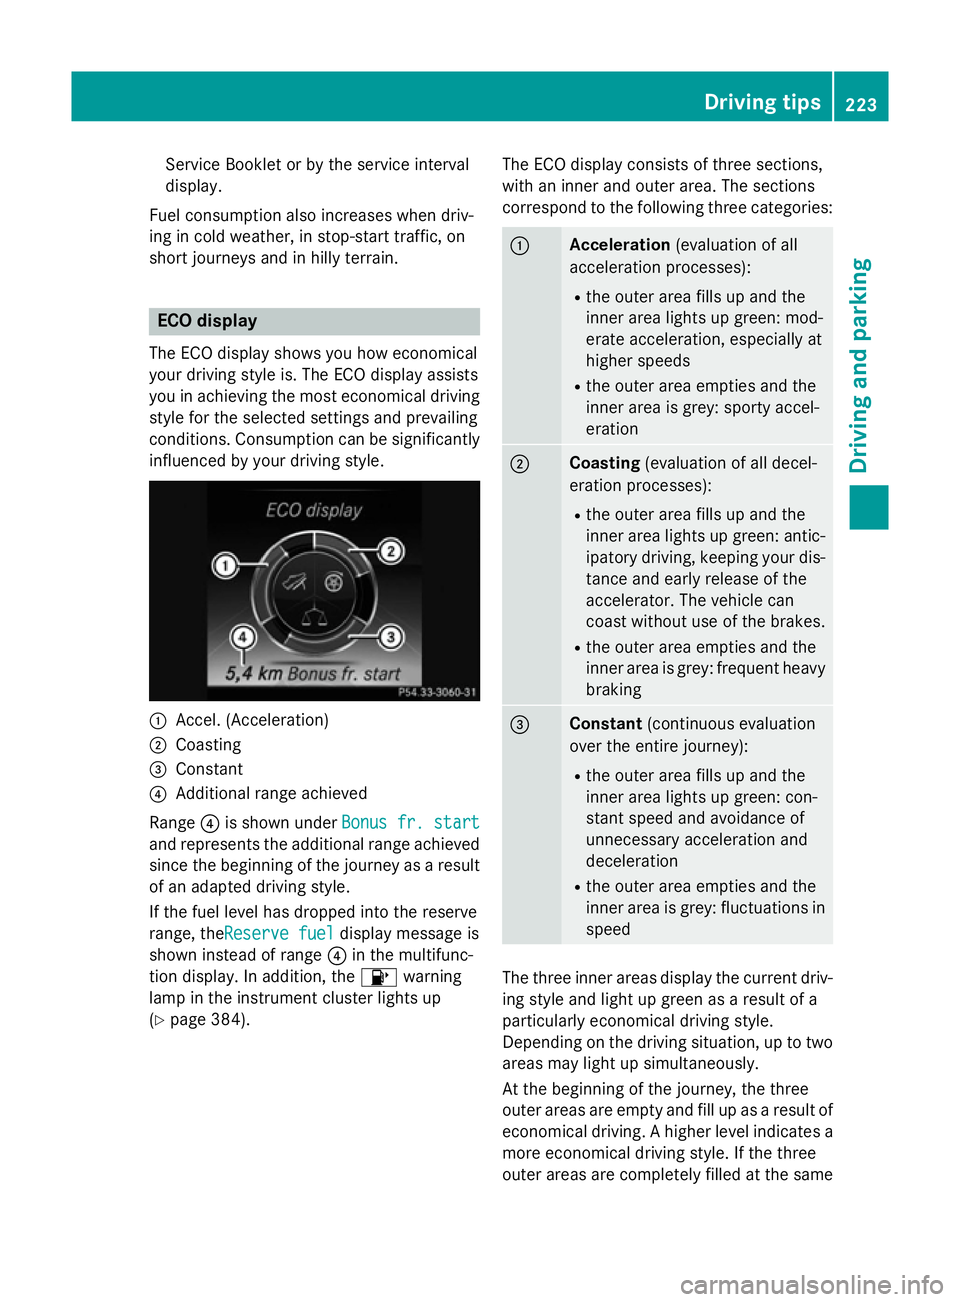
The ECO display shows you how economical
your driving style is. The ECO display assists
you in achieving the most economical driving
style for the selected settings and prevailing
conditions. Consumption can be significantly
influenced by your driving style. :
Accel. (Acceleration)
; Coasting
= Constant
? Additional range achieved
Range ?is shown under Bonus fr. start Bonus fr. start
and represents the additional range achieved since the beginning of the journey as a resultof an adapted driving style.
If the fuel level has dropped into the reserve
range, theReserve fuel Reserve fuel display message is
shown instead of range ?in the multifunc-
tion display. In addition, the 8warning
lamp in the instrument cluster lights up
(Y page 384). The ECO display consists of three sections,
with an inner and outer area. The sections
correspond to the following three categories: :
Acceleration
(evaluation of all
acceleration processes):
R the outer area fills up and the
inner area lights up green: mod-
erate acceleration, especially at
higher speeds
R the outer area empties and the
inner area is grey: sporty accel-
eration ;
Coasting
(evaluation of all decel-
eration processes):
R the outer area fills up and the
inner area lights up green: antic-
ipatory driving, keeping your dis- tance and early release of the
accelerator. The vehicle can
coast without use of the brakes.
R the outer area empties and the
inner area is grey: frequent heavy
braking =
Constant
(continuous evaluation
over the entire journey):
R the outer area fills up and the
inner area lights up green: con-
stant speed and avoidance of
unnecessary acceleration and
deceleration
R the outer area empties and the
inner area is grey: fluctuations in
speed The three inner areas display the current driv-
ing style and light up green as a result of a
particularly economical driving style.
Depending on the driving situation, up to two
areas may light up simultaneously.
At the beginning of the journey, the three
outer areas are empty and fill up as a result of economical driving. A higher level indicates a more economical driving style. If the three
outer areas are completely filled at the same Driving tips
223Driving and parking Z
Page 239 of 497
There are several ways to deactivate variable
SPEEDTRONIC:
X Briefly press the cruise control lever for-
wards =.
or X Briefly press the cruise control lever in the
direction of arrow ;.
LIM indicator lamp :in the cruise control
lever goes out. Variable SPEEDTRONIC is
deactivated.
Cruise control or DISTRONIC PLUS is selec-
ted.
i The last speed stored is cleared when you
switch off the engine.
Permanent SPEEDTRONIC
You can use the on-board computer to limit
the speed permanently to a value between
160 km/h(e.g. for driving on winter tyres) and the maximum speed (Y page 333).
Shortly before the stored speed is reached, it
appears in the multifunction display.
Permanent SPEEDTRONIC remains active,
even if variable SPEEDTRONIC is deactivated.
You cannot exceed the stored limit speed,
even if you depress the accelerator pedal
beyond the pressure point (kickdown). DISTRONIC PLUS
General notes DISTRONIC PLUS regulates the speed and
automatically helps you maintain the dis-
tance to the vehicle detected in front. Vehi-
cles are detected with the aid of the radar
sensor system. DISTRONIC PLUS brakes
automatically so that the set speed is not
exceeded.
Change into a lower gear in good time on long
and steep downhill gradients. Take particular note of this when driving a laden vehicle. By
doing so, you will make use of the braking
effect of the engine. This relieves the load on the brake system and prevents the brakes
from overheating and wearing too quickly.
If DISTRONIC PLUS detects that there is a risk
of a collision, you will be warned visually and acoustically. Without your intervention,
DISTRONIC PLUS cannot prevent a collision.
An intermittent warning tone will then sound
and the distance warning lamp will light up in
the instrument cluster. Brake immediately to
increase the distance to the vehicle driving in
front, or take evasive action, provided it is
safe to do so.
DISTRONIC PLUS operates in the range
between 0 km/h and 200 km/h.
Do not use DISTRONIC PLUS while driving on roads with steep gradients.
Important safety notes G
WARNING
DISTRONIC PLUS does not react to:
R people or animals
R stationary obstacles on the road, e.g. stop-
ped or parked vehicles
R oncoming and crossing traffic
As a result, DISTRONIC PLUS may neither give
warnings nor intervene in such situations.
There is a risk of an accident.
Always pay careful attention to the traffic sit- uation and be ready to brake. G
WARNING
DISTRONIC PLUS cannot always clearly rec-
ognise other road users and complex traffic
conditions.
In such cases, DISTRONIC PLUS may:
R give an unnecessary warning and then
brake the vehicle
R neither give a warning nor intervene
R accelerate or brake unexpectedly
There is a risk of an accident.
Continue to drive carefully and be prepared to
brake, particularly if DISTRONIC PLUS warns
you. 236
Driving systemsDriving an
d parking
Page 259 of 497
Rear sensors
Centre Approx. 120 cm
Corners Approx. 80 cm
Minimum distance
Centre Approx. 20 cm
Corners Approx. 15 cm
If there is an obstacle within this range, the
relevant warning displays light up and a warn- ing tone sounds. If the distance falls below
the minimum, the distance may no longer be
shown.
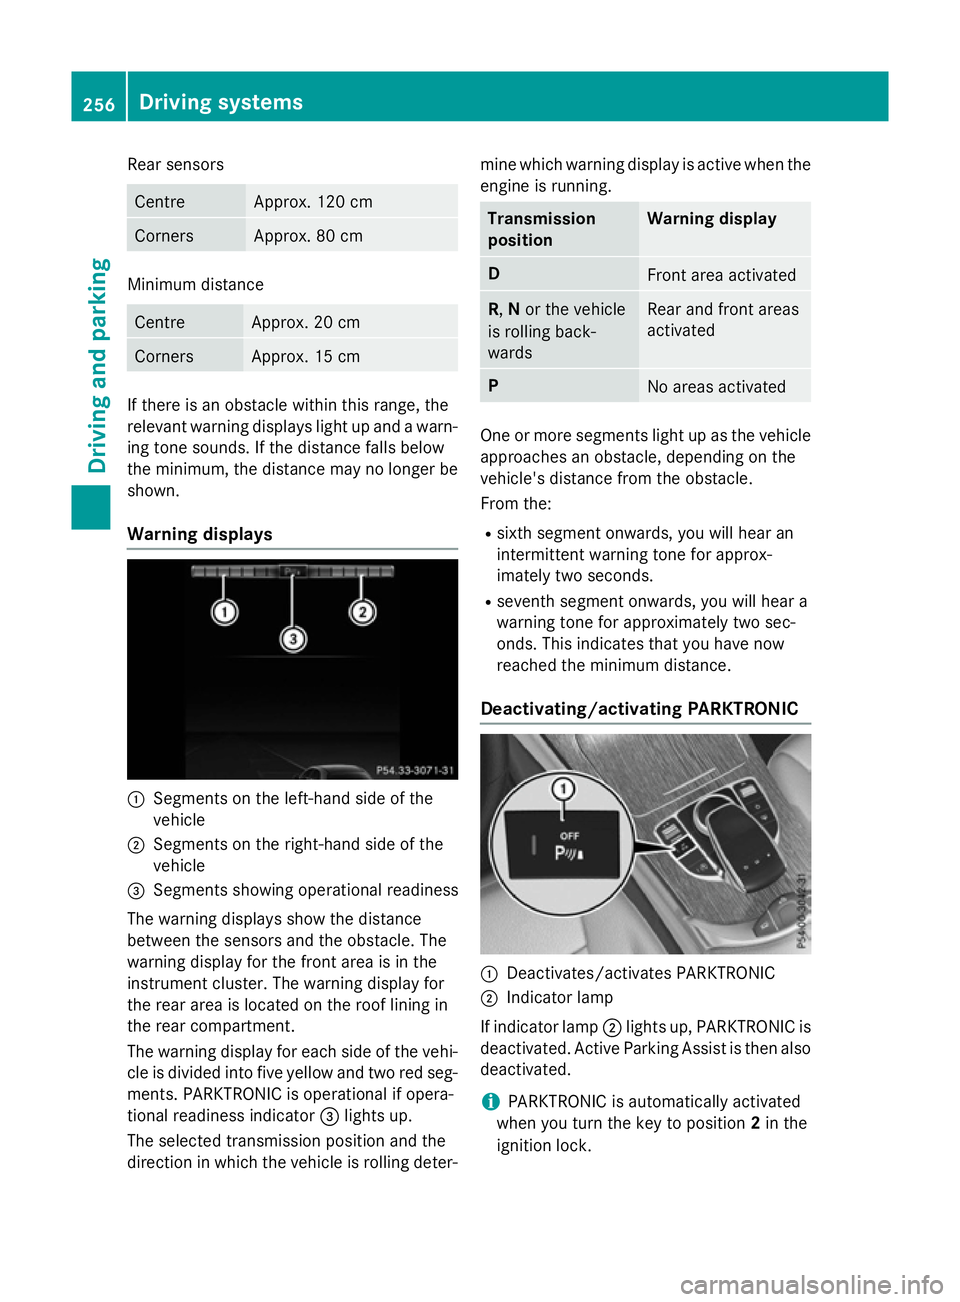
Warning displays :
Segments on the left-hand side of the
vehicle
; Segments on the right-hand side of the
vehicle
= Segments showing operational readiness
The warning displays show the distance
between the sensors and the obstacle. The
warning display for the front area is in the
instrument cluster. The warning display for
the rear area is located on the roof lining in
the rear compartment.
The warning display for each side of the vehi-
cle is divided into five yellow and two red seg- ments. PARKTRONIC is operational if opera-
tional readiness indicator =lights up.
The selected transmission position and the
direction in which the vehicle is rolling deter- mine which warning display is active when the
engine is running. Transmission
position Warning display
D
Front area activated
R,
Nor the vehicle
is rolling back-
wards Rear and front areas
activated
P
No areas activated
One or more segments light up as the vehicle
approaches an obstacle, depending on the
vehicle's distance from the obstacle.
From the:
R sixth segment onwards, you will hear an
intermittent warning tone for approx-
imately two seconds.
R seventh segment onwards, you will hear a
warning tone for approximately two sec-
onds. This indicates that you have now
reached the minimum distance.
Deactivating/activating PARKTRONIC :
Deactivates/activates PARKTRONIC
; Indicator lamp
If indicator lamp ;lights up, PARKTRONIC is
deactivated. Active Parking Assist is then also
deactivated.
i PARKTRONIC is automatically activated
when you turn the key to position 2in the
ignition lock. 256
Driving systemsDriving and pa
rking
Page 262 of 497
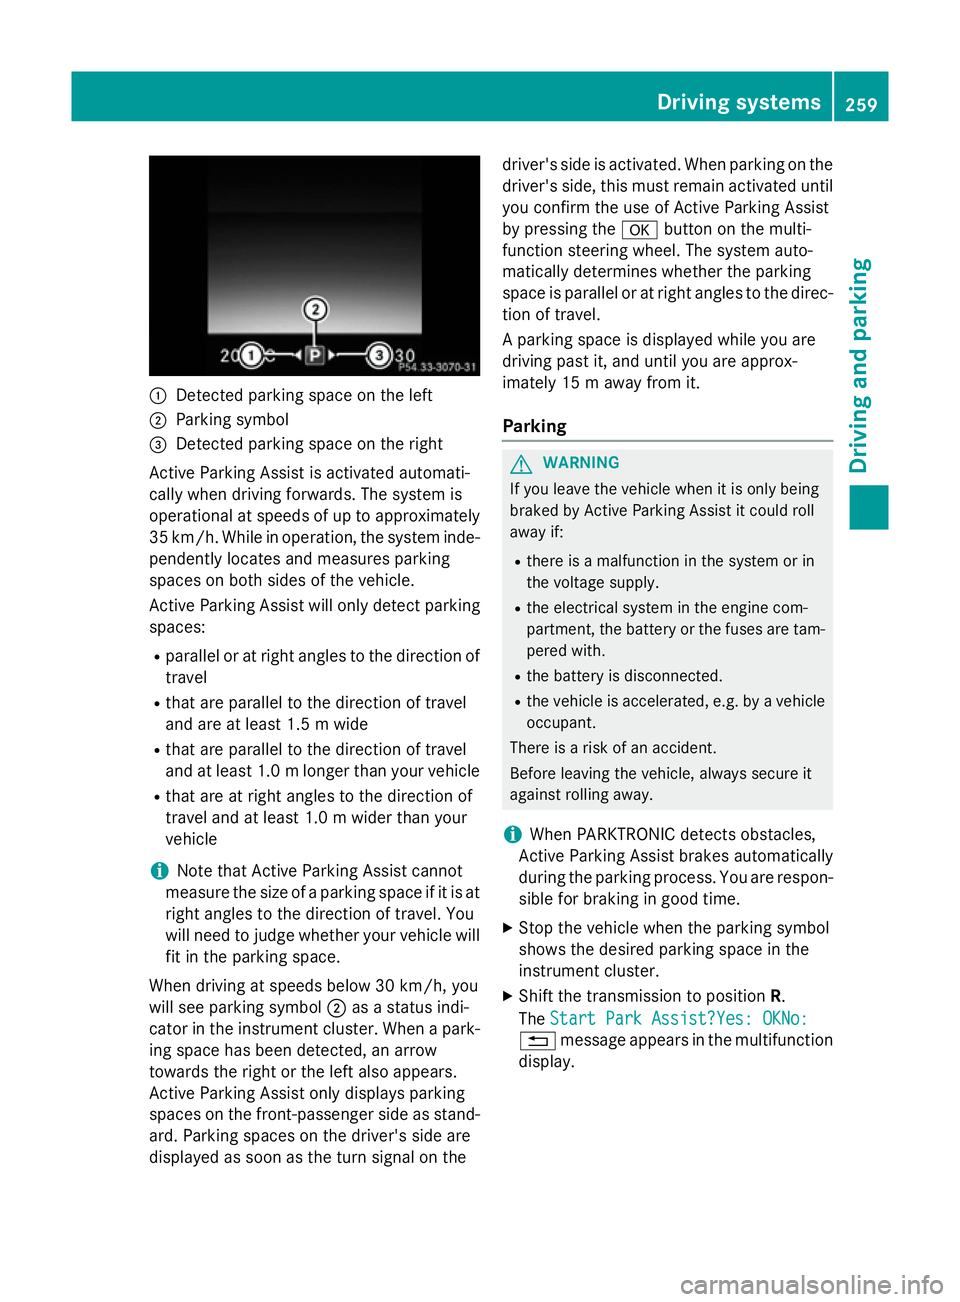
:
Detected parking space on the left
; Parking symbol
= Detected parking space on the right
Active Parking Assist is activated automati-
cally when driving forwards. The system is
operational at speeds of up to approximately
35 km/h. While in operation, the system inde- pendently locates and measures parking
spaces on both sides of the vehicle.
Active Parking Assist will only detect parkingspaces:
R parallel or at right angles to the direction of
travel
R that are parallel to the direction of travel
and are at least 1.5 m wide
R that are parallel to the direction of travel
and at least 1.0 mlonger than your vehicle
R that are at right angles to the direction of
travel and at least 1.0 m wider than your
vehicle
i Note that Active Parking Assist cannot
measure the size of a parking space if it is at
right angles to the direction of travel. You
will need to judge whether your vehicle will
fit in the parking space.
When driving at speeds below 30 km/h, you
will see parking symbol ;as a status indi-
cator in the instrument cluster. When a park- ing space has been detected, an arrow
towards the right or the left also appears.
Active Parking Assist only displays parking
spaces on the front-passenger side as stand-
ard. Parking spaces on the driver's side are
displayed as soon as the turn signal on the driver's side is activated. When parking on the
driver's side, this must remain activated untilyou confirm the use of Active Parking Assist
by pressing the abutton on the multi-
function steering wheel. The system auto-
matically determines whether the parking
space is parallel or at right angles to the direc-
tion of travel.
A parking space is displayed while you are
driving past it, and until you are approx-
imately 15 m away from it.
Parking G
WARNING
If you leave the vehicle when it is only being
braked by Active Parking Assist it could roll
away if:
R there is a malfunction in the system or in
the voltage supply.
R the electrical system in the engine com-
partment, the battery or the fuses are tam-
pered with.
R the battery is disconnected.
R the vehicle is accelerated, e.g. by a vehicle
occupant.
There is a risk of an accident.
Before leaving the vehicle, always secure it
against rolling away.
i When PARKTRONIC detects obstacles,
Active Parking Assist brakes automatically
during the parking process. You are respon-
sible for braking in good time.
X Stop the vehicle when the parking symbol
shows the desired parking space in the
instrument cluster.
X Shift the transmission to position R.
The Start Park Assist?Yes: OKNo:
Start Park Assist?Yes: OKNo:
% message appears in the multifunction
display. Driving syste
ms
259Driving an d parking Z
Page 265 of 497
R
you are driving faster than 10 km/h
R a wheel spins and ESP ®
intervenes or fails.
The ÷ warning lamp lights up in the
instrument cluster.
A warning tone sounds. The parking symbol
disappears and the multifunction display
shows the Park Assist cancelled Park Assist cancelled mes-
sage.
When Active Parking Assist is cancelled, you
must steer and brake again yourself.
If a system malfunction occurs, the vehicle is braked to a standstill. To drive on, depress the
accelerator pedal again. Reversing camera
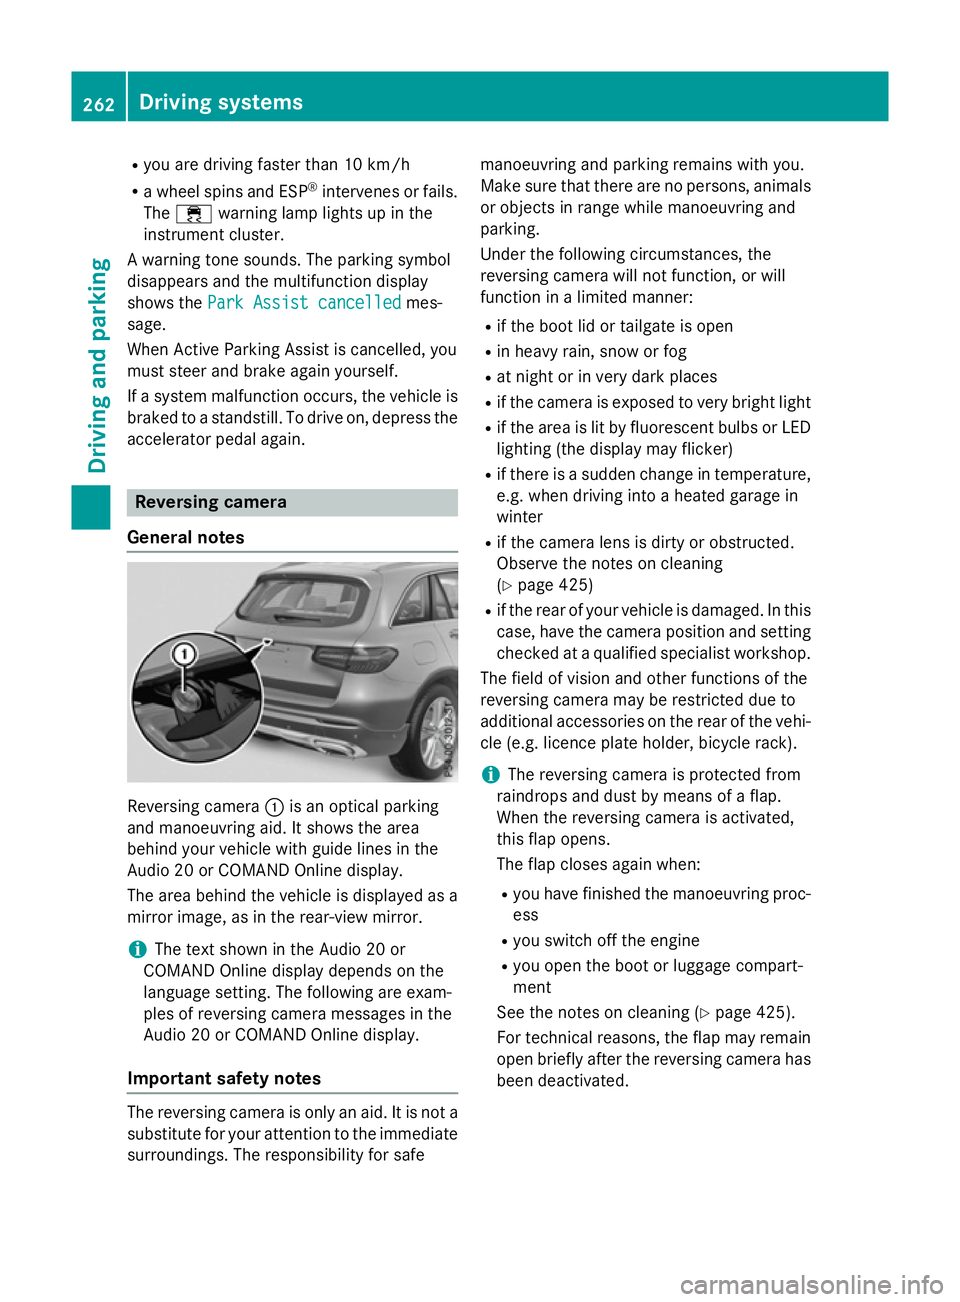
General notes Reversing camera
:is an optical parking
and manoeuvring aid. It shows the area
behind your vehicle with guide lines in the
Audio 20 or COMAND Online display.
The area behind the vehicle is displayed as a
mirror image, as in the rear-view mirror.
i The text shown in the Audio 20 or
COMAND Online display depends on the
language setting. The following are exam-
ples of reversing camera messages in the
Audio 20 or COMAND Online display.
Important safety notes The reversing camera is only an aid. It is not a
substitute for your attention to the immediate
surroundings. The responsibility for safe manoeuvring and parking remains with you.
Make sure that there are no persons, animals
or objects in range while manoeuvring and
parking.
Under the following circumstances, the
reversing camera will not function, or will
function in a limited manner:
R if the boot lid or tailgate is open
R in heavy rain, snow or fog
R at night or in very dark places
R if the camera is exposed to very bright light
R if the area is lit by fluorescent bulbs or LED
lighting (the display may flicker)
R if there is a sudden change in temperature,
e.g. when driving into a heated garage in
winter
R if the camera lens is dirty or obstructed.
Observe the notes on cleaning
(Y page 425)
R if the rear of your vehicle is damaged. In this
case, have the camera position and setting checked at a qualified specialist workshop.
The field of vision and other functions of the
reversing camera may be restricted due to
additional accessories on the rear of the vehi-
cle (e.g. licence plate holder, bicycle rack).
i The reversing camera is protected from
raindrops and dust by means of a flap.
When the reversing camera is activated,
this flap opens.
The flap closes again when:
R you have finished the manoeuvring proc-
ess
R you switch off the engine
R you open the boot or luggage compart-
ment
See the notes on cleaning (Y page 425).
For technical reasons, the flap may remain
open briefly after the reversing camera has been deactivated. 262
Driving syste
msDriving and parking