2015 MERCEDES-BENZ GLC SUV instrument cluster
[x] Cancel search: instrument clusterPage 92 of 497
R
darkness
R if:
- pedestrians move quickly, e.g. into the
path of the vehicle
- the camera system no longer detects a
pedestrian as a person due to special
clothing or other objects
- a pedestrian is concealed by other
objects
- the typical outline of a person is not dis-
tinguishable from the background
Following damage to the front end of the vehi-
cle, have the radar sensor settings and oper- ation checked at a qualified specialist work-
shop. This also applies to collisions at slow
speeds where there is no visible damage to
the front of the vehicle.
Following damage to the windscreen, have
the configuration and operation of the cam-
era system checked at a qualified specialist
workshop.
Function X
To activate/deactivate: activate or deac-
tivate PRE-SAFE ®
Brake in the on-board
computer (Y page 328).
If the PRE-SAFE ®
Brake is not activated, the
æ symbol appears in the multifunction
display.
If you have activated DSR (Y page 248) PRE-
SAFE ®
Brake is also deactivated.
This function will issue a warning if:
R at a speed of around 30 km/ hor more, the
distance maintained to the vehicle travel-
ling in front is insufficient for several sec-
onds
The · distance warning lamp then lights
up in the instrument cluster.
R at a speed of around 7 km/h or more, you
rapidly approach a vehicle in front or a
pedestrian
An intermittent warning tone will then
sound and the ·distance warning lamp
lights up in the instrument cluster. X
Brake immediately to defuse the situation.
or
X Take evasive action provided it is safe to do
so.
The PRE-SAFE ®
Brake function can also brake
the vehicle automatically under the following
conditions:
R the driver and front passenger have their
seat belts fastened
and
R the vehicle speed is between approx-
imately 7 km/h and 200 km/h
At a speed of up to approximately 70 km/h,
PRE-SAFE ®
Brake can also detect:
R stationary objects in the path of your vehi-
cle, e.g. stopped or parked vehicles
R pedestrians in the path of your vehicle
i If there is an increased risk of a collision,
preventive passenger protection measures
(PRE-SAFE ®
) are activated (Y page 64).
If the risk of a collision with the vehicle in front remains and you do not brake, take evasive
action or accelerate significantly, the vehicle
may perform automatic emergency braking,
up to the point of full brake application. Auto-
matic emergency braking is not performed
until immediately prior to an imminent acci-
dent.
You can prevent the intervention of PRE-
SAFE ®
Brake at any time by:
R depressing the accelerator pedal further
R activating kickdown
R releasing the brake pedal
The braking action of PRE-SAFE ®
Brake is
ended automatically if:
R you manoeuvre to avoid the obstacle
R there is no longer a risk of collision
R there is no longer an obstacle detected in
front of your vehicle Driving safety systems
89Safety Z
Page 142 of 497
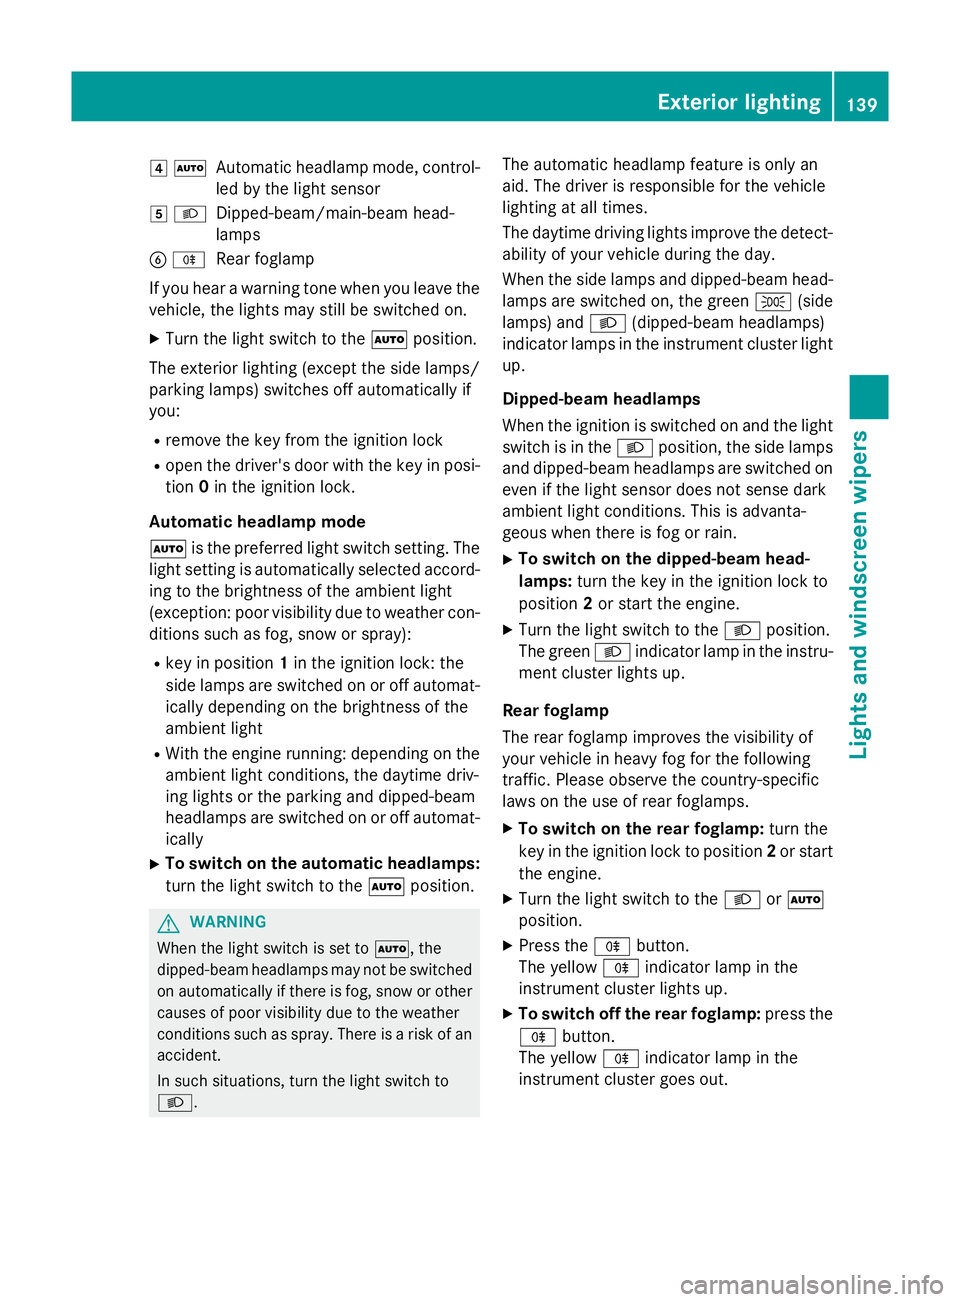
4
Ã
Automatic headlamp mode, control-
led by the light sensor
5 L
Dipped-beam/main-beam head-
lamps
B R
Rear foglamp
If you hear a warning tone when you leave the
vehicle, the lights may still be switched on.
X Turn the light switch to the Ãposition.
The exterior lighting (except the side lamps/
parking lamps) switches off automatically if
you:
R remove the key from the ignition lock
R open the driver's door with the key in posi-
tion 0in the ignition lock.
Automatic headlamp mode
à is the preferred light switch setting. The
light setting is automatically selected accord- ing to the brightness of the ambient light
(exception: poor visibility due to weather con-
ditions such as fog, snow or spray):
R key in position 1in the ignition lock: the
side lamps are switched on or off automat- ically depending on the brightness of the
ambient light
R With the engine running: depending on the
ambient light conditions, the daytime driv-
ing lights or the parking and dipped-beam
headlamps are switched on or off automat- ically
X To switch on the automatic headlamps:
turn the light switch to the Ãposition. G
WARNING
When the light switch is set to Ã, the
dipped-beam headlamps may not be switched on automatically if there is fog, snow or othercauses of poor visibility due to the weather
conditions such as spray. There is a risk of an
accident.
In such situations, turn the light switch to
L. The automatic headlamp feature is only an
aid. The driver is responsible for the vehicle
lighting at all times.
The daytime driving lights improve the detect-
ability of your vehicle during the day.
When the side lamps and dipped-beam head-lamps are switched on, the green T(side
lamps) and L(dipped-beam headlamps)
indicator lamps in the instrument cluster light
up.
Dipped-beam headlamps
When the ignition is switched on and the light
switch is in the Lposition, the side lamps
and dipped-beam headlamps are switched on even if the light sensor does not sense dark
ambient light conditions. This is advanta-
geous when there is fog or rain.
X To switch on the dipped-beam head-
lamps: turn the key in the ignition lock to
position 2or start the engine.
X Turn the light switch to the Lposition.
The green Lindicator lamp in the instru-
ment cluster lights up.
Rear foglamp
The rear foglamp improves the visibility of
your vehicle in heavy fog for the following
traffic. Please observe the country-specific
laws on the use of rear foglamps.
X To switch on the rear foglamp: turn the
key in the ignition lock to position 2or start
the engine.
X Turn the light switch to the LorÃ
position.
X Press the Rbutton.
The yellow Rindicator lamp in the
instrument cluster lights up.
X To switch off the rear foglamp: press the
R button.
The yellow Rindicator lamp in the
instrument cluster goes out. Exterior lighting
139Lights andwindscreen wipers Z
Page 147 of 497
Important safety notes
G
WARNING
Adaptive Highbeam Assist Plus does not rec-
ognise road users:
R who have no lights, e.g. pedestrians
R who have poor lighting, e.g. cyclists
R whose lighting is blocked, e.g. by a barrier
In very rare cases, Adaptive Highbeam Assist
Plus may not recognise road users who do
have lights, or may recognise them too late. In this, or in similar situations, the automatic
main-beam headlamps will not be deactivated
or will be activated despite the presence of
other road users. There is a risk of an acci-
dent.
Always carefully observe the traffic conditions and switch off the main-beam headlamps in
good time.
Adaptive Highbeam Assist Plus cannot take
into account road, weather or traffic condi-
tions. Adaptive Highbeam Assist Plus is only
an aid. You are responsible for adjusting the
vehicle's lighting to the prevailing light, visi-
bility and traffic conditions.
In particular, the detection of obstacles can
be restricted if there is:
R poor visibility, e.g. due to fog, heavy rain or
snow
R dirt on the sensors or if the sensors are
obscured
Switching Adaptive Highbeam Assist
Plus on/off X
To switch on: turn the light switch to the
à position.
X Press the combination switch beyond the
pressure point in the direction of arrow :.
The _ indicator lamp in the multifunc-
tion display lights up when it is dark and the
light sensor switches on the dipped-beam
headlamps.
At speeds above approx. 25 km/h: the
headlamp range is automatically controlled according to the distance to other road
users.
At speeds above approx. 30 km/h:
R If no other road users are detected, the
main-beam headlamps are automatically
switched on.
R If other road users are detected, the par-
tial main-beam headlamps are automat-
ically switched on.
The K indicator lamp in the instrument
cluster also lights up.
At speeds below approx. 25 km/h or
when there is sufficient street lighting:
R The partial main-beam headlamps are
switched off automatically.
R The main-beam headlamps are switched
off automatically.
The K indicator lamp in the instrument
cluster goes out. The _indicator lamp
in the multifunction display remains lit.
X To switch off: move the combination
switch back to its normal position or move the light switch to another position.
The _ indicator lamp in the multifunc-
tion display goes out. Headlamps misted up on the inside
Certain climatic and physical conditions may
cause moisture to form in the headlamp. This
moisture does not affect the functionality of
the headlamp. 144
Exterior lightingLights and windscreen wipers
Page 154 of 497
position, causing the windscreen wiper to
wipe more frequently.
If the wiper blades are worn, the windscreen
will no longer be wiped properly. This could
prevent you from observing the traffic condi-
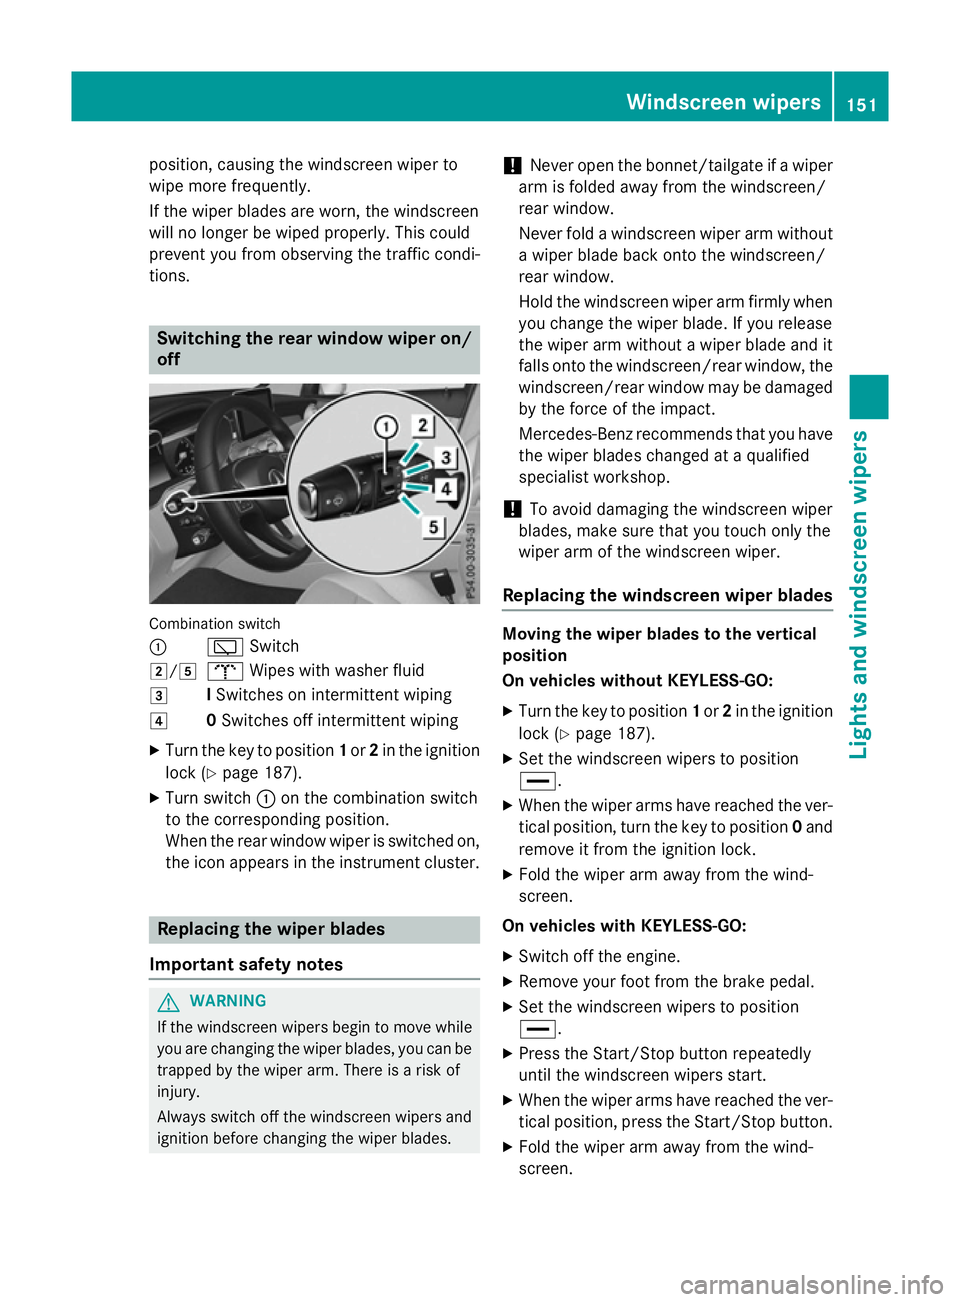
tions. Switching the rear window wiper on/
off Combination switch
:
èSwitch
2/5 bWipes with washer fluid
3 ISwitches on intermittent wiping
4 0Switches off intermittent wiping
X Turn the key to position 1or 2in the ignition
lock (Y page 187).
X Turn switch :on the combination switch
to the corresponding position.
When the rear window wiper is switched on,
the icon appears in the instrument cluster. Replacing the wiper blades
Important safety notes G
WARNING
If the windscreen wipers begin to move while
you are changing the wiper blades, you can be trapped by the wiper arm. There is a risk of
injury.
Always switch off the windscreen wipers and
ignition before changing the wiper blades. !
Never open the bonnet/tailgate if a wiper
arm is folded away from the windscreen/
rear window.
Never fold a windscreen wiper arm without a wiper blade back onto the windscreen/
rear window.
Hold the windscreen wiper arm firmly when
you change the wiper blade. If you release
the wiper arm without a wiper blade and it
falls onto the windscreen/rear window, the windscreen/rear window may be damaged
by the force of the impact.
Mercedes-Benz recommends that you have the wiper blades changed at a qualified
specialist workshop.
! To avoid damaging the windscreen wiper
blades, make sure that you touch only the
wiper arm of the windscreen wiper.
Replacing the windscreen wiper blades Moving the wiper blades to the vertical
position
On vehicles without KEYLESS-GO:
X Turn the key to position 1or 2in the ignition
lock (Y page 187).
X Set the windscreen wipers to position
°.
X When the wiper arms have reached the ver-
tical position, turn the key to position 0and
remove it from the ignition lock.
X Fold the wiper arm away from the wind-
screen.
On vehicles with KEYLESS-GO:
X Switch off the engine.
X Remove your foot from the brake pedal.
X Set the windscreen wipers to position
°.
X Press the Start/Stop button repeatedly
until the windscreen wipers start.
X When the wiper arms have reached the ver-
tical position, press the Start/Stop button.
X Fold the wiper arm away from the wind-
screen. Windscreen wipers
151Lights and windscreen wipers Z
Page 191 of 497
To start the vehicle without actively using the
key:
R the Start/Stop button must be inserted in
the ignition lock
R the key must be in the vehicle
R the vehicle must not be locked with the key
or KEYLESS-GO (Y page 95)
Do not keep the key:
R with electronic devices, e.g. a mobile
phone or another key
R with metallic objects, e.g. coins or metal
film
R inside metallic objects, e.g. a metal case
This can affect the key's functionality.
If you lock the vehicle with the key's remote
control or with KEYLESS-GO, after a short
time:
R you will not be able to switch on the ignition
with the Start/Stop button
R you will not be able to start the engine with
the Start/Stop button until the vehicle is
unlocked again
If you lock the vehicle centrally using the but- ton on the front door (Y page 101), you can
continue to start the engine with the Start/
Stop button.
The engine can be switched off while the vehi-
cle is in motion by pressing and holding the
Start/Stop button for three seconds. This
function operates independently of the ECO
start/stop automatic engine switch-off func-
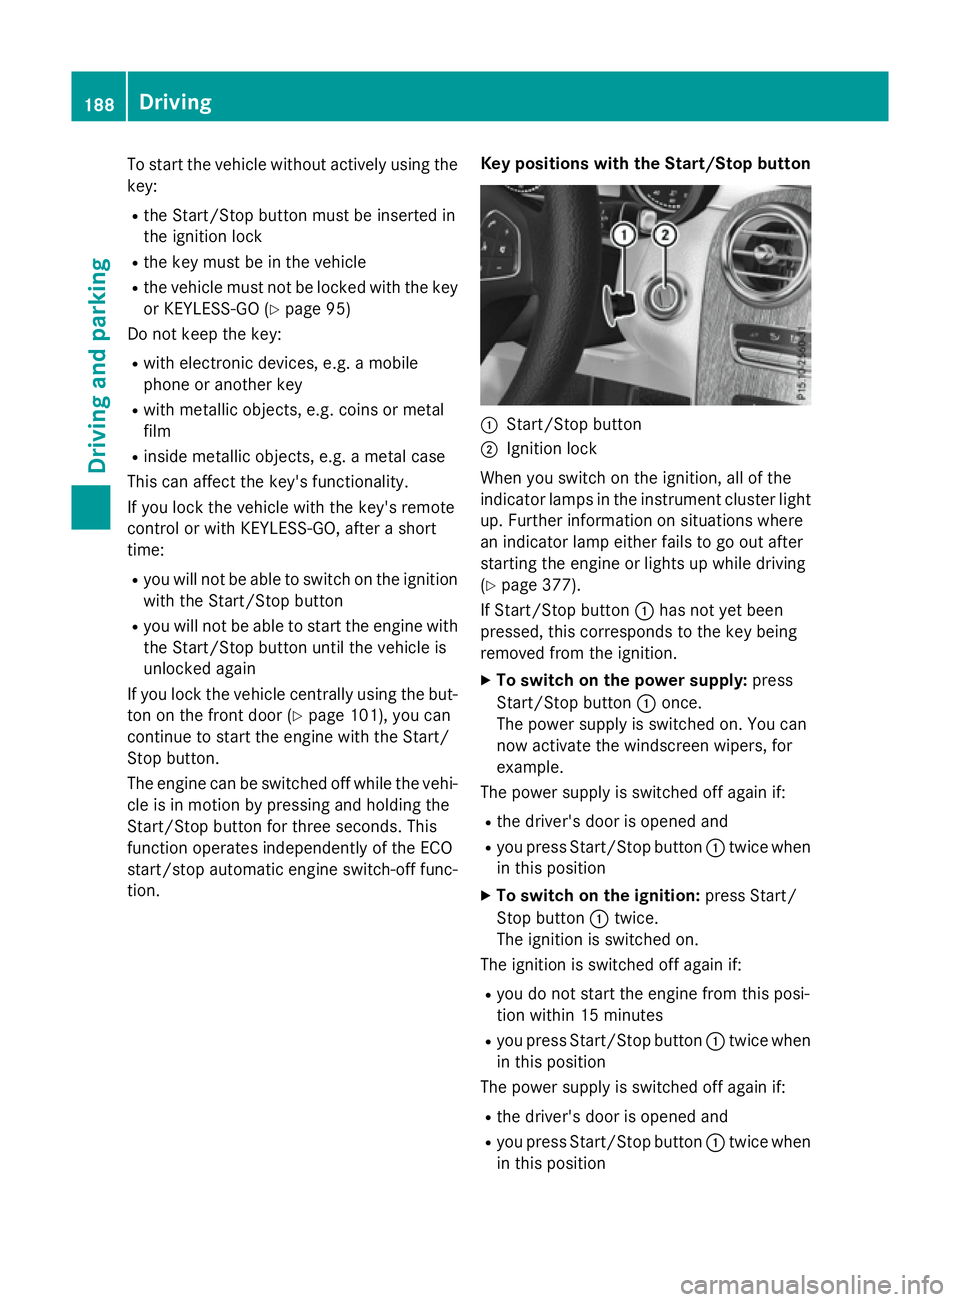
tion. Key positions with the Start/Stop button :
Start/Stop button
; Ignition lock
When you switch on the ignition, all of the
indicator lamps in the instrument cluster light up. Further information on situations where
an indicator lamp either fails to go out after
starting the engine or lights up while driving
(Y page 377).
If Start/Stop button :has not yet been
pressed, this corresponds to the key being
removed from the ignition.
X To switch on the power supply: press
Start/Stop button :once.
The power supply is switched on. You can
now activate the windscreen wipers, for
example.
The power supply is switched off again if:
R the driver's door is opened and
R you press Start/Stop button :twice when
in this position
X To switch on the ignition: press Start/
Stop button :twice.
The ignition is switched on.
The ignition is switched off again if:
R you do not start the engine from this posi-
tion within 15 minutes
R you press Start/Stop button :twice when
in this position
The power supply is switched off again if:
R the driver's door is opened and
R you press Start/Stop button :twice when
in this position 188
DrivingDriving and parking
Page 193 of 497
X
To start a diesel engine : turn the key to
position 2in the ignition lock (Y page 187).
The % preglow indicator lamp in the
instrument cluster lights up.
X Turn the key to position 3in the ignition
lock and release it as soon as the engine is running (Y page 187).
i Vehicles with a diesel engine:
you can
start the engine without preglow if the
engine is warm.
If the engine will not start:
X Remove the key from the ignition lock.
X Reinsert the key into the ignition lock after
waiting for a short period.
X Turn the key to position 2in the ignition
lock (Y page 187).
The indicator lamps in the instrument clus- ter light up (Y page 375).
X Turn the key to position 3in the ignition
lock (Y page 187 )and release it as soon as
the engine is running.
Starting procedure using the Start/
Stop button The Start/Stop button is only available on
vehicles with KEYLESS-GO or the KEYLESS-
GO start function.
The Start/Stop button can be used to start
the vehicle manually without inserting the key
into the ignition lock. The key must be in the
vehicle and the Start/Stop button must be
inserted in the ignition lock. This mode for
starting the engine operates independently of
the ECO start/stop automatic engine start
function.
You can start the engine if a valid key is in the vehicle. Switch off the engine and always take
the key with you when leaving the vehicle,
even if you only leave it for a short time. Pay
attention to the important safety notes. X
Depress the brake pedal and keep it
depressed.
X Press the Start/Stop button once
(Y page 187).
Vehicles with a petrol engine: the engine
starts.
Vehicles with a diesel engine: preglow is
activated and the engine starts. Pulling away
General notes G
WARNING
If the engine speed is above the idling speed
and you engage transmission position Dor R,
the vehicle could pull away suddenly. There is a risk of an accident.
When engaging transmission position Dor R,
always firmly depress the brake pedal and do not simultaneously accelerate.
Depress the accelerator carefully when pull-
ing away.
The vehicle locks centrally once you have
pulled away. The locking knobs in the doors
drop down.
You can open the doors from the inside at any
time.
You can also deactivate the automatic locking feature, see the Digital Owner's Manual.
It is only possible to shift the transmission
from position Pto the desired position if you
depress the brake pedal. Only then is the
parking lock released. If you do not depress
the brake pedal, the DIRECT SELECT lever can still be moved but the parking lock remains
engaged.
i Upshifts take place at higher engine
speeds after a cold start. This helps the
catalytic converter to reach its operating
temperature more quickly.
Information on automatically releasing the
electrical parking brake (Y page 220).190
DrivingDriving an
d parking
Page 197 of 497
Problems with the engine
Problem
Possible causes/consequences and
M
MSolutions The engine does not
start. The HOLD function or DISTRONIC PLUS is activated.
X Deactivate the HOLD function (Y page 247) or DISTRONIC
PLUS (Y page 236).
X Try to start the engine again (Y page 189).The engine does not
start. The starter motor
can be heard. R
There is a malfunction in the engine electronics.
R There is a malfunction in the fuel supply.
Before attempting to start the engine again:
X Turn the key back to position 0in the ignition lock.
or
X Press the Start/Stop button repeatedly until all indicator lamps
in the instrument cluster go out.
X Try to start the engine again (Y page 189). Avoid excessively
long and frequent attempts to start the engine, as this will drain the battery.
If the engine does not start after several attempts: X Consult a qualified specialist workshop. The engine does not
start. The starter motor
can be heard. The
reserve fuel warning
lamp is lit and the fuel
gauge display is at the
reserve level. The fuel tank is empty.
X Refuel the vehicle. The engine does not
start. You cannot hear
the starter motor. The on-board voltage is too low because the battery is too weak or
discharged.
X Jump-start the vehicle (Y page 443).
If the engine does not start despite attempts to jump-start it:
X Consult a qualified specialist workshop. The starter motor was exposed to a thermal load that was too high.
X Try to start the engine again (Y page 189).
If the engine still does not start: X Consult a qualified specialist workshop. 194
DrivingDriving and parking
Page 205 of 497
Further information on activating manual
gearshifting on PLUG-IN HYBRID vehicles
(Y page 296).
Temporary setting will be active for a certain
amount of time. Under certain conditions the minimum amount of time is extended, e.g. in
the case of lateral acceleration, during an
overrun phase or when driving on steep ter-
rain.
X To deactivate: pull steering wheel gear-
shift paddle ;and hold it in place.
or
X Use the DIRECT SELECT lever to shift the
transmission position.
or
X Use the DYNAMIC SELECT switch to
change the drive program.
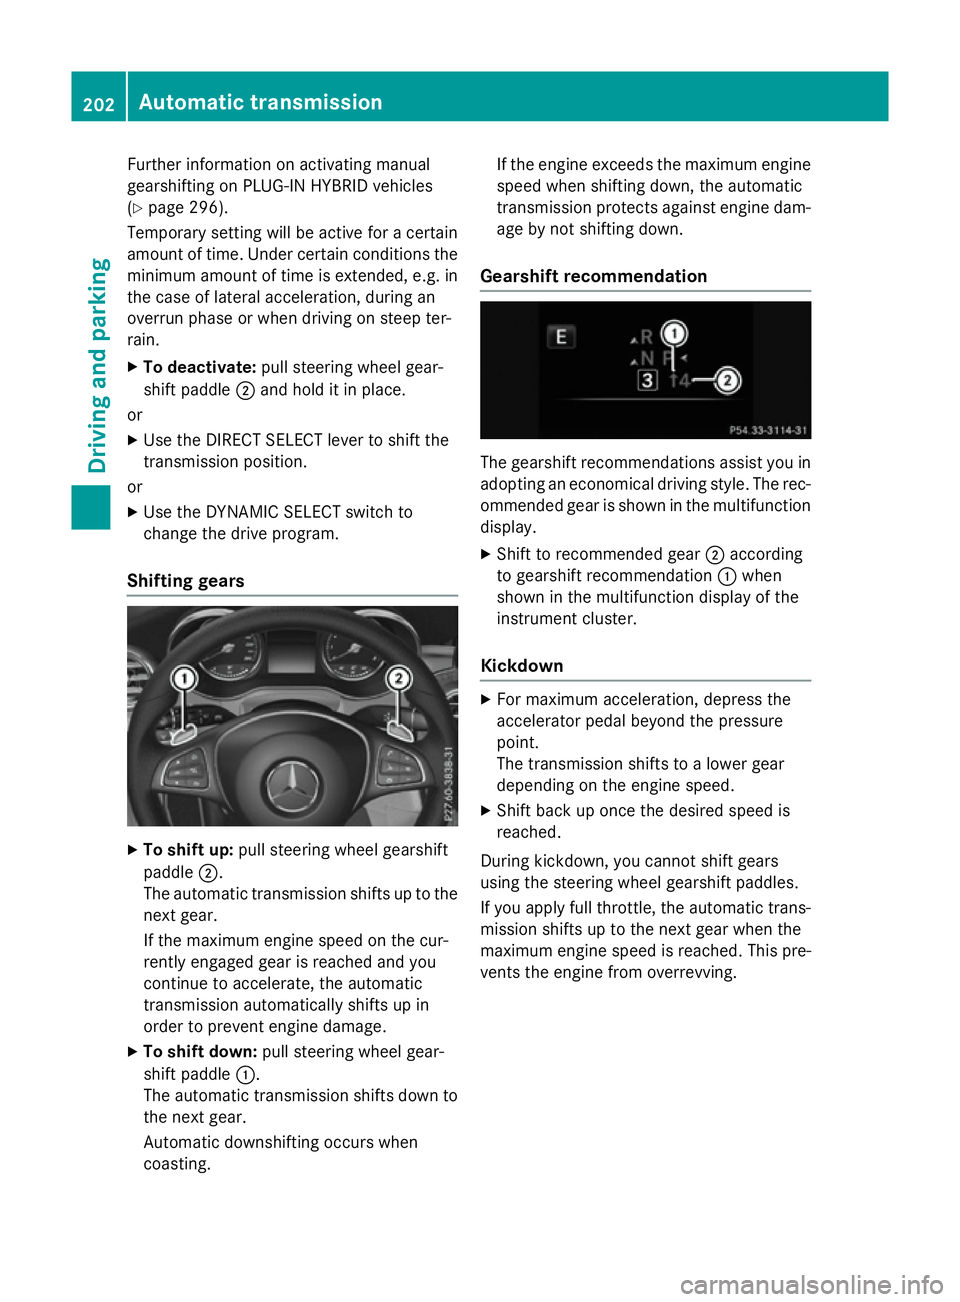
Shifting gears X
To shift up: pull steering wheel gearshift
paddle ;.
The automatic transmission shifts up to the next gear.
If the maximum engine speed on the cur-
rently engaged gear is reached and you
continue to accelerate, the automatic
transmission automatically shifts up in
order to prevent engine damage.
X To shift down: pull steering wheel gear-
shift paddle :.
The automatic transmission shifts down to the next gear.
Automatic downshifting occurs when
coasting. If the engine exceeds the maximum engine
speed when shifting down, the automatic
transmission protects against engine dam-
age by not shifting down.
Gearshift recommendation The gearshift recommendations assist you in
adopting an economical driving style. The rec- ommended gear is shown in the multifunction
display.
X Shift to recommended gear ;according
to gearshift recommendation :when
shown in the multifunction display of the
instrument cluster.
Kickdown X
For maximum acceleration, depress the
accelerator pedal beyond the pressure
point.
The transmission shifts to a lower gear
depending on the engine speed.
X Shift back up once the desired speed is
reached.
During kickdown, you cannot shift gears
using the steering wheel gearshift paddles.
If you apply full throttle, the automatic trans- mission shifts up to the next gear when the
maximum engine speed is reached. This pre-
vents the engine from overrevving. 202
Automatic transmissionDriving and parking