2015 MERCEDES-BENZ G-CLASS SUV lock
[x] Cancel search: lockPage 79 of 274
Side windows
Important safety notes
GWARNING
While closing the side windows, body parts inthe closing area could become trapped. There is a risk of injury.
When closing make sure that no parts of the
body are in the closing area. If somebody
becomes trapped, release the switch or press
the switch to open the side window again.
GWARNING
While opening the side windows, body parts
could become trapped between the side win- dow and the door frame as the side window
moves. There is a risk of injury.
Make sure that nobody touches the side win-
dow during the opening procedure. If some-
body becomes trapped, release the switch or pull the switch to close the side window again.
Information in the Digital Operator's Manual
In the Digital Operator's Manual you will find
information on the following topics:
R Opening and closing the side windows
R Opening and closing all side windows
Problems with the side windows
GWARNING
Closing the side windows with increased force
or without the anti-entrapment feature could
lead to serious or even fatal injury. Make sure
that nobody can become trapped when clos-
ing the side windows.
Problem: a side window cannot be closed because objects are trapped between the
side window and the door frame.
X Remove the objects.
X Close the side window. Problem: a side window cannot be closed
and you cannot see the cause.
If a side window is obstructed during closing
and reopens again slightly:
X Immediately after the window blocks, pull
the corresponding switch again until the
side window has closed.
If a side window is obstructed again during
closing and reopens again slightly: X Immediately after the window blocks, pull
the corresponding switch again until the
side window has closed.
iIf a side window no longer opens or closes
due to a malfunction, contact a qualified
specialist workshop.
Sliding sunroof
Important safety notes
!
Only open the sliding sunroof if it is free of
snow and ice. Otherwise, malfunctions may
occur.
Do not allow anything to protrude from the sliding sunroof. Otherwise, the seals could
be damaged.
!If the sliding sunroof still cannot be
opened or closed as a result of a malfunc-
tion, contact a qualified specialist work-shop.
!The weather can change abruptly. It could
start to rain or snow. Make sure that the
sliding sunroof is closed when you leave the
vehicle. The vehicle electronics can be
damaged if water enters the vehicle inte-rior.
iResonance noises can occur in addition to
the usual airflow noises when the sliding
sunroof is open. They are caused by minor
pressure fluctuations in the vehicle interior.
Change the position of the sliding sunroof
or open a side window slightly to reduce or
eliminate these noises.
Sliding sunroof77
Opening and closing
Z
Page 80 of 274
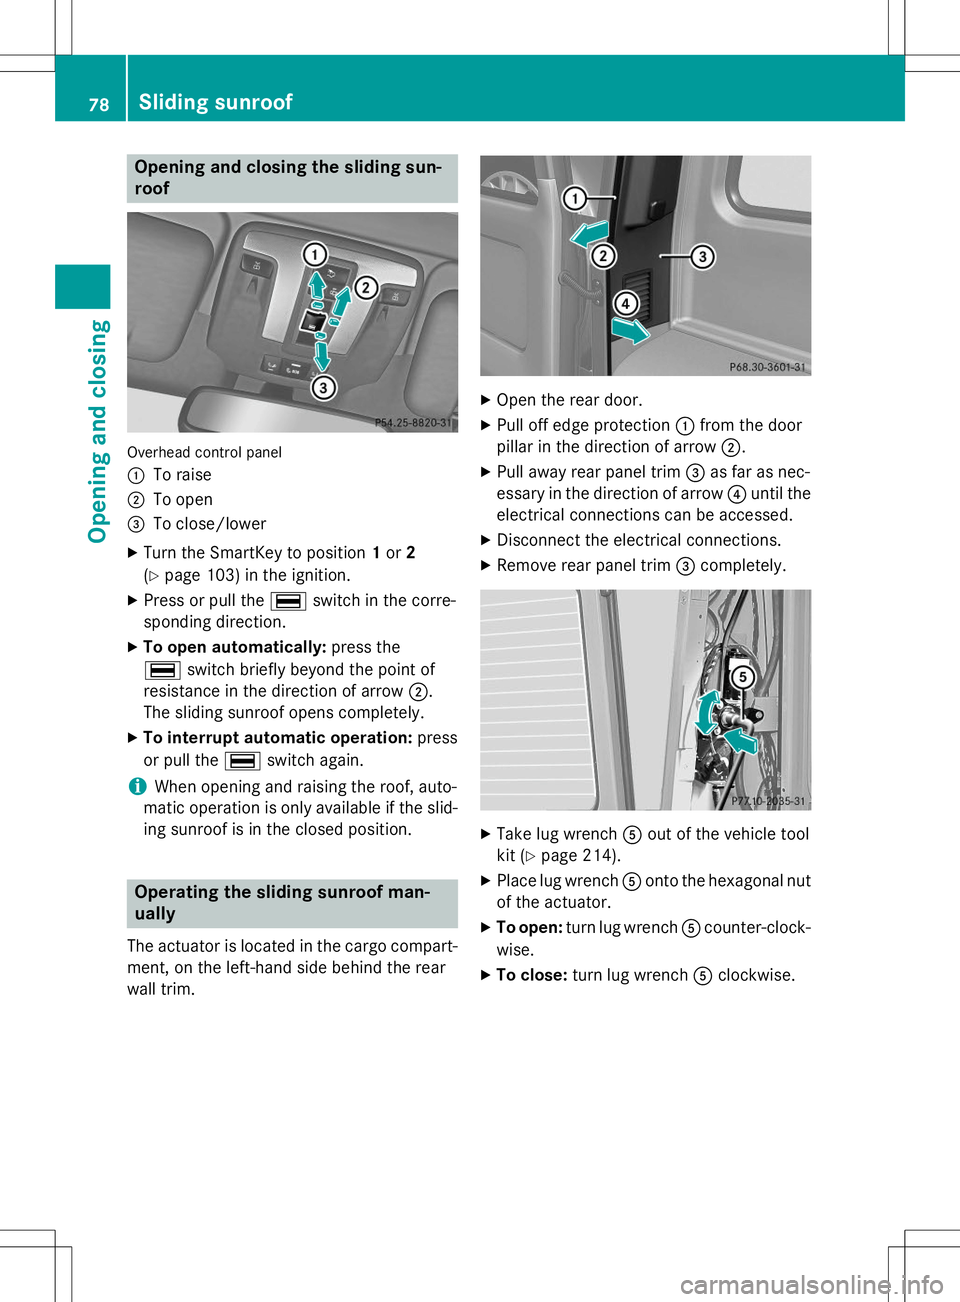
Opening and closing the sliding sun- roof
Overhead control panel :
To raise
;To open
=To close/lower
X Turn the SmartKey to position 1or 2
( Y page 103) in the ignition.
X Press or pull the ¡switch in the corre-
sponding direction.
X To open automatically: press the
¡ switch briefly beyond the point of
resistance in the direction of arrow ;.
The sliding sunroof opens completely.
X To interrupt automatic operation: press
or pull the ¡switch again.
iWhen opening and raising the roof, auto-
matic operation is only available if the slid- ing sunroof is in the closed position.
Operating the sliding sunroof man- ually
The actuator is located in the cargo compart-
ment, on the left-hand side behind the rear
wall trim.
X Open the rear door.
X Pull off edge protection :from the door
pillar in the direction of arrow ;.
X Pull away rear panel trim =as far as nec-
essary in the direction of arrow ?until the
electrical connections can be accessed.
X Disconnect the electrical connections.
X Remove rear panel trim =completely.
X
Take lug wrench Aout of the vehicle tool
kit ( Ypage 214).
X Place lug wrench Aonto the hexagonal nut
of the actuator.
X To open: turn lug wrench Acounter-clock-
wise.
X To close: turn lug wrench Aclockwise.
78Sliding sunroof
Opening and closing
Page 84 of 274
Useful information
iThis Operator's Manual describes all
models and all standard and optional equip- ment of your vehicle available at the time of
publication of the Operator's Manual.
Country-specific differences are possible.
Please note that your vehicle may not be
equipped with all features described. This
also applies to safety-related systems and
functions.
iRead the information on qualified special-
ist workshops: ( Ypage 28).
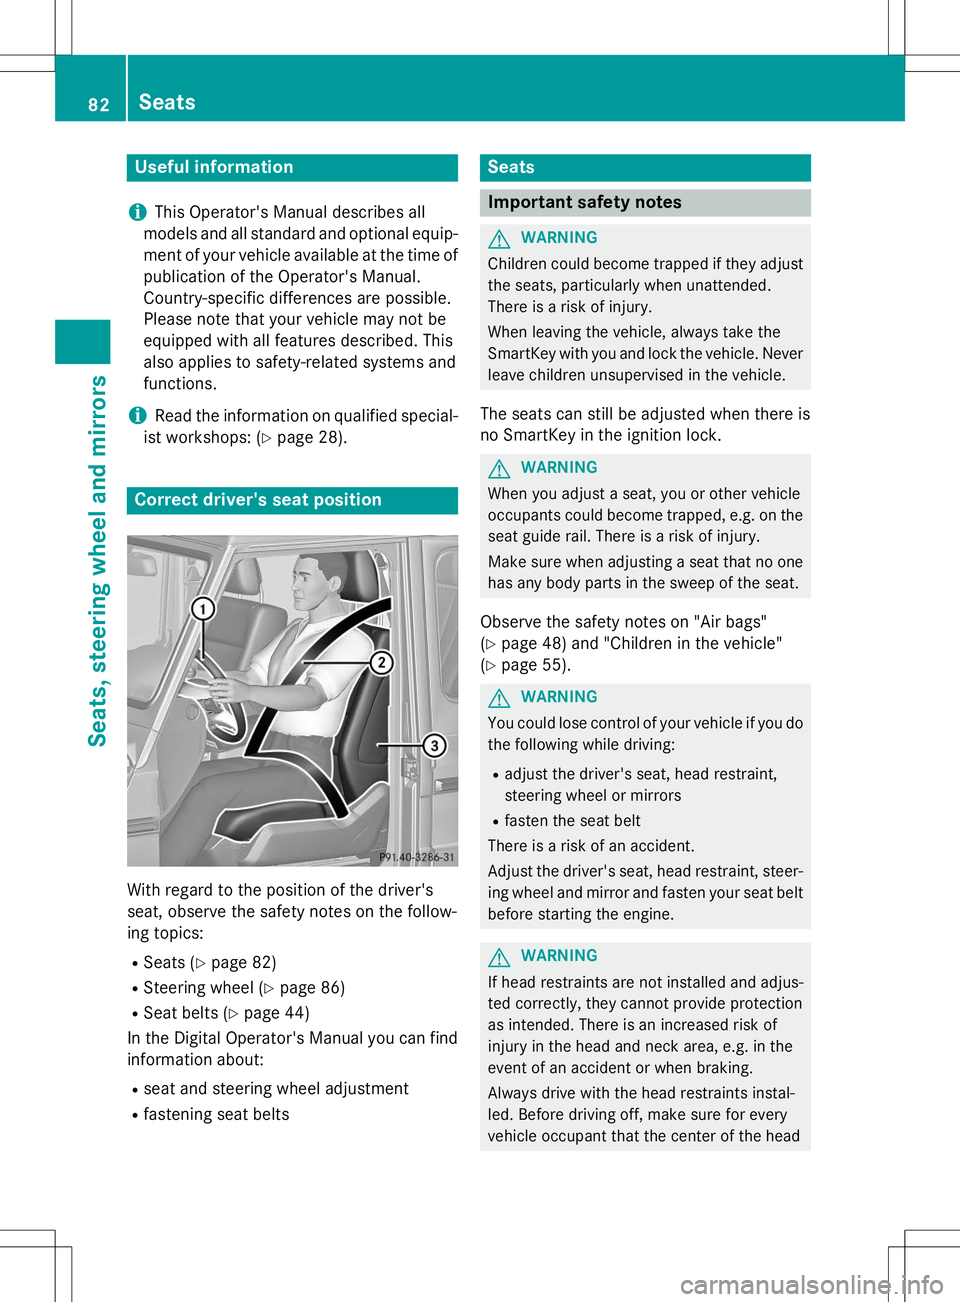
Correct driver's seat position
With regard to the position of the driver's
seat, observe the safety notes on the follow-
ing topics: R
Seats ( Ypage 82)
R Steering wheel ( Ypage 86)
R Seat belts ( Ypage 44)
In the Digital Operator's Manual you can find
information about:
R seat and steering wheel adjustment
R fastening seat belts
Seats
Important safety notes
GWARNING
Children could become trapped if they adjust
the seats, particularly when unattended.
There is a risk of injury.
When leaving the vehicle, always take the
SmartKey with you and lock the vehicle. Neverleave children unsupervised in the vehicle.
The seats can still be adjusted when there is
no SmartKey in the ignition lock.
GWARNING
When you adjust a seat, you or other vehicle
occupants could become trapped, e.g. on the seat guide rail. There is a risk of injury.
Make sure when adjusting a seat that no one
has any body parts in the sweep of the seat.
Observe the safety notes on "Air bags" ( Y page 48) and "Children in the vehicle"
( Y page 55).
GWARNING
You could lose control of your vehicle if you do
the following while driving:
R adjust the driver's seat, head restraint,
steering wheel or mirrors
R fasten the seat belt
There is a risk of an accident.
Adjust the driver's seat, head restraint, steer-
ing wheel and mirror and fasten your seat belt before starting the engine.
GWARNING
If head restraints are not installed and adjus-
ted correctly, they cannot provide protection
as intended. There is an increased risk of
injury in the head and neck area, e.g. in the
event of an accident or when braking.
Always drive with the head restraints instal-
led. Before driving off, make sure for every
vehicle occupant that the center of the head
82Seats
Seats, steering wheel and mirrors
Page 87 of 274
interrupted, e.g. if the battery has been com-pletely discharged or disconnected.
X Make sure that the cup holder on the center
console is folded down ( Ypage 197).
X Move the seat as far forward as possible
and the head restraint in as far as possible.
Rear seat head restraints
Important safety notes
GWARNING
If head restraints are not installed and adjus-
ted correctly, they cannot provide protection
as intended. There is an increased risk of
injury in the head and neck area, e.g. in the
event of an accident or when braking.
Always drive with the head restraints instal-
led. Before driving off, make sure for every
vehicle occupant that the center of the head
restraint supports the back of the head at
about eye level.
Observe the following when adjusting the
head restraints: X Do not rotate the head restraints of the
front and rear seats.
Otherwise, you cannot adjust the height
and angle of the head restraints correctly.
X Adjust the head restraint so that it is as
close as possible to your head.
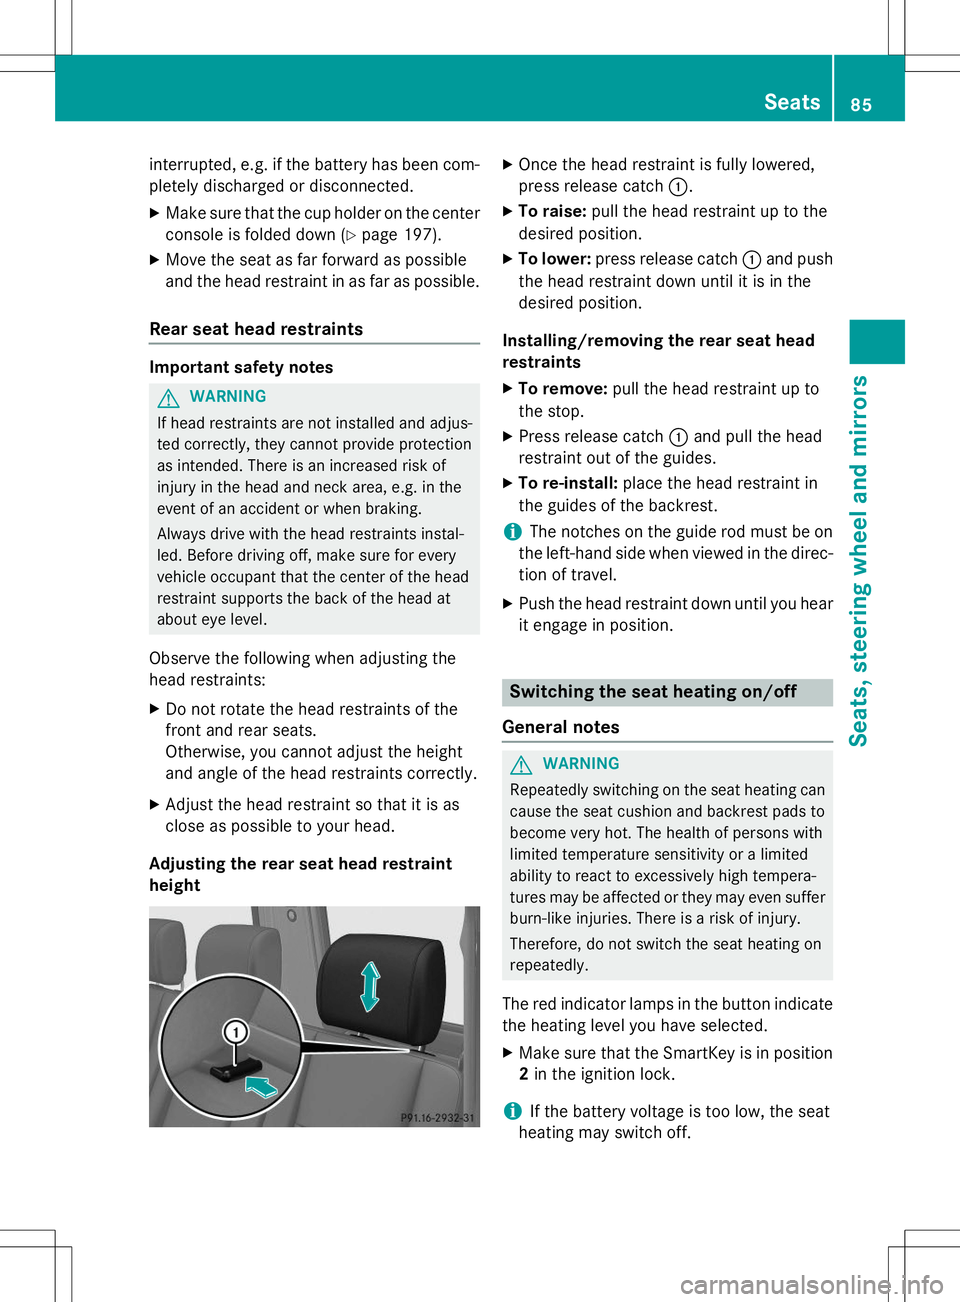
Adjusting the rear seat head restraintheight
X Once the head restraint is fully lowered,
press release catch :.
X To raise: pull the head restraint up to the
desired position.
X To lower: press release catch :and push
the head restraint down until it is in the
desired position.
Installing/removing the rear seat head
restraints
X To remove: pull the head restraint up to
the stop.
X Press release catch :and pull the head
restraint out of the guides.
X To re-install: place the head restraint in
the guides of the backrest.
iThe notches on the guide rod must be on
the left-hand side when viewed in the direc- tion of travel.
X Push the head restraint down until you hear
it engage in position.
Switching the seat heating on/off
General notes
GWARNING
Repeatedly switching on the seat heating can
cause the seat cushion and backrest pads to
become very hot. The health of persons with
limited temperature sensitivity or a limited
ability to react to excessively high tempera-
tures may be affected or they may even suffer burn-like injuries. There is a risk of injury.
Therefore, do not switch the seat heating on
repeatedly.
The red indicator lamps in the button indicate the heating level you have selected.
X Make sure that the SmartKey is in position
2 in the ignition lock.
iIf the battery voltage is too low, the seat
heating may switch off.
Seats85
Seats, steering wheel and mirrors
Z
Page 88 of 274
One or more of the indicator lamps in the
seat heating button are flashing.
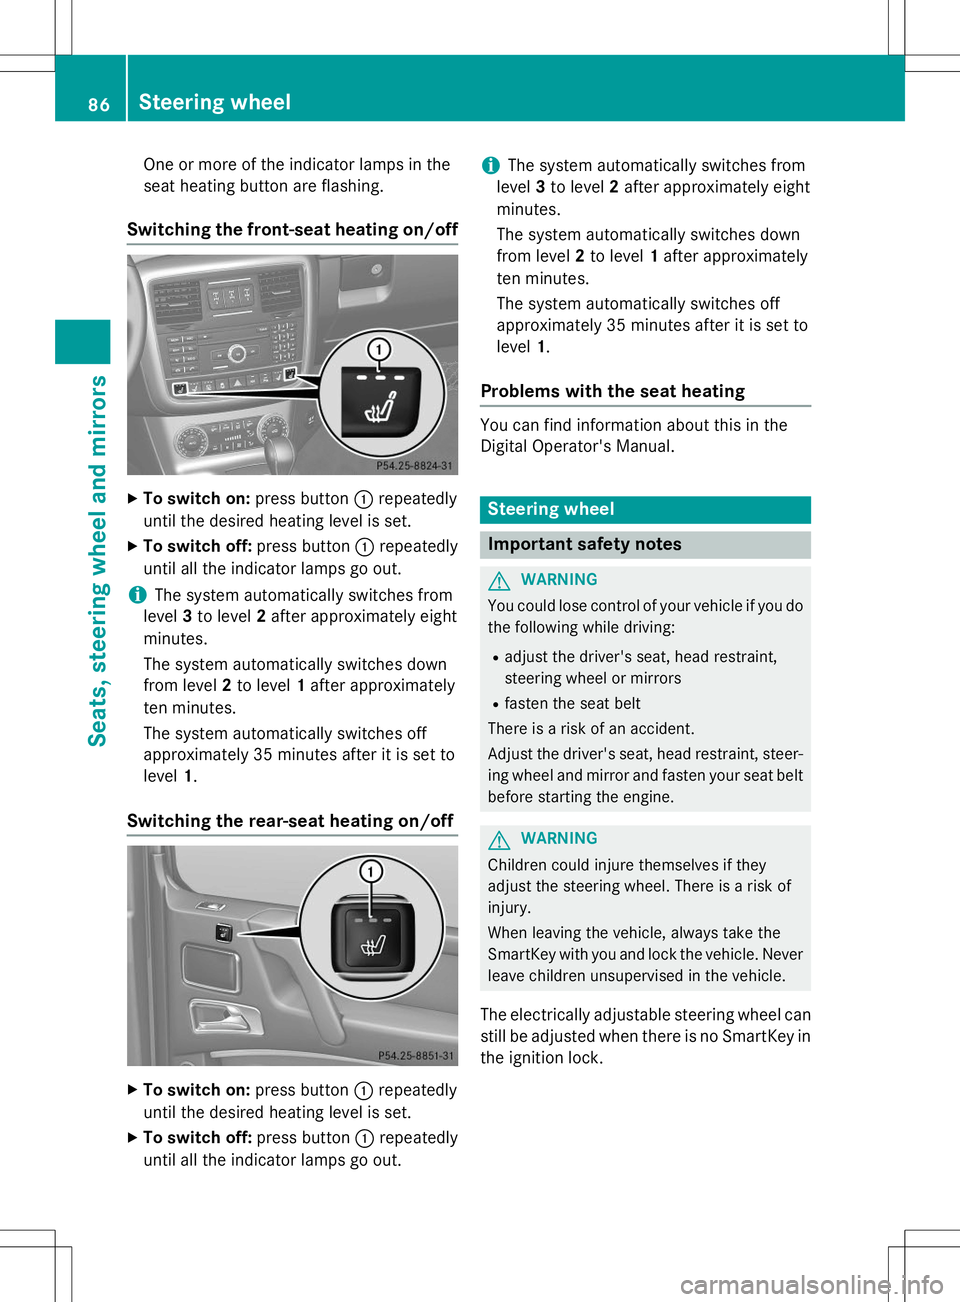
Switching the front-seat heating on/off
XTo switch on: press button:repeatedly
until the desired heating level is set.
X To switch off: press button:repeatedly
until all the indicator lamps go out.
iThe system automatically switches from
level 3to level 2after approximately eight
minutes.
The system automatically switches down
from level 2to level 1after approximately
ten minutes.
The system automatically switches off
approximately 35 minutes after it is set tolevel 1.
Switching the rear-seat heating on/off
X
To switch on: press button:repeatedly
until the desired heating level is set.
X To switch off: press button:repeatedly
until all the indicator lamps go out.
iThe system automatically switches from
level 3to level 2after approximately eight
minutes.
The system automatically switches down
from level 2to level 1after approximately
ten minutes.
The system automatically switches off
approximately 35 minutes after it is set tolevel 1.
Problems with the seat heating
You can find information about this in the
Digital Operator's Manual.
Steering wheel
Important safety notes
GWARNING
You could lose control of your vehicle if you do
the following while driving:
R adjust the driver's seat, head restraint,
steering wheel or mirrors
R fasten the seat belt
There is a risk of an accident.
Adjust the driver's seat, head restraint, steer-
ing wheel and mirror and fasten your seat belt before starting the engine.
GWARNING
Children could injure themselves if they
adjust the steering wheel. There is a risk ofinjury.
When leaving the vehicle, always take the
SmartKey with you and lock the vehicle. Neverleave children unsupervised in the vehicle.
The electrically adjustable steering wheel can
still be adjusted when there is no SmartKey in
the ignition lock.
86Steering wheel
Seats, steering wheel and mirrors
Page 93 of 274

If you hear a warning tone when you leave the
vehicle, the lights may still be switched on.X Turn the light switch to Ã.
The turn signals, high-beam headlamps and
the high-beam flasher are operated using the combination switch ( Ypage 92).
The exterior lighting (except the parking/
standing lamps) switches off automatically if
you:
R remove the SmartKey from the ignition lock
R open the driver's door with the SmartKey in
position 0
Low-beam headlamps
X
To switch on the low-beam headlamps:
turn the SmartKey in the ignition lock to
position 2or start the engine.
X Turn the light switch to L.
The L indicator lamp in the instrument
cluster lights up.
Fog lamps (except AMG vehicles)
GWARNING
When the light switch is set to Ã, the low-
beam headlamps may not be switched on
automatically if there is fog, snow or other
causes of poor visibility due to the weather
conditions such as spray. There is a risk of anaccident.
In such situations, turn the light switch to L .
The automatic headlamp feature is only an
aid. The driver is responsible for the vehicle's lighting at all times. X To switch on the fog lamps: turn the
SmartKey in the ignition lock to position 2
or start the engine.
X Turn the light switch to T,L or
à . X
Press the Nbutton.
The green Nindicator lamp in the instru-
ment cluster lights up.
X To switch off the fog lamps: press the
N button.
The green Nindicator lamp in the instru-
ment cluster goes out.
Only vehicles with front fog lamps have the
fog lamps function.
Rear fog lamp
X To switch on the rear fog lamp: turn the
SmartKey in the ignition lock to position 2
or start the engine.
X Turn the light switch to Lorà .
X Press the Rbutton.
The yellow Rindicator lamp in the
instrument cluster lights up.
X To switch off the rear fog lamp: press the
R button.
The yellow Rindicator lamp in the
instrument cluster goes out.
Parking lamps
X To switch on: turn the light switch to T.
Standing lamps
Switching on the standing lamps ensures the
corresponding side of the vehicle is illumina- ted.
X To switch on the standing lamps: the
SmartKey is not inserted in the ignition lock
or it is in position 0(Y page 103).
X Turn the light switch to W(left-hand side
of the vehicle) or X(right-hand side of
the vehicle).
Exterior lighting91
Lights and windshield wipers
Z
Page 97 of 274

XLightly press bulb ?, turn it counter-clock-
wise and pull it out.
X Insert the new bulb and, applying slight
pressure, turn it clockwise until it engages.
X Insert the bulb holder into housing ;.
X Attach dust cover =.
X Insert housing ;.
X Replace and tighten screws :.
Windshield wipers
Switching the windshield wipers
on/off
If the wiper blades are worn, the windshield
will no longer be wiped properly. This could
prevent you from observing the traffic condi-
tions, thereby causing an accident.
Combination switch 1
$ Windshield wipers off
2ÄIntermittent wipe, low (rain sensor
set to low sensitivity)
3Å Intermittent wipe, high (rain sensor
set to high sensitivity)
4° Continuous wipe, slow
5¯Continuous wipe, fast
BíSingle wipe
CîTo wipe with washer fluid
X Switch on the ignition.
X Turn the combination switch to the corre-
sponding position.
In the ÄorÅ position, the appropriate
wiping frequency is set automatically accord-
ing to the intensity of the rain. In the Å
position, the rain sensor is more sensitive
than in the Äposition, causing the wind-
shield wipers to wipe more frequently.
Switching the rear window wiper on/ off
Combination switch :
è Switch
2bWipes with washer fluid
3ISwitches on intermittent wiping
40 Switches off intermittent wiping
5b Wipes with washer fluid
X Turn the SmartKey to position 1or 2in the
ignition lock.
X Turn switch :on the combination switch
to the corresponding position.
When the rear window wiper is switched on,
the icon appears in the instrument cluster.
iThe rear window wiper comes on auto-
matically if you shift the selector lever to R
while the windshield wiper are on.
Windshield wipers95
Lights and windshield wipers
Z
Page 98 of 274
Replacing the wiper blades
Important safety notes
GWARNING
If the windshield wipers begin to move while
you are changing the wiper blades, you could be trapped by the wiper arm. There is a risk of
injury.
Always switch off the windshield wipers and
ignition before changing the wiper blades.
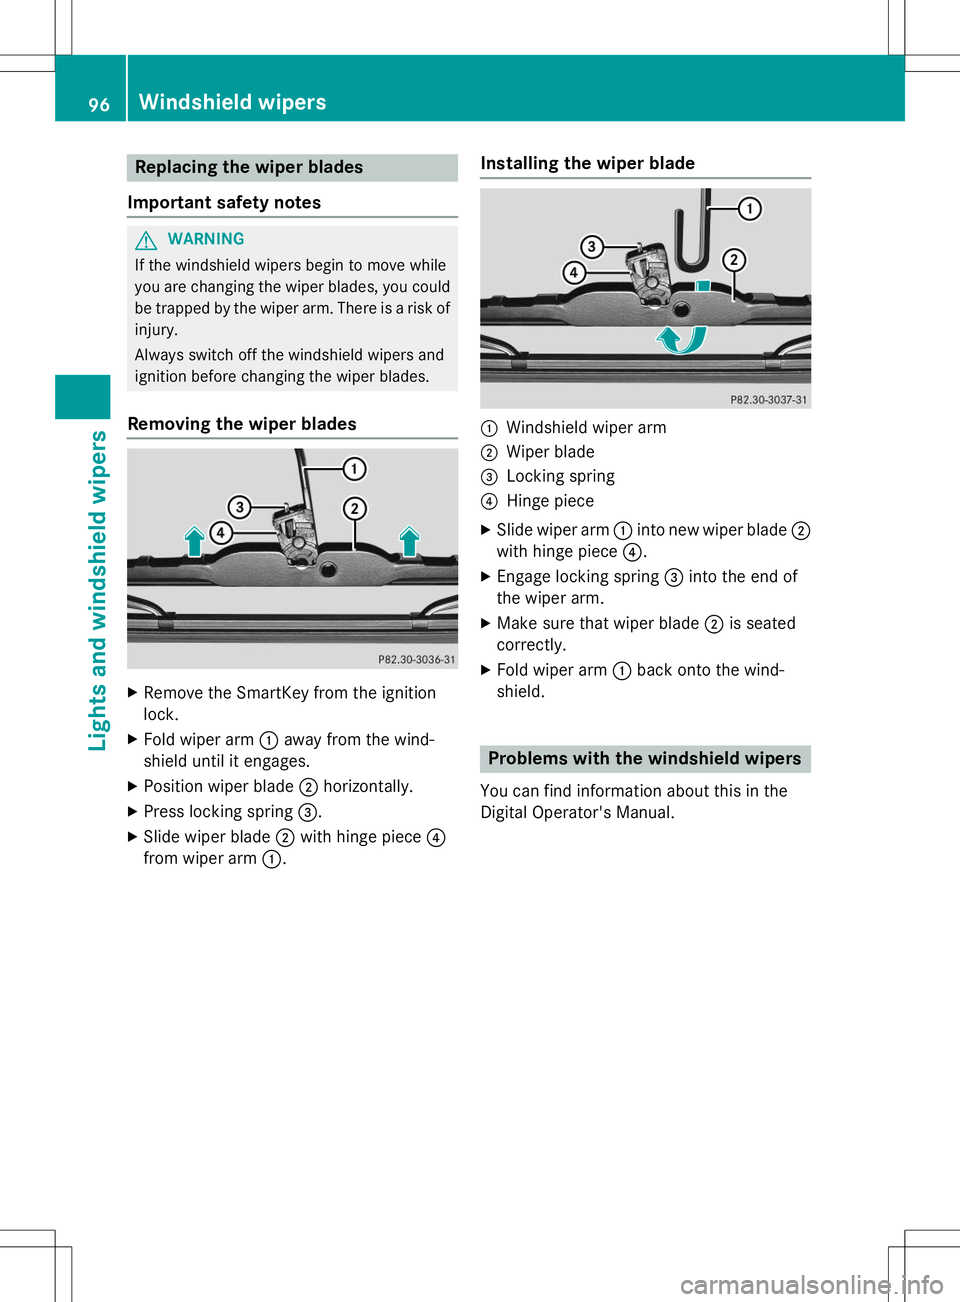
Removing the wiper blades
X Remove the SmartKey from the ignition
lock.
X Fold wiper arm :away from the wind-
shield until it engages.
X Position wiper blade ;horizontally.
X Press locking spring =.
X Slide wiper blade ;with hinge piece ?
from wiper arm :.
Installing the wiper blade
:Windshield wiper arm
;Wiper blade
=Locking spring
?Hinge piece
X Slide wiper arm :into new wiper blade ;
with hinge piece ?.
X Engage locking spring =into the end of
the wiper arm.
X Make sure that wiper blade ;is seated
correctly.
X Fold wiper arm :back onto the wind-
shield.
Problems with the windshield wipers
You can find information about this in the
Digital Operator's Manual.
96Windshield wipers
Lights and windshield wipers