2015 MERCEDES-BENZ E-CLASS SALOON wheel
[x] Cancel search: wheelPage 398 of 497
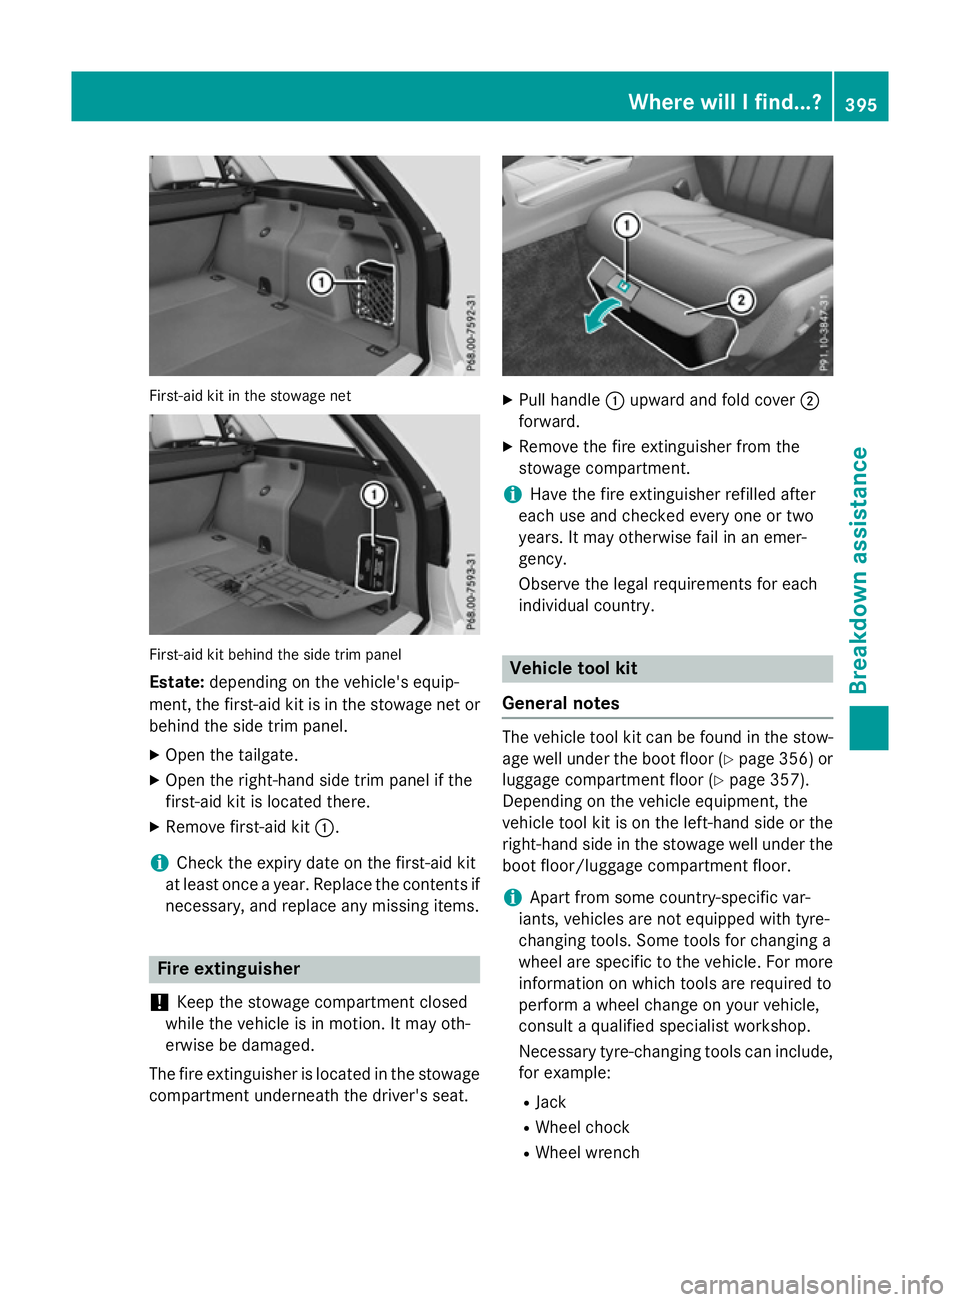
First-aid kit in the stowage net
First-aid kit behind the sid
etrim panel
Estate: depending on the vehicle' sequip-
ment, the first-aid kit is in the stowage net or
behind the sid etrim panel.
X Ope nthe tailgate.
X Ope nthe right-hand sid etrim panel if the
first-aid kit is located there.
X Remove first-aid kit :.
i Check the expiry date on the first-aid kit
at least once ayear. Replace the contents if
necessary ,and replace any missing items. Fire extinguisher
! Keep the stowage compartment closed
while the vehicle is in motion. It may oth-
erwise be damaged.
The fire extinguisher is located in the stowage compartment underneath the driver's seat. X
Pull handle :upward and fold cover ;
forward.
X Remove the fire extinguisher from the
stowage compartment.
i Have the fire extinguisher refilled after
each use and checked ever yone or two
years .Itmay otherwise fai linanemer-
gency.
Observe the legal requirements for each
individua lcountry. Vehicl
etoolk it
General notes The vehicle tool kit can be found in the stow-
age well unde rthe boo tfloo r(Y page 356 )or
luggage compartment floo r(Ypage 357).
Depending on the vehicle equipment, the
vehicle tool kit is on the left-hand sid eorthe
right-hand sid einthe stowage well unde rthe
boo tfloor/luggage compartment floor.
i Apar
tfrom some country-specific var-
iants, vehicles are not equipped with tyre-
changing tools. Some tool sfor changing a
wheel are specifi ctothe vehicle. For more
information on which tool sare require dto
perform awheel chang eonyourv ehicle,
consult aquali fied specialist workshop.
Necessar ytyre-changing tool scan include,
for example:
R Jack
R Wheel chock
R Wheel wrench Where will
Ifind...?
395Breakdow nassistance
Page 399 of 497
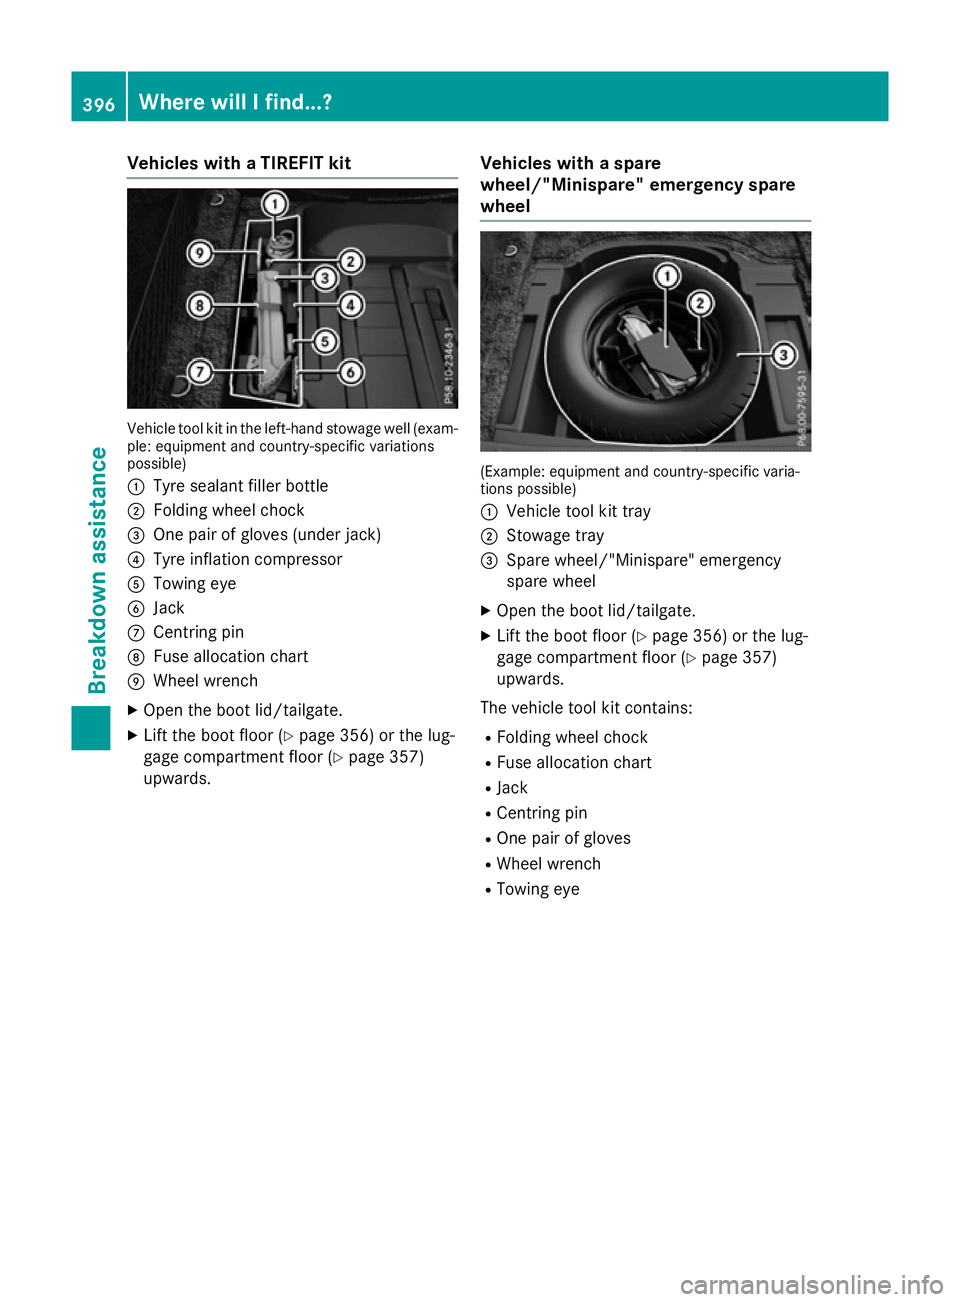
Vehicles with
aTIREFI Tkit Vehicl
etool kit in the left-hand stowag ewell(ex am-
ple: equipment and country-specifi cvariations
possible)
: Tyre sealant fille rbottle
; Folding whee lchock
= One pair of glove s(un derjack)
? Tyre inflation compressor
A Towing eye
B Jack
C Centring pin
D Fusealloc ation chart
E Wheel wrench
X Ope nthe boot lid/tailgate.
X Lif tthe boot floor (Y page 356) or the lug-
gage compartment floor (Y page 357)
upwards. Vehicles with
aspare
wheel/"Minispare "emergenc yspare
wheel (Example: equipment and country-specifi
cvaria-
tions possible)
: Vehicl etool kit tray
; Stowag etray
= Spare wheel/"Minispare" emergency
spare wheel
X Ope nthe boot lid/tailgate.
X Lif tthe boot floor (Y page 356) or the lug-
gage compartment floor (Y page 357)
upwards.
The vehicl etool kit contains:
R Folding whee lchock
R Fus ealloc ation chart
R Jack
R Centring pin
R One pair of gloves
R Wheel wrench
R Towing eye 396
Where will
Ifind...?Breakdo wn assis tance
Page 400 of 497
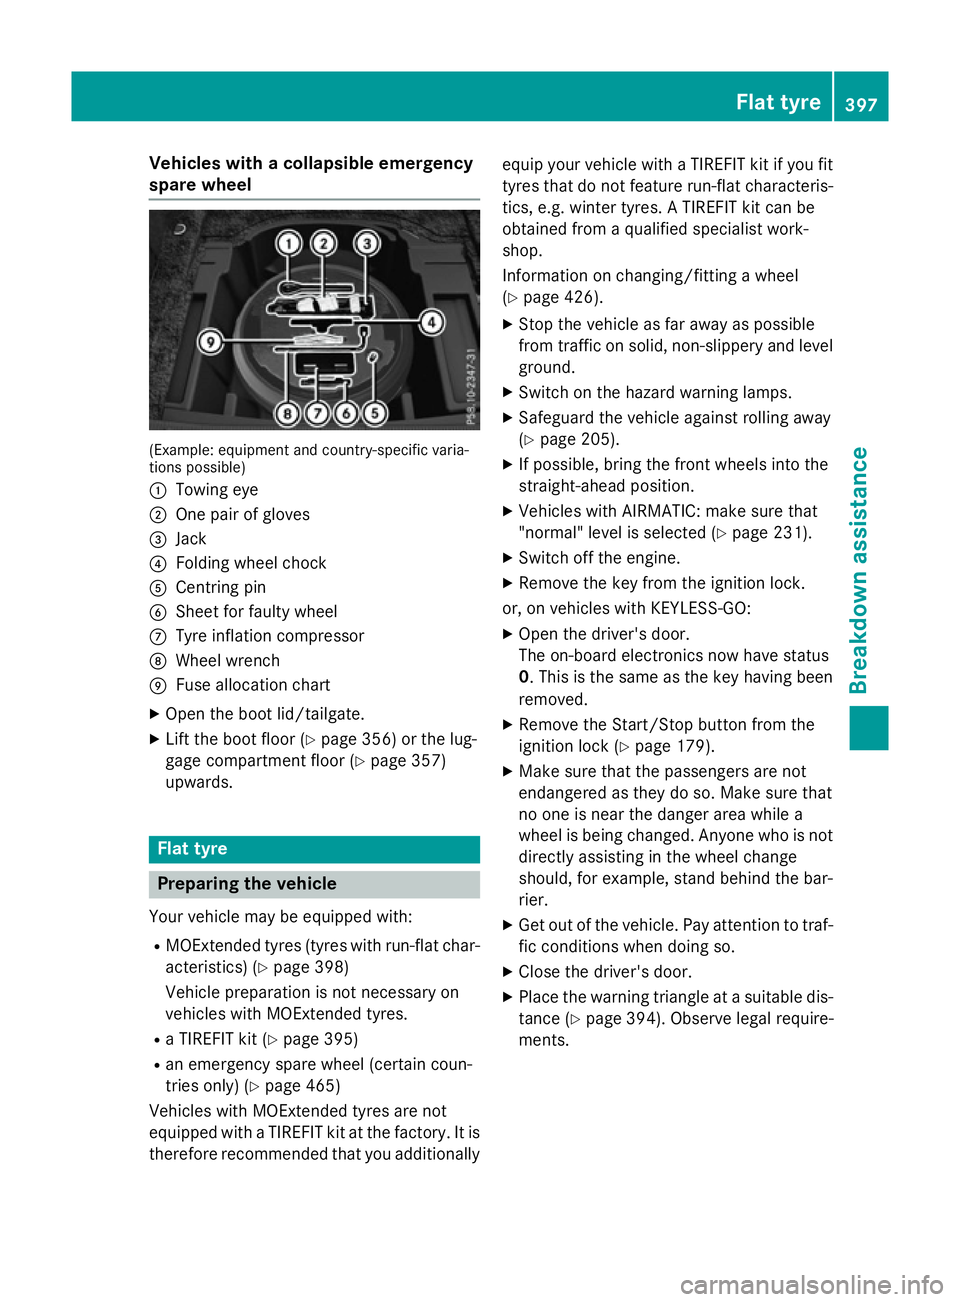
Vehicles with
acolla psibl eemergency
spare wheel (Example: equipment and country-specifi
cvaria-
tions possible)
: Towing eye
; One pair of gloves
= Jack
? Folding whee lchock
A Centring pin
B Shee tfor faulty wheel
C Tyre inflation compressor
D Wheel wrench
E Fusealloc ation chart
X Ope nthe boot lid/tailgate.
X Lif tthe boot floor (Y page 356)orthe lug-
gage compartment floor (Y page 357)
upwards. Flat tyre
Preparin
gthe vehicle
Your vehicl emaybe equipped with:
R MOExtende dtyres (tyres with run-fla tchar-
acteristics )(Ypage 398)
Vehicl epreparatio nisn ot necessary on
vehicles with MOExtende dtyres.
R aT IREFIT kit (Y page 395)
R an emergency spare whee l(certai ncoun-
trie sonly) (Y page 465)
Vehicles with MOExtende dtyres ar enot
equipped with aTIREFIT kit at the factory .Itis
therefore recommende dthatyou additionally equi
pyourvehicl ewithaT IREFIT kit if yo ufit
tyres tha tdon ot feature run-fla tcharacteris-
tics ,e.g.w inter tyres. ATIREFIT kit can be
obtained from aquali fied specialist work-
shop.
Informatio nonchanging/fitting awheel
( Y page 426).
X Stop the vehicl easfar away as possible
from traffic on solid ,non-slippery and level
ground.
X Switch on the hazard warning lamps.
X Safeguar dthe vehicl eagain st rolling away
(Y page 205).
X If possible, bring the front wheels into the
straight-ahea dposition.
X Vehicles with AIRMATIC: make sure that
"normal" level is selecte d(Ypage 231).
X Switch off the engine.
X Remove the key from the ignition lock.
or, on vehicles with KEYLESS‑ GO:
X Ope nthe driver' sdoor.
The on-boar delectronics now have status
0.T hisist he same as the key having been
removed.
X Remove the Start/Sto pbutton from the
ignition lock (Y page 179).
X Make sure tha tthe passenger sarenot
endangere dasthey do so. Make sure that
no one is nea rthe danger area whil ea
whee lisbeing changed .Anyone wh oisnot
directl yassis ting in the whee lchange
should, for example, stand behind the bar-
rier.
X Ge toutof the vehicle. Pa yattentio ntotraf-
fic conditions when doing so.
X Close the driver' sdoor.
X Place the warning triangl eatasuitabl edis-
tance (Y page 394). Observe lega lrequire-
ments. Flat tyre
397Breakdown assis tance
Page 413 of 497
X
Switch on the hazard warning lamps
(Y page 145).
X Leave the key in position 2in the ignition
lock.
i Whe
ntowing with the hazard warning
lamps switche don, us ethe combination
switch as usua ltosignal achange of direc-
tion. In this case, onl ythe turn signal sfor
the desired direction flash. Whe nyou reset
the combination switch, the hazard warn-
ing lamps star tflashing again. Towin
gthe vehicle awa ywitht he rear
axl eraised
! Vehicles with 4MATI
Cmustn ot be towed
with the front or rea raxler aised ;otherwise,
the transmissio nmay be damaged.
! Vehicles with automatic transmission
mus tnot be towed with the rea raxler aised.
The car/traile rcombination may otherwise
swerve or eve noverturn.
! The ignition mus
tbes witche doff if you
are towing the vehicl ewitht he rea raxle
raised .Intervention by ESP ®
could other-
wise damag ethe brake system.
Onl yvehicle swithout 4MATIC can be
towed awa ywitht he rear axl eraised.
X Switch on the hazard warning lamps
(Y page 145).
X Mov ethe front wheel stothe straight-
ahea dposition.
X Turn the key in the ignition lock to position
0 and remove the key from the ignition
lock.
X Whe nleaving the vehicle, take the key or
the KEYLESS-GO key with you.
Whe ntowing your vehicl eawayw itht he rear
axl eraised ,itisi mportant tha tyou observe
the safety instructions (Y page 407). Transporting the vehicle
! Yo
um ay onl ysecure the vehicl ebythe
wheels, not by parts of the vehicl esuchas
axl eors teering components .Otherwise,
the vehicl ecould be damaged.
The towing eyes or traile rtow hitch can be
used to pull the vehicl eonto atraile rort rans-
porter if yo uwishtot ranspor tit.
X Vehicles with manual transmission:
depress the clutch peda lfully and shift to
neutral.
X Vehicles with automatic transmission:
turn the key to position 2in the ignition
lock.
X Shift the automatic transmissio ntoposi-
tion N.
As soon as the vehicle is loaded: X Prevent the vehicl efrom rolling away by
applying the parking brake.
X Vehicles with manual transmission:
depress the clutch peda lfully and engage
first or reverse gear.
X Vehicles with automatic transmission:
shift the automatic transmissio ntoposi-
tion P.
X Turn the key in the ignition lock to position
0 and remove the key from the ignition
lock.
X Secure the vehicle. Note
sfor 4MATIC vehicles
! Vehicles with 4MATI
Cmustn ot be towed
with the front or rea raxler aised ;otherwise,
the transmissio nmay be damaged.
If the vehicl ehastransmissio ndamageor
damag etothe front or rea raxle, have it trans-
ported on atransporter or trailer.
In the even tofdamage to the electrical
system
If the battery is defective, the automatic
transmissio nwillbel ocked in position P.To
shift the automatic transmissio ntoposition 410
Towin
gawayand tow-startingBreakdown assistance
Page 418 of 497
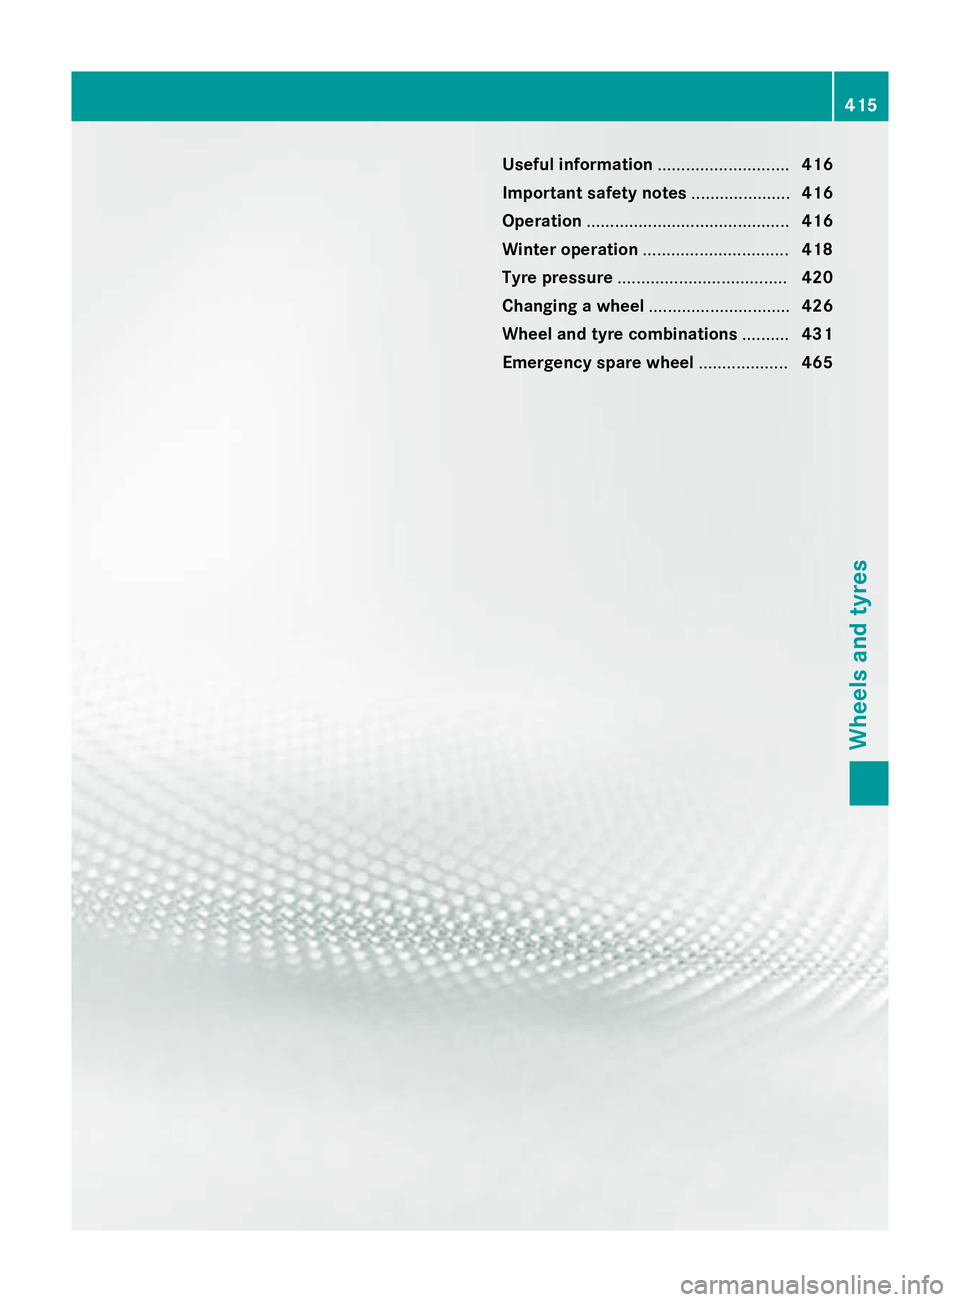
Useful information
............................416
Importan tsafet ynotes ..................... 416
Operation ........................................... 416
Winter operation ............................... 418
Tyr epressure .................................... 420
Changing awheel .............................. 426
Wheel and tyr ecombinations ..........431
Emergency spar ewheel ................... 465 415Wheels and tyres
Page 419 of 497
Useful information
i This Owner's Manual describes all mod-
els, series and optional equipment for your
vehicle that were available at the time of
going to press. National variation sare pos-
sible. Not ethat your vehicle may not be
equipped with all of the function sdescri-
bed. This is also the case for system sand
function srelevan ttosafety.
i Read the information on qualified special-
ist workshops: (Y page 27). Important safet
ynotes G
WARNING
If wheels and tyres of the wrong size are used, the wheel brakes or suspensio ncomponents
may be damaged. There is arisk of an acci-
dent.
Always replace wheels and tyres with those
that fulfil the specification softhe original
part.
When replacin gwheels, make sure to fit the
correct:
R designation
R type
When replacin gtyres, make sure to fit the
correct:
R designation
R manufacturer
R type G
WARNING
Af lat tyre severely impairs the driving, steer-
ing and brakin gcharacteristic softhe vehicle.
There is arisk of accident.
Tyres without run-flat characteristics:
R do not drive with aflat tyre.
R immediately replace the flat tyre with your
emergency spare wheel or spare wheel, or
consult aqualified specialist workshop. Tyres with run-flat characteristics:
R pay attention to the information and warn-
ing notices on MOExtended tyres (tyres
with run-flat characteristics).
Accessories that are not approved for your
vehicle by Mercedes-Benz or are not being
used correctly can impair the operating
safety.
Before purchasin gand using non-approved
accessories, visit aqualified specialist work-
shop and enquire about:
R suitability
R legal stipulations
R factory recommendations
Information on the sizes and types of wheels
and tyres for your vehicle can be found under
"Wheel/tyre combinations" (Y page 431).
Information on tyre pressures can be found:
R on the tyre pressure label on the fuel filler
flap (Y page 202)
R under "Tyre pressure" (Y page 420)
Modification work on the brake system and
wheels is not permitted. The use of wheel
spacers or brake dust shields is not permit-
ted. This invalidates the general operating
permit for the vehicle.
i Further information on wheels and tyres
can be obtained at any qualified specialist
workshop. Operation
Information on driving
Check the tyre pressures when the vehicle is
heavily laden and adjust prior to atrip.
While driving, pay attention to vibrations,
noises and unusual handling characteristics,
e.g. pulling to one side. This may indicat ethat
the wheels or tyres are damaged. If you sus-
pect that atyre is defective, reduce your
speed immediately. Stop the vehicle as soon
as possible to chec kthe wheels and tyres for
damage. Hidden tyre damage could also be 416
OperationWheels and tyres
Page 420 of 497
causing the unusual handling characteristics.
If yo ufind no signs of damage, have the tyres
and wheel schecke dataq ualified specialist
workshop.
Whe nparking your vehicle ,make sure that
the tyre sdonot get deforme dbythe kerb or
othe robstacles. If it is necessary to drive over
kerbs, speed humps or similar elevations ,try
to do so slowl yand at an obtuse angle .Oth-
erwise ,the tyres, particularly the sidewalls,
may be damaged. Regular checking of wheel
sand tyres G
WARNING
Damaged tyre scan cause tyre inflation pres-
sure loss. As aresult, yo ucould los econtrol of
your vehicle .There is ariskofa ccident.
Check the tyre sregularl yfor signs of damage
and replace any damaged tyre simmediately.
Regularly check the wheel sand tyre sofyour
vehicle for damag eatleastonce amonth, as
well as afte rdriving off-road or on rough
roads. Damaged wheel scan cause alossof
tyre pressure. Pa yparticula rattention to
damag esucha s:
R cuts in the tyres
R punctures
R tears in the tyres
R bulge sont he tyres
R deformation or severe corrosio nonwheels
Regularly check the tyre trea ddepth and the
condition of the trea dacross the whol ewidth
of the tyre (Y page 417). If necessary, turn
the front wheel stofullloc kino rder to inspect
the inner sid eofthe tyre surface.
All wheel smusth aveav alve cap to protect
the valve against dirt and moisture. Do not fit
anything onto the valve othe rthan the stand-
ard valve cap or othe rvalve cap sapproved for
your vehicle by Mercedes-Benz. Do not fit any othe rvalve cap sorsystems ,e.g. tyre pres-
sure monitoring systems. Regularly check the pressure of al
lthe tyres,
particularly prior to long trips. Adjust the tyre pressure as necessary (Y page 420).
Observe the notes on the emergency spare
wheel (Y page 465).
The service life of tyre sdepends on various
factors, including the following:
R driving style
R tyre pressure
R mileage Note
sont he tyre tread G
WARNING
Insufficient tyre trea dwillr educe tyre trac-
tion. The tyre is no longer able to dissipate
water. Thi smeans that on we troa ds urfaces,
the ris kofaquapl aning increases, in particular
where speed is not adapted to suit the driving
conditions .There is ariskofa ccident.
If the tyre pressure is too hig hortoo low ,tyres
may exhibi tdifferent level sofwearatd iffer-
ent locations on the tyre tread. Thus, you
shoul dregularl ycheck the trea ddepth and
the condition of the trea dacross the entire
width of al ltyres.
Minimum tyre trea ddepth for:
R summer tyres: 3mm
R M+S tyres: 4mm
For safety reasons, replace the tyre sbefore
the legall yprescribed limit for the minimum
tyre trea ddepth is reached. Selecting, fitting and replacing tyres
G
WARNING
Exceeding the state dtyre load-bearing capa-
city and the approved maximum speed could
lead to tyre damag eorthe tyre bursting .There
is ar iskofa ccident.
Therefore, only us etyre types and sizes
approved for your vehicle model .Observe the Operation
417Wheels and tyres
Z
Page 421 of 497
tyr
eloa dr ating and spee drating required for
your vehicle.
Pa ys pecial attentio ntocountry-specific
requirements for tyr eapproval. These
requirements can stipulate aspecific tyre
typ efor your vehicle. Furthermore, the us eof
certain tyr etypes in certain regions and areas
of operatio ncan be highl ybeneficial. Yo ucan
fin df urthe rinformation regarding tyres at
specialis ttyrer etailers ,atqualified specialist
workshop soratany Mercedes-Benz Service
Centre.
R Onl yfit tyres and wheels of the same type
and make.
Exception: it is permissibl etofitad ifferent
typ eorm akeint he event of aflatt yre.
Observe the "MOExtende dtyres (tyres with
run-flat characteristics) "section
(Y page 398).
R Onl yfit tyres of the correct size onto the
wheels.
R Ru ninn ew tyres at moderate speeds for
the first 100 km .The yo nlyr each their full
performance after thi sdistance.
R Do not drive with tyres which have too little
trea ddepth.T hiso therwis esignificantly
reduce sthe tractio nonwetroads (aqua-
planing).
R Replace the tyres after si xyears at the lat-
est, regardles sofwear.
Observe the note sonthe emergency spare
whee l(Y page 465). MOExtende
dtyre s(tyres with run-flat
characteristics)
With MOExtende dtyres (tyres with run-flat
characteristics) ,you can continue to drive
your vehicl eevenift here is atota llos sof
pressure in one or mor etyres.
MOExtende dtyres ma yonlybeu sedinc on-
junction with an activated tyr epressure loss
warning system or with an activated tyr epres-
sure monitor and on wheels specifically tes-
ted by Mercedes-Benz. Note
sond rivingwithM OExtende dtyres with
af latt yre( Ypage 398).
Vehicles with MOExtende dtyres ar enot
equipped with aTIREFIT kit at the factory .Itis
therefore recommende dthatyou additionally
equi pyourvehicl ewithaT IREFIT kit if yo ufit
tyres tha tdon ot featur erun-flat characteris-
tics ,e.g.w inter tyres .ATIREFIT kit can be
obtained fro maqualified specialis twork-
shop. Winter operation
General notes
Hav eyourvehicl ewinterproofed at aquali fied
specialis tworkshop at the onse tofwinter.
Observe the note sinthe "Changing awheel"
sectio n(Ypage 426). Driving with summe
rtyres
At temperatures belo w+7†,summertyres
lose elasticity and therefore tractio nand
braking power. Chang ethe tyres on your vehi-
cle to M+S tyres .Using summe rtyres at very
col dtemperatures could cause tears to form,
thereb ydamagin gthe tyres permanently.
Mercedes-Benz cannot accep tresponsibility
for thi stypeofd amage. G
WARNING
Damaged tyres can cause tyr einflatio npres-
sure loss. As aresult, yo ucould lose contro lof
your vehicle. There is ariskofa ccident.
Check the tyres regularly for signs of damage and replace any damage dtyres immediately. M+S tyres
G
WARNING
M+S tyres with atyret rea ddepth of less than
4m marenot suitabl efor us einw inter as they
do not provid esufficient traction. There is a
ris kofa ccident. 418
Winter operationWheel
sand tyres