2015 MERCEDES-BENZ E-CLASS SALOON wheel
[x] Cancel search: wheelPage 360 of 497
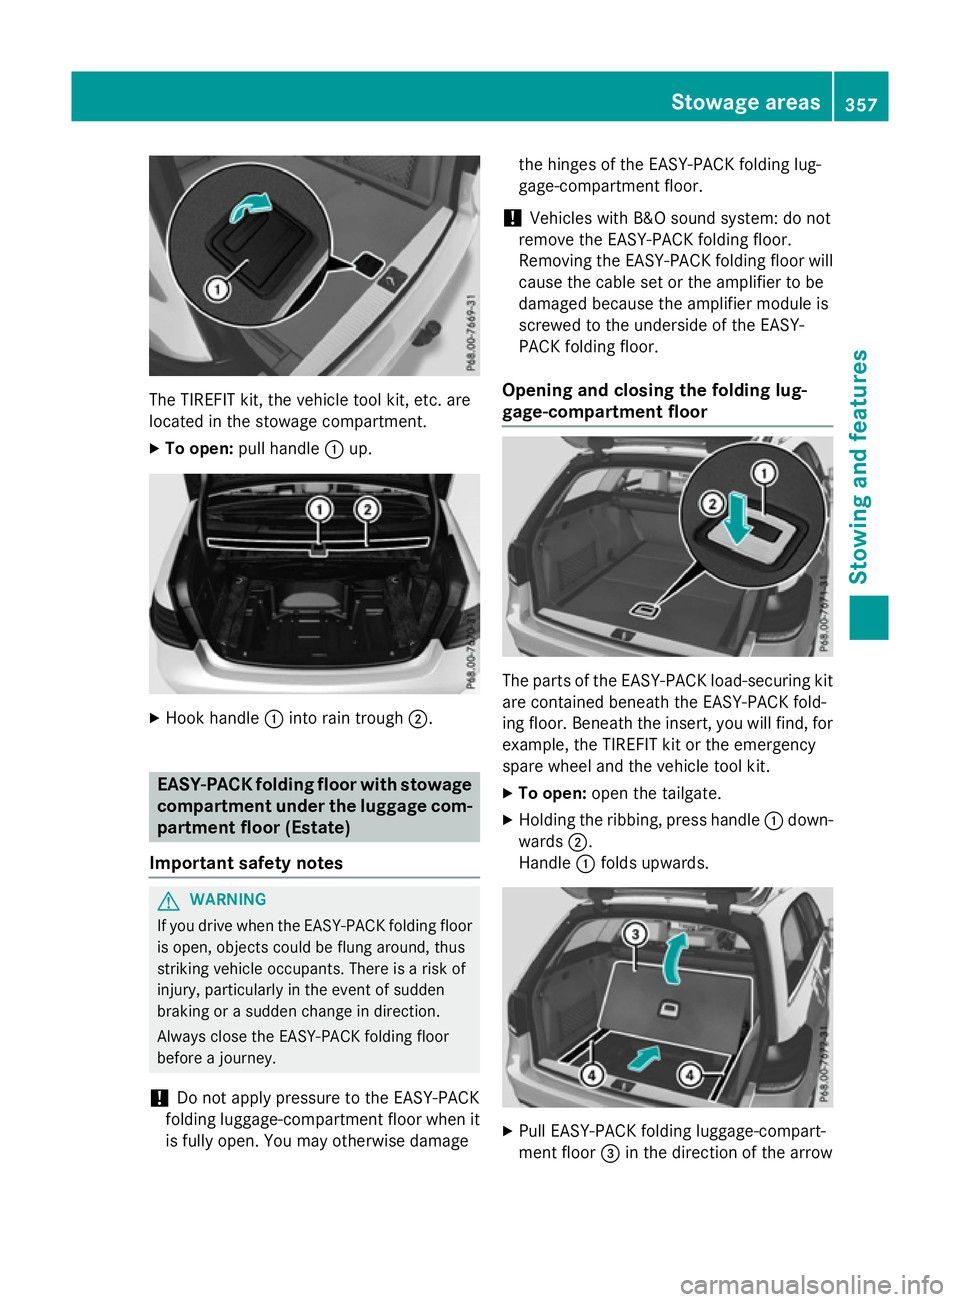
The TIREFIT kit, the vehicle tool kit, etc. are
located in the stowage compartment.
X To open: pull handle :up. X
Hook handle :into rain trough ;. EASY-PAC
Kfolding floor with stowage
compartment under the luggage com- partment floor (Estate)
Important safety notes G
WARNING
If you drive when the EASY-PACK folding floor is open, object scould be flung around, thus
striking vehicle occupants. There is arisk of
injury, particularly in the event of sudden
braking or asudden change in direction.
Always close the EASY-PACK folding floor
before ajourney.
! Do not apply pressure to the EASY-PACK
folding luggage-compartment floor when it is fully open. You may otherwise damage the hinges of the EASY-PACK folding lug-
gage-compartment floor.
! Vehicles with B&O sound system: do not
remove the EASY-PACK folding floor.
Removing the EASY-PACK folding floor will cause the cable set or the amplifier to be
damaged because the amplifier module is
screwed to the underside of the EASY-
PACK folding floor.
Opening and closing the folding lug-
gage-compartment floor The parts of the EASY-PACK load-securing kit
are contained beneath the EASY-PACK fold-
ing floor. Beneat hthe insert ,you will find, for
example, the TIREFIT kit or the emergency
spare wheel and the vehicle tool kit.
X To open: open the tailgate.
X Holding the ribbing, press handle :down-
wards ;.
Handle :folds upwards. X
Pull EASY-PACK folding luggage-compart-
ment floor =in the direction of the arrow Stowage areas
357Stowing and features Z
Page 371 of 497
More information on suitable mobile phones,
mobile phone brackets and on connecting
Bluetooth ®
-capable mobile phones to
COMAND Online/Audio 20 can be obtained:
R at your Mercedes-Ben zService Centre
R on the Internet at http://www.mercedes-
benz.com/connect
The functions and services available when
you use the phone depend on your mobile
phone model and service provider.
Using amobile phone To connect
amobile phone to the exterior
aerial and charge it, insert it into the mobile
phone bracket.
X Open the telephone compartment
(Y page 344).
X Place the mobile phone bracket into the
pre-installed fitting; see the separate instal-
lation instructions for the mobile phone fit-
ting.
X Insert the mobile phone into the mobile
phone bracket; see the separate installa-
tion instructions for the mobile phone fit-
ting.
i The mobile phone can also be operated
without being in the bracket. However, the charging function and aerial function are
not available.
In order to use Bluetooth ®
(SAP profile) on
your telephone module, you must first insert
the telephone module into the pre-installed
fitting. This connects it to the exterior aerial.
If you wish to charge the mobile phone, then
you must connect it to aUSB port.
Further information on the telephone module
with Bluetooth ®
(SAP profile) can be found in
the Digital Owner's Manual.
Operating the mobile phone You can operate the telephone using the
6 and~ buttons on the multifunction
steering wheel. You can operate other mobile phone functions via the on-board computer
(Y page 284).
When you remove the key from the ignition
lock, the mobile phone is disconnected from
the hands-free system. Active calls will first
be transferred to the mobile phone directly.
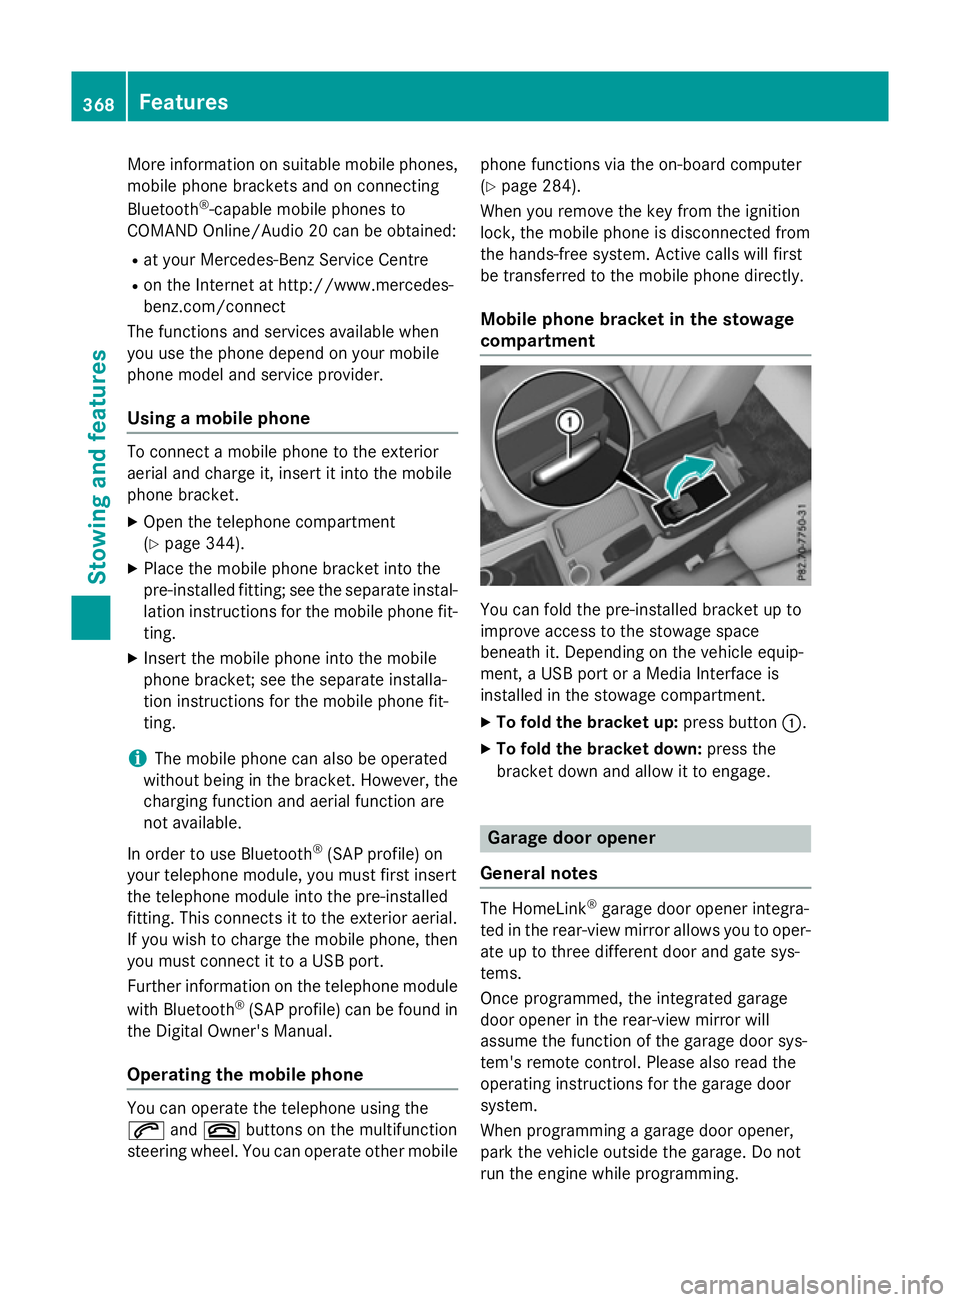
Mobile phone bracket in the stowage
compartment You can fold the pre-installed bracket up to
improve access to the stowage space
beneath it. Depending on the vehicle equip-
ment,aU
SB port or aMedia Interface is
installed in the stowage compartment.
X To fold the bracket up: press button:.
X To fold the bracket down: press the
bracket down and allow it to engage. Garage door opener
General notes The HomeLink
®
garage door opener integra-
ted in the rear-view mirror allowsy ou to oper-
ate up to three different door and gate sys-
tems.
Once programmed, the integrated garage
door opener in the rear-view mirror will
assume the function of the garage door sys-
tem's remote control. Please also read the
operating instructions for the garage door
system.
When programming agarage door opener,
park the vehicle outside the garage. Do not
run the engine while programming. 368
FeaturesStowing and features
Page 387 of 497
Further information on windscreen washer
fluid/antifreeze (Y page 480).Service
ASSYST PLUS
Servic emessages The ASSYST PLUS service interval display
informs yo uofthe next service du edate.
Information on the typ eofservice and service
interval s(seet he separate Service Booklet).
You can obtain further information from a
Mercedes-Benz Service Centre.
i The ASSYST PLUS service interval display
doe snot sho wany information on the
engine oil level .Observe the notes on the
engine oil level (Y page 380).
The multifunction display shows aservice
messag efor afew seconds, e.g.:
R Service Ain..d ays
Service Ain..d ays
R Service Aoverdue
Service Aoverdue
R Service Aoverdue by .. days
Service Aoverdue by .. days
Depending on the operating conditions of the vehicle, the remaining time or distance until
the next service du edateisd isplayed.
The letter indicates which service is due. A A
stand sfor am inorservice and B
B for am ajor
service. Anumber or another letter may be
displayed afte rthe letter.
Only for certain countries :the positio nafter
the letter A
A or B
Bindicates any necessar yaddi-
tiona lmaintenance work to be performed. If
yo un otify aquali fied specialist worksho pof
this display ,you will receive astatement on
the associated costs.
The ASSYST PLUS service interval display
doe snot take into account any period sof
time during which the battery is disconnec-
ted. Maintaining the time-dependent service
schedule:
X Note dow nthe service du edated isplayed
in the multifunction display before discon-
necting the battery.
or
X After reconnecting the battery ,sub tract
the battery disconnection period sfrom the
service date shown on the display.
Hiding servic emessages X
Pres sthe a or% button on the steer-
ing wheel.
Displayin gservic em essages X
Switch the ignition on.
X Pres sthe = or; button on the steer-
ing wheel to select the Service Servicemenu.
X Pres sthe 9 or: button to select the
ASSYST PLUS
ASSYST PLUS submenu and confir mby
pressing the abutton.
The service du edatea ppears in the multi-
function display.
Informatio nabout Service Resettin
gthe ASSYST PLU Sservic einter-
val display
! If the ASSYST PLUS service interval dis-
play ha sbeeni nadvertently reset, this set-
ting can be corrected at aquali fied special-
ist workshop.
Have service work carried ou tasd escribed
in the Service Booklet. Thi smay otherwise
lead to increase dweara nd damag etothe
majo rassemblies or the vehicle.
Aq uali fied specialist workshop, e.g. a
Mercedes-Benz Service Centre, will rese tthe
ASSYST PLUS service interval display after
the service work ha sbeenc arried out. You
can also obtain further information on main-
tenance work, for example. 384
ServiceMaintenance and care
Page 389 of 497
!
Do not park up the vehicle for an extended
period straight after cleaning it, particularly after having cleaned the wheels with wheel cleaner. Wheel cleaners could cause
increased corrosion of the brake discs and
brake pads/linings. For this reason, you
should drive for afew minutes after clean-
ing. Braking heats the brake discs and the
brake pads/linings, thus drying them. The
vehicle can then be parked up.
Regular care of your vehicle is acondition for
retaining the quality in the long term.
Use care products and cleaning agents rec-
ommended and approved by Mercedes-Benz. Washing the vehiclea
nd cleaning the
paintwork
Automatic car wash G
WARNING
Braking efficiency is reduced after the vehicle has been washed.T here isarisk of an acci-
dent.
After washing the vehicle, brake carefully
while paying attention to the traffic conditions in order to restore full braking efficiency.
! When DISTRONIC PLUS or the HOLD
function is activated, the vehicle brakes
automaticallyinc ertain situations.
To avoid damage to the vehicle, deactivate DISTRONIC PLUS and the HOLD function in
the following or similars ituations:
R when towing away
R in ac ar wash
! Make sure that:
R the side windows and sliding sunroof are
closed completely.
R the blowerf or the ventilation/heating is
switched off (OFF button is depressed).
R the windscreen wiper switch is at posi-
tion 0.
The vehicle could otherwise be damaged. !
In car washes with
atowing mechanism,
make sure that the automatic transmission
is in transmission position N;otherwise,
the vehicle could be damaged.
R Vehicles with DIRECT SELECT lever and
key:
do not remove the key from the ignition
lock. Do not open the driver's door or
front-passenger door when the engine is
switched off. Otherwise, the automatic
transmission selects park position P
automaticallya nd locks the wheels. You
can prevent this by shifting the auto-
matic transmission to Nbeforehand.
R Vehicles with DIRECT SELECT lever and
KEYLESS-GO:
do not open the driver's door or front-
passenger door when the engine is
switched off. Otherwise, the automatic
transmission selects park position P
automaticallya nd locks the wheels.
! If the key is within the rear detection
range of KEYLESS-GO, situations such as
the following could lead to the uninten-
tional opening of the boot lid/tailgate:
R using acar wash
R using ahigh-pressure cleaner
Make sure that the key is at least 3maway
fro mt hevehicle.
Observe th efollowing to mak esure that the
automatic transmission on vehicles with
DIRECT SELECT stays in position N:
X Make sure th evehicle is stationar yand the
ignitio nisswitche doff.
X Turn th ekey to position 2(Y page 179) in
th ei gnitio nlock.
Use th ekey instead of th eStart/Sto pbut-
to nonv ehicles with KEYLESS-GO.
X Depress th ebrak epedal and kee pit
depressed.
X Shift th eautomatic transmission to posi-
tion N.
X Release th ebrak epedal. 386
CareMaintenance and care
Page 391 of 497
Scratches, corrosiv
edeposits, areas affected
by corrosio nand damag ecaused by inade-
quate care canno talway sbec ompletely
repaired .Insuchc ases, visit aquali fied spe-
cialist workshop.
X Remove impuritie simmediately, where
possible ,whilst avoiding rubbing too hard.
X Soa kinsect remains with insect remover
and rins eoff the treated areas afterwards.
X Soa kbirdd ropping swithw ater and rinse
off the treated areas afterwards.
X Remove coolant, brake fluid ,tree resin,
oils, fuels and greases by rubbing gently
with acloth soaked in petroleu metheror
lighte rfluid.
X Use tar remover to remove tar stains.
X Use silicone remover to remove wax.
Care and treatment of matt paintwork !
Neve
rpolish the vehicl eorthe light alloy
wheels. Polishing make sthe paintwork
shiny.
! The following may cause the paint to
become shiny and thu sreduce the matt
effect:
R Vigorous rubbing with unsuitable mate-
rials.
R Frequent us eofcar washes.
R Washing the vehicl eindirect sunlight.
! Neve
ruse paint cleaner, buffing or pol-
ishing products, or gloss preserver, e.g.
wax. These products are onl ysuitabl efor
high-gloss surfaces. Their us eonvehicles
with matt finish lead stoconsiderable sur-
face damag e(shiny ,spotted areas).
Alway shavep aintwork repairs carrie dout
at aq uali fied specialist workshop.
! Do not us
ewashp rograms with ahot wax
treatment under any circumstances.
Observe thes enotes if your vehicl ehas a
clear matt finish. Thi swillh elpy ou to avoid
damag etothe paintwork du etoincorrect
treatment. These notes also appl
ytolight-alloy wheels
with aclear matt finish.
i The vehicl
eshoul dpreferabl ybewashed
by hand using asoft sponge, car shampoo
and plenty of water.
i Use onl
yinsect remover and car shampoo
from the rang eofrecommended and
approved Mercedes-Benz care products. Cleanin
gvehicle parts
Cleanin gthe wheels G
WARNING
The water jet of circular-jet nozzle s(dirt grind-
ers )can cause damag enot visible from the
outsid etotyresorc hassi scomponents .Com-
ponents damaged in this wa ycan unexpect-
edly fail. There is ariskofana ccident.
Do not us ehigh-pressure cleaners with circu-
lar-jet nozzle stoclean the vehicle. Hav edam-
aged tyre sorchassiscomponents replaced
immediately.
! Do not us
eacidi cwheel cleaning products
to remove brake dust. Thi scould damage
wheel bolts and brake components.
! Do not park up the vehicl
efor an extended
perio dstraight afte rcleaning it, particularly
afte rhaving cleane dthe wheel swithw heel
cleaner. Wheel cleaners could cause
increased corrosio nofthe brake discs and
brake pads/linings. For this reason, you
shoul ddrive for afew minutes afte rclean-
ing .Braking heats the brake discs and the
brake pads/linings, thu sdrying them. The
vehicl ecan then be parked up.
Cleanin gthe windows G
WARNING
If the windscreen wipers are set in motion
when cleaning the windscreen or wiper
blades, yo ucould become trapped. There is a
danger of injury. 388
CareMaintenanc
eand care
Page 393 of 497

X
Clean sensors :of th edriving systems
wit hw ater, car shampoo and asoftc loth.
Cleaning th ereversing camera !
Do no
tclean th ecamera len sand th earea
aroun dthe reversing camera wit hahigh-
pressur ecleaner. X
Use clear wate rand asoftc loth to clean
camera lens :.
Cleaning th e360° camera !
Do no
tclean th ecamera len sand th earea
aroun dthe 360° camera wit hahigh-pres-
sure cleaner.360 X
Use clear wate rand asoftc loth to clean
camera lens :.
Cleaning th eexhaust tail pipes G
WARNING
The exhaust tai lpipe and tai lpipe trim can
become ver yhot.Ify ou come int ocontact
wit hthese part softhevehicle, you could burn
yourself. Ther eisariskofi njury.
Always be particularly careful aroun dthe
exhaust tai lpipe and th etailp ipe trim. Allow
these component stocooldown before touch-
ing them.
! Do no
tclean th eexhaust pipe wit hacid-
based cleanin gagents ,suc hass anitary
cleanser or wheel cleaner.
Impurities combined wit hthe effect sofroad
gri tand corrosiv eenvironmental factors may
caus eflas hrust to for monthesurface .You
can restore th eoriginal shin eoftheexhaust
pipe by cleanin gitregularly, especially in win-
te ra nd after washing.
X Clean th eexhaust pipe wit hacarep roduct
tested and approve dbyMercedes-Benz.
Cleaning th etraile rtow hitch H
Environmental note
Dispose of oily and greasy cloth sinanenvi-
ronmentally-responsible manner.
! Do no
tclean th eball couplin gwithah igh-
pressur ecleaner. Do no tuse solvents. 390
CareMaintenance and care
Page 394 of 497
!
Please note the care instructions in the
trailer coupling manufacturer's operating
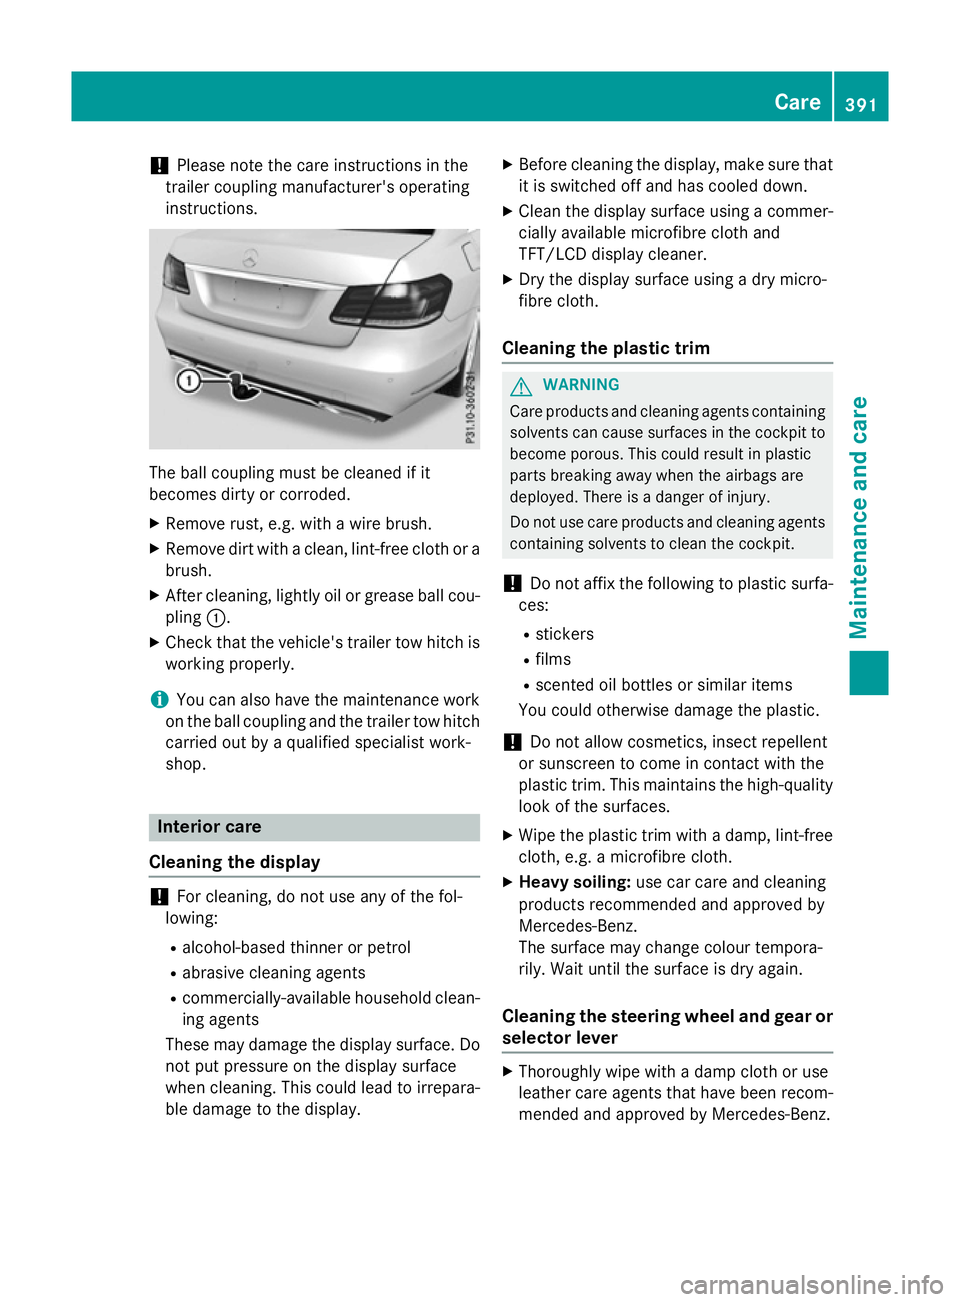
instructions. The ball coupling must be cleaned if it
becomes dirty or corroded.
X Remove rust, e.g. with awire brush.
X Remove dirt with aclean, lint-free cloth or a
brush.
X After cleaning, lightly oil or grease ball cou-
pling :.
X Check that the vehicle's trailer tow hitch is
working properly.
i You can also have the maintenance work
on the ball coupling and the trailer tow hitch
carried out by aqualified specialist work-
shop. Interior care
Cleaning the display !
For cleaning, do not use any of the fol-
lowing:
R alcohol-based thinner or petrol
R abrasive cleaning agents
R commercially-available householdc lean-
ing agents
These may damage the displays urface. Do
not put pressure on the displays urface
when cleaning. This could lead to irrepara-
ble damage to the display. X
Before cleaning the display, make sure that
it is switched off and has cooled down.
X Cleant he displays urface using acommer-
cially available microfibre cloth and
TFT/LCD displayc leaner.
X Dry the displays urface usingadry micro-
fibre cloth.
Cleaning the plastic trim G
WARNING
Care products and cleaning agents containing solvents can cause surfaces in the cockpit to
become porous. This could result in plastic
parts breaking awayw hen the airbags are
deployed. There is adanger of injury.
Do not use care products and cleaning agents containing solvents to clean the cockpit.
! Do not affix the following to plastic surfa-
ces:
R stickers
R films
R scented oil bottles or similari tems
You could otherwise damage the plastic.
! Do not allowc
osmetics, insect repellent
or sunscreen to come in contact with the
plastic trim. This maintains the high-quality look of the surfaces.
X Wipe the plastic trim with adamp, lint-free
cloth, e.g. amicrofibre cloth.
X Heavy soiling: use car care and cleaning
products recommended and approved by
Mercedes-Benz.
The surface may change colour tempora-
rily. Wait until the surface is dry again.
Cleaning the steering wheela nd gear or
selector lever X
Thoroughlyw ipe withadamp cloth or use
leather care agents that have been recom-
mended and approved by Mercedes-Benz. Care
391Maintenance and care Z
Page 395 of 497
Cleaning wooden trim and trim ele-
ments !
Do no
tuse solvent-based cleanin gagents
suc hast ar remover, wheel cleaners, pol-
ishe sorw axes. Ther eisotherwise ariskof
damaging th esurface.
X Wipe th ewoode ntrima nd trim elements
wit had amp, lint-free cloth ,e.g.am icrofi-
bre cloth.
X Heavy soiling: use car careand cleaning
product srecommended and approved by
Mercedes-Benz.
Cleaning th eseat covers General notes
! Do no
tuse microfibre cloth stoclean gen-
uine leather ,artificial leather or DINAMICA
covers. If used often ,the se can damag ethe
cover.
i Not
ethatregular car eisessential to
mak esure that th eappearanc eand com-
for toft hecover sare retaine dovertime.
Genuine leather seat covers
Leather is anatural product.
It has natural surface properties, e.g.: R unevenness in structure
R marks caused by growth and injury
R subtle colour differences
Thes eare characteristic sofleather and not
material faults.
! To retain th
enatural appearanc eofthe
leather ,observ ethe followin gcleaning
instructions:
R Clean genuine leather cover scarefully
wit had amp cloth and then wipe th ecov-
ers down wit hadry cloth.
R Mak esure that th eleather does not
become soaked. It may otherwise
become roug hand cracked.
R Only use leather car eagents that have
been tested and approved by Mercedes- Benz. You can obtain these from
aquali-
fied specialist workshop.
Seat cover sfromo ther materials
! Observ
ethe followin gwhen cleaning:
R clean artificial leather cover swithac loth
moistene dwithas olution containing 1%
detergen t(e.g. washing-up liquid).
R clean cloth cover switham icrofibre cloth
moistene dwithas olution containing 1%
detergen t(e.g. washing-up liquid). Rub
carefully, and always wipe entir eseat
sections to avoid leavin gvisible lines.
Leav ethe seat to dry afterwards. Clean-
ing results depen donthetype of dirt and
how lon githas been there.
R Clean DINAMICA cover swithad amp
cloth .Makes ure that you wipe entire
seat sections to avoid leavin gvisible
lines.
Cleaning th eseat belts G
WARNING
Seat belt smay be severely weakened if
bleached or coloured. This may lead to the
seat belts, for example ,tea rin gorf ailinginan
accident. Ther eisanincreased ris kofinjury,
possibly eve nfatal.
Never bleac horcolour seat belts.
! Do no
tclean th eseat belt susin gchemical
cleanin gagents .Donotdry th eseat belt sat
temperatures abov e80†or in direct sun-
light.
X Use clean, lukewarm wate rand soap solu-
tion.
Cleaning th eroof lining and carpets X
Roof lining: if it is verydirty, use asoft
brus hord ry shampoo.
X Carpets: use thecarpet and textile clean-
ing agents recommended and approved by
Mercedes-Benz. 392
CareMaintenance and care