2015 MERCEDES-BENZ E-CLASS SALOON wheel
[x] Cancel search: wheelPage 294 of 497
X
Press the :or9 button to select the
Intell. Light Sys.
Intell. Light Sys. function.
If the Intell. Light Sys.
Intell. Light Sys. function has
been switched on, the cone of light and the L symbol in the multifunction display
are shown in orange.
X Press the abutton to save the setting.
When you switch the Intell. Light Sys.
Intell. Light Sys.
function on, you activat ethe following func-
tions:
R Motorway mode
R Active light function
R Cornerin glight function
R Extended range foglamps
If you set the dipped-beam headlamps for
driving on the right/left, the multifunction
display shows the Intell.
Intell. Light LightSystem:
System:
System inoperative Inactive for
System inoperative Inactive for
left-side traffic left-side traffic orIntell. Light
Intell. Light
System:
System: System
Systeminoperative
inoperative Inactive
Inactive
for right-sid etraffic
for right-sid etraffic display message
instead of the Intell.
Intell. Light
LightSys.
Sys.function
in the Light
Light submenu (Y page 291). This
display message will only appear if the setting for driving on the left/right is set opposite to
your vehicle's country version.
Observe the additional information on the
Intelligent Light System (Y page 145).
Setting the dipped-beam headlamps for
driving on the left/right
This function is only availabl eonvehicles with
the Intelligent Light System.
You can use this function to switch between
symmetrical and asymmetrical dipped beam
(Y page 142).
X Press the =or; button on the steer-
ing wheel to select the Settings
Settings menu.
X Press the :or9 button to select the
Light
Light submenu.
X Press ato confirm. X
Press the :or9 button to select the
Dipped beams Setting for: Dipped beams Setting for: function.
You will see the selected setting: Right-
Right-
side traffic
side traffic orLeft-side traffic
Left-side traffic.
X Press the abutton to save the setting.
If you change the setting, conversion does
not take place until the next time the vehi-
cle is stationary.
If you set the dipped-beam headlamps for
driving on the right/left, then motorway
mode and the extended range foglamps are
unavailable. These are only deactivated if the
setting for driving on the left/right is set
opposite to your vehicle's country version.
Aq ualified specialist workshop can set the
dipped-beam headlamps for driving on the
left/right.
Setting the brightness of the ambient
lighting
X Press the =or; button on the steer-
ing wheel to select the Settings
Settings menu.
X Press the :or9 button to select the
Lights Lights submenu.
X Press ato confirm.
X Press the :or9 button to select the
Amb. light +/-
Amb. light +/- function.
You will see the selected setting.
X Press ato confirm.
X Press the :or9 button to adjust the
brightness to any level from Off
OfftoLevel 5
Level 5
(bright).
X Press the aor% button to save the
setting.
Setting the ambient lighting colour X Press the =or; button on the steer-
ing wheel to select the Settings
Settingsmenu.
X Press the :or9 button to select the
Lights
Lights submenu.
X Press ato confirm.
X Press the :or9 button to select the
Amb. light col.
Amb. light col. function.
X Press ato confirm. Menus and submenus
291On-board computer and displays Z
Page 295 of 497
X
Press the :or9 button to set the
colour to SOLAR SOLAR,NEUTRAL NEUTRAL orPOLAR
POLAR.
X Press the aor% button to save the
setting.
Activating/deactivating the surround
lighting and exterior lighting delayed
switch-off
X Press the =or; button on the steer-
ing wheel to select the Settings
Settings menu.
X Press the :or9 button to select the
Light Light submenu.
X Press ato confirm.
X Press the :or9 button to select the
Surround lighting
Surround lighting function.
If the Surround
Surround lighting
lightingfunction is acti-
vated, the light cone and the area around
the vehicle are displayed in orange in the
multifunction display.
X Press the abutton to save the setting.
Deactivating delayed switch-off of the exte-
rior lighting temporarily:
X Before leaving the vehicle, turn the key to
position 0in the ignition lock.
X Turn the key to position 2in the ignition
lock.
The exterior lighting delayed switch-off is
deactivated.
Delayed switch-off of the exterior lighting is
reactivated the next time you start the
engine.
If you have activated the Surround light‐
Surround light‐
ing
ing function and the light switch is set to
Ã,t he following functions are activated
when it is dark:
R surround lighting: the exterior lighting
remains lit for 40 seconds after unlocking
with the key. If you start the engine, the
surround lighting is switched off and auto-
matic headlamp mode is activated
(Y page 143).
R exterior lighting delayed switch-off: the
exterior lighting remains lit for 60 seconds
after the engine is switched off. If you close all the doors and the boot lid/tailgate, the
exterior lighting goes off after 15 seconds.
i Dependin
gonyour vehicle's equipment,
when the surround lighting and delayed
switch-off exterior lighting are on, the fol-
lowing light up:
R Side lamps
R Surround lighting in the exterior mirrors
Activating/deactivating the interior light-
ing delayed switch-off
If you activat ethe Light. delay Switch Light. delay Switch
off
off function, the interior lighting remains on
for 20 seconds after you remove the key from the ignition lock.
X Press the =or; button on the steer-
ing wheel to select the Settings
Settings menu.
X Press the :or9 button to select the
Light
Light submenu.
X Press ato confirm.
X Press the :or9 button to select the
Light. delay
Light. delay function.
If the Light. delay
Light. delay function has been
switched on, the vehicle interior is dis-
played in orange in the multifunction dis-
play.
X Press the abutton to save the setting.
Vehicle Setting permanent SPEEDTRONIC
X Press the =or; button on the steer-
ing wheel to select the Settings Settingsmenu.
X Press the :or9 button to select the
Vehicle
Vehicle submenu.
X Press ato confirm.
X Press :or9 to select the Limit
Limit
speed (winter tyres):
speed (winter tyres): function.
You will see the curren tsetting.
X Press ato confirm.
X Press the :or9 button to adjust
permanen tSPEEDTRONIC in increment sof
ten (240 km/h 240 km/h to160 km/h
160 km/h). The Off
Offset- 292
Menus and submenusOn-board computer and displays
Page 297 of 497
In the
Heating
Heating submenu, you can select a
stored departure time or change adeparture
time.
The auxiliary heating timer function calcu-
lates the switch-on time according to the out-
side temperature so that the vehicle is pre-
heated by the departure time. When the
departure time is reached ,the auxiliary heat-
ing continues to heat for afurther five
minutes and then switches off. The auxiliary
heating adopts the THERMATIC or
THERMOTRONIC temperature setting.
You can switch off the auxiliary heating by
using the remote control or the auxiliary heat- ing button on the centre console.
i Switch the auxiliary heating on regularly
once amonth for aboutt en minutes.
Further information on auxiliary heating
(Y page 168).
Selecting the departur etime or deactivat-
ing aselected departur etime
X Press the =or; button on the steer-
ing wheeltos elect theSettings
Settings menu.
X Press the :or9 button to select the
Heating
Heating submenu.
X Press ato confirm.
You wills ee the selected setting.
X Press ato confirm.
X Press the :or9 button to select
one of the three departure times or Timer Timer
off
off (no timer active).
X Press ato confirm.
If ad eparture time is selected, the yellow
indicator lamp lights up on the auxiliary
heating button.
Changing the departur etime
X Press the =or; button on the steer-
ing wheeltos elect theSettings Settings menu.
X Press the :or9 button to select the
Heating
Heating submenu.
X Press ato confirm.
You wills ee the selected setting. X
Press the :or9 button to select A A,B B
or Change C
Change C.
X Press ato confirm.
You can now change the departure time.
X Press the =or; button to select the
display to be changed: hours, minutes.
X Press the :or9 button to set the
selected display.
X Press the abutton to store the entry.
The yellow indicator lamp on the auxiliary
heating button lights up.
Comfort Activating/deactivating the EASY-
ENTRY/EXIT feature
G
WARNING
When the EASY-ENTRY/EXIT feature adjusts
the steering wheel, you and other vehicle
occupants –particularly childre n–could
become trapped .There is arisk of injury.
Whilet he EASY-ENTRY/EXIT feature is mak-
ing adjustments, make sure that no one has
any body parts in the sweep of the steering
wheel.
If someone is trapped:
R press one of the memory function position
buttons, or
R move the switch for steering wheela djust-
ment in the opposite direction to that in
which the steering wheelism oving.
The adjustment process is stopped.
X Press the =or; button on the steer-
ing wheeltos elect theSettings Settings menu.
X Press the :or9 button to select the
Convenience
Convenience submenu.
X Press ato confirm.
X Press the :or9 button to select the
Easy Entry/Exit:
Easy Entry/Exit: function.
If the Easy Entry/Exit
Easy Entry/Exit function is activa-
ted, the vehicle steering wheelisd isplayed
in orange in the multifunction display.
X Press the abutton to save the setting. 294
Menus and submenusOn-board computer and displays
Page 298 of 497
Further information on the EASY-ENTRY/EXIT
feature (Y page 135).
Switchin gbelta djustmen ton/off
X Pres sthe = or; button on the steer-
ing wheel to select the Settings
Settingsmenu.
X Pres sthe : or9 button to select the
Convenience
Convenience submenu.
X Press ato confirm.
X Pres sthe : or9 button to select the
Belt adjustment
Belt adjustment function.
If the Belt adjustment
Belt adjustment function is activa-
ted, the vehicle sea tbeltiss hown in orange
in the multifunction display.
X Pres sthe a button to sav ethe setting.
For further information on bel tadjustment,
see (Y page 49).
Switchin gthe fold-in mirrors whe nlock-
ing functio non/off
Thi sfunction is only available whe nthe vehi-
cle is equipped with the electrica lfold-in func-
tion.
Whe nyou switch on the Auto.fold in
Auto .fold in
function, the exterior mirrors are folded in
whe nthe vehicle is locked. If yo uunlock the
vehicle and then ope nthe driver' sorfront-
passenger door, the exterior mirrors fol dout
again.
X Pres sthe = or; button on the steer-
ing wheel to select the Settings Settingsmenu.
X Pres sthe : or9 button to select the
Convenience
Convenience submenu.
X Press ato confirm.
X Pres sthe : or9 button to select the
Auto .fold in
Auto .fold in function.
If the Auto.
Auto. fold
foldin
infunction is switched
on, the multifunction display shows the
vehicle' sexterior mirror in orange.
X Pres sthe a button to sav ethe setting. If yo
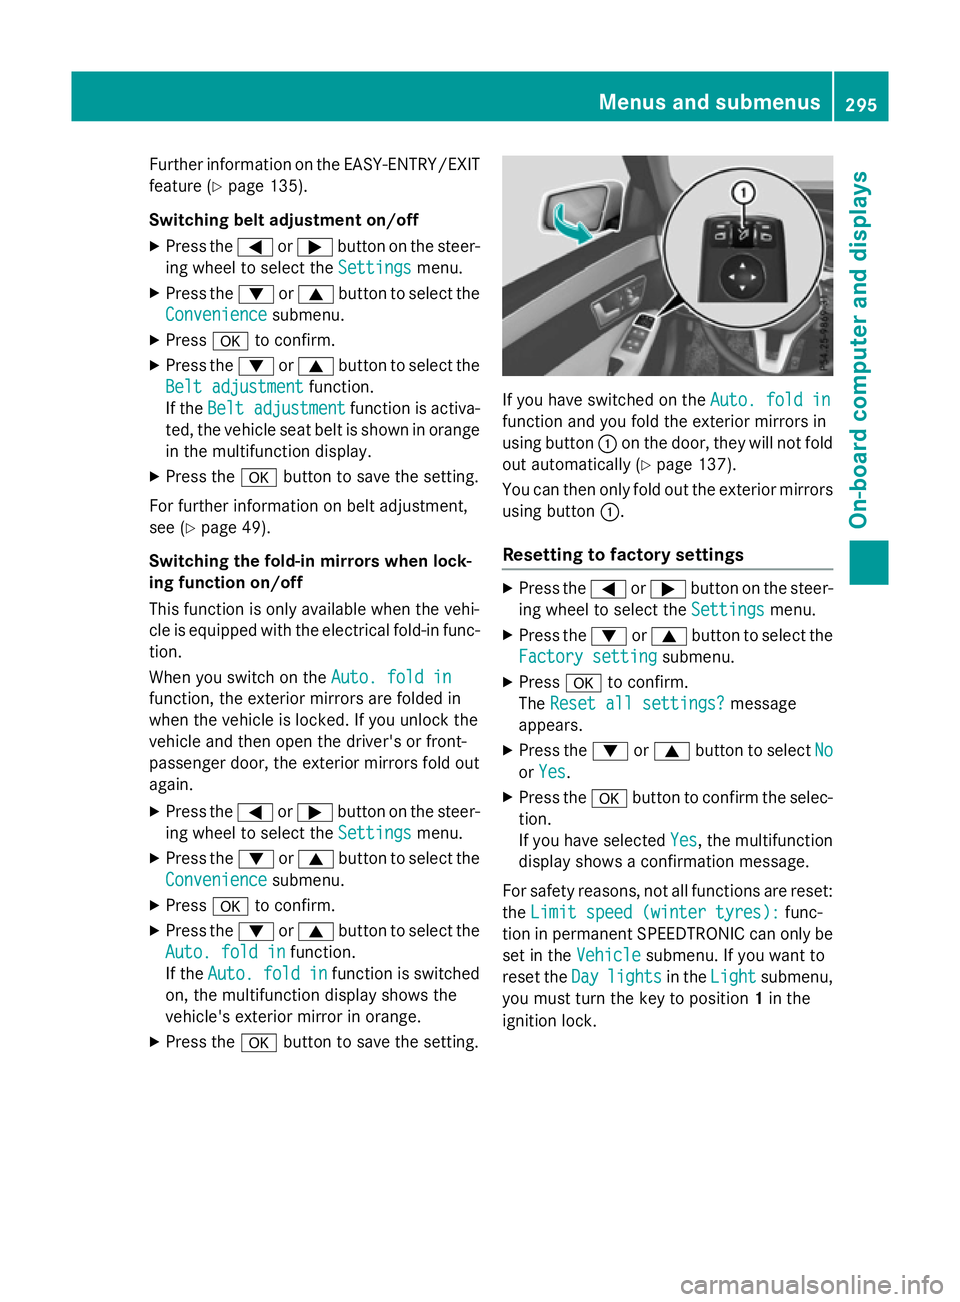
uhaves witched on the Auto.fold in
Auto .fold in
function and yo ufoldt he exterior mirrors in
using button :on the door, they will not fold
ou ta utomaticall y(Ypage 137).
You can then only fol doutthe exterior mirrors
using button :.
Resettin gtofactory settings X
Pres sthe = or; button on the steer-
ing wheel to select the Settings Settingsmenu.
X Pres sthe : or9 button to select the
Factory setting
Factory setting submenu.
X Press ato confirm.
The Rese tall settings?
Rese tall settings? message
appears.
X Pres sthe : or9 button to select No
No
or Yes
Yes.
X Pres sthe a button to confir mthe selec-
tion.
If yo uhaves elected Yes Yes,the multifunction
display shows aconfirmation message.
For safety reasons, not al lfunctions are reset:
the Limi tspee d(winter tyres):
Limi tspee d(winter tyres): func-
tion in permanent SPEEDTRONIC can only be
set in the Vehicle
Vehiclesubmenu. If yo uwantto
rese tthe Day
Day lights
lights in theLight
Light submenu,
yo um ustturn the key to position 1in the
ignition lock. Menus and submenus
295On-board computer and displays Z
Page 300 of 497
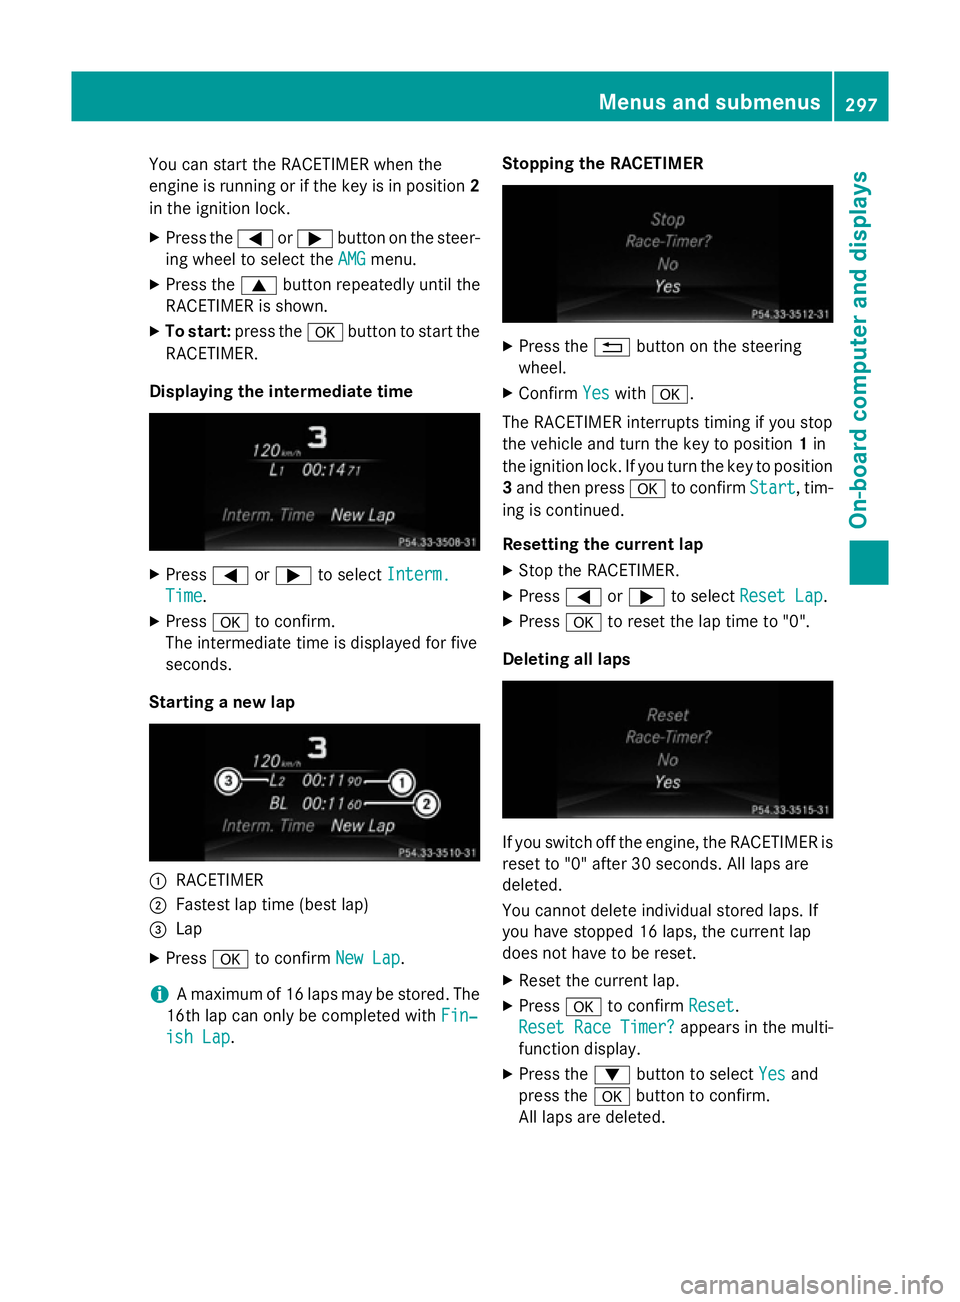
You can star
tthe RACETIME Rwhen the
engin eisrunning or if the key is in position 2
in the ignition lock.
X Press the =or; button on the steer-
ing wheel to selec tthe AMG
AMG menu.
X Press the 9button repeatedly until the
RACETIME Risshown.
X To start: press the abutton to star tthe
RACETIMER.
Displaying th eintermediat etime X
Press =or; to select Interm.
Interm.
Time
Time .
X Press ato confirm.
The intermediate tim eisdisplayed for five
seconds.
Starting anew lap :
RACETIMER
; Fastest lap tim e(best lap)
= Lap
X Press ato confirm New Lap
New Lap.
i Am
aximum of 16 laps may be stored. The
16t hlap can only be complete dwithFin‐
Fin‐
ish Lap
ish Lap. Stopping th
eRACETIMER X
Press the %button on the steering
wheel.
X Confirm Yes
Yeswith a.
The RACETIME Rinterrupt stiming if you stop
the vehicle and turn the key to position 1in
the ignition lock .Ifyou turn the key to position
3 and the npress a to confirm Start
Start,tim-
ing is continued.
Resetting th ecurrent lap
X Stop the RACETIMER.
X Press =or; to select ResetLap
Rese tLap.
X Press ato reset the lap tim eto"0".
Deleting all laps If you switc
hoff the engine, the RACETIME Ris
reset to "0" after 30 seconds .All laps are
deleted.
You cannot delet eindividual stored laps. If
you have stopped 16 laps, the current lap
does not have to be reset.
X Reset the current lap.
X Press ato confirm Reset
Reset.
Rese tRace Timer?
Rese tRace Timer? appears in the multi-
function display.
X Press the :button to select Yes Yesand
press the abutton to confirm.
All laps are deleted. Menus and submenus
297On-board computer and displays Z
Page 301 of 497
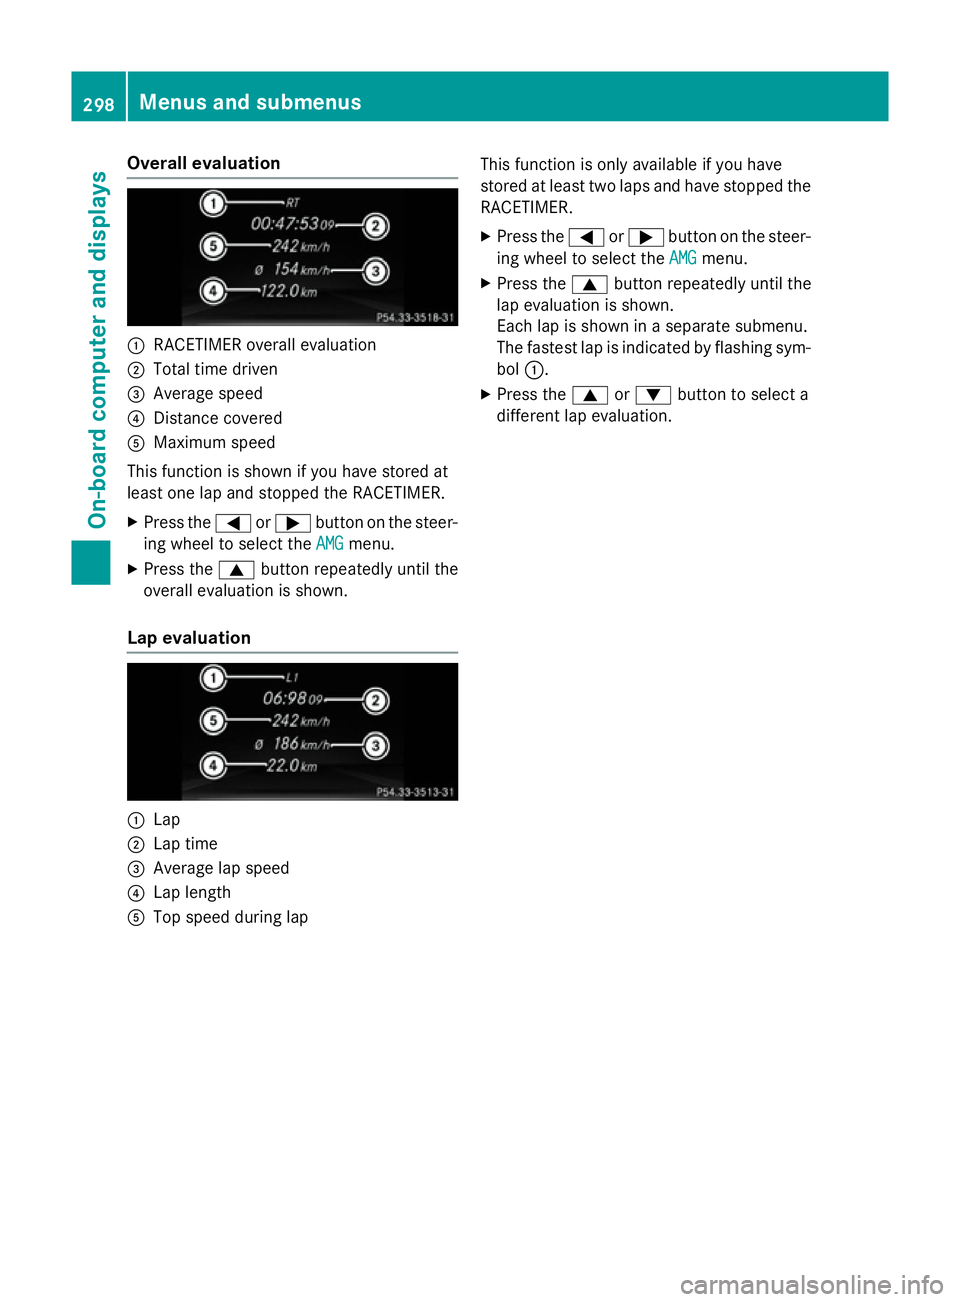
Overall evaluation
:
RACETIME Roverall evaluation
; Total time driven
= Average speed
? Distance covered
A Maximum speed
This function is shown if you have stored at
least one lap and stopped the RACETIMER.
X Press the =or; button on the steer-
ing wheel to select the AMG
AMGmenu.
X Press the 9button repeatedly until the
overall evaluation is shown.
Lap evaluation :
Lap
; Lap time
= Average lap speed
? Lap length
A Top speed during lap This function is only available if you have
stored at least two laps and have stopped the
RACETIMER.
X Press the =or; button on the steer-
ing wheel to select the AMG AMGmenu.
X Press the 9button repeatedly until the
lap evaluation is shown.
Each lap is shown in aseparate submenu.
The fastest lap is indicated by flashing sym- bol :.
X Press the 9or: button to select a
differen tlap evaluation. 298
Menus and submenusOn-boar
dcomputer and displays
Page 303 of 497

Safety systems
Display messages
Possible causes/consequences and
M
MSolutions !÷
currently unavail‐ currently unavail‐
able See Owner's able See Owner's
Manual Manual ABS (Anti-lock Braking System), ESP
®
(Electronic Stability Pro-
gram), BAS (Brake Assist System), the HOLD function, PRE-SAFE ®
,
hill start assist and ESP ®
trailer stabilisation are temporarily
unavailable.
The adaptive brake lights, BAS PLUS with Cross-Traffic Assist,
COLLISION PREVENTION ASSIST PLUS, PRE ‑SAFE®
PLUS and
PRE‑SAFE ®
Brake may also have failed.
In addition, the ÷,åand! warning lamps light up in the
instrumen tcluster.
ATTENTION ASSIST is deactivated.
For example, the on-board voltage may be insufficient.
G WARNING
The brake system continues to function normally, but without the functions listed above. The wheels could therefore lock if you
brake hard, for example.
The steerability and braking characteristics may be severely affec-ted. The braking distance may increase in an emergency braking
situation.
If ESP ®
is not operational, ESP ®
is unable to stabilise the vehicle.
There is an increased danger of skidding and risk of an accident.
X Drive on carefully.
If the display message disappears, the functions mentioned
above are available again.
If the multifunction display still shows the display message: X Drive on carefully.
X Consult aqualified specialist workshop. !÷
inoperative See inoperative See
Owner's Manual Owner's Manual ABS,E
SP®
,B AS ,the HOLD function, PRE-SAFE ®
,h ill start assist
and ESP ®
trailer stabilisation are not available due to amalfunc-
tion.
The adaptive brake lights, BAS PLUS with Cross-Traffic Assist,
COLLISION PREVENTION ASSIST PLUS, PRE ‑SAFE®
PLUS and
PRE‑SAFE ®
Brake may also have failed.
In addition, the J,÷,åand! warning lamps light up
in the instrumen tcluster.
ATTENTION ASSIST is deactivated.
G WARNING 300
Display messagesOn-board computer and displays
Page 304 of 497

Display messages
Possible causes/consequences and
M
MSolutions The brak
esystem continues to function normally, but without the
function slisted above. The wheels could therefore loc kifyou
brak ehard, fo rexample.
The steerabilit yand brakin gcharacteristics may be severely affec-
ted. The brakin gdistanc emay increase in an emergenc ybraking
situation.
If ESP ®
is no toperational, ESP ®
is unable to stabilis ethe vehicle.
There is an increase ddanger of skiddin gand ris kofana ccident.
X Drive on carefully.
X Consult aqualified specialist workshop immediately. ÷
inoperative See inoperative See
Owner'
sManual
Owner' sManual ESP
®
,B AS ,the HOLD function ,PRE-SAFE ®
,h ill start assist and
ESP ®
trailer stabilisation are no tavailable due to amalfunction.
The adaptive brak elights ,BAS PLU SwithC ross-Traffic Assist,
COLLISION PREVENTION ASSIST PLUS, PRE ‑SAFE®
PLU Sand
PRE ‑SAFE ®
Brake may also hav efailed.
In addition ,the ÷ andå warnin glamp sligh tupint he
instrumen tcluster.
The self-diagnosi sfunction ,for example, may no tbecomplete.
ATTENTION ASSIST is deactivated.
G WARNING
The brak esystem continues to function normally, but without the
function slisted above.
The brakin gdistanc emay thus increase in an emergenc ybraking
situation.
If ESP ®
is no toperational, ESP ®
is unable to stabilis ethe vehicle.
There is an increase ddanger of skiddin gand ris kofana ccident.
X Drive on carefully.
X Consult aqualified specialist workshop. Display
messages
301On-boardcomputer an ddisplays Z