2015 MERCEDES-BENZ E-CLASS CABRIOLET boot
[x] Cancel search: bootPage 197 of 349
R
a split-screen with top view and the image
from the front camera or
R a split-screen with top view and the image
from the reversing camera
or
X Press the Øbutton in the centre console.
The vehicle menu appears.
X Select 360°
360° camera
camera and press 7to confirm.
The following appears depending on whether transmission position Dor Ris selected:
R a split-screen with top view and the image
from the front camera or
R a split-screen with top view and the image
from the reversing camera
Switching on the 360° camera using
reverse gear You can show images from the 360° camera
automatically by engaging reverse gear.
X Make sure that the key is in position 2in the
ignition lock.
X Make sure that the Activation by R gear
Activation by R gear
function is selected in the multimedia system (see the separate operating instructions).
X To show the 360° camera image: engage
reverse gear.
The area behind the vehicle is shown in the
multimedia system display in split-screen
mode. You see the top view of the vehicle and the image from the reversing camera.
Selecting the split-screen and full
screen displays Switching between split screen views
X To switch to the line with the vehicle icons:
slide 5the controller.
X To select one of the vehicle icons: turn 3
the controller.
X To switch to 180° view
180° view :turn 3 the con-
troller to select 180° view
180° view and press7to
confirm.
i The
180°
180° view viewoption is only available in the
following views:
R Top view with image from the reversing
camera
R Top view with image from the front camera Messages in the multimedia system dis-
play Important safety notes
The system may show a distorted view of obsta-
cles or show them incorrectly or not at all.
Obstacles are not shown by the system in the
following locations:
R under the front and rear bumpers
R very close to the front and rear bumpers
R in the area immediately above the handle on
the boot lid
R very close to the exterior mirrors
R in the transitional areas between the various
cameras in the virtual top view
! Objects not at ground level may appear to
be further away than they actually are, e.g.:
R the bumper of a parked vehicle
R the drawbar of a trailer
R the ball coupling of a trailer tow hitch
R the rear section of an HGV
R a slanted post
Use the guidelines only for orientation.
Approach objects no further than the bottom- most guideline.
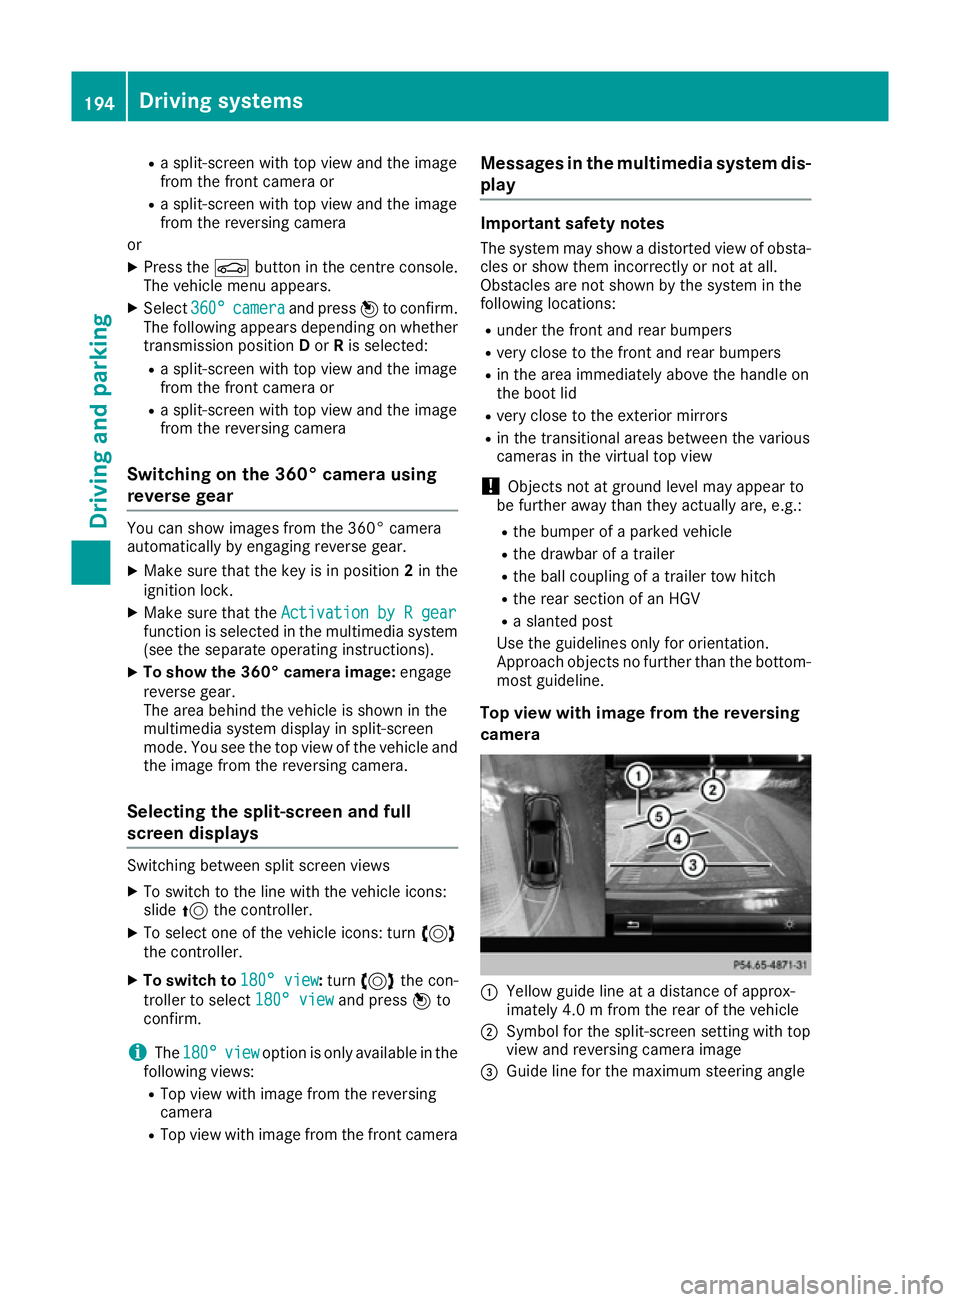
Top view with image from the reversing
camera :
Yellow guide line at a distance of approx-
imately 4.0 m from the rear of the vehicle
; Symbol for the split-screen setting with top
view and reversing camera image
= Guide line for the maximum steering angle 194
Driving systemsDriving and parking
Page 213 of 349

the power output of the engine, and conse-
quently the vehicle's gradient-climbing capa-
bility, decrease with increasing altitude.
Folding the ball coupling in/out
Folding out the ball coupling G
WARNING
If the ball coupling is not correctly engaged,
the trailer can detach. There is a risk of an
accident.
Always engage the ball coupling as described. G
WARNING
If you release the ball coupling or it does not
engage correctly when folding in, it will swing out. Within pivoting range of the ball coupling,
there is an increased risk of an accident and
injury.
Only release the ball coupling if the pivoting
range is unobstructed. Always make sure that the ball coupling engages when folding in.
Before you can tow a trailer with your vehicle,
you must fold out the ball coupling. The release wheel is located behind the left-
hand side trim panel in the boot.
Opening the cover:
X Turn handle :around anti-clockwise and
fold cover ;down. Unlocking and folding out the ball coupling:
X Pull out release wheel ?.
X Turn release wheel ?anti-clockwise until the
ball coupling releases and folds out from
under the rear bumper. Indicator lamp =
flashes. X
Pull the ball coupling in the direction of the
arrow until it engages in a vertical position.
The trailer power socket is integrated into the ball coupling and swivels out with it.
Indicator lamp =goes out.
The multifunction display shows the
Trailer hitch Check lock mech. Trailer hitch Check lock mech. mes-
sage until the ball coupling is engaged.
X Remove the protective covering from the ball
coupling and store it in a safe place.
X Make sure that the ball of the ball coupling is
clean and greased.
HYBRID vehicles : make sure that you read the
"HYBRID" Supplement included in the vehicle
literature. Otherwise, you may not recognise
dangers. 210
Towing a trailerDriving an
d parking
Page 228 of 349

the extended range foglamps are unavailable.
These are only deactivated if the setting for driv-
ing on the left/right is set opposite to your vehi- cle's country version.
A qualified specialist workshop can set the
dipped-beam headlamps for driving on the left/
right.
Activating/deactivating the surround
lighting and exterior lighting delayed
switch-off
X Press the =or; button on the steering
wheel to select the Settings
Settings menu.
X Press the :or9 button to select the
Lights Lights submenu.
X Press ato confirm.
X Using :or9, select the Surround
Surround
lighting
lighting function.
If the Surround
Surround lighting
lightingfunction is activa-
ted, the light cone and the area around the
vehicle are displayed in orange in the multi-
function display.
X Press the abutton to save the setting.
Deactivating delayed switch-off of the exterior
lighting temporarily:
X Before leaving the vehicle, turn the key to
position 0in the ignition lock.
X Turn the key to position 2in the ignition lock.
The exterior lighting delayed switch-off is
deactivated.
Delayed switch-off of the exterior lighting is
reactivated the next time you start the engine.
If you have activated the Surround lighting
Surround lighting
function and the light switch is set to the Ã
position, the following functions are activated
when it is dark:
R surround lighting: the exterior lighting
remains lit for 40 second s after unlocking
with the key. If you start the engine, the sur-
round lighting is switched off and automatic
headlamp mode is activated (Y page 114).
R exterior lighting delayed switch-off: the
exterior lighting remains lit for 60 seconds
after the engine is switched off. If you close all
the doors and the boot lid, the exterior lighting
goes off after 15 seconds.
i Depending on your vehicle's equipment,
when the surround lighting and delayed
switch-off exterior lighting are on, the follow- ing light up: R
Side lamps
R Surround lighting in the exterior mirrors
Activating/deactivating the interior light-
ing delayed switch-off
If you activate the Lighting
Lighting delayed delayedsw.-off
sw.-off
function, the interior lighting remains on for
20 seconds after you remove the key from the
ignition lock.
X Press the =or; button on the steering
wheel to select the Settings Settingsmenu.
X Press the :or9 button to select the
Lights
Lights submenu.
X Press ato confirm.
X Press the :or9 button to select the
Lighting delayed sw.-off
Lighting delayed sw.-off function.
When the Lighting
Lighting delayed
delayedsw.-off
sw.-offfunc-
tion is activated, the vehicle interior is dis-
played in orange in the multifunction display.
X Press the abutton to save the setting.
Vehicle Setting permanent SPEEDTRONIC
X Press the =or; button on the steering
wheel to select the Settings Settingsmenu.
X Press the :or9 button to select the
Vehicle
Vehicle submenu.
X Press ato confirm.
X Press :or9 to select the Limit
Limit
speed (winter tyres):
speed (winter tyres): function.
The current setting appears.
X Press ato confirm.
X Press the :or9 button to adjust per-
manent SPEEDTRONIC in increments of ten
(240 km/h 240 km/h to160 km/h
160 km/h). The Off
Offsetting
switches permanent SPEEDTRONIC off.
X Press the abutton to store the entry.
Observe the additional information on perma-
nent SPEEDTRONIC (Y page 168).
Activating/deactivating the automatic
locking feature
X Press the =or; button on the steering
wheel to select the Settings
Settings menu.
X Press the :or9 button to select the
Vehicle Vehicle submenu.
X Press ato confirm. Menus and submenus
225On-board computer and displays Z
Page 253 of 349
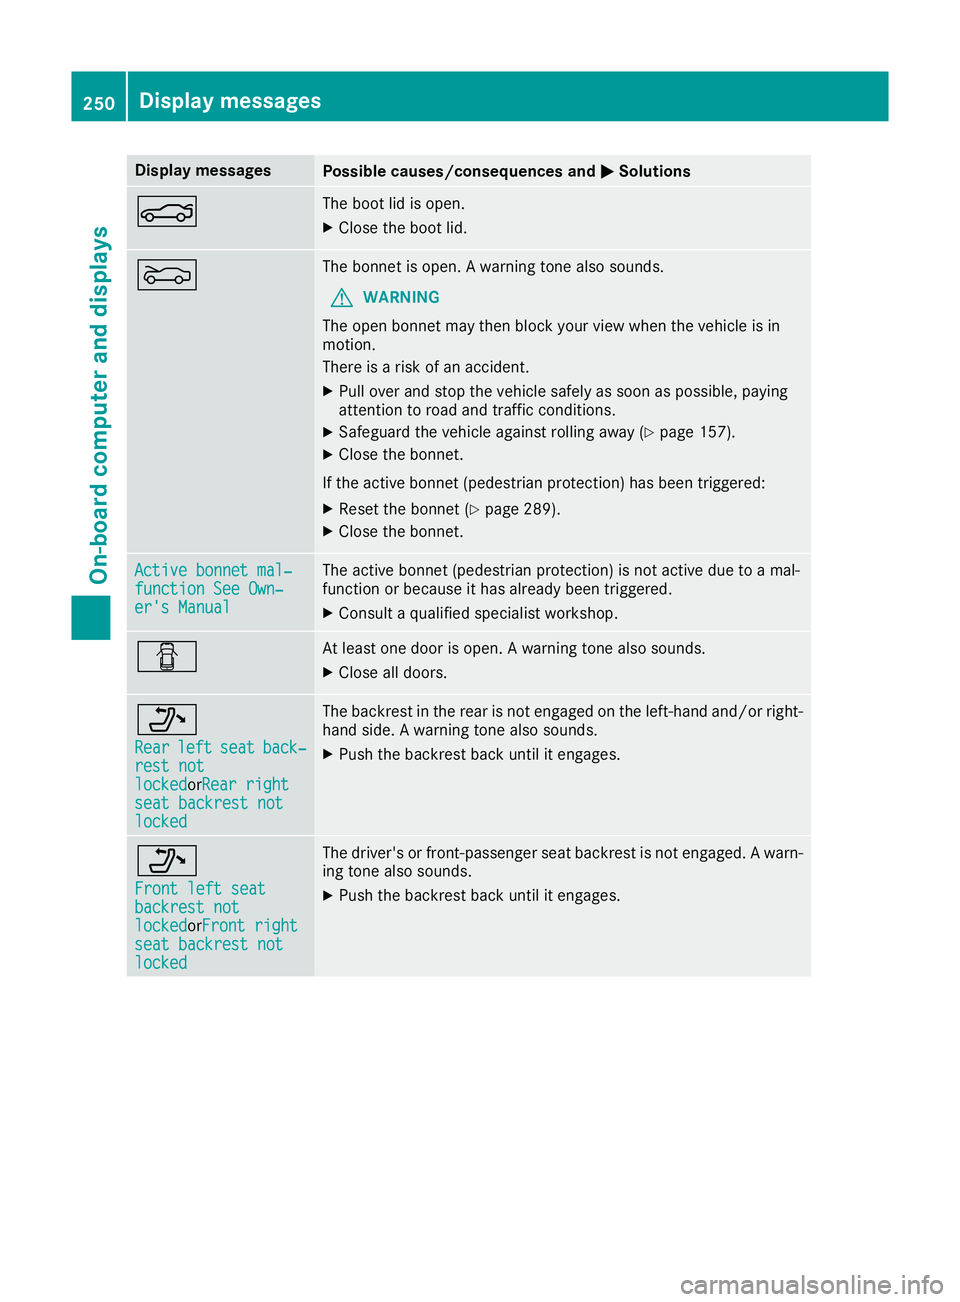
Display messages
Possible causes/consequences and
M
MSolutions N The boot lid is open.
X Close the boot lid. M The bonnet is open. A warning tone also sounds.
G WARNING
The open bonnet may then block your view when the vehicle is in
motion.
There is a risk of an accident.
X Pull over and stop the vehicle safely as soon as possible, paying
attention to road and traffic conditions.
X Safeguard the vehicle against rolling away (Y page 157).
X Close the bonnet.
If the active bonnet (pedestrian protection) has been triggered: X Reset the bonnet (Y page 289).
X Close the bonnet. Active bonnet mal‐ Active bonnet mal‐
function See Own‐ function See Own‐
er's Manual er's Manual The active bonnet (pedestrian protection) is not active due to a mal-
function or because it has already been triggered.
X Consult a qualified specialist workshop. C At least one door is open. A warning tone also sounds.
X Close all doors. _
Rear Rear
left
leftseat
seatback‐
back‐
rest not
rest not
locked locked orRear rightRear right
seat backrest not
seat backrest not
locked locked The backrest in the rear is not engaged on the left-hand and/or right-
hand side. A warning tone also sounds.
X Push the backrest back until it engages. _
Front left seat Front left seat
backrest not backrest not
locked locked
orFront rightFront right
seat backrest not
seat backrest not
locked locked The driver's or front-passenger seat backrest is not engaged. A warn-
ing tone also sounds.
X Push the backrest back until it engages. 250
Display
messagesOn-board computer and displays
Page 255 of 349
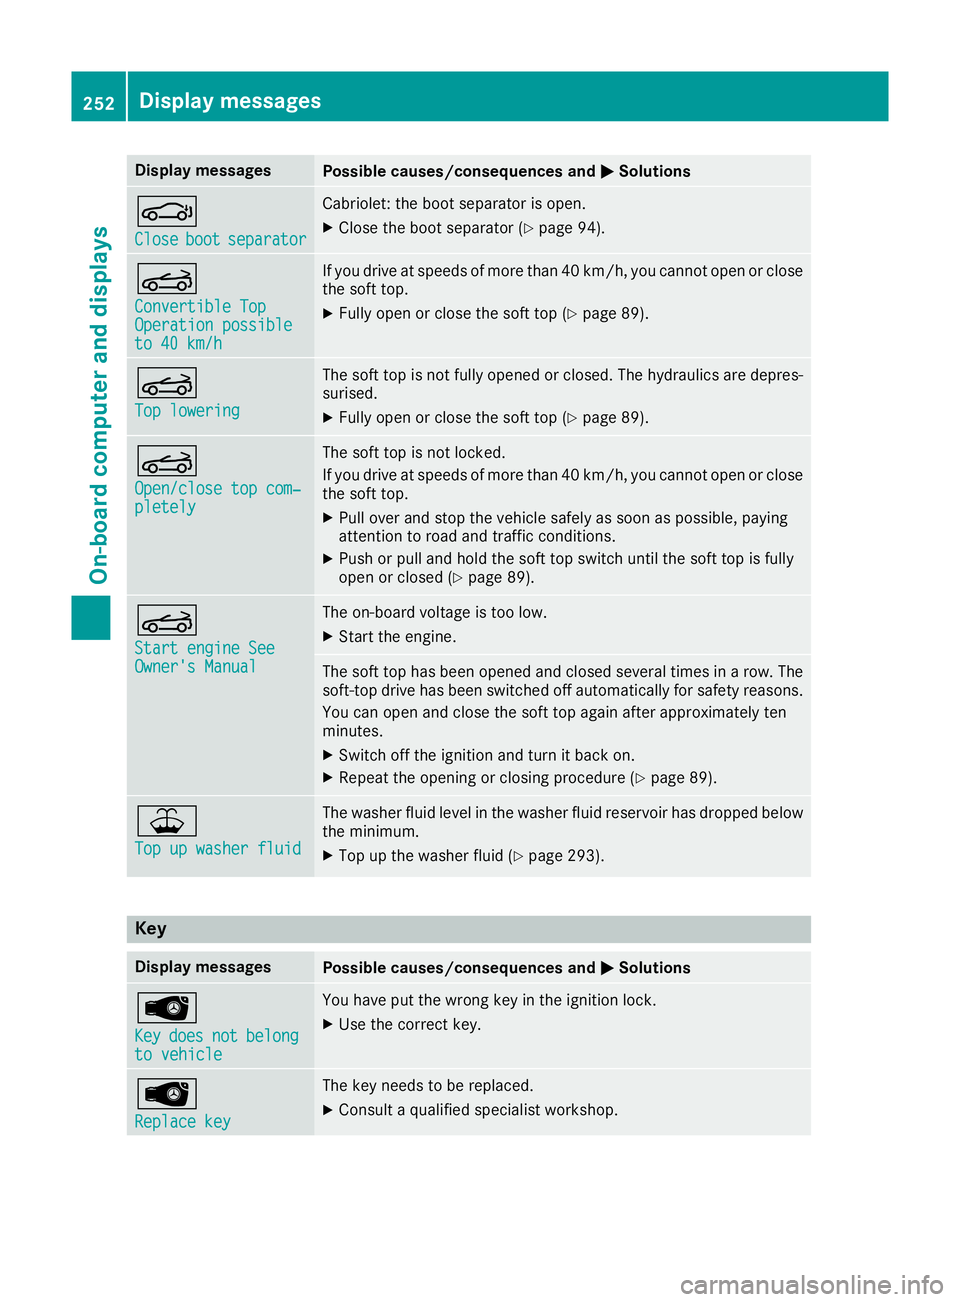
Display messages
Possible causes/consequences and
M
MSolutions J
Close Close
boot
bootseparator
separator Cabriolet: the boot separator is open.
X Close the boot separator (Y page 94).K
Convertible Top Convertible Top
Operation possible Operation possible
to 40 km/h to 40 km/h If you drive at speeds of more than 40 km/h, you cannot open or close
the soft top.
X Fully open or close the soft top (Y page 89).K
Top lowering Top lowering The soft top is not fully opened or closed. The hydraulics are depres-
surised.
X Fully open or close the soft top (Y page 89).K
Open/close top com‐ Open/close top com‐
pletely pletely The soft top is not locked.
If you drive at speeds of more than 40 km/h, you cannot open or close
the soft top.
X Pull over and stop the vehicle safely as soon as possible, paying
attention to road and traffic conditions.
X Push or pull and hold the soft top switch until the soft top is fully
open or closed (Y page 89). K
Start engine See Start engine See
Owner's Manual Owner's Manual The on-board voltage is too low.
X Start the engine. The soft top has been opened and closed several times in a row. The
soft-top drive has been switched off automatically for safety reasons.
You can open and close the soft top again after approximately ten
minutes.
X Switch off the ignition and turn it back on.
X Repeat the opening or closing procedure (Y page 89).¥
Top up washer fluid Top up washer fluid The washer fluid level in the washer fluid reservoir has dropped below
the minimum.
X Top up the washer fluid (Y page 293).Key
Display messages
Possible causes/consequences and
M
MSolutions Â
Key Key
does
does not
notbelong
belong
to vehicle
to vehicle You have put the wrong key in the ignition lock.
X Use the correct key. Â
Replace key Replace key The key needs to be replaced.
X Consult a qualified specialist workshop. 252
Display
messagesOn-board computer and displays
Page 275 of 349
Stowage areas
Loading guidelines
G
WARNING
If objects, luggage or loads are not secured or not secured sufficiently, they could slip, tip
over or be flung around and thereby hit vehicle
occupants. There is a risk of injury, especially when braking or abruptly changing directions.
Always store objects so that they cannot be
flung around. Secure objects, luggage or
loads against slipping or tipping before the
journey. G
WARNING
Combustion engines emit poisonous exhaust
gases such as carbon monoxide. Exhaust
gases can enter the vehicle interior if the boot
lid is open when the engine is running, espe-
cially if the vehicle is in motion. There is a risk of poisoning.
Always switch off the engine before opening
the boot lid. Never drive with the boot lid
open. G
WARNING
The exhaust tail pipe and tail pipe trim can
become very hot. If you come into contact
with these parts of the vehicle, you could burn
yourself. There is a risk of injury.
Always be particularly careful around the
exhaust tail pipe and the tail pipe trim. Allow
these components to cool down before touch-
ing them.
The handling characteristics of a laden vehicle
are dependent on the distribution of the load
within the vehicle. For this reason, you should
observe the following notes when transporting a
load:
R never exceed the maximum permissible gross
vehicle weight or the permissible axle loads
for the vehicle (including occupants).
R the boot is the preferred place to store
objects.
R position heavy loads as far forwards as pos-
sible and as low down in the boot as possible. R
the load must not protrude above the upper
edge of the seat backrests.
R always place the load against the rear or front
seat backrests. Make sure that the seat
backrests are securely locked into place.
R always place the load behind unoccupied
seats if possible.
R use the lashing eyelets and the luggage nets
to transport loads and luggage.
R only use lashing eyelets and fastening com-
ponents that are suitable for the weight and
size of the load.
R secure the load with sufficiently strong and
wear-resistant lashing material. Pad sharp
edges for protection.
i Load restraints are available at any qualified
specialist workshop, e.g. a Mercedes-Benz
Service Centre. Stowage compartments
Important safety notes G
WARNING
If objects in the passenger compartment are
stowed incorrectly, they can slide or be
thrown around and hit vehicle occupants. In
addition, cupholders, open stowage spaces
and mobile phone brackets cannot always
retain all objects they contain. There is a risk of injury, particularly in the event of sudden
braking or a sudden change in direction.
R Always stow objects so that they cannot be
thrown around in such situations.
R Always make sure that objects do not pro-
trude from stowage spaces, parcel nets or
stowage nets.
R Close the lockable stowage spaces before
starting a journey.
R Always stow and secure heavy, hard, poin-
ted, sharp-edged, fragile or bulky objects in
the boot.
Observe the loading guidelines (Y page 272).272
Stowage areasStowing and features
Page 277 of 349
X
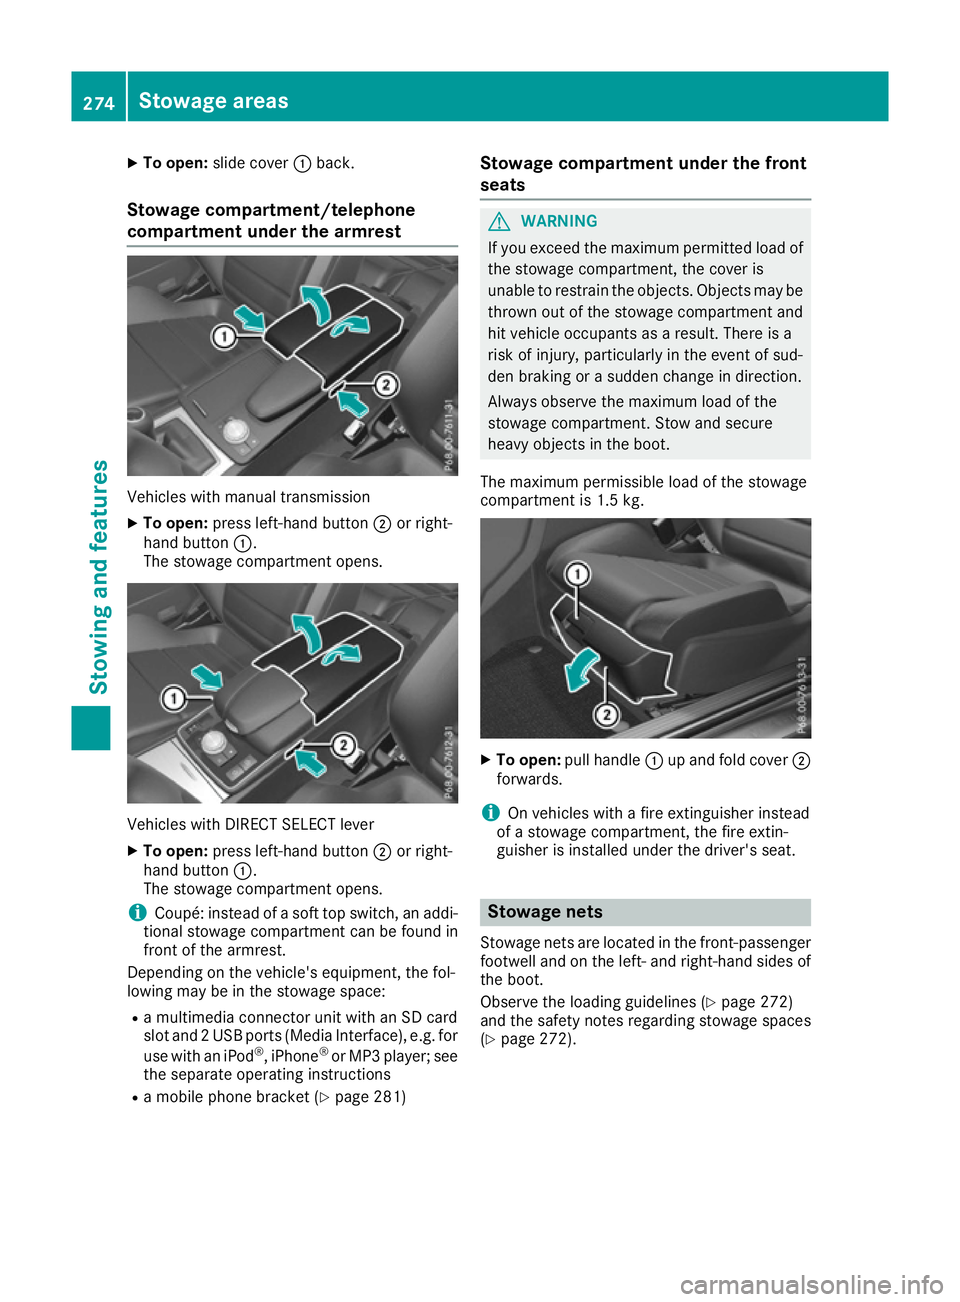
To open: slide cover :back.
Stowage compartment/telephone
compartment under the armrest Vehicles with manual transmission
X To open: press left-hand button ;or right-
hand button :.
The stowage compartment opens. Vehicles with DIRECT SELECT lever
X To open: press left-hand button ;or right-
hand button :.
The stowage compartment opens.
i Coupé: instead of a soft top switch, an addi-
tional stowage compartment can be found in
front of the armrest.
Depending on the vehicle's equipment, the fol-
lowing may be in the stowage space:
R a multimedia connector unit with an SD card
slot and 2 USB ports (Media Interface), e.g. for
use with an iPod ®
, iPhone ®
or MP3 player; see
the separate operating instructions
R a mobile phone bracket (Y page 281)Stowage compartment under the front
seats G
WARNING
If you exceed the maximum permitted load of the stowage compartment, the cover is
unable to restrain the objects. Objects may be
thrown out of the stowage compartment and
hit vehicle occupants as a result. There is a
risk of injury, particularly in the event of sud-
den braking or a sudden change in direction.
Always observe the maximum load of the
stowage compartment. Stow and secure
heavy objects in the boot.
The maximum permissible load of the stowage
compartment is 1.5 kg. X
To open: pull handle :up and fold cover ;
forwards.
i On vehicles with a fire extinguisher instead
of a stowage compartment, the fire extin-
guisher is installed under the driver's seat. Stowage nets
Stowage nets are located in the front-passenger footwell and on the left- and right-hand sides of
the boot.
Observe the loading guidelines (Y page 272)
and the safety notes regarding stowage spaces
(Y page 272). 274
Stowage areasSto
wing an d features
Page 278 of 349
Skibag
Unfolding the skibag and loading skis G
WARNING
The skibag in conjunction with the lashing
straps cannot restrain any objects other than skis.
Vehicle occupants could be struck in the
event of sudden braking or an accident, for
instance, if you:
R transport other heavy or sharp-edged
objects in the skibag
R do not secure the skibag with the lashing
straps
There is a risk of accident and injury.
Store only skis in the skibag. Always secure
the skibag with the lashing straps so that it
cannot move around.
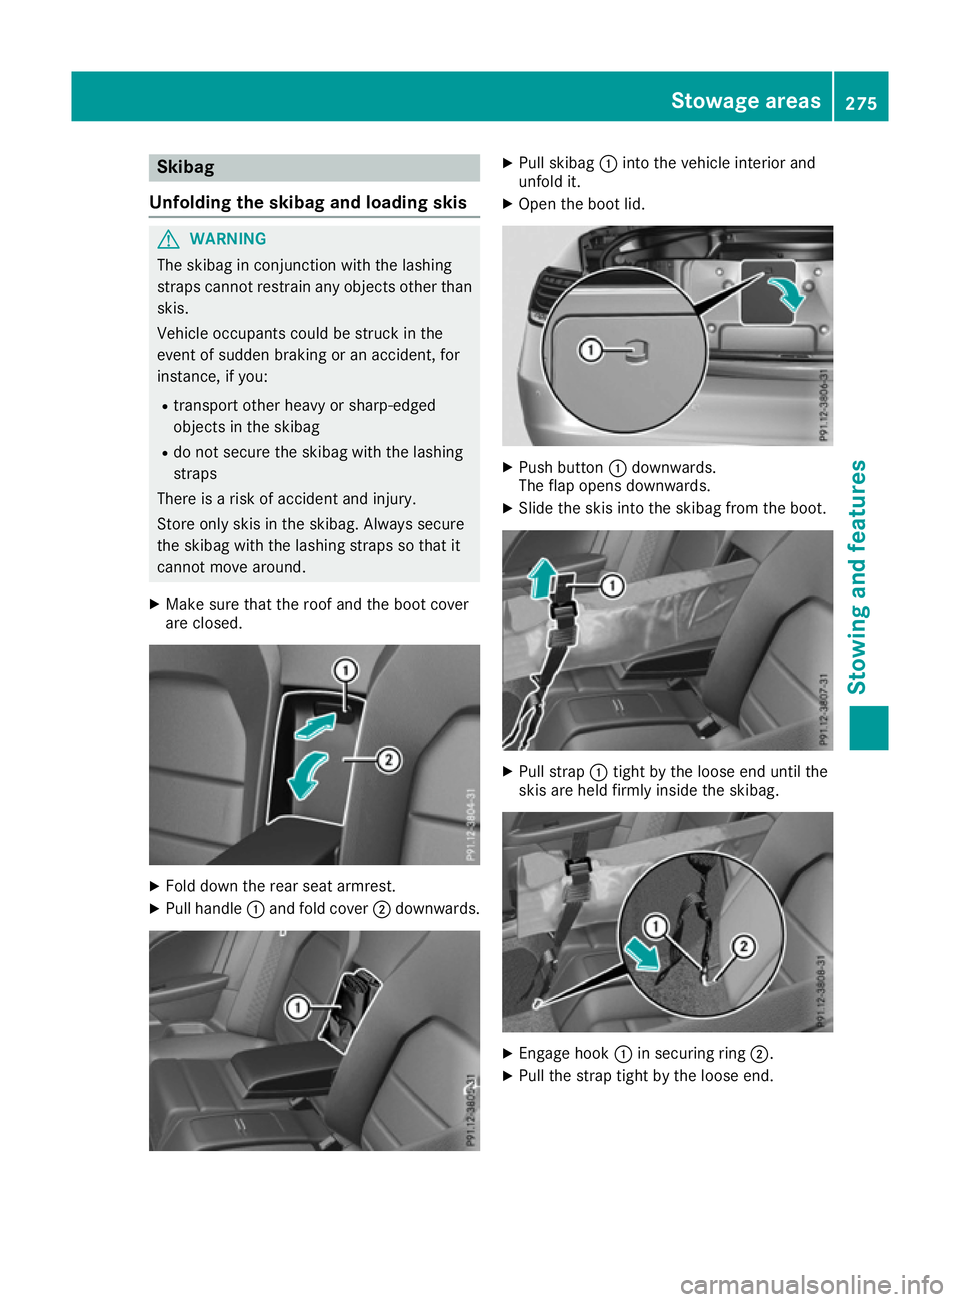
X Make sure that the roof and the boot cover
are closed. X
Fold down the rear seat armrest.
X Pull handle :and fold cover ;downwards. X
Pull skibag :into the vehicle interior and
unfold it.
X Open the boot lid. X
Push button :downwards.
The flap opens downwards.
X Slide the skis into the skibag from the boot. X
Pull strap :tight by the loose end until the
skis are held firmly inside the skibag. X
Engage hook :in securing ring ;.
X Pull the strap tight by the loose end. Stowage areas
275Stowing and features Z