2015 MERCEDES-BENZ E-CLASS CABRIOLET height
[x] Cancel search: heightPage 42 of 349
If the seat belt is pulled quickly or sharply by the
seat-belt extender, the inertia reel locks. The
belt strap cannot be pulled out any further.
The belt tensioner tightens the seat belt in the
event of a collision so that it fits tightly across
your body. However, it does not pull the vehicle occupants back in the direction of the seat
backrest.
The belt tensioner does not, however, correct an
incorrect seat position or correct the routing of
a seat belt that is worn incorrectly.
If the seat belt is also fitted with a belt force
limiter and this is triggered, the force exerted by the seat belt on the vehicle occupant is reduced.
The belt force limiters on the front seats are
synchronised with the front airbags, which take
on a part of the deceleration force. This can
reduce the forces to which the vehicle occu-
pants are subjected during an accident.
! If the front-passenger seat is not occupied,
do not engage the seat belt tongue in the
buckle on the front-passenger seat. Other-
wise, the belt tensioner and the front-
passenger front airbag could be triggered in
the event of an accident and would need to be
replaced.
Important safety notes G
WARNING
The seat belt cannot perform its intended pro- tective function if it is not fastened correctly. Also, an improperly fastened seat belt can
cause additional injuries in the event of an
accident, sudden braking or abrupt changes
of direction. There is an increased risk of
injury, possibly even fatal.
Always make sure that all vehicle occupants
are wearing their seat belt properly and are
seated correctly. G
WARNING
The seat belt does not offer the intended level of protection if you have not moved the back-
rest to an almost vertical position. When brak-
ing or in the event of an accident, you could
slide underneath the seat belt and sustain
abdomen or neck injuries, for example. This poses an increased risk of injury or even fatal
injury.
Adjust the seat properly before beginning
your journey. Always ensure that the backrestis in an almost vertical position and that the
shoulder section of your seatbelt is routed
across the centre of your shoulder. G
WARNING
Persons under 1.50 mtall cannot wear the
seat belts correctly without a suitable, addi-
tional restraint system. The seat belt cannot
perform its intended protective function if it is not fastened correctly. Also, an improperly
fastened seat belt can cause additional inju-
ries in the event of an accident, sudden brak-
ing or abrupt changes of direction. There is an increased risk of injury, possibly even fatal.
Secure persons less than 1.50 mtall in a suit-
able restraint system.
If a child younger than twelve years old and
under 1.50 m in height is travelling in the vehi-
cle: R always secure the child in a child restraint
system suitable for this Mercedes-Benz vehi-
cle. The child restraint system must be appro-
priate to the age, weight and size of the child.
R always observe the instructions and safety
notes on "Children in the vehicle"
(Y page 49) in addition to the child restraint
system manufacturer's installation and oper-
ating instructions. G
WARNING
Seat belts cannot protect as intended, if:
R they are damaged, have been modified, are
extremely dirty, bleached or dyed
R the seat belt buckle is damaged or
extremely dirty
R modifications have been made to the belt
tensioners, belt anchorages or inertia reels
Seat belts may sustain non-visible damage in an accident, e.g. due to glass splinters. Modi-
fied or damaged seat belts can tear or fail, for example in the event of an accident. Modified
seat belt tensioners may be deployed unin- Occupant safety
39Safety
Z
Page 45 of 349
hold on to the seat belt tightly while it is adjust-
ing.
You can switch the seat-belt adjustment on and
off in the on-board computer (Y page 227).
Belt warning for the driver and front
passenger The
7 seat belt warning lamp in the instru-
ment cluster is a reminder that all vehicle occu-
pants must wear their seat belts. It may light up
continuously or flash. In addition, a warning tone may sound.
The 7 seat belt warning lamp goes out and
the warning tone ceases when the driver and the
front passenger have fastened their seat belts.
i More information on the
7seat belt
warning lamp can be found under "Warning
and indicator lamps in the instrument cluster,
seat belt" (Y page 254).
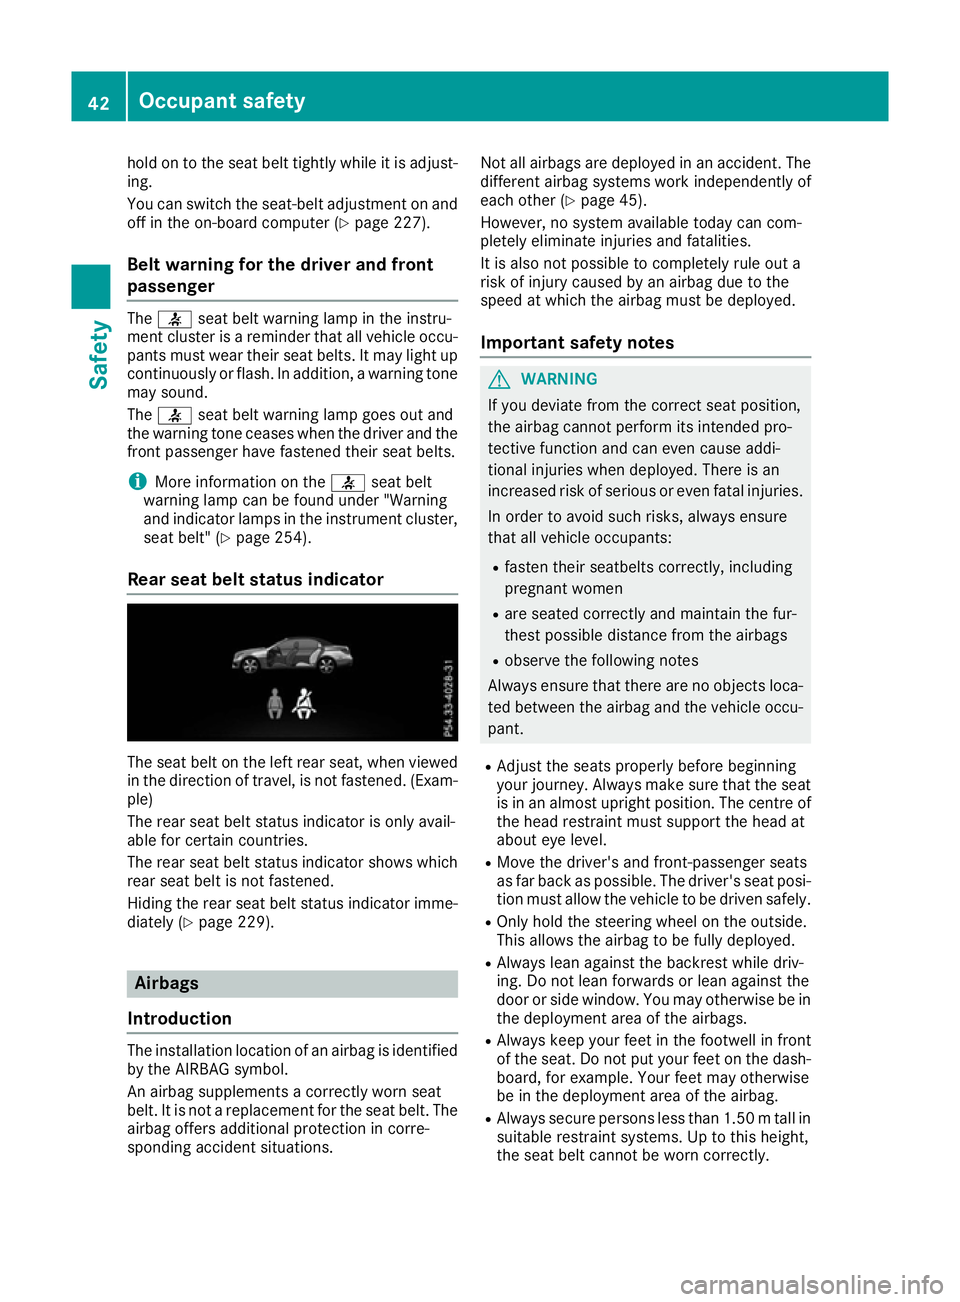
Rear seat belt status indicator The seat belt on the left rear seat, when viewed
in the direction of travel, is not fastened. (Exam- ple)
The rear seat belt status indicator is only avail-
able for certain countries.
The rear seat belt status indicator shows which rear seat belt is not fastened.
Hiding the rear seat belt status indicator imme-
diately (Y page 229). Airbags
Introduction The installation location of an airbag is identified
by the AIRBAG symbol.
An airbag supplements a correctly worn seat
belt. It is not a replacement for the seat belt. The airbag offers additional protection in corre-
sponding accident situations. Not all airbags are deployed in an accident. The
different airbag systems work independently of
each other (Y page 45).
However, no system available today can com-
pletely eliminate injuries and fatalities.
It is also not possible to completely rule out a
risk of injury caused by an airbag due to the
speed at which the airbag must be deployed.
Important safety notes G
WARNING
If you deviate from the correct seat position,
the airbag cannot perform its intended pro-
tective function and can even cause addi-
tional injuries when deployed. There is an
increased risk of serious or even fatal injuries.
In order to avoid such risks, always ensure
that all vehicle occupants:
R fasten their seatbelts correctly, including
pregnant women
R are seated correctly and maintain the fur-
thest possible distance from the airbags
R observe the following notes
Always ensure that there are no objects loca-
ted between the airbag and the vehicle occu-
pant.
R Adjust the seats properly before beginning
your journey. Always make sure that the seat
is in an almost upright position. The centre of
the head restraint must support the head at
about eye level.
R Move the driver's and front-passenger seats
as far back as possible. The driver's seat posi-
tion must allow the vehicle to be driven safely.
R Only hold the steering wheel on the outside.
This allows the airbag to be fully deployed.
R Always lean against the backrest while driv-
ing. Do not lean forwards or lean against the
door or side window. You may otherwise be in
the deployment area of the airbags.
R Always keep your feet in the footwell in front
of the seat. Do not put your feet on the dash-
board, for example. Your feet may otherwise
be in the deployment area of the airbag.
R Always secure persons less than 1.50 mtall in
suitable restraint systems. Up to this height,
the seat belt cannot be worn correctly. 42
Occupant safetySafety
Page 52 of 349
The PRE-SAFE
®
PLUS braking application is can-
celled:
R if the accelerator pedal is depressed when a
gear is engaged
R if the risk of a collision passes or is no longer
detected
R if DISTRONIC PLUS indicates an intention to
pull away
If the hazardous situation passes without result- ing in an accident, the original settings are
restored. Automatic measures after an acci-
dent
Immediately after an accident, the following
measures may be implemented, depending on
the type and severity of the impact:
R the hazard warning lamps are activated
R the emergency lighting is activated
R the vehicle doors are unlocked
R the front side windows are lowered
R vehicles with a memory function: the electri-
cally adjustable steering wheel is raised
R the engine is switched off and the fuel supply
is cut off
R vehicles with the Mercedes-Benz emergency
call system: automatic emergency call Children in the vehicle
Important safety notes
Accident statistics show that children secured
in the rear seats are safer than children secured in the front seats. For this reason, Mercedes-
Benz strongly advises that you fit a child
restraint system on a rear seat. Children are
generally better protected there.
If a child younger than twelve years old and
under 1.50 m in height is travelling in the vehi-
cle:
R always secure the child in a child restraint
system suitable for Mercedes-Benz vehicles.
The child restraint system must be appropri-
ate to the age, weight and size of the child.
R be sure to observe the instructions and safety
notes in this section in addition to the child
restraint system manufacturer's installation
instructions. G
WARNING
If you leave children unattended in the vehi-
cle, they may be able to set the vehicle in
motion if, for example, they:
R release the parking brake
R shift the automatic transmission out of park
position Por shift manual transmission into
neutral
R start the engine
In addition, they may operate vehicle equip-
ment and become trapped. There is a risk of
an accident and injury.
When leaving the vehicle, always take the key with you and lock the vehicle. Never leave
children unattended in the vehicle. G
WARNING
If persons (particularly children) are exposed
to heat or cold for a prolonged period, there is a risk of serious or even fatal injuries. Never
leave persons (particularly children) unatten-
ded in the vehicle. G
WARNING
If the child restraint system is placed in direct sunlight, the parts could become very hot.
Children could be suffer burns by touching
these parts, in particular on the metallic parts
of the child restraint system. There is a risk of injury.
If you and your child leave the vehicle, always
make sure that the child restraint system is
not in direct sunlight. Cover it with a blanket, for example. If the child restraint system has
been exposed to direct sunlight, leave it to
cool down before securing the child in it.
Never leave children unattended in the vehi-
cle.
Always ensure that all vehicle occupants have
their seat belts fastened correctly and are sitting
properly. Particular attention must be paid to
children.
Observe the safety notes on the seat belt
(Y page 39) and the notes on how to use the seat
belt properly (Y page 40). Children in the vehicle
49Safety Z
Page 91 of 349
Problems with the side windows
G
WARNING
If you close a side window again immediately after it has been blocked or reset, the side window
closes with increased or maximum force. The reversing function is then not active. Parts of the
body could be trapped in the closing area in the process. This poses an increased risk of injury or even fatal injury.
Make sure that no parts of the body are in the closing area. To stop the closing process, releasethe switch or push the switch again to reopen the side window. Problem
Possible causes/consequences and
M MSolutions A side window cannot be
closed because it is
blocked by objects, e.g.
leaves in the window
guide. X
Remove the objects.
X Close the side window. A side window cannot be
closed and you cannot
see the cause. If a side window is obstructed during closing and reopens again
slightly:
X Immediately after the window blocks, pull the corresponding switch
again until the side window has closed.
The side window is closed with increased force.
If a side window is obstructed again during closing and reopens again slightly:
X Immediately after the window blocks, pull the corresponding switch
again until the side window has closed.
The side window is closed without the automatic reversing feature. Soft top
Important safety notes
G
WARNING
If you do not fully open/close the soft top, the soft-top hydraulics depressurise after a short time. This causes the soft top to lower unex-
pectedly and may cause you or others to be
trapped. There is a risk of injury.
Always open or close the soft top completely.
! Never sit on the soft-top compartment
cover or stow heavy objects there. You will
otherwise damage the soft top and soft-top
compartment cover of the vehicle. !
When opening and closing the soft top,
make sure that:
R there is sufficient clearance above it as the
soft top swings upwards
R the boot separator is closed
R the boot is only loaded to below the boot
separator
R the boot separator is not pushed up by the
load
R the flap of the skibag is closed
R the boot lid is closed
R there are no objects on the soft-top com-
partment cover
R the soft-top fabric is not dirty, wet or frozen
You could otherwise damage the soft top,
boot and other parts of the vehicle.
Vehicle height when opening/closing the soft
top (Y page 342). 88
Soft topOpening and closing
Page 100 of 349
restraints in the direction of the arrow with
both toothed bars facing straight down.
X Push the AIRCAP draught stop down until the
bolts are at the same height as the brackets
on the head restraints.
X Insert the bolts into the brackets on both
sides.
X Tighten the bolts with the 4 mm Allen key until
they engage.
The markings on the pins are vertical. Soft top
97Opening and closing Z
Page 103 of 349
Observe the safety notes on "Airbags"
(Y
page 42) and "Children in the vehicle"
(Y page 49). G
WARNING
You could lose control of the vehicle while
driving if you:
R adjust the driver's seat, steering wheel or
mirrors
R fasten the seat belt
There is a risk of an accident.
Adjust the driver's seat, head restraint, steer-
ing wheel and mirrors and fasten your seat
belt before starting the engine. G
WARNING
If you adjust the seat height carelessly, you or other vehicle occupants could be trapped andthereby injured. Children in particular could
accidentally press the electrical seat adjust-
ment buttons and become trapped. There is a
risk of injury.
While moving the seats, make sure that your
hands or other body parts do not get under the
lever assembly of the seat adjustment sys-
tem. G
WARNING
When adjusting a seat, you or another vehicle occupant could become trapped by the guiderail of the seat, for instance. There is a risk of
injury.
Make sure that no one has any part of their
body within the sweep of the seat when
adjusting it.
! To avoid damage to the seats and the seat
heating, observe the following information:
R do not spill any liquids on the seats. If liquid
is spilled on the seats, dry them as soon as possible.
R if the seat covers are damp or wet, do not
switch on the seat heating. The seat heat-
ing should also not be used to dry the seats.
R clean the seat covers as recommended;
see "Interior care".
R do not transport heavy loads on the seats.
Do not place sharp objects on the seat cushions, e.g. knives, nails or tools. The
seats should only be occupied by passen-
gers, if possible.
R when the seat heating is in operation, do
not cover the seats with insulating materi-
als, e.g. blankets, coats, bags, seat covers,
child seats or booster seats.
! Make sure that there are no objects in the
footwell under or behind the seats when mov- ing the seats back. There is a risk that the
seats and/or the objects could be damaged.
i The head restraints in the front seats are
fitted with the NECK-PRO system (Y page 47).
For this reason, it is not possible to remove
the head restraints from the front seats.
For more information, contact a qualified spe-
cialist workshop. Adjusting the seats manually and
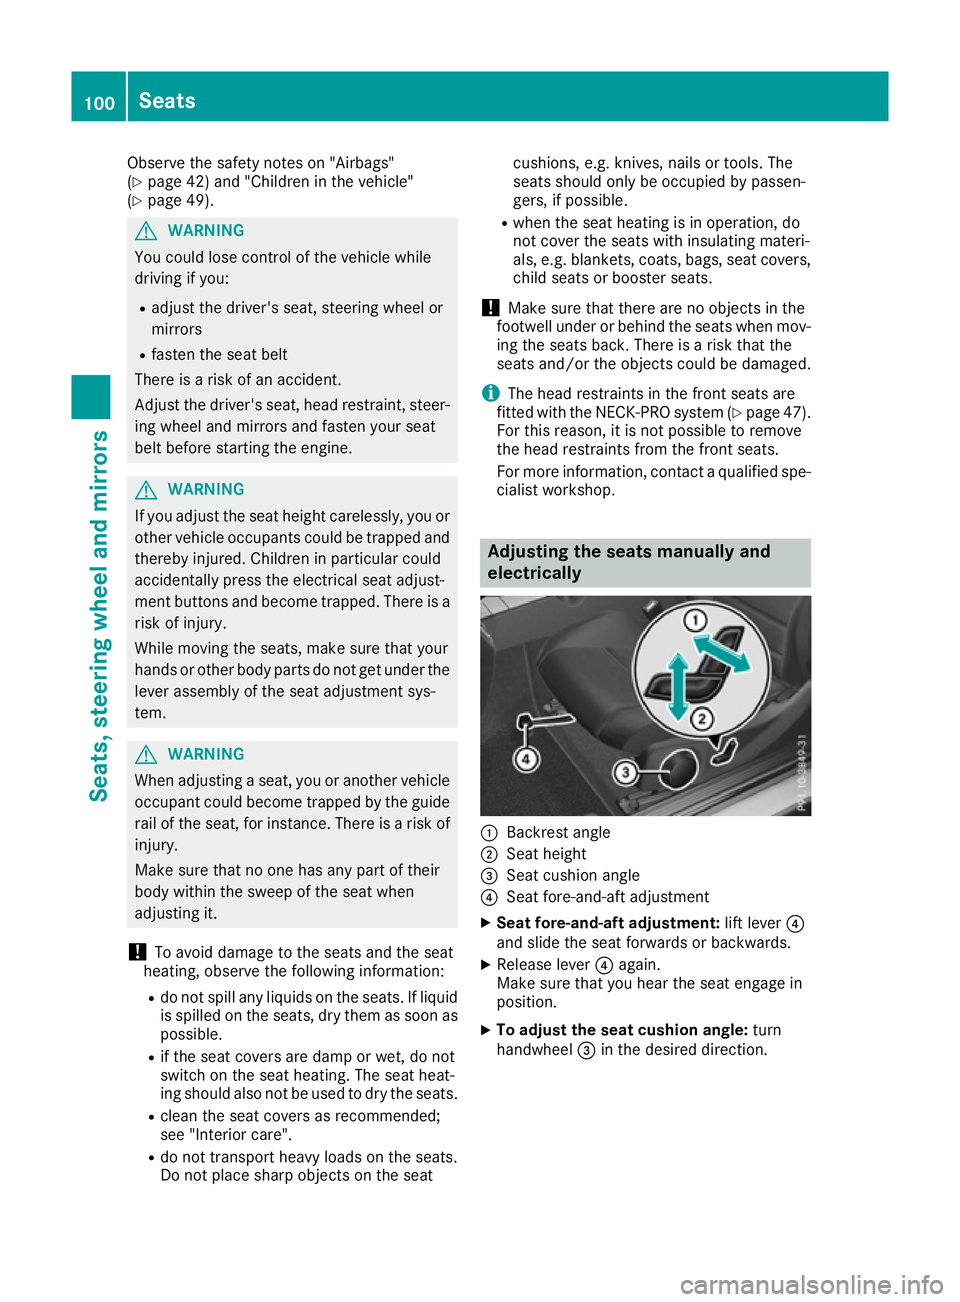
electrically :
Backrest angle
; Seat height
= Seat cushion angle
? Seat fore-and-aft adjustment
X Seat fore-and-aft adjustment: lift lever?
and slide the seat forwards or backwards.
X Release lever ?again.
Make sure that you hear the seat engage in
position.
X To adjust the seat cushion angle: turn
handwheel =in the desired direction. 100
SeatsSeats, steering wheel and mirrors
Page 104 of 349
Adjusting the seats electrically
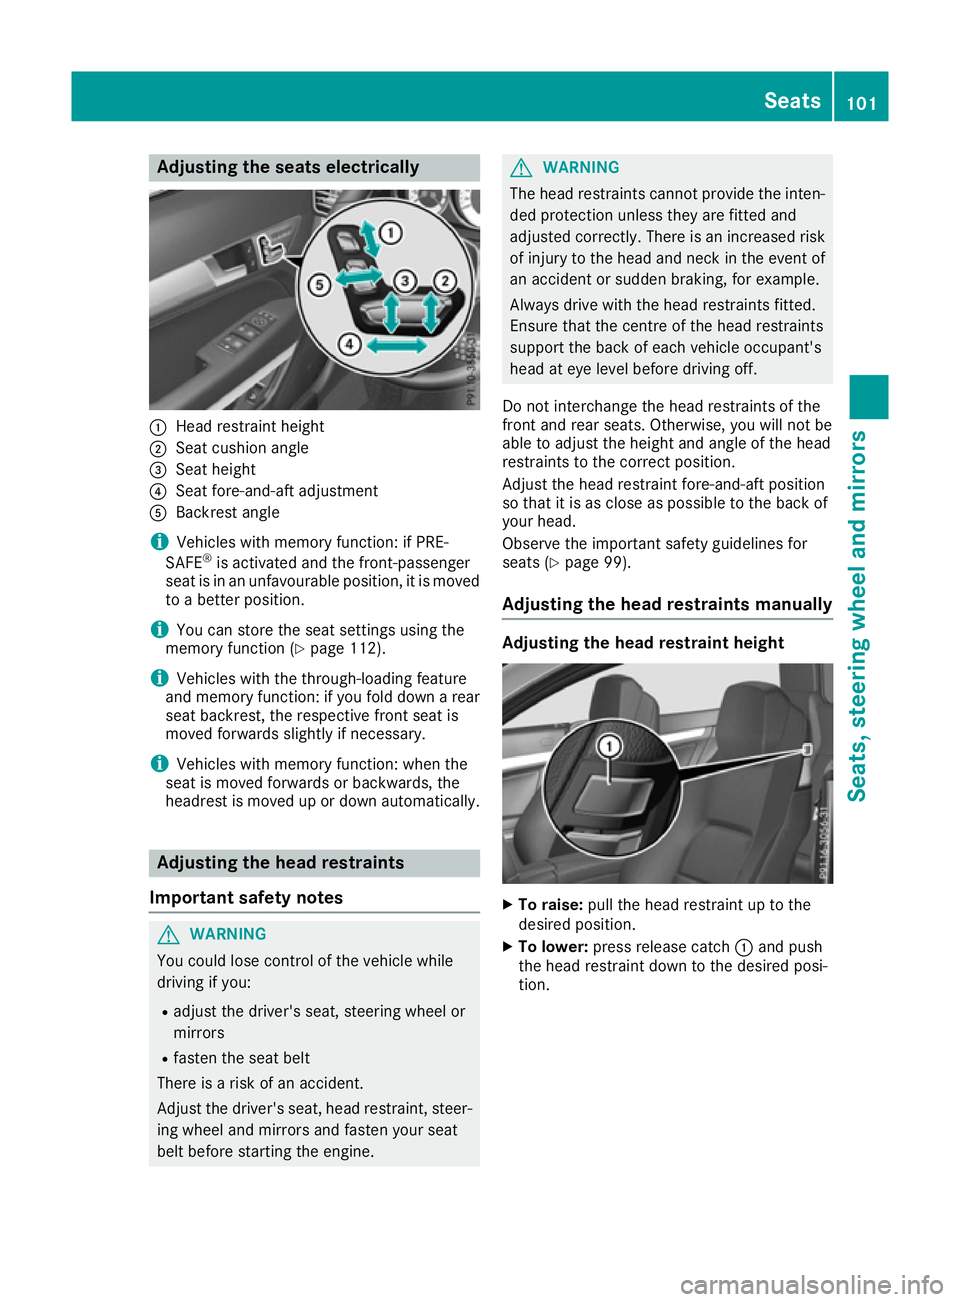
:
Head restraint height
; Seat cushion angle
= Seat height
? Seat fore-and-aft adjustment
A Backrest angle
i Vehicles with memory function: if PRE-
SAFE ®
is activated and the front-passenger
seat is in an unfavourable position, it is moved to a better position.
i You can store the seat settings using the
memory function (Y page 112).
i Vehicles with the through-loading feature
and memory function: if you fold down a rear
seat backrest, the respective front seat is
moved forwards slightly if necessary.
i Vehicles with memory function: when the
seat is moved forwards or backwards, the
headrest is moved up or down automatically. Adjusting the head restraints
Important safety notes G
WARNING
You could lose control of the vehicle while
driving if you:
R adjust the driver's seat, steering wheel or
mirrors
R fasten the seat belt
There is a risk of an accident.
Adjust the driver's seat, head restraint, steer-
ing wheel and mirrors and fasten your seat
belt before starting the engine. G
WARNING
The head restraints cannot provide the inten-
ded protection unless they are fitted and
adjusted correctly. There is an increased risk of injury to the head and neck in the event of
an accident or sudden braking, for example.
Always drive with the head restraints fitted.
Ensure that the centre of the head restraints
support the back of each vehicle occupant's
head at eye level before driving off.
Do not interchange the head restraints of the
front and rear seats. Otherwise, you will not be
able to adjust the height and angle of the head
restraints to the correct position.
Adjust the head restraint fore-and-aft position
so that it is as close as possible to the back of
your head.
Observe the important safety guidelines for
seats (Y page 99).
Adjusting the head restraints manually Adjusting the head restraint height
X
To raise: pull the head restraint up to the
desired position.
X To lower: press release catch :and push
the head restraint down to the desired posi-
tion. Seats
101Seats, steering wheel and mirrors Z
Page 105 of 349
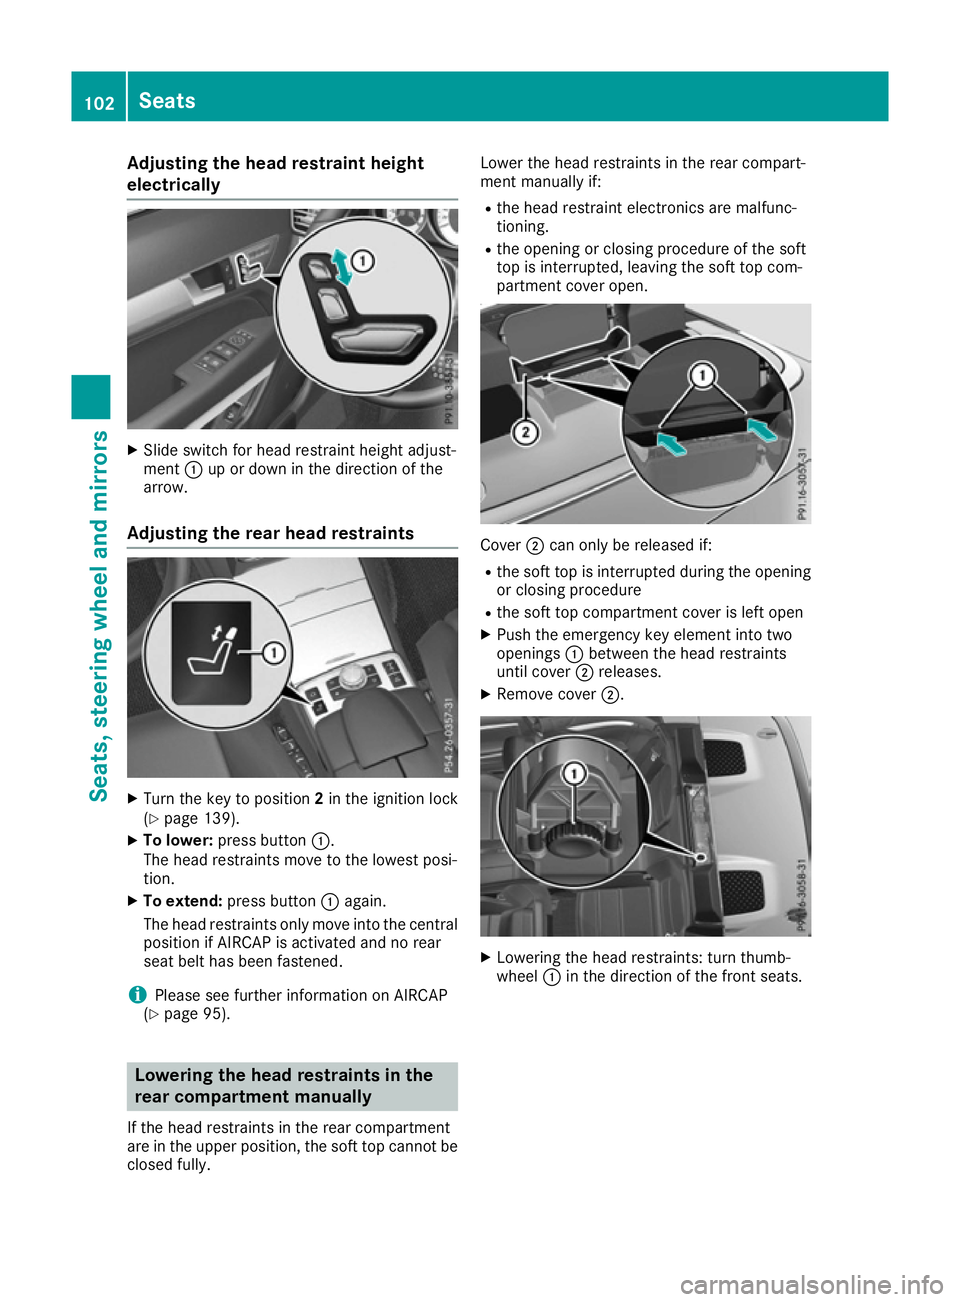
Adjusting the head restraint height
electrically X
Slide switch for head restraint height adjust-
ment :up or down in the direction of the
arrow.
Adjusting the rear head restraints X
Turn the key to position 2in the ignition lock
(Y page 139).
X To lower: press button :.
The head restraints move to the lowest posi-
tion.
X To extend: press button :again.
The head restraints only move into the central
position if AIRCAP is activated and no rear
seat belt has been fastened.
i Please see further information on AIRCAP
(Y page 95). Lowering the head restraints in the
rear compartment manually
If the head restraints in the rear compartment
are in the upper position, the soft top cannot be
closed fully. Lower the head restraints in the rear compart-
ment manually if:
R the head restraint electronics are malfunc-
tioning.
R the opening or closing procedure of the soft
top is interrupted, leaving the soft top com-
partment cover open. Cover
;can only be released if:
R the soft top is interrupted during the opening
or closing procedure
R the soft top compartment cover is left open
X Push the emergency key element into two
openings :between the head restraints
until cover ;releases.
X Remove cover ;. X
Lowering the head restraints: turn thumb-
wheel :in the direction of the front seats. 102
SeatsSeats
, steering wheel and mirrors