2015 MERCEDES-BENZ E-CLASS CABRIOLET boot
[x] Cancel search: bootPage 279 of 349
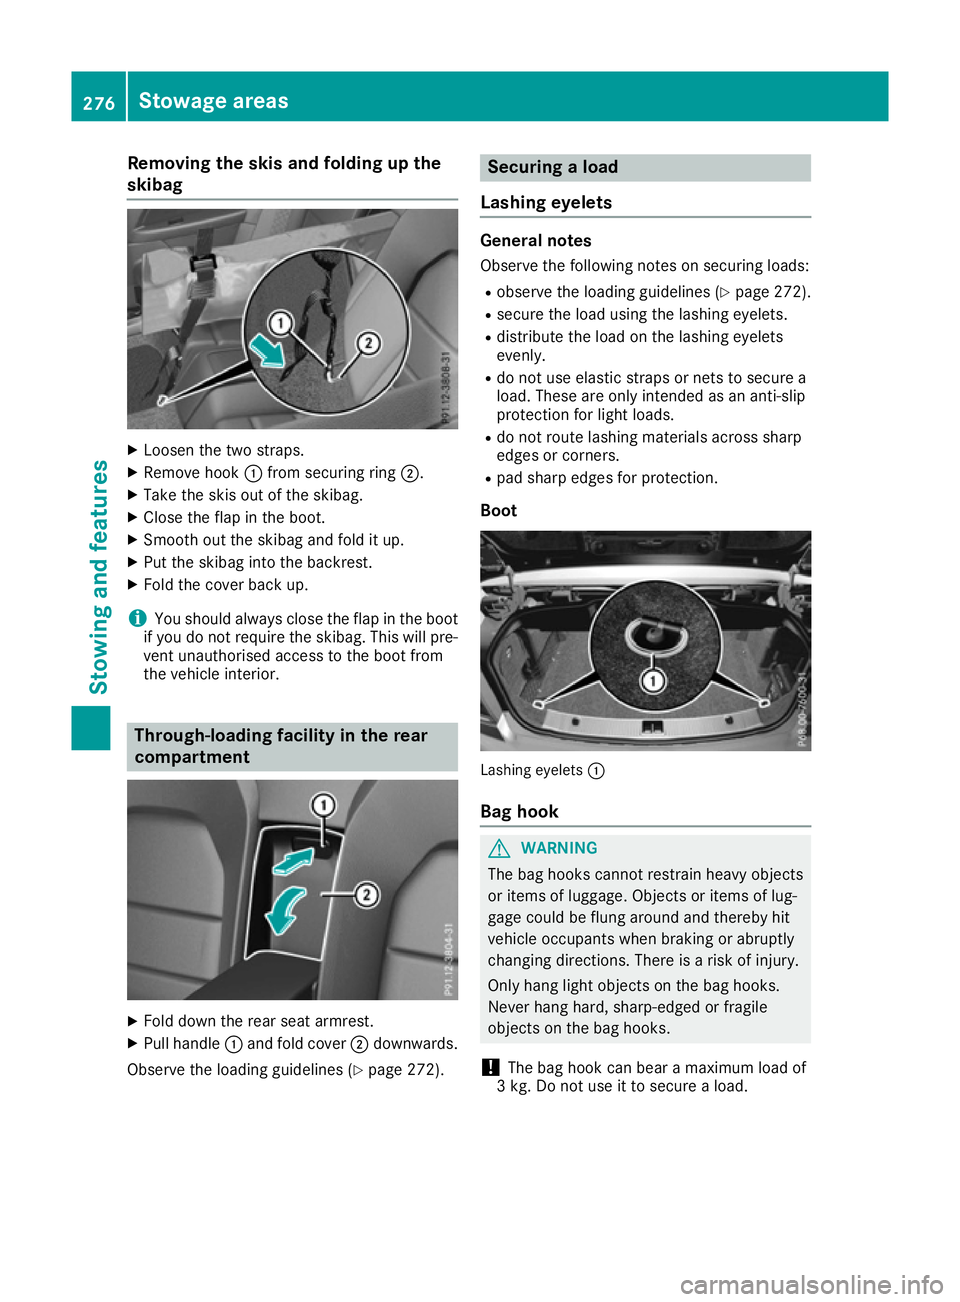
Removing the skis and folding up the
skibag X
Loosen the two straps.
X Remove hook :from securing ring ;.
X Take the skis out of the skibag.
X Close the flap in the boot.
X Smooth out the skibag and fold it up.
X Put the skibag into the backrest.
X Fold the cover back up.
i You should always close the flap in the boot
if you do not require the skibag. This will pre-
vent unauthorised access to the boot from
the vehicle interior. Through-loading facility in the rear
compartment
X
Fold down the rear seat armrest.
X Pull handle :and fold cover ;downwards.
Observe the loading guidelines (Y page 272). Securing a load
Lashing eyelets General notes
Observe the following notes on securing loads:
R observe the loading guidelines (Y page 272).
R secure the load using the lashing eyelets.
R distribute the load on the lashing eyelets
evenly.
R do not use elastic straps or nets to secure a
load. These are only intended as an anti-slip
protection for light loads.
R do not route lashing materials across sharp
edges or corners.
R pad sharp edges for protection.
Boot Lashing eyelets
:
Bag hook G
WARNING
The bag hooks cannot restrain heavy objects
or items of luggage. Objects or items of lug-
gage could be flung around and thereby hit
vehicle occupants when braking or abruptly
changing directions. There is a risk of injury.
Only hang light objects on the bag hooks.
Never hang hard, sharp-edged or fragile
objects on the bag hooks.
! The bag hook can bear a maximum load of
3 kg. Do not use it to secure a load. 276
Stowage areasStowing and features
Page 280 of 349
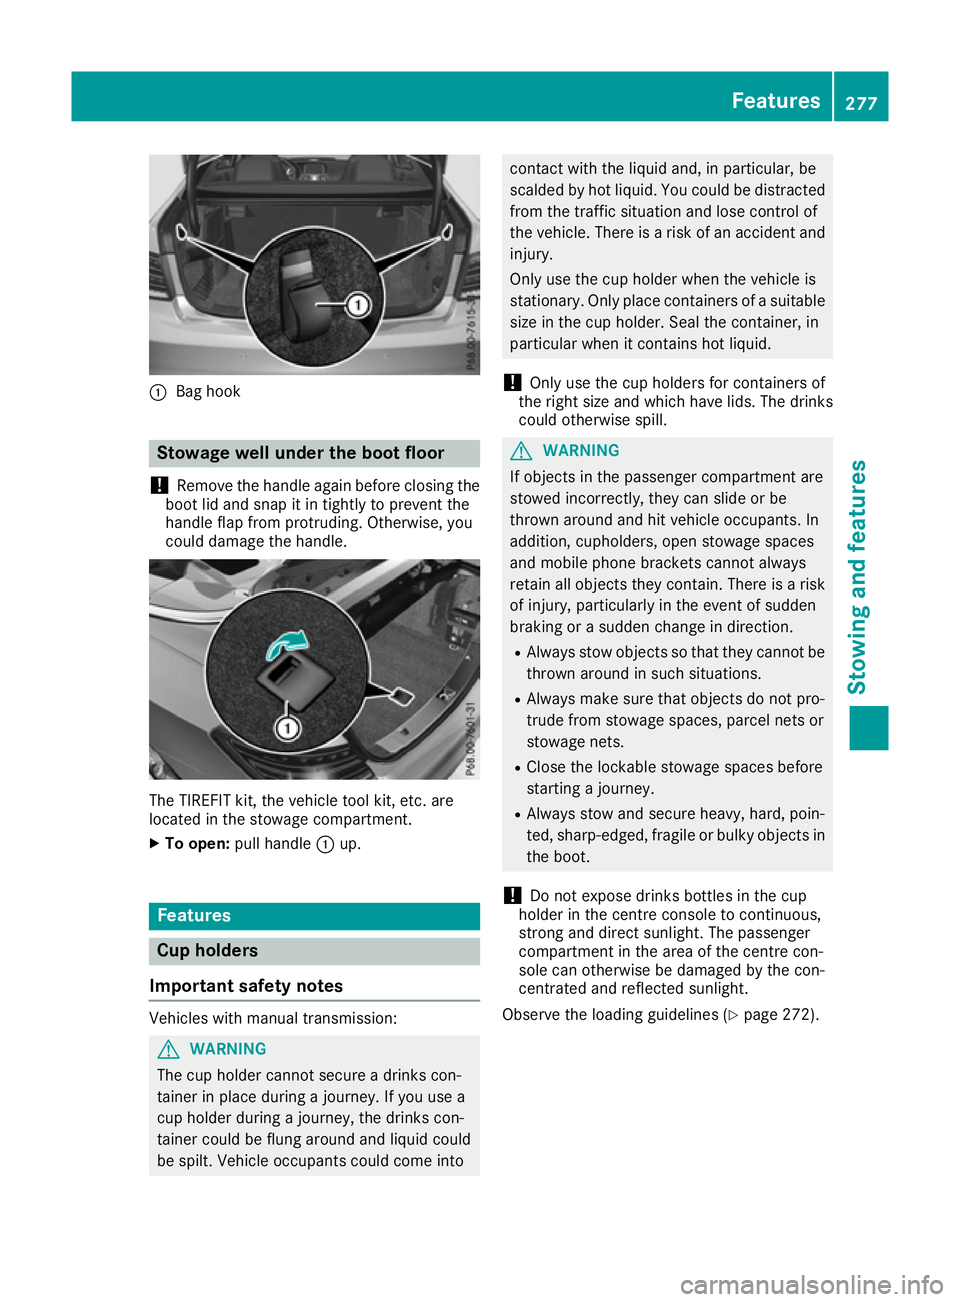
:
Bag hook Stowage well under the boot floor
! Remove the handle again before closing the
boot lid and snap it in tightly to prevent the
handle flap from protruding. Otherwise, you
could damage the handle. The TIREFIT kit, the vehicle tool kit, etc. are
located in the stowage compartment.
X To open: pull handle :up. Features
Cup holders
Important safety notes Vehicles with manual transmission:
G
WARNING
The cup holder cannot secure a drinks con-
tainer in place during a journey. If you use a
cup holder during a journey, the drinks con-
tainer could be flung around and liquid could
be spilt. Vehicle occupants could come into contact with the liquid and, in particular, be
scalded by hot liquid. You could be distracted
from the traffic situation and lose control of
the vehicle. There is a risk of an accident and
injury.
Only use the cup holder when the vehicle is
stationary. Only place containers of a suitable size in the cup holder. Seal the container, in
particular when it contains hot liquid.
! Only use the cup holders for containers of
the right size and which have lids. The drinks
could otherwise spill. G
WARNING
If objects in the passenger compartment are
stowed incorrectly, they can slide or be
thrown around and hit vehicle occupants. In
addition, cupholders, open stowage spaces
and mobile phone brackets cannot always
retain all objects they contain. There is a risk of injury, particularly in the event of sudden
braking or a sudden change in direction.
R Always stow objects so that they cannot be
thrown around in such situations.
R Always make sure that objects do not pro-
trude from stowage spaces, parcel nets or
stowage nets.
R Close the lockable stowage spaces before
starting a journey.
R Always stow and secure heavy, hard, poin-
ted, sharp-edged, fragile or bulky objects in
the boot.
! Do not expose drinks bottles in the cup
holder in the centre console to continuous,
strong and direct sunlight. The passenger
compartment in the area of the centre con-
sole can otherwise be damaged by the con-
centrated and reflected sunlight.
Observe the loading guidelines (Y page 272). Features
277Stowing and features Z
Page 307 of 349
Where will I find...?
Warning triangle
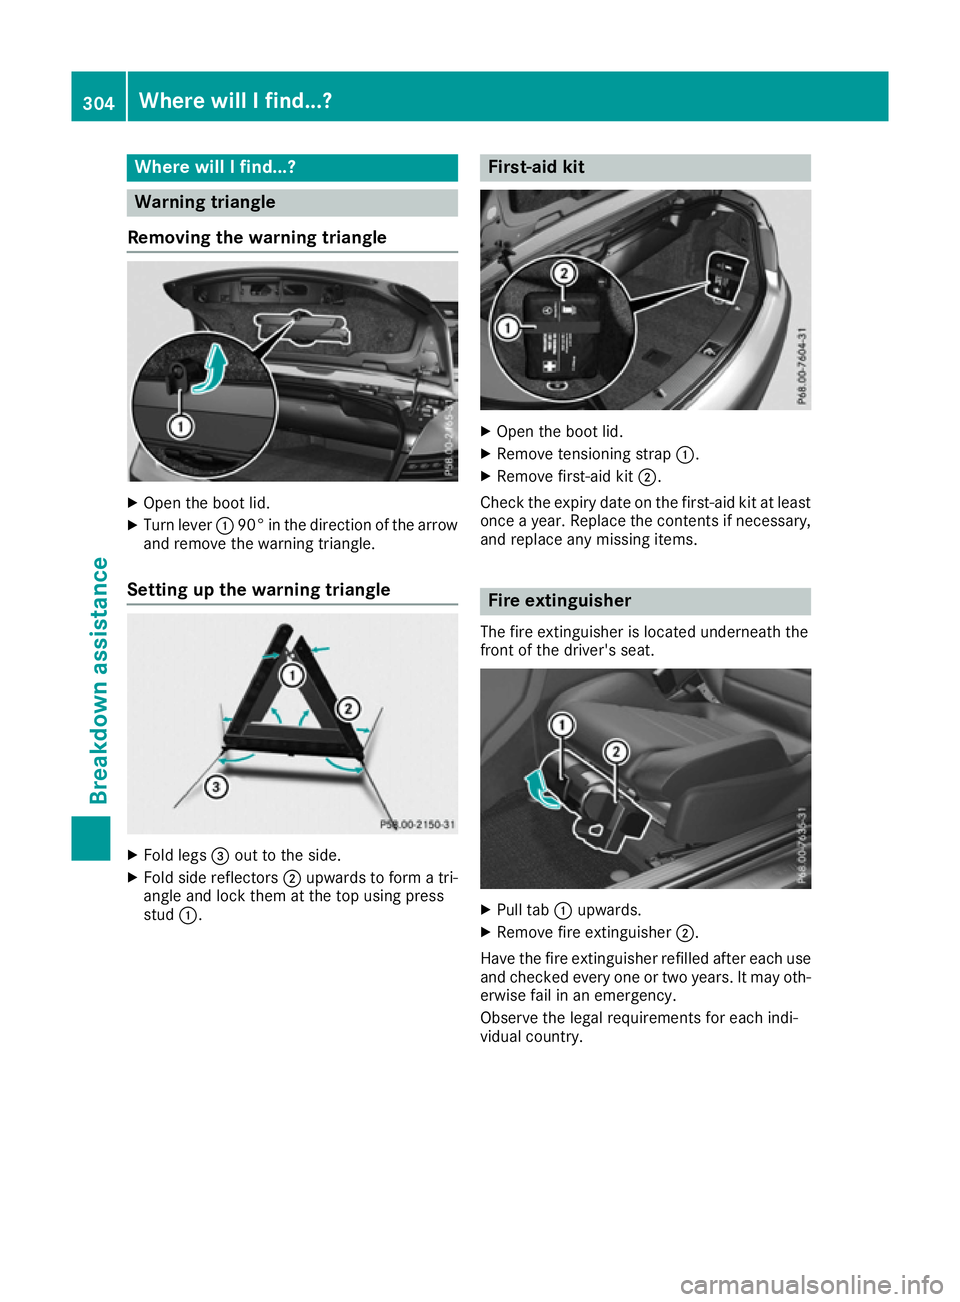
Removing the warning triangle X
Open the boot lid.
X Turn lever :90° in the direction of the arrow
and remove the warning triangle.
Setting up the warning triangle X
Fold legs =out to the side.
X Fold side reflectors ;upwards to form a tri-
angle and lock them at the top using press
stud :. First-aid kit
X
Open the boot lid.
X Remove tensioning strap :.
X Remove first-aid kit ;.
Check the expiry date on the first-aid kit at least once a year. Replace the contents if necessary,and replace any missing items. Fire extinguisher
The fire extinguisher is located underneath the
front of the driver's seat. X
Pull tab :upwards.
X Remove fire extinguisher ;.
Have the fire extinguisher refilled after each use and checked every one or two years. It may oth-
erwise fail in an emergency.
Observe the legal requirements for each indi-
vidual country. 304
Where will I find...?Breakdown assistance
Page 308 of 349
Vehicle tool kit
General notes The vehicle tool kit can be found in the stowage
well under the boot floor (Y page 277).
Apart from some country-specific variants, vehi-
cles are not equipped with tyre-changing tools.
Some tools for changing a wheel are specific to the vehicle. For more information on which tools
are required to perform a wheel change on your vehicle, consult a qualified specialist workshop.
Necessary tyre-changing tools can include, for
example:
R Jack
R Wheel chock
R Wheel wrench
i The jack weighs approximately 2.1 kg.
The maximum load bearing capacity of the
jack can be found on the adhesive label on the jack.
The jack is maintenance-free. If there is a
malfunction, please contact a qualified spe-
cialist workshop.
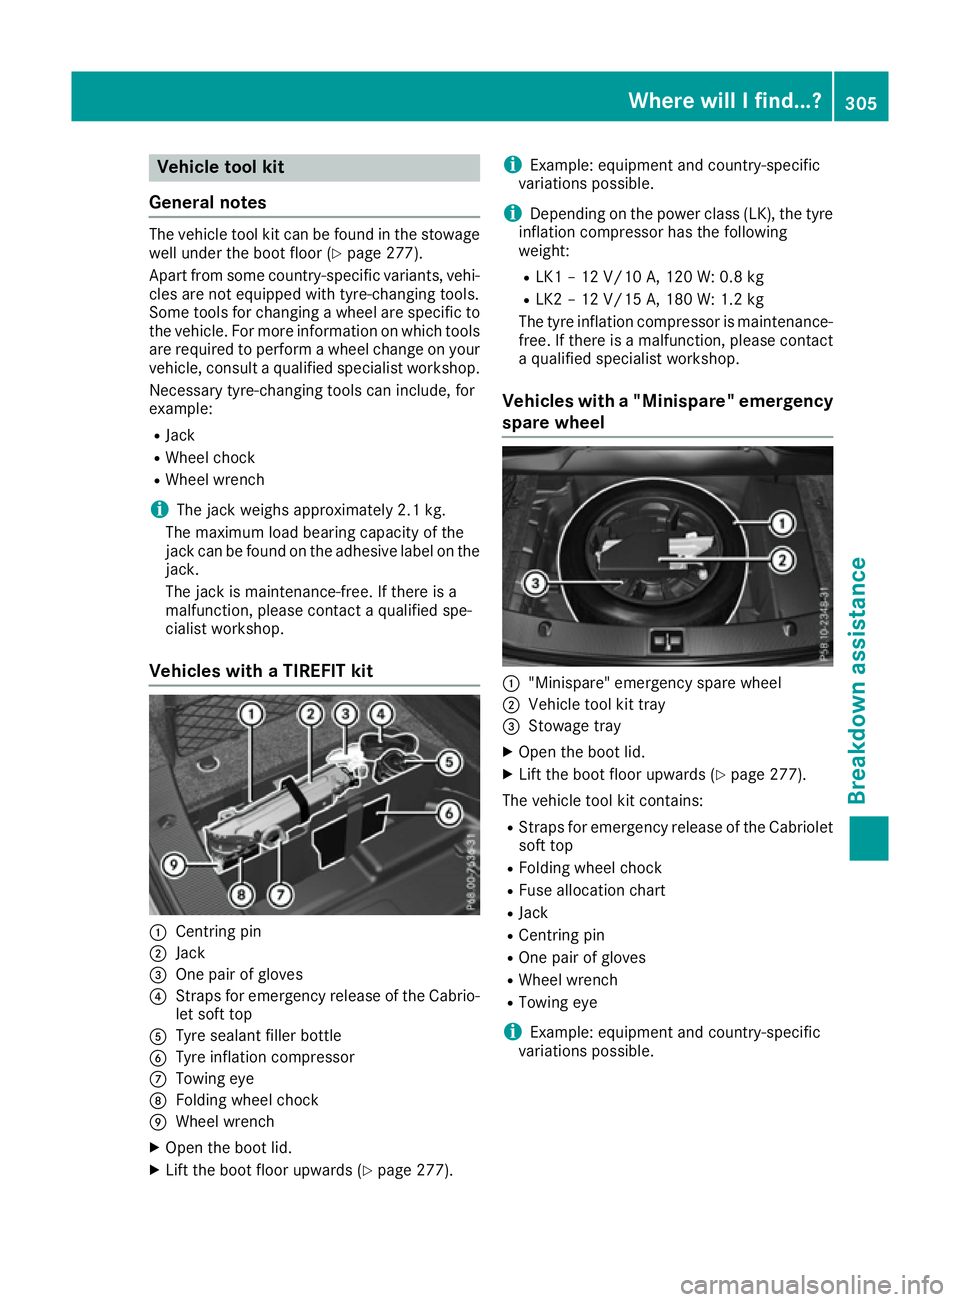
Vehicles with a TIREFIT kit :
Centring pin
; Jack
= One pair of gloves
? Straps for emergency release of the Cabrio-
let soft top
A Tyre sealant filler bottle
B Tyre inflation compressor
C Towing eye
D Folding wheel chock
E Wheel wrench
X Open the boot lid.
X Lift the boot floor upwards (Y page 277).i
Example: equipment and country-specific
variations possible.
i Depending on the power class (LK), the tyre
inflation compressor has the following
weight:
R LK1 – 12 V/10 A, 120 W: 0.8 kg
R LK2 – 12 V/15 A, 180 W:1.2 kg
The tyre inflation compressor is maintenance-
free. If there is a malfunction, please contact a qualified specialist workshop.
Vehicles with a "Minispare" emergency
spare wheel :
"Minispare" emergency spare wheel
; Vehicle tool kit tray
= Stowage tray
X Open the boot lid.
X Lift the boot floor upwards (Y page 277).
The vehicle tool kit contains: R Straps for emergency release of the Cabriolet
soft top
R Folding wheel chock
R Fuse allocation chart
R Jack
R Centring pin
R One pair of gloves
R Wheel wrench
R Towing eye
i Example: equipment and country-specific
variations possible. Where will I find...?
305Breakdown assistance
Page 311 of 349
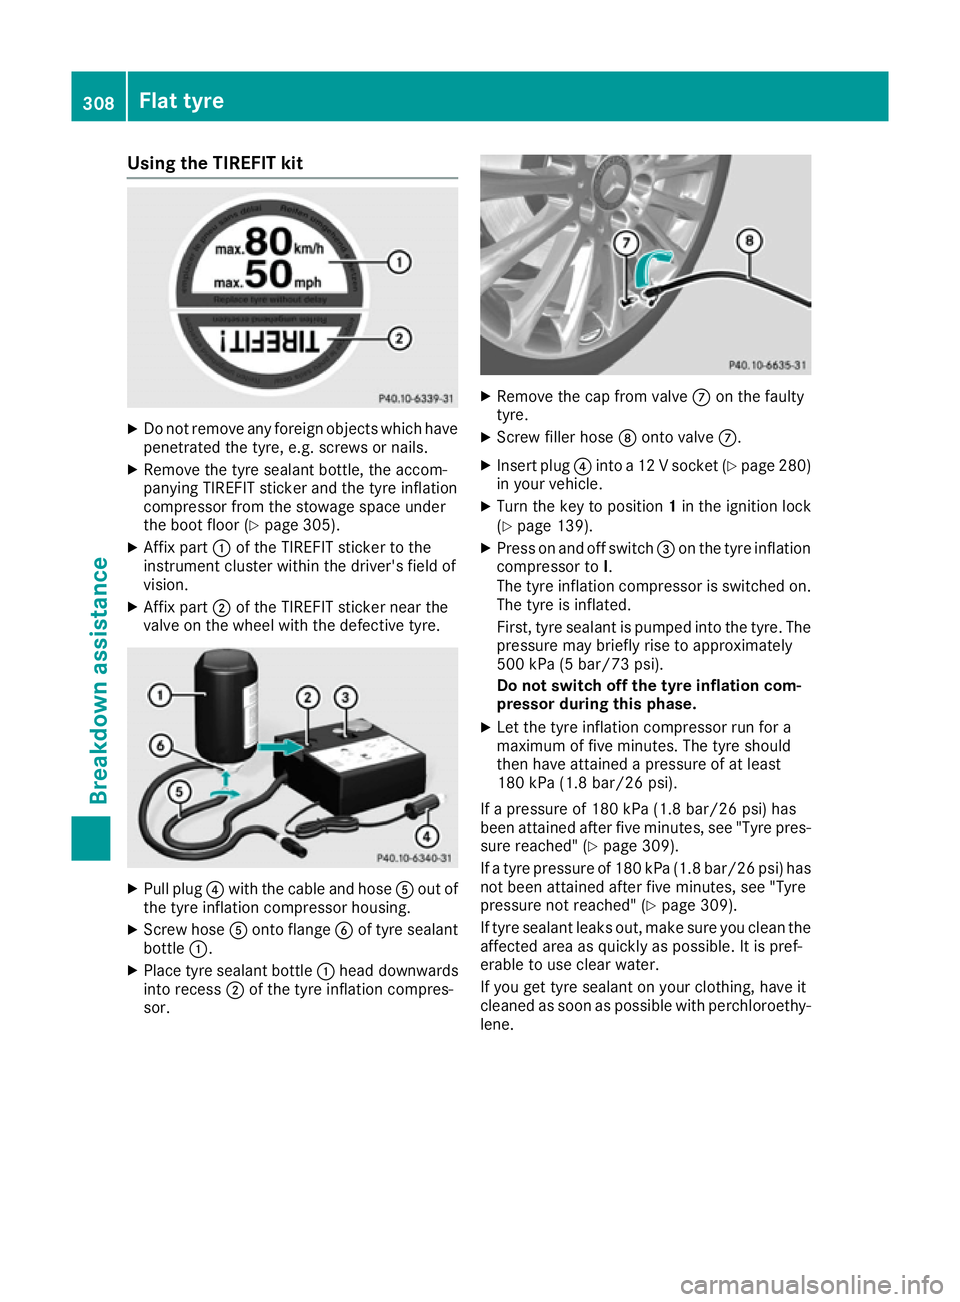
Using the TIREFIT kit
X
Do not remove any foreign objects which have
penetrated the tyre, e.g. screws or nails.
X Remove the tyre sealant bottle, the accom-
panying TIREFIT sticker and the tyre inflation
compressor from the stowage space under
the boot floor (Y page 305).
X Affix part :of the TIREFIT sticker to the
instrument cluster within the driver's field of
vision.
X Affix part ;of the TIREFIT sticker near the
valve on the wheel with the defective tyre. X
Pull plug ?with the cable and hose Aout of
the tyre inflation compressor housing.
X Screw hose Aonto flange Bof tyre sealant
bottle :.
X Place tyre sealant bottle :head downwards
into recess ;of the tyre inflation compres-
sor. X
Remove the cap from valve Con the faulty
tyre.
X Screw filler hose Donto valve C.
X Insert plug ?into a 12 V socket (Y page 280)
in your vehicle.
X Turn the key to position 1in the ignition lock
(Y page 139).
X Press on and off switch =on the tyre inflation
compressor to I.
The tyre inflation compressor is switched on.
The tyre is inflated.
First, tyre sealant is pumped into the tyre. The pressure may briefly rise to approximately
500 kPa (5 bar/73 psi).
Do not switch off the tyre inflation com-
pressor during this phase.
X Let the tyre inflation compressor run for a
maximum of five minutes. The tyre should
then have attained a pressure of at least
180 kPa (1.8 bar/26 psi).
If a pressure of 180 kPa (1.8 bar/26 psi) has
been attained after five minutes, see "Tyre pres-
sure reached" (Y page 309).
If a tyre pressure of 180 kPa (1.8 bar/26 psi) has not been attained after five minutes, see "Tyre
pressure not reached" (Y page 309).
If tyre sealant leaks out, make sure you clean the
affected area as quickly as possible. It is pref-
erable to use clear water.
If you get tyre sealant on your clothing, have it
cleaned as soon as possible with perchloroethy- lene. 308
Flat tyreBreakdown assistance
Page 321 of 349

X
Vehicles with manual transmission:
depress the clutch pedal fully and engage
neutral.
X Vehicles with automatic transmission:
turn the key to position
2in the ignition lock.
X Shift the automatic transmission to position
N.
As soon as the vehicle is loaded: X Prevent the vehicle from rolling away by
applying the parking brake.
X Vehicles with manual transmission:
depress the clutch pedal fully and engage first
or reverse gear.
X Vehicles with automatic transmission:
shift the automatic transmission to position
P.
X Turn the key to position 0in the ignition lock
and remove it.
X Secure the vehicle. Tow-starting (emergency engine
starting)
! Vehicles with automatic transmission must
not be tow-started. The transmission may
otherwise be damaged.
i You can find information on "Jump-starting"
under (Y page 313).
Before tow-starting, the following conditions
must be fulfilled:
R the battery is connected
R the engine has cooled down
R the exhaust system has cooled down
When tow-starting, it is important that you
observe the safety notes (Y page 315) and the
legal requirements in each respective country.
X Switch on the hazard warning lamps
(Y page 116).
X Fit the towing eye (Y page 316).
X Secure the rigid towing bar or the towing
rope.
X Depress the brake pedal and keep it
depressed.
X Turn the key to position 2in the ignition lock.
X Depress the clutch pedal fully, engage second
gear and continue to keep the clutch pedal
fully depressed.
X Release the brake pedal. X
Tow-start the vehicle.
X Release the clutch pedal slowly, do not
depress the accelerator pedal while doing so.
X When the engine has been started, immedi-
ately depress the clutch pedal fully and shift
to neutral.
X Pull over at a suitable place and stop the vehi-
cle safely, paying attention to road and traffic
conditions.
X Depress the parking brake.
X Remove the rigid towing bar or towing rope.
X Remove the towing eye (Y page 317).
X Switch off the hazard warning lamps. Electrical fuses
Important safety notes
G
WARNING
If you manipulate, bridge or replace a faulty
fuse with a fuse of a higher amperage, the
electric cables could be overloaded. This may result in a fire. There is a risk of an accident
and injury.
Always replace faulty fuses with specified new fuses of the correct amperage.
Blown fuses must be replaced with fuses of the same rating, which you can recognise by the
colour and fuse rating. The fuse ratings are listed
in the fuse allocation chart.
The fuse allocation chart is located in the vehicle tool kit in the stowage compartment under the
boot floor (Y page 305).
If the newly inserted fuse also blows, have the
cause traced and rectified at a qualified special- ist workshop, e.g. a Mercedes-Benz Service
Centre.
! Only use fuses that have been approved for
Mercedes-Benz vehicles and which have the
correct fuse rating for the system concerned.
Otherwise, components or systems could be
damaged.
! Make sure that no moisture can enter the
fuse box when the cover is open.
! When closing the cover, make sure that it is
lying correctly on the fuse box. Moisture seep-
ing in or dirt could otherwise impair the oper- ation of the fuses. 318
Electrical fusesBreakdown assistance
Page 322 of 349

The fuses in your vehicle disconnect faulty cir-
cuits. If a fuse blows, all the components on the
circuit and their functions will fail. Before replacing a fuse
Observe the important safety notes
(Y page 318).
X Switch off the engine.
X Switch off all electrical consumers.
X Safeguard the vehicle against rolling away
(Y page 157).
X Remove the key from the ignition lock.
or, on vehicles with KEYLESS‑GO:
X Open the driver's door.
The on-board electronics now have status 0.
This is the same as the key having been
removed.
X Remove the Start/Stop button from the igni-
tion lock (Y page 139).
All indicator lamps in the instrument cluster
must be off.
The fuses are located in various fuse boxes:
R fuse box on the driver's side of the dashboard
R fuse box in the engine compartment on the
left-hand side of the vehicle, when viewed in
the direction of travel
R fuse box in the boot on the right-hand side of
the vehicle, when viewed in the direction of
travel Dashboard fuse box
Pay attention to the important safety notes
(Y page 318).
! Do not use a pointed object such as a screw-
driver to open the cover in the dashboard. You
could damage the dashboard or the cover.
! Make sure that no moisture can enter the
fuse box when the cover is open.
! When closing the cover, make sure that it is
lying correctly on the fuse box. Moisture seep-
ing in or dirt could otherwise impair the oper- ation of the fuses. X
To open: pull out cover :slightly at the bot-
tom in the direction of arrow =.
X Pull cover :outwards in the direction of
arrow ;and remove it.
X To close: clip in cover :on the front of the
dashboard.
X Fold cover :inwards until it engages. Fuse box in the engine compartment
Observe the important safety notes
(Y page 318). G
WARNING
When the bonnet is open, and the windscreen wipers are set in motion, you can be injured by
the wiper linkage. There is a risk of injury.
Always switch off the windscreen wipers and
the ignition before opening the bonnet. X
Make sure that the windscreen wipers are
switched off.
X Open the bonnet (Y page 290).
X Remove any existing moisture from the fuse
box using a dry cloth.
X To open: take lines ;out of the guides. Electrical fuses
319Breakdown assistance Z
Page 323 of 349

X
Move lines ;to one side. Route the lines
behind connection =to do this.
X Open retaining clamps :.
X Remove the fuse box cover forwards.
X To close: check whether the seal is lying cor-
rectly in the cover.
X Insert the cover at the rear of the fuse box into
the retainer.
X Fold down cover and close clamps :.
X Secure lines ;in the guides.
X Close the bonnet. Fuse box in the boot
Observe the important safety notes
(Y page 318). X
Open the boot lid.
X To open: raise boot floor :(Ypage 277).
X Slightly push back floor covering with slits ;
at gap =and lift it up. 320
Electrical fusesBreakdown assistance