2015 MERCEDES-BENZ E-CLASS CABRIOLET boot
[x] Cancel search: bootPage 92 of 349
Make sure that the soft top is dry and clean
before closing it. Otherwise, water or dirt could
enter the vehicle interior or boot.
You can open or close the soft top:
R when the vehicle is stationary or
R when you do not exceed a speed of
40 km/h
If there is a strong headwind, it may not be pos-
sible to close the soft top fully. In this case,
reduce speed or stop in order to close the soft
top fully.
For safety reasons, Mercedes-Benz recom-
mends that you only open or close the soft top
when the vehicle is stationary.
If the soft top does not open or close fully, the
soft-top hydraulics are depressurised and the
soft top is lowered:
R after about seven minutes if the ignition is
switched on
R immediately if the ignition is switched off Opening/closing with the soft-top
switch
Important safety notes G
WARNING
When opening or closing the soft top, there is a risk that parts of the body could become
trapped by moving parts such as the roof
mechanism, the boot lid, or the side windows.
There is a risk of injury.
When opening or closing the roof, make sure
that no parts of the body are in the vicinity of moving parts. Release the switch if somebody
becomes trapped. G
WARNING
If the vehicle speed exceeds 40 km/h, the
soft top stops during the opening or closing
procedure. This impairs your view to the rear. There is a risk of an accident.
Reduce your speed to below 40 km/h or stop the vehicle in accordance with the traffic con-
ditions. Operate the soft-top switch again in
order to open or close the soft top fully. Opening and closing X
Make sure that the boot separator is closed
(Y page 94).
X Close the boot lid.
X Turn the key to position 2in the ignition lock.
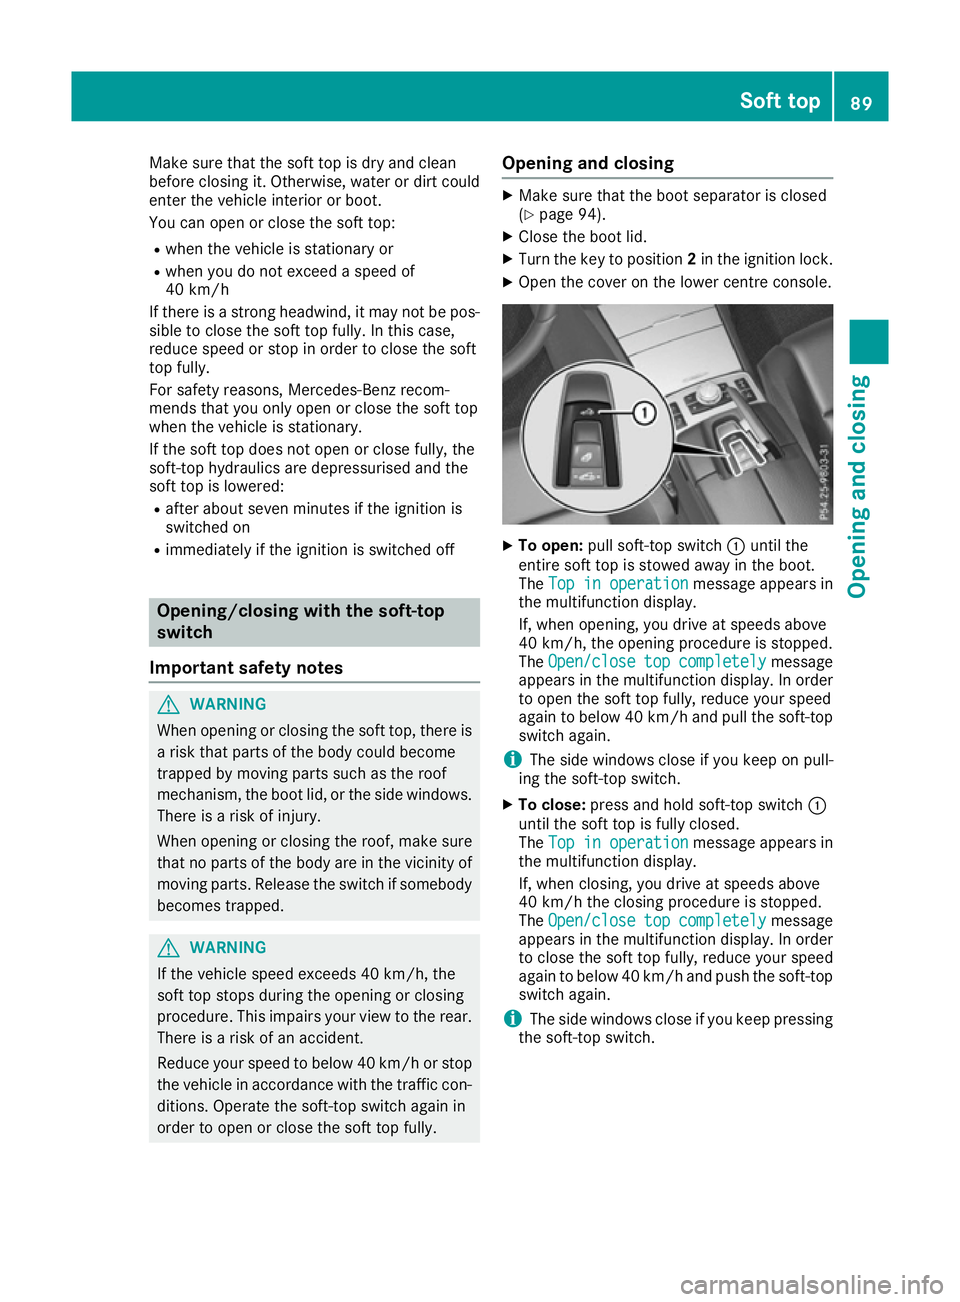
X Open the cover on the lower centre console. X
To open: pull soft-top switch :until the
entire soft top is stowed away in the boot.
The Top in operation Top in operation message appears in
the multifunction display.
If, when opening, you drive at speeds above
40 km/h, the opening procedure is stopped.
The Open/close Open/close top
topcompletely
completely message
appears in the multifunction display. In order to open the soft top fully, reduce your speed
again to below 40 km/h and pull the soft-top switch again.
i The side windows close if you keep on pull-
ing the soft-top switch.
X To close: press and hold soft-top switch :
until the soft top is fully closed.
The Top in operation Top in operation message appears in
the multifunction display.
If, when closing, you drive at speeds above
40 km/h the closing procedure is stopped.
The Open/close Open/close top
topcompletely
completely message
appears in the multifunction display. In order
to close the soft top fully, reduce your speed
again to below 40 km/h and push the soft-top switch again.
i The side windows close if you keep pressing
the soft-top switch. Soft top
89Opening and closing Z
Page 93 of 349

Opening and closing with the key
Important safety notes G
WARNING
When opening or closing the soft top, there is a risk that parts of the body could become
trapped by moving parts such as the roof
mechanism, the boot lid, or the side windows.
There is a risk of injury.
When opening or closing the roof, make sure
that no parts of the body are in the vicinity of moving parts. Release the switch if somebody
becomes trapped.
Opening and closing The key must be near the door handle.
X To open: press the %button in the key
until the soft top is completely opened.
The Top in operation
Top in operation message appears in
the multifunction display. The seat ventilation
is switched on. The rear side windows open.
X To close: press the&button in the key
until the soft top is completely closed.
The Top in operation
Top in operation message appears in
the multifunction display. The soft top and the
side windows close. Closing the soft top manually
Important safety notes G
WARNING
Closing the soft top manually is a complex,
technically challenging procedure which can
also be physically demanding. It could lead to you trapping yourself or other persons. There
is a risk of injury.
Where possible, have the soft top closed man-
ually at a qualified specialist workshop.
If the soft top cannot be closed automatically,
check the following points:
R Is the boot separator engaged (Y page 94)?
R Are the head restraints on the rear bench
seats extended? R
Is the boot lid closed?
R Is the on-board voltage sufficient?
Start the engine if necessary.
If automatic operation still does not work, the
soft top can be closed manually.
The help of a second person is required in car-
rying out this procedure.
Closing the soft top X
Apply the parking brake.
X Open the side windows.
X Lower the head restraints automatically
(Y page 102) or manually (Y page 102).
X Remove the key from the ignition lock.
X Open the boot.
X Take the two straps out of the vehicle tool kit
(Y page 305).
X Take the Allen key out of the Owner's Manual
wallet and keep it with you. X
Turn rotary catch :anti-clockwise and fold
cover ;down. X
Insert Allen key =into valve screw ?on the
hydraulic pump.
X Turn valve screw ?of the hydraulic pump
with Allen key =anti-clockwise a full turn. 90
Soft topOpening and closing
Page 94 of 349
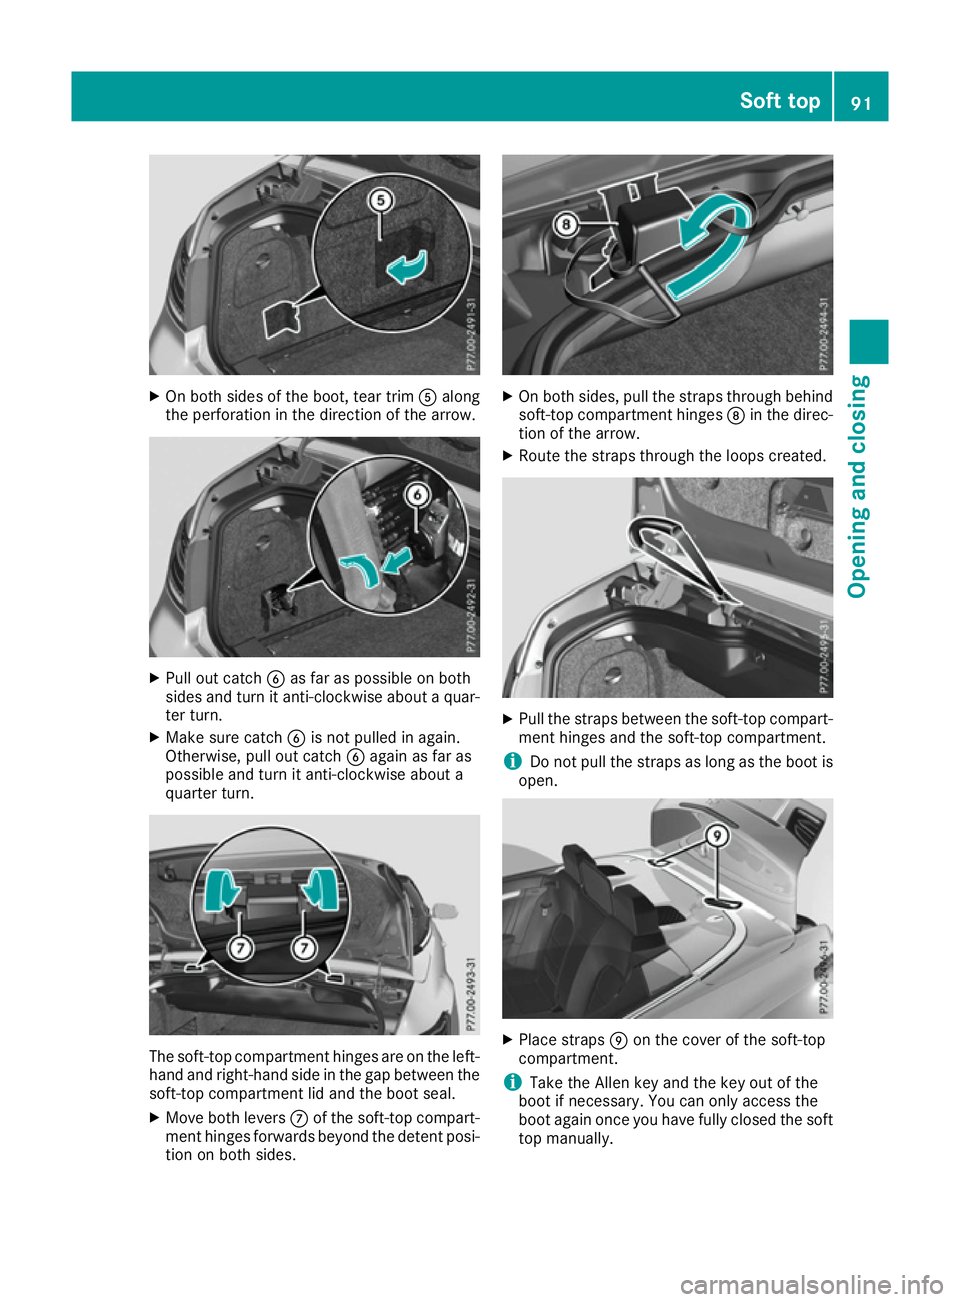
X
On both sides of the boot, tear trim Aalong
the perforation in the direction of the arrow. X
Pull out catch Bas far as possible on both
sides and turn it anti-clockwise about a quar-
ter turn.
X Make sure catch Bis not pulled in again.
Otherwise, pull out catch Bagain as far as
possible and turn it anti-clockwise about a
quarter turn. The soft-top compartment hinges are on the left-
hand and right-hand side in the gap between the soft-top compartment lid and the boot seal.
X Move both levers Cof the soft-top compart-
ment hinges forwards beyond the detent posi- tion on both sides. X
On both sides, pull the straps through behind
soft-top compartment hinges Din the direc-
tion of the arrow.
X Route the straps through the loops created. X
Pull the straps between the soft-top compart-
ment hinges and the soft-top compartment.
i Do not pull the straps as long as the boot is
open. X
Place straps Eon the cover of the soft-top
compartment.
i Take the Allen key and the key out of the
boot if necessary. You can only access the
boot again once you have fully closed the soft
top manually. Soft top
91Opening and closing Z
Page 95 of 349
X
Make sure that catch Bis not pulled again.
Otherwise, pull out catch Bagain as far as
possible and turn it anti-clockwise about a
quarter turn.
X Close the boot lid.
! The boot lid must be closed for the next
steps. The soft top compartment cover could
otherwise collide with the boot lid. X
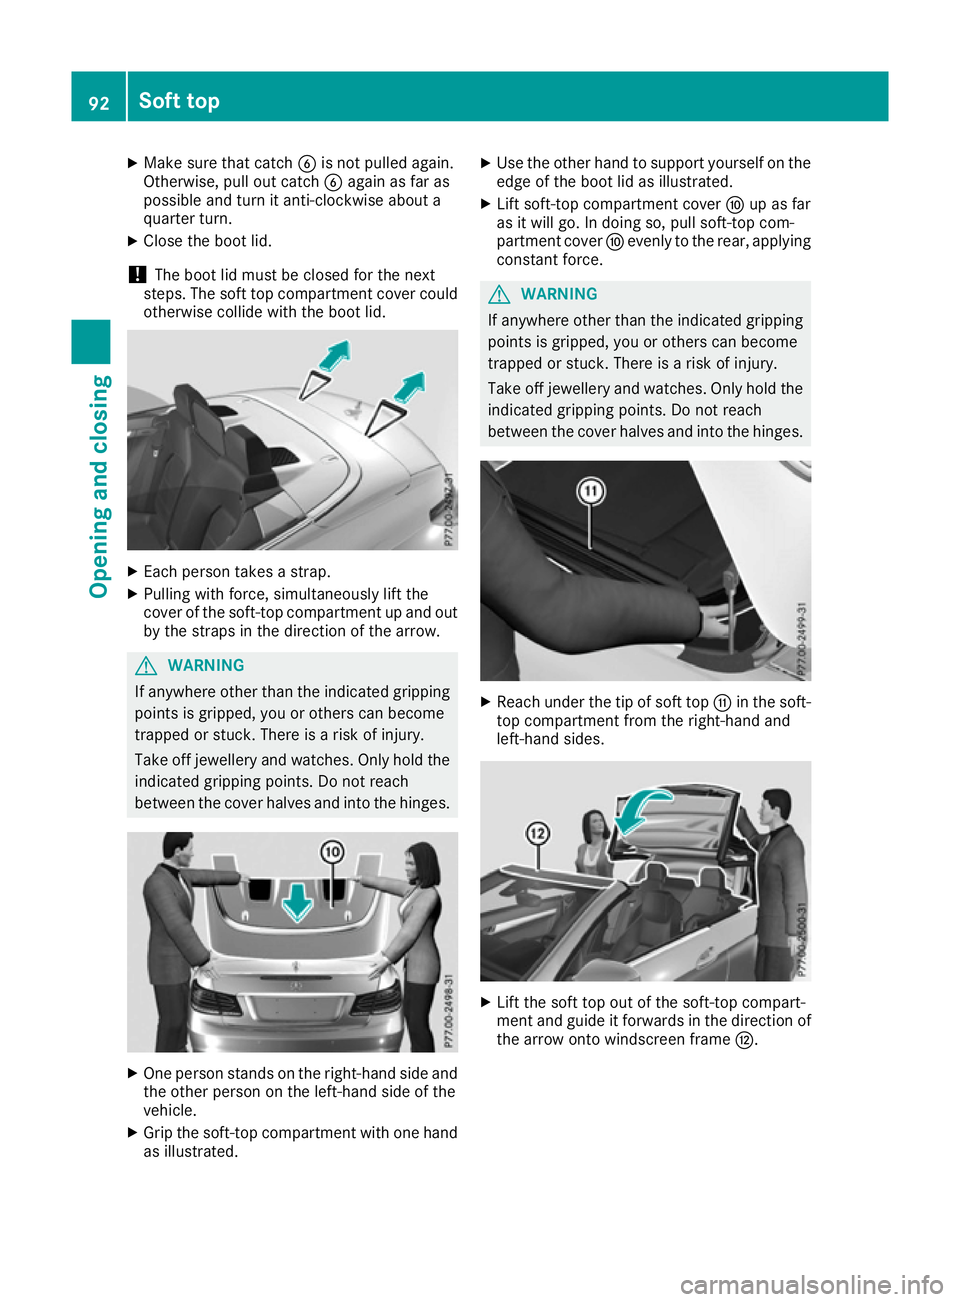
Each person takes a strap.
X Pulling with force, simultaneously lift the
cover of the soft-top compartment up and out
by the straps in the direction of the arrow. G
WARNING
If anywhere other than the indicated gripping points is gripped, you or others can become
trapped or stuck. There is a risk of injury.
Take off jewellery and watches. Only hold the
indicated gripping points. Do not reach
between the cover halves and into the hinges. X
One person stands on the right-hand side and
the other person on the left-hand side of the
vehicle.
X Grip the soft-top compartment with one hand
as illustrated. X
Use the other hand to support yourself on the
edge of the boot lid as illustrated.
X Lift soft-top compartment cover Fup as far
as it will go. In doing so, pull soft-top com-
partment cover Fevenly to the rear, applying
constant force. G
WARNING
If anywhere other than the indicated gripping points is gripped, you or others can become
trapped or stuck. There is a risk of injury.
Take off jewellery and watches. Only hold the
indicated gripping points. Do not reach
between the cover halves and into the hinges. X
Reach under the tip of soft top Gin the soft-
top compartment from the right-hand and
left-hand sides. X
Lift the soft top out of the soft-top compart-
ment and guide it forwards in the direction of
the arrow onto windscreen frame H.92
Soft topOpening and closing
Page 97 of 349
i
Press the soft-top compartment cover again
if the boot lid cannot be opened.
! Do not under any circumstances open the
boot lid with the emergency key. You could
otherwise damage the boot lid and the soft-
top compartment cover. Relocking the soft top
Important safety notes G
WARNING
If you do not fully open/close the soft top, the soft-top hydraulics depressurise after a short time. This causes the soft top to lower unex-
pectedly and may cause you or others to be
trapped. There is a risk of injury.
Always open or close the soft top completely.
The soft top is not locked if: R the Top in operation
Top in operation message appears in
the multifunction display
R you hear a warning tone for up to ten seconds
when pulling away or while driving
Locking You can lock the soft top again if it is not locked
fully.
X Pull over and stop the vehicle safely as soon
as possible, paying attention to road and traf-
fic conditions.
X Turn the key to position 2in the ignition lock.
X Press the soft-top switch (Y page 89).Boot separator
General notes !
In order to avoid damaging the soft top or
stowed loads, please adhere to the following
while the soft top is open:
R Do not place any long objects inside or
behind the side stowage nets when the
boot separator is open. These objects could obstruct the boot separator or cause
damage to the open soft top.
R Make sure that the load does not push the
boot separator upwards.
The soft top can only be opened when the boot
separator is closed.
The boot separator can be used to cover luggage
and loads in the boot.
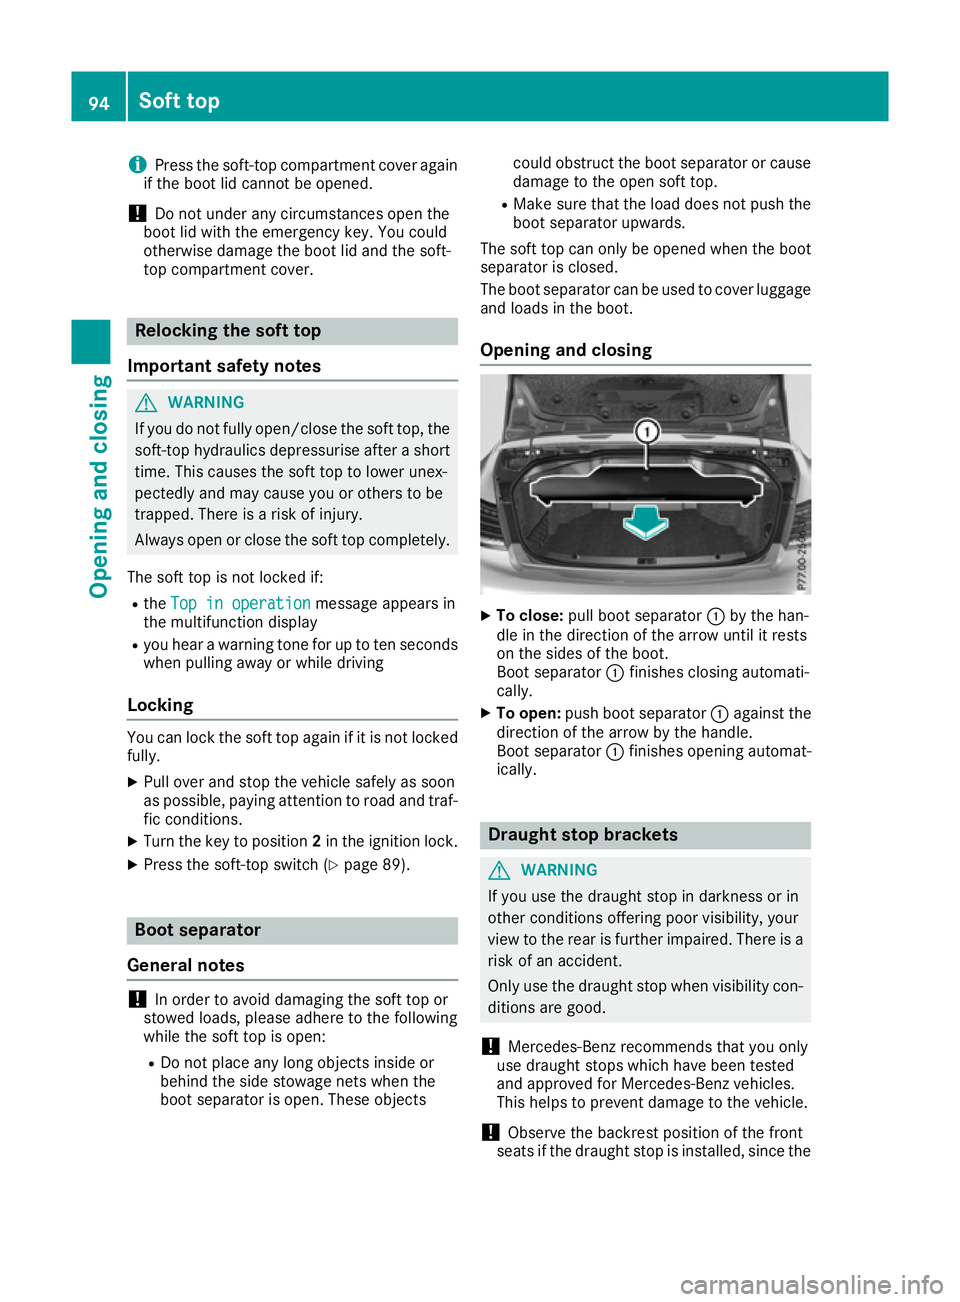
Opening and closing X
To close: pull boot separator :by the han-
dle in the direction of the arrow until it rests
on the sides of the boot.
Boot separator :finishes closing automati-
cally.
X To open: push boot separator :against the
direction of the arrow by the handle.
Boot separator :finishes opening automat-
ically. Draught stop brackets
G
WARNING
If you use the draught stop in darkness or in
other conditions offering poor visibility, your
view to the rear is further impaired. There is a
risk of an accident.
Only use the draught stop when visibility con- ditions are good.
! Mercedes-Benz recommends that you only
use draught stops which have been tested
and approved for Mercedes-Benz vehicles.
This helps to prevent damage to the vehicle.
! Observe the backrest position of the front
seats if the draught stop is installed, since the 94
Soft topOpening and closing
Page 101 of 349
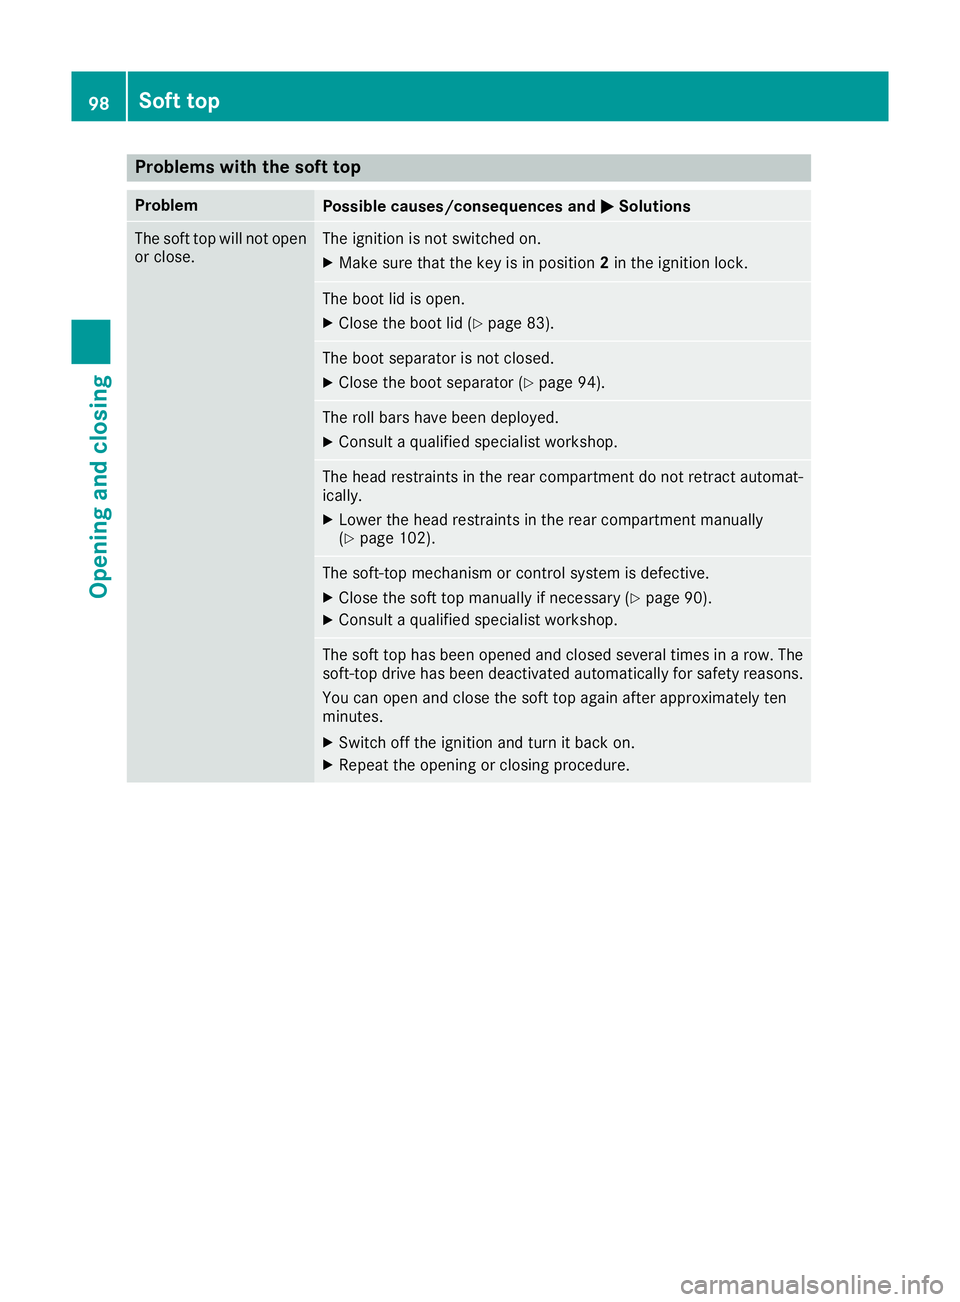
Problems with the soft top
Problem
Possible causes/consequences and
M
MSolutions The soft top will not open
or close. The ignition is not switched on.
X Make sure that the key is in position 2in the ignition lock. The boot lid is open.
X Close the boot lid (Y page 83). The boot separator is not closed.
X Close the boot separator (Y page 94). The roll bars have been deployed.
X Consult a qualified specialist workshop. The head restraints in the rear compartment do not retract automat-
ically.
X Lower the head restraints in the rear compartment manually
(Y page 102). The soft-top mechanism or control system is defective.
X Close the soft top manually if necessary (Y page 90).
X Consult a qualified specialist workshop. The soft top has been opened and closed several times in a row. The
soft-top drive has been deactivated automatically for safety reasons.
You can open and close the soft top again after approximately ten
minutes.
X Switch off the ignition and turn it back on.
X Repeat the opening or closing procedure. 98
Soft topOpening and closing
Page 191 of 349
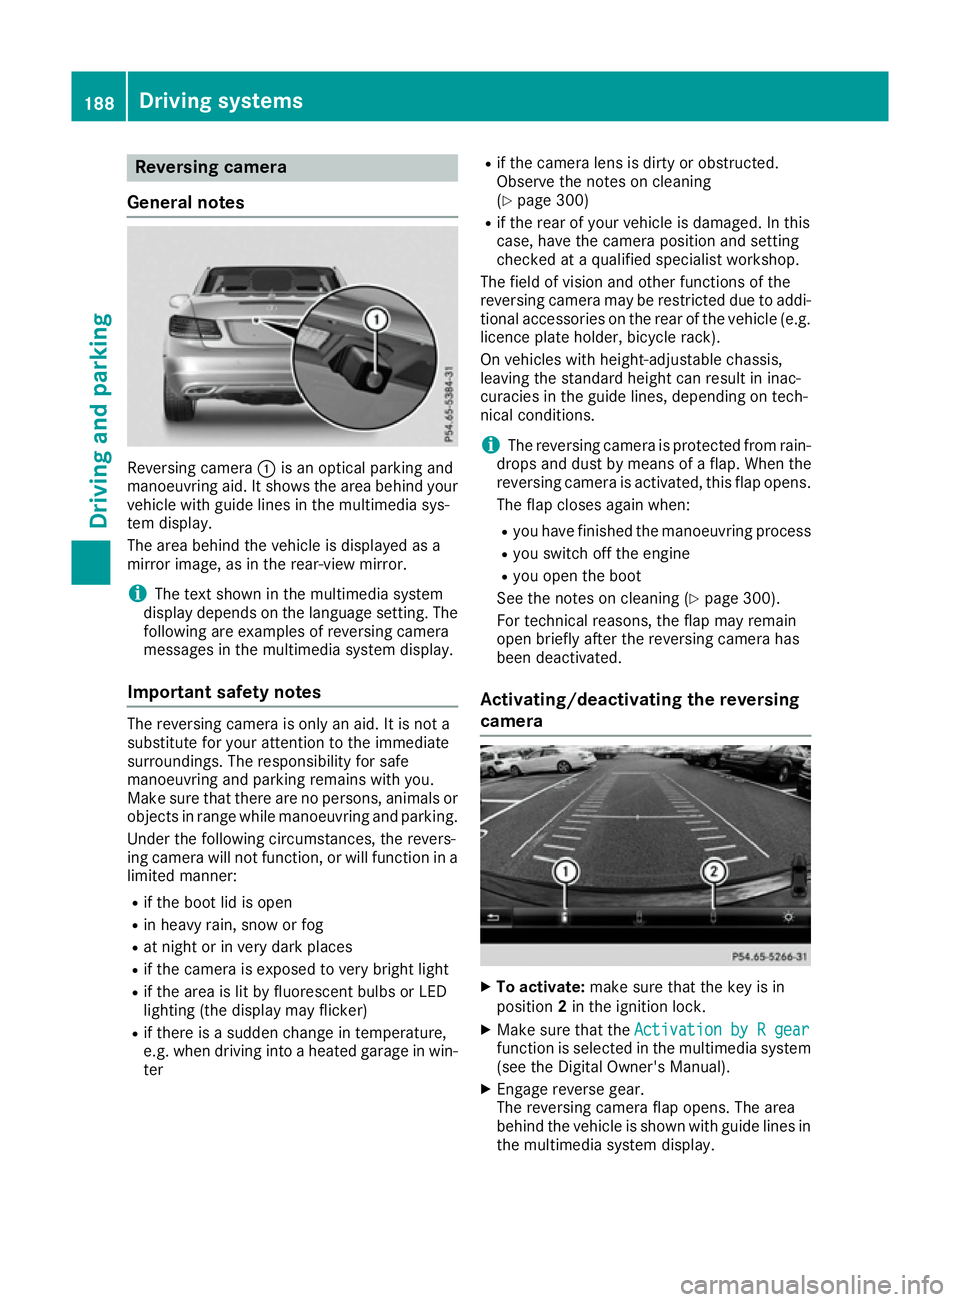
Reversing camera
General notes Reversing camera
:is an optical parking and
manoeuvring aid. It shows the area behind your vehicle with guide lines in the multimedia sys-
tem display.
The area behind the vehicle is displayed as a
mirror image, as in the rear-view mirror.
i The text shown in the multimedia system
display depends on the language setting. The following are examples of reversing camera
messages in the multimedia system display.
Important safety notes The reversing camera is only an aid. It is not a
substitute for your attention to the immediate
surroundings. The responsibility for safe
manoeuvring and parking remains with you.
Make sure that there are no persons, animals or
objects in range while manoeuvring and parking.
Under the following circumstances, the revers-
ing camera will not function, or will function in a limited manner:
R if the boot lid is open
R in heavy rain, snow or fog
R at night or in very dark places
R if the camera is exposed to very bright light
R if the area is lit by fluorescent bulbs or LED
lighting (the display may flicker)
R if there is a sudden change in temperature,
e.g. when driving into a heated garage in win-
ter R
if the camera lens is dirty or obstructed.
Observe the notes on cleaning
(Y page 300)
R if the rear of your vehicle is damaged. In this
case, have the camera position and setting
checked at a qualified specialist workshop.
The field of vision and other functions of the
reversing camera may be restricted due to addi-
tional accessories on the rear of the vehicle (e.g.
licence plate holder, bicycle rack).
On vehicles with height-adjustable chassis,
leaving the standard height can result in inac-
curacies in the guide lines, depending on tech-
nical conditions.
i The reversing camera is protected from rain-
drops and dust by means of a flap. When the
reversing camera is activated, this flap opens.
The flap closes again when:
R you have finished the manoeuvring process
R you switch off the engine
R you open the boot
See the notes on cleaning (Y page 300).
For technical reasons, the flap may remain
open briefly after the reversing camera has
been deactivated.
Activating/deactivating the reversing
camera X
To activate: make sure that the key is in
position 2in the ignition lock.
X Make sure that the Activation by R gear Activation by R gear
function is selected in the multimedia system (see the Digital Owner's Manual).
X Engage reverse gear.
The reversing camera flap opens. The area
behind the vehicle is shown with guide lines in
the multimedia system display. 188
Driving systemsDriving and parking
Page 196 of 349
R
Top view and image from the reversing cam-
era (130° viewing angle)
R Top view and image from the front camera
(130° viewing angle without displaying the
maximum steering wheel angle)
R Top view and enlarged rear view
R Top view and enlarged front view
R Top view and trailer view (vehicles with trailer
tow hitch)
R Top view and images from the rear-facing side
cameras (rear wheel view)
R Top view and images from the forward-facing
side cameras (front wheel view)
When the function is active and you shift the
transmission from Dor Rto N, the dynamic
guide lines are hidden.
When you change between transmission posi-
tions Dand R, you see the previously selected
front or rear view.
Distances measured by PARKTRONIC will also
be optically displayed:
R as red or yellow brackets around the vehicle
symbol in top view in split-screen mode or
R at the bottom right as red or yellow brackets
around the vehicle symbol in full-screen mode
The line thickness and colour of the brackets
show how far the vehicle is from an object.
R yellow brackets with thin lines: PARKTRONIC
is active
R yellow brackets with normal lines: an object is
present in close range of the vehicle
R red line: an object is present in the immediate
close range of the vehicle
Important safety notes The 360° camera is only an aid and may show a
distorted view of obstacles, show them incor-
rectly or not at all. The 360° camera is not a
substitute for attentive driving.
The responsibility for safe manoeuvring and
parking remains with you. Make sure that there are no persons, animals or objects in range
while manoeuvring and parking.
You are always responsible for safety, and must
always pay attention to your surroundings when parking and manoeuvring. This applies to the
areas behind, in front of and beside the vehicle.
You could otherwise endanger yourself and oth- ers. The 360° camera will not function or will func-
tion only in a limited manner:
R if the doors are open
R if the exterior mirrors are folded in
R if the boot lid is open
R in heavy rain, snow or fog
R at night or in very dark places
R if the cameras are exposed to very bright light
R if the area is lit by fluorescent bulbs or LED
lighting (the display may flicker)
R if there is a sudden change in temperature,
e.g. when driving into a heated garage in win-
ter
R if the camera lenses are dirty or covered
R if the vehicle components in which the cam-
eras are fitted are damaged. In this event,
have the camera position and setting checked at a qualified specialist workshop.
Do not use the 360° camera under such cir-
cumstances. You could otherwise injure others
or damage objects when parking the vehicle.
Guide lines are always shown at road level. In
trailer mode, the guide lines are shown at the
level of the trailer coupling.
The field of vision and other functions of the
camera system may be restricted due to addi-
tional accessories on the rear of the vehicle (e.g.
licence plate holder, bicycle rack).
On vehicles with height-adjustable suspension,
due to the technical conditions, leaving the
standard height can result in:
R inaccuracies in the guide lines
R inaccuracies in the display of generated
images (top view)
Activation conditions The 360° camera image can be displayed if:
R your vehicle is equipped with a 360° camera
R the key is in position 2in the ignition lock
R the multimedia system is switched on
R the 360° camera 360° camera function is switched on
Activating the 360° camera X
Press the Øbutton in the centre console
for longer than two seconds.
The following appears depending on whether
transmission position Dor Ris selected: Driving systems
193Driving and parking Z