2015 MERCEDES-BENZ E-CLASS CABRIOLET battery location
[x] Cancel search: battery locationPage 15 of 349

Coolan
t.......................................... 259
Engine diagnostics ......................... 259
Indicator lamps
Display message ............................ 236
see Warning and indicator lamps
Indicators
see Turn signals
Insect protection on the radiator .... 291
Instrument cluster
Overview .......................................... 31
Setting s......................................... 223
Warning and indicator lamps ........... 31
Instrument cluster lighting .............. 223
Intelligent Light System
Activating/deactivating ................. 224
Display message ............................ 236
Overview ........................................ 116
Setting the dipped-beam head-
lamps for driving on the right/left .. 224
Interior lighting
Automatic control system .............. 118
Delayed switch-off (on-board
computer) ...................................... 225
Overview ........................................ 118
Reading lamp ................................. 118
Setting brightness for display/
switches (on-board computer) ....... 223
Interior motion sensor
Deactivating ..................................... 73
Function ........................................... 72
Priming ............................................ 73
Switching off .................................... 73
iPod ®
See also Digital Owner's Manua l... 263
ISOFIX child seat securing system .... 51J
Jack Storage location ............................ 305
Using ............................................. 330
Jump starting (engine) ...................... 313K
Key Changing the battery ....................... 77
Checking the battery ....................... 77 Display message ............................ 252
Door central locking/unlocking ....... 74
Emergency key element ................... 76
Important safety notes .................... 74
Loss ................................................. 79
Modifying the programming ............. 76
Opening/closing soft top ................. 90
Overview .......................................... 74
Positions (ignition lock) ................. 139
Problem (malfunction) ..................... 79
Starting the engine ........................ 141
Key positions
Key ................................................ 139
KEYLESS GO .................................. 139
KEYLESS-GO
Deactivation ..................................... 75
Display message ............................ 253
Locking ............................................ 75
Removing the Start/Stop button ... 140
Start/Stop button .......................... 139
Starting the engine ........................ 141
Unlocking ......................................... 75
Kickdown
Driving tips .................................... 150
Manual drive progra m.................... 153
Kneebag ............................................... 43 L
Lamps see Warning and indicator lamps
Lane Keeping Assist
Activating/deactivating ................. 222
Display message ............................ 242
Function/information .................... 202
Lane package ..................................... 200
Lashing eyelets ................................. 276
Licence plate lamp (display mes-
sage) ................................................... 236
Light sensor (display message) ....... 237
Lighting
see Lights
Lights
Activating/deactivating the Intel-
ligent Light System ........................ 224
Activating/deactivating the inte-
rior lighting delayed switch-off ....... 225
Active light function ....................... 117 12
Index
Page 135 of 349

X
Convenience opening feature: press and
hold the gbutton until the side windows
are opened. The side windows move back to
their original positions.
The indicator lamp above the gbutton
goes out. Air-recirculation mode is deactiva-
ted.
i If you open the side windows manually after
closing them using the convenience closing
feature, they will remain in this position when
opened using the convenience opening fea-
ture. Switching the residual heat on/off
General notes It is possible to make use of the residual heat of
the engine to continue heating the vehicle for
approximately 30 minutes after the engine has
been switched off. The heating time depends on
the set interior temperature.
The "residual heat" function only functions opti- mally with the side windows closed.
The "residual heat" function only functions opti-
mally with the soft top closed.
Activating/deactivating X
Turn the key to position 0in the ignition lock
or remove it (Y page 139).
X To switch on: press theÌbutton.
The indicator lamp above the Ìbutton
lights up.
i If the residual heat function is switched on,
the windows may mist up on the inside.
i The blower will run at a low speed regardless
of the airflow setting.
i If you activate the residual heat function at
high temperatures, only the ventilation will be
activated. The blower runs at medium speed.
X To switch off: press theÌbutton.
The indicator lamp above the Ìbutton
goes out.
Residual heat is deactivated automatically:
R after approximately 30 minutes
R when the ignition is switched on
R if the battery voltage drops
R when the auxiliary heating is switched on Auxiliary heating
Important safety notes G
DANGER
If the exhaust pipe is blocked or sufficient
ventilation is not possible, toxic exhaust
fumes can enter the vehicle, especially car-
bon monoxide. This is the case, e.g. in
enclosed spaces, or if the vehicle is stuck in
snow. There is a risk of fatal injuries.
You should switch off the auxiliary heating in
enclosed spaces which do not have an extrac- tion system, e.g. a garage. If the vehicle is
stuck in snow and you must leave the auxiliary
heating running, keep the exhaust pipe and
the area around the vehicle clear of snow. To guarantee a sufficient supply of fresh air, open
a window on the side of the vehicle away from the wind. G
WARNING
When the auxiliary heating is switched on,
parts of the vehicle can become very hot.
Flammable materials such as leaves, grass or twigs may ignite if they come into contact
with:
R hot parts of the exhaust system
R the exhaust gas itself
There is a risk of fire.
When the auxiliary heating is switched on,
make sure that:
R no flammable materials come into contact
with hot vehicle components
R the exhaust gas can escape from the
exhaust pipe unhindered
R the exhaust gas does not come into contact
with flammable materials.
The auxiliary heating and the exhaust gas dis-
charge location can be found in front of the right- hand front wheel.
! Operating the auxiliary heating/ventilation
draws on the vehicle battery. After you have
heated or ventilated the vehicle a maximum of two times, drive for a longer distance. 132
Operating the climate control systemClimate control
Page 138 of 349

time and at an unsuitable location. When setting
the departure time, also observe the important
safety notes (Y page 132).
X Briefly press the ubutton.
X Press the ,or. button repeatedly
until the time to be changed appears in the
display.
X Press the uand^ buttons simultane-
ously.
The Îsymbol in the remote control display
flashes.
X Press the ,or. button to set the
desired departure time.
i The longer you press the
,or. but-
ton, the faster the time changes.
X Press the uand^ button simultane-
ously.
The new departure time is stored.
Activating the set departure time
X Briefly press the ubutton.
X Press the ,or. button repeatedly
until the desired departure time appears in
the display.
X Press the ubutton.
The Ísymbol, the departure time and,
depending on the selected departure time,
the letter A, BorCappear in the display.
Deactivating the set departure time
X Briefly press the ubutton.
The status of the auxiliary heating is shown in the display.
X Press the .button.
The first departure time stored appears in the
display.
X Press the ^button.
OFF is shown in the remote control display.
Replacing the remote control battery Important safety notes
G
WARNING
Batteries contain toxic and corrosive substan- ces. If batteries are swallowed, it can result in
severe health problems. There is a risk of fatal injury. Keep batteries out of the reach of children. If
a battery is swallowed, seek medical attention
immediately. H
Environmental note Batteries contain pollutants.
It is illegal to dispose of them
with the household rubbish.
They must be collected sep-
arately and disposed of in anenvironmentally responsible
recycling system. Dispose of batteries in an
environmentally responsible
manner. Take discharged
batteries to a qualified spe-
cialist workshop or to a col-
lection point for used batter-
ies.
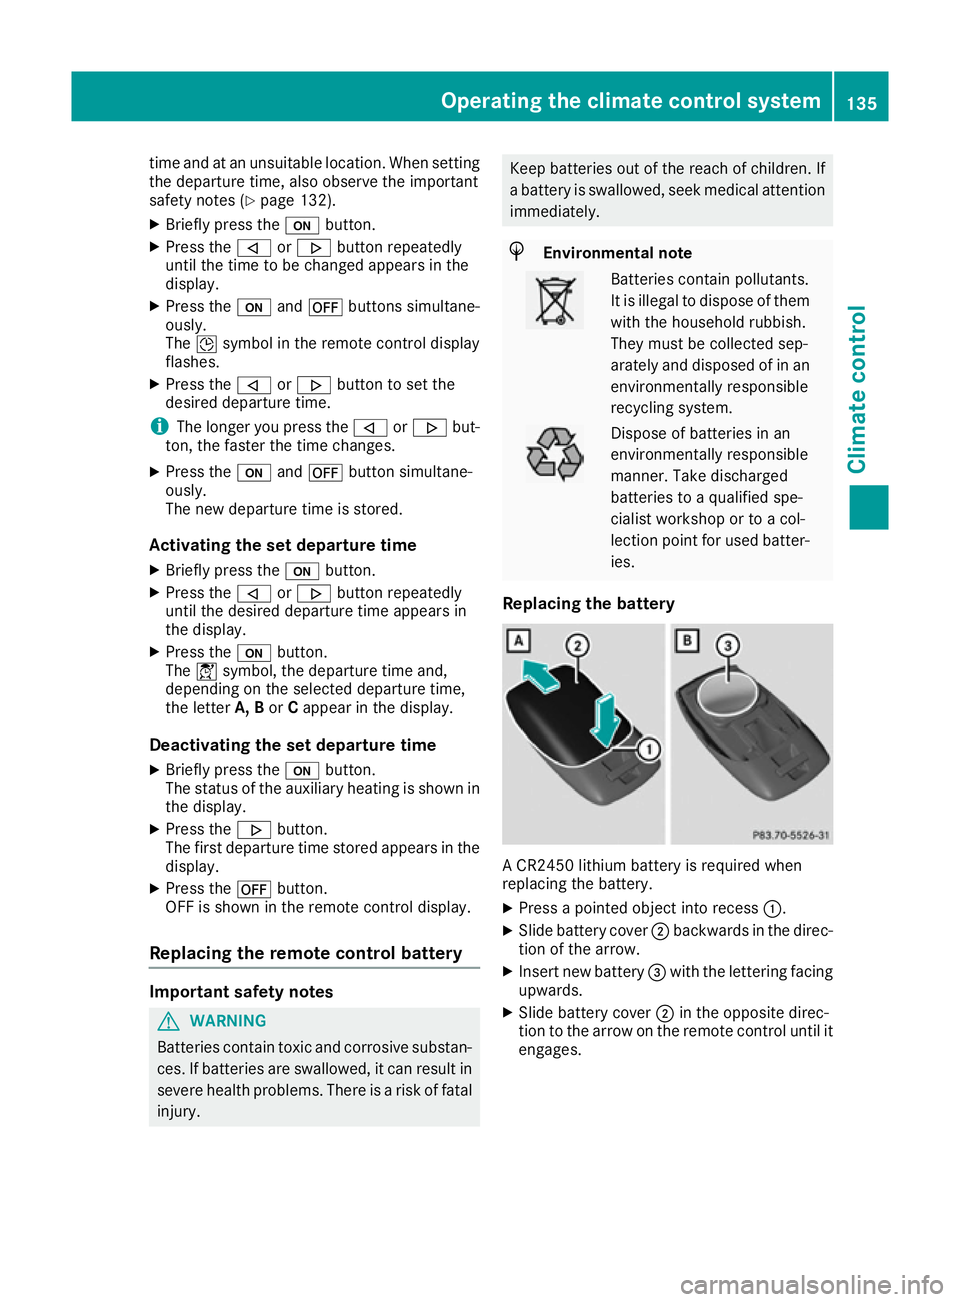
Replacing the battery A CR2450 lithium battery is required when
replacing the battery.
X Press a pointed object into recess :.
X Slide battery cover ;backwards in the direc-
tion of the arrow.
X Insert new battery =with the lettering facing
upwards.
X Slide battery cover ;in the opposite direc-
tion to the arrow on the remote control until it engages. Operating the climate control system
135Climate control Z
Page 256 of 349

Display messages
Possible causes/consequences and
M
MSolutions Â
Change Change
key
keybatteries
batteries The battery of the KEYLESS-GO key is discharged.
X Change the replace (Y page 77).Â
Key not detected Key not detected
(red display message) The KEYLESS-GO key is not in the vehicle.
A warning tone also sounds.
If the engine is switched off, you can no longer lock the vehicle cen-
trally or start the engine.
X Pull over and stop the vehicle safely as soon as possible, paying
attention to road and traffic conditions.
X Secure the vehicle against rolling away (Y page 157).
X Locate the KEYLESS-GO key. A strong source of radio waves is causing interference, this means that
the KEYLESS-GO key is not recognised when the engine is running.
A warning tone also sounds.
X Pull over and stop the vehicle safely as soon as possible, paying
attention to road and traffic conditions.
X Secure the vehicle against rolling away (Y page 157).
X Insert the key into the ignition lock and bring into key mode. Â
Key not detected Key not detected
(white display message) The KEYLESS-GO key cannot be detected at present.
X Change the location of the key with the KEYLESS-GO functions in
the vehicle.
If the KEYLESS-GO key is still not detected: X Operate the vehicle with the key in the ignition lock if necessary. Â
Remove Remove
starting
starting but‐
but‐
ton,
ton, then
theninsert
insert key
key The KEYLESS-GO key is not continually detected.
KEYLESS-GO is temporarily malfunctioning or is defective. A warning tone also sounds.
X Insert the key into the ignition lock and turn it to the desired posi-
tion.
X Consult a qualified specialist workshop. Warning and indicator lamps in the instrument cluster
General notes
Some systems carry out a self-diagnosis when the ignition is switched on. Several warning and
indicator lamps can thereby temporarily light up or flash. This behaviour is non-critical. These
warning and indicator lamps only indicate a malfunction if they light up or flash after the engine is started or during a journey. Wa
rning and indi cator lamps in the instrument cluster
253On-board computer and displays Z
Page 321 of 349

X
Vehicles with manual transmission:
depress the clutch pedal fully and engage
neutral.
X Vehicles with automatic transmission:
turn the key to position
2in the ignition lock.
X Shift the automatic transmission to position
N.
As soon as the vehicle is loaded: X Prevent the vehicle from rolling away by
applying the parking brake.
X Vehicles with manual transmission:
depress the clutch pedal fully and engage first
or reverse gear.
X Vehicles with automatic transmission:
shift the automatic transmission to position
P.
X Turn the key to position 0in the ignition lock
and remove it.
X Secure the vehicle. Tow-starting (emergency engine
starting)
! Vehicles with automatic transmission must
not be tow-started. The transmission may
otherwise be damaged.
i You can find information on "Jump-starting"
under (Y page 313).
Before tow-starting, the following conditions
must be fulfilled:
R the battery is connected
R the engine has cooled down
R the exhaust system has cooled down
When tow-starting, it is important that you
observe the safety notes (Y page 315) and the
legal requirements in each respective country.
X Switch on the hazard warning lamps
(Y page 116).
X Fit the towing eye (Y page 316).
X Secure the rigid towing bar or the towing
rope.
X Depress the brake pedal and keep it
depressed.
X Turn the key to position 2in the ignition lock.
X Depress the clutch pedal fully, engage second
gear and continue to keep the clutch pedal
fully depressed.
X Release the brake pedal. X
Tow-start the vehicle.
X Release the clutch pedal slowly, do not
depress the accelerator pedal while doing so.
X When the engine has been started, immedi-
ately depress the clutch pedal fully and shift
to neutral.
X Pull over at a suitable place and stop the vehi-
cle safely, paying attention to road and traffic
conditions.
X Depress the parking brake.
X Remove the rigid towing bar or towing rope.
X Remove the towing eye (Y page 317).
X Switch off the hazard warning lamps. Electrical fuses
Important safety notes
G
WARNING
If you manipulate, bridge or replace a faulty
fuse with a fuse of a higher amperage, the
electric cables could be overloaded. This may result in a fire. There is a risk of an accident
and injury.
Always replace faulty fuses with specified new fuses of the correct amperage.
Blown fuses must be replaced with fuses of the same rating, which you can recognise by the
colour and fuse rating. The fuse ratings are listed
in the fuse allocation chart.
The fuse allocation chart is located in the vehicle tool kit in the stowage compartment under the
boot floor (Y page 305).
If the newly inserted fuse also blows, have the
cause traced and rectified at a qualified special- ist workshop, e.g. a Mercedes-Benz Service
Centre.
! Only use fuses that have been approved for
Mercedes-Benz vehicles and which have the
correct fuse rating for the system concerned.
Otherwise, components or systems could be
damaged.
! Make sure that no moisture can enter the
fuse box when the cover is open.
! When closing the cover, make sure that it is
lying correctly on the fuse box. Moisture seep-
ing in or dirt could otherwise impair the oper- ation of the fuses. 318
Electrical fusesBreakdown assistance