2015 MERCEDES-BENZ E-CLASS CABRIOLET ESP
[x] Cancel search: ESPPage 86 of 349
!
The boot lid swings upwards when opened.
Therefore, make sure that there is sufficient
clearance above the boot lid.
The opening dimensions of the boot lid can be
found in the "Vehicle data" section
(Y page 342).
Stow luggage or loads preferably in the boot.
Observe the loading guidelines (Y page 272).
Do not leave the key in the boot. You could oth-
erwise lock yourself out.
The boot lid can be:
R opened and closed manually from outside
R opened automatically from inside
R locked separately
R unlocked with the emergency key element Opening/closing from the outside
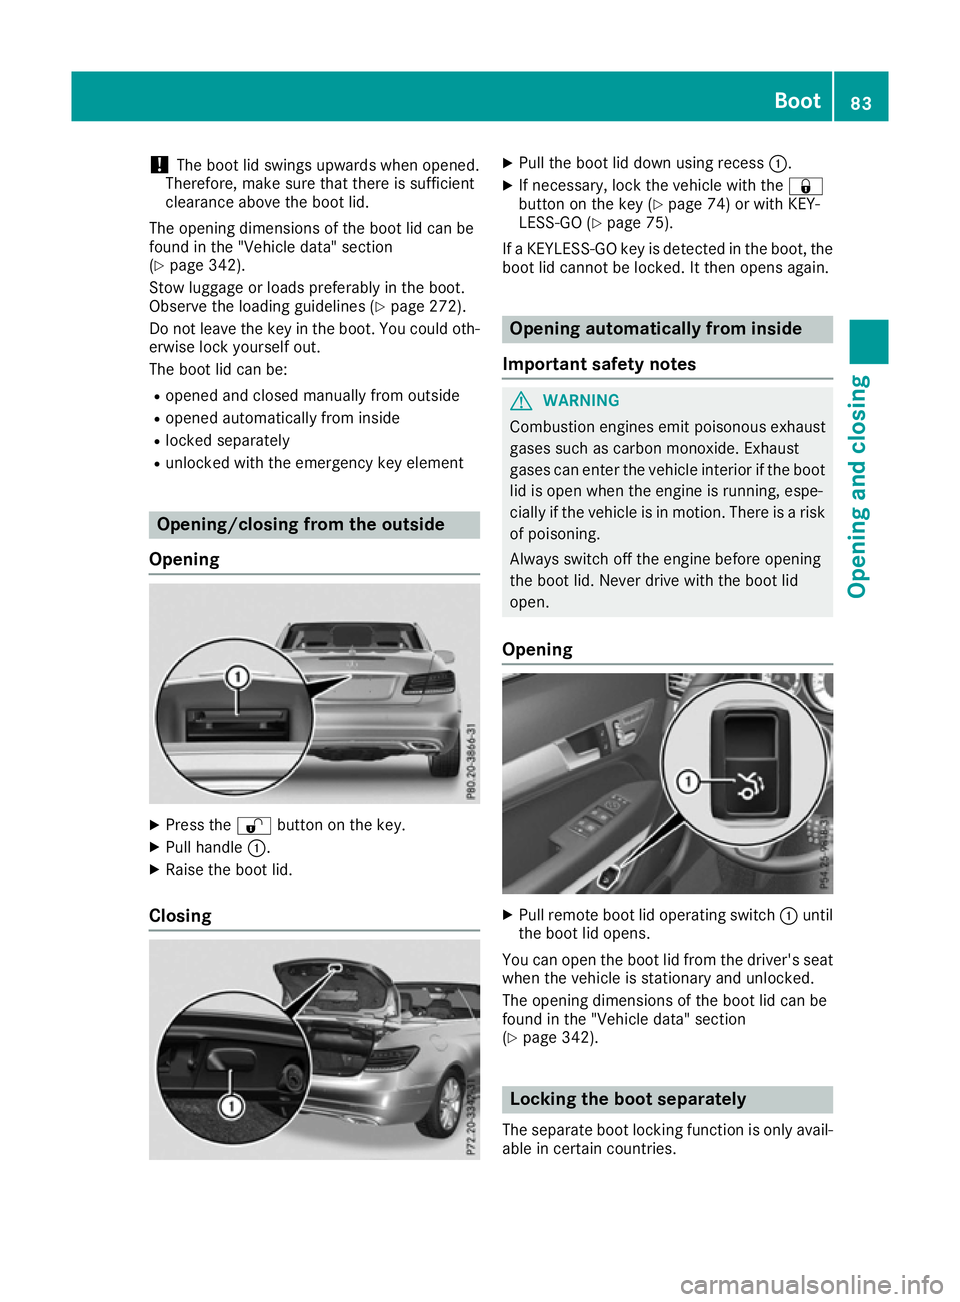
Opening X
Press the %button on the key.
X Pull handle :.
X Raise the boot lid.
Closing X
Pull the boot lid down using recess :.
X If necessary, lock the vehicle with the &
button on the key (Y page 74) or with KEY-
LESS-GO (Y page 75).
If a KEYLESS-GO key is detected in the boot, the
boot lid cannot be locked. It then opens again. Opening automatically from inside
Important safety notes G
WARNING
Combustion engines emit poisonous exhaust
gases such as carbon monoxide. Exhaust
gases can enter the vehicle interior if the boot
lid is open when the engine is running, espe-
cially if the vehicle is in motion. There is a risk of poisoning.
Always switch off the engine before opening
the boot lid. Never drive with the boot lid
open.
Opening X
Pull remote boot lid operating switch :until
the boot lid opens.
You can open the boot lid from the driver's seat when the vehicle is stationary and unlocked.
The opening dimensions of the boot lid can be
found in the "Vehicle data" section
(Y page 342). Locking the boot separately
The separate boot locking function is only avail-
able in certain countries. Boot
83Opening and closing Z
Page 88 of 349

G
WARNING
If children operate the side windows they
could become trapped, particularly if they are left unsupervised. There is a risk of injury.
Activate the override feature for the rear side
windows. When leaving the vehicle, always
take the key with you and lock the vehicle.
Never leave children unattended in the vehi-
cle. Side window reversing feature
The side windows are equipped with an auto-
matic reversing feature. If a solid object blocks
or restricts a side window during the closing
process, the side window opens again automat-
ically. The automatic reversing feature is, how-
ever, only an aid and is no substitute for your
attention when closing a side window. G
WARNING
The reversing function does not react:
R to soft, light and thin objects, e.g. small fin-
gers
R over the last 4 mm of the closing movement
R during resetting
R when closing the side window again man-
ually immediately after automatic reversing
This means that the reversing function cannot prevent someone being trapped in these sit-
uations. There is a risk of injury.
When closing make sure that no parts of the
body are in the closing area. If someone
becomes trapped, press the switch to open
the side window again. Opening and closing the side win-
dows
The switches for all side windows are located on
the driver's door. There is also a switch on the
front-passenger door as well as on the doors in
the rear compartment on the left and right-hand sides for the corresponding side window.
The switches on the driver's door take prece-
dence. :
Front left
; Front right
= Rear right
? Rear left
X Turn the key to position 1or 2in the ignition
lock.
X To open manually: press and hold the cor-
responding button.
X To open fully: press the button beyond the
point of resistance and release it.
Automatic operation is started.
X To close manually: pull and hold the corre-
sponding switch.
X To close fully: pull the corresponding switch
beyond the pressure point.
Automatic operation is started.
X To interrupt automatic operation: press/
pull the corresponding switch again.
You can use automatic operation when opening or closing the front side windows. To do so,
press or pull the switch to just beyond the point
of resistance in the corresponding direction.
You can stop automatic operation by pressing or pulling again.
You can continue to operate the side windows
after switching off the engine or removing the
key. This function remains active for five
minutes or until the driver's or front-passenger
door is opened.
The side windows cannot be operated from the
rear when the override feature for the side win-
dows is activated (Y page 61). Side windows
85Opening and closing Z
Page 90 of 349

X
Touch recessed sensor surface :on the
door handle until the side windows are fully
closed.
i Make sure you only touch recessed sensor
surface :.
X To interrupt convenience closing: release
recessed sensor surface :on the door han-
dle. Resetting the side windows
If a side window can no longer be closed fully,
you must reset it.
X Close all doors.
X Turn the key to position 1or 2in the ignition
lock.
X Pull the corresponding switch on the door
control panel until the side window is com-
pletely closed (Y page 85).
X Hold the switch for an additional second.
If the side window opens again slightly: X Immediately pull the corresponding switch on
the door control panel until the side window is completely closed (Y page 85).
X Hold the switch for an additional second.
X If the corresponding side window remains
closed after the button has been released, the
side window has been reset correctly. If this is
not the case, repeat the steps above again. Side windows
87Opening and closing Z
Page 91 of 349
Problems with the side windows
G
WARNING
If you close a side window again immediately after it has been blocked or reset, the side window
closes with increased or maximum force. The reversing function is then not active. Parts of the
body could be trapped in the closing area in the process. This poses an increased risk of injury or even fatal injury.
Make sure that no parts of the body are in the closing area. To stop the closing process, releasethe switch or push the switch again to reopen the side window. Problem
Possible causes/consequences and
M MSolutions A side window cannot be
closed because it is
blocked by objects, e.g.
leaves in the window
guide. X
Remove the objects.
X Close the side window. A side window cannot be
closed and you cannot
see the cause. If a side window is obstructed during closing and reopens again
slightly:
X Immediately after the window blocks, pull the corresponding switch
again until the side window has closed.
The side window is closed with increased force.
If a side window is obstructed again during closing and reopens again slightly:
X Immediately after the window blocks, pull the corresponding switch
again until the side window has closed.
The side window is closed without the automatic reversing feature. Soft top
Important safety notes
G
WARNING
If you do not fully open/close the soft top, the soft-top hydraulics depressurise after a short time. This causes the soft top to lower unex-
pectedly and may cause you or others to be
trapped. There is a risk of injury.
Always open or close the soft top completely.
! Never sit on the soft-top compartment
cover or stow heavy objects there. You will
otherwise damage the soft top and soft-top
compartment cover of the vehicle. !
When opening and closing the soft top,
make sure that:
R there is sufficient clearance above it as the
soft top swings upwards
R the boot separator is closed
R the boot is only loaded to below the boot
separator
R the boot separator is not pushed up by the
load
R the flap of the skibag is closed
R the boot lid is closed
R there are no objects on the soft-top com-
partment cover
R the soft-top fabric is not dirty, wet or frozen
You could otherwise damage the soft top,
boot and other parts of the vehicle.
Vehicle height when opening/closing the soft
top (Y page 342). 88
Soft topOpening and closing
Page 102 of 349
Correct driver's seat position
G
WARNING
You could lose control of the vehicle while
driving if you:
R adjust the driver's seat, steering wheel or
mirrors
R fasten the seat belt
There is a risk of an accident.
Adjust the driver's seat, head restraint, steer-
ing wheel and mirrors and fasten your seat
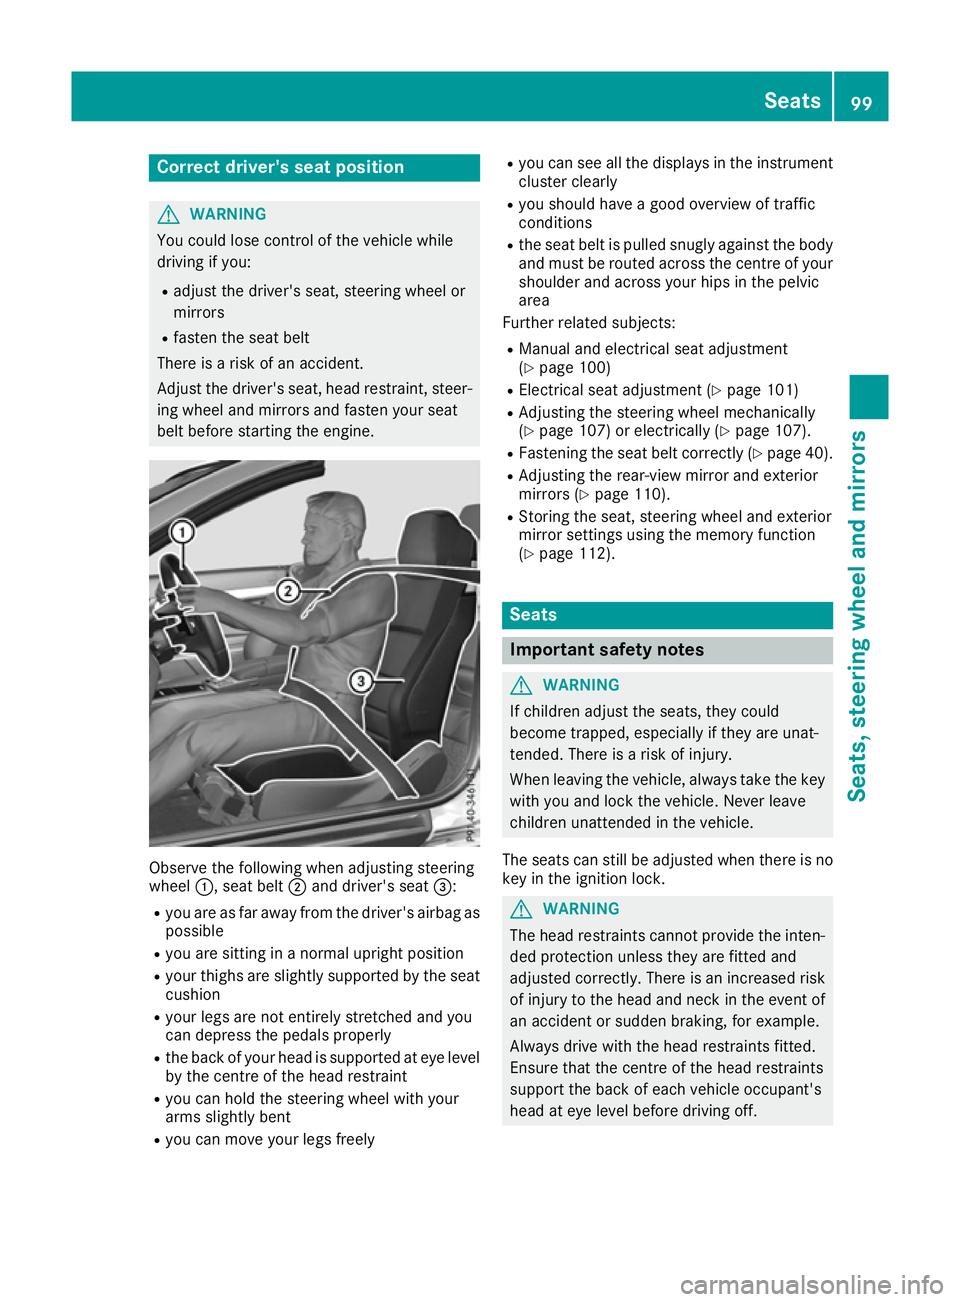
belt before starting the engine. Observe the following when adjusting steering
wheel
:, seat belt ;and driver's seat =:
R you are as far away from the driver's airbag as
possible
R you are sitting in a normal upright position
R your thighs are slightly supported by the seat
cushion
R your legs are not entirely stretched and you
can depress the pedals properly
R the back of your head is supported at eye level
by the centre of the head restraint
R you can hold the steering wheel with your
arms slightly bent
R you can move your legs freely R
you can see all the displays in the instrument
cluster clearly
R you should have a good overview of traffic
conditions
R the seat belt is pulled snugly against the body
and must be routed across the centre of your
shoulder and across your hips in the pelvic
area
Further related subjects:
R Manual and electrical seat adjustment
(Y page 100)
R Electrical seat adjustment (Y page 101)
R Adjusting the steering wheel mechanically
(Y page 107) or electrically (Y page 107).
R Fastening the seat belt correctly (Y page 40).
R Adjusting the rear-view mirror and exterior
mirrors (Y page 110).
R Storing the seat, steering wheel and exterior
mirror settings using the memory function
(Y page 112). Seats
Important safety notes
G
WARNING
If children adjust the seats, they could
become trapped, especially if they are unat-
tended. There is a risk of injury.
When leaving the vehicle, always take the key with you and lock the vehicle. Never leave
children unattended in the vehicle.
The seats can still be adjusted when there is no
key in the ignition lock. G
WARNING
The head restraints cannot provide the inten-
ded protection unless they are fitted and
adjusted correctly. There is an increased risk of injury to the head and neck in the event of
an accident or sudden braking, for example.
Always drive with the head restraints fitted.
Ensure that the centre of the head restraints
support the back of each vehicle occupant's
head at eye level before driving off. Seats
99Seats, steering wheel and mirrors Z
Page 104 of 349
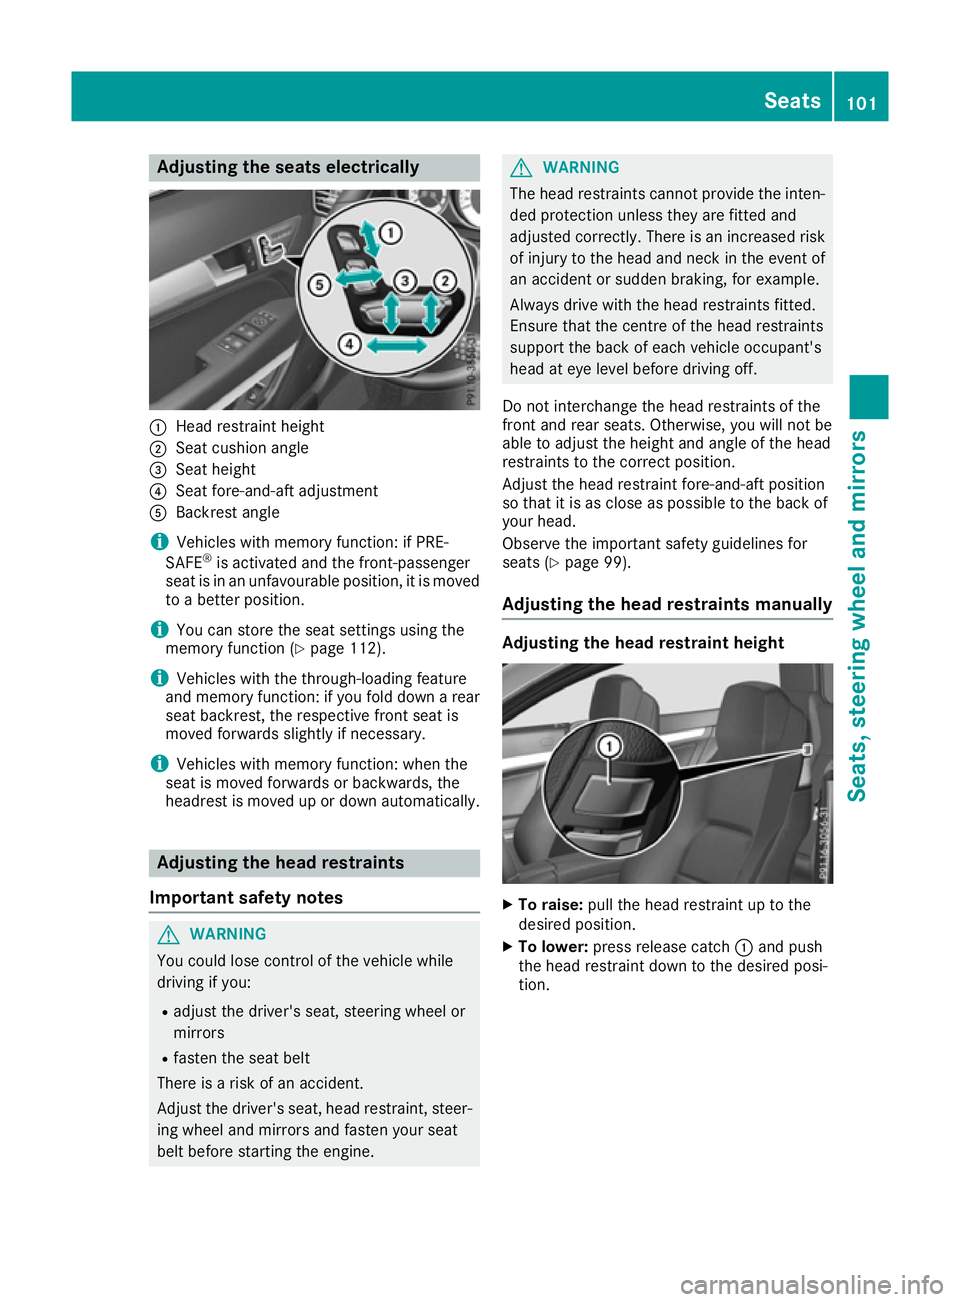
Adjusting the seats electrically
:
Head restraint height
; Seat cushion angle
= Seat height
? Seat fore-and-aft adjustment
A Backrest angle
i Vehicles with memory function: if PRE-
SAFE ®
is activated and the front-passenger
seat is in an unfavourable position, it is moved to a better position.
i You can store the seat settings using the
memory function (Y page 112).
i Vehicles with the through-loading feature
and memory function: if you fold down a rear
seat backrest, the respective front seat is
moved forwards slightly if necessary.
i Vehicles with memory function: when the
seat is moved forwards or backwards, the
headrest is moved up or down automatically. Adjusting the head restraints
Important safety notes G
WARNING
You could lose control of the vehicle while
driving if you:
R adjust the driver's seat, steering wheel or
mirrors
R fasten the seat belt
There is a risk of an accident.
Adjust the driver's seat, head restraint, steer-
ing wheel and mirrors and fasten your seat
belt before starting the engine. G
WARNING
The head restraints cannot provide the inten-
ded protection unless they are fitted and
adjusted correctly. There is an increased risk of injury to the head and neck in the event of
an accident or sudden braking, for example.
Always drive with the head restraints fitted.
Ensure that the centre of the head restraints
support the back of each vehicle occupant's
head at eye level before driving off.
Do not interchange the head restraints of the
front and rear seats. Otherwise, you will not be
able to adjust the height and angle of the head
restraints to the correct position.
Adjust the head restraint fore-and-aft position
so that it is as close as possible to the back of
your head.
Observe the important safety guidelines for
seats (Y page 99).
Adjusting the head restraints manually Adjusting the head restraint height
X
To raise: pull the head restraint up to the
desired position.
X To lower: press release catch :and push
the head restraint down to the desired posi-
tion. Seats
101Seats, steering wheel and mirrors Z
Page 113 of 349
The last position of the steering wheel is stored
when you switch off the ignition or when you
store the setting with the memory function
(Y page 112).
Crash-responsive EASY-EXIT feature If the crash-responsive EASY-EXIT feature is trig-
gered in an accident, the steering column will
move upwards when the driver's door is opened. This occurs irrespective of the position of the
key in the ignition lock. This makes it easier to
exit the vehicle and rescue the occupants.
The crash-responsive EASY-EXIT feature is only
operational if the EASY-EXIT/ENTRY feature is
activated in the on-board computer
(Y page 227). Mirrors
Rear-view mirror
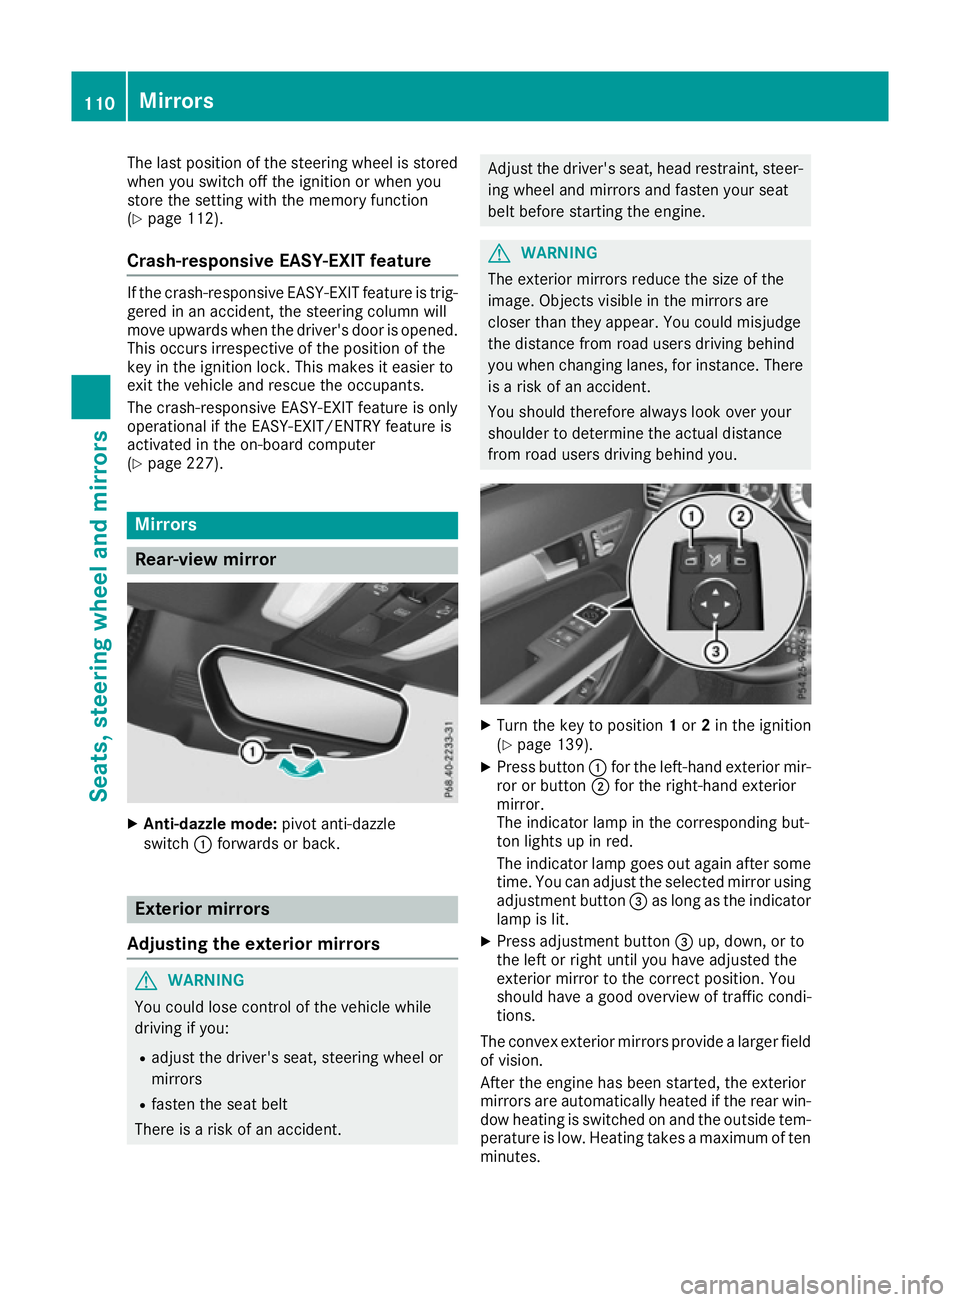
X
Anti-dazzle mode: pivot anti-dazzle
switch :forwards or back. Exterior mirrors
Adjusting the exterior mirrors G
WARNING
You could lose control of the vehicle while
driving if you:
R adjust the driver's seat, steering wheel or
mirrors
R fasten the seat belt
There is a risk of an accident. Adjust the driver's seat, head restraint, steer-
ing wheel and mirrors and fasten your seat
belt before starting the engine. G
WARNING
The exterior mirrors reduce the size of the
image. Objects visible in the mirrors are
closer than they appear. You could misjudge
the distance from road users driving behind
you when changing lanes, for instance. There is a risk of an accident.
You should therefore always look over your
shoulder to determine the actual distance
from road users driving behind you. X
Turn the key to position 1or 2in the ignition
(Y page 139).
X Press button :for the left-hand exterior mir-
ror or button ;for the right-hand exterior
mirror.
The indicator lamp in the corresponding but-
ton lights up in red.
The indicator lamp goes out again after some
time. You can adjust the selected mirror using
adjustment button =as long as the indicator
lamp is lit.
X Press adjustment button =up, down, or to
the left or right until you have adjusted the
exterior mirror to the correct position. You
should have a good overview of traffic condi-
tions.
The convex exterior mirrors provide a larger field of vision.
After the engine has been started, the exterior
mirrors are automatically heated if the rear win-
dow heating is switched on and the outside tem- perature is low. Heating takes a maximum of tenminutes. 110
MirrorsSeats, steering wheel and mirrors
Page 116 of 349
Only use the memory function on the driver's
side while the vehicle is stationary. G
WARNING
If children activate the memory function, they
could become trapped, especially if they are
unattended. There is a risk of injury.
When leaving the vehicle, always take the key with you and lock the vehicle. Never leave
children unattended in the vehicle. G
WARNING
When the memory function adjusts the seat or steering wheel, you and other vehicle occu-
pants – particularly children – could become
trapped. There is a risk of injury.
While the memory function is making adjust-
ments, make sure that no one has any body
parts in the sweep of the seat or steering
wheel. If somebody becomes trapped, imme-
diately release the memory function position
button. The adjustment process is stopped.
The memory function can be used at any time,
e.g. even when the key isn't in the ignition lock.
With the memory function, you can store up to
three different settings, e.g. for three different
people. X
Adjust the seat (Y page 101).
X On the driver's side, adjust the steering wheel
(Y page 107) and the exterior mirrors
(Y page 110).
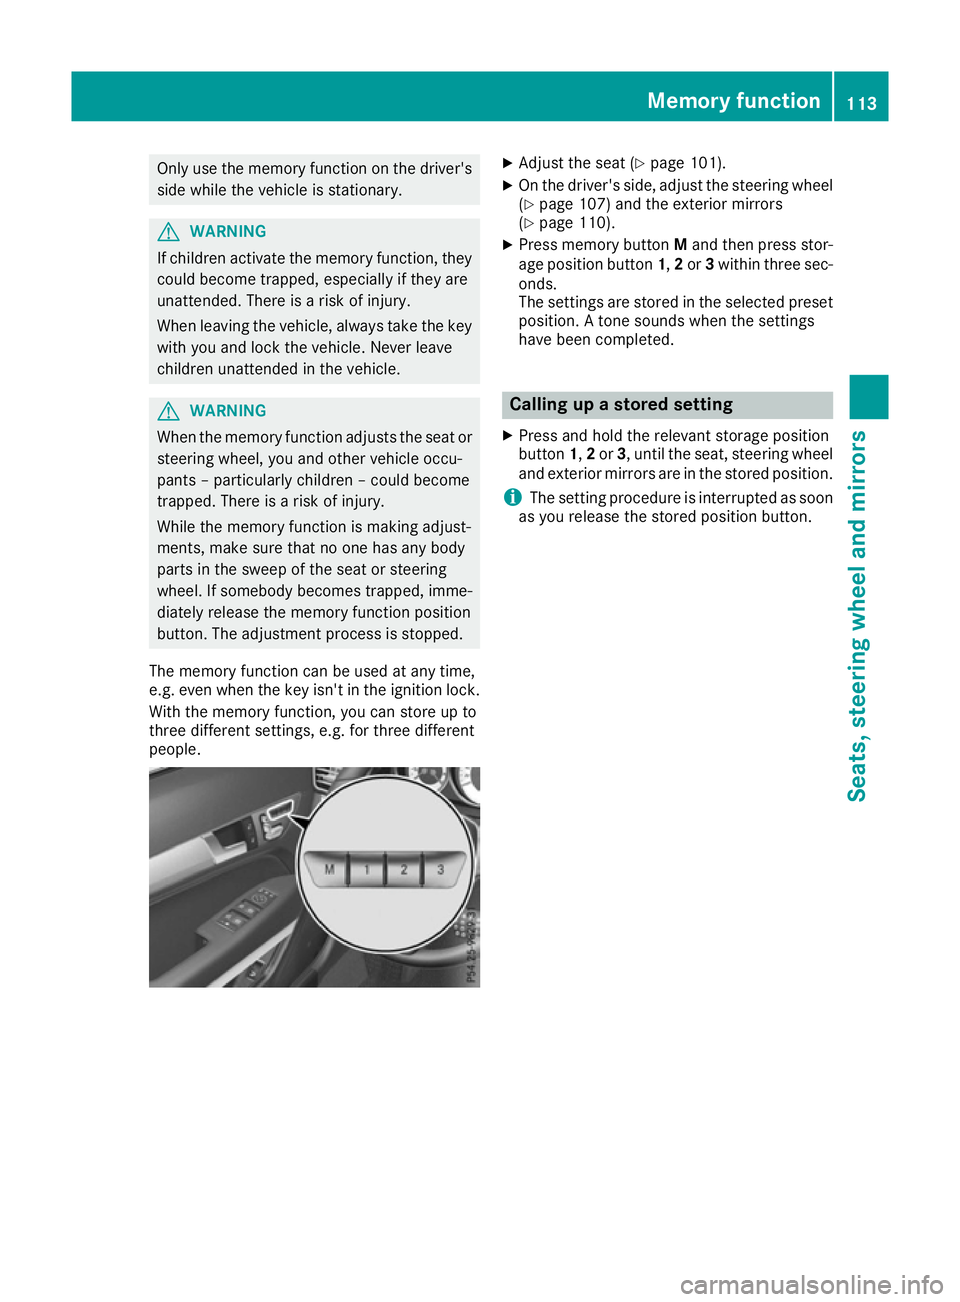
X Press memory button Mand then press stor-
age position button 1,2or 3within three sec-
onds.
The settings are stored in the selected preset position. A tone sounds when the settings
have been completed. Calling up a stored setting
X Press and hold the relevant storage position
button 1,2or 3, until the seat, steering wheel
and exterior mirrors are in the stored position.
i The setting procedure is interrupted as soon
as you release the stored position button. Memory function
113Seats, steering wheel and mirrors Z