2015 MERCEDES-BENZ E-CLASS CABRIOLET fuel type
[x] Cancel search: fuel typePage 19 of 349
Pulling away
Automatic transmission ................. 141
General notes ................................ 141
Manual transmission ......................1 41Q
QR code Mercedes-Benz Guide App ................. 1
Rescue card ..................................... 27
Qualified specialist workshop ........... 27R
Radiator cover ................................... 291
Radio
Selecting a station ......................... 218
see separate operating instructions
Radio mode
See also Digital Owner's Manual ... 263
Radio-based vehicle components
Declaration of conformity ................ 26
Reading lamp ..................................... 118
Rear compartment
Setting the temperature ................ 128
Rear foglamp
Display message ............................ 236
Switching on/off ........................... 115
Rear seat
Display message ............................ 250
Rear window heating
Problem (fault) ............................... 131
Switching on/off ........................... 130
Rear-compartment seat belt sta-
tus indicator ........................................ 42
Rear-view mirror
Anti-dazzle mode (automatic) ....... .111
Dipping (manual) ........................... 110
Refuelling
Fuel gauge ....................................... 31
Important safety notes .................. 154
Refuelling process ......................... 155
see Fuel
Remote control
Auxiliary heating/ventilation .......... 133
Changing the batteries (auxiliary
heating) ......................................... 135
Garage door opener ....................... 282 Programming (garage door
opener) .......................................... 283
Replacing bulbs
Important safety notes .................. 119
Overview of bulb types .................. 119
Replacing the battery (auxiliary
heating remote control) .................... 135
Rescue card ......................................... 27
Reserve (fuel tank)
see Fuel
Reserve fuel
Display message ............................ 239
Warning lamp ................................. 259
Residual heat (climate control) ........132
Restraint system
Display message ............................ 235
Introduction ..................................... 37
Problem (malfunction) ................... 258
Warning lamp (function) ................... 38
Rev counter ........................................ 213
Reverse gear
Engaging (manual transmission) .... 146
Reversing camera
Cleaning instructions ..................... 300
Display in the multimedia system .. 189
Function/notes ............................ .188
Switching on/off ........................... 188
Reversing feature
Side windows ................................... 85
Reversing lamp (display message) .. 236
Roll bar
Display message ............................ 234
Operation ......................................... 45
Roof
Overview .......................................... 88
see Soft top
Roof lining and carpets (cleaning
instructions) ...................................... 303
Roof load (maximum) ........................ 342
Route guidance
See also Digital Owner's Manual ... 263 S
Safety Children in the vehicle ..................... 49
see Occupant safety 16
Index
Page 24 of 349
Variable SPEEDTRONIC
see SPEEDTRONIC
Vehicle
Correct use ...................................... 27
Data acquisition ............................... 27
Display message ............................ 248
Electronics ..................................... 335
Equipment ....................................... 25
Implied warranty .............................. 27
Individual settings .......................... 223
Leaving parked up ......................... 159
Locking (in an emergency) ............... 82
Locking (key) ................................... 74
Lowering ........................................ 332
Pulling away ................................... 141
Raising ........................................... 330
Registration ..................................... 27
Securing from rolling away ............ 330
Tow-starting ................................... 315
Towing away .................................. 315
Transporting .................................. 317
Unlocking (in an emergency) ........... 82
Unlocking (key) ................................ 74
Vehicle data ................................... 342
Vehicle data ....................................... 342
Vehicle dimensions ........................... 342
Vehicle emergency locking ................ 82
Vehicle identification number
see VIN
Vehicle identification plate .............. 336
Vehicle tool kit .................................. 305
Video
Operating the DVD ......................... 218
See also Digital Owner's Manua l... 263
VIN
Seat ............................................... 337
Type plate ...................................... 336 W
Warning and indicator lamps ABS ................................................ 256
Brakes ........................................... 255
Distance warning signal ................. 261
ESP ®
.............................................. 256
ESP ®
OFF ....................................... 257
Fuel tank ........................................ 259
General notes ................................ 253 LIM (cruise control) ........................ 163
LIM (DISTRONIC PLUS) .................. 169
LIM (variable SPEEDTRONIC) ......... 166
Overview .......................................... 31
PASSENGER AIR BAG OFF ............... 38
Reserve fue l................................... 259
Seat belt ........................................ 254
Tyre pressure monitor ................... 262
Warning triangle ................................ 304
Washer fluid
Display message ............................ 252
Wheel and tyre combinations
Tyres .............................................. 333
Wheel bolt tightening torque ........... 332
Wheel chock ...................................... 330
Wheels
Changing a whee l.......................... 328
Changing/replacing ....................... 329
Checking ........................................ 321
Cleaning ......................................... 299
Emergency spare wheel ................. 333
Fitting a new wheel ........................ 332
Fitting a wheel ............................... 329
Important safety notes .................. 321
Information on driving .................... 321
Removing a whee l.......................... 331
Storing ........................................... 329
Tightening torque ........................... 332
Wheel size/tyre size ...................... 333
Wind deflector (cleaning instruc-
tions) .................................................. 298
Windows
Cleaning ......................................... 299
see Side windows
Windscreen
Demisting ...................................... 129
Windscreen washer fluid
see Windscreen washer system
Windscreen washer system
Important safety notes .................. 342
Topping up ..................................... 293
Windscreen wipers
Problem (malfunction) ................... 122
Replacing the wiper blades ............ 120
Switching on/of f........................... 120
Winter operation
Important safety notes .................. 323
Radiator cover ............................... 291 Index
21
Page 52 of 349
The PRE-SAFE
®
PLUS braking application is can-
celled:
R if the accelerator pedal is depressed when a
gear is engaged
R if the risk of a collision passes or is no longer
detected
R if DISTRONIC PLUS indicates an intention to
pull away
If the hazardous situation passes without result- ing in an accident, the original settings are
restored. Automatic measures after an acci-
dent
Immediately after an accident, the following
measures may be implemented, depending on
the type and severity of the impact:
R the hazard warning lamps are activated
R the emergency lighting is activated
R the vehicle doors are unlocked
R the front side windows are lowered
R vehicles with a memory function: the electri-
cally adjustable steering wheel is raised
R the engine is switched off and the fuel supply
is cut off
R vehicles with the Mercedes-Benz emergency
call system: automatic emergency call Children in the vehicle
Important safety notes
Accident statistics show that children secured
in the rear seats are safer than children secured in the front seats. For this reason, Mercedes-
Benz strongly advises that you fit a child
restraint system on a rear seat. Children are
generally better protected there.
If a child younger than twelve years old and
under 1.50 m in height is travelling in the vehi-
cle:
R always secure the child in a child restraint
system suitable for Mercedes-Benz vehicles.
The child restraint system must be appropri-
ate to the age, weight and size of the child.
R be sure to observe the instructions and safety
notes in this section in addition to the child
restraint system manufacturer's installation
instructions. G
WARNING
If you leave children unattended in the vehi-
cle, they may be able to set the vehicle in
motion if, for example, they:
R release the parking brake
R shift the automatic transmission out of park
position Por shift manual transmission into
neutral
R start the engine
In addition, they may operate vehicle equip-
ment and become trapped. There is a risk of
an accident and injury.
When leaving the vehicle, always take the key with you and lock the vehicle. Never leave
children unattended in the vehicle. G
WARNING
If persons (particularly children) are exposed
to heat or cold for a prolonged period, there is a risk of serious or even fatal injuries. Never
leave persons (particularly children) unatten-
ded in the vehicle. G
WARNING
If the child restraint system is placed in direct sunlight, the parts could become very hot.
Children could be suffer burns by touching
these parts, in particular on the metallic parts
of the child restraint system. There is a risk of injury.
If you and your child leave the vehicle, always
make sure that the child restraint system is
not in direct sunlight. Cover it with a blanket, for example. If the child restraint system has
been exposed to direct sunlight, leave it to
cool down before securing the child in it.
Never leave children unattended in the vehi-
cle.
Always ensure that all vehicle occupants have
their seat belts fastened correctly and are sitting
properly. Particular attention must be paid to
children.
Observe the safety notes on the seat belt
(Y page 39) and the notes on how to use the seat
belt properly (Y page 40). Children in the vehicle
49Safety Z
Page 158 of 349
G
WARNING
Electrostatic charge can cause sparks and
thereby ignite fuel vapours. There is a risk of
fire and explosion.
Always touch the vehicle body before opening the fuel filler flap or touching the fuel pump
nozzle. This discharges any electrostatic
charge that may have built up. G
WARNING
Vehicles with a diesel engine:
If you mix diesel fuel with petrol, the flash
point of this fuel mixture is lower than that of pure diesel fuel. When the engine is running,
components in the exhaust system may over-
heat unnoticed. There is a risk of fire.
Never refuel with petrol. Never add petrol to
diesel fuel.
! Do not use diesel to refuel vehicles with a
petrol engine. Do not switch on the ignition if you accidentally refuel with the wrong fuel.
Otherwise, the fuel will enter the fuel system.
Even small amounts of the wrong fuel can
result in damage to the fuel system and the
engine. Notify a qualified specialist workshop
and have the fuel tank and fuel lines drained
completely.
! Do not use petrol to refuel vehicles with a
diesel engine. Do not switch on the ignition if you accidentally refuel with the wrong fuel.
Otherwise, fuel can enter the fuel system.
Even small amounts of the wrong fuel could
result in damage to the fuel system and the
engine. The repair costs are high. Notify a
qualified specialist workshop and have the
fuel tank and fuel lines drained completely.
! Overfilling the fuel tank could damage the
fuel system.
! Take care not to spill any fuel on painted
surfaces. You could otherwise damage the
paintwork.
! Use a filter when adding fuel from a fuel can.
The fuel lines and/or the fuel injection system could otherwise be blocked by particles fromthe fuel can. Do not get into the vehicle again during the refu-
elling process. Otherwise, electrostatic charge
could build up again.
If you overfill the fuel tank, some fuel may spray out when you remove the fuel pump nozzle.
Further information on fuel and fuel quality
(Y page 337). Refuelling
General notes Observe the important safety notes
(Y
page 154).
The fuel filler flap is unlocked or locked auto-
matically when you unlock or lock the vehicle
with the key or using KEYLESS-GO.
The position of the 8fuel filler cap is dis-
played in the instrument cluster. The arrow next to the filling pump indicates the side of the vehi-
cle.
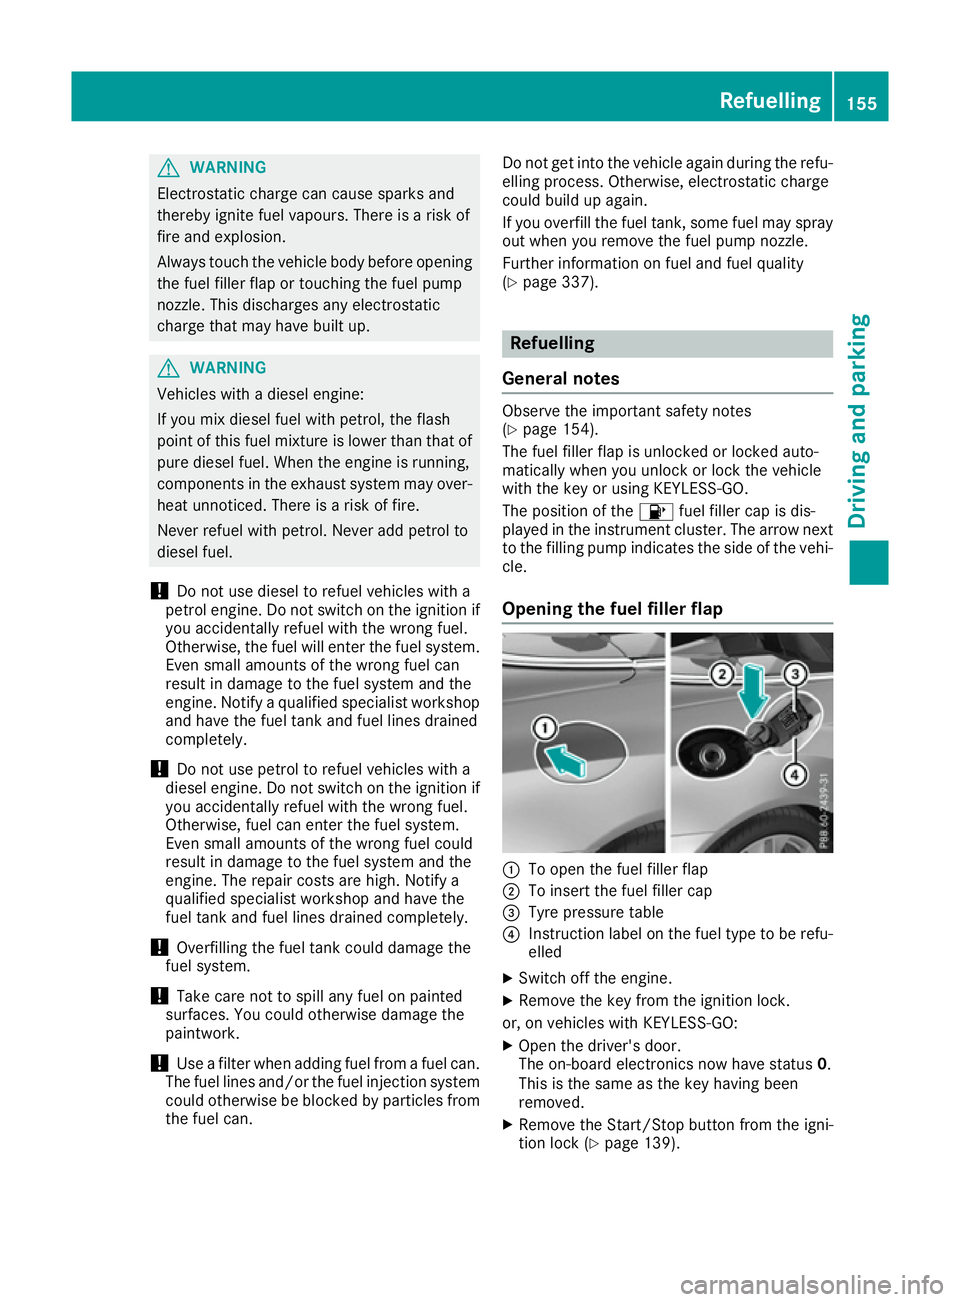
Opening the fuel filler flap :
To open the fuel filler flap
; To insert the fuel filler cap
= Tyre pressure table
? Instruction label on the fuel type to be refu-
elled
X Switch off the engine.
X Remove the key from the ignition lock.
or, on vehicles with KEYLESS‑ GO:
X Open the driver's door.
The on-board electronics now have status 0.
This is the same as the key having been
removed.
X Remove the Start/Stop button from the igni-
tion lock (Y page 139). Refuelling
155Driving and parking Z
Page 212 of 349

You will find the applicable permissible values,
which must not be exceeded, in the vehicle
documents.
You will find the values approved by the manu-
facturer on the vehicle identification plates and
those for the towing vehicle under "Technical
data" (Y page 344).
When towing a trailer, your vehicle's handling
characteristics will be different in comparison to
when driving without a trailer.
The vehicle/trailer combination:
R is heavier
R is restricted in its acceleration and gradient-
climbing capability
R has an increased braking distance
R is affected more by strong crosswinds
R demands more sensitive steering
R has a larger turning circle
This can impair the vehicle's handling charac-
teristics. Adapt your driving style accordingly.
Maintain a safe distance. Drive carefully.
When towing a trailer, always adjust your speed to the current road and weather conditions. Do
not exceed the maximum permissible speed for
your vehicle/trailer combination. Notes on towing a trailer
General notes The E 500 model cannot be used to tow a trailer.
i When towing a trailer, set the tyre pressure
on the rear axle of the towing vehicle for a
maximum load; see the tyre pressure table in
the fuel filler flap (Y page 324).
Please note that when towing a trailer, the fol-
lowing driving systems have limited availability
or are not available at all.
R PARKTRONIC (Y page 179)
R Active Parking Assist (Y page 183)
R Blind Spot Assist (Y page 200)
i The height of the ball coupling changes with
the load of the vehicle. If necessary, use a
trailer with a height-adjustable drawbar.
You will find fitting dimensions and loads under "Technical data" (Y page 343). Driving tips i
Observe the notes on ESP ®
trailer stabilisa-
tion (Y page 68).
The maximum permissible speed for vehicle/
trailer combinations depends on the type of
trailer. Before beginning the journey, check the
trailer's documents to see what the maximum
permitted speed is. Observe the legally prescri-
bed maximum speed in the relevant country.
For certain Mercedes-Benz vehicles, the maxi-
mum permissible rear axle load is increased
when towing a trailer. See the "Technical data"
section to find out whether this applies to your
vehicle (Y page 344). If you utilise any of the
added maximum rear axle load when towing a
trailer, the vehicle/trailer combination may not
exceed a maximum speed of 100 km/h for rea-
sons concerning the operating permit. This also applies in countries in which the permissible
maximum speed for vehicle/trailer combina-
tions is above 100 km/h.
When towing a trailer, your vehicle's handling
characteristics will be different in comparison to
when driving without a trailer and it will con-
sume more fuel.
Change into a lower gear in good time on long
and steep downhill gradients.
i This also applies if you have activated cruise
control, SPEEDTRONIC or DISTRONIC PLUS.
This will use the braking effect of the engine, so
less braking will be required to maintain vehicle speed. This relieves the load on the brake sys-
tem and prevents the brakes from overheating
and wearing too quickly. If you need additional
braking, depress the brake pedal repeatedly
rather than continuously.
Driving tips If the trailer swings from side to side:
X Do not accelerate.
X Do not countersteer.
X Brake if necessary.
R Maintain a greater distance to the vehicle in
front than when driving without a trailer.
R Avoid braking abruptly. If possible, brake gen-
tly at first to allow the trailer to run on. Then,
increase the braking force rapidly.
R The values given for gradient-climbing capa-
bilities from a standstill refer to sea level.
When driving in mountainous areas, note that Towing a trailer
209Driving and parking Z
Page 216 of 349

Important safety notes
G
WARNING
Operating the integrated information systems and communications equipment in the vehicle
while driving will distract you from traffic con-
ditions. You could then lose control of the
vehicle. There is a risk of an accident.
Only operate these devices if road traffic con-
ditions permit. If you are unsure about the
surrounding conditions, pull over to a safe
location and make entries only while the vehi-
cle is stationary.
You must observe the legal requirements for the country in which you are currently driving whenoperating the on-board computer. G
WARNING
If the instrument cluster has failed or mal-
functioned, you may not recognise function
restrictions relevant to safety. The operating
safety of your vehicle may be impaired. There is a risk of an accident.
Drive on carefully. Have the vehicle checked
at a qualified specialist workshop immedi-
ately.
The on-board computer only shows messages or warnings from certain systems in the multifunc-tion display. You should therefore make sure
your vehicle is operating safely at all times.
If the operating safety of your vehicle is
impaired, park the vehicle safely as soon as pos- sible. Contact a qualified specialist workshop.
For an overview; see the instrument cluster illus-
tration (Y page 31). Displays and operation
Speedometer with segments
The segments in the speedometer indicate
which speed range is available.
R Cruise control activated (Y page 163):
The segments light up from the stored speed to the type-tested maximum speed.
R Variable SPEEDTRONIC activated
(Y page 165): The segments light up from the start of the
scale to the selected limit speed.
R DISTRONIC PLUS activated (Y page 168):
One or two segments in the set speed range
light up.
R DISTRONIC PLUS detects a vehicle in front:
The segments between the speed of the vehi-
cle in front and the stored speed light up. Rev counter
! Do not drive in the overrevving range. Doing
so will damage the engine.
The red band in the rev counter indicates the
engine's overrevving range.
The fuel supply is interrupted to protect the
engine when the red band is reached. Outside temperature display
You should pay special attention to road condi-
tions when temperatures are around freezing
point.
Bear in mind that the outside temperature dis-
play indicates the measured air temperature
and not the road surface temperature.
The outside temperature display is in the multi-
function display (Y page 215).
The multifunction display shows changes in the
outside temperature with a delay. Coolant temperature gauge
G
WARNING
If you open the bonnet while the engine is
overheating or while there is a fire in the
engine compartment, you could come into
contact with hot gases or other leaking ser-
vice products. There is a danger of injury.
Allow an overheating engine to cool down
before opening the bonnet. If there is a fire in the engine compartment, leave the bonnet
closed and notify the fire brigade.
The coolant temperature gauge is in the instru-
ment cluster on the left-hand side (Y page 31). Displays and operation
213On-board computer and displays Z
Page 262 of 349

Engine
Warning/
indicator
lamp
N N
Signal type
Possible causes/consequences and M
MSolutions ;
N
The yellow engine diagnostics warning lamp lights up while the engine is run-
ning.
There may be a fault, for example:
R in the engine management
R in the fuel injection system
R in the exhaust system
R in the ignition system (for vehicles with petrol engines)
R in the fuel system
The emission limit values may be exceeded and the engine may be running in
emergency mode.
X Consult a qualified specialist workshop immediately.
Vehicles with a diesel engine: the fuel tank has been run dry (Y page 157).
X After refuelling start the engine three to four times.
If the yellow engine diagnostics warning lamp goes out, emergency running
mode is cancelled. You do not need to have the vehicle checked. 8
N
The yellow reserve fuel warning lamp is on while the engine is running.
The fuel level has dropped into the reserve range.
Operation of the auxiliary heating is deactivated if the fuel level drops into the
reserve range.
X Refuel at the nearest filling station. ?
N
The red coolant warning lamp lights up while the engine is running and the
coolant temperature gauge is at the start of the scale.
The temperature sensor for the coolant temperature gauge is faulty.
The coolant temperature is no longer being monitored. There is a risk of engine
damage if the coolant temperature is too high.
X Stop the vehicle immediately, paying attention to road and traffic conditions,
and switch off the engine. Do not continue driving under any circumstances.
X Safeguard the vehicle against rolling away (Y page 157).
X Consult a qualified specialist workshop. Warning and indicator lamps in the instrument cluster
259On-board computer and displays Z
Page 324 of 349
Important safety notes
G
WARNING
If wheels and tyres of the wrong size are used, the wheel brakes or suspension components
may be damaged. There is a risk of an acci-
dent.
Always replace wheels and tyres with those
that fulfil the specifications of the original
part.
When replacing wheels, make sure to fit the
correct:
R designation
R type
When replacing tyres, make sure to fit the
correct:
R designation
R manufacturer
R type G
WARNING
A flat tyre severely impairs the driving, steer-
ing and braking characteristics of the vehicle.
There is a risk of accident.
Tyres without run-flat characteristics:
R do not drive with a flat tyre.
R immediately replace the flat tyre with your
emergency spare wheel or spare wheel, or
consult a qualified specialist workshop.
Tyres with run-flat characteristics:
R pay attention to the information and warn-
ing notices on MOExtended tyres (tyres
with run-flat characteristics).
Accessories that are not approved for your vehi-
cle by Mercedes-Benz or are not being used cor- rectly can impair the operating safety.
Before purchasing and using non-approved
accessories, visit a qualified specialist work-
shop and enquire about:
R suitability
R legal stipulations
R factory recommendations Further information regarding wheels and tyres
can be found under "Wheel/tyre combinations"
(Y page 333).
You can ask for information regarding permitted
wheel-tyre combinations at a Mercedes-Benz
Service Centre.
Information on tyre pressures can be found:
R in the tyre pressure table in the fuel filler flap
(Y page 155)
R under "Tyre pressure" (Y page 324)
Modification work on the brake system and
wheels is not permitted. The use of spacers or
brake dust shields is not permitted. This inva-
lidates the general operating permit for the vehi- cle.
i Further information on wheels and tyres can
be obtained at any qualified specialist work-
shop. Operation
Information on driving
Check the tyre pressures when the vehicle is
heavily laden and adjust prior to a trip.
While driving, pay attention to vibrations, noises
and unusual handling characteristics, e.g. pull-
ing to one side. This may indicate that the
wheels or tyres are damaged. If you suspect that a tyre is defective, reduce your speed immedi-
ately. Stop the vehicle as soon as possible to
check the wheels and tyres for damage. Hidden
tyre damage could also be causing the unusual
handling characteristics. If you find no signs of
damage, have the tyres and wheels checked at a qualified specialist workshop.
When parking your vehicle, make sure not to
squash the tyre sidewalls. If this cannot be avoi-ded, drive slowly over obstacles, e.g. kerbs, and
only at an obtuse angle. You could otherwise
damage the wheel rims and tyres. Regular checking of wheels and tyres
G
WARNING
Damaged tyres can cause tyre inflation pres-
sure loss. As a result, you could lose control of your vehicle. There is a risk of accident. Operation
321Wheels and ty res
Z