2015 MERCEDES-BENZ E-CLASS CABRIOLET charging
[x] Cancel search: chargingPage 8 of 349
Remote control .............................. 133
Setting the departure time ............
.134
Switching on/off (on the centre
console) ......................................... 133
Auxiliary ventilation
Activating/deactivating ................. 133
Axle load, permissible (trailer tow-
ing) ...................................................... 344 B
Back button ....................................... 264
Bag hook ............................................ 276
Ball coupling
Folding in ....................................... 211
Folding in/out ................................ 210
Folding out ..................................... 210
BAS (Brake Assist System) ................. 62
BAS PLUS (Brake Assist System
PLUS) with Cross-Traffic Assist
Function/notes ................................ 62
BAS PLUS with Cross-Traffic Assist
(Brake Assist PLUS with Cross-
Traffic Assist)
Important safety notes .................... 63
Battery (key)
Checking .......................................... 77
Important safety notes .................... 77
Replacing ......................................... 77
Battery (vehicle)
Charging ........................................ 312
Display message ............................ 239
Important safety notes .................. 310
Jump starting ................................. 313
Belt
see Seat belts
Belt tensioner
Activation ......................................... 45
Blind Spot Assist
Activating/deactivating (on-
board computer) ............................ 222
Display message ............................ 242
Notes/function .............................. 200
Trailer towing ................................. 202
see Active Blind Spot Assist
BlueTEC (AdBlue ®
) ............................ .340 Bluetooth
®
Connecting another mobile
phone ............................................ 267
Searching for a mobile phone ....... .266
See also Digital Owner's Manual ... 263
Telephony ...................................... 266
Bonnet
Active bonnet (pedestrian protec-tion) ............................................... 289
Closing .......................................... .291
Display message ............................ 250
Important safety notes .................. 289
Opening ......................................... 290
Boot
Emergency release .......................... 84
Important safety notes .................... 82
Locking separately ........................... 83
Opening (automatically from
inside) .............................................. 83
Opening/closing (manually from
outside) ............................................ 83
Boot lid
Display message ............................ 250
Opening dimensions ..................... .342
Boot load (maximum) ........................ 342
Boot separator
Display message ............................ 252
General notes .................................. 94
Opening/closing .............................. 94
Brake Assist
see BAS (Brake Assist System)
Brake fluid
Display message ............................ 232
Notes ............................................. 341
Brake force distribution
see EBD (electronic brake force
distribution)
Brake lamps
Adaptive .......................................... .66
Display message ............................ 236
Brakes
ABS .................................................. 62
Adaptive Brake Assist ...................... 66
BAS .................................................. 62
BAS PLUS with Cross-Traffic
Assist ............................................... 62
Brake fluid (notes) ........................ .341
Display message ............................ 230 Index
5
Page 22 of 349

T
Tail lamps Display message ............................ 236
Tank
see Fuel tank
Technical data
Capacities ...................................... 337
Emergency spare wheel ................. 334
Information .................................... 335
Trailer load s................................... 344
Tyres/wheels ................................. 333
Vehicle data ................................... 342
Telephone
Accepting a call (multifunction
steering wheel) .............................. 219
Authorising a mobile phone (con-
necting) ......................................... 266
Connecting a Mobile phone (gen-
eral information) ............................ 266
Display message ............................ 251
Menu (on-board computer) ............ 219
Number from the phone book ........ 220
Redialling ....................................... 220
Rejecting/ending a call ................. 220
See also Digital Owner's Manua l... 263
Switching between mobile
phones ........................................... 267
Telephone compartment ................ 274
Telephone module with Bluetooth ®
(SAP profile) Activating and connecting the
module ........................................... 268
Charging a mobile phone ............... 270
Connecting the mobile phone ........ 269
Connecting the module using a
USB cable ...................................... 268
Data modem mode ........................ 269
Installing the module ..................... 268
Introduction ................................... 267
Saving/deleting the PIN for the
SIM card ........................................ 269
Setting s......................................... 269
SIM card mode .............................. 268
Text messages ............................... 270
Transferring the phone book .......... 269
Temperature
Coolant .......................................... 213 Outside temperature ...................... 213
Setting (climate control
)................ 128
TEMPOMAT
Function/note s............................. 163
Text messages
Telephone module with Blue-
tooth ®
(SAP profile) ....................... 270
Through-loading ................................ 276
TIREFIT kit .......................................... 307
Important safety notes .................. 307
Storage location ............................ 305
Tyre pressure not reached ............. 309
Tyre pressure reached ................... 309
Total distance recorder .................... 215
Tow-away protection
Activating ......................................... 72
Deactivating ..................................... 72
Function ........................................... 72
Tow-starting
Emergency engine starting ............ 318
Important safety notes .................. 315
Towing
Important safety notes .................. 315
Transporting the vehicle ................ 317
With the rear axle raised ................ 317
Towing a trailer
Active Blind Spot Assist ................. 205
Active Lane Keeping Assist ............ 208
Active Parking Assist ..................... 187
Axle load, permissibl e.................... 344
ESP ®
(Electronic Stability Pro-
gram) ............................................... 68
Failure check for LEDs ................... 212
General notes ................................ 209
Trailer tow hitch display message .. 251
Towing away
Fitting the towing ey e.................... 316
Removing the towing eye ............... 317
With both axles on the ground ....... 317
Towing eye ......................................... 305
Traffic Sign Assist
Activating/deactivating the warn-ing function .................................... 221
Display message ............................ 241
Function/note s............................. 197
Important safety notes .................. 198
Instrument cluster display ............. 198 Index
19
Page 121 of 349

Adaptive Highbeam Assist Plus cannot take into
account road, weather or traffic conditions.
Adaptive Highbeam Assist Plus is only an aid.
You are responsible for adjusting the vehicle's
lighting to the prevailing light, visibility and traf-
fic conditions.
In particular, the detection of obstacles can be
restricted if there is:
R poor visibility, e.g. due to fog, heavy rain or
snow
R dirt on the sensors or if the sensors are
obscured
Switching Adaptive Highbeam Assist
Plus on/off X
To switch on: turn the light switch to Ã.
X Press the combination switch beyond the
pressure point in the direction of arrow :.
The _ indicator lamp in the multifunction
display lights up when it is dark and the light
sensor switches on the dipped-beam head-
lamps.
At speeds above approx. 25 km/h: the
headlamp range is automatically controlled
according to the distance to other road users.
At speeds above approx. 30 km/h:
R If no other road users are detected, the
main-beam headlamps are automatically
switched on.
R If other road users are detected, the partial
main-beam headlamps are automatically
switched on.
The K indicator lamp in the instrument
cluster also lights up.
At speeds below approx. 25 km/h or
when there is sufficient street lighting:
R The partial main-beam headlamps are
switched off automatically.
R The main-beam headlamps are switched off
automatically.
The K indicator lamp in the instrument
cluster goes out. The _indicator lamp in
the multifunction display remains lit.
X To switch off: move the combination switch
back to its normal position or move the light
switch to another position.
The _ indicator lamp in the multifunction
display goes out. Headlamps misted up on the inside
Certain climatic and physical conditions may
cause moisture to form in the headlamp. This
moisture does not affect the functionality of the headlamp. Interior lighting
Overview of interior lighting
:
u Switches the interior lighting on/off
; | Switches the automatic interior light-
ing control on/off
= p Switches the right-hand reading lamp
on/off
? c Switches the front interior lighting on/
off
A p Switches the left-hand reading lamp
on/off Interior lighting control
General notes In order to prevent the vehicle's battery from
discharging, the interior lighting functions are
automatically deactivated after some time
except for when the key is in position 2in the
ignition lock.
Automatic interior lighting control X
To switch on/off: press the|button.
When the automatic interior lighting control is
switched on, the button is flush with the over- head control panel. 118
Interior lightingLights and
windscreen wipers
Page 162 of 349

Parking brake
G
WARNING
If you must brake the vehicle with the parking brake, the braking distance is considerably
longer and the wheels could lock. This increa-
ses the risk of skidding and an accident.
Only use the parking brake to brake the vehi- cle when the service brake is faulty. Do not
apply the parking brake too firmly. If the
wheels lock, release the parking brake until
the wheels begin turning again. G
WARNING
If you leave children unattended in the vehi-
cle, they may be able to set the vehicle in
motion if, for example, they:
R release the parking brake
R shift the automatic transmission out of park
position Por shift manual transmission into
neutral
R start the engine
In addition, they may operate vehicle equip-
ment and become trapped. There is a risk of
an accident and injury.
When leaving the vehicle, always take the key with you and lock the vehicle. Never leave
children unattended in the vehicle. The brake lights do not light up when you brake
the vehicle with the parking brake. X
To apply: depress parking brake ;firmly.
The J indicator lamp in the instrument
cluster lights up if the engine is running.
X To release: depress the brake pedal and keep
it depressed.
X Pull release handle :.
The J indicator lamp in the instrument
cluster goes out. Parking up the vehicle
If you leave the vehicle parked up for longer than
four weeks, the battery may be damaged by
exhaustive discharging.
If you leave the vehicle parked up for longer than six weeks, it may suffer from lack of use.
X Contact a qualified specialist workshop and
seek advice.
i You can obtain information about trickle
chargers from a qualified specialist work-
shop. Driving tips
General notes
G
WARNING
If you switch off the ignition while driving,
safety-relevant functions are only available
with limitations, or not at all. This could affect, for example, the power steering and the brake
boosting effect. You will require considerably
more effort to steer and brake. There is a risk of an accident.
Do not switch off the ignition while driving. ECO display
The ECO display provides feedback on how eco-
nomical your driving characteristics are. The Driving tips
159Driving and parking Z
Page 271 of 349
R
access to the phone book of the mobile phone
(if supported by the mobile phone)
(Y page 269)
R charging a mobile phone via the USB connec-
tion (Y page 270)
i The module is not available in all vehicles,
depending on the equipment.
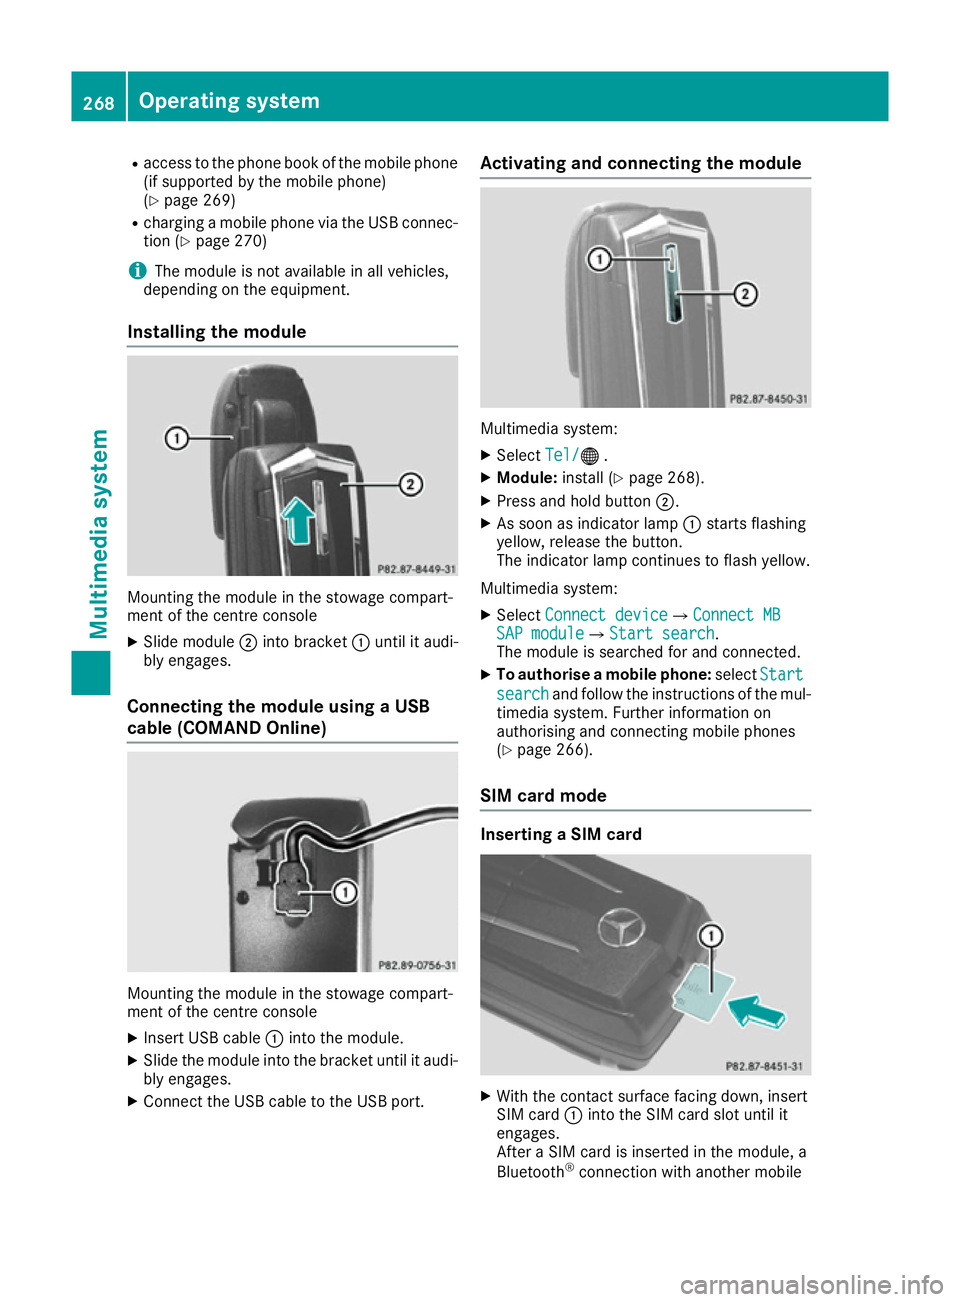
Installing the module Mounting the module in the stowage compart-
ment of the centre console
X Slide module ;into bracket :until it audi-
bly engages.
Connecting the module using a USB
cable (COMAND Online) Mounting the module in the stowage compart-
ment of the centre console
X Insert USB cable :into the module.
X Slide the module into the bracket until it audi-
bly engages.
X Connect the USB cable to the USB port. Activating and connecting the module
Multimedia system:
X Select Tel/ Tel/® .
X Module: install (Y page 268).
X Press and hold button ;.
X As soon as indicator lamp :starts flashing
yellow, release the button.
The indicator lamp continues to flash yellow.
Multimedia system: X Select Connect device Connect device QConnect MBConnect MB
SAP module
SAP module QStart searchStart search .
The module is searched for and connected.
X To authorise a mobile phone: selectStart
Start
search
search and follow the instructions of the mul-
timedia system. Further information on
authorising and connecting mobile phones
(Y page 266).
SIM card mode Inserting a SIM card
X
With the contact surface facing down, insert
SIM card :into the SIM card slot until it
engages.
After a SIM card is inserted in the module, a
Bluetooth ®
connection with another mobile 268
Operating systemMultimedia system
Page 273 of 349
Text messages
Requirements
The module is connected with the mobile phone
(Y page 269) or is being used in the SIM card
mode (Y page 268).
Activating/deactivating text message
downloading from the mobile phone Dial number Function
00080 Text message down-
loading is deactiva-
ted.
00081 Text message down-
loading is activated.
For further information on receiving text mes-
sages when using the telephone module (see
the manufacturer's operating instructions).
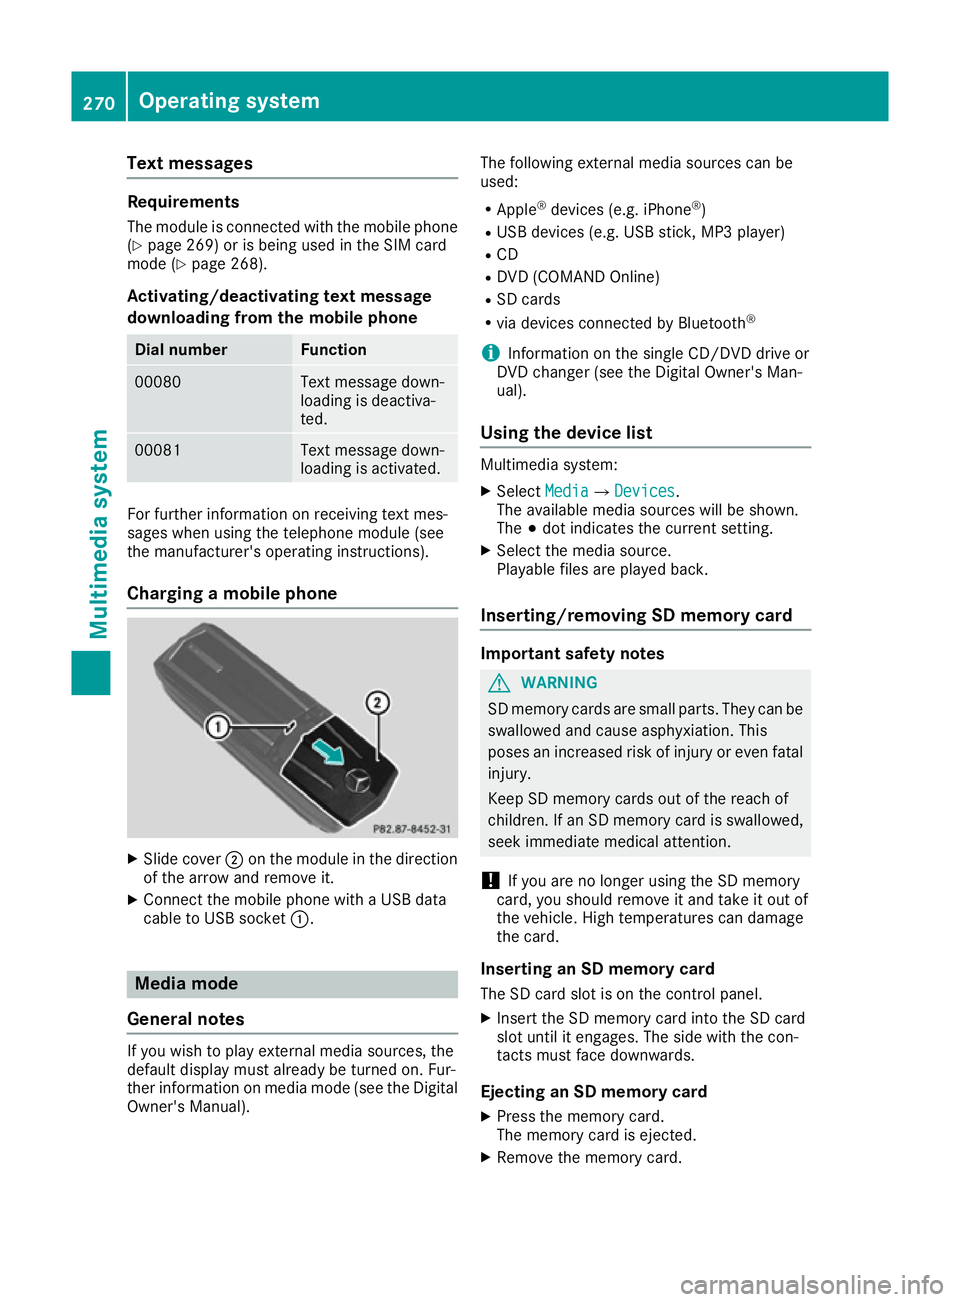
Charging a mobile phone X
Slide cover ;on the module in the direction
of the arrow and remove it.
X Connect the mobile phone with a USB data
cable to USB socket :.Media mode
General notes If you wish to play external media sources, the
default display must already be turned on. Fur-
ther information on media mode (see the Digital
Owner's Manual). The following external media sources can be
used:
R Apple ®
devices (e.g. iPhone ®
)
R USB devices (e.g. USB stick, MP3 player)
R CD
R DVD (COMAND Online)
R SD cards
R via devices connected by Bluetooth ®
i Information on the single CD/DVD drive or
DVD changer (see the Digital Owner's Man-
ual).
Using the device list Multimedia system:
X Select Media MediaQ Devices
Devices.
The available media sources will be shown.
The #dot indicates the current setting.
X Select the media source.
Playable files are played back.
Inserting/removing SD memory card Important safety notes
G
WARNING
SD memory cards are small parts. They can be swallowed and cause asphyxiation. This
poses an increased risk of injury or even fatal injury.
Keep SD memory cards out of the reach of
children. If an SD memory card is swallowed,
seek immediate medical attention.
! If you are no longer using the SD memory
card, you should remove it and take it out of
the vehicle. High temperatures can damage
the card.
Inserting an SD memory card
The SD card slot is on the control panel.
X Insert the SD memory card into the SD card
slot until it engages. The side with the con-
tacts must face downwards.
Ejecting an SD memory card X Press the memory card.
The memory card is ejected.
X Remove the memory card. 270
Operating systemMultimedia system
Page 285 of 349
An exterior aerial has the following advantages:
R it conducts the electromagnetic fields gener-
ated by a wireless device to the exterior
R the field strength in the vehicle interior is
lower than in a vehicle that does not have an exterior aerial
Information on retrofitting two-way radios and
mobile phones (RF transmitters) (Y page 335).
General notes There are various mobile phone brackets that
may be fitted in your vehicle; in some cases,
these are country-specific.
More information on suitable mobile phones,
mobile phone brackets and on connecting Blue-
tooth ®
-capable mobile phones with the multi-
media system can be obtained:
R at your Mercedes-Benz Service Centre
R on the Internet at http://www.mercedes-
benz.com/connect
The functions and services available when you
use the phone depend on your mobile phone
model and service provider.
Using a mobile phone To connect a mobile phone to the exterior aerial
and charge it, insert it into the mobile phone
bracket.
X Open the telephone compartment
(Y page 274).
X Place the mobile phone bracket into the pre-
installed fitting; see the separate installation
instructions for the mobile phone fitting.
X Insert the mobile phone into the mobile phone
bracket; see the separate installation instruc-
tions for the mobile phone fitting.
i The mobile phone can also be operated
without being in the bracket. However, the
charging function and aerial function are not
available.
In order to use Bluetooth ®
(SAP profile) on your
telephone module, you must first insert the tele-
phone module into the pre-installed fitting. This connects it to the exterior aerial. If you wish to
charge the mobile phone, then you must con-
nect it to a USB port.
Further information on the telephone module
with Bluetooth ®
(SAP profile) can be found in the
Digital Owner's Manual. Operating the mobile phone You can operate the telephone using the
6
and ~ buttons on the multifunction steering
wheel. You can operate other mobile phone
functions via the on-board computer
(Y page 219).
When you remove the key from the ignition lock,
the mobile phone is disconnected from the
hands-free system. Active calls will first be
transferred to the mobile phone directly.
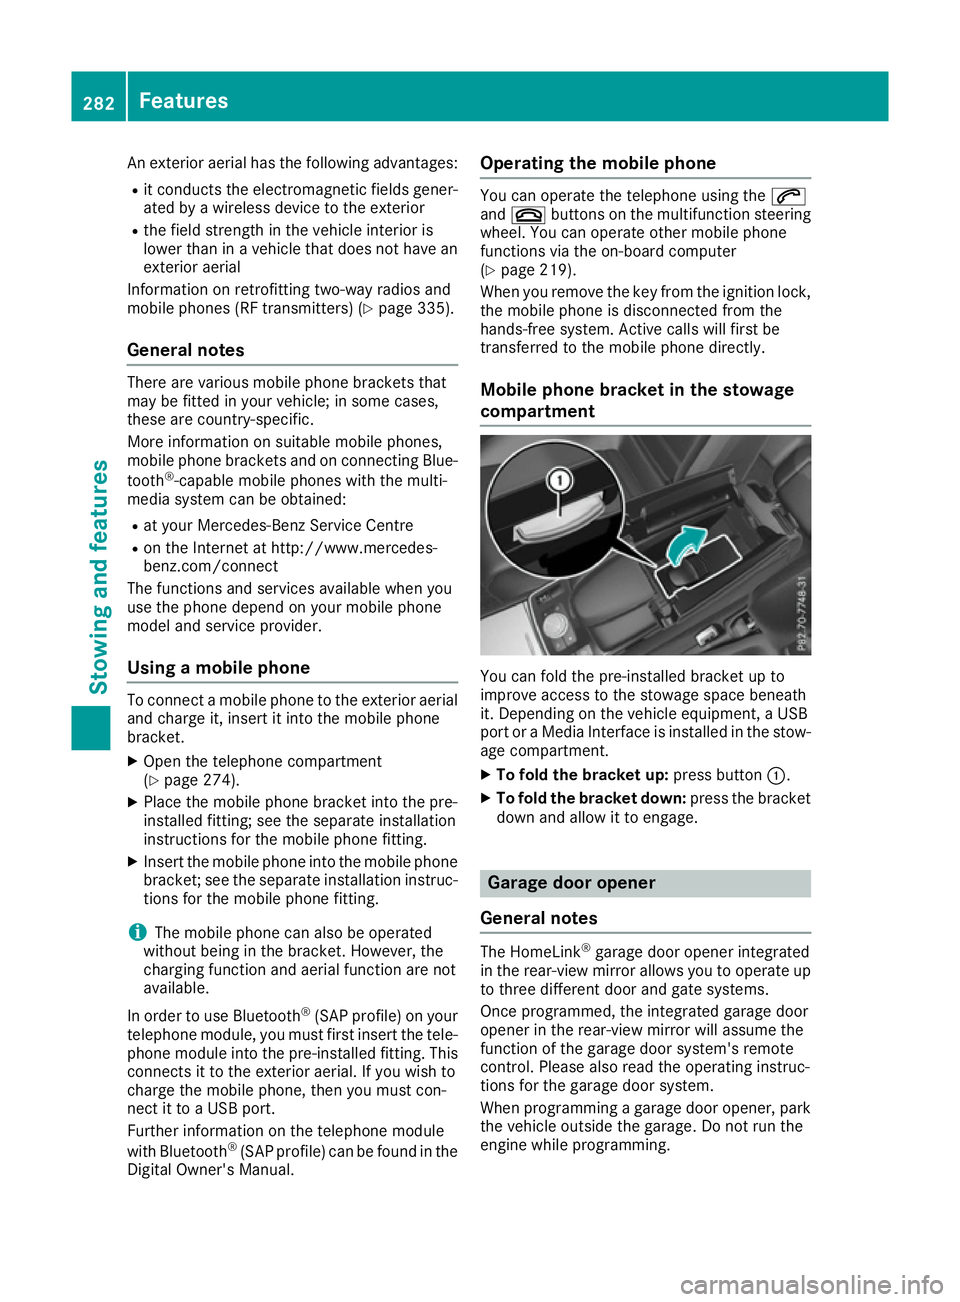
Mobile phone bracket in the stowage
compartment You can fold the pre-installed bracket up to
improve access to the stowage space beneath
it. Depending on the vehicle equipment, a USB
port or a Media Interface is installed in the stow- age compartment.
X To fold the bracket up: press button:.
X To fold the bracket down: press the bracket
down and allow it to engage. Garage door opener
General notes The HomeLink
®
garage door opener integrated
in the rear-view mirror allows you to operate up
to three different door and gate systems.
Once programmed, the integrated garage door
opener in the rear-view mirror will assume the
function of the garage door system's remote
control. Please also read the operating instruc-
tions for the garage door system.
When programming a garage door opener, park
the vehicle outside the garage. Do not run the
engine while programming. 282
FeaturesSto
wing an d features
Page 313 of 349
X
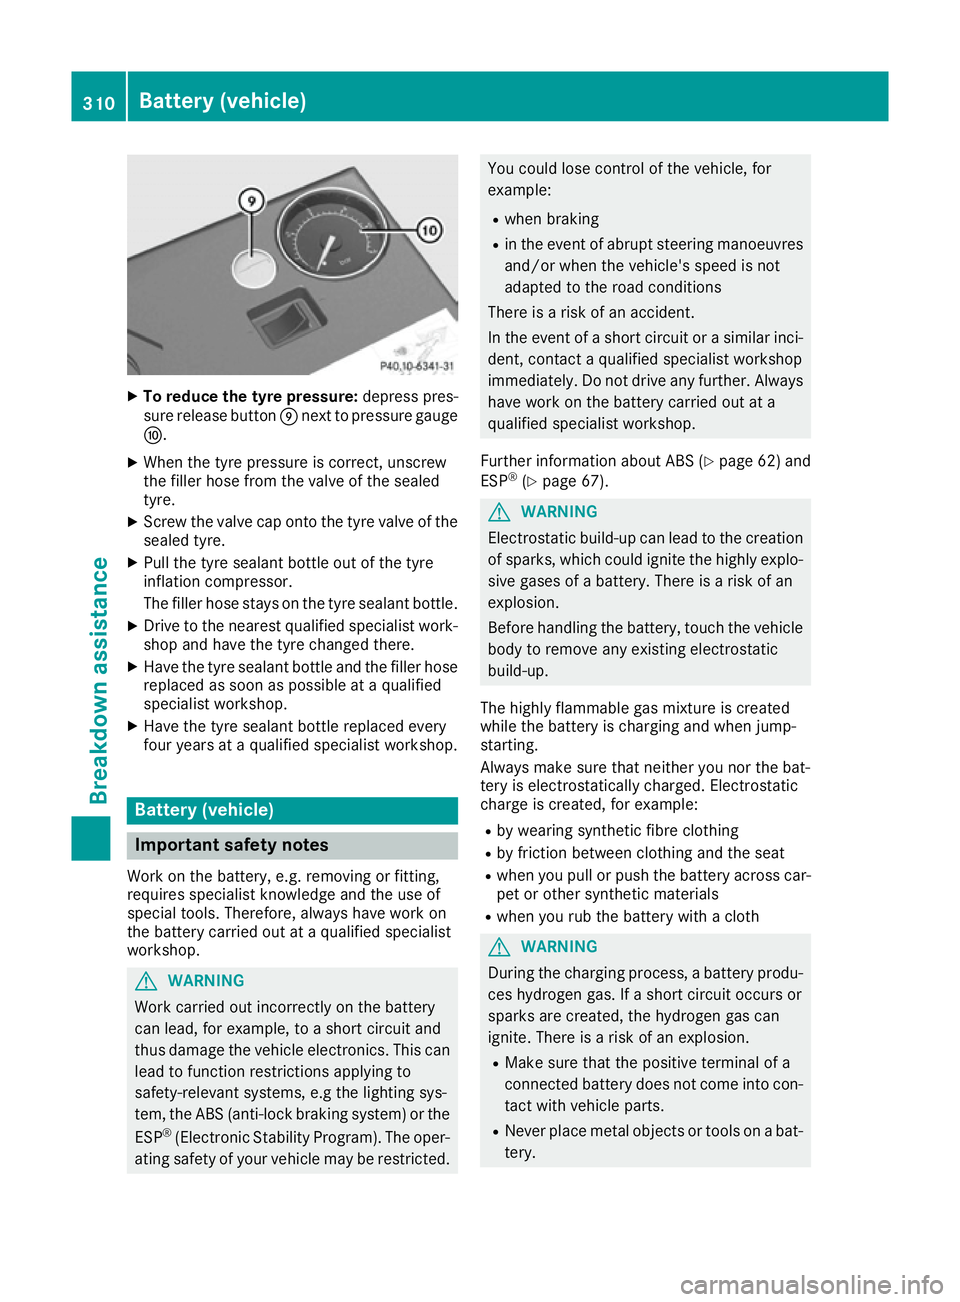
To reduce the tyre pressure: depress pres-
sure release button Enext to pressure gauge
F.
X When the tyre pressure is correct, unscrew
the filler hose from the valve of the sealed
tyre.
X Screw the valve cap onto the tyre valve of the
sealed tyre.
X Pull the tyre sealant bottle out of the tyre
inflation compressor.
The filler hose stays on the tyre sealant bottle.
X Drive to the nearest qualified specialist work-
shop and have the tyre changed there.
X Have the tyre sealant bottle and the filler hose
replaced as soon as possible at a qualified
specialist workshop.
X Have the tyre sealant bottle replaced every
four years at a qualified specialist workshop. Battery (vehicle)
Important safety notes
Work on the battery, e.g. removing or fitting,
requires specialist knowledge and the use of
special tools. Therefore, always have work on
the battery carried out at a qualified specialist
workshop. G
WARNING
Work carried out incorrectly on the battery
can lead, for example, to a short circuit and
thus damage the vehicle electronics. This can lead to function restrictions applying to
safety-relevant systems, e.g the lighting sys-
tem, the ABS (anti-lock braking system) or the
ESP ®
(Electronic Stability Program). The oper-
ating safety of your vehicle may be restricted. You could lose control of the vehicle, for
example:
R when braking
R in the event of abrupt steering manoeuvres
and/or when the vehicle's speed is not
adapted to the road conditions
There is a risk of an accident.
In the event of a short circuit or a similar inci-
dent, contact a qualified specialist workshop
immediately. Do not drive any further. Always have work on the battery carried out at a
qualified specialist workshop.
Further information about ABS (Y page 62)and
ESP ®
(Y page 67). G
WARNING
Electrostatic build-up can lead to the creation of sparks, which could ignite the highly explo-
sive gases of a battery. There is a risk of an
explosion.
Before handling the battery, touch the vehicle body to remove any existing electrostatic
build-up.
The highly flammable gas mixture is created
while the battery is charging and when jump-
starting.
Always make sure that neither you nor the bat-
tery is electrostatically charged. Electrostatic
charge is created, for example:
R by wearing synthetic fibre clothing
R by friction between clothing and the seat
R when you pull or push the battery across car-
pet or other synthetic materials
R when you rub the battery with a cloth G
WARNING
During the charging process, a battery produ- ces hydrogen gas. If a short circuit occurs or
sparks are created, the hydrogen gas can
ignite. There is a risk of an explosion.
R Make sure that the positive terminal of a
connected battery does not come into con-
tact with vehicle parts.
R Never place metal objects or tools on a bat-
tery. 310
Battery (vehicle)Breakdo
wn assis tance