2015 MERCEDES-BENZ E-CLASS CABRIOLET clock
[x] Cancel search: clockPage 85 of 349

function has been deactivated. You can deacti-
vate the double lock function by deactivating the
interior motion sensor (Y page 72).
For all countries: when a locked door is opened
from inside the vehicle, the previous unlocking
process will be observed if the vehicle has been:
R locked with the locking button for the central
locking or
R locked automatically
The vehicle will be fully unlocked if it had previ-
ously been fully unlocked. Only the door which
has been opened from the inside is unlocked if
only the driver's door had been previously
unlocked. Automatic locking feature
X
To deactivate: press and hold button :for
about five seconds until a tone sounds.
X To activate: press and hold button ;for
about five seconds until a tone sounds.
If you press one of the two buttons and do not
hear a tone, the relevant setting has already
been selected.
The vehicle is locked automatically when the
ignition is switched on and the wheels are turn-
ing.
You could therefore be locked out if:
R the vehicle is being pushed.
R the vehicle is being towed.
R the vehicle is being tested on a dynamometer.
You can also activate and deactivate the auto-
matic locking function using the on-board com- puter (Y page 225). Unlocking/locking the driver's door
using the emergency key element
i If you want to centrally lock the vehicle using
the emergency key element, begin by press-
ing the locking button for the interior locking
mechanism while the driver's door is open.
Then proceed to lock the driver's door using
the emergency key element. X
To unlock: turn the emergency key element
anti-clockwise as far as it will go to position
1.
X To lock: turn the emergency key element
clockwise as far as it will go to position 1.
Right-hand-drive vehicle: turn the emergency
key element in the opposite direction in both
cases.
If you use the emergency key element to unlock
and open the driver's door, the anti-theft alarm
system will be triggered. Switch off the alarm
(Y page 71). Boot
Important safety notes
G
WARNING
Combustion engines emit poisonous exhaust
gases such as carbon monoxide. Exhaust
gases can enter the vehicle interior if the boot
lid is open when the engine is running, espe-
cially if the vehicle is in motion. There is a risk of poisoning.
Always switch off the engine before opening
the boot lid. Never drive with the boot lid
open. 82
BootOpening and closing
Page 87 of 349
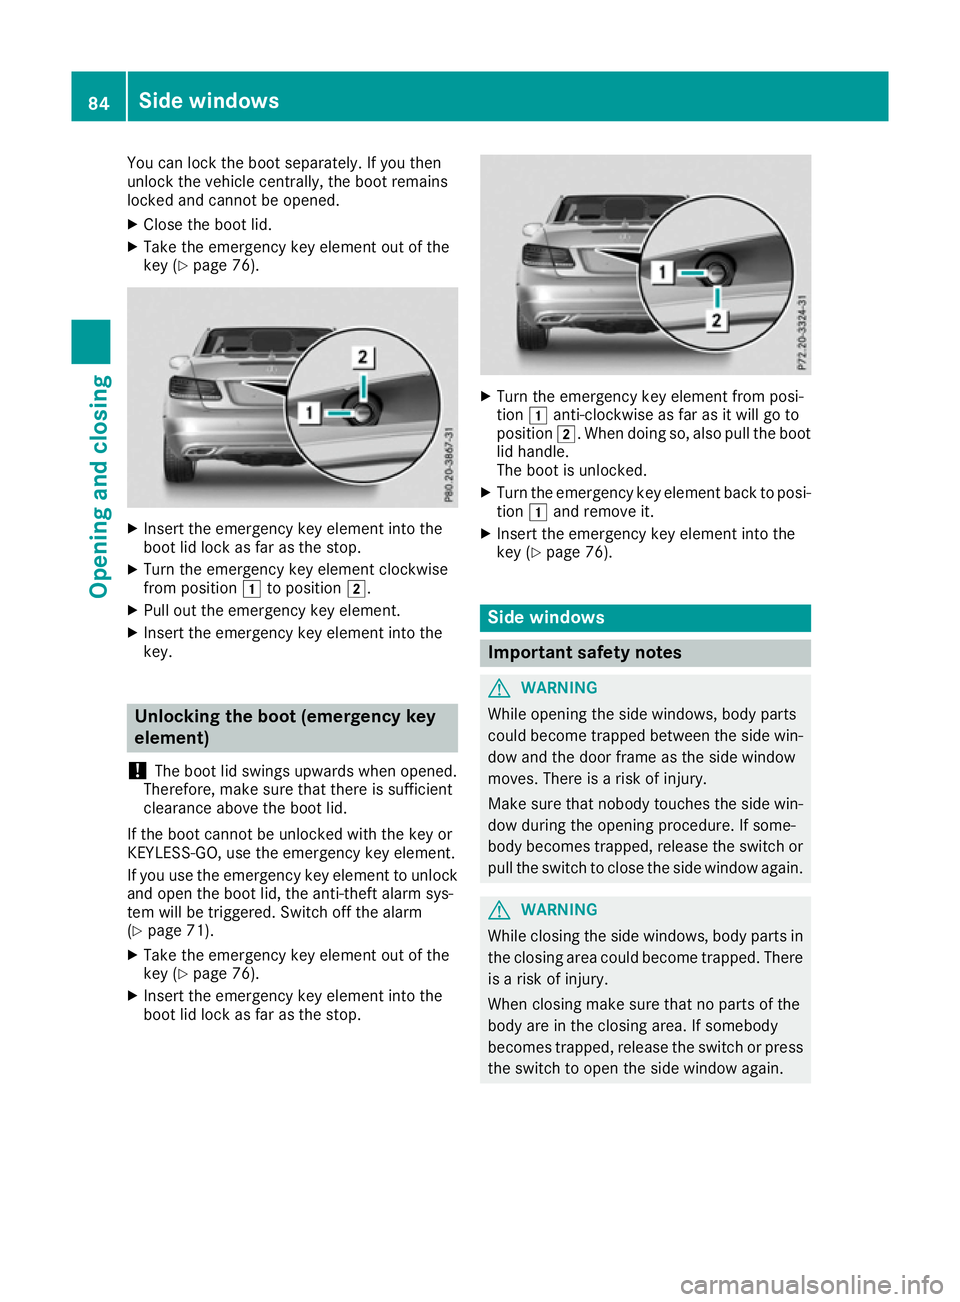
You can lock the boot separately. If you then
unlock the vehicle centrally, the boot remains
locked and cannot be opened.
X Close the boot lid.
X Take the emergency key element out of the
key (Y page 76). X
Insert the emergency key element into the
boot lid lock as far as the stop.
X Turn the emergency key element clockwise
from position 1to position 2.
X Pull out the emergency key element.
X Insert the emergency key element into the
key. Unlocking the boot (emergency key
element)
! The boot lid swings upwards when opened.
Therefore, make sure that there is sufficient
clearance above the boot lid.
If the boot cannot be unlocked with the key or
KEYLESS-GO, use the emergency key element.
If you use the emergency key element to unlock
and open the boot lid, the anti-theft alarm sys-
tem will be triggered. Switch off the alarm
(Y page 71).
X Take the emergency key element out of the
key (Y page 76).
X Insert the emergency key element into the
boot lid lock as far as the stop. X
Turn the emergency key element from posi-
tion 1anti-clockwise as far as it will go to
position 2. When doing so, also pull the boot
lid handle.
The boot is unlocked.
X Turn the emergency key element back to posi-
tion 1and remove it.
X Insert the emergency key element into the
key (Y page 76). Side windows
Important safety notes
G
WARNING
While opening the side windows, body parts
could become trapped between the side win- dow and the door frame as the side window
moves. There is a risk of injury.
Make sure that nobody touches the side win-
dow during the opening procedure. If some-
body becomes trapped, release the switch or pull the switch to close the side window again. G
WARNING
While closing the side windows, body parts in the closing area could become trapped. There is a risk of injury.
When closing make sure that no parts of the
body are in the closing area. If somebody
becomes trapped, release the switch or press
the switch to open the side window again. 84
Side windowsOpening and closing
Page 93 of 349

Opening and closing with the key
Important safety notes G
WARNING
When opening or closing the soft top, there is a risk that parts of the body could become
trapped by moving parts such as the roof
mechanism, the boot lid, or the side windows.
There is a risk of injury.
When opening or closing the roof, make sure
that no parts of the body are in the vicinity of moving parts. Release the switch if somebody
becomes trapped.
Opening and closing The key must be near the door handle.
X To open: press the %button in the key
until the soft top is completely opened.
The Top in operation
Top in operation message appears in
the multifunction display. The seat ventilation
is switched on. The rear side windows open.
X To close: press the&button in the key
until the soft top is completely closed.
The Top in operation
Top in operation message appears in
the multifunction display. The soft top and the
side windows close. Closing the soft top manually
Important safety notes G
WARNING
Closing the soft top manually is a complex,
technically challenging procedure which can
also be physically demanding. It could lead to you trapping yourself or other persons. There
is a risk of injury.
Where possible, have the soft top closed man-
ually at a qualified specialist workshop.
If the soft top cannot be closed automatically,
check the following points:
R Is the boot separator engaged (Y page 94)?
R Are the head restraints on the rear bench
seats extended? R
Is the boot lid closed?
R Is the on-board voltage sufficient?
Start the engine if necessary.
If automatic operation still does not work, the
soft top can be closed manually.
The help of a second person is required in car-
rying out this procedure.
Closing the soft top X
Apply the parking brake.
X Open the side windows.
X Lower the head restraints automatically
(Y page 102) or manually (Y page 102).
X Remove the key from the ignition lock.
X Open the boot.
X Take the two straps out of the vehicle tool kit
(Y page 305).
X Take the Allen key out of the Owner's Manual
wallet and keep it with you. X
Turn rotary catch :anti-clockwise and fold
cover ;down. X
Insert Allen key =into valve screw ?on the
hydraulic pump.
X Turn valve screw ?of the hydraulic pump
with Allen key =anti-clockwise a full turn. 90
Soft topOpening and closing
Page 94 of 349
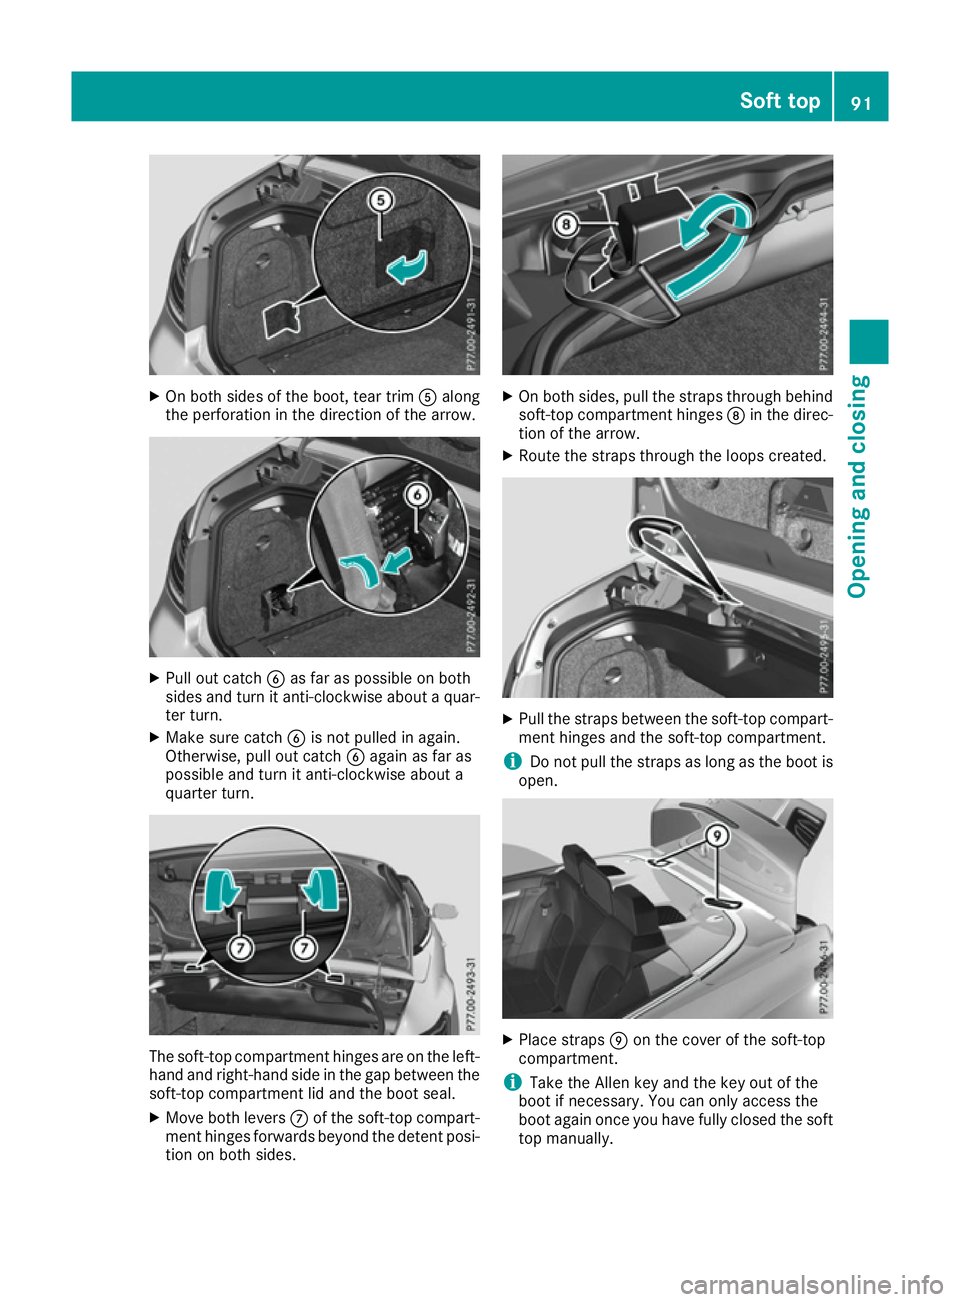
X
On both sides of the boot, tear trim Aalong
the perforation in the direction of the arrow. X
Pull out catch Bas far as possible on both
sides and turn it anti-clockwise about a quar-
ter turn.
X Make sure catch Bis not pulled in again.
Otherwise, pull out catch Bagain as far as
possible and turn it anti-clockwise about a
quarter turn. The soft-top compartment hinges are on the left-
hand and right-hand side in the gap between the soft-top compartment lid and the boot seal.
X Move both levers Cof the soft-top compart-
ment hinges forwards beyond the detent posi- tion on both sides. X
On both sides, pull the straps through behind
soft-top compartment hinges Din the direc-
tion of the arrow.
X Route the straps through the loops created. X
Pull the straps between the soft-top compart-
ment hinges and the soft-top compartment.
i Do not pull the straps as long as the boot is
open. X
Place straps Eon the cover of the soft-top
compartment.
i Take the Allen key and the key out of the
boot if necessary. You can only access the
boot again once you have fully closed the soft
top manually. Soft top
91Opening and closing Z
Page 95 of 349
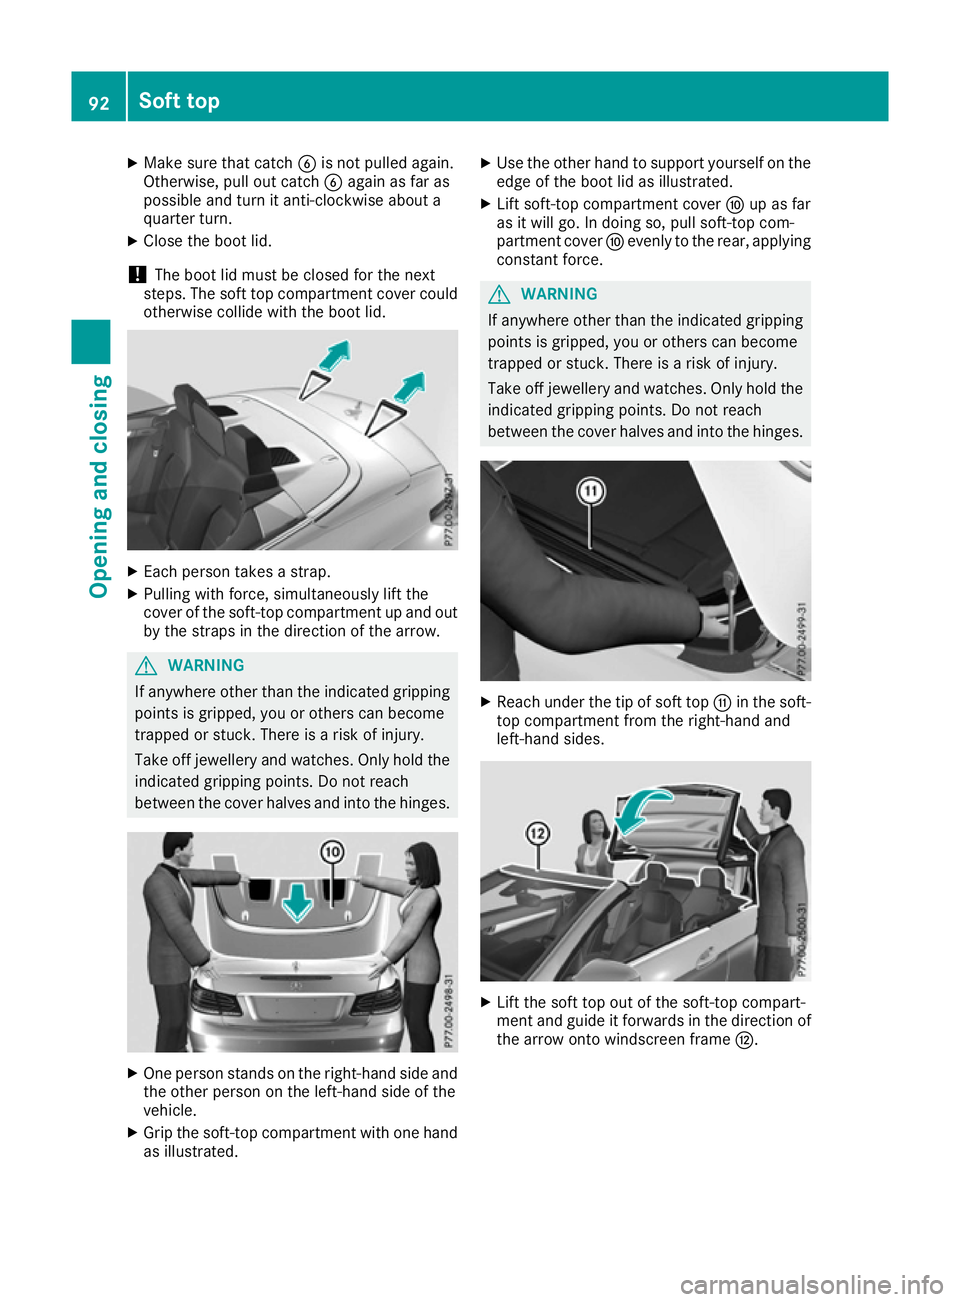
X
Make sure that catch Bis not pulled again.
Otherwise, pull out catch Bagain as far as
possible and turn it anti-clockwise about a
quarter turn.
X Close the boot lid.
! The boot lid must be closed for the next
steps. The soft top compartment cover could
otherwise collide with the boot lid. X
Each person takes a strap.
X Pulling with force, simultaneously lift the
cover of the soft-top compartment up and out
by the straps in the direction of the arrow. G
WARNING
If anywhere other than the indicated gripping points is gripped, you or others can become
trapped or stuck. There is a risk of injury.
Take off jewellery and watches. Only hold the
indicated gripping points. Do not reach
between the cover halves and into the hinges. X
One person stands on the right-hand side and
the other person on the left-hand side of the
vehicle.
X Grip the soft-top compartment with one hand
as illustrated. X
Use the other hand to support yourself on the
edge of the boot lid as illustrated.
X Lift soft-top compartment cover Fup as far
as it will go. In doing so, pull soft-top com-
partment cover Fevenly to the rear, applying
constant force. G
WARNING
If anywhere other than the indicated gripping points is gripped, you or others can become
trapped or stuck. There is a risk of injury.
Take off jewellery and watches. Only hold the
indicated gripping points. Do not reach
between the cover halves and into the hinges. X
Reach under the tip of soft top Gin the soft-
top compartment from the right-hand and
left-hand sides. X
Lift the soft top out of the soft-top compart-
ment and guide it forwards in the direction of
the arrow onto windscreen frame H.92
Soft topOpening and closing
Page 96 of 349
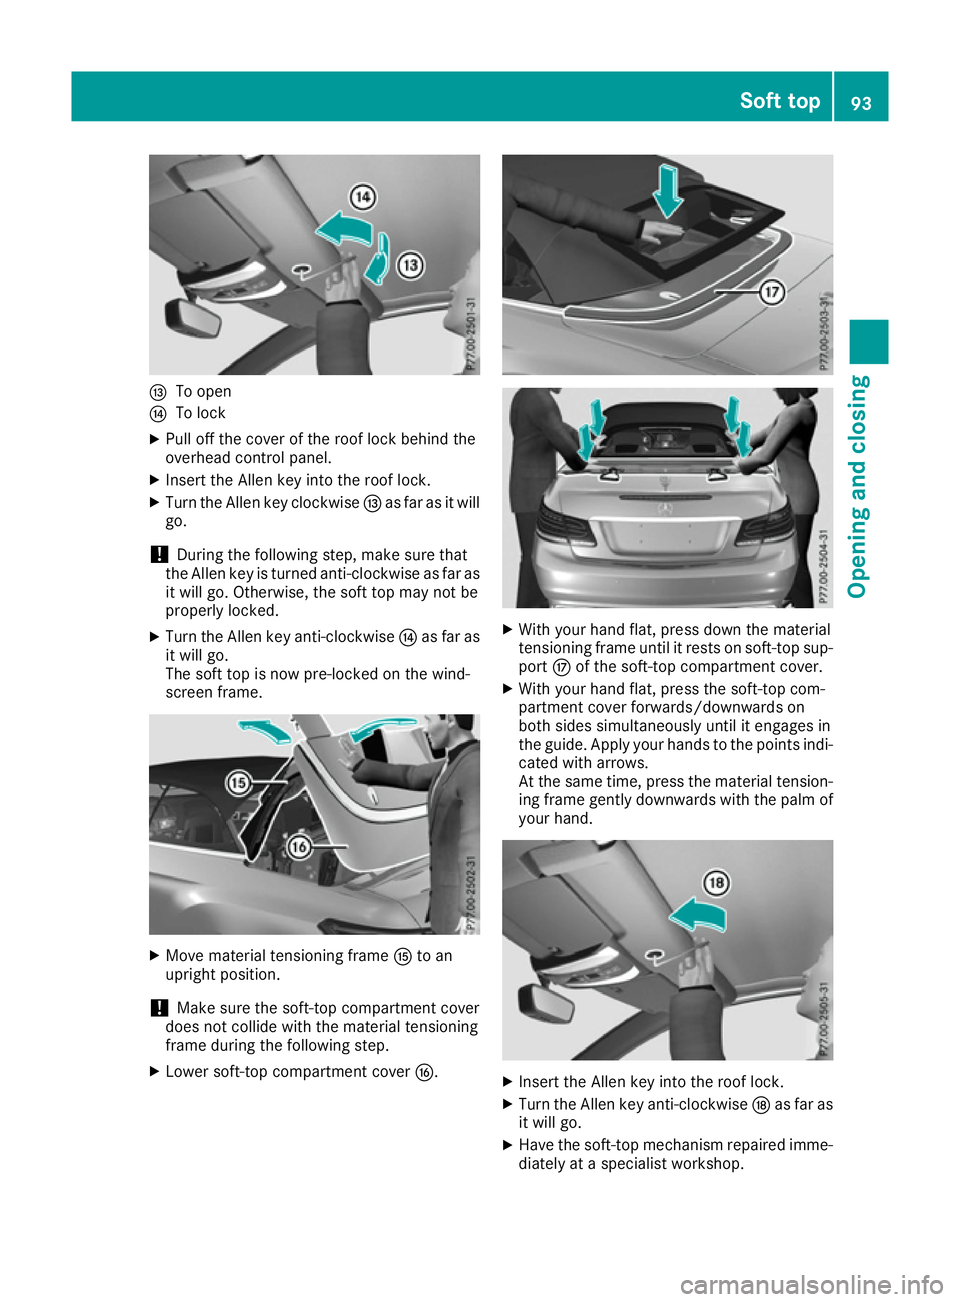
I
To open
J To lock
X Pull off the cover of the roof lock behind the
overhead control panel.
X Insert the Allen key into the roof lock.
X Turn the Allen key clockwise Ias far as it will
go.
! During the following step, make sure that
the Allen key is turned anti-clockwise as far as it will go. Otherwise, the soft top may not be
properly locked.
X Turn the Allen key anti-clockwise Jas far as
it will go.
The soft top is now pre-locked on the wind-
screen frame. X
Move material tensioning frame Kto an
upright position.
! Make sure the soft-top compartment cover
does not collide with the material tensioning
frame during the following step.
X Lower soft-top compartment cover L. X
With your hand flat, press down the material
tensioning frame until it rests on soft-top sup-
port Mof the soft-top compartment cover.
X With your hand flat, press the soft-top com-
partment cover forwards/downwards on
both sides simultaneously until it engages in
the guide. Apply your hands to the points indi-
cated with arrows.
At the same time, press the material tension-
ing frame gently downwards with the palm of
your hand. X
Insert the Allen key into the roof lock.
X Turn the Allen key anti-clockwise Nas far as
it will go.
X Have the soft-top mechanism repaired imme-
diately at a specialist workshop. Soft top
93Opening and closing Z
Page 99 of 349
If you park your vehicle with the soft top down
and remove the key, the wind deflector and the
head restraints in the rear compartment retract automatically. When you restart your engine
after having been parked, the wind deflector and
the head restraints in the rear compartment
extend again automatically.
AIRCAP cannot be extended or retracted if the
vehicle speed exceeds approximately
160 km/h.
Retracting AIRCAP X
Turn the key to position 2in the ignition lock.
X Open the cover on the lower centre console.
X Press AIRCAP button :.
The two indicator lamps on the AIRCAP button
go out. Wind deflector ;retracts.
The head restraints on the rear bench seats and
AIRCAP draught stop =move to the lowest
position simultaneously.
If there are passengers wearing seat belts in the rear compartment, the head restraints on the
rear bench seats and the AIRCAP draught stop
remain in the upper position.
Retracting the head restraints on the
rear bench seats from the driver's seat To improve the rear view, you can retract the
head restraints on the rear bench seats individ- ually (Y page 102). The wind deflector remains
in its current position. Fitting/removing the AIRCAP draught
stop
Preparation You will need a 4 mm Allen key to fit and remove
the AIRCAP draught stop.
Before fitting or removing the AIRCAP draught
stop:
X Turn the key to position 2in the ignition lock.
X Open the folding roof fully (Y page 89).
X Extend the head restraints in the rear com-
partment fully (Y page 102). Removing
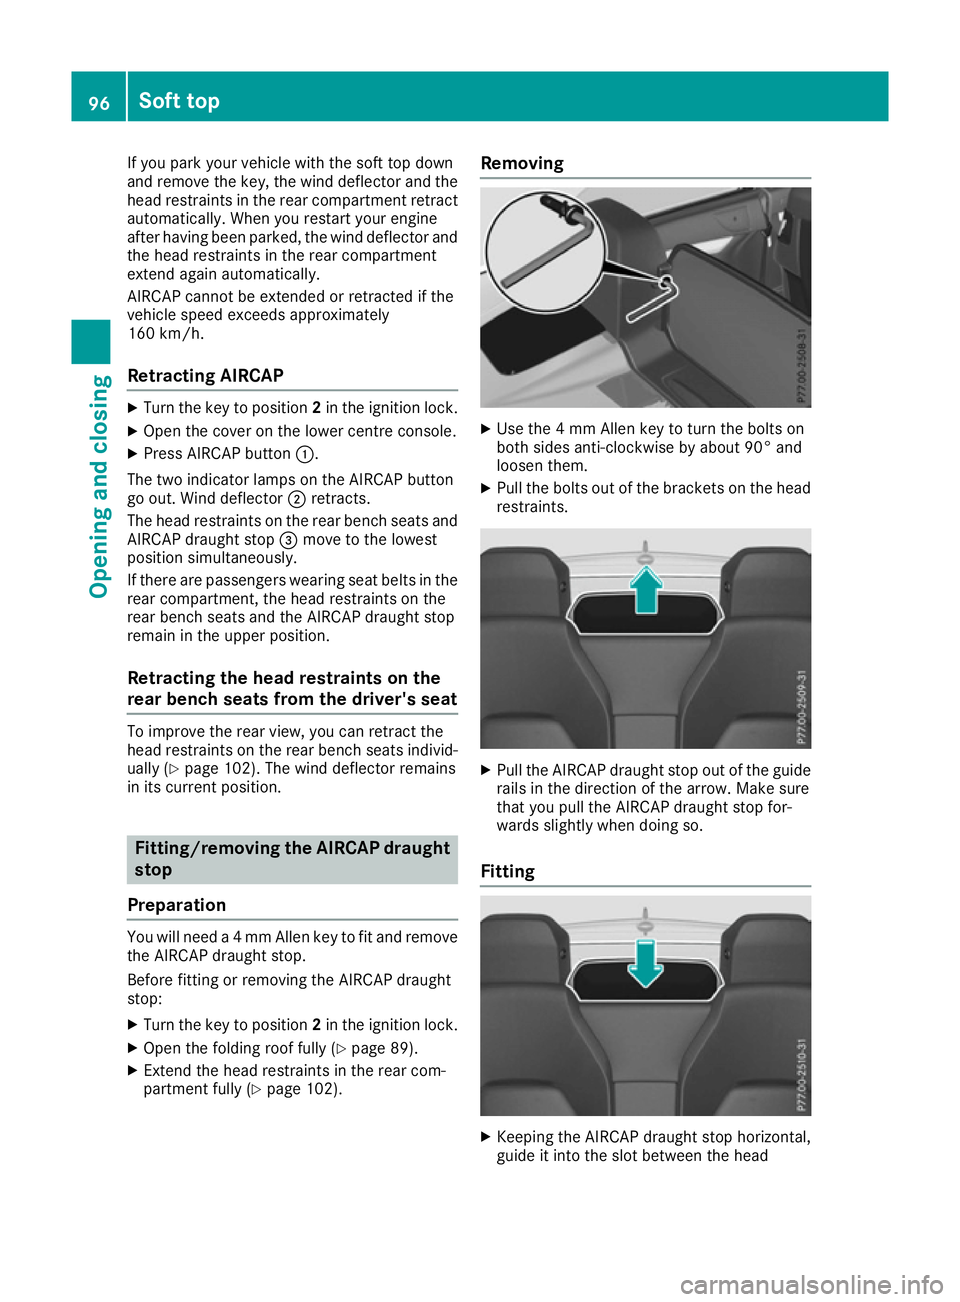
X
Use the 4 mm Allen key to turn the bolts on
both sides anti-clockwise by about 90° and
loosen them.
X Pull the bolts out of the brackets on the head
restraints. X
Pull the AIRCAP draught stop out of the guide
rails in the direction of the arrow. Make sure
that you pull the AIRCAP draught stop for-
wards slightly when doing so.
Fitting X
Keeping the AIRCAP draught stop horizontal,
guide it into the slot between the head 96
Soft topOpening and closing
Page 123 of 349

Replacing the front bulbs
Main-beam headlamps (static LED
headlamps) X
Switch off the lights.
X Open the bonnet.
X Turn housing cover :anti-clockwise and
remove it.
X Turn bulb holder ;anti-clockwise and pull
out.
X Pull the bulb out of bulb holder ;.
X Insert the new bulb into bulb holder ;.
X Insert bulb holder ;and turn it clockwise.
X Press on housing cover :and turn it to the
right. Windscreen wipers
Switching the windscreen wipers on/
off
! Do not operate the windscreen wipers when
the windscreen is dry, as this could damage
the wiper blades. Moreover, dust that has col-
lected on the windscreen can scratch the
glass if wiping takes place when the wind-
screen is dry.
If it is necessary to switch on the windscreen wipers in dry weather conditions, always
operate them using washer fluid.
! If the windscreen wipers leave smears on
the windscreen after the vehicle has been
washed in an automatic car wash, this may be
due to wax or other residue. Clean the wind-
screen with washer fluid after an automatic
car wash. !
Intermittent wiping with rain sensor: due to
optical influences and the windscreen becom-
ing dirty in dry weather conditions, the wind-
screen wipers may be activated inadvertently. This could damage the windscreen wiper
blades or scratch the windscreen.
For this reason, you should always switch off
the windscreen wipers in dry weather. 1
$ Windscreen wipers off
2 Ä Intermittent wipe, low (rain sensor set
to low sensitivity)
3 Å Intermittent wipe, high (rain sensor
set to high sensitivity)
4 ° Continuous wipe, slow
5 ¯ Continuous wipe, fast
B í Single wipe
î To wipe with washer fluid
X Turn the key to position 1or 2in the ignition
lock.
X Turn the combination switch to the corre-
sponding position.
In the ÄorÅ position, the appropriate
wiping frequency is set automatically according
to the intensity of the rain. In the Åposition,
the rain sensor is more sensitive than in the
Ä position, causing the windscreen wiper to
wipe more frequently.
If the wiper blades are worn, the windscreen will
no longer be wiped properly. This could prevent you from observing the traffic conditions. Replacing the wiper blades
Important safety notes G
WARNING
If the windscreen wipers begin to move while
you are changing the wiper blades, you can be 120
Windscreen wipersLights and windscreen wipers