2015 MERCEDES-BENZ B-CLASS SPORTS fold seats
[x] Cancel search: fold seatsPage 17 of 346
SeatsAdjusting (electrically) ..................... 94
Adjusting (manually) ........................ 94
Adjusting the 4-way lumbar sup-
port .................................................. 95
Adjusting the head restraint ............ 94
Cleaning the cover ........................ .281
Correct driver's seat position ........... 92
Folding the backrest (rear com-
partment) forwards/back (vehi-
cles with the EASY-VARIO-PLUS
system) .......................................... 253
Folding the backrest (rear com-
partment) forwards/back (vehi-
cles without the EASY-VARIO-
PLUS system) ................................ 252
Important safety notes .................... 93
Seat heating problem ..................... .97
Storing settings (memory func-
tion) ............................................... 101
Switching seat heating on/of f......... 96
Securing cargo .................................. 255
Selector lever
Cleaning ......................................... 280
Sensors (cleaning instructions) ....... 279
Service menu (on-board com- puter) .................................................. 204
Service message
see ASSYST PLUS
Service products
Brake fluid ..................................... 338
Coolant (engine) ............................ 339
Engine oil ....................................... 337
Fuel ................................................ 335
Important safety notes .................. 335
Refrigerant (air-conditioning sys-
tem) ............................................... 340
Washer fluid ................................... 339
Setting the air distribution ............... 127
Setting the airflow ............................ 127
Settings
Factory (on-board computer) ......... 206
On-board computer ....................... 204
Side impact air bag ............................. 46
Side marker lamp (display mes-
sage) ................................................... 221 Side windows
Cleaning ......................................... 278
Convenience closing feature ............ 83
Convenience opening feature .......... 82
Important safety information ........... 81
Opening/closing .............................. 82
Problem (malfunction) ..................... 85
Resetting ......................................... 84
Reversing feature ............................. 81
Sliding sunroof
see Panorama roof with power
tilt/sliding panel
SmartKey
Changing the battery ....................... 74
Changing the programming ............. 72
Checking the battery ....................... 73
Convenience closing feature ............ 83
Convenience opening feature .......... 82
Display message ............................ 234
Door central locking/unlocking ....... 70
Important safety notes .................... 70
KEYLESS-GO start function .............. 72
Loss ................................................. 75
Mechanical key ................................ 72
Positions (ignition lock) ................. 135
Problem (malfunction) ..................... 75
Starting the engine ........................ 137
SmartKey positions (ignition lock) .. 135
Snow chains ...................................... 305
Sockets
Center console .............................. 263
General notes ................................ 262
Luggage compartment ................... 263
Rear compartment ......................... 263
Special seat belt retractor .................. 55
Specialist workshop ............................ 24
Speed, controlling
see Cruise control
Speedometer
Activating/deactivating the addi-
tional speedometer ........................ 204
Digital ............................................ 197
In the Instrument cluster ................. 29
Segments ...................................... 193
Selecting the unit of measure-
ment .............................................. 204
Standing lamps
Display message ............................ 221
Index15
Page 36 of 346
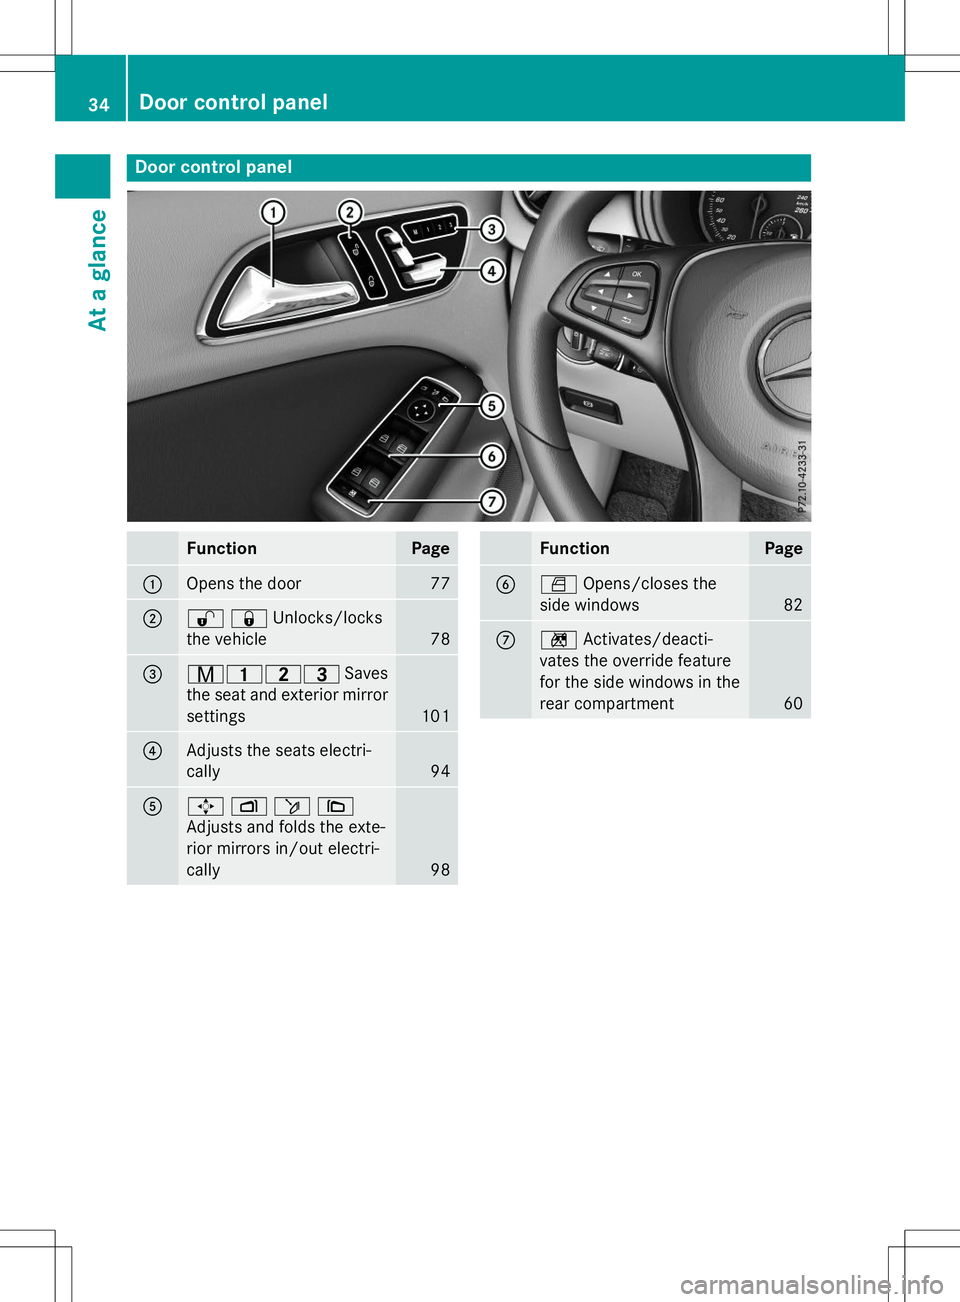
Door control panel
FunctionPage
:Opens the door77
;%&Unlocks/locks
the vehicle
78
=r 45= Saves
the seat and exterior mirror settings
101
?Adjusts the seats electri- cally
94
A7 Zö\
Adjusts and folds the exte-
rior mirrors in/out electri-cally
98
FunctionPage
BW Opens/closes the
side windows
82
Cn Activates/deacti-
vates the override feature
for the side windows in the
rear compartment
60
34Door control panel
At a glance
Page 59 of 346
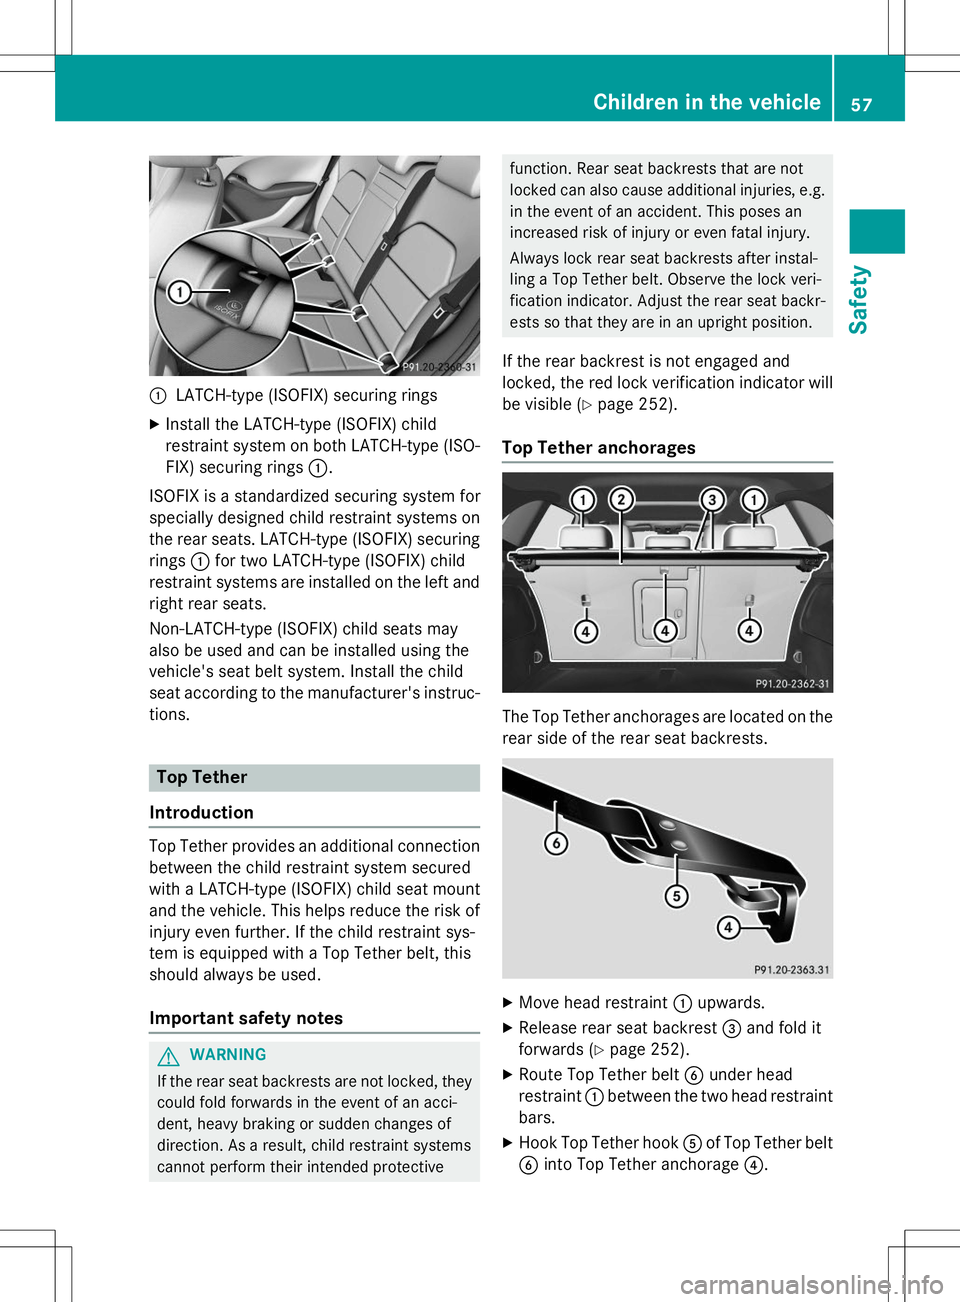
:LATCH-type (ISOFIX) securing rings
X Install the LATCH-type (ISOFIX) child
restraint system on both LATCH-type (ISO-
FIX) securing rings :.
ISOFIX is a standardized securing system for
specially designed child restraint systems on
the rear seats. LATCH-type (ISOFIX) securing rings :for two LATCH-type (ISOFIX) child
restraint systems are installed on the left and
right rear seats.
Non-LATCH-type (ISOFIX) child seats may
also be used and can be installed using the
vehicle's seat belt system. Install the child
seat according to the manufacturer's instruc-
tions.
Top Tether
Introduction
Top Tether provides an additional connection between the child restraint system secured
with a LATCH-type (ISOFIX) child seat mount
and the vehicle. This helps reduce the risk of
injury even further. If the child restraint sys-
tem is equipped with a Top Tether belt, this
should always be used.
Important safety notes
GWARNING
If the rear seat backrests are not locked, they
could fold forwards in the event of an acci-
dent, heavy braking or sudden changes of
direction. As a result, child restraint systems
cannot perform their intended protective
function. Rear seat backrests that are not
locked can also cause additional injuries, e.g.in the event of an accident. This poses an
increased risk of injury or even fatal injury.
Always lock rear seat backrests after instal-
ling a Top Tether belt. Observe the lock veri-
fication indicator. Adjust the rear seat backr-
ests so that they are in an upright position.
If the rear backrest is not engaged and
locked, the red lock verification indicator will
be visible ( Ypage 252).
Top Tether anchorages
The Top Tether anchorages are located on the
rear side of the rear seat backrests.
X
Move head restraint :upwards.
X Release rear seat backrest =and fold it
forwards ( Ypage 252).
X Route Top Tether belt Bunder head
restraint :between the two head restraint
bars.
X Hook Top Tether hook Aof Top Tether belt
B into Top Tether anchorage ?.
Children in the vehicle57
Safety
Z
Page 96 of 346
rials, e.g. blankets, coats, bags, seat cov-ers, child seats or booster seats.
!Make sure that there are no objects in the
footwell under or behind the seats when
moving the seats back. There is a risk that
the seats and/or the objects could be dam-
aged.
iFurther related subjects:
R cargo compartment enlargement (fold-
ing down the rear seats) ( Ypage 252)
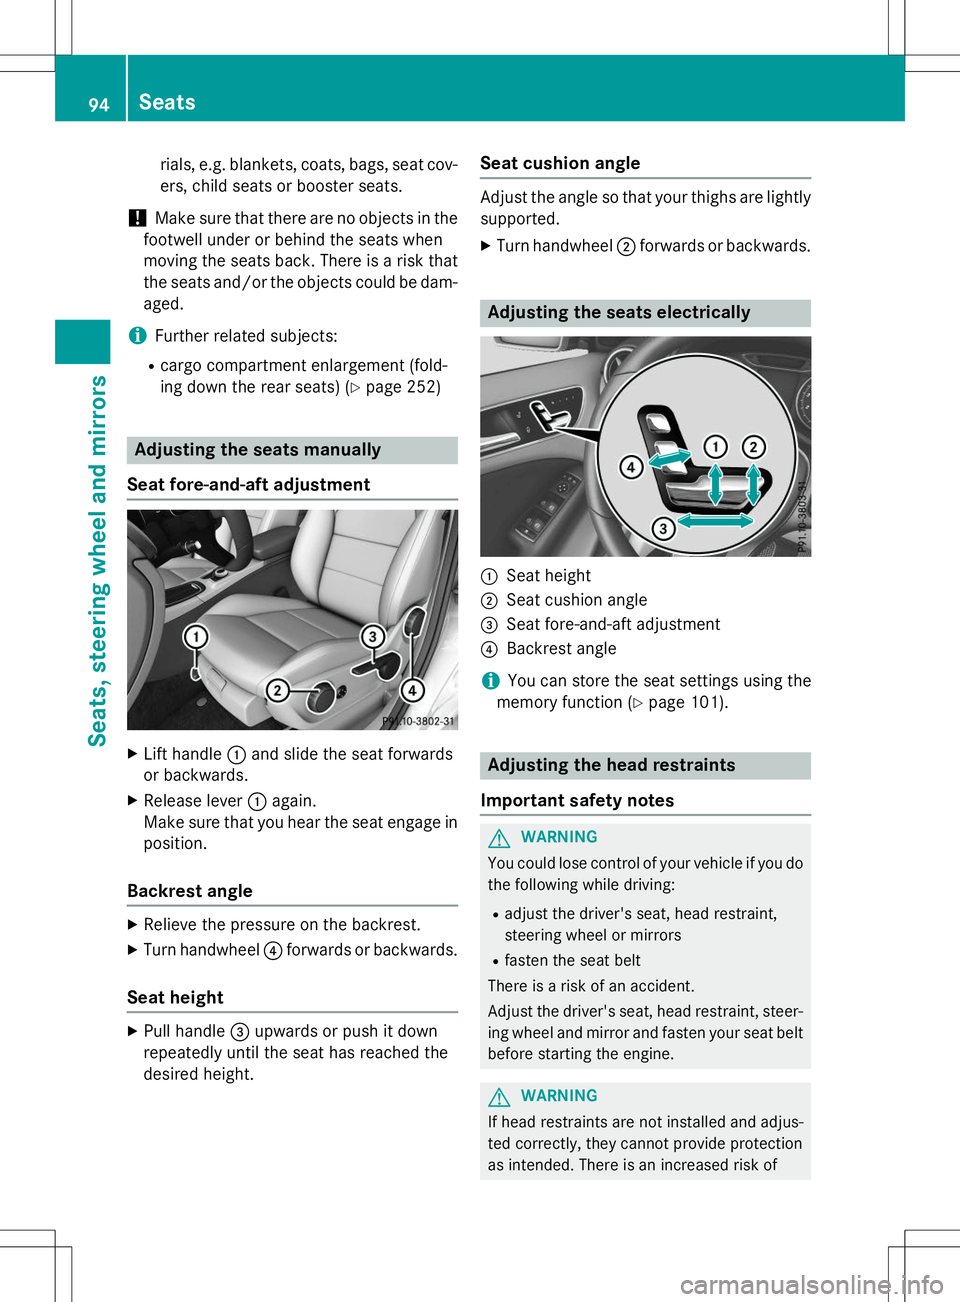
Adjusting the seats manually
Seat fore-and-aft adjustment
X Lift handle :and slide the seat forwards
or backwards.
X Release lever :again.
Make sure that you hear the seat engage in
position.
Backrest angle
X Relieve the pressure on the backrest.
X Turn handwheel ?forwards or backwards.
Seat height
X
Pull handle =upwards or push it down
repeatedly until the seat has reached the
desired height.
Seat cushion angle
Adjust the angle so that your thighs are lightly
supported.
X Turn handwheel ;forwards or backwards.
Adjusting the seats electrically
:Seat height
;Seat cushion angle
=Seat fore-and-aft adjustment
?Backrest angle
iYou can store the seat settings using the
memory function ( Ypage 101).
Adjusting the head restraints
Important safety notes
GWARNING
You could lose control of your vehicle if you do the following while driving:
R adjust the driver's seat, head restraint,
steering wheel or mirrors
R fasten the seat belt
There is a risk of an accident.
Adjust the driver's seat, head restraint, steer-
ing wheel and mirror and fasten your seat belt before starting the engine.
GWARNING
If head restraints are not installed and adjus-
ted correctly, they cannot provide protection
as intended. There is an increased risk of
94Seats
Seats, steering wheel and mirrors
Page 100 of 346
Mirrors
Rear-view mirror
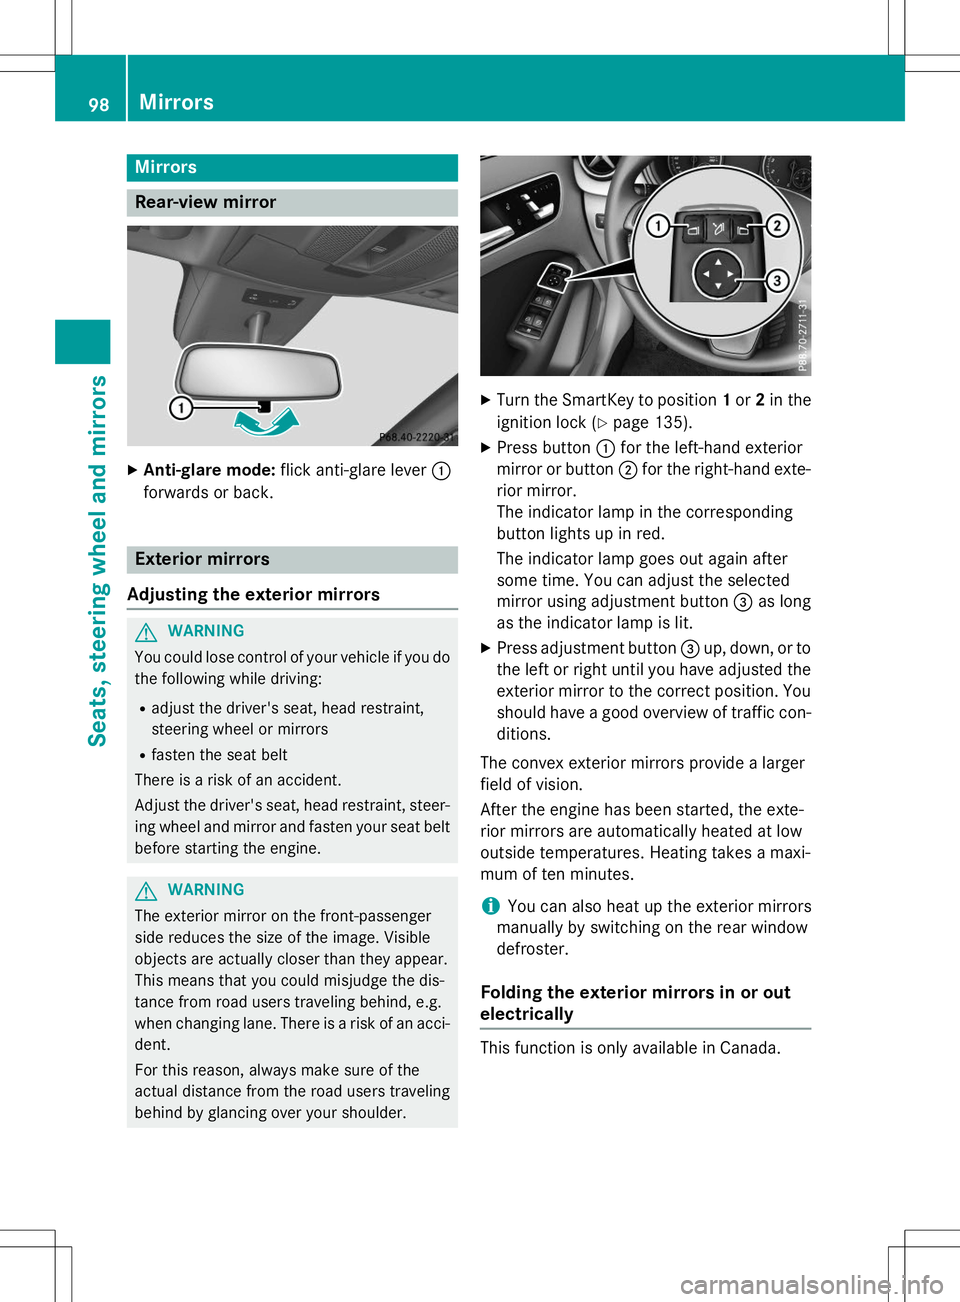
XAnti-glare mode: flick anti-glare lever :
forwards or back.
Exterior mirrors
Adjusting the exterior mirrors
GWARNING
You could lose control of your vehicle if you do the following while driving:
R adjust the driver's seat, head restraint,
steering wheel or mirrors
R fasten the seat belt
There is a risk of an accident.
Adjust the driver's seat, head restraint, steer-
ing wheel and mirror and fasten your seat belt before starting the engine.
GWARNING
The exterior mirror on the front-passenger
side reduces the size of the image. Visible
objects are actually closer than they appear.
This means that you could misjudge the dis-
tance from road users traveling behind, e.g.
when changing lane. There is a risk of an acci-dent.
For this reason, always make sure of the
actual distance from the road users traveling
behind by glancing over your shoulder.
X Turn the SmartKey to position 1or 2in the
ignition lock ( Ypage 135).
X Press button :for the left-hand exterior
mirror or button ;for the right-hand exte-
rior mirror.
The indicator lamp in the corresponding
button lights up in red.
The indicator lamp goes out again after
some time. You can adjust the selected
mirror using adjustment button =as long
as the indicator lamp is lit.
X Press adjustment button =up, down, or to
the left or right until you have adjusted the
exterior mirror to the correct position. You
should have a good overview of traffic con- ditions.
The convex exterior mirrors provide a larger
field of vision.
After the engine has been started, the exte-
rior mirrors are automatically heated at low
outside temperatures. Heating takes a maxi-
mum of ten minutes.
iYou can also heat up the exterior mirrors
manually by switching on the rear window
defroster.
Folding the exterior mirrors in or out
electrically
This function is only available in Canada.
98Mirrors
Seats, steering wheel and mirrors
Page 101 of 346
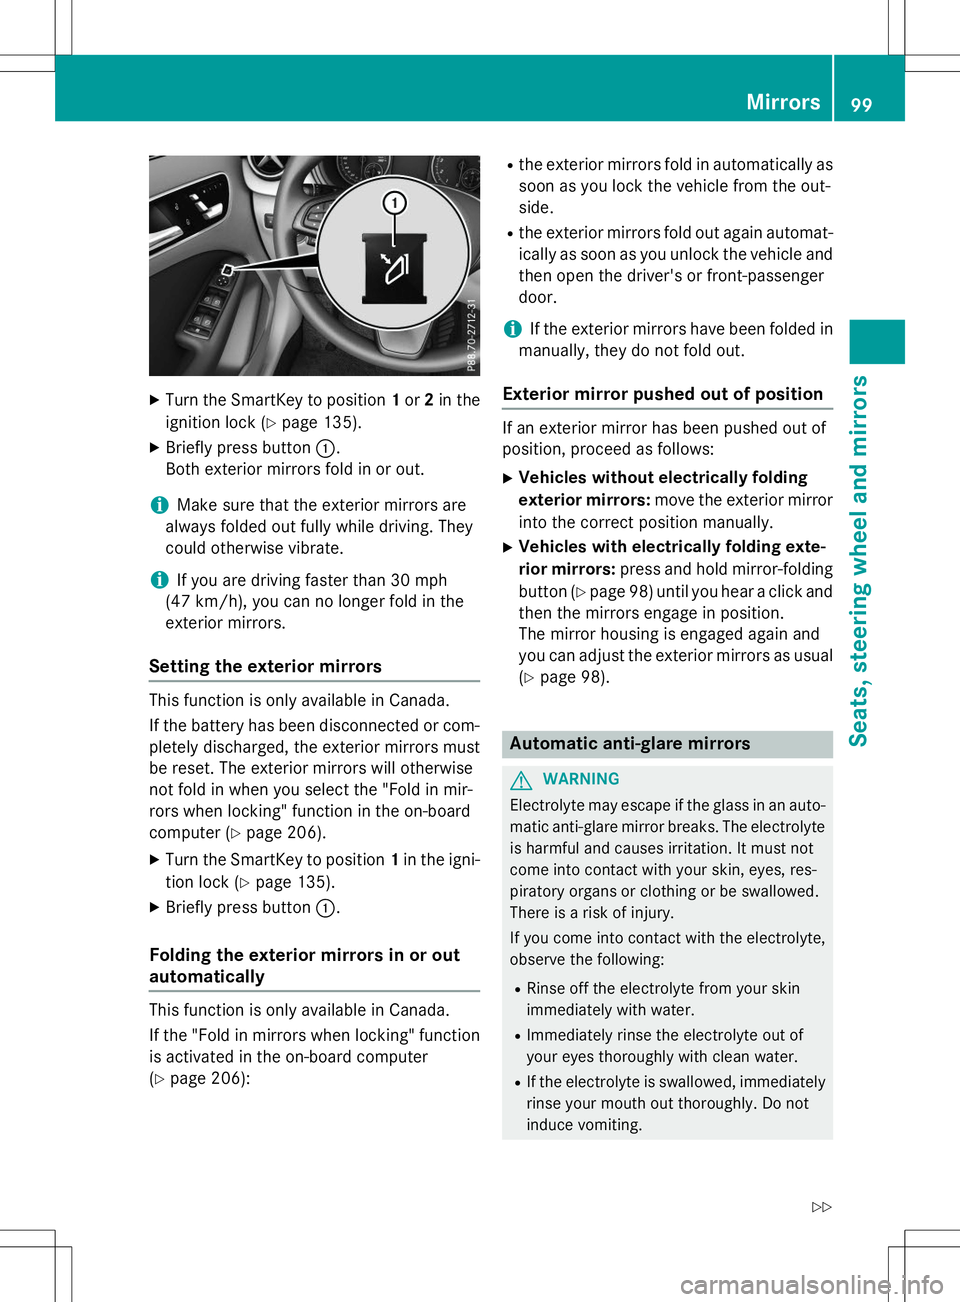
XTurn the SmartKey to position 1or 2in the
ignition lock ( Ypage 135).
X Briefly press button :.
Both exterior mirrors fold in or out.
iMake sure that the exterior mirrors are
always folded out fully while driving. They
could otherwise vibrate.
iIf you are driving faster than 30 mph
(47 km/ h), you can no longer fold in the
exterior mirrors.
Setting the exterior mirrors
This function is only available in Canada.
If the battery has been disconnected or com- pletely discharged, the exterior mirrors must
be reset. The exterior mirrors will otherwise
not fold in when you select the "Fold in mir-
rors when locking" function in the on-board
computer ( Ypage 206).
X Turn the SmartKey to position 1in the igni-
tion lock ( Ypage 135).
X Briefly press button :.
Folding the exterior mirrors in or out
automatically
This function is only available in Canada.
If the "Fold in mirrors when locking" function
is activated in the on-board computer ( Y page 206): R
the exterior mirrors fold in automatically as
soon as you lock the vehicle from the out-side.
R the exterior mirrors fold out again automat-
ically as soon as you unlock the vehicle and
then open the driver's or front-passengerdoor.
iIf the exterior mirrors have been folded in
manually, they do not fold out.
Exterior mirror pushed out of position
If an exterior mirror has been pushed out of
position, proceed as follows:
X Vehicles without electrically folding
exterior mirrors: move the exterior mirror
into the correct position manually.
X Vehicles with electrically folding exte-
rior mirrors: press and hold mirror-folding
button ( Ypage 98) until you hear a click and
then the mirrors engage in position.
The mirror housing is engaged again and
you can adjust the exterior mirrors as usual
( Y page 98).
Automatic anti-glare mirrors
GWARNING
Electrolyte may escape if the glass in an auto-
matic anti-glare mirror breaks. The electrolyte
is harmful and causes irritation. It must not
come into contact with your skin, eyes, res-
piratory organs or clothing or be swallowed.
There is a risk of injury.
If you come into contact with the electrolyte,
observe the following:
R Rinse off the electrolyte from your skin
immediately with water.
R Immediately rinse the electrolyte out of
your eyes thoroughly with clean water.
R If the electrolyte is swallowed, immediately
rinse your mouth out thoroughly. Do not
induce vomiting.
Mirrors99
Seats, steering wheel and mirrors
Z
Page 250 of 346
Useful information
iThis Operator's Manual describes all
models and all standard and optional equip- ment of your vehicle available at the time of
publication of the Operator's Manual.
Country-specific differences are possible.
Please note that your vehicle may not be
equipped with all features described. This
also applies to safety-related systems and
functions.
iRead the information on qualified special-
ist workshops ( Ypage 24).
Loading guidelines
GWARNING
If objects, luggage or loads are not secured or
not secured sufficiently, they could slip, tip
over or be flung around and thereby hit vehicle
occupants. There is a risk of injury, particu-
larly in the event of sudden braking or a sud-
den change in direction.
Always store objects so that they cannot be
flung around. Secure objects, luggage or
loads against slipping or tipping before the
journey.
GWARNING
Combustion engines emit poisonous exhaust
gases such as carbon monoxide. If the tailgate is open when the engine is running, particu-
larly if the vehicle is moving, exhaust fumes
could enter the passenger compartment.
There is a risk of poisoning.
Turn off the engine before opening the tail-
gate. Never drive with the tailgate open.
GWARNING
The exhaust tail pipe and tail pipe trim can
become very hot. If you come into contact
with these parts of the vehicle, you could burn
yourself. There is a risk of injury.
Always be particularly careful around the
exhaust tail pipe and the tail pipe trim. Allow
these components to cool down before touch-
ing them.
The handling characteristics of a laden vehi-
cle are dependent on the distribution of the
load within the vehicle. For this reason, you
should observe the following notes when
transporting a load: R Never exceed the maximum permissible
gross vehicle mass or the gross axle weight
rating for the vehicle (including occupants).
The values are specified on the vehicle
identification plate on the B-pillar of the
driver's door.
R The cargo compartment is the preferred
place to carry objects.
R Position heavy loads as far forwards as pos-
sible and as low down in the cargo com-
partment as possible.
R The load must not protrude above the
upper edge of the seat backrests.
R Always place the load against the rear or
front seat backrests. Make sure that the
seat backrests are securely locked intoplace.
R Always place the load behind unoccupied
seats if possible.
R Use the cargo tie-down rings and the parcel
nets to transport loads and luggage.
R Use cargo tie-down rings and fastening
materials appropriate for the weight and
size of the load.
R Hook in the cargo net when loading.
R The maximum load capacity of the stowage
well under the cargo compartment floor is
55 lbs (25 kg).
R Secure the load with sufficiently strong and
wear-resistant tie-downs. Pad sharp edges
for protection.
!Do not position the load on one part of the
folding cargo compartment floor only. The
maximum load capacity of the folding cargo
compartment floor is 220 lbs (100 kg). Dis- tribute the weight evenly to avoid damaging
the cargo compartment floor. Place a solid
248Loading guidelines
Stowage and features
Page 256 of 346
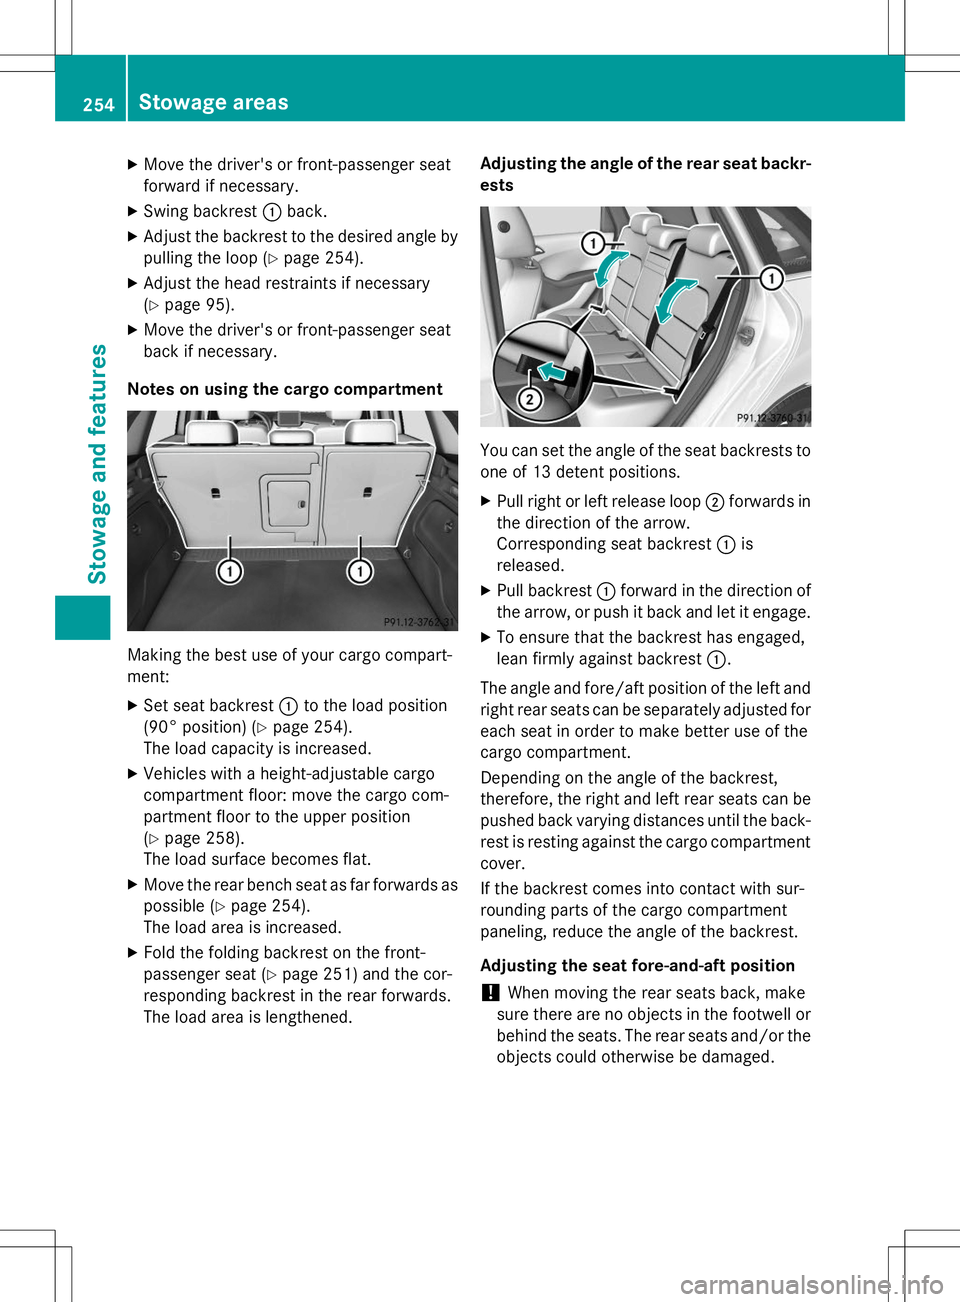
XMove the driver's or front-passenger seat
forward if necessary.
X Swing backrest :back.
X Adjust the backrest to the desired angle by
pulling the loop ( Ypage 254).
X Adjust the head restraints if necessary(Y page 95).
X Move the driver's or front-passenger seat
back if necessary.
Notes on using the cargo compartment
Making the best use of your cargo compart-
ment: X Set seat backrest :to the load position
(90° position) ( Ypage 254).
The load capacity is increased.
X Vehicles with a height-adjustable cargo
compartment floor: move the cargo com-
partment floor to the upper position(Y page 258).
The load surface becomes flat.
X Move the rear bench seat as far forwards as
possible ( Ypage 254).
The load area is increased.
X Fold the folding backrest on the front-
passenger seat ( Ypage 251) and the cor-
responding backrest in the rear forwards.
The load area is lengthened. Adjusting the angle of the rear seat backr-ests
You can set the angle of the seat backrests to
one of 13 detent positions. X Pull right or left release loop ;forwards in
the direction of the arrow.
Corresponding seat backrest :is
released.
X Pull backrest :forward in the direction of
the arrow, or push it back and let it engage.
X To ensure that the backrest has engaged,
lean firmly against backrest :.
The angle and fore/aft position of the left and
right rear seats can be separately adjusted for
each seat in order to make better use of the
cargo compartment.
Depending on the angle of the backrest,
therefore, the right and left rear seats can be pushed back varying distances until the back-
rest is resting against the cargo compartment cover.
If the backrest comes into contact with sur-
rounding parts of the cargo compartment
paneling, reduce the angle of the backrest.
Adjusting the seat fore-and-aft position
!When moving the rear seats back, make
sure there are no objects in the footwell or behind the seats. The rear seats and/or the
objects could otherwise be damaged.
254Stowage areas
Stowage and features