2015 MERCEDES-BENZ B-CLASS SPORTS flat tire
[x] Cancel search: flat tirePage 7 of 346
AUTO lightsDisplay message ............................ 222
see Lights
Automatic car wash (care) ...............276
Automatic engine start (ECO start/
stop function) ................................... .139
Automatic engine switch-off (ECO
start/stop function) .......................... 139
Automatic headlamp mode .............. 104
Automatic transmission
Accelerator pedal position ............. 146
Automatic drive program .............. .147
Changing gear ............................... 146
DIRECT SELECT lever ..................... 142
Drive program displa y.................... 143
Driving tips .................................... 146
Emergency running mode .............. 150
Engaging drive position .................. 145
Engaging neutral ............................ 144
Engaging park position automati-
cally ............................................... 143
Engaging reverse gear ................... 144
Engaging the park position ............ 143
Holding the vehicle stationary on
uphill gradients .............................. 146
Kickdown ....................................... 146
Manual drive progra m.................... 148
Overview ........................................ 142
Problem (malfunction) ................... 150
Program selector button ................ 147
Pulling away ................................... 138
Starting the engine ........................ 137
Steering wheel paddle shifters ...... 147
Transmission position display ........ 143
Transmission positions .................. 145
Automatic transmission emer-
gency mode ....................................... 150
B
Backup lamp
Changing bulb s.............................. 112
Display message ............................ 221
Bag hook ............................................ 255
BAS (Brake Assist System) ................. 61
Battery (SmartKey)
Checking .......................................... 73
Important safety notes .................... 73 Replacing ......................................... 74
Battery (vehicle)
Charging ........................................ 291
Display message ............................ 223
Important safety notes .................. 289
Jump starting ................................. 293
Blind Spot Assist
Activating/deactivating (on-
board computer) ............................ 203
Display message ............................ 226
Notes/function .............................. 185
Brake fluid
Display message ............................ 214
Notes ............................................. 338
Brake force distribution
see EBD (electronic brake force
distribution)
Brake lamps
Display message ............................ 220
Brakes
ABS .................................................. 61
Adaptive Brake Assist ...................... 63
BAS .................................................. 61
Brake fluid (notes) ......................... 338
Display message ............................ 208
EBD .................................................. 66
Hill start assist ............................... 138
HOLD function ............................... 170
Important safety notes .................. 157
Maintenance .................................. 158
Parking brake ................................ 153
Riding tips ...................................... 157
Warning lamp ................................. 237
Breakdown
see Flat tire
Brightness control (instrument
cluster lighting) ................................... 29
Buttons on the steering wheel ......... 193C
Calling up a malfunction
see Display messages
Care
Car wash ........................................ 276
Carpets .......................................... 282
Display ........................................... 280
Exhaust pipe .................................. 280
Index5
Page 11 of 346
Important safety notes .................. 139
Introduction ................................... 139
Emergency
Automatic measures after an acci-
dent ................................................ .54
Emergency release
Driver's door .................................... 78
Vehicle ............................................ .78
Emergency spare wheel
General notes ................................ 329
Important safety notes .................. 329
Removing ...................................... .330
Technical data ............................... 331
Emergency Tensioning Devices
Activation ......................................... 52
Emergency unlocking
Tailgate ............................................ 80
Emissions control
Service and warranty information .... 21
Engine
Check Engine warning lamp ........... 244
Display message ............................ 222
ECO start/stop function ................ 139
Engine number ............................... 335
Irregular running ............................ 141
Jump-starting ................................. 293
Starting problems .......................... 141
Starting the engine with the
SmartKey ....................................... 137
Starting with the Start/Stop but-
ton ................................................. 138
Switching off .................................. 153
Tow-starting (vehicle) ..................... 298
Engine electronics
Problem (malfunction) ................... 141
Engine oil
Adding .......................................... .272
Additives ........................................ 338
Checking the oil level ..................... 271
Checking the oil level using the
dipstick .......................................... 272
Display message ............................ 224
Filling capacity ............................... 338
Notes about oil grades ................... 337
Notes on oil level/consumption .... 271
Viscosity ........................................ 338 ESP
®
(Electronic Stability Pro-
gram)
Activating/deactivating (on-
board computer) ............................ 202
Characteristics ................................. 65
Deactivating/activating (notes) ....... 65
Display message ............................ 208
ETS/4ETS ........................................ 64
Function/notes ................................ 64
General notes .................................. 64
Important safety information ........... 64
Trailer stabilization ........................... 66
Warning lamp ................................. 240
ETS/4ETS (Electronic Traction Sys-
tem) ...................................................... 64
Exhaust
see Exhaust pipe
Exhaust check ................................... 156
Exhaust pipe
Cleaning ......................................... 280
Exterior lighting
Cleaning ......................................... 279
see Lights
Exterior mirrors
Adjusting ......................................... 98
Dipping (automatic) ......................... 99
Folding in when locking (on-boardcomputer) ...................................... 206
Folding in/out (automatically )......... 99
Folding in/out (electrically) ............. 98
Out of position (troubleshooting) ..... 99
Setting ............................................. 99
Storing settings (memory func-
tion) ............................................... 101
Storing the parking position .......... 100
Eyeglasses compartment ................. 249
F
Filler cap
see Fuel filler flap
Flat tire
MOExtended tire s.......................... 285
Preparing the vehicle ..................... 284
TIREFIT kit ...................................... 286
see Emergency spare wheel
Floormats ........................................... 268
Index9
Page 19 of 346
Checking ........................................ 303
Curb weight (definition)................. 321
Definition of terms ......................... 319
Direction of rotation ...................... 322
Display message ............................ 229
Distribution of the vehicle occu-
pants (definition) ............................ 322
DOT (Department of Transporta-
tion) (definition) ............................. 320
DOT, Tire Identification Number
(TIN) ............................................... 319
GAWR (Gross Axle Weight Rating)
(definition) ..................................... 320
General notes ................................ 326
GVW (Gross Vehicle Weight) (def-
inition) ........................................... 320
GVWR (Gross Vehicle Weight Rat-
ing) (definition) .............................. 320
Important safety notes .................. 302
Increased vehicle weight due to
optional equipment (definition) ...... 320
Information on driving .................... 302
Kilopascal (kPa) (definition) ........... 320
Labeling (overview) ........................ 316
Load bearing index (definition) ...... 321
Load index ..................................... 318
Load index (definition) ................... 320
M+S tire s....................................... 304
Maximum load on a tire (defini-
tion) ............................................... 321
Maximum loaded vehicle weight
(definition) ..................................... 320
Maximum permissible tire pres-
sure (definition) ............................. 321
Maximum tire load ......................... 318
Maximum tire load (definition) ....... 321
MOExtended tire s.......................... 304
Optional equipment weight (defi-
nition) ............................................ 321
PSI (pounds per square inch) (def-
inition) ........................................... 321
Replacing ....................................... 322
Service life ..................................... 304
Sidewall (definition) ....................... 321
Speed rating (definition) ................ 320
Storing ........................................... 322
Structure and characteristics
(definition) ..................................... 319 Summer tire
s................................. 304
Temperature .................................. 315
TIN (Tire Identification Number)
(definition) ..................................... 321
Tire bead (definition) ...................... 321
Tire pressure (definition) ................ 321
Tire pressures (recommended) ...... 320
Tire size (data) ............................... 326
Tire size designation, load-bearing capacity, speed rating .................... 316
Tire tread ....................................... 303
Tire tread (definition) ..................... 321
Total load limit (definition) ............. 322
Traction ......................................... 315
Traction (definition) ....................... 321
Tread wear ..................................... 315
Uniform Tire Quality Grading
Standards ...................................... 314
Uniform Tire Quality Grading
Standards (definition) .................... 320
Wear indicator (definition) ............. 321
Wheel and tire combination ........... 328
Wheel rim (definition) .................... 320
see Flat tire
Top Tether ............................................ 57
Tow-starting
Emergency engine starting ............ 298
Important safety notes .................. 295
Installing the towing eye ................ 296
Removing the towing eye ............... 297
Towing a trailer
ESP ®
(Electronic Stability Pro-
gram) ............................................... 66
Towing away
Important safety guidelines ........... 295
Installing the towing eye ................ 296
Notes for 4MATIC vehicles ............ 298
Removing the towing eye ............... 297
Transporting the vehicl e................ 298
With both axles on the ground ....... 297
With front axle raised ..................... 297
Towing eye ......................................... 284
Transmission
see Automatic transmission
Transmission position display
(DIRECT SELECT lever) ...................... 143
Transporting the vehicle .................. 298
Index17
Page 49 of 346
However, it does not protect the chest or
arms.
In the event of a side impact, the window cur-
tain air bag is deployed on the side on which
the impact occurs.
If the system determines that they can offer
additional protection to that provided by the
seat belt, a window curtain air bag may be
deployed in other accident situations( Y page 52).
Occupant Classification System
(OCS)
Introduction
The Occupant Classification System (OCS)
categorizes the person in the front-passenger
seat. Depending on that result, the front-
passenger front air bag is either enabled or
deactivated.
The system does not deactivate: R the side impact air bag
R the window curtain air bag
R the Emergency Tensioning Devices
Prerequisites
To be classified correctly, the front passenger
must sit:
R with the seat belt fastened correctly
R in an almost upright position with their
back against the seat backrest
R with their feet resting on the floor, if possi-
ble
If the front passenger does not observe these
conditions, OCS may produce a false classi-
fication, e.g. because the front passenger:
R transfers their weight by supporting them-
selves on a vehicle armrest
R sits in such a way that their weight is raised
from the seat cushion
If it is absolutely necessary to install a child
restraint system on the front-passenger seat,
be sure to observe the correct positioning of the child restraint system. Never place
objects under or behind the child restraint
system, e.g. cushions. The entire base of the
child restraint system must always rest on the
seat cushion of the front-passenger seat. The
backrest of the forward-facing child restraint system must lie as flat as possible against the
backrest of the front-passenger seat.
The child restraint system must not touch the
roof or be subjected to a load by the head
restraint. Adjust the angle of the seat back-
rest and the head restraint position accord-
ingly.
Only then can OCS be guaranteed to function correctly. Always observe the child restraint
system manufacturer's installation instruc-tions.
Operation of Occupant Classification
System (OCS)
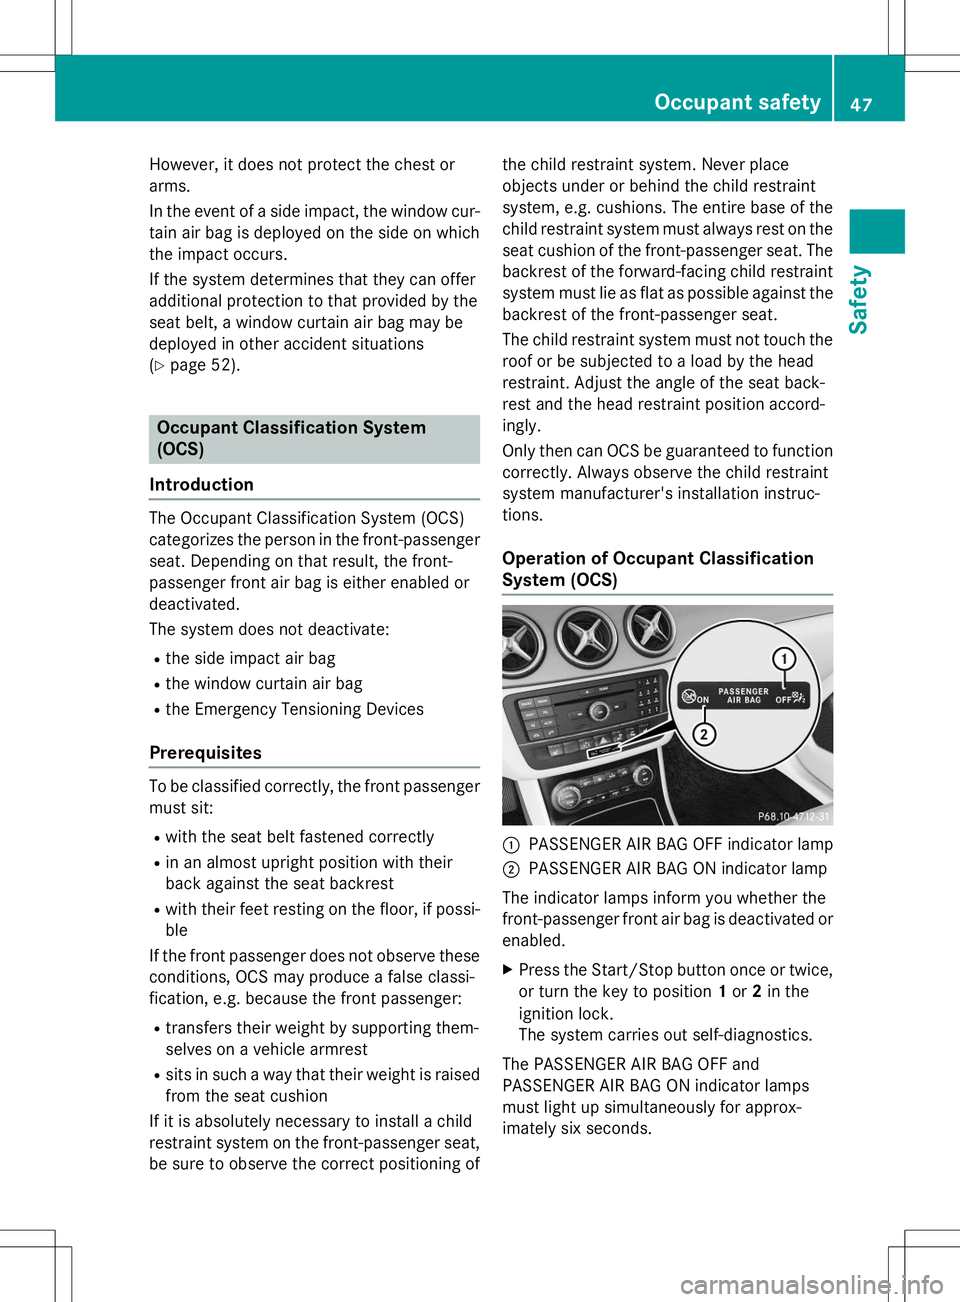
:PASSENGER AIR BAG OFF indicator lamp
;PASSENGER AIR BAG ON indicator lamp
The indicator lamps inform you whether the
front-passenger front air bag is deactivated or
enabled.
X Press the Start/Stop button once or twice,
or turn the key to position 1or 2in the
ignition lock.
The system carries out self-diagnostics.
The PASSENGER AIR BAG OFF and
PASSENGER AIR BAG ON indicator lamps
must light up simultaneously for approx-
imately six second s.
Occupant safety47
Safety
Z
Page 53 of 346
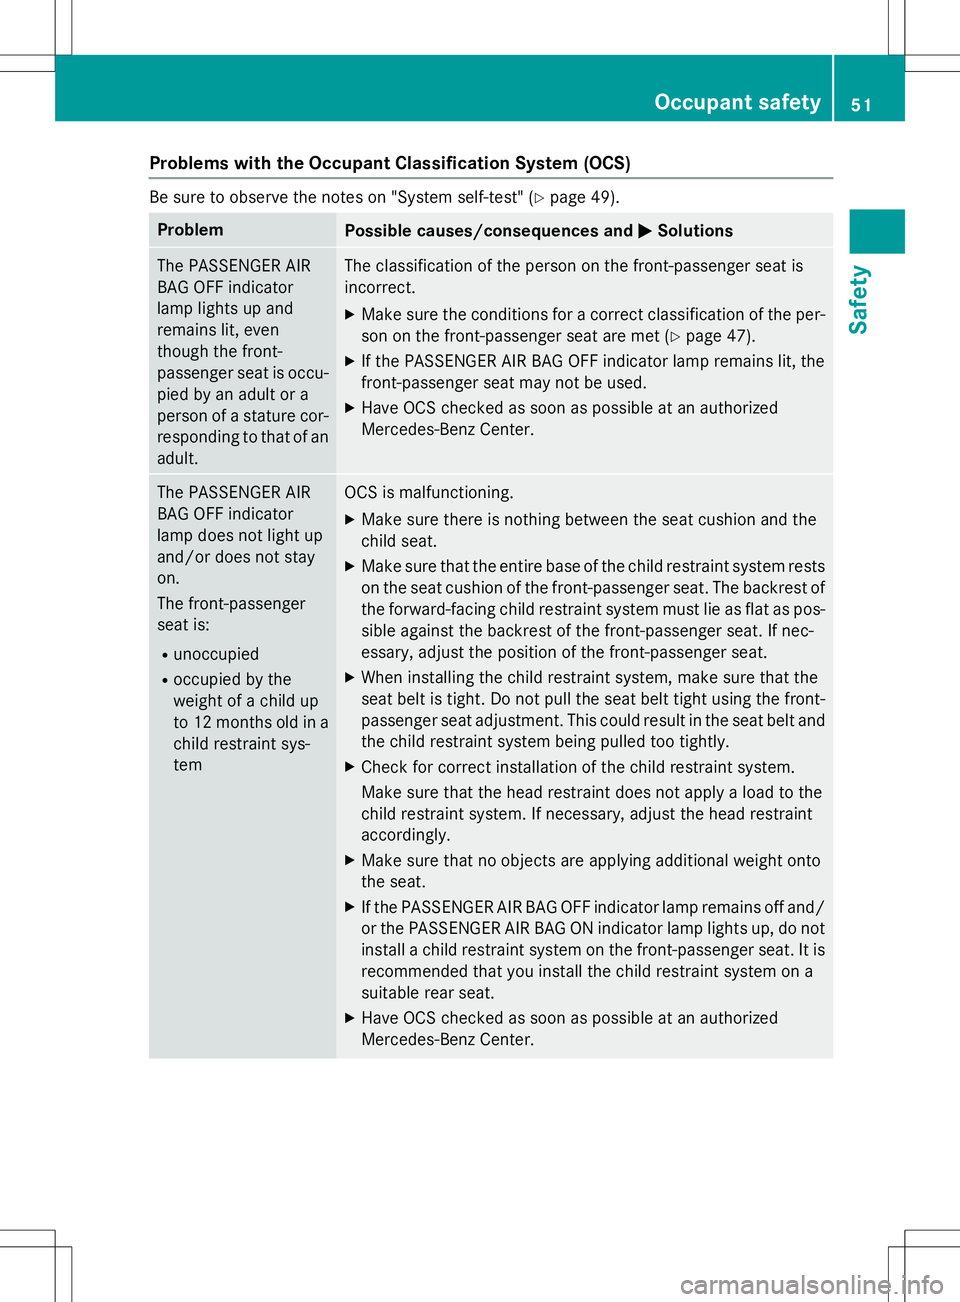
Problems with the Occupant Classification System (OCS)
Be sure to observe the notes on "System self-test" (Ypage 49).
ProblemPossible causes/consequences and MSolutions
The PASSENGER AIR
BAG OFF indicator
lamp lights up and
remains lit, even
though the front-
passenger seat is occu-
pied by an adult or a
person of a stature cor-
responding to that of an
adult.The classification of the person on the front-passenger seat is
incorrect.
X Make sure the conditions for a correct classification of the per-
son on the front-passenger seat are met ( Ypage 47).
X If the PASSENGER AIR BAG OFF indicator lamp remains lit, the
front-passenger seat may not be used.
X Have OCS checked as soon as possible at an authorized
Mercedes-Benz Center.
The PASSENGER AIR
BAG OFF indicator
lamp does not light up
and/or does not stayon.
The front-passenger
seat is:
R unoccupied
R occupied by the
weight of a child up
to 12 months old in a
child restraint sys-temOCS is malfunctioning.
X Make sure there is nothing between the seat cushion and the
child seat.
X Make sure that the entire base of the child restraint system rests
on the seat cushion of the front-passenger seat. The backrest of
the forward-facing child restraint system must lie as flat as pos- sible against the backrest of the front-passenger seat. If nec-
essary, adjust the position of the front-passenger seat.
X When installing the child restraint system, make sure that the
seat belt is tight. Do not pull the seat belt tight using the front-
passenger seat adjustment. This could result in the seat belt and the child restraint system being pulled too tightly.
X Check for correct installation of the child restraint system.
Make sure that the head restraint does not apply a load to the
child restraint system. If necessary, adjust the head restraintaccordingly.
X Make sure that no objects are applying additional weight onto
the seat.
X If the PASSENGER AIR BAG OFF indicator lamp remains off and/
or the PASSENGER AIR BAG ON indicator lamp lights up, do not install a child restraint system on the front-passenger seat. It is
recommended that you install the child restraint system on a
suitable rear seat.
X Have OCS checked as soon as possible at an authorized
Mercedes-Benz Center.
Occupant safety51
Safety
Z
Page 60 of 346
Make sure that:
R Top Tether hook Ais hooked into Top
Tether anchorage ?as shown.
R Top Tether belt Bis not twisted.
R Top Tether belt Bis routed between rear
seat backrest =and cargo compart-
ment cover ;if cargo compartment
cover ;is installed.
R Top Tether belt Bis routed between the
rear seat backrest =and the cargo net if
the cargo net is installed.
X Swing back rear seat backrest =until it
engages.
The red lock verification indicator is no lon- ger visible.
X Install the LATCH-type (ISOFIX) child
restraint system with Top Tether. Always
comply with the child restraint system
manufacturer's installation instructions
when doing so.
X Tension Top Tether belt B. Always comply
with the child restraint system manufactur- er's installation instructions when doing so.
X Move head restraint :back down again
slightly if necessary ( Ypage 95). Make
sure that you do not interfere with the cor-
rect routing of Top Tether belt B.
Child restraint system on the front-
passenger seat
General notes
Accident statistics show that children
secured in the rear seats are safer than chil-
dren secured in the front-passenger seat. For this reason, Mercedes-Benz strongly advises
that you install the child restraint system on a
rear seat.
If it is absolutely necessary to install a child
restraint system on the front-passenger seat,
be sure to observe the instructions and safety
notes on the "Occupant Classification System (OCS)" ( Ypage 47). You can thus avoid the risks that could arise
as a result of:
R an incorrectly categorized person in the
front-passenger seat
R the unintentional deactivation of the front-
passenger front air bag
R the unsuitable positioning of the child
restraint system, e.g. too close to the dash-
board
Rearward-facing child restraint system
If it is absolutely necessary to install a rear-
ward-facing child restraint system on the
front-passenger seat, always make sure that
the front-passenger front air bag is deactiva-
ted. Only if the PASSENGER AIR BAG OFF
indicator lamp is permanently lit ( Ypage 39)
is the front-passenger front air bag deactiva-ted.
Always observe the child restraint system
manufacturer's installation and operating
instructions.
Forward-facing child restraint system
If it is absolutely necessary to install a
forward-facing child restraint system on the
front-passenger seat, always move the front-
passenger seat as far back as possible. The
entire base of the child restraint system must
always rest on the seat cushion of the front-
passenger seat. The backrest of the child
restraint system must lie as flat as possible
against the backrest of the front-passenger
seat. The child restraint system must not
touch the roof or be subjected to a load by the
head restraint. Adjust the angle of the seat
backrest and the head restraint position
accordingly. Always make sure that the shoul- der belt strap is correctly routed from the
vehicle belt outlet to the shoulder belt guide
on the child restraint system. The shoulder
belt strap must be routed forwards and down-wards from the vehicle belt outlet. If neces-
sary, adjust the vehicle belt outlet and the
front-passenger seat accordingly.
58Children in the vehicle
Safety
Page 114 of 346
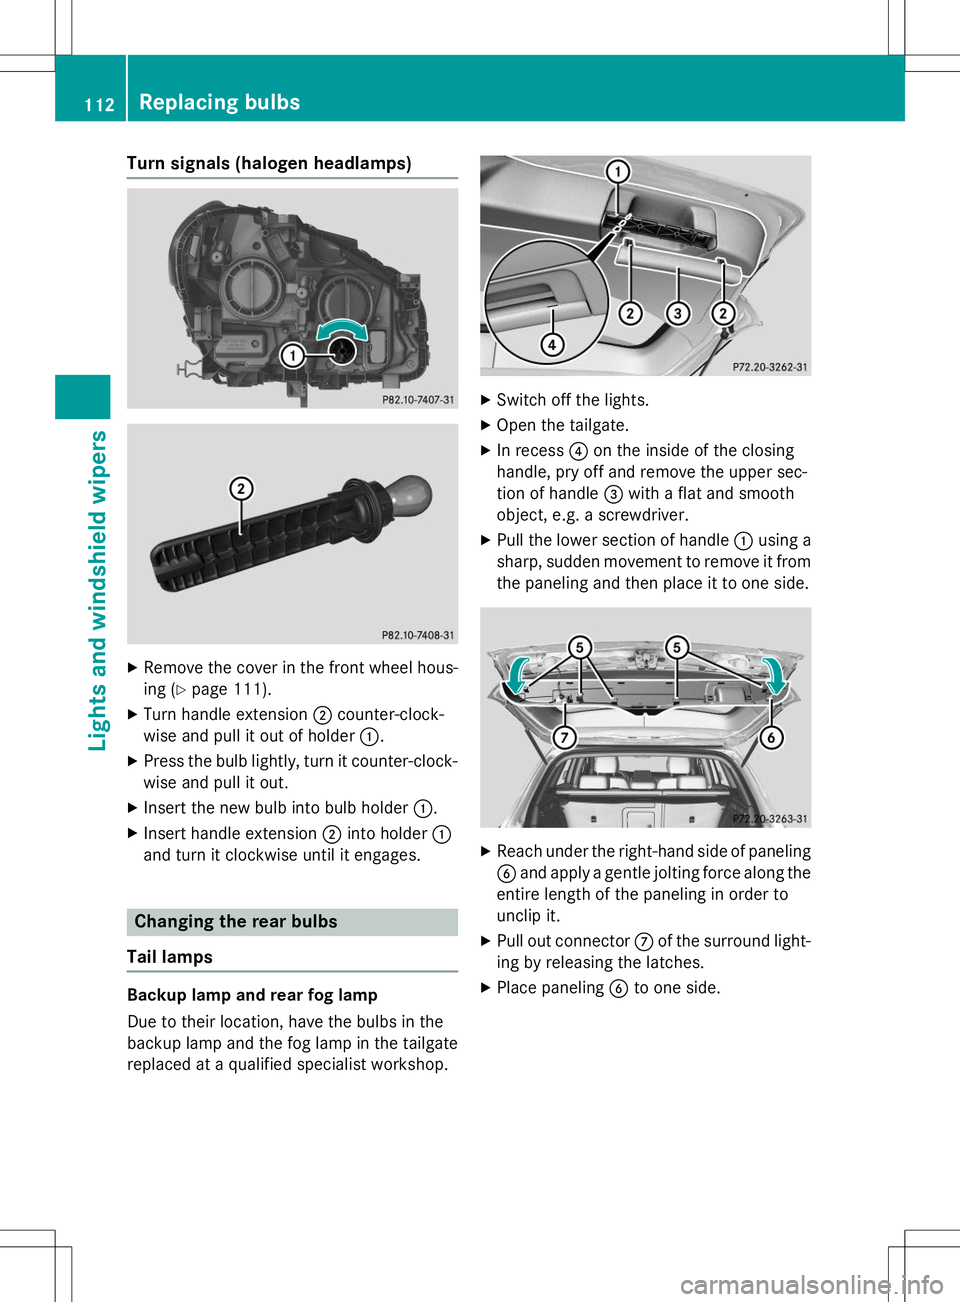
Turn signals (halogen headlamps)
XRemove the cover in the front wheel hous-
ing ( Ypage 111).
X Turn handle extension ;counter-clock-
wise and pull it out of holder :.
X Press the bulb lightly, turn it counter-clock-
wise and pull it out.
X Insert the new bulb into bulb holder :.
X Insert handle extension ;into holder :
and turn it clockwise until it engages.
Changing the rear bulbs
Tail lamps
Backup lamp and rear fog lamp
Due to their location, have the bulbs in the
backup lamp and the fog lamp in the tailgate replaced at a qualified specialist workshop.
X Switch off the lights.
X Open the tailgate.
X In recess ?on the inside of the closing
handle, pry off and remove the upper sec-
tion of handle =with a flat and smooth
object, e.g. a screwdriver.
X Pull the lower section of handle :using a
sharp, sudden movement to remove it from the paneling and then place it to one side.
X Reach under the right-hand side of paneling
B and apply a gentle jolting force along the
entire length of the paneling in order to
unclip it.
X Pull out connector Cof the surround light-
ing by releasing the latches.
X Place paneling Bto one side.
112Replacing bulbs
Lights and windshield wipers
Page 158 of 346
Drive sensibly – save fuel
Observe the following tips to save fuel:R The tires should always be inflated to the
recommended tire pressure.
R Remove unnecessary loads.
R Remove roof racks when they are not nee-ded.
R Warm up the engine at low engine speeds.
R Avoid frequent acceleration or braking.
R Have all maintenance work carried out as
indicated by the service intervals in the
Maintenance Booklet or by the service
interval display.
Fuel consumption also increases when driv-
ing in cold weather, in stop-start traffic and in
hilly terrain.
Drinking and driving
GWARNING
Drinking and driving and/or taking drugs and driving are very dangerous combinations.
Even a small amount of alcohol or drugs can
affect your reflexes, perceptions and judg-
ment.
The possibility of a serious or even fatal acci-
dent is greatly increased when you drink or
take drugs and drive.
Do not drink or take drugs and drive or allow
anyone to drive who has been drinking or tak-
ing drugs.
Emission control
GWARNING
Combustion engines emit poisonous exhaust
gases such as carbon monoxide. Inhaling
these exhaust gases leads to poisoning. There is a risk of fatal injury. Therefore never leave
the engine running in enclosed spaces with-
out sufficient ventilation.
Certain engine systems are designed to keep
the level of poisonous components in exhaust
fumes within legal limits. These systems only work at peak efficiency if
they are serviced exactly in accordance with
the manufacturer's specifications. For this
reason, only have work on the engine carried
out by qualified and authorized Mercedes-
Benz technicians.
The engine settings must not be changed
under any circumstances. Furthermore, all
specific service work must be carried out at
regular intervals and in accordance with the
Mercedes-Benz service requirements. Details
can be found in the Maintenance Booklet.
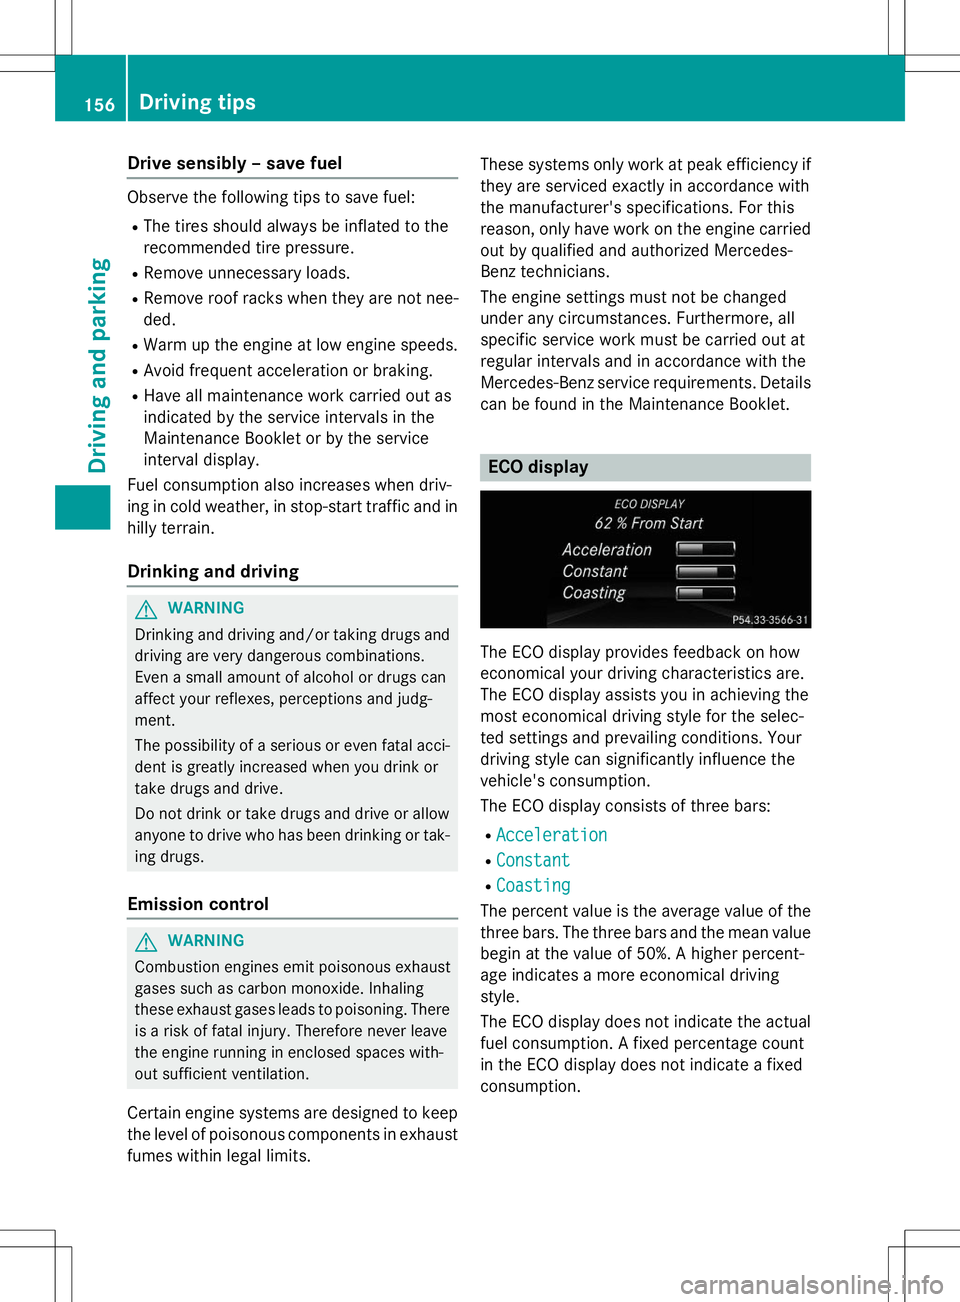
ECO display
The ECO display provides feedback on how
economical your driving characteristics are.
The ECO display assists you in achieving the
most economical driving style for the selec-
ted settings and prevailing conditions. Your
driving style can significantly influence the
vehicle's consumption.
The ECO display consists of three bars: R
Acceleration
RConstant
RCoasting
The percent value is the average value of the three bars. The three bars and the mean value
begin at the value of 50%. A higher percent-
age indicates a more economical driving
style.
The ECO display does not indicate the actual fuel consumption. A fixed percentage count
in the ECO display does not indicate a fixed
consumption.
156Driving tips
Driving and pa rking