2015 MERCEDES-BENZ B-Class ELECTRIC warning light
[x] Cancel search: warning lightPage 67 of 338
If the distance warning function is not activa-
ted, the æsymbol appears in the assis-
tance graphics display.
The distance warning function can help you to minimize the risk of a front-end collision with
a vehicle ahead or reduce the effects of such
a collision. If the distance warning function
detects that there is a risk of a collision, you
will be warned visually and acoustically.
Starting at a speed of around 4 mph (7 km/h),
the distance warning function warns you if
you rapidly approach a vehicle in front. An
intermittent warning tone will then sound,
and the ·distance warning lamp will light
up in the instrument cluster.
X Brake immediately in order to increase the
distance from the vehicle in front.
or
X Take evasive action, provided it is safe to do
so.
Due to the nature of the system, particularly
complicated but non-critical driving condi-
tions may also cause the system to display a
warning.
With the help of the radar sensor system, the distance warning function can detect obsta-
cles that are in the path of your vehicle for an
extended period of time.
Up to a speed of around 44 mph (70 km/h),
the distance warning function can also react
to stationary obstacles, such as stopped or
parked vehicles.
If you approach an obstacle and the distance
warning function detects a risk of a collision,
the system will initially alert you both visually and acoustically.
Autonomous braking function If the driver does not react to the distance
warning signal in a critical situation, COLLI-
SION PREVENTION ASSIST PLUS can assist
with the autonomous braking function. The autonomous braking function:
R gives the driver more time to react to criti-
cal driving situations
R can help the driver to avoid an accident or
R reduces the effects of an accident
The autonomous braking function is available
in the following speed ranges:
R 5 - 65 mph (7 - 105 km/h) for moving
objects
R 5 - 31 mph (7 - 50 km/h) for stationary
objects
If the autonomous braking function requires a particularly high braking force, preventative
passenger protection measures (PRE-SAFE ®
)
are activated simultaneously.
Adaptive Brake Assist i
Observe the "Important safety notes" sec-
tion (Y page 62).
Adaptive Brake Assist provides braking assis- tance in hazardous situations at speeds
above 4 mph (7 km/h). It uses radar sensor
technology to assess the traffic situation. G
WARNING
Adaptive Brake Assist cannot always clearly
identify objects and complex traffic situa-
tions.
In such cases, Adaptive Brake Assist can:
R intervene unnecessarily
R not intervene
There is a risk of an accident.
Always pay careful attention to the traffic sit- uation and be ready to brake. Terminate the
intervention in a non-critical driving situation. G
WARNING
Adaptive Brake Assist does not react:
R to people or animals
R to oncoming vehicles
R to crossing traffic
R when cornering Driving safety systems
65Safety
Z
Page 69 of 338
Drive on carefully. Have ESP
®
checked at a
qualified specialist workshop.
When towing your vehicle with the front axle
raised, observe the notes on ESP ®
(Y page 295).
When towing the vehicle with the rear axle
raised, observe the notes on ESP ®
(Y page 295).
ESP ®
is only deactivated if the åwarning
lamp is lit continuously.
If the ÷ warning lamp and the åwarn-
ing lamp are lit continuously, ESP ®
is not
available due to a malfunction.
Observe the information on warning lamps
(Y page 233) and display messages which
may be shown in the instrument cluster
(Y page 201).
Only use wheels with the recommended tire
sizes. Only then will ESP ®
function properly.
Characteristics of ESP ®Characteristics of ESP
®
If the ÷ ESP warning lamp goes out before
beginning the journey, ESP ®
is automatically
active.
If ESP ®
intervenes, the ÷ESP®
warning
lamp flashes in the instrument cluster.
If ESP ®
intervenes:
X Do not deactivate ESP ®
under any circum-
stances.
X Only depress the accelerator pedal as far as
necessary when pulling away.
X Adapt your driving style to suit the prevail-
ing road and weather conditions. Deactivating/activating ESP
® Important safety notes
You can select between the following states
of ESP ®
:
R ESP ®
is activated.
R ESP ®
is deactivated. G
WARNING
If you deactivate ESP ®
, ESP ®
no longer sta-
bilizes the vehicle. There is an increased risk
of skidding and an accident.
Only deactivate ESP ®
in the situations descri-
bed in the following.
It may be best to deactivate ESP ®
in the fol-
lowing situations:
R when using snow chains
R in deep snow
R on sand or gravel
i Activate ESP ®
as soon as the situations
described above no longer apply. ESP ®
will
otherwise not be able to stabilize the vehi-
cle if the vehicle starts to skid or a wheel
starts to spin.
! Avoid spinning the driven wheels for an
extended period with ESP ®
deactivated.
You could otherwise damage the drivetrain.
Deactivating/activating ESP ®
You can deactivate or activate ESP ®
via the
on-board computer (Y page 194).
ESP ®
deactivated:
The å ESP®
OFF warning lamp in the
instrument cluster lights up.
ESP ®
activated:
The å ESP®
OFF warning lamp in the
instrument cluster goes out.
Characteristics when ESP ®
is deactivated
If ESP ®
is deactivated and one or more wheels
start to spin, the ÷ESP®
warning lamp in
the instrument cluster flashes. In such situa-
tions, ESP ®
will not stabilize the vehicle. Driving safety systems
67Safety Z
Page 70 of 338
If you deactivate ESP
®
:
R ESP ®
no longer improves driving stability.
R engine torque is no longer limited and the
drive wheels are able to spin.
The spinning of the wheels results in a cut-
ting action for better traction on loose sur-faces.
R traction control is still activated.
R ESP ®
still provides support when you
brake. EBD (electronic brake force distribu-
tion)
General information EBD monitors and controls the brake pres-
sure on the rear wheels to improve driving
stability while braking.
Important safety notes i
Observe the "Important safety notes" sec-
tion (Y page 62). G
WARNING
If EBD is malfunctioning, the rear wheels can
lock, e.g. under full braking. This increases the risk of skidding and an accident.
You should therefore adapt your driving style
to the different handling characteristics. Have the brake system checked at a qualified spe-
cialist workshop.
Observe information regarding indicator and
warning lamps (Y page 230) as well as dis-
play messages (Y page 205).ADAPTIVE BRAKE
ADAPTIVE BRAKE enhances braking safety
and offers increased braking comfort. In addi- tion to the braking function, ADAPTIVE BRAKE
also has the HOLD function (Y page 163) and
hill start assist (Y page 134). STEER CONTROL
General information STEER CONTROL helps you by transmitting a
noticeable steering force to the steering
wheel in the direction required for vehicle
stabilization.
This steering assistance is provided in partic-
ular if:
R both right wheels or both left wheels are on
a wet or slippery road surface when you
brake.
R the vehicle starts to skid.
Important safety notes i
Observe the "Important safety notes" sec-
tion (Y page 62).
No steering assistance is provided from
STEER CONTROL, if: R ESP ®
is malfunctioning.
R the lighting is faulty.
If ESP ®
is malfunctioning, you will be assisted
further by the electrical power steering. Recuperative Brake System
G
WARNING
In the event of malfunctions in the Recupera- tive Brake System, the following may occur:
R the braking performance of the electric
motor may be either reduced or not effec-
tive
R brake pedal resistance may be lower than
usual
R pedal travel may be longer than usual
If you do not make an additional effort to apply
the brake yourself, the braking effect may not be sufficient. There is a risk of an accident.
In the event of this malfunction, continue to
depress the brake pedal. The brake system is
still fully functional. 68
Driving safety systemsSafety
Page 71 of 338
Observe the "Important safety notes" section
for driving safety systems (Y page 62).
The Recuperative Brake System converts the kinetic energy when braking into electrical
energy. The electric motor is used as an alter-
nator during braking. This electrical energy is
then stored in the high-voltage battery.
You can find information about manually
adjustable recuperation under "Steering
wheel paddle shifters" (Y page 138).
If the warning light in the instrument cluster is lit up, there is a motor malfunction or a brake
malfunction.
Observe information regarding indicator and
warning lamps (Y page 229) as well as dis-
play messages (Y page 201). Protection against theft
Immobilizer
The immobilizer prevents your vehicle from
being started without the correct SmartKey.
X To activate with the SmartKey: remove
the SmartKey from the ignition lock.
X To activate with KEYLESS-GO start-
function or KEYLESS-GO: switch the igni-
tion off and open the driver's door.
X To deactivate: switch on the ignition.
When leaving the vehicle, always take the
SmartKey with you and lock the vehicle. Any-
one can start the drive system if a valid key
has been left inside the vehicle.
i The immobilizer is always deactivated
when you start the drive system.
In the event that the engine cannot be star- ted (yet the vehicle's battery is charged),
the system is not operational. The READY
display in the multifunction display does
not appear. Contact an authorized
Mercedes-Benz Center or call
1-800-FOR-MERCedes (in the USA) or
1-800-387-0100 (in Canada). ATA (anti-theft alarm system)
X
To arm: lock the vehicle with the SmartKey
or KEYLESS-GO.
Indicator lamp :flashes. The alarm sys-
tem is armed after approximately
15 seconds.
X To disarm: unlock the vehicle with the
SmartKey or KEYLESS-GO.
or X Insert the SmartKey into the ignition lock.
A visual and audible alarm is triggered if the
alarm system is armed and you open:
R a door
R the vehicle with the mechanical key
R the tailgate
R the hood
X To turn the alarm off with the SmartKey:
press the %or& button on the
SmartKey.
The alarm is switched off.
or
X Vehicles with KEYLESS-GO start-func-
tion or KEYLESS-GO: remove the Start/
Stop button from the ignition lock
(Y page 131).
X Insert the SmartKey into the ignition lock.
The alarm is switched off. Protection against theft
69Safety Z
Page 77 of 338
If you unlock the vehicle using the mechanical
key, the charge socket flap will not be
unlocked automatically.
Removing the mechanical key X
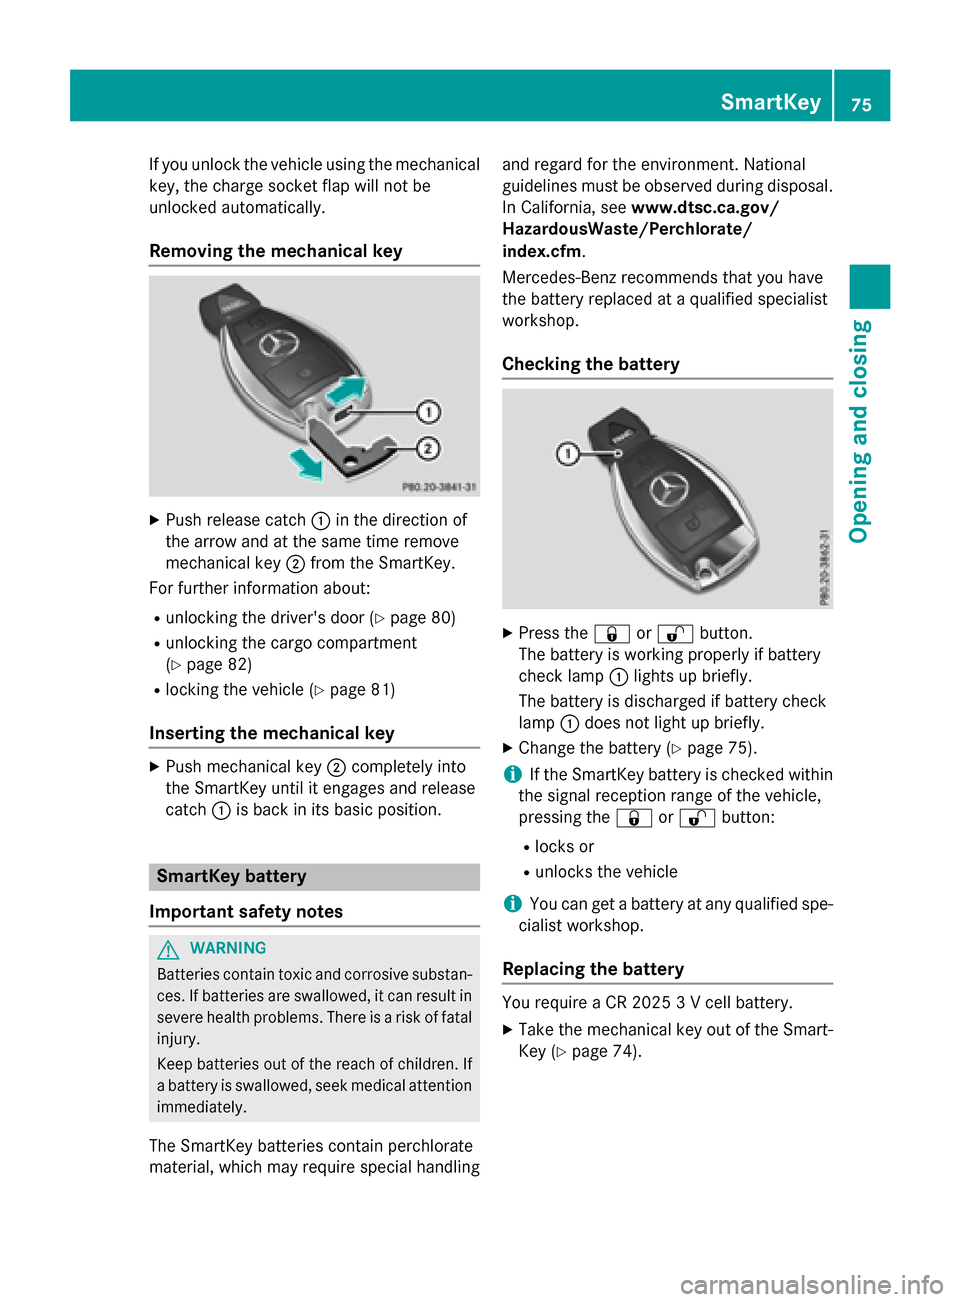
Push release catch :in the direction of
the arrow and at the same time remove
mechanical key ;from the SmartKey.
For further information about:
R unlocking the driver's door (Y page 80)
R unlocking the cargo compartment
(Y page 82)
R locking the vehicle (Y page 81)
Inserting the mechanical key X
Push mechanical key ;completely into
the SmartKey until it engages and release
catch :is back in its basic position. SmartKey battery
Important safety notes G
WARNING
Batteries contain toxic and corrosive substan- ces. If batteries are swallowed, it can result in
severe health problems. There is a risk of fatal injury.
Keep batteries out of the reach of children. If
a battery is swallowed, seek medical attention immediately.
The SmartKey batteries contain perchlorate
material, which may require special handling and regard for the environment. National
guidelines must be observed during disposal.
In California, see www.dtsc.ca.gov/
HazardousWaste/Perchlorate/
index.cfm.
Mercedes-Benz recommends that you have
the battery replaced at a qualified specialist
workshop.
Checking the battery X
Press the &or% button.
The battery is working properly if battery
check lamp :lights up briefly.
The battery is discharged if battery check
lamp :does not light up briefly.
X Change the battery (Y page 75).
i If the SmartKey battery is checked within
the signal reception range of the vehicle,
pressing the &or% button:
R locks or
R unlocks the vehicle
i You can get a battery at any qualified spe-
cialist workshop.
Replacing the battery You require a CR 2025 3 V cell battery.
X Take the mechanical key out of the Smart-
Key (Y page 74). SmartKey
75Opening and closing Z
Page 85 of 338
Opening
X
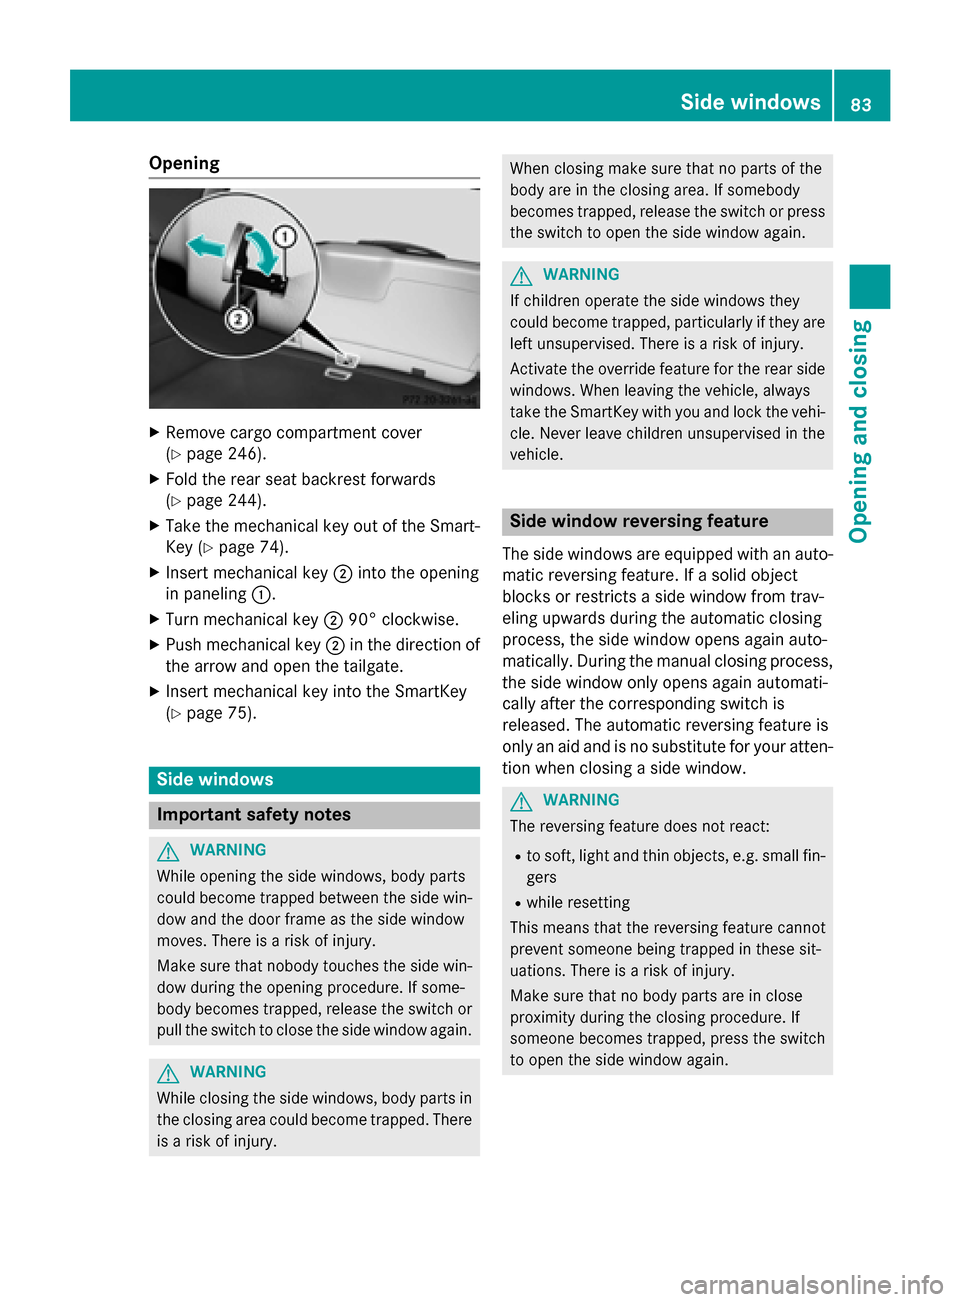
Remove cargo compartment cover
(Y page 246).
X Fold the rear seat backrest forwards
(Y page 244).
X Take the mechanical key out of the Smart-
Key (Y page 74).
X Insert mechanical key ;into the opening
in paneling :.
X Turn mechanical key ;90° clockwise.
X Push mechanical key ;in the direction of
the arrow and open the tailgate.
X Insert mechanical key into the SmartKey
(Y page 75). Side windows
Important safety notes
G
WARNING
While opening the side windows, body parts
could become trapped between the side win- dow and the door frame as the side window
moves. There is a risk of injury.
Make sure that nobody touches the side win-
dow during the opening procedure. If some-
body becomes trapped, release the switch or pull the switch to close the side window again. G
WARNING
While closing the side windows, body parts in the closing area could become trapped. There is a risk of injury. When closing make sure that no parts of the
body are in the closing area. If somebody
becomes trapped, release the switch or press
the switch to open the side window again. G
WARNING
If children operate the side windows they
could become trapped, particularly if they are left unsupervised. There is a risk of injury.
Activate the override feature for the rear side
windows. When leaving the vehicle, always
take the SmartKey with you and lock the vehi-
cle. Never leave children unsupervised in the
vehicle. Side window reversing feature
The side windows are equipped with an auto- matic reversing feature. If a solid object
blocks or restricts a side window from trav-
eling upwards during the automatic closing
process, the side window opens again auto-
matically. During the manual closing process,
the side window only opens again automati-
cally after the corresponding switch is
released. The automatic reversing feature is
only an aid and is no substitute for your atten- tion when closing a side window. G
WARNING
The reversing feature does not react:
R to soft, light and thin objects, e.g. small fin-
gers
R while resetting
This means that the reversing feature cannot
prevent someone being trapped in these sit-
uations. There is a risk of injury.
Make sure that no body parts are in close
proximity during the closing procedure. If
someone becomes trapped, press the switch
to open the side window again. Side windows
83Opening and closing Z
Page 88 of 338
Problems with the side windows
G
WARNING
If you close a side window again immediately after it has been blocked or reset, the side window
closes with increased or maximum force. The reversing feature is then not active. Parts of the
body could be trapped in the closing area in the process. This poses an increased risk of injury or even fatal injury.
Make sure that no parts of the body are in the closing area. To stop the closing process, releasethe switch or push the switch again to reopen the side window. Problem
Possible causes/consequences and
M MSolutions A side window cannot
be closed because it is
blocked by objects, e.g.
leaves in the window
guide. X
Remove the objects.
X Close the side window. A side window cannot
be closed and you can-
not see the cause. If a side window is obstructed during closing and reopens again
slightly:
X Immediately after the window blocks, pull the corresponding
switch again until the side window has closed.
The side window is closed with increased force.
If a side window is obstructed again during closing and reopens
again slightly: X Immediately after the window blocks, pull the corresponding
switch again until the side window has closed.
The side window is closed without the anti-entrapment feature. 86
Side windowsOpening and closing
Page 90 of 338
Useful information
i This Operator's Manual describes all
models and all standard and optional equip- ment of your vehicle available at the time of
publication of the Operator's Manual.
Country-specific differences are possible.
Please note that your vehicle may not be
equipped with all features described. This
also applies to safety-related systems and
functions.
i Read the information on qualified special-
ist workshops (Y page 25). Correct driver's seat position
G
WARNING
You could lose control of your vehicle if you do the following while driving:
R adjust the driver's seat, head restraint,
steering wheel or mirrors
R fasten the seat belt
There is a risk of an accident.
Adjust the driver's seat, head restraint, steer-
ing wheel and mirror and fasten your seat belt before starting the vehicle's drive system. X
Observe the safety guidelines on seat
adjustment (Y page 89).
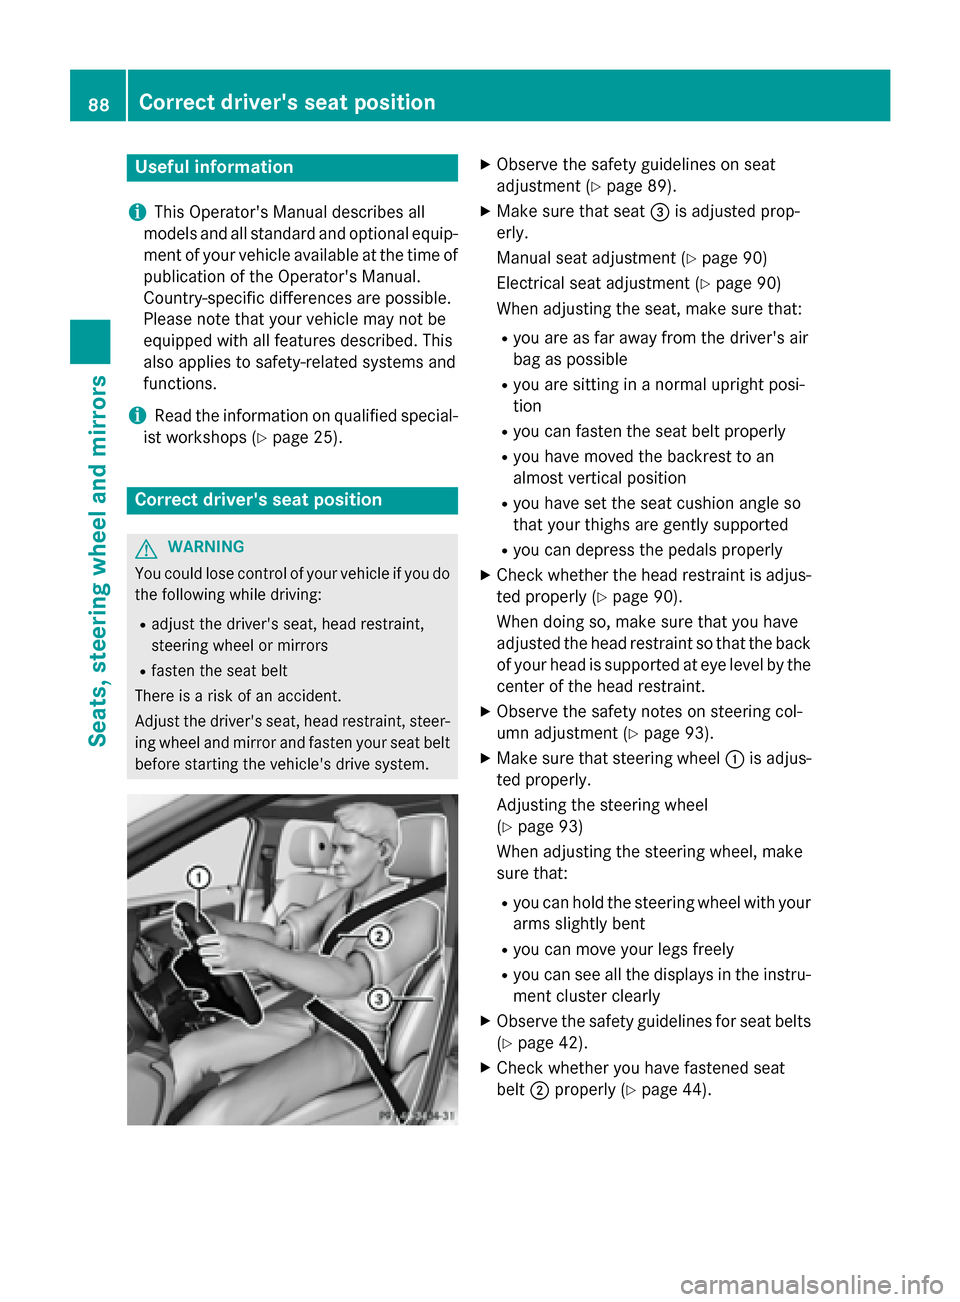
X Make sure that seat =is adjusted prop-
erly.
Manual seat adjustment (Y page 90)
Electrical seat adjustment (Y page 90)
When adjusting the seat, make sure that:
R you are as far away from the driver's air
bag as possible
R you are sitting in a normal upright posi-
tion
R you can fasten the seat belt properly
R you have moved the backrest to an
almost vertical position
R you have set the seat cushion angle so
that your thighs are gently supported
R you can depress the pedals properly
X Check whether the head restraint is adjus-
ted properly (Y page 90).
When doing so, make sure that you have
adjusted the head restraint so that the back of your head is supported at eye level by the
center of the head restraint.
X Observe the safety notes on steering col-
umn adjustment (Y page 93).
X Make sure that steering wheel :is adjus-
ted properly.
Adjusting the steering wheel
(Y page 93)
When adjusting the steering wheel, make
sure that:
R you can hold the steering wheel with your
arms slightly bent
R you can move your legs freely
R you can see all the displays in the instru-
ment cluster clearly
X Observe the safety guidelines for seat belts
(Y page 42).
X Check whether you have fastened seat
belt ;properly (Y page 44). 88
Correct driver's seat positionSeats, steering wheel and mirrors