Page 65 of 156

Copying Music From CD
• Push the LOAD button on the faceplate.
• Insert a disc, then push the MY FILES button on the faceplate. Select the “MY
MUSIC” button on the touchscreen.
• Press the “Add Music Files to HDD” button on the touchscreen, then press the
“Disc” button on the touchscreen in the next screen to start the process.
NOTE:
• You might need to select the folder or
title depending on the CD, then push
“DONE” to start the copy process.
• The copy progress is shown in the
lower left corner of the screen.
Copying Music From USB
• The USB port on the radio face plate
allows you to copy files to your hard drive. To access, lift up on the cover.
• Insert a USB device (e.g. thumb drive or memory stick), then select the “MY
MUSIC” button on the touchscreen.
• Press the “Add Music Files to HDD” button on the touchscreen, then press the
“Front USB” button on the touchscreen in the next screen.
• Select the folders or titles you would
like to copy, then press the “SAVE”
button on the touchscreen to start the
copy process.
•To copy all of the titles, press the “ALL”
button on the touchscreen then press
the “SAVE” button on the touchscreen.
NOTE:
The copy progress is shown in the lower
left corner of the screen.
Copying Pictures To The HDD
• Insert either a CD or a USB device containing your pictures in JPEG format.
• Push the MY FILES button on the faceplate.
• Press the “My Pictures” button on the touchscreen to get an overview of the
currently stored images, then press the “Add” button on the touchscreen.
• Press the “Disc” or “USB” button on the touchscreen, then select the folders or
pictures you wish to copy to the HDD. Use the “PAGE” buttons on the touchscreen
to page through the list of pictures.
Copying Music From CD
Copying Music From USB
ELECTRONICS
63
Page 66 of 156

•Press the desired pictures or press the “All” button on the touchscreen for all
pictures. Confirm your selections by pressing the “SAVE” button on the touchscreen.
NOTE:
The copy progress is shown in the lower
left corner of the screen.
Display A Picture On The Radio Screen
• Once the import is complete, the pic-
tures will then be available in the “MY
PICTURES” screen.
•Push the MY FILES button on the face-
plate, then press the “My Pictures” but-
ton on the touchscreen. Press the desired picture, press the “Set as Picture View”
button on the touchscreen and then press the “Exit” button on the touchscreen.
Lastly push the MENU button on the faceplate and press the “Picture View” button
on the touchscreen to display the chosen picture on the radio screen.
NOTE:
• A check mark in the My Pictures screen indicates the currently used picture.
• You can also delete pictures by pressing the “Delete” button on the touchscreen.
Playing Music From The HDD
• Push the MEDIA button on the faceplate to display the media source tabs at the
top of the screen. Press the “HDD” button on the touchscreen. Press the desired
track button on the touchscreen to play or press the “SEARCH/BROWSE” button
on the touchscreen to search by artist, by album, by song, by genre, from a folder,
or from Favorites.
Copying Pictures To The HDD
Playing Music From The HDD
Browsing Music From The HDD
ELECTRONICS
64
Page 67 of 156

Cleaning Your Touchscreen Radio
• Do not spray any liquid or caustic chemicals directly on the screen. Use a clean
and dry micro fiber lens cleaning cloth to clean the touchscreen.
• If necessary, use a lint-free cloth dampened with a cleaning solution such as
isopropyl alcohol or an isopropyl alcohol and water solution ratio of 50:50. Always
follow the solvent manufacturer's precautions and directions.
Garmin® Navigation
•Uconnect®430N integrates Garmin’s consumer-friendly navigation into your vehicle.
Garmin®Navigation includes a database with over six million points of interest.
• Press the “NAV” button on the touchscreen in the upper right corner of the screen
to access the Navigation system.
Changing The Navigation Voice Prompt
Volume
1. Program a destination.
2. While traveling on your route, press
the upper left area of the map screen
where your next turn is displayed.
3. The Navigation system will then re-
peat the distance to your next turn.
4. While the Navigation system is speaking, use the ON/OFF VOLUME rotary knob to
adjust the volume to a comfortable level. Please note the volume setting for
Navigation Voice Prompt is different than the audio system.
NOTE:
For your own safety and the safety of others, it is not possible to use certain features
while the vehicle is in motion.
Main Navigation Menu
Finding Points Of Interest
• From the main Navigation menu, press the “Where To?” button on the touch-
screen, then press the “Points of Interest” button on the touchscreen.
• Select a Category, then a subcategory,
if necessary.
• Select your destination and press the
“Go” button on the touchscreen.
Garmin® Navigation
Main Navigation Menu
ELECTRONICS
65
Page 68 of 156

Finding A Place By Spelling The Name
• From the Main Navigation Menu press the “Where To?” button on the touch-
screen. Next, press the “Points of Interest” button on the touchscreen then press
the “Spell Name” button on the touchscreen.
• Enter the name of your destination.
• Press the “Done” button on the touchscreen.
• Select your destination and press the “Go” button on the touchscreen.
Entering A Destination Address
• From the main Navigation menu press the “Where To?” button on the touch-
screen, then press the “Address” button on the touchscreen.
• Follow the on-screen prompts to enter the address then press the “Go” button on
the touchscreen.
Setting Your Home Location
• From the main Navigation menu press the "Tools" icon. Next select the "My Data"
folder icon. Then select "Set Home Location."
• You may enter your address directly, use your current location as your home
address, or choose from recently found locations.
Edit Home Location
• From the main Navigation menu press the “Where To?” button on the touch-
screen, then press the "Tools" icon. Next, press the "My Data" folder.
• You may enter a new address directly, use your current location or choose from
recently found locations.
Go Home
• A Home location must be saved in the system. From the Main Navigation menu,
press the “Where To?” button on the touchscreen, then press the “Go Home”
button on the touchscreen.
ELECTRONICS
66
Page 69 of 156
Following Your Route
Your route is marked with a magenta line on the map. If you depart from the original
route, your route is recalculated. A speed limit icon could appear as you travel on
major roadways.
Adding A Via Point
To add a stop between the current location and the end destination (Via Point) you
must be navigating a route.
• Press the “back arrow” icon multiple times to return to the Main Navigation menu.
• Press the “Where To?” button on the touchscreen, then search for the additional
stop. Select the destination you wish to add from the given search results.
• Press the “Go” button on the touchscreen, then press "Add as a Via Point" button
on the touchscreen and press the "Done" button on the touchscreen.
Following Your Route
1 — Distance To Next Turn2 — Current Location3 — Zoom In4 — Zoom Out5 — Current Speed
6 — Drag Map For Different View7 — Your Location On The Map8 — Estimated Time Of Arrival9 — Navigation Main Menu
ELECTRONICS
67
Page 70 of 156
Taking A Detour
To take a detour you must be navigating a route.
• Press the “back arrow” icon button on the touchscreen multiple times to return to
the Main Navigation menu.
• Press the “Detour” button on the touchscreen.
NOTE:
If the route you are currently taking is the only reasonable option, the device might
not calculate a detour.
Acquiring Satellites
The GPS Satellite strength bars indicate the strength of your satellite reception.
• Acquiring satellite signals can take a few minutes. When at least one of the bars
is green, your device has acquired satellite signals.
•You may experience delays receiving satellite signals when in areas with an ob-
structed view to the sky, such as garages, tunnels, or large cities with tall buildings.
ELECTRONICS
68
Page 71 of 156
Uconnect® 730N
NOTE:
Your radio has many features that add to the comfort and convenience of you and your
passengers. Some of these radio features should not be used when driving because
they take your eyes from the road or your attention from driving.
Clock Setting
1. Turn the radio on, then press the screen where the time is displayed.
2. Press the “User Clock” button on the touchscreen.
3. To adjust the hours, press either the “Hour Forward” or “Hour Backward” button
on the touchscreen.
4. To adjust the minutes, press either the “Minute Forward” or “Minute Backward”
button on the touchscreen.
5. To save the new time setting, press the screen where the word “Save” is displayed.
Uconnect® 730N
1 — Open/Close Display7 — Audio Jack2 — Voice Command Button8 — Radio Sales Code3 — Uconnect®Phone Button9 — ON/OFF/Rotate For Volume4 — Menu Button10 — Media Mode Button5 — Navigation Button11 — Seek Down Button6 — USB Port12 — Seek Up Button
ELECTRONICS
69
Page 72 of 156
 to
change mode sp")
Menu
• Push the MENU button on the faceplate to access the System Setup menu and the
My Files menu.
• Push the MENU button on the faceplate in an active mode (SAT, CD, AUX, etc.) to
change mode specific settings.
Equalizer, Balance And Fade
Audio Control Menu
• Push the MENU button on the face-
plate on the right side of the radio.
Then press the “Audio Control” button
on the touchscreen to get to the audio
control menu.
• Use either the arrow buttons on the
touchscreen or the cross-hair on the
screen to change Balance and Fade.
The “Center” button on the touch-
screen resets the settings.
• Press the “Equalizer” button on the touchscreen and use either the arrow buttons
on the touchscreen or the sliders on the screen to adjust BASS, MID, and/or
TREBLE.
Display Settings
• Push the MENU button on the face-
plate and press the “Display Settings”
button on the touchscreen to access
the Display Settings menu.
•Select the “Daytime Colors” button on
the touchscreen to switch to manual
daytime mode and to adjust the bright-
ness of the display using daytime colors.
•Select the “Nighttime Colors” button
on the touchscreen to switch to manual
nighttime mode and to adjust the brightness of the display using nighttime colors.
• Select the “Auto Color Mode” button on the touchscreen to switch to automatic
daytime/nighttime mode and to control the brightness of the display using the
dimmer switch of the vehicle.
• Press the “EXIT” button on the touchscreen to save your settings.
Audio Control Menu
Display Settings
ELECTRONICS
70
 1
1 2
2 3
3 4
4 5
5 6
6 7
7 8
8 9
9 10
10 11
11 12
12 13
13 14
14 15
15 16
16 17
17 18
18 19
19 20
20 21
21 22
22 23
23 24
24 25
25 26
26 27
27 28
28 29
29 30
30 31
31 32
32 33
33 34
34 35
35 36
36 37
37 38
38 39
39 40
40 41
41 42
42 43
43 44
44 45
45 46
46 47
47 48
48 49
49 50
50 51
51 52
52 53
53 54
54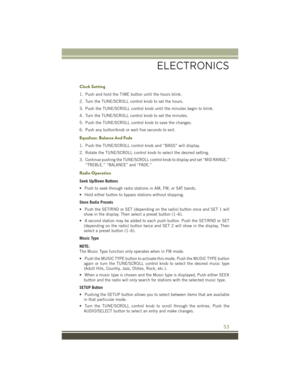 55
55 56
56 57
57 58
58 59
59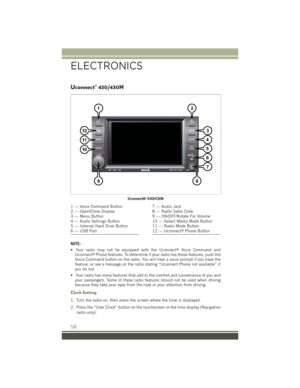 60
60 61
61 62
62 63
63 64
64 65
65 66
66 67
67 68
68 69
69 70
70 71
71 72
72 73
73 74
74 75
75 76
76 77
77 78
78 79
79 80
80 81
81 82
82 83
83 84
84 85
85 86
86 87
87 88
88 89
89 90
90 91
91 92
92 93
93 94
94 95
95 96
96 97
97 98
98 99
99 100
100 101
101 102
102 103
103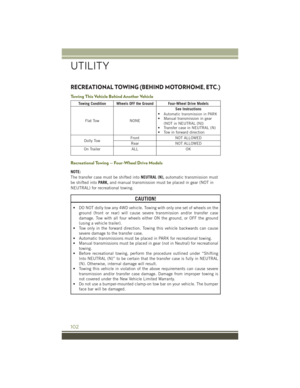 104
104 105
105 106
106 107
107 108
108 109
109 110
110 111
111 112
112 113
113 114
114 115
115 116
116 117
117 118
118 119
119 120
120 121
121 122
122 123
123 124
124 125
125 126
126 127
127 128
128 129
129 130
130 131
131 132
132 133
133 134
134 135
135 136
136 137
137 138
138 139
139 140
140 141
141 142
142 143
143 144
144 145
145 146
146 147
147 148
148 149
149 150
150 151
151 152
152 153
153 154
154 155
155

