Page 81 of 156

1.From the NAV - Main Menu, press “New Destination,” then press “Street Address.”
2. Once the Country and State are set and the Street Address screen is displayed,
begin spelling the street name in the speller. In the upper right corner the number
of possible roads decreases.
3. Press the “LIST” button on the touchscreen to display a list of possible street
names. Select the correct street name.
4. Next input the number.
5. In the Confirm Route screen the navigation radio displays the complete address,
a map of the destination area, and the current routing method for you to verify.
6. Press the “GO” button on the touchscreen to activate the route guidance.
Entering Your Home Location
1. Push the NAV button on the faceplate.
2. From the NAV - Main Menu, press “Guide Me Home” to enter your home address.
If no home address has been set, press “YES” to access the Enter Home Address
menu.
3. Press “Street Address” to enter your address. Press the button on the touchscreen
with your state’s name and enter your street name into the speller.
4. Once the street name has been input, press “CONTINUE” to confirm. Enter the
house number into the next screen. If more than one city has this address, you will
then need to select your city from a list.
5. Once the address is entered completely, the system shows a map of your home
address area. Press “SAVE” to confirm the address. The system will then ask if
you want to go there. Press the “Yes” or “No” button on the touchscreen.
Change Home Address
NOTE:
This procedure will allow you to change your Home Address if one has already been
entered. Entering the city or zip code before entering the street name facilitates
address entry.
1. Push the MENU button on the faceplate, press “My Files” and then press “My
Address Book.”
2. Press “Home”, then press “Edit Contacts” and then “Change Address.”
3. Press the button on the touchscreen with your state’s name and enter your street
name into the speller.
4. Once the street name has been input, press “CONTINUE” to confirm.
5. Enter the house number into the next screen. If more than one city has this
address, you will then need to select your city from a list.
6. Press the “SAVE” button on the touchscreen to confirm the address.
ELECTRONICS
79
Page 82 of 156
Go Home
• From the NAV - Main Menu, press “Guide Me Home” when you want to route to
your home destination.
Where Am I Now?
1. From the NAV - Main Menu, press “Where Am I Now?” The Where Am I Now?
menu displays location information for the current vehicle position.
2. Press the “NEARBY POI” button on the touchscreen to search for a local Point of
Interest.
3. Press the “SAVE LOCATION” button on the touchscreen to save the current
location in the Saved Locations memory.
Route Guidance
After starting route guidance, the system calculates the route and announces:
“Follow the arrows on the display.” You will receive navigation recommendations by
voice messages and screen displays.
Navigation Route Guidance
1 — Map Zoom Level6 — Navigation Options2 — Map Orientation7 — Navigation Main Menu3 — Next Turn8 — Map Display (2D/3D)4 — Repeat Navigation Announcement 9 — Current Location Display ON/OFF5 — Distance/Direction Of Next Turn
ELECTRONICS
80
Page 83 of 156

Route Options
After pressing the “OPTIONS” button on the touchscreen in the Route Guidance
Menu, the following information is displayed:
• In the left half of the screen, the current position and the current routing method
are displayed.
• “Take Detour” will allow you to calculate a different route.
• “Find Nearby POI” to search for a local POI.
• “Destination Info” displays destination information.
• “View Turn List” lists streets utilized for the current route.
• “Save Destination” to save the destination address.
• “Change Method” will allow you to change the routing method.
SiriusXM SATELLITE RADIO/TRAVEL LINK
• SiriusXM Travel Link requires a subscription, sold separately after the 1 year trial
subscription included with your vehicle purchase.
• SiriusXM Travel Link is only available in the United States.
• The following describes features that are available when in SiriusXM Satellite
Radio mode.
• To access SiriusXM Satellite Radio, push the RADIO/MEDIA or RADIO button on
the faceplate, then press the “SAT” button on the touchscreen.
Info
• Press the “i” button on the touchscreen to view detailed information about the
current Sirius XM Satellite channel.
SiriusXM Parental Controls
• SiriusXM offers the option to permanently block selected channels. Call
1-888-539-7474 and request the Family Package.
•Uconnect® 430/430N and 730N:Push the “MENU” button on the faceplate while
in SiriusXM™ Satellite Radio Mode, then press the “Channel Lock” to enable
and/or disable desired channels. The SEEK and SCAN function will then only
display channels without Channel lock.
ELECTRONICS
81
Page 84 of 156

Search/Browse
• Press the “magnifying glass” button on the touchscreen to search/browse the
SiriusXM channel listing by Favorites and Categories such as Song, Artist and
Channel Name. The Search/Browse also allows you to manage your Favorites.
SiriusXM™ Satellite Radio Favorites
(SAT Favorites)
• You can save 50 favorite songs and 50
favorite artists.
• Press the “Add Favorite” button on the
touchscreen to add either the song or
the artist of the currently playing pro-
gram to the SAT Favorites list. The
favorite star will appear in the upper
right corner, below the “SAT” button
on the touchscreen.
• You will see a favorite star indicator in
the upper right side of the screen be-
low the “SAT” button on the touch-
screen and a pop up will alert you that
a favorite song or artist is currently
playing on one of the SiriusXM™ sat-
ellite radio channels.
NOTE:
Refer to your Uconnect®730N or 430/
430N Supplement Manual for more in-
formation.
Display SAT Favorites List
• Press the “Search/Browse” button on
the touchscreen and select “Favorites”
from the SAT Browse screen.
• Press the desired favorites button on
the touchscreen to switch the SAT
tuner to the corresponding channel.
SAT Browse
Manage SAT Favorites
Favorites Alert
SAT Browse
ELECTRONICS
82
Page 85 of 156

• You may use the “LIST” button on the touchscreen to toggle between:
• Favorite Songs
• Favorite Artists
• Currently playing favorites
Replay
• While you are in SAT mode, you
can replay 44 minutes of the current
SiriusXM channel (when the channel is
changed, this audio buffer is erased).
Push the REPLAY button to listen to
the stored audio.
• You can press the on-screen controls to pause and rewind audio playback, press
the SCAN button to preview each of the tracks stored in the buffer, or select a track
from the list.
• The time displayed below the bar indi-
cates how much time is present be-
tween the current buffer play position
and the live broadcast.
Replay Option Option Description
Play/Pause Press to pause content playback. Press Pause/Play again to resumeplayback.
Rewind/RW Rewinds the channel content in steps of five seconds. Press and holdto rewind continuously, then release to begin playing content at thatpoint.
Fast Forward/FW Forwards the content, and works similarly to Rewind/RW. However,Fast Forward/FW can only be used when content has been previouslyrewound.
Replay Time Displays the amount of time in the upper center of the screen bywhich your content lags the live channel.
Live Resumes playback of live content at any time while replaying re-wound content.
SAT Favorites
SAT Mode Replay
ELECTRONICS
83
Page 86 of 156
SiriusXM Travel Link (Uconnect® 730N & Uconnect® 430N Only)
• SiriusXM Travel Link brings a wealth of useful information into your vehicle and
right to your fingertips.
• To access Travel Link, push the MENU button on the faceplate, then the “Travel
Link” button on the touchscreen.
1 – FavoritesView and store your favorite location, theater and sport teams forquick access.
2 – ForecastView detailed weather conditions, forecasts and ski/snowboardingconditions at resorts.
3 – Ski InfoView ski and snowboarding conditions at ski resorts.
4 – Fuel PricesView detailed price information for fuel stations.
5 – MoviesView information on movies that are playing at theaters.
6 – SportsView sports scores and upcoming events for all major sports.
NOTE:
• SiriusXM Travel Link requires a subscription, sold separately after the 1 year trial
subscription included with your vehicle purchase.
• SiriusXM Travel Link is only available in the United States.
SiriusXM Travel Link
ELECTRONICS
84
Page 87 of 156

STEERING WHEEL AUDIO CONTROLS
The steering wheel audio controls are located on the rear surface of the steering wheel.
Right Switch
•Push the switch up or down to increase
or decrease the volume.
• Push the button in the center to
change modes AM/FM/CD/SAT.
Left Switch
• Push the switch up or down to search
for the next listenable station or select
the next or previous CD track.
•Push the button in the center to select
the next preset station (radio) or to
change CDs if equipped with a CD
Changer.
iPod®/USB/MP3 CONTROL
There are many ways to play music from iPod®/MP3 players or USB devices through
your vehicle's sound system.
The remote USB port, located within the center console, allows you to plug an iPod®
into the vehicle's sound system.
NOTE:
If equipped with the Uconnect®730N or 731N the USB port on the faceplate allows
the same functions as the remote USB port.
•Non-Touchscreen Radios:To hear audio from devices connected to the USB port,
push the AUX button on the faceplate.
•Touchscreen Radios:To hear audio from devices connected to the USB port, push
the MEDIA button on the faceplate, then press the “AUX” or “iPod®” button on the
touchscreen.
When connected to this feature:
• The iPod®can be controlled using the
radio buttons to Play, Browse, and List
the iPod®or external devices contents.
• The iPod®battery charges whenplugged into the USB port (if sup-ported by the specific audio device).
• Compatible iPod®devices may also becontrollable using voice commands.Refer to the Owner's Manual on theDVD for details.
Steering Wheel Audio Controls(Rearview Of Steering Wheel)
iPod®/USB/MP3
ELECTRONICS
85
Page 88 of 156

NOTE:
The USB port supports certain Mini, Classic, Nano, Touch, and iPhone®devices. The
USB port also supports playing music from compatible external USB Mass Storage
Class memory devices. For supported audio file formats, refer to the USB Port section
in the Owner's Manual on the DVD. Refer to UconnectPhone.com for a list of tested
iPod®s. Some iPod®software versions may not fully support the USB port features.
Please visit Apple’s website for iPod®software updates.
WARNING!
Do not plug in or remove the iPod®or external device while driving. Failure to
follow this warning could result in a collision.
Uconnect® PHONE
Uconnect® Phone
The Uconnect®Phone is a voice-activated, hands-free, in-vehicle communications
system with Voice Command Capability that allows you to dial a phone number with
your mobile phone using simple voice commands (see Voice Command section).
• To determine if your vehicle is equipped with Uconnect®Phone, push the
“Uconnect®Phone” buttonlocated on the radio faceplate. If your vehicle
has this feature, you will hear a voice prompt. If not, you will see a message on the
radio “Uconnect®Phone not available.”
NOTE:
To access the tutorial, push the “Uconnect®Phone” button. After the BEEP,
say “tutorial.” Push any button on the faceplate, or press any button on the
touchscreen, to cancel the tutorial.
• Refer to your vehicle Owner's Manual on the DVD for further details.
NOTE:
The Uconnect®Phone requires a mobile phone equipped with the Bluetooth®
Hands-Free Profile, Version 1.0 or higher. For Uconnect®Customer Support: U.S.
residents - visitUconnectPhone.com or call 1–877–855–8400. Canadian residents
- visit UconnectPhone.com or call, 1-800-465–2001 (English) or 1-800-387-9983
(French). This site will provide specific instructions based on the type of mobile
phone being paired.
Phone Pairing
NOTE:
Pairing is a one - time initial setup before using the phone. Prior to starting the pairing
procedure ensure all additional phones within the vehicle have their Bluetooth®disabled.
1. Activate Bluetooth®on the phone you are pairing.
2. Push the “Phone”button to begin.
ELECTRONICS
86
 1
1 2
2 3
3 4
4 5
5 6
6 7
7 8
8 9
9 10
10 11
11 12
12 13
13 14
14 15
15 16
16 17
17 18
18 19
19 20
20 21
21 22
22 23
23 24
24 25
25 26
26 27
27 28
28 29
29 30
30 31
31 32
32 33
33 34
34 35
35 36
36 37
37 38
38 39
39 40
40 41
41 42
42 43
43 44
44 45
45 46
46 47
47 48
48 49
49 50
50 51
51 52
52 53
53 54
54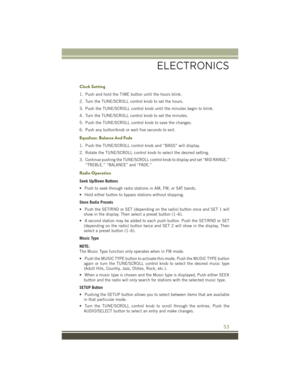 55
55 56
56 57
57 58
58 59
59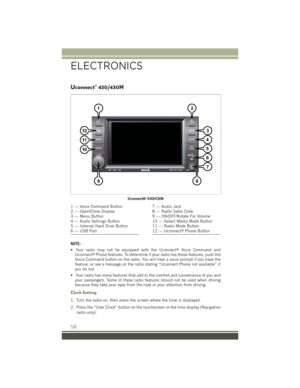 60
60 61
61 62
62 63
63 64
64 65
65 66
66 67
67 68
68 69
69 70
70 71
71 72
72 73
73 74
74 75
75 76
76 77
77 78
78 79
79 80
80 81
81 82
82 83
83 84
84 85
85 86
86 87
87 88
88 89
89 90
90 91
91 92
92 93
93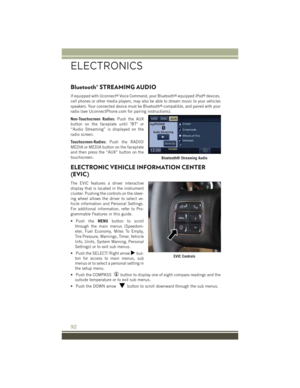 94
94 95
95 96
96 97
97 98
98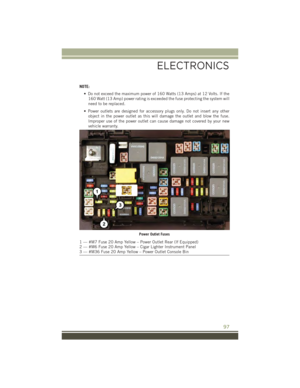 99
99 100
100 101
101 102
102 103
103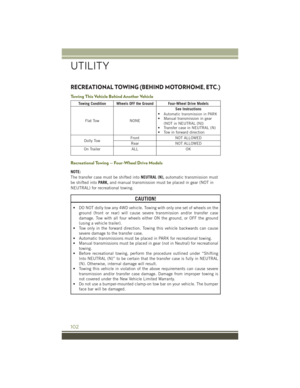 104
104 105
105 106
106 107
107 108
108 109
109 110
110 111
111 112
112 113
113 114
114 115
115 116
116 117
117 118
118 119
119 120
120 121
121 122
122 123
123 124
124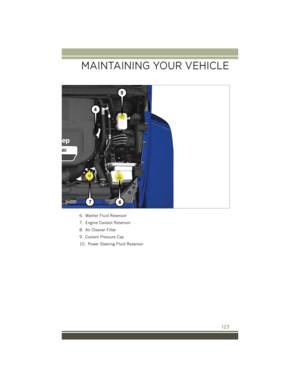 125
125 126
126 127
127 128
128 129
129 130
130 131
131 132
132 133
133 134
134 135
135 136
136 137
137 138
138 139
139 140
140 141
141 142
142 143
143 144
144 145
145 146
146 147
147 148
148 149
149 150
150 151
151 152
152 153
153 154
154 155
155

• SiriusXM Travel Link brings a wealth of useful information into your vehicle and
right to your fingertips.
• To access Travel Link,")