Page 17 of 148
 that is designed to keep the lap portion of the")
Installing the Child Restraint Using the Vehicle Seat Belts
•ThefrontpassengerseatingpositionisequippedwithaSwitchableAutomaticLocking
Retractor (ALR) that is designed to keep the lap portion of the seat belt tight around the
child restraint. Any seat belt system will loosen with time, so check the belt occasion-
ally, and pull it tight if necessary.
•Thereisatetherstrapanchorlocatedbehindthechildtetheraccesscoverbehindthe
passenger seat.
Tether Anchorage Weight Limit
Always use the tether anchor when using
the seat belt to install a forward facing child
restraint, up to the recommended weight
limit of the child restraint.
To Install A Child Seat Using An ALR:
1. Pull enough of the seat belt webbing
from the retractor to pass it through the
belt path of the child restraint. Do not
twist the belt webbing in the belt path.
2. Slide the latch plate into the buckle
until you hear a “click.”
3. Pull on the webbing to make the lap
portion tight against the child seat.
4. To lock the seat belt, pull down on the
shoulder part of the belt until you have
pulled all the seat belt webbing out of
the retractor. Then, allow the webbing to
retract back into the retractor. As the
webbing retracts, you will hear a clicking
sound. This means the seat belt is now
in the Automatic Locking mode.
5. Try to pull the webbing out of the retrac-
tor. If it is locked, you should not be able
to pull out any webbing. If the retractor
is not locked, repeat the last step.
Child Tether Anchorage Access Cover
Child Tether Anchorage
GETTING STARTED
15
Page 18 of 148

6. Finally, pull up on any extra webbing to tighten the lap portion around the child
restraint while you push the child restraint rearward and downward into the vehicle
seat.
7. If the child restraint has a top tether strap and the seating position has a top tether
anchorage, connect the tether strap to the anchorage and tighten the tether strap. See
below for directions to attach a tether anchor.
8. Test that the child restraint is installed tightly by pulling back and forth on the child
seat at the belt path. It should not move more than 1 inch (25.4 mm) in any direction.
Installing the Top Tether Strap with the Vehicle Seat Belt:
When installing a forward-facing child restraint, always secure the top tether strap, up to
the tether anchor weight limit, when the child restraint is installed with the vehicle seat
belt.
Tether Anchorage Installation
There is a tether strap anchor located behind the child tether access cover behind the
passenger seat. To attach a child restraint tether strap to the anchor:
1. Move the seat forward.
2. Move the seatback to its full forward position.
3. Remove the child tether access cover by prying either side with a screwdriver or similar
tool, as shown.
NOTE:
While the child tether is in use, keep the access cover in a safe place so that it can be
replaced after use of the child tether.
4. Pass the child restraint tether hook through either opening in the seatback underneath
the head restraint.
5. Attach the tether hook to the anchor loop.
6. Move the seat to its farthest rearward position. Apply body pressure to the seat to be
sure the seat adjusters have latched.
7. Return the seatback to an upright position.
8. Remove slack from the tether strap according to the child restraint manufacturer’s
directions.
GETTING STARTED
16
Page 19 of 148

WARNING!
•Inacollision,anunrestrainedchild,evenatinybaby,canbecomeaprojectile
inside the vehicle. The force required to hold even an infant on your lap could
become so great that you could not hold the child, no matter how strong you are.
The child and others could be severely injured or killed. Any child riding in your
vehicle should be in a proper restraint for the child's size.
•Rearward-facingchildseatsmustneverbeusedinthefrontseatofavehiclewith
afrontpassengerairbag.Anairbagdeploymentcouldcausesevereinjuryordeath
to infants in this position.
•Onlyusearearward-facingchildrestraintinavehiclewitharearseat.
•ImproperinstallationofachildrestrainttotheLATCHanchoragescanleadto
failure of an infant or child restraint. The child could be severely injured or killed.
Follow the manufacturer’s directions exactly when installing an infant or child
restraint.
•Anincorrectlyanchoredtetherstrapcouldleadtoincreasedheadmotionand
possible injury to the child. Use only the anchor positions directly behind the child
seat to secure a child restraint top tether strap.
•Ifyourvehicleisequippedwithasplitrearseat,makesurethetetherstrapdoesnot
slip into the opening between the seatbacks as you remove slack in the strap.
NON-ADJUSTABLE HEAD RESTRAINTS
The non-adjustable head restraints are form fitted into the upper structure of the seatback
and are designed to reduce the risk of injury by restricting head movement in the event of
arearimpact.Theseatbackshouldbeproperlyadjustedtoanuprightpositionwherethe
head restraint is positioned as close as possible to the back of your head.
WARNING!
Be certain that the seatback is locked securely into position. Otherwise, the seat will
not provide the proper stability for passengers. An improperly latched seatback could
cause serious injury.
GETTING STARTED
17
Page 20 of 148

FRONT SEATS
Power Seats
The power seat switches are located on the outboard side of the front seat cushions.
The power seat switch controls forward,
rearward, up and down adjustments. Push
the switch forward, rearward, up or down
and the seat will move in the direction of the
switch. Release the switch when the de-
sired position has been reached.
The recline switch controls the angle of the
seatback. Push the switch forward or rear-
ward and the seatback will move in either
direction.
Manual Seats
Forward/Rearward
Lift up on the adjusting bar located at the
front of the seat near the floor and release at
the desired position. Then, using body pres-
sure, move forward and backward on the
seat to be sure that the seat adjusters have
latched.
Recliner
Lean forward in the seat and lift the recliner
lever, then lean back to the desired position
and release the lever.
Lift the lever to return the seatback to an
upright position.
Height Adjustment
Ratchet the front lever, located on the outboard side of the seat, upward to raise the seat
height.
Ratchet the lever downward to lower the seat height.
Power Seat Switches
1—PowerReclineSwitch2—PowerSeatSwitch
Seat Adjustments
1—SeatAdjustmentBar2—ReclineLever3—HeightAdjustmentLever
GETTING STARTED
18
Page 21 of 148

CAUTION!
Do not place any article under a power seat or impede its ability to move as it may cause
damage to the seat controls. Seat travel may become limited if movement is stopped
by an obstruction in the seat's path.
WARNING!
•Adjusting a seat while the vehicle is moving is dangerous. The sudden movement of
the seat could cause you to lose control. The seat belt might not be properly adjusted,
and you could be severely injured or killed. Only adjust a seat while the vehicle is
parked.
•Donotridewiththeseatbackreclinedsothattheseatbeltisnolongerresting
against your chest. In a collision, you could slide under the seat belt and be severely
injured or killed. Use the recliner only when the vehicle is parked.
ADJUSTABLE PEDALS
•Theadjustablepedalscanbemovedinanypositionoftheenginestart/stopbutton
(OFF/ACC/RUN).
•Theadjustablepedalswitchislocatedtotheleftsideofthesteeringcolumn.
•Pushtheswitchforwardtomovethe
pedals forward (toward the front of the
vehicle).
•Pushtheswitchrearwardtomovethe
pedals rearward (toward the driver).
CAUTION!
Do not place any article under the adjustable pedals or impede its ability to move, as
it may cause damage to the pedal controls. Pedal travel may become limited if
movement is stopped by an obstruction in the adjustable pedal's path.
WARNING!
Do not adjust the pedals while the vehicle is moving. You could lose control and have
acollision.Alwaysadjustthepedalswhilethevehicleisparked.
Adjustable Pedal Switch
GETTING STARTED
19
Page 22 of 148

ADJUSTABLE FOOT REST
•Theadjustablefootrestcanbeadjustedforwardorrearwardandrotatedupwardor
downward to allow for greater driving comfort.
•Toadjustthepedal:
1. Adjust the seat and steering column to a
comfortable position.
2. Using a socket wrench, loosen the nut
on the pedal.
3. Slide the pedal either forward or rear-
ward and rotate it upward or downward
as desired.
4. Tighten the nut, being careful not to over
tighten it.
TILT STEERING COLUMN
•Thetiltreleaseleverislocatedbelowthemultifunctionleverontheleftsideofthe
steering column.
•Totiltthecolumn,simplypullthere-
lease lever rearward toward you and then
move the steering wheel upward or down-
ward as desired.
•Pushthereleaseleverforwardtolockthe
column firmly in place.
WARNING!
Do not adjust the steering wheel while driving. The tilt adjustment must be locked
while driving. Adjusting the steering wheel while driving or driving without the tilt
adjustment locked could cause the driver to lose control of the vehicle. Failure to follow
this warning may result in you and others being severely injured or killed.
Adjustable Foot Rest Location
Tilt Steering Column Lever
GETTING STARTED
20
Page 23 of 148

SRT ENGINE BREAK-IN RECOMMENDATIONS
SRT Engine Break-In Recommendations: The following tips will be helpful in obtaining
optimum performance and maximum durability for your new SRT Vehicle.
Despite modern technology and World Class manufacturing methods, the moving parts of
the vehicle must still wear in with each other. This wearing in occurs mainly during the first
500 miles (805 km) and continues through the first oil change interval.
It is recommended for the operator to observe the following driving behaviors during the
new vehicle break-in period:
0to100miles(0to161km):
•Donotallowtheenginetooperateatidleforanextendedperiodoftime.
•Depress the accelerator pedal slowly and not more than halfway to avoid rapid accelera-
tion.
•Avoidaggressivebraking.
•Drivewiththeenginespeedlessthan3,500RPM.
•Maintainvehiclespeedbelow55mph(88km/h)andobservelocalspeedlimits.
100 to 300 miles (161 to 483 km):
•Depress the accelerator pedal slowly and not more than halfway to avoid rapid acceleration
in lower gears (1st to 3rd gears).
•Avoidaggressivebraking.
•Drivewiththeenginespeedlessthan5,000RPM.
•Maintainvehiclespeedbelow70mph(112km/h)andobservelocalspeedlimits.
300 to 500 miles (483 to 805 km):
•Exercisethefullenginerpmrange,shiftingmanually(paddlesorgearshift)athigher
rpms when possible.
•Donotperformsustainedoperationwiththeacceleratorpedalatwideopenthrottle.
•Maintainvehiclespeedbelow85mph(136km/h)andobservelocalspeedlimits.
For the first 1500 mi (2414 km):
•Donotparticipateintrackevents,sportdrivingschools,orsimilaractivitiesduringthe
first 1500 mi (2414 km).
NOTE:
Check engine oil with every refueling and add if necessary. Oil and fuel consumption may
be higher through the first oil change interval.
OPERATING YOUR VEHICLE
21
Page 24 of 148
TURN SIGNALS/WIPER/WASHER/HIGH BEAMS LEVER
Wipers
Intermittent, Low And High Operation
•Rotatetheendofthelevertothefirstdetentpositionforoneoffiveintermittent
settings, the second detent for low wiper operation and the third detent for high wiper
operation.
Washer Operation
•Pushtheendoftheleverinwardtotheseconddetentandholdforaslongassprayis
desired.
Mist Feature
•Whenasinglewipetoclearoffroadmistorsprayfromapassingvehicleisneeded,
push the washer knob, located on the end of the multifunction lever, inward to the first
detent and release. The wipers will cycle one time and automatically shut off.
High Beams
•Pushtheleverawayfromyoutoactivatethehighbeams.
Ahighbeamsymbolwillilluminateintheclustertoindicatethehighbeamsareon.
NOTE:
For safe driving, turn off the high beams when oncoming traffic is present to prevent
headlight glare and as a courtesy to other motorists.
Turn Signal/Wiper/Washer/High Beam Lever
OPERATING YOUR VEHICLE
22
 1
1 2
2 3
3 4
4 5
5 6
6 7
7 8
8 9
9 10
10 11
11 12
12 13
13 14
14 15
15 16
16 17
17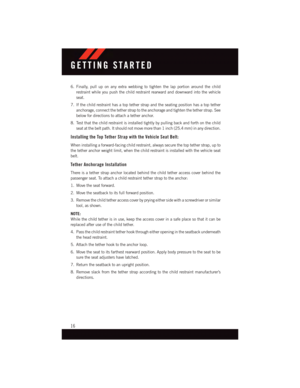 18
18 19
19 20
20 21
21 22
22 23
23 24
24 25
25 26
26 27
27 28
28 29
29 30
30 31
31 32
32 33
33 34
34 35
35 36
36 37
37 38
38 39
39 40
40 41
41 42
42 43
43 44
44 45
45 46
46 47
47 48
48 49
49 50
50 51
51 52
52 53
53 54
54 55
55 56
56 57
57 58
58 59
59 60
60 61
61 62
62 63
63 64
64 65
65 66
66 67
67 68
68 69
69 70
70 71
71 72
72 73
73 74
74 75
75 76
76 77
77 78
78 79
79 80
80 81
81 82
82 83
83 84
84 85
85 86
86 87
87 88
88 89
89 90
90 91
91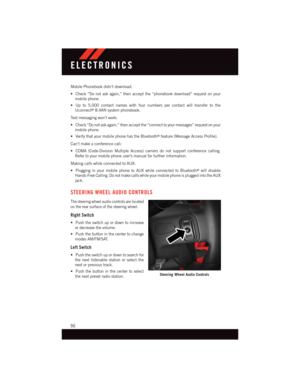 92
92 93
93 94
94 95
95 96
96 97
97 98
98 99
99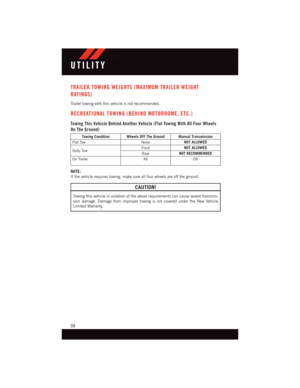 100
100 101
101 102
102 103
103 104
104 105
105 106
106 107
107 108
108 109
109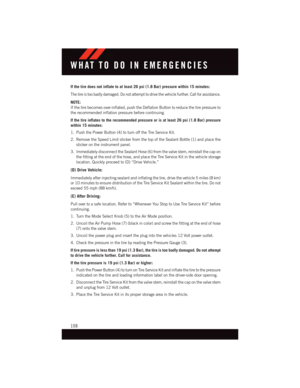 110
110 111
111 112
112 113
113 114
114 115
115 116
116 117
117 118
118 119
119 120
120 121
121 122
122 123
123 124
124 125
125 126
126 127
127 128
128 129
129 130
130 131
131 132
132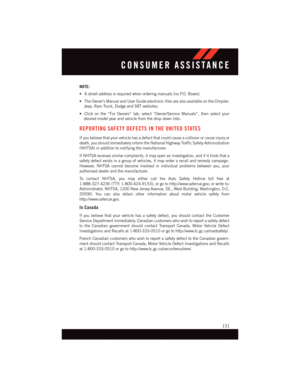 133
133 134
134 135
135 136
136 137
137 138
138 139
139 140
140 141
141 142
142 143
143 144
144 145
145 146
146 147
147