Page 177 of 236

IF YOUR ENGINE OVERHEATS
In any of the following situations, you can reduce the potential for overheating by taking
the appropriate action:
•Onthehighways—slowdown.
•Incitytraffic—whilestopped,shiftthetransmissiontoNEUTRAL,butdonotincrease
engine idle speed.
NOTE:
There are steps that you can take to slow down an impending overheat condition:
•Ifyourairconditioner(A/C)ison,turnitoff.TheA/Csystemaddsheattotheengine
cooling system and turning the A/C off can help remove this heat.
•Youcanalsoturnthetemperaturecontroltomaximumheat,themodecontroltofloor
and the blower control to high. This allows the heater core to act as a supplement to the
radiator and aids in removing heat from the engine cooling system.
CAUTION!
Driving with a hot cooling system could damage your vehicle. If the temperature gauge
reads HOT (H), pull over and stop the vehicle. Idle the vehicle with the air conditioner
turned off until the pointer drops back into the normal range. If the pointer remains on
HOT (H), and you hear continuous chimes, turn the engine off immediately, and call for
service.
WARNING!
Yo u o r o t h e r s c a n b e b a d l y b u r n e d b y h o t e n g i n e c o o l a n t ( a n t i f r e e z e ) o r s t e a m f r o m y o u r
radiator. If you see or hear steam coming from under the hood, do not open the hood
until the radiator has had time to cool. Never try to open a cooling system pressure cap
when the radiator or coolant bottle is hot.
WHAT TO DO IN EMERGENCIES
175
Page 178 of 236
JACKING AND TIRE CHANGING
Jack Location
The scissor-type jack and tire changing tools are located in rear cargo area, below the load
floor.
•Rotatetheplasticthumbscrewonthe
end of the jack to remove the jack from
the bracket.
Spare Tire Stowage
The spare tire is stowed under the rear of
the vehicle by means of a cable winch
mechanism. To remove or stow the spare,
use the jack handle/lug wrench connected
to the square socket extension to rotate the
“spare tire drive” nut. The nut is located
under a plastic cover at the center-rear of
the cargo floor area, just inside the liftgate
opening.
Jack Location
Jack Removal
Spare Tire Location
WHAT TO DO IN EMERGENCIES
176
Page 179 of 236
Spare Tire Removal
1. Remove the jack tools from the bag.
2. Raise the protective rubber mat covering the storage compartment floor and remove
the plug to access the winch drive.
3. Fit the jack handle extension over the drive nut. Use the lug wrench handle and
extension to completely lower the spare tire. Keep turning the handle until the winch
STOPS.
NOTE:
Do not use power tools to operate the winch.
4. Slide the tire out from under the vehicle
and rotate it vertically behind the rear
bumper.
Winch Drive Nut Location
Spare Tire Removal
WHAT TO DO IN EMERGENCIES
177
Page 180 of 236
5. Spread the retaining tabs on the plastic plate and pull the metal stamping toward you
to release it from the plastic plate.
6. Slide the metal stamping up the steel
extension tube and winch cable. Rotate
the metal stamping and push it through
the hole in the plastic plate and wheel.
7. Pinch the three short and two long tubes
to remove the protective plate from the
steel spare wheel.
Spare Tire Retainer
Retainer Removal
Protective Plate Removal
WHAT TO DO IN EMERGENCIES
178
Page 181 of 236
Preparations For Jacking
1. Park the vehicle on a firm level surface, away from traffic for your safety.
2. Turn the engine off, place the transmission in PARK, fully depress the pedal to the floor
to set the parking brake, and activate the Hazard Warning flashers.
3. Block both the front and rear of the wheel diagonally opposite of the jacking position.
NOTE:
Passengers should not remain in the vehicle
when the vehicle is being jacked.
Jacking Instructions
1. Loosen the lug nuts on the road wheel
one turn while still on the ground, but do
not remove.
Wheel Blocked
Jack Warning Label
WHAT TO DO IN EMERGENCIES
179
Page 182 of 236
2. Determine the jacking location on the side of the vehicle. Attach the jack tool with the
hook, the extension and the lug wrench to the jack as shown.
Assembled Jack
Jacking Locations
WHAT TO DO IN EMERGENCIES
180
Page 183 of 236

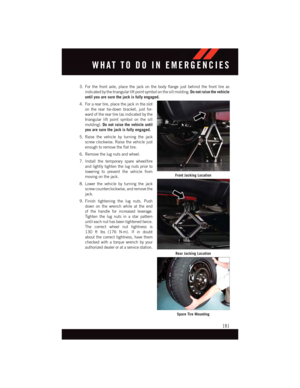
3. For the front axle, place the jack on the body flange just behind the front tire as
indicated by the triangular lift point symbol on the sill molding.Do not raise the vehicle
until you are sure the jack is fully engaged.
4. For a rear tire, place the jack in the slot
on the rear tie-down bracket, just for-
ward of the rear tire (as indicated by the
triangular lift point symbol on the sill
molding).Do not raise the vehicle until
you are sure the jack is fully engaged.
5. Raise the vehicle by turning the jack
screw clockwise. Raise the vehicle just
enough to remove the flat tire.
6. Remove the lug nuts and wheel.
7. Install the temporary spare wheel/tire
and lightly tighten the lug nuts prior to
lowering to prevent the vehicle from
moving on the jack.
8. Lower the vehicle by turning the jack
screw counterclockwise, and remove the
jack.
9. Finish tightening the lug nuts. Push
down on the wrench while at the end
of the handle for increased leverage.
Ti g h t e n t h e l u g n u t s i n a s t a r p a t t e r n
until each nut has been tightened twice.
The correct wheel nut tightness is
130 ft lbs (176 N·m). If in doubt
about the correct tightness, have them
checked with a torque wrench by your
authorized dealer or at a service station.
Front Jacking Location
Rear Jacking Location
Spare Tire Mounting
WHAT TO DO IN EMERGENCIES
181
Page 184 of 236

10. Remove the Dodge center cap using a jack tool from inside the aluminum road wheel
and snap on the protective plastic plate.
NOTE:
The plastic plate will prevent the road wheel
from being scratched when sliding it under
the vehicle.
11. Stand the wheel up against the bum-
per with the plastic plate facing you.
12. Slide the cable end, spring and metal
tube through the wheel and plastic
plate. Rotate the stamping on the
cable and push it through the wheel
and plastic plate. Snap the stamping
into place.
13. Slide the road wheel on the ground using the protective plate until it is directly under
the winch and between the rear bumper and exhaust system heat shields. Raise the
tire by turning the lug wrench on the winch extension clockwise until it clicks/skips
three times to make sure the cable is tight.
NOTE:
Double check to ensure the tire is snug
against the underbody of the vehicle. Dam-
age to the winch cable may result if the
vehicle is driven with the tire loose.
Protective Plate
Flat Tire Storage
WHAT TO DO IN EMERGENCIES
182