2015 DODGE DURANGO battery
[x] Cancel search: batteryPage 3 of 236

INTRODUCTION/WELCOME
WELCOME FROM FCA US LLC.......2
CONTROLS AT A GLANCE
DRIVER COCKPIT...............6INSTRUMENT CLUSTER...........8
GETTING STARTED
KEY FOB . . . . . . . . . . . . . . . . . . . 10REMOTE START . . . . . . . . . . . . . . . . 11KEYLESS ENTER-N-GO™.........12VEHICLE SECURITY ALARM........15SEAT BELT SYSTEMS............15SUPPLEMENTAL RESTRAINT SYSTEM(SRS) — AIR BAGS.............16CHILD RESTRAINTS............19HEAD RESTRAINTS.............25FRONT SEATS.................28REAR SEATS.................31HEATED/VENTILATED SEATS........34HEATED STEERING WHEEL........36TILT/TELESCOPING STEERINGCOLUMN...................37
OPERATING YOUR VEHICLE
ENGINE BREAK-INRECOMMENDATIONS............39TURN SIGNAL/WIPER/WASHER/HIGHBEAM LEVER.................40HEADLIGHT SWITCH............41ELECTRONIC SPEED CONTROL......42ADAPTIVE CRUISE CONTROL (ACC)....44FORWARD COLLISION WARNING (FCW)WITH MITIGATION..............49AUTOMATIC DIMMING MIRRORS.....51ELECTRONIC SHIFTER...........51AUTOSTICK..................52FUEL ECONOMY (ECO) MODE.......54AUTOMATIC CLIMATE CONTROLS.....55PA R K S E N S E®REAR PARK ASSIST.....60PA R K V I E W®REAR BACK-UP CAMERA...61BLIND SPOT MONITORING.........61POWER SUNROOF..............62WIND BUFFETING..............63
ELECTRONICSYOUR VEHICLE'S SOUND SYSTEM....64IDENTIFYING YOUR RADIO.........66Uconnect®ACCESS.............67Uconnect®5.0 . . . . . . . . . . . . . . . . 84Uconnect®8.4A...............96Uconnect®8.4AN.............124Uconnect®PHONE.............137STEERING WHEEL AUDIO CONTROLS...147DRIVER INFORMATION DISPLAY (DID)...148PROGRAMMABLE FEATURES.......150UNIVERSAL GARAGE DOOR OPENER(HomeLink®).................152
POWER INVERTER.............154POWER OUTLET..............155
OFF-ROAD CAPABILITIESALL-WHEEL DRIVE OPERATION.....157
UTILITYROOF LUGGAGE RACK..........160TRAILER TOWING WEIGHTS (MAXIMUMTRAILER WEIGHT RATINGS).......161RECREATIONAL TOWING (BEHINDMOTORHOME, ETC.)............163
WHAT TO DO IN EMERGENCIESROADSIDE ASSISTANCE..........168INSTRUMENT CLUSTER WARNINGLIGHTS....................168INSTRUMENT CLUSTER INDICATORLIGHTS...................173IF YOUR ENGINE OVERHEATS......175JACKING AND TIRE CHANGING.....176BATTERY LOCATION............186JUMP-STARTING..............186MANUAL PARK RELEASE.........189TOWING A DISABLED VEHICLE.....190FREEING A STUCK VEHICLE.......191EVENT DATA RECORDER (EDR).....192CAP-LESS FUEL FILL FUNNEL......192
MAINTAINING YOUR VEHICLE
OPENING THE HOOD...........193ENGINE COMPARTMENT.........194FLUID CAPACITIES.............198FLUIDS, LUBRICANTS AND GENUINEPA RT S....................199MAINTENANCE PROCEDURES......201MAINTENANCE SCHEDULE.......201MAINTENANCE RECORD.........205FUSES....................206TIRE PRESSURES.............209ADDING FUEL................210SPARE TIRES — IF EQUIPPED......211WHEEL AND WHEEL TRIM CARE....213REPLACEMENT BULBS..........214
CUSTOMER ASSISTANCE
FCA US LLC CUSTOMER CENTER....215CHRYSLER CANADA INC. CUSTOMERCENTER...................215ASSISTANCE FOR THE HEARINGIMPAIRED..................215PUBLICATIONS ORDERING........216REPORTING SAFETY DEFECTS IN THEUNITED STATES..............216
MOPAR® ACCESSORIESAUTHENTIC ACCESSORIES BY MOPAR®...217
FREQUENTLY ASKED QUESTIONS
FREQUENTLY ASKED QUESTIONS....218
INDEX.....................220
TABLE OF CONTENTS
Page 76 of 236

Selling Your Vehicle
When you sell your vehicle, we recommend that you remove your Uconnect®Access
Account information from the vehicle. You can do this using the radio touchscreen in the
vehicle or on the Mopar Owner Connect website (moparownerconnect.com). Removing
your account information cancels your subscription and makes your vehicle factory-ready
for a new owner/subscriber.
1. From your vehicle’s radio touchscreen, select “Uconnect®Store” from the Apps Menu.
2. Select “My Apps,” then “Settings.” Press “Remove Uconnect®Account.”
3. Enter your Uconnect®Security PIN, and select “Continue.”
For additional information on Uconnect®:
•U.S.residents-visitDriveUconnect.comorcall1-877-855-8400.
•CanadianResidents-visitDriveUconnect.caorcall,1-800-465-2001(English)or
1-800-387-9983 (French).
Built-In Features (Uconnect® 8.4A/8.4AN)
CAUTION!
•Ignoringtherearviewmirrorlightcouldmeanyoumaynothave9-1-1Callservice
if needed. If the rearview mirror light is illuminated, have an authorized dealer
service the 9-1-1 Call system immediately.
•TheOccupantRestraintController(ORC)turnsontheAirBagWarningLightonthe
instrument panel if a malfunction is detected in any part of the air bag system. If the
Air Bag Warning Light is illuminated, the air bag system may not be working
properly and the 9-1-1 system may not be able to send a signal to a 9-1-1 operator.
If the Air Bag Warning Light is illuminated, have an authorized dealer service your
vehicle immediately.
•Ifanyoneinthevehiclecouldbeindanger(e.g.,fireorsmokeisvisible,dangerous
road conditions or location), do not wait for voice contact from a 9-1-1 operator. All
occupants should exit the vehicle immediately and move to a safe location.
•Donotaddanyaftermarketelectricalequipmenttothevehicle’selectricalsystem.
This may prevent your vehicle from sending a signal to initiate an emergency call.
To a v o i d i n t e r f e r e n c e t h a t c a n c a u s e t h e 9 - 1 - 1 C a l l s y s t e m t o f a i l , n e v e r a d d
aftermarket equipment (e.g., two-way mobile radio, CB radio, data recorder, etc.) to
your vehicle’s electrical system or modify the antennas on your vehicle. IF YOUR
VEHICLE LOSES BATTERY POWER FOR ANY REASON (INCLUDING DURING OR
AFTER AN ACCIDENT), THE UCONNECT®FEATURES, APPS AND SERVICES,
AMONG OTHERS, WILL NOT OPERATE.
ELECTRONICS
74
Page 105 of 236
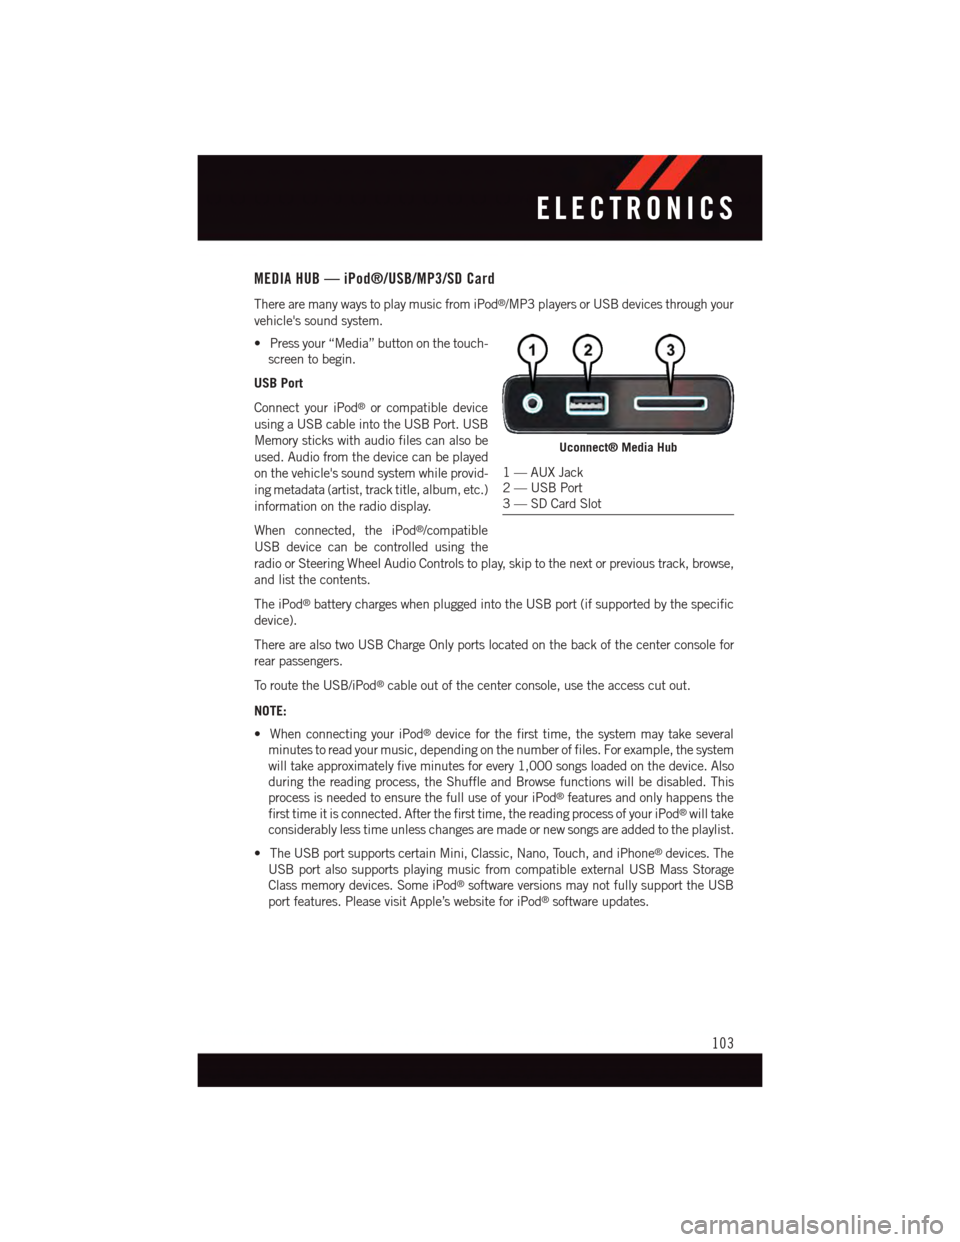
MEDIA HUB — iPod®/USB/MP3/SD Card
There are many ways to play music from iPod®/MP3 players or USB devices through your
vehicle's sound system.
•Pressyour“Media”buttononthetouch-
screen to begin.
USB Port
Connect your iPod®or compatible device
using a USB cable into the USB Port. USB
Memory sticks with audio files can also be
used. Audio from the device can be played
on the vehicle's sound system while provid-
ing metadata (artist, track title, album, etc.)
information on the radio display.
When connected, the iPod®/compatible
USB device can be controlled using the
radio or Steering Wheel Audio Controls to play, skip to the next or previous track, browse,
and list the contents.
The iPod®battery charges when plugged into the USB port (if supported by the specific
device).
There are also two USB Charge Only ports located on the back of the center console for
rear passengers.
To r o u t e t h e U S B / i P o d®cable out of the center console, use the access cut out.
NOTE:
•WhenconnectingyouriPod®device for the first time, the system may take several
minutes to read your music, depending on the number of files. For example, the system
will take approximately five minutes for every 1,000 songs loaded on the device. Also
during the reading process, the Shuffle and Browse functions will be disabled. This
process is needed to ensure the full use of your iPod®features and only happens the
first time it is connected. After the first time, the reading process of your iPod®will take
considerably less time unless changes are made or new songs are added to the playlist.
•TheUSBportsupportscertainMini,Classic,Nano,Touch,andiPhone®devices. The
USB port also supports playing music from compatible external USB Mass Storage
Class memory devices. Some iPod®software versions may not fully support the USB
port features. Please visit Apple’s website for iPod®software updates.
Uconnect® Media Hub
1—AUXJack2—USBPort3—SDCardSlot
ELECTRONICS
103
Page 133 of 236
MEDIA HUB — iPod®/USB/MP3/SD Card
There are many ways to play music from iPod®/MP3 players, SD card, or USB devices
through your vehicle's sound system.
•Pressyour“Media”buttononthetouchscreentobegin.
USB Port
Connect your iPod®or compatible device using a USB cable into the USB Port. USB
Memory sticks with audio files can also be used. Audio from the device can be played on
the vehicle's sound system while providing metadata (artist, track title, album, etc.)
information on the radio display.
When connected, the iPod®/compatible USB device can be controlled using the radio or
Steering Wheel Audio Controls to play, skip to the next or previous track, browse, and list
the contents.
The iPod®battery charges when plugged into the USB port (if supported by the specific
device.)
To r o u t e t h e U S B / i P o d®cable out of the center console, use the access cut out.
NOTE:
•WhenconnectingyouriPod®device for the first time, the system may take several
minutes to read your music, depending on the number of files. For example, the system
will take approximately five minutes for every 1,000 songs loaded on the device. Also
during the reading process, the Shuffle and Browse functions will be disabled. This
process is needed to ensure the full use of your iPod®features and only happens the
first time it is connected. After the first time, the reading process of your iPod®will take
considerably less time unless changes are made or new songs are added to the playlist.
•TheUSBportsupportscertainMini,Classic,Nano,Touch,andiPhone®devices. The
USB port also supports playing music from compatible external USB Mass Storage
Class memory devices. Some iPod®software versions may not fully support the USB
port features. Please visit Apple’s website for iPod®software updates.
Audio Jack (AUX)
The AUX allows a portable device, such as an MP3 player or an iPod®,tobepluggedinto
the radio and utilize the vehicle’s sound system, using a 3.5 mm audio cable, to amplify
the source and play through the vehicle speakers.
•Pressingthe“AUX”buttononthetouchscreenwillchangethemodetoauxiliarydevice
if the audio jack is connected, allowing the music from your portable device to be heard
through the vehicle's speakers. In order to activate the AUX, plug in the audio jack.
•Thefunctionsoftheportabledevicearecontrolledusingthedevicebuttons.The
volume may be controlled using the radio or portable device.
•Toroutetheaudiocableoutofthecenterconsole,usetheaccesscutoutinthefront
of the console.
ELECTRONICS
131
Page 139 of 236
NOTE:
SiriusXM Travel Link requires a subscription, sold separately after the five (5) year trial
subscription included with your vehicle purchase.
SiriusXM Travel Link is only available in the United States.
Fuel PricesCheck local gas and diesel prices in your area and route to the station ofyour choice.
Movie ListingsCheck local movie theatres and listings in your area and route to thetheater of your choice.
Sports ScoresIn-game and final scores as well as weekly schedules.
WeatherCheck variety of local and national weather information from radar mapsto current and 5-day forecast.
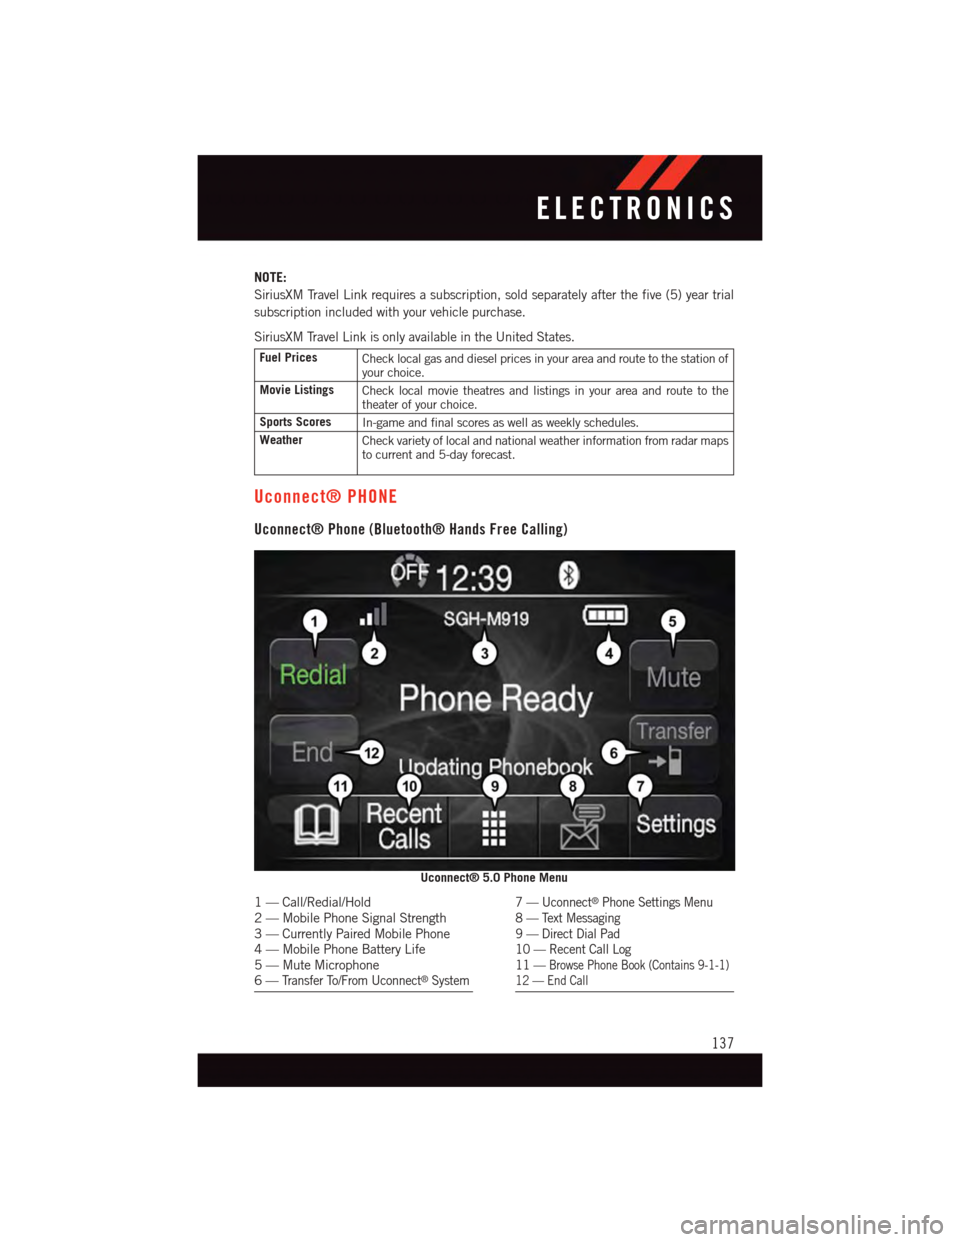
Uconnect® PHONE
Uconnect® Phone (Bluetooth® Hands Free Calling)
Uconnect® 5.0 Phone Menu
1—Call/Redial/Hold2—MobilePhoneSignalStrength3—CurrentlyPairedMobilePhone4—MobilePhoneBatteryLife5—MuteMicrophone6—Tr a n s f e r To / F r o m U c o n n e c t®System
7—Uconnect®Phone Settings Menu8—TextMessaging9—DirectDialPad10 — Recent Call Log11 —Browse Phone Book (Contains 9-1-1)12 — End Call
ELECTRONICS
137
Page 140 of 236
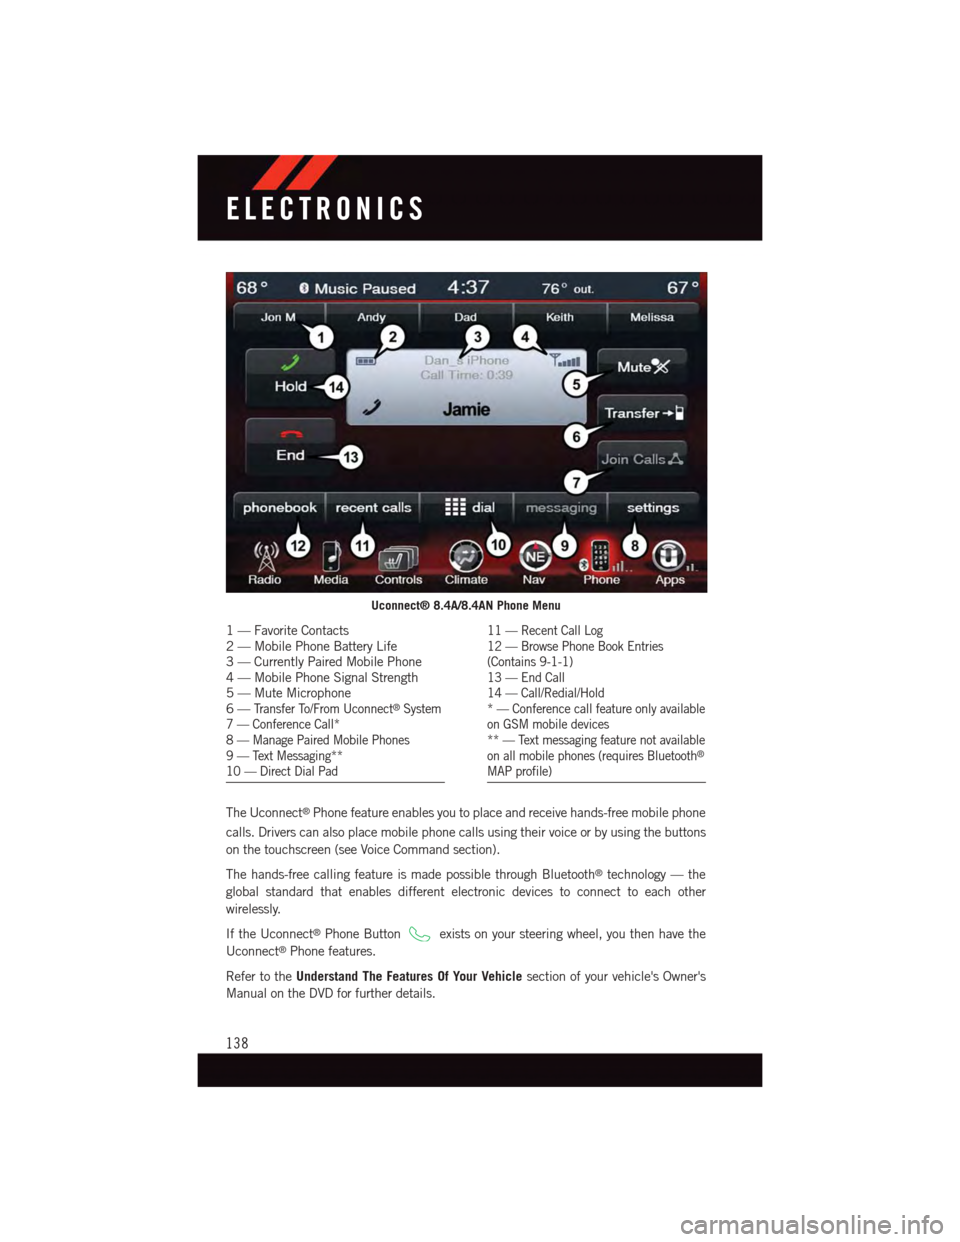
The Uconnect®Phone feature enables you to place and receive hands-free mobile phone
calls. Drivers can also place mobile phone calls using their voice or by using the buttons
on the touchscreen (see Voice Command section).
The hands-free calling feature is made possible through Bluetooth®technology — the
global standard that enables different electronic devices to connect to each other
wirelessly.
If the Uconnect®Phone Buttonexists on your steering wheel, you then have the
Uconnect®Phone features.
Refer to theUnderstand The Features Of Your Vehiclesection of your vehicle's Owner's
Manual on the DVD for further details.
Uconnect® 8.4A/8.4AN Phone Menu
1—FavoriteContacts2—MobilePhoneBatteryLife3—CurrentlyPairedMobilePhone4—MobilePhoneSignalStrength5—MuteMicrophone6—Tr a n s f e r To / F r o m U c o n n e c t®System7—ConferenceCall*8—ManagePairedMobilePhones9—TextMessaging**10 — Direct Dial Pad
11 — Recent Call Log12 — Browse Phone Book Entries(Contains 9-1-1)13 — End Call14 — Call/Redial/Hold*—Conferencecallfeatureonlyavailableon GSM mobile devices** — Text messaging feature not availableon all mobile phones (requires Bluetooth®
MAP profile)
ELECTRONICS
138
Page 148 of 236
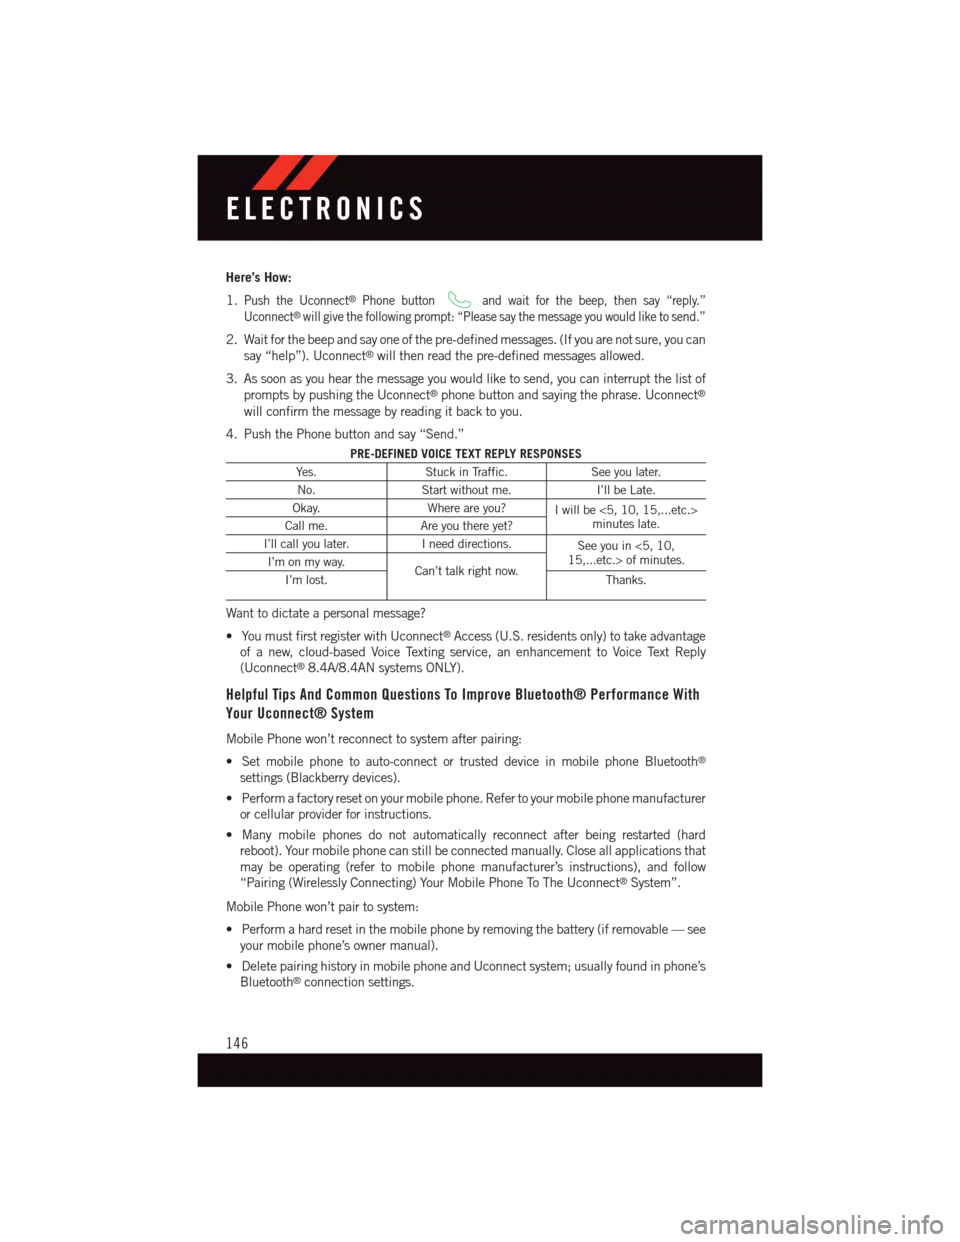
Here’s How:
1.Push the Uconnect®Phone buttonand wait for the beep, then say “reply.”
Uconnect®will give the following prompt: “Please say the message you would like to send.”
2. Wait for the beep and say one of the pre-defined messages. (If you are not sure, you can
say “help”). Uconnect®will then read the pre-defined messages allowed.
3. As soon as you hear the message you would like to send, you can interrupt the list of
prompts by pushing the Uconnect®phone button and saying the phrase. Uconnect®
will confirm the message by reading it back to you.
4. Push the Phone button and say “Send.”
PRE-DEFINED VOICE TEXT REPLY RESPONSES
Ye s .Stuck in Traffic.See you later.
No.Start without me.I’ll be Late.
Okay.Where are you?Iwillbe<5,10,15,...etc.>minutes late.Call me.Are you there yet?
I’ll call you later.Ineeddirections.See you in <5, 10,15,...etc.> of minutes.I’m on my way.Can’t talk right now.I’m lost.Thanks.
Want to dictate a personal message?
•YoumustfirstregisterwithUconnect®Access (U.S. residents only) to take advantage
of a new, cloud-based Voice Texting service, an enhancement to Voice Text Reply
(Uconnect®8.4A/8.4AN systems ONLY).
Helpful Tips And Common Questions To Improve Bluetooth® Performance With
Your Uconnect® System
Mobile Phone won’t reconnect to system after pairing:
•Setmobilephonetoauto-connectortrusteddeviceinmobilephoneBluetooth®
settings (Blackberry devices).
•Performafactoryresetonyourmobilephone.Refertoyourmobilephonemanufacturer
or cellular provider for instructions.
•Manymobilephonesdonotautomaticallyreconnectafterbeingrestarted(hard
reboot). Your mobile phone can still be connected manually. Close all applications that
may be operating (refer to mobile phone manufacturer’s instructions), and follow
“Pairing (Wirelessly Connecting) Your Mobile Phone To The Uconnect®System”.
Mobile Phone won’t pair to system:
•Performahardresetinthemobilephonebyremovingthebattery(ifremovable—see
your mobile phone’s owner manual).
•DeletepairinghistoryinmobilephoneandUconnectsystem;usuallyfoundinphone’s
Bluetooth®connection settings.
ELECTRONICS
146
Page 154 of 236
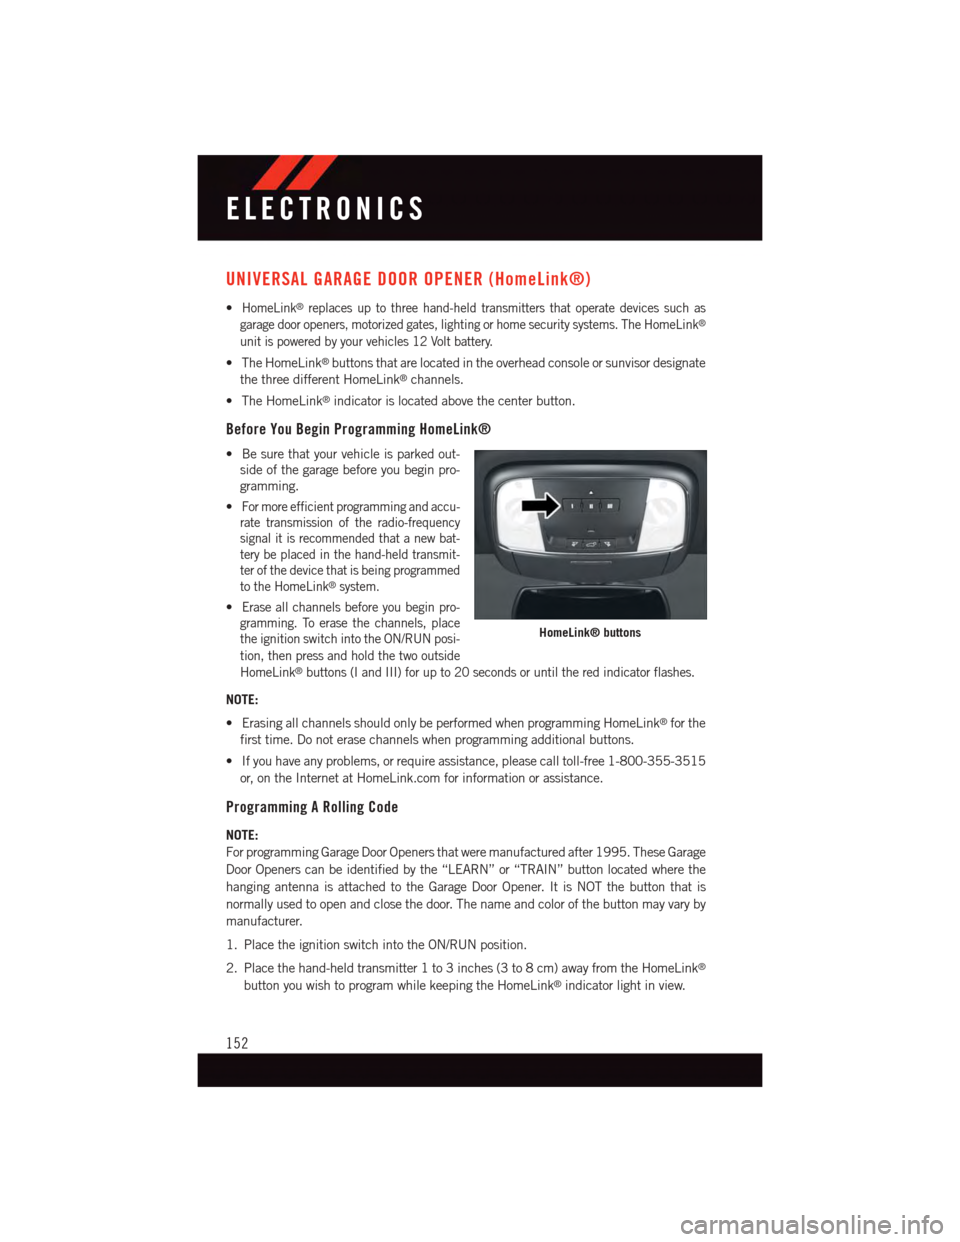
UNIVERSAL GARAGE DOOR OPENER (HomeLink®)
•HomeLink®replaces up to three hand-held transmitters that operate devices such as
garage door openers, motorized gates, lighting or home security systems. The HomeLink®
unit is powered by your vehicles 12 Volt battery.
•TheHomeLink®buttons that are located in the overhead console or sunvisor designate
the three different HomeLink®channels.
•TheHomeLink®indicator is located above the center button.
Before You Begin Programming HomeLink®
•Besurethatyourvehicleisparkedout-
side of the garage before you begin pro-
gramming.
•For more efficient programming and accu-
rate transmission of the radio-frequency
signal it is recommended that a new bat-
tery be placed in the hand-held transmit-
ter of the device that is being programmed
to the HomeLink®system.
•Erase all channels before you begin pro-
gramming. To erase the channels, place
the ignition switch into the ON/RUN posi-
tion, then press and hold the two outside
HomeLink®buttons (I and III) for up to 20 seconds or until the red indicator flashes.
NOTE:
•ErasingallchannelsshouldonlybeperformedwhenprogrammingHomeLink®for the
first time. Do not erase channels when programming additional buttons.
•Ifyouhaveanyproblems,orrequireassistance,pleasecalltoll-free1-800-355-3515
or, on the Internet at HomeLink.com for information or assistance.
Programming A Rolling Code
NOTE:
For programming Garage Door Openers that were manufactured after 1995. These Garage
Door Openers can be identified by the “LEARN” or “TRAIN” button located where the
hanging antenna is attached to the Garage Door Opener. It is NOT the button that is
normally used to open and close the door. The name and color of the button may vary by
manufacturer.
1. Place the ignition switch into the ON/RUN position.
2. Place the hand-held transmitter 1 to 3 inches (3 to 8 cm) away from the HomeLink®
button you wish to program while keeping the HomeLink®indicator light in view.
HomeLink® buttons
ELECTRONICS
152