Page 161 of 180

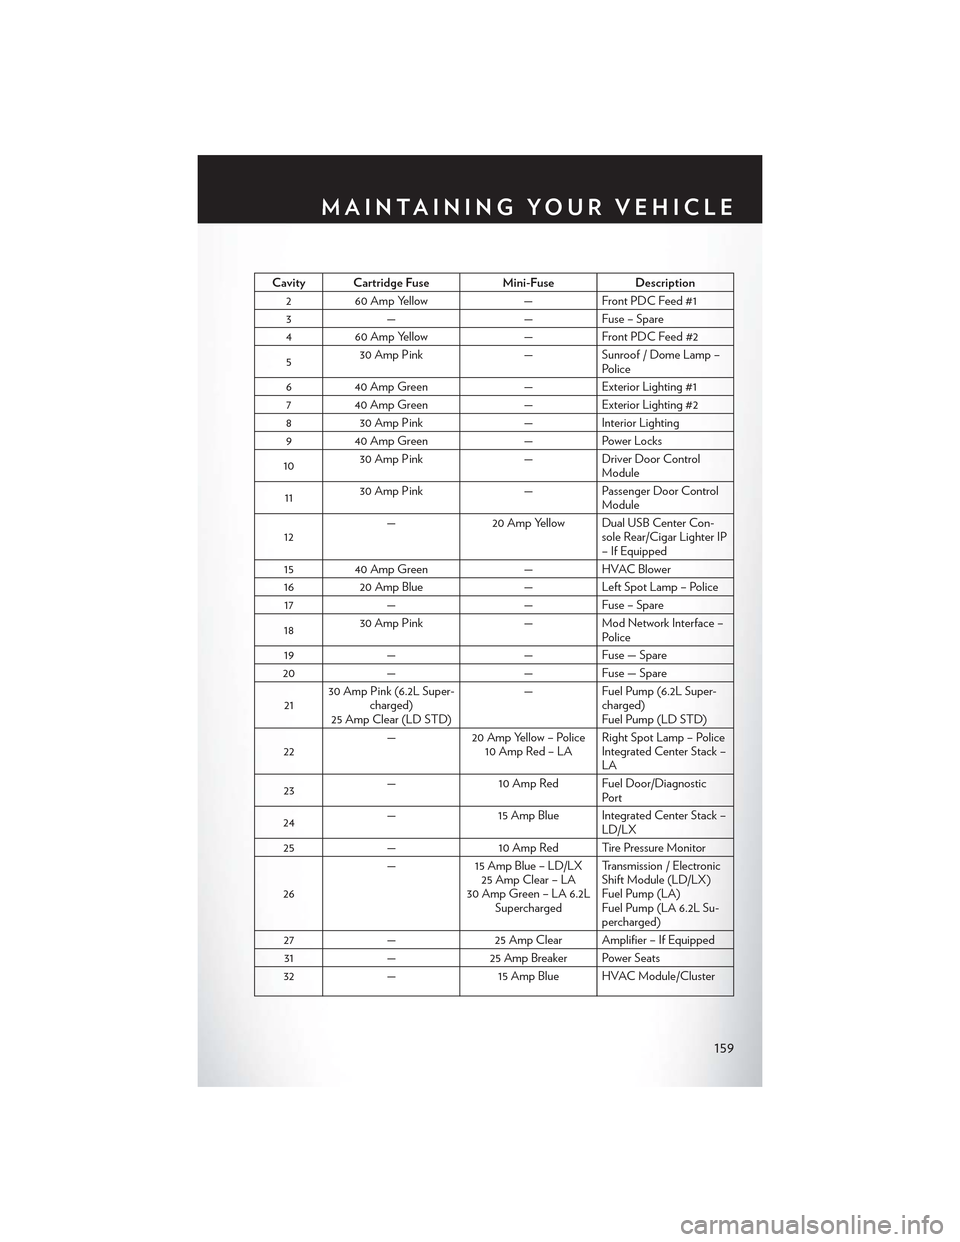
Cavity Cartridge FuseMini-FuseDescription
260 Amp Yellow—Front PDC Feed #1
3——Fuse – Spare
460 Amp Yellow—Front PDC Feed #2
530 Amp Pink—Sunroof / Dome Lamp –Police
640 Amp Green—Exterior Lighting #1
740 Amp Green—Exterior Lighting #2
830 Amp Pink—Interior Lighting
940 Amp Green—Power Locks
1030 Amp Pink—Driver Door ControlModule
1130 Amp Pink—Passenger Door ControlModule
12—20 Amp Yellow Dual USB Center Con-sole Rear/Cigar Lighter IP– If Equipped
15 40 Amp Green—HVAC Blower
1620 Amp Blue—Left Spot Lamp – Police
17——Fuse – Spare
1830 Amp Pink—Mod Network Interface –Police
19——Fuse — Spare
20——Fuse — Spare
2130 Amp Pink (6.2L Super-charged)25 Amp Clear (LD STD)
—Fuel Pump (6.2L Super-charged)Fuel Pump (LD STD)
22—20 Amp Yellow – Police10 Amp Red – LARight Spot Lamp – PoliceIntegrated Center Stack –LA
23—10 Amp Red Fuel Door/DiagnosticPort
24—15 Amp Blue Integrated Center Stack –LD/LX
25—10 Amp Red Tire Pressure Monitor
26
—15 Amp Blue – LD/LX25 Amp Clear – LA30 Amp Green – LA 6.2LSupercharged
Transmission / ElectronicShift Module (LD/LX)Fuel Pump (LA)Fuel Pump (LA 6.2L Su-percharged)
27—25 Amp Clear Amplifier – If Equipped
31—25 Amp Breaker Power Seats
32—15 Amp Blue HVAC Module/Cluster
MAINTAINING YOUR VEHICLE
159
Page 162 of 180

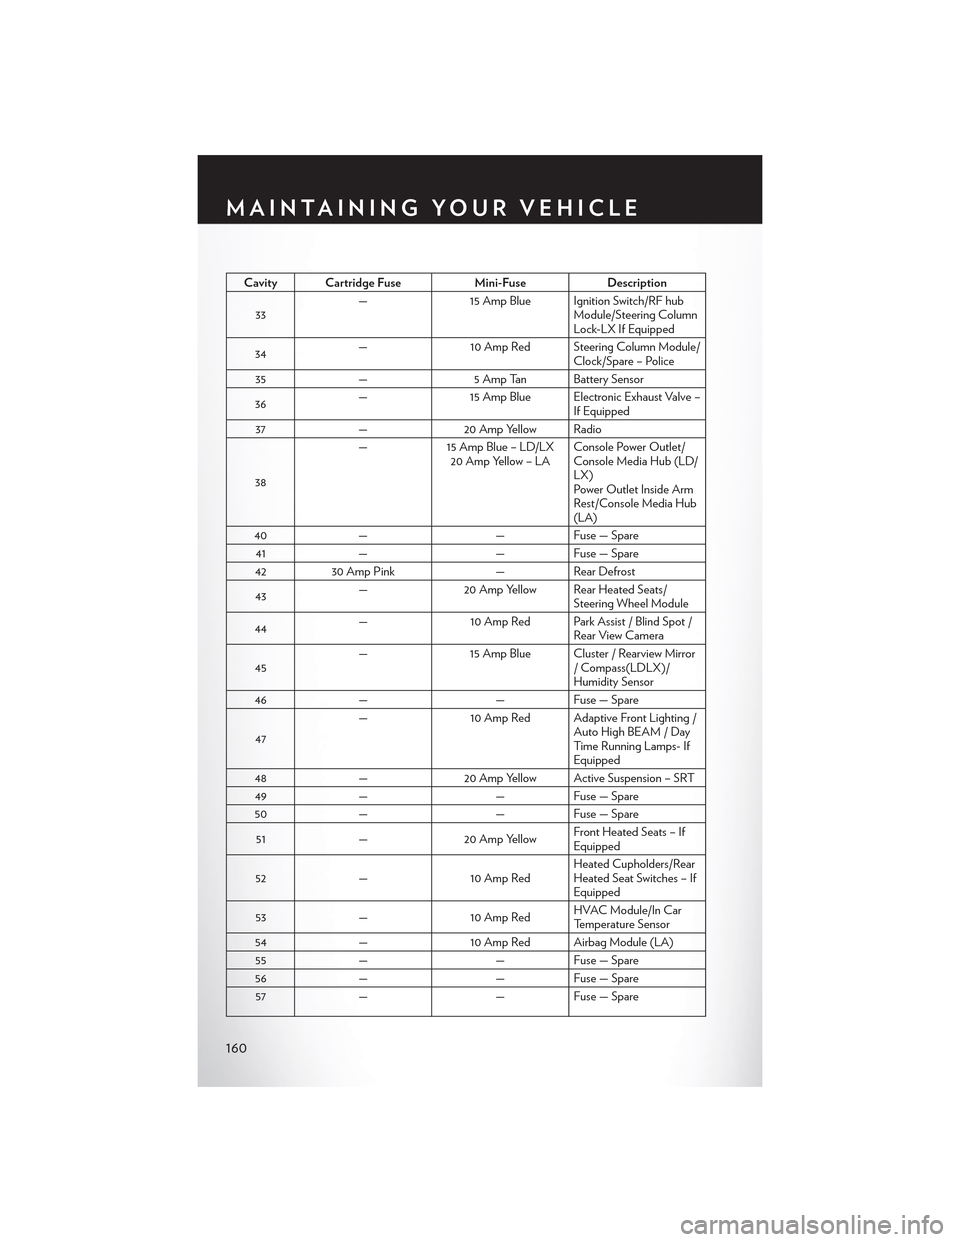
Cavity Cartridge FuseMini-FuseDescription
33—15 Amp Blue Ignition Switch/RF hubModule/Steering ColumnLock-LX If Equipped
34—10 Amp Red Steering Column Module/Clock/Spare – Police
35—5 Amp Tan Battery Sensor
36—15 Amp Blue Electronic Exhaust Valve –If Equipped
37—20 Amp Yellow Radio
38
—15 Amp Blue – LD/LX20 Amp Yellow – LAConsole Power Outlet/Console Media Hub (LD/LX)Power Outlet Inside ArmRest/Console Media Hub(LA)
40——Fuse — Spare
41——Fuse — Spare
4230 Amp Pink—Rear Defrost
43—20 Amp Yellow Rear Heated Seats/Steering Wheel Module
44—10 Amp Red Park Assist / Blind Spot /Rear View Camera
45—15 Amp Blue Cluster / Rearview Mirror/Compass(LDLX)/Humidity Sensor
46——Fuse — Spare
47
—10 Amp Red Adaptive Front Lighting /Auto High BEAM / DayTi m e R u n n i n g L a m p s- IfEquipped
48—20 Amp Yellow Active Suspension – SRT
49——Fuse — Spare
50——Fuse — Spare
51—20 Amp YellowFront Heated Seats – IfEquipped
52—10 Amp RedHeated Cupholders/RearHeated Seat Switches – IfEquipped
53—10 Amp RedHVAC Module/In CarTemperature Sensor
54—10 Amp Red Airbag Module (LA)
55——Fuse — Spare
56——Fuse — Spare
57——Fuse — Spare
MAINTAINING YOUR VEHICLE
160
Page 163 of 180
Cavity Cartridge FuseMini-FuseDescription
58—10 Amp Red Airbag Module (LD/LX)
59—20 Amp Yellow Adjustable Pedals – Police
60—5AmpTanHeated Washer Nozzles(LD)
61—20 Amp YellowCigar Lighter (LA) – IfEquipped
62——Fuse — Spare
63——Fuse — Spare
64—25 Amp Breaker Rear Windows (LD/LX)
65—10 Amp Red Airbag Module
66——Fuse — Spare
67—10 Amp RedRain and Light Sensor/Sunroof
68—10 Amp RedDual USB Power Outlet –R/A Sense (LD/LX) RearSunshade (LD/LX)
69——Fuse — Spare
70——Fuse — Spare
TIRE PRESSURES
Check the inflation pressure of each tire, including the spare tire (if equipped), at least monthly
and inflate to the recommended pressure for your vehicle.
The tire pressures recommended for your vehicle are found on the “Tire and Loading Informa-
tion” label located on the driver’s side door opening.
NOTE:
Refer to the Owner's Manual on the DVD for
more information regarding tire warnings and
instructions.
Tire And Loading Information Location (Ex-ample)
MAINTAINING YOUR VEHICLE
161
Page 164 of 180

WARNING!
•Overloadingofyourtiresisdangerous.Overloadingcancausetirefailure,affectvehicle
handling, and increase your stopping distance. Use tires of the recommended load
capacity for your vehicle.Neveroverloadthem.
• Improperly inflated tires are dangerous and can cause collisions. Under-inflation increases
tire flexing and can result in over-heating and tire failure. Over-inflation reduces a tire’s
ability to cushion shock. Objects on the road and chuck holes can cause damage that
results in tire failure. Unequal tire pressures can cause steering problems. You could lose
control of your vehicle. Over-inflated or under-inflated tires can affect vehicle handling
and can fail suddenly, resulting in loss of vehicle control. Always drive with each tire inflated
to the recommended cold tire inflation pressure.
SPARE TIRES — IF EQUIPPED
NOTE:
For vehicles equipped with Tire Service Kit instead of a spare tire, please refer to “Tire Service Kit”
in “What To Do In Emergencies” on your DVD for further information.
CAUTION!
Because of the reduced ground clearance, do not take your vehicle through an automatic car
wash with a compact or limited-use temporary spare installed. Damage to the vehicle may
result.
Spare Tire Matching Original Equipped Tire And Wheel — If Equipped
Yo u r v e h i c l e m a y b e e q u i p p e d w i t h a s p a r e t i r e a n d w h e e l e q u i v a l e n t i n l o o k a n d f u n c t i o n t o t h e
original equipment tire and wheel found on the front or rear axle of your vehicle. This spare tire
may be used in the tire rotation for your vehicle. If your vehicle has this option, refer to an
authorized tire dealer for the recommended tire rotation pattern.
Compact Spare Tire — If Equipped
The compact spare is for temporary emergency use only. You can identify if your vehicle is
equipped with a compact spare by looking at the spare tire description on the Tire and Loading
Information Placard located on the driver’s side door opening or on the sidewall of the tire.
Compact spare tire descriptions begin with the letter “T” or “S” preceding the size designation.
Example: T145/80D18 103M.
T, S = Temporary Spare Tire
Since this tire has limited tread life, the original equipment tire should be repaired (or replaced)
and reinstalled on your vehicle at the first opportunity.
MAINTAINING YOUR VEHICLE
162
Page 165 of 180

Do not install a wheel cover or attempt to mount a conventional tire on the compact spare wheel,
since the wheel is designed specifically for the compact spare tire. Do not install more than one
compact spare tire and wheel on the vehicle at any given time.
WARNING!
Compact spares are for temporary emergency use only. With these spares, do not drive more
than 50 mph (80 km/h). Temporary use spares have limited tread life. When the tread is worn
to the tread wear indicators, the temporary use spare tire needs to be replaced. Be sure to
follow the warnings, which apply to your spare. Failure to do so could result in spare tire failure
and loss of vehicle control.
Full Size Spare — If Equipped
The full size spare is for temporary emergency use only. This tire may look like the originally
equipped tire on the front or rear axle of your vehicle, but it is not. This spare tire may have limited
tread life. When the tread is worn to the tread wear indicators, the temporary use full size spare
tire needs to be replaced. Since it is not the same as your original equipment tire, replace (or
repair) the original equipment tire and reinstall on the vehicle at the first opportunity.
Limited-Use Spare — If Equipped
The limited-use spare tire is for temporary emergency use only. This tire is identified by a label
located on the limited-use spare wheel. This label contains the driving limitations for this spare.
This tire may look like the original equipped tire on the front or rear axle of your vehicle, but it is
not. Installation of this limited-use spare tire affects vehicle handling. Since it is not the same as
your original equipment tire, replace (or repair) the original equipment tire and reinstall on the
vehicle at the first opportunity.
WARNING!
Limited-use spares are for emergency use only. Installation of this limited-use spare tire affects
vehicle handling. With this tire, do not drive more than the speed listed on the limit-use spare
wheel. Keep inflated to the cold tire inflation pressures listed on your Tire and Loading
Information Placard located on the driver’s side B-P illar or the rear edge of the driver’s side
door. Replace (or repair) the original equipment tire at the first opportunity and reinstall it on
your vehicle. Failure to do so could result in loss of vehicle control.
MAINTAINING YOUR VEHICLE
163
Page 166 of 180
FUEL DOOR RELEASE
The fuel door release button is located in the driver's door map pocket.
• Push the button once and release to open
the fuel door.
Fuel Door Emergency Release
•Tomanuallyopenthefueldoor,removethe
cover and pull the release cable located in
the trunk.
Emergency Refueling
Afunnelisprovided(locatedinthetrunkinthe
spare tire area) to open the flapper door to
allow for emergency refueling with a gas can.
Emergency Fuel Funnel
MAINTAINING YOUR VEHICLE
164
Page 167 of 180

CAUTION!
To a v o i d f u e l s p i l l a g e a n d o v e r f i l l i n g , d o n o t “ t o p o f f ” t h e f u e l t a n k a f t e r f i l l i n g .
WARNING!
•Neverhaveanysmokingmaterialslitinornearthevehiclewhenthefueldoorisopenor
the tank is being filled.
•Neveraddfuelwhentheengineisrunning.Thisisinviolationofmoststateandfederalfire
regulations and/or local bylaws, and will cause the MIL to turn on.
• A fire may result if gasoline is pumped into a portable container that is inside of a vehicle.
Yo u c o u l d b e b u r n e d . A l w a y s p l a c e g a s c o n t a i n e r s o n t h e g r o u n d w h i l e f i l l i n g .
WHEEL AND WHEEL TRIM CARE
All wheels and wheel trim, especially aluminum and chrome plated wheels, should be cleaned
regularly with a mild soap and water to prevent corrosion.
To r e m o v e h e a v y s o i l a n d / o r e x c e s s i v e b r a k e d u s t t h e f o l l o w i n g M O P A R ® w h e e l c l e a n e r s a r e
recommended or select a non-abrasive, non-acidic cleaner.
For chrome wheels, use MOPAR® Chrome Cleaner or equivalent.
For aluminum wheels, use MOPAR® Wheel Cleaner or equivalent.
Dark Vapor Chrome Wheels — If Equipped
If your vehicle is equipped with Dark Vapor Chrome wheelsUSE ONLY MILD SOAP AND
WATER WITH A SOFT CLOTH.
Used on a regular basis this is all that is required to maintain this finish.
NOTE:
DO NOT USE wheel cleaners, abrasives or polishing compounds. They will permanently
damage this finish and void your warranty.
CAUTION!
Do not use scouring pads, steel wool, a bristle brush, or metal polishes. Do not use oven
cleaner. These products may damage the wheel's protective finish. Avoid automatic car
washes that use acidic solutions or harsh brushes that may damage the wheel's protective
finish. Only MOPAR® Wheel Cleaner or equivalent is recommended.
MAINTAINING YOUR VEHICLE
165
Page 168 of 180

REPLACEMENT BULBS
All of the interior bulbs are glass wedge base or glass cartridge types. Aluminum base bulbs arenot approved and should not be used for replacement.
Interior Bulbs
Bulb Number
Rear Courtesy/Reading LampsW5W
Rear Compartment (Trunk) Lamp562
Overhead Console Reading Lamps578
Visor Vanity LampsA6220
Glove Box Lamp – If Equipped194
Door Courtesy562
Shift Indicator LampJKLE14140
Optional Door Map Pocket/CupholderLED (Serviced at Authorized Dealer)
For lighted switches, see your authorized dealer for replacement instructions.
Exterior Bulbs
Bulb Number
Low Beam/High Beam (Bi-Halogen Headlamp)HIR2LL
Low Beam/High Beam (Bi-Xenon Headlamp) D3S (Serviced at Authorized Dealer)
Front Turn Signal LampPSY24WSV
Front Park LampLED (Serviced at Authorized Dealer)
Daytime Running LampLED (Serviced at Authorized Dealer)
Front Fog Lamp – If EquippedLED (Serviced at Authorized Dealer)
Front Sidemarker LampLED (Serviced at Authorized Dealer)
Rear Tail/Stop/Turn LampLED (Serviced at Authorized Dealer)
Rear Sidemarker LampLED (Serviced at Authorized Dealer)
Backup LampLED (Serviced at Authorized Dealer)
Center High Mount Stop Lamp (CHMSL) LED (Serviced at Authorized Dealer)
LicenseLED (Serviced at Authorized Dealer)
Rear Fog Lamp – If EquippedLED (Serviced at Authorized Dealer)
MAINTAINING YOUR VEHICLE
166